| Prev | Next | J2EETM Developer's Guide
Clients |
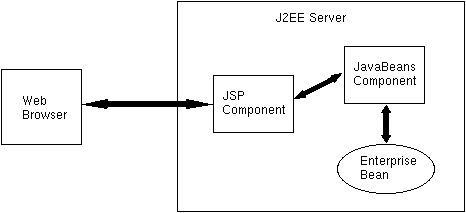
FIGURE 7-2 JSP Client of an Enterprise Bean
The sections that follow show how to create a J2EE application with the following elements:
Account.jsp and AccountBean.java files are in the doc/guides/ejb/examples/jsptobean directory. The AccountEJB.java source code is in the doc/guides/ejb/examples/account directory.
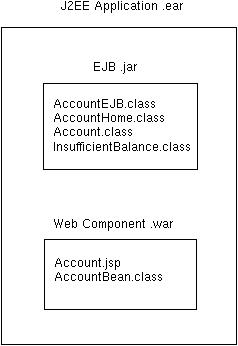
AccountEJB entity bean described in the section, "A Bean-Managed Persistence Example". The .war file contains the JSP component (Account.jsp) and the JavaBeans component (AccountBean).
FIGURE 7-3 J2EE Application .ear File
The sections that follow describe how to create and package the web components, but first, you should set up the J2EE application:
AccountJSPApp. AccountBean.Account.jsp file. These tags are marked by bold font in the full listing of Account.jsp included at the end of this section. (For more information on writing JSP files, see the JavaServer Pages web site .)
The first JSP tag in the Account.jsp file specifies the JavaBeans component. The jsp:useBean tag creates a JavaBeans component by instantiating the AccountBean class, names the component accountBean, and indicates that the component will be available for the current HTTP session. Unlike the other JSP tags, the jsp:useBean tag is executed just once during the session-- when the end-user first accesses the Account.jsp page:
The<jsp:useBean id="accountBean" scope="session" class="AccountBean" />
jsp:setProperty tag sets all of the property values in the accountBean to the parameters passed by the HTML form. For example, if the end-user selects the Debit radio button and clicks Submit, the action parameter is set to debit. This parameter value is sent to the web server, which assigns it to the action property value of the accountBean. The asterisk in the tag indicates that all properties will be set:
JSP scripting elements are enclosed as follows:<jsp:setProperty name="accountBean" property="*" />
<% element %>. The first scripting element declares the status variable:
The next scripting element invokes<%! String status; %>
processRequest method of the accountBean object. This method checks the action property value and invokes methods on the entity bean:
Near the bottom of the<% status = accountBean.processRequest(); %>
Account.jsp file, the status variable returned by the processRequest method is displayed:
In the HTML<h3><b>Status :</b></h3> <%= status %>
form tag, the action parameter indicates that the Account.jsp page is to be executed when the end-user clicks the form's Submit button. (Behind the scenes, the web server transforms the Account.jsp page into a servlet which it then executes.) Except for the jsp:useBean tag, every JSP tag and scripting element in the Account.jsp page is executed whenever the end-user clicks Submit:
Each<form method=POST action=Account.jsp>
jsp:getProperty tag fetches a property value from the accountBean. For example, the second jsp:getProperty tag retrieves the balance property from the accountBean. The balance is displayed in the text field of the HTML form. The next time the end-user clicks the Submit button, the value in the text field is sent to the web server as the balance parameter. The jsp:setProperty tag causes the web server to assign this parameter to the balance property of the accountBean. Here is the jsp:getProperty tag for the balance property:
The full listing for the<INPUT type=text name="balance" size="8" value="<jsp:getProperty name="accountBean" property="balance" />">
Account.jsp file follows:
<html>
<jsp:useBean id="accountBean" scope="session" class="AccountBean" />
<jsp:setProperty name="accountBean" property="*" />
<%! String status; %>

<% status = accountBean.processRequest(); %>

<html>
<head>
    <title>Account JSP</title>
</head>
<body background="back.gif">
<font size = 5 color="#CC0000">
<h1><b><center>Account JSP Example</center></b></h1>
<hr>
<br>
<form method=POST action=Account.jsp>
<br>

<br>Account ID
<INPUT type=text name="id" size="8"
value="<jsp:getProperty name="accountBean" property="id" />" >
Balance
<INPUT type=text name="balance"  size="8"
value="<jsp:getProperty name="accountBean" property="balance" />" >
<br>
First Name
<INPUT type=text name="firstName" size="8"
value="<jsp:getProperty name="accountBean" property="firstName" />">
Last Name
<INPUT type=text name="lastName" "size=8"
Value="<jsp:getProperty name="accountBean" property="lastName" />"
><br>

<br>
<h2><b>Action :</b></h2>
  <INPUT type="radio" name="action" value="find">Find
  <INPUT type="radio" name="action" value="create">Create
  <INPUT type="radio" name="action" value="debit">Debit
  <INPUT type="radio" name="action" value="credit">Credit
<br>

<br>Amount  <INPUT type=text name="amount"><br>
<INPUT type=submit name="submit" value="Submit">

</form>
</FONT>
</body>
</html>

<hr>
<h3><b>Status :</b></h3> <%= status %>
</html>
AccountBean code is quite brief. For more information on coding JavaBeans components , see the JavaBeans home page.
The AccountBean JavaBeans component is created when the end-user first accesses the Account.jsp page. (This action is specified by the jsp:useBean tag in the Account.jsp file.) The AccountBean class accesses the entity bean implemented by the AccountEJB class. The constructor of the AccountBean class locates the entity bean's home interface by invoking the lookup method:
public AccountBean() {

   try {
       Context ic = new InitialContext();
       java.lang.Object objref =
          ic.lookup("java:comp/env/ejb/Account");
       accountHome =
           (AccountHome) PortableRemoteObject.narrow(objref,
                                         AccountHome.class);
   } catch (Exception re) {
       System.err.println ("Couldn't locate Account Home");
       re.printStackTrace();
   }
   reset();
}
The end-user indicates the action parameter by selecting a radio button on the Account.jsp page. The web server assigns the parameter value to the action property of the AccountBean. Invoked by a scripting element in the Account.jsp page, the processRequest method of the AccountBean checks the value of the action property. If the action property is create, for example, the processRequest method creates a new entity bean. Here is the code for the processRequest method:
public String processRequest() {

   String  message = "";

   System.out.println("Process request called ");
   System.out.println(this);

   try {

     if( action.equals("create") ) {

        account =
          accountHome.create(id, firstName, lastName, balance);
        message = "Created account `" + id + "`";

     }
     else if( action.equals("debit") ) {

        account = accountHome.findByPrimaryKey(id);
        account.debit(amount);
        loadFromEJB();
        message = "Debited account `" + id + "` by $" + amount;

     }
     else if( action.equals("credit") ) {

        account = accountHome.findByPrimaryKey(id);
        account.credit(amount);
        loadFromEJB();
        message = "Credited account `" + id + "` by $" + amount;

     }
     else if( action.equals("find") ) {

        account = accountHome.findByPrimaryKey(id);
        loadFromEJB();
        message = "Found account `" + id;

     }

   } // try

   catch (Exception e) {
     message = e.toString();
   }

   return message;
}
The state of the AccountBean instance mirrors that of the entity bean instance. Both instances contain these variables: id, firstName, lastName, and balance. The AccountBean changes the balance variable of the entity bean by invoking the debit and credit business methods. To refresh its state from the entity bean, the AccountBean invokes business methods such as getFirstName and getLastName. It invokes these getter methods in the private method loadFromEJB:
private void loadFromEJB()
{
   System.out.println("Calling loadFromEJB()");
   try {
       setFirstName(account.getFirstName());
       setLastName(account.getLastName());
       setBalance(account.getBalance());
    } catch (Exception re) {
        System.err.println
           ("Failed to load AccountBean from AccountEJB.");
        re.printStackTrace();
    }
}
AccountBean.java, you must include the j2ee.jar and ejb.jar files in the classpath. The ejb.jar file is required because it contains the class files for the Account and AccountHome interfaces-- types used by the AccountBean class. When you created the enterprise bean (AccountEJB) for the AccountJSPApp application, the tool inserted the ejb.jar file into the AccountJSPApp.ear file. To extract the ejb.jar file from the AccountJSPApp.ear file, follow these steps:
1. In the tree view, select the EJB .jar file for the AccountJSPApp application.
2. From the File menu, choose Save As.
3. Save the ejb.jar file in the examples/jsptobean directory.
To compile the JavaBeans component, change to the examples/jsptobean directory and execute these commands:
Windows:CPATH=.:$J2EE_HOME/lib/j2ee.jar:ejb.jar javac -classpath "$CPATH" AccountBean.java
set CPATH=.;%J2EE_HOME%\lib\j2ee.jar;ejb.jar
javac -classpath %CPATH% AccountBean.java
AccountBean.class and Account.jsp files in a .war file, you run the New Web Component Wizard of the Application Deployment Tool. To start the wizard, from the File menu choose New Web Component. The wizard displays the following dialog boxes. (You may skip any dialog boxes not listed here.)
WAR File General Properties Dialog Box:
a. In the combo box labelled "Web Component Will Go In," select AccountJSPApp.
b. In the WAR Display Name field, enter AccountWAR.
c. Click Add.
d. In the Add Content Files dialog box, choose the root directory containing theAccount.jspfile (examples/jsptobean). You may either type the directory name in the Root Directory field or locate it by clicking Browse.
e. Select the Account.jsp file from the text area and click Add.
f. Click Next.
g. In the Add Class Files dialog box choose, the examples/jsptobean directory again.
h. Select the AccountBean.class file from the text area and click Add.
i. Click Finish.
j. Click Next.Choose Component Type Dialog Box:
a. Select JSP.
b. Click Next.Component General Properties Dialog Box:
a. In the JSP Filename combo box, select Account.jsp.
b. In the Web Component Display Name field, enter TheAccount.
c. Click Next.Enterprise Bean References Dialog Box:
a. Click Add.
b. In the Coded Name column enter ejb/Account.
c. In the Type column select Entity.
d. In the Home column enter AccountHome.
e. In the Remote column enter Account.
f. Click Finish.
2. In the Web Context tabbed pane, enter AccountContextRoot in the ContextRoot column.
AccountJSPApp, enter the JNDI names shown in the following table:
|
Component/ Reference Name
|
JNDI Name
|
|---|---|
| AccountBean | MyAccount |
| jdbc/AccountDB | jdbc/Cloudscape |
| ejb/Account | MyAccount |
2. In the first dialog box, do not select the checkbox labelled "Return Client Jar."
3. In the second dialog box, verify the JNDI names.
4. In the third dialog box, verify the context root.
Account.jsp from your browser, specify the URL as follows, but replace <host> with the name of the machine that is running the J2EE server:
To create a new account, follow these steps:http://<host>:8000/AccountContextRoot/Account.jsp
1. In the Account ID field, enter a three-digit integer.
2. In the Balance field, enter the intitial balance (for example, 100.00).
3. In the First Name and Last Name fields enter your name.
4. Under Action, select Create.
5. Click the Submit button.To credit an account, perform the following tasks:
1. In the Account ID field, enter the three-digit account identifier.
2. In the Amount field, enter the credit amount (for example, 55.00).
3. Under Action, select Credit.
5. Click the Submit button.