| Prev | Next | J2EETM Developer's Guide
Clients |
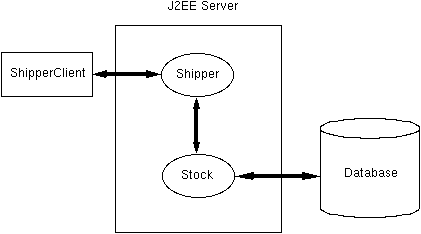
The following figure shows the structure of a J2EE application in which one enterprise bean is the client of another. The ShipperClient is a stand-alone Java application that accesses the Shipper session bean. The Shipper session bean is the client of the Stock entity bean, which accesses a database.
FIGURE 7-4 The ShipperApp Sample Application
ShipperApp application illustrated in figure 7-4. Before proceeding, you should perform these tasks:
1. Compile the source code files in the doc/guides/ejb/examples/shipper directory:
ShipperApp.
a. In the combo box labelled "Enterprise Bean will go in," select ShipperApp.
b. In the JAR Display Name field, enter StockJAR.
c. Add the following files to the Contents text area:General Dialog Box:Stock.class,StockEJB.class,StockHome.class.
a. In the Enterprise Bean Class combo box, select StockEJB.
b. In the Home Interface combo box, select StockHome.
c. In the Remote Interface combo box, select Stock.
d. Select the Entity radio button.
e. In the Enterprise Bean Display Name field, enter StockBean.
Entity Settings Dialog Box:
Select the radio button labelled "Bean-Managed Persistence."Resource References Dialog Box:
a. In the Coded Name column enter jdbc/StockDB.
b. In the other columns retain the default values.Transaction Management Dialog Box:
a. In the Transaction Type column, select Required for theupdateOnHandandreorderNeededmethods.
b. Click Finish
a. In the combo box labelled "Enterprise Bean will go in," select ShipperApp.
b. In the JAR Display Name field, enter ShipperJAR.
c. Add the following files to the Contents text area:General Dialog Box:Shipper.class,ShipperEJB.class,ShipperHome.class.
a. In the Enterprise Bean Class combo box, select ShipperEJB.
b. In the Home Interface combo box, select ShipperHome.
c. In the Remote Interface combo box, select Shipper.
d. Select the Session radio button.
e. Select the Stateful radio button.
f. In the Enterprise Bean Display Name field, enter ShipperBean.
Enterprise Bean References Dialog Box:
a. Click Add.
b. In the Coded Name column enter ejb/Stocker.
c. In the Type column select Entity.
d. In the Home column enter StockHome.
e. In the Remote column enter Stock.
f. Click Finish.
ShipperApp, enter the JNDI names shown in the following table:
|
Component/ Reference Name
|
JNDI Name
|
|---|---|
| ejb/Stocker | MyStocker |
| jdbc/StockDB | jdbc/Cloudscape |
| ShipperBean | MyShipper |
| StockBean | MyStocker |
The first row in the table links the ejb/Stocker reference to the MyStocker JNDI name. The ShipperEJB class uses ejb/Stocker to reference the StockBean in the following call:
Object objref = initial.lookup("java:comp/env/ejb/Stocker");
The MyStocker JNDI name corresponds to StockBean, the entity bean component for the StockEJB class. This class fetches a DataSource so that it can connect to a Cloudscape database:
private String dbName = "java:comp/env/jdbc/StockDB";
DataSource ds = (DataSource) ic.lookup(dbName);
MyShipper is the JNDI name for ShipperBean, the session bean component for the SessionEJB class. The SessionClient program locates the ShipperBean with the following call:
Object objref = initial.lookup("MyShipper");
ShipperApp, select the checkbox labelled "Return Client Jar". In the text field that appears enter the full path name for the ShipperAppClient.jar file.
2. Create the database table used by the ShipperApp:
Windows:cd $J2EE_HOME/doc/guides/ejb/examples/shipper ../util/cloudTable.sh
3. To try out thecd %J2EE_HOME%\doc\guides\ejb\examples\shipper ..\util\cloudTable
ShipperApp, run the client program:
Windows:CPATH=$J2EE_HOME/lib/j2ee.jar:ShipperAppClient.jar:. java -classpath "$CPATH" ShipperClient
4. Although the client program does not print any results, there are two ways you can verify that theset CPATH=.;%J2EE_HOME%\lib\j2ee.jar;ShipperAppClient.jar java -classpath "%CPATH%" ShipperClient
ShipperApp ran correctly:
a. If you started the J2EE server with the -verbose option, it will print these lines:
b. Run theShipperEJB: ejbCreate() ShipperEJB: shipItem() StockEJB: updateOnHand() StockEJB: reorderNeeded()
cloudIJ.sh (UNIX) or cloudIJ.bat (Windows) script in the examples/util directory and query the STOCK table in the database:
ij> select * from stock;
PR&|QUANTITY_ON_HA&|REORDER_LEVEL
-----------------------------------
123|91             |90

1 row selected