10 Useful du (Disk Usage) Commands to Find Disk Usage of Files and Directories

The Linux “du” (Disk Usage) is a standard Unix/Linux command, used to check the information of disk usage of files and directories on a machine. The du command has many parameter options that can be used to get the results in many formats. The du command also displays the files and directory sizes in a recursively manner.

Check Disk Usage In Linux

Check Disk Usage of Files and Folders In Linux

This article explains 10 useful “du” commands with their examples, that might helps you to find out the sizes of files and directories in Linux. The information provided in this article are taken from the man pages of ducommand.

Read Also:

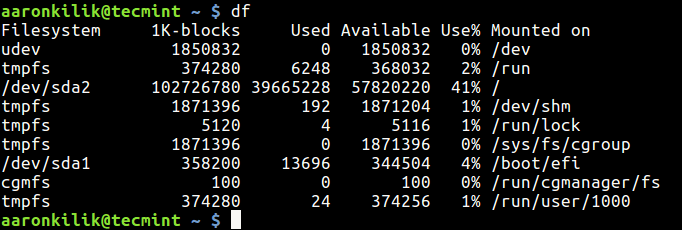
  1. 12 “df” Command to Check Linux System Disk Space
  2. Agedu – A Useful Tool for Tracking Down Wasted Disk Space in Linux

1. To find out the disk usage summary of a /home/tecmint directory tree and each of its sub directories. Enter the command as:

[root@tecmint]# du  /home/tecmint

40      /home/tecmint/downloads
4       /home/tecmint/.mozilla/plugins
4       /home/tecmint/.mozilla/extensions
12      /home/tecmint/.mozilla
12      /home/tecmint/.ssh
689112  /home/tecmint/Ubuntu-12.10
689360  /home/tecmint

The output of the above command displays the number of disk blocks in the /home/tecmint directory along with its sub-directories.

2. Using “-h” option with “du” command provides results in “Human Readable Format“. Means you can see sizes in BytesKilobytes, MegabytesGigabytes etc.

[root@tecmint]# du -h /home/tecmint

40K     /home/tecmint/downloads
4.0K    /home/tecmint/.mozilla/plugins
4.0K    /home/tecmint/.mozilla/extensions
12K     /home/tecmint/.mozilla
12K     /home/tecmint/.ssh
673M    /home/tecmint/Ubuntu-12.10
674M    /home/tecmint

3. To get the summary of a grand total disk usage size of an directory use the option “-s” as follows.

[root@tecmint]# du -sh /home/tecmint

674M    /home/tecmint

4. Using “-a” flag with “du” command displays the disk usage of all the files and directories.

[root@tecmint]# du -a /home/tecmint

4       /home/tecmint/.bash_logout
12      /home/tecmint/downloads/uploadprogress-1.0.3.1.tgz
24      /home/tecmint/downloads/Phpfiles-org.tar.bz2
40      /home/tecmint/downloads
12      /home/tecmint/uploadprogress-1.0.3.1.tgz
4       /home/tecmint/.mozilla/plugins
4       /home/tecmint/.mozilla/extensions
12      /home/tecmint/.mozilla
4       /home/tecmint/.bashrc
689108  /home/tecmint/Ubuntu-12.10/ubuntu-12.10-server-i386.iso
689112  /home/tecmint/Ubuntu-12.10
689360  /home/tecmint

5. Using “-a” flag along with “-h” displays disk usage of all files and folders in human readeable format. The below output is more easy to understand as it shows the files in KilobytesMegabytes etc.

[root@tecmint]# du -ah /home/tecmint

4.0K    /home/tecmint/.bash_logout
12K     /home/tecmint/downloads/uploadprogress-1.0.3.1.tgz
24K     /home/tecmint/downloads/Phpfiles-org.tar.bz2
40K     /home/tecmint/downloads
12K     /home/tecmint/uploadprogress-1.0.3.1.tgz
4.0K    /home/tecmint/.mozilla/plugins
4.0K    /home/tecmint/.mozilla/extensions
12K     /home/tecmint/.mozilla
4.0K    /home/tecmint/.bashrc
673M    /home/tecmint/Ubuntu-12.10/ubuntu-12.10-server-i386.iso
673M    /home/tecmint/Ubuntu-12.10
674M    /home/tecmint

6. Find out the disk usage of a directory tree with its subtress in Kilobyte blcoks. Use the “-k” (displays size in 1024 bytes units).

[root@tecmint]# du -k /home/tecmint
40      /home/tecmint/downloads
4       /home/tecmint/.mozilla/plugins
4       /home/tecmint/.mozilla/extensions
12      /home/tecmint/.mozilla
12      /home/tecmint/.ssh
689112  /home/tecmint/Ubuntu-12.10
689360  /home/tecmint

7. To get the summary of disk usage of directory tree along with its subtrees in Megabytes (MB) only. Use the option “-mh” as follows. The “-m” flag counts the blocks in MB units and “-h” stands for human readable format.

[root@tecmint]# du -mh /home/tecmint

40K     /home/tecmint/downloads
4.0K    /home/tecmint/.mozilla/plugins
4.0K    /home/tecmint/.mozilla/extensions
12K     /home/tecmint/.mozilla
12K     /home/tecmint/.ssh
673M    /home/tecmint/Ubuntu-12.10
674M    /home/tecmint

8. The “-c” flag provides a grand total usage disk space at the last line. If your directory taken 674MB space, then the last last two line of the output would be.

[root@tecmint]# du -ch /home/tecmint

40K     /home/tecmint/downloads
4.0K    /home/tecmint/.mozilla/plugins
4.0K    /home/tecmint/.mozilla/extensions
12K     /home/tecmint/.mozilla
12K     /home/tecmint/.ssh
673M    /home/tecmint/Ubuntu-12.10
674M    /home/tecmint
674M    total

9. The below command calculates and displays the disk usage of all files and directories, but excludes the files that matches given pattern. The below command excludes the “.txt” files while calculating the total size of diretory. So, this way you can exclude any file formats by using flag “-–exclude“. See the output there is no txtfiles entry.

[root@tecmint]# du -ah --exclude="*.txt" /home/tecmint

4.0K    /home/tecmint/.bash_logout
12K     /home/tecmint/downloads/uploadprogress-1.0.3.1.tgz
24K     /home/tecmint/downloads/Phpfiles-org.tar.bz2
40K     /home/tecmint/downloads
12K     /home/tecmint/uploadprogress-1.0.3.1.tgz
4.0K    /home/tecmint/.bash_history
4.0K    /home/tecmint/.bash_profile
4.0K    /home/tecmint/.mozilla/plugins
4.0K    /home/tecmint/.mozilla/extensions
12K     /home/tecmint/.mozilla
4.0K    /home/tecmint/.bashrc
24K     /home/tecmint/Phpfiles-org.tar.bz2
4.0K    /home/tecmint/geoipupdate.sh
4.0K    /home/tecmint/.zshrc
120K    /home/tecmint/goaccess-0.4.2.tar.gz.1
673M    /home/tecmint/Ubuntu-12.10/ubuntu-12.10-server-i386.iso
673M    /home/tecmint/Ubuntu-12.10
674M    /home/tecmint

10. Display the disk usage based on modification of time, use the flag “–time” as shown below.

[root@tecmint]# du -ha --time /home/tecmint

4.0K    2012-10-12 22:32        /home/tecmint/.bash_logout
12K     2013-01-19 18:48        /home/tecmint/downloads/uploadprogress-1.0.3.1.tgz
24K     2013-01-19 18:48        /home/tecmint/downloads/Phpfiles-org.tar.bz2
40K     2013-01-19 18:48        /home/tecmint/downloads
12K     2013-01-19 18:32        /home/tecmint/uploadprogress-1.0.3.1.tgz
4.0K    2012-10-13 00:11        /home/tecmint/.bash_history
4.0K    2012-10-12 22:32        /home/tecmint/.bash_profile
0       2013-01-19 18:32        /home/tecmint/xyz.txt
0       2013-01-19 18:32        /home/tecmint/abc.txt
4.0K    2012-10-12 22:32        /home/tecmint/.mozilla/plugins
4.0K    2012-10-12 22:32        /home/tecmint/.mozilla/extensions
12K     2012-10-12 22:32        /home/tecmint/.mozilla
4.0K    2012-10-12 22:32        /home/tecmint/.bashrc
24K     2013-01-19 18:32        /home/tecmint/Phpfiles-org.tar.bz2
4.0K    2013-01-19 18:32        /home/tecmint/geoipupdate.sh
4.0K    2012-10-12 22:32        /home/tecmint/.zshrc
120K    2013-01-19 18:32        /home/tecmint/goaccess-0.4.2.tar.gz.1
673M    2013-01-19 18:51        /home/tecmint/Ubuntu-12.10/ubuntu-12.10-server-i386.iso
673M    2013-01-19 18:51        /home/tecmint/Ubuntu-12.10
674M    2013-01-19 18:52        /home/tecmint

Read Also :

  1. 10 fdisk Commands to Manage Linux Disk Partitions
  2. 12 Useful “df” Commands to Check Disk Space in Linux

Source

Ways to Use ‘find’ Command to Search Directories More Efficiently

This tutorial will take you through the different ways of finding a directory in Linux. As you may already know, in Linux everything is a file including directories. And one of the common things a Linux user will do within the command line is searching for a file or a directory.

There are several different means and utilities used for searching for files on the command line such as findlocate and which. However, the last utility (which) is only used for locating a command.

For the scope of this tutorial, we will mainly focus on the find utility, which searches files on a live Linux filesystem and is more efficient and reliable as compared to locate.

The downside of locate is that it reads one or more databases created by updatedb, it does not search through a live filesystem. In addition, it does not as well offer flexibility regarding where to search from (starting point).

Below is the syntax for running locate command:

# locate [option] [search-pattern]

To demonstrate the disadvantage of locate, let us assume we are searching for a directory named pkg in the current working directory.

Note: In the command below, the option --basename or -b tells locate to only match the file (directory) basename (which is exactly pkg) but not the path (/path/to/pkg). Where \ is a globbing character, it disables the implicit replacement of pkg by *pkg*.

$ locate --basename '\pkg'

Find Directory Using locate Command

Find Directory Using locate Command

As you can see from the command output above, locate will search beginning from the root (/) directory, that is why other directories with the same name are matched.

Therefore, to deal with this issue, use find by following the simplified syntax below:

$ find starting-point options [expression]

Let us look at a few examples.

To search for the same directory (pkg) above, within the current working directory, run the following command, where the -name flag reads the expression which in this case is the directory basename.

$ find . -name "pkg"

If you encounter “Permission denied” errors, use sudo command like so:

$ sudo find . -name "pkg"

Search a Directory Using find Command

Search a Directory Using find Command

You can prevent find from searching for other file types except directories by using -type flag to specify the type of file (in the command below d means directory) as follows:

$ sudo find . -type d -name "pkg"

Furthermore, if you wish to list the directory in a long listing format, employ the action switch -ls:

$ sudo find . -type d -name "pkg" -ls

Find and List Directory

Find and List Directory

Next, the option -iname will enable a case insensitive search:

$ sudo find . -type d -iname "pkg" 
$ sudo find . -type d -iname "PKG" 

Find Directory with Case Sensitive

Find Directory with Case Sensitive

To find more interesting and advanced usage information, read the man pages of find and locate.

$ man find
$ man locate

As a last remark, the find command is more reliable and efficient for searching files ( or directories) in a Linux system when weighed against the locate command.

Source

4 Ways to Batch Convert Your PNG to JPG and Vice-Versa

In computing, Batch processing is the execution of a series of tasks in a program non-interactively. In this guide will offer you 4 simple ways to batch convert several .PNG images to .JPG and vice-versa using Linux command-line tools.

We will use convert command line tool in all the examples, however, you can as well make use of mogrify to achieve this.

The syntax for using convert is:

$ convert input-option input-file output-option output-file

And for mogrify is:

$ mogrify options input-file

Note: With mogrify, the original image file is replaced with the new image file by default, but it is possible to prevent this, by using certain options that you can find in the man page.

Below are the various ways to batch convert your all .PNG images to .JPG format, if you want to convert .JPG to .PNG, you can modify the commands according to your needs.

1. Convert PNG to JPG Using ‘ls’ and ‘xargs’ Commands

The ls command allows you to list all your png images and xargs make it possible to build and execute a convert command from standard input to convert all .png images to .jpg.

----------- Convert PNG to JPG ----------- 
$ ls -1 *.png | xargs -n 1 bash -c 'convert "$0" "${0%.png}.jpg"'

----------- Convert JPG to PNG ----------- 
$ ls -1 *.jpg | xargs -n 1 bash -c 'convert "$0" "${0%.jpg}.png"'

Explanation about the options used in the above command.

  1. -1 – flag tells ls to list one image per line.
  2. -n – specifies the maximum number of arguments, which is 1 for the case.
  3. -c – instructs bash to run the given command.
  4. ${0%.png}.jpg – sets the name of the new converted image, the % sign helps to remove the old file extension.

Convert PNG to JPG Format in Linux

Convert PNG to JPG Format in Linux

I used ls -ltr command to list all files by modified date and time.

Similarly, you can use above command to convert all your .jpg images to .png by tweaking the above command.

2. Convert PNG to JPG Using GNU ‘Parallel’ Command

GNU Parallel enables a user to build and execute shell commands from standard input in parallel. Make sure you have GNU Parallel installed on your system, otherwise install it using the appropriate commands below:

$ sudo apt-get install parallel     [On Debian/Ubuntu systems]
$ sudo yum install parallel         [On RHEL/CentOS and Fedora]

Once Parallel utility installed, you can run the following command to convert all .png images to .jpg format from the standard input.

----------- Convert PNG to JPG ----------- 
$ parallel convert '{}' '{.}.jpg' ::: *.png

----------- Convert JPG to PNG -----------
$ parallel convert '{}' '{.}.png' ::: *.jpg

Where,

  1. {} – input line which is a replacement string substituted by a complete line read from the input source.
  2. {.} – input line minus extension.
  3. ::: – specifies input source, that is the command line for the example above where *png or *jpg is the argument.

Parallel Command - Converts All PNG Images to JPG Format

Parallel Command – Converts All PNG Images to JPG Format

Alternatively, you can as well use ls and parallel commands together to batch convert all your images as shown:

----------- Convert PNG to JPG ----------- 
$ ls -1 *.png | parallel convert '{}' '{.}.jpg'

----------- Convert JPG to PNG -----------
$ ls -1 *.jpg | parallel convert '{}' '{.}.png'

3. Convert PNG to JPG Using ‘for loop’ Command

To avoid the hustle of writing a shell script, you can execute a for loop from the command line as follows:

----------- Convert PNG to JPG ----------- 
$ bash -c 'for image in *.png; do convert "$image" "${image%.png}.jpg"; echo “image $image converted to ${image%.png}.jpg ”; done'

----------- Convert JPG to PNG -----------
$ bash -c 'for image in *.jpg; do convert "$image" "${image%.jpg}.png"; echo “image $image converted to ${image%.jpg}.png ”; done'

Description of each option used in the above command:

  1. -c allows for execution of the for loop statement in single quotes.
  2. The image variable is a counter for number of images in the directory.
  3. For each conversion operation, the echo command informs the user that a png image has been converted to jpg format and vice-versa in the line $image converted to ${image%.png}.jpg”.
  4. “${image%.png}.jpg” creates the name of the converted image, where % removes the extension of the old image format.

for loop - Convert PNG to JPG Format

for loop – Convert PNG to JPG Format

4. Convert PNG to JPG Using Shell Script

If you do not want to make your command line dirty as in the previous example, write a small script like so:

Note: Appropriately interchange the .png and .jpg extensions as in the example below for conversion from one format to another.

#!/bin/bash
#convert
for image in *.png; do
        convert  "$image"  "${image%.png}.jpg"
        echo “image $image converted to ${image%.png}.jpg ”
done
exit 0 

Save it as convert.sh and make the script executable and then run it from within the directory that has your images.

$ chmod +x convert.sh
$ ./convert.sh

Batch Image Convert Using Shell Script

Batch Image Convert Using Shell Script

In summary, we covered some important ways to batch convert .png images to .jpg format and vice-versa. If you want to optimize images, you can go through our guide that shows how to compress png and jpg images in Linux.

You can as well share with us any other methods including Linux command line tools for converting images from one format to another on the terminal, or ask a question via the comment section below.

Source

How to Recover a Deleted File in Linux

Did this ever happen to you? You realized that you had mistakenly deleted a file – either through the Del key, or using rm in the command line.

In the first case, you can always go to the Trashsearch for the file, and restore it to its original location. But what about the second case? As I am sure you probably know, the Linux command line does not send removed files anywhere – it REMOVES them. Bum. They’re gone.

Suggested Read: How to Recover Deleted Files/Directories Using Scalpel Tool

In this article we will share a tip that may be helpful to prevent this from happening to you, and a tool that you may consider using if at any point you are careless enough to do it anyway.

Create an alias to ‘rm -i’

The -i switch, when used with rm (and also other file-manipulation tools such as cp or mv) causes a prompt to appear before removing a file.

The same applies to copying, moving, or renaming a file in a location where one with the same name exists already.

This prompt gives you a second chance to consider if you actually want to remove the file – if you confirm the prompt, it will be gone. In that case, I’m sorry but this tip will not protect you from your own carelessness.

To replace rm with an alias to 'rm -i', do:

alias rm='rm -i'

The alias command will confirm that rm is now aliased:

Add Alias rm Command

Add Alias rm Command

However, this will only last during the current user session in the current shell. To make the change permanent, you will have to save it to ~/.bashrc (some distributions may use ~/.profile instead) as shown below:

Add Alias Permanently in Linux

Add Alias Permanently in Linux

In order for the changes in ~/.bashrc (or ~/.profile) to take effect immediately, source the file from the current shell:

. ~/.bashrc

Active Alias in Linux

Active Alias in Linux

The forensics tool – Foremost

Hopefully, you will be careful with your files and will only need to use this tool while recovering a lost file from an external disk or USB drive.

However, if you realize you accidentally removed a file in your system and are going to panic – don’t. Let’s take a look at foremost, a forensics tool that was designed for this kind of scenarios.

To install foremost in CentOS/RHEL 7, you will need to enable Repoforge first:

# rpm -Uvh http://pkgs.repoforge.org/rpmforge-release/rpmforge-release-0.5.3-1.el7.rf.x86_64.rpm
# yum install foremost

Whereas in Debian and derivatives, just do

# aptitude install foremost

Once the installation has completed, let’s proceed with a simple test. We will begin by removing an image file named nosdos.jpg from the /boot/images directory:

# cd images
# rm nosdos.jpg

To recover it, use foremost as follows (you’ll need to identify the underlying partition first – /dev/sda1 is where /boot resides in this case):

# foremost -t jpg -i /dev/sda1 -o /home/gacanepa/rescued

where /home/gacanepa/rescued is a directory on a separate disk – keep in mind that recovering files on the same drive where the removed ones were located is not a wise move.

If, during the recovery, you occupy the same disk sectors where the removed files used to be, it may not be possible to recover anything. Additionally, it is essential to stop all your activities before performing the recovery.

After foremost has finished executing, the recovered file (if recovery was possible) will be found inside the /home/gacanepa/rescued/jpg directory.

Summary

In this article we have explained how to avoid removing a file accidentally and how to attempt to recover it if such an undesired event happens. Be warned, however, that foremost can take quite a while to run depending on the size of the partition.

As always, don’t hesitate to let us know if you have questions or comments. Feel free to drop us a note using the form below.

Source

10 Linux Dig (Domain Information Groper) Commands to Query DNS

In our last article we have showed you the most used 8 Nslookup commands with their examples, now here we come with another command line tool called Dig, which is much similar to Linux Nslookup tool. We will see the usage of dig command closely with their examples as shown below.

Linux Dig Command Examples

Linux Dig Command Examples

Dig stands for (Domain Information Groper) is a network administration command-line tool for querying Domain Name System (DNS) name servers. It is useful for verifying and troubleshooting DNS problems and also to perform DNS lookups and displays the answers that are returned from the name server that were queried. dig is part of the BIND domain name server software suite. dig command replaces older tool such as nslookup and the host. dig tool is available in major Linux distributions.

1. Query Domain “A” Record

# dig yahoo.com; <<>> DiG 9.8.2rc1-RedHat-9.8.2-0.10.rc1.el6_3.2 <<>> yahoo.com
;; global options: +cmd
;; Got answer:
;; ->>HEADER<

Above command causes dig to look up the “A” record for the domain name yahoo.com. Dig command reads the /etc/resolv.conf file and querying the DNS servers listed there. The response from the DNS server is what dig displays.

Let us understand the output of the commands:
  1. Lines beginning with ; are comments not part of the information.
  2. The first line tell us the version of dig (9.8.2) command.
  3. Next, dig shows the header of the response it received from the DNS server
  4. Next comes the question section, which simply tells us the query, which in this case is a query for the “A”record of yahoo.com. The IN means this is an Internet lookup (in the Internet class).
  5. The answer section tells us that yahoo.com has the IP address 72.30.38.140
  6. Lastly there are some stats about the query. You can turn off these stats using the +nostats option.

2. Query Domain “A” Record with +short

By default dig is quite verbose. One way to cut down the output is to use the +short option. which will drastically cut the output as shown below.

# dig yahoo.com +short

98.139.183.24
72.30.38.140
98.138.253.109

Note: By default dig looks for the “A” record of the domain specified, but you can specify other records also. The MX or Mail eXchange record tells mail servers how to route the email for the domain. Likewise TTLSOA etc.

3. Querying MX Record for Domain

Querying different types of DNS resource records only.

# dig yahoo.com MX

; <> DiG 9.8.2rc1-RedHat-9.8.2-0.10.rc1.el6_3.2 <> yahoo.com MX
;; global options: +cmd
;; Got answer:
;; ->>HEADER<<- opcode: QUERY, status: NOERROR, id: 31450
;; flags: qr rd ra; QUERY: 1, ANSWER: 3, AUTHORITY: 0, ADDITIONAL: 24

;; QUESTION SECTION:
;yahoo.com.                     IN      MX

;; ANSWER SECTION:
yahoo.com.              33      IN      MX      1 mta6.am0.yahoodns.net.
yahoo.com.              33      IN      MX      1 mta7.am0.yahoodns.net.
yahoo.com.              33      IN      MX      1 mta5.am0.yahoodns.net.

4. Querying SOA Record for Domain

# dig yahoo.com SOA

; <> DiG 9.8.2rc1-RedHat-9.8.2-0.10.rc1.el6_3.2 <> yahoo.com SOA
;; global options: +cmd
;; Got answer:
;; ->>HEADER<<- opcode: QUERY, status: NOERROR, id: 2197
;; flags: qr rd ra; QUERY: 1, ANSWER: 1, AUTHORITY: 7, ADDITIONAL: 7

;; QUESTION SECTION:
;yahoo.com.                     IN      SOA

;; ANSWER SECTION:
yahoo.com.              1800    IN      SOA     ns1.yahoo.com. hostmaster.yahoo-inc.com. 2012081409 3600 300 1814400 600

5. Querying TTL Record for Domain

# dig yahoo.com TTL

; <> DiG 9.8.2rc1-RedHat-9.8.2-0.10.rc1.el6_3.2 <> yahoo.com TTL
;; global options: +cmd
;; Got answer:
;; ->>HEADER<<- opcode: QUERY, status: NOERROR, id: 56156
;; flags: qr rd ra; QUERY: 1, ANSWER: 3, AUTHORITY: 0, ADDITIONAL: 0

;; QUESTION SECTION:
;yahoo.com.                     IN      A

;; ANSWER SECTION:
yahoo.com.              3589    IN      A       98.138.253.109
yahoo.com.              3589    IN      A       98.139.183.24
yahoo.com.              3589    IN      A       72.30.38.140

6. Querying only answer section

# dig yahoo.com +nocomments +noquestion +noauthority +noadditional +nostats

; <<>> DiG 9.8.2rc1-RedHat-9.8.2-0.10.rc1.el6 <<>> yahoo.com +nocomments +noquestion +noauthority +noadditional +nostats
;; global options: +cmd
yahoo.com.              3442    IN      A       72.30.38.140
yahoo.com.              3442    IN      A       98.138.253.109
yahoo.com.              3442    IN      A       98.139.183.24

7. Querying ALL DNS Records Types

# dig yahoo.com ANY +noall +answer

; <<>> DiG 9.8.2rc1-RedHat-9.8.2-0.10.rc1.el6 <<>> yahoo.com ANY +noall +answer
;; global options: +cmd
yahoo.com.              3509    IN      A       72.30.38.140
yahoo.com.              3509    IN      A       98.138.253.109
yahoo.com.              3509    IN      A       98.139.183.24
yahoo.com.              1709    IN      MX      1 mta5.am0.yahoodns.net.
yahoo.com.              1709    IN      MX      1 mta6.am0.yahoodns.net.
yahoo.com.              1709    IN      MX      1 mta7.am0.yahoodns.net.
yahoo.com.              43109   IN      NS      ns2.yahoo.com.
yahoo.com.              43109   IN      NS      ns8.yahoo.com.
yahoo.com.              43109   IN      NS      ns3.yahoo.com.
yahoo.com.              43109   IN      NS      ns1.yahoo.com.
yahoo.com.              43109   IN      NS      ns4.yahoo.com.
yahoo.com.              43109   IN      NS      ns5.yahoo.com.
yahoo.com.              43109   IN      NS      ns6.yahoo.com.

8. DNS Reverse Look-up

Querying DNS Reverse Look-up. Only display answer section with using +short.

# dig -x 72.30.38.140 +short

ir1.fp.vip.sp2.yahoo.com.

9. Querying Multiple DNS Records

Query multiple website’s DNS specific query viz. MXNS etc. records.

# dig yahoo.com mx +noall +answer redhat.com ns +noall +answer

; <<>> DiG 9.8.2rc1-RedHat-9.8.2-0.10.rc1.el6 <<>> yahoo.com mx +noall +answer redhat.com ns +noall +answer
;; global options: +cmd
yahoo.com.              1740    IN      MX      1 mta6.am0.yahoodns.net.
yahoo.com.              1740    IN      MX      1 mta7.am0.yahoodns.net.
yahoo.com.              1740    IN      MX      1 mta5.am0.yahoodns.net.
redhat.com.             132     IN      NS      ns1.redhat.com.
redhat.com.             132     IN      NS      ns4.redhat.com.
redhat.com.             132     IN      NS      ns3.redhat.com.
redhat.com.             132     IN      NS      ns2.redhat.com.

10. Create .digrc file

Create .digrc file under $HOME/.digrc to store default dig options.

# dig yahoo.com
yahoo.com.              3427    IN      A       72.30.38.140
yahoo.com.              3427    IN      A       98.138.253.109
yahoo.com.              3427    IN      A       98.139.183.24

We have store +noall +answer options permanently in .digrc file under user’s home directory. Now, whenever dig command execute it will show only answer section of dig output. No Need to type every-time options like +noall+answer.

In this article, we tried to find out dig command which may help you to search (DNS) Domain Name Service related information. Share your thoughts through comment box.

Source

How to Save Command Output to a File in Linux

There are many things you can do with the output of a command in Linux. You can assign the output of a command to a variable, send it to another command/program for processing through a pipe or redirect it to a file for further analysis.

Suggested Read: Learn The Basics of How Linux I/O (Input/Output) Redirection Works

In this short article, I will show you a simple but useful command-line trick: how to view output of a command on the screen and also write to a file in Linux.

Viewing Output On Screen and also Writing to a File

Assuming you want to get a full summary of available and used disk space of a file system on a Linux system, you can employ the df command; it also helps you determine the file system type on a partition.

$ $df

Check Filesystem Disk Space

Check Filesystem Disk Space

With the -h flag, you can show the file system disk space statistics in a “human readable” format (displays statistics details in bytes, mega bytes and gigabyte).

$ df -h

Disk Space in Human Readable Format

Disk Space in Human Readable Format

Now to display the above information on the screen and also write it to a file, say for later analysis and/or send to a system administrator via email, run the command below.

$ df -h | tee df.log
$ cat df.log

Linux Command Output to File

Linux Command Output to File

Here, the magic is done by the tee command, it reads from standard input and writes to standard output as well as files.

If a file(s) already exists, you can append it using the -a or --append option like this.

$ df -h | tee -a df.log 

Note: You can also use pydf an alternative “df” command to check disk usage in different colors.

For more information, read through the df and tee man pages.

$ man df
$ man tee

You may also like to read similar articles.

  1. 5 Interesting Command Line Tips and Tricks in Linux
  2. 10 Useful Linux Command Line Tricks for Newbies
  3. 10 Interesting Linux Command Line Tricks and Tips Worth Knowing
  4. How to Run or Repeat a Linux Command Every X Seconds Forever
  5. Set Date and Time for Each Command You Execute in Bash History

In this short article, I showed you how to view output of a command on the screen and also write to a file in Linux. If you have any questions or additional ideas to share, do that via the comment section below.

Source

How to Use ‘find’ Command to Search for Multiple Filenames (Extensions) in Linux

Many times, we are locked in a situation where we have to search for multiple files with different extensions, this has probably happened to several Linux users especially from within the terminal.

There are several Linux utilities that we can use to locate or find files on the file system, but finding multiple filenames or files with different extensions can sometimes prove tricky and requires specific commands.

Find Multiple File Names in Linux

Find Multiple File Names in Linux

One of the many utilities for locating files on a Linux file system is the find utility and in this how-to guide, we shall walk through a few examples of using find to help us locate multiple filenames at once.

Before we dive into the actual commands, let us look at a brief introduction to the Linux find utility.

The simplest and general syntax of the find utility is as follows:

# find directory options [ expression ]

Let us proceed to look at some examples of find command in Linux.

1. Assuming that you want to find all files in the current directory with .sh and .txt file extensions, you can do this by running the command below:

# find . -type f \( -name "*.sh" -o -name "*.txt" \)

Find .sh and .txt Extension Files in Linux

Find .sh and .txt Extension Files in Linux

Interpretation of the command above:

  1. . means the current directory
  2. -type option is used to specify file type and here, we are searching for regular files as represented by f
  3. -name option is used to specify a search pattern in this case, the file extensions
  4. -o means “OR”

It is recommended that you enclose the file extensions in a bracket, and also use the \ ( back slash) escape character as in the command.

2. To find three filenames with .sh.txt and .c extensions, issues the command below:

# find . -type f \( -name "*.sh" -o -name "*.txt" -o -name "*.c" \)

Find Multiple File Extensions in Linux

Find Multiple File Extensions in Linux

3. Here is another example where we search for files with .png.jpg.deb and .pdf extensions:

# find /home/aaronkilik/Documents/ -type f \( -name "*.png" -o -name "*.jpg" -o -name "*.deb" -o -name ".pdf" \)

Find More than 3 File Extensions in Linux

Find More than 3 File Extensions in Linux

When you critically observe all the commands above, the little trick is using the -o option in the find command, it enables you to add more filenames to the search array, and also knowing the filenames or file extensions you are searching for.

Conclusion

In this guide, we covered a simple yet helpful find utility trick to enable us find multiple filenames by issuing a single command. To understand and use find for many other vital command line operations, you can read our article below.

35 Practical Examples of Linux Find Command

The Linux Find Command is one of the most important and much used command in Linux sytems. Find command used to search and locate list of files and directories based on conditions you specify for files that match the arguments. Find can be used in variety of conditions like you can find files by permissionsusersgroupsfile typedatesize and other possible criteria.

Linux Find Command

35 Linux Find Commands Examples

Through this article we are sharing our day-to-day Linux find command experience and its usage in the form of examples. In this article we will show you the most used 35 Find Commands examples in Linux. We have divided the section into Five parts from basic to advance usage of find command.

  1. Part I: Basic Find Commands for Finding Files with Names
  2. Part II: Find Files Based on their Permissions
  3. Part III: Search Files Based On Owners and Groups
  4. Part IV: Find Files and Directories Based on Date and Time
  5. Part V: Find Files and Directories Based on Size
  6. Part VIFind Multiple Filenames in Linux
Part I – Basic Find Commands for Finding Files with Names

1. Find Files Using Name in Current Directory

Find all the files whose name is tecmint.txt in a current working directory.

# find . -name tecmint.txt

./tecmint.txt

2. Find Files Under Home Directory

Find all the files under /home directory with name tecmint.txt.

# find /home -name tecmint.txt

/home/tecmint.txt

3. Find Files Using Name and Ignoring Case

Find all the files whose name is tecmint.txt and contains both capital and small letters in /home directory.

# find /home -iname tecmint.txt

./tecmint.txt
./Tecmint.txt

4. Find Directories Using Name

Find all directories whose name is Tecmint in / directory.

# find / -type d -name Tecmint

/Tecmint

5. Find PHP Files Using Name

Find all php files whose name is tecmint.php in a current working directory.

# find . -type f -name tecmint.php

./tecmint.php

6. Find all PHP Files in Directory

Find all php files in a directory.

# find . -type f -name "*.php"

./tecmint.php
./login.php
./index.php
Part II – Find Files Based on their Permissions

7. Find Files With 777 Permissions

Find all the files whose permissions are 777.

# find . -type f -perm 0777 -print

8. Find Files Without 777 Permissions

Find all the files without permission 777.

# find / -type f ! -perm 777

9. Find SGID Files with 644 Permissions

Find all the SGID bit files whose permissions set to 644.

# find / -perm 2644

10. Find Sticky Bit Files with 551 Permissions

Find all the Sticky Bit set files whose permission are 551.

# find / -perm 1551

11. Find SUID Files

Find all SUID set files.

# find / -perm /u=s

12. Find SGID Files

Find all SGID set files.

# find / -perm /g=s

13. Find Read Only Files

Find all Read Only files.

# find / -perm /u=r

14. Find Executable Files

Find all Executable files.

# find / -perm /a=x

15. Find Files with 777 Permissions and Chmod to 644

Find all 777 permission files and use chmod command to set permissions to 644.

# find / -type f -perm 0777 -print -exec chmod 644 {} \;

16. Find Directories with 777 Permissions and Chmod to 755

Find all 777 permission directories and use chmod command to set permissions to 755.

# find / -type d -perm 777 -print -exec chmod 755 {} \;

17. Find and remove single File

To find a single file called tecmint.txt and remove it.

# find . -type f -name "tecmint.txt" -exec rm -f {} \;

18. Find and remove Multiple File

To find and remove multiple files such as .mp3 or .txt, then use.

# find . -type f -name "*.txt" -exec rm -f {} \;

OR

# find . -type f -name "*.mp3" -exec rm -f {} \;

19. Find all Empty Files

To find all empty files under certain path.

# find /tmp -type f -empty

20. Find all Empty Directories

To file all empty directories under certain path.

# find /tmp -type d -empty

21. File all Hidden Files

To find all hidden files, use below command.

# find /tmp -type f -name ".*"
Part III – Search Files Based On Owners and Groups

22. Find Single File Based on User

To find all or single file called tecmint.txt under / root directory of owner root.

# find / -user root -name tecmint.txt

23. Find all Files Based on User

To find all files that belongs to user Tecmint under /home directory.

# find /home -user tecmint

24. Find all Files Based on Group

To find all files that belongs to group Developer under /home directory.

# find /home -group developer

25. Find Particular Files of User

To find all .txt files of user Tecmint under /home directory.

# find /home -user tecmint -iname "*.txt"
Part IV – Find Files and Directories Based on Date and Time

26. Find Last 50 Days Modified Files

To find all the files which are modified 50 days back.

# find / -mtime 50

27. Find Last 50 Days Accessed Files

To find all the files which are accessed 50 days back.

# find / -atime 50

28. Find Last 50-100 Days Modified Files

To find all the files which are modified more than 50 days back and less than 100 days.

# find / -mtime +50 –mtime -100

29. Find Changed Files in Last 1 Hour

To find all the files which are changed in last 1 hour.

# find / -cmin -60

30. Find Modified Files in Last 1 Hour

To find all the files which are modified in last 1 hour.

# find / -mmin -60

31. Find Accessed Files in Last 1 Hour

To find all the files which are accessed in last 1 hour.

# find / -amin -60
Part V – Find Files and Directories Based on Size

32. Find 50MB Files

To find all 50MB files, use.

# find / -size 50M

33. Find Size between 50MB – 100MB

To find all the files which are greater than 50MB and less than 100MB.

# find / -size +50M -size -100M

34. Find and Delete 100MB Files

To find all 100MB files and delete them using one single command.

# find / -size +100M -exec rm -rf {} \;

35. Find Specific Files and Delete

Find all .mp3 files with more than 10MB and delete them using one single command.

# find / -type f -name *.mp3 -size +10M -exec rm {} \;

That’s it, We are ending this post here, In our next article we will discuss more about other Linux commands in depth with practical examples. Let us know your opinions on this article using our comment section.

Source

How to Restore Deleted /tmp Directory in Linux

The /tmp directory contains mostly files that are required temporarily, it is used by different programs to create lock files and for temporary storage of data. Many of these files are important for currently running programs and deleting them may result in a system crash.

On all if not most Linux systems, the contents of the /tmp directory are deleted (cleared out) at boot time or at shutdown by the local system. This is a standard procedure for system administration, to reduce the amount of storage space used (typically, on a disk drive).

Important: Do not delete files from the /tmp directory unless you know exactly what you are doing! In multi-user systems, this can potentially remove active files, disrupting users activities (via programs they are using).

What if you accidentally delete the /tmp directory? In this article, we will show you how to restore (recreate) /tmp directory after deleting it.

Suggested Read: How to Recover Deleted Files in Linux

A few things to note before running the commands below.

  • the /tmp must belong to the root user.
  • set appropriate permissions that will allow all users to use this directory (make it public).
$ sudo mkdir /tmp 
$ sudo chmod 1777 /tmp

Alternatively, run this command.

$ sudo mkdir -m 1777 /tmp

Now run the command below to check the permissions of the directory.

$ ls -ld /tmp

Restore Deleted /tmp Directory in Linux

Restore Deleted /tmp Directory in Linux

The permission set here mean everybody (owner, group and others) can read, write and access files in the directory, and the t (sticky bit), implying files may only be deleted by their owner.

Note: Once you have restored the /tmp directory as shown above, it is recommended you reboot the system to ensure that all programs start operating normally.

That’s it! In this article, we showed how to restore (recreate) /tmp directory after deleting it accidentally in Linux. Drop your comments via the feedback form below.

Source

Fping – A High Performance Ping Tool for Linux

fping is a small command line tool to send ICMP (Internet Control Message Protocol) echo request to network hosts, similar to ping, but much higher performing when pinging multiple hosts. fping totally differs from ping in that you can define any number of hosts on the command line or specify a file with the list of IP addresses or hosts to ping.

Read AlsoA Linux Sysadmin’s Guide to Network Management, Troubleshooting and Debugging

For example, using fping, we can specify the complete network range (192.168.0.1/24). It will send Fping request to host and move to another target host in a round-robin fashion. Unlike ping, Fping is meant for basically scripting.

How to Install Fping in Linux Systems

In most Linux distributions, the package fping is available to install from the default package repositories using package management tool as shown.

# sudo apt install fping  [On Debian/Ubuntu]
# sudo yum install fping  [On CentOS/RHEL]
# sudo dnf install fping  [On Fedora 22+]
# sudo pacman -S fping    [On Arch Linux]

Alternatively, you can install latest version of fping (4.0) from the source package using following commands.

$ wget https://fping.org/dist/fping-4.0.tar.gz
$ tar -xvf fping-4.0.tar.gz
$ cd fping-4.0/
$ ./configure
$ make && make install

Let’s see some Fping command with their examples.

1. Fping Multiple IP Address

The below command will fping multiple IP address at once and it will display status as alive or unreachable.

# fping 50.116.66.139 173.194.35.35 98.139.183.24

50.116.66.139 is alive
173.194.35.35 is unreachable
98.139.183.24 is unreachable

2. Fping Range of IP Address

The following command will fping a specified range of IP addressees. With below output we are sending echo request to range of IP address and getting reply as we wanted. Also cumulative result shown after exit.

# fping -s -g 192.168.0.1 192.168.0.9

192.168.0.1 is alive
192.168.0.2 is alive
ICMP Host Unreachable from 192.168.0.2 for ICMP Echo sent to 192.168.0.3
ICMP Host Unreachable from 192.168.0.2 for ICMP Echo sent to 192.168.0.4
192.168.0.3 is unreachable
192.168.0.4 is unreachable

8      9 targets
       2 alive
       2 unreachable
       0 unknown addresses

       4 timeouts (waiting for response)
       9 ICMP Echos sent
       2 ICMP Echo Replies received
      2 other ICMP received

 0.10 ms (min round trip time)
 0.21 ms (avg round trip time)
 0.32 ms (max round trip time)
        4.295 sec (elapsed real time)

3. Fping Complete Network with Different Options

With above command, it will ping complete network and repeat once (-r 1). Sorry, it’s not possible to show output of the command as it is scrolling up my screen with no time.

# fping -g -r 1 192.168.0.0/24

4. Reads the List of Targets From a File

We have create a file called fping.txt having IP address (173.194.35.35 and 98.139.183.24) to fping.

# fping < fping.txt

173.194.35.35 is alive
98.139.183.24 is alive

5. Show Version of Fping

Check the Fping version by executing the command.

# fping -v

fping: Version 4.0
fping: comments to david@schweikert.ch

Those who want to get more information with options about Fping command, please look into a man page. Also requested to try Fping command in your environment and share your experience with us through the comment box below.

Source

8 Best Video Editing Softwares I Discovered for Linux

It has been a long known fact that there is a larger variety of software products for Windows and Macs compared to Linux. And even though Linux is continuously growing it is still hard to find some specific software. We know many of you like editing videos and that you often need to switch back to Windows in order to make some easy video editing tasks.

Best Linux Video Editing Softwares

8 Best Linux Video Editing Softwares

Don’t Miss: 15 Best Image Editors I Discovered for Linux

This is why we have gathered a list of the best Linux video editing software so you can easily manage your videos in Linux environment.

1. Open Shot

We start our list with OpenShot,is a feature rich, multiplatform video editor that can be used on Linux, Windows and Macs. OpenShot is written in Python and it supports many different audio and video formats and also includes drag-n-drop feature.

To get a better understanding of the features that OpenShot has, here is a more detailed list:

  1. Supports large variety of video, audio and image formats based on ffmpeg.
  2. Easy Gnome integration and support for drag and drop.
  3. Video resizing, scaling, trimming and cutting.
  4. Video transitions
  5. Include watermarks
  6. 3D animated titles
  7. Digital zooming
  8. Video effects
  9. Speed changes

Installation of OpenShot

The installation of this video editor is performed via PPA and it’s only supports Ubuntu 14.04 and above. To complete the installation, you can run the following commands:

$ sudo add-apt-repository ppa:openshot.developers/ppa
$ sudo apt-get update
$ sudo apt-get install openshot-qt

Once installed, OpenShort will be present in the applications menu.

OpenShot Video Editor

OpenShot Video Editor

2. Pitivi

Pitivi is another great free, open source video editing software. It uses Gstreamer framework for importing/exporting and rendering of media. Pitivi supports simple tasks such as:

  1. Trimming
  2. Cutting
  3. Snapping
  4. Splitting
  5. Mixing

Audio and video clips can be linked together and managed as single clip. Another thing that I personally find useful is that Pitivi can be used in different languages and has a very extended documentation. Learning how to use this software is easy and doesn’t require much time. Once you get used to it, you will be able to edit video and audio files with high precision.

Installation of Pitivi

Pitivi is available for download via the Ubuntu software manager or via:

$ sudo apt-get install pitivi

To install on other Linux distributions, you need to compile it from source using distro-agnostic all-in-one binary bundle, the only requirement is glibc 2.13 or higher.

Just download the distro-agnostic bundle, extract the executable file, and double-click on it launch.

Pitivi Video Editor

Pitivi Video Editor

3. Avidemux

Avidemux is another free open source video editing software. It was originally designed mainly for cutting, filtering and encoding tasks. Avidemux is available on Linux, Windows and Mac. It is ideal for the afford mentioned tasks, but if you want to do something a bit more complex, you may want to check the rest of the editors in this list.

Installation of Avidemux

Avidemux is available for install from the Ubuntu software center and it can also be installed via:

$ sudo apt-get install avidemux

Avidemux Video Editor

Avidemux Video Editor

For other Linux distributions, you need to compile it from source using source binary packages available from Avidemux download page.

4. Blender

Blender is an advanced open source video editing software, that has many useful features, which is why it might be a preferred choice from people who are looking for a more professional video editing solution.

Here are some of the features in question:

  1. 3D modeling
  2. Grid and bridge fill
  3. N-Gon support
  4. Physically accurate shaders
  5. Open Shading Language for developing custom shaders
  6. Automatic skinning
  7. Animation toolset
  8. Sculpting
  9. Fast UV Unwrapping

Installation of Blender

Blender is available for download via the Ubuntu software manager or installed via:

$ sudo apt-get install blender

Blender Video Editor

Blender Video Editor

Download source binary packages for other Linux distributions from Blender download page.

5. Cinelerra

Cinelerra is a video editor that was released in 2002 and has millions of downloads ever since. It’s designed to be used from both beginners and advanced users. According to developer’s page, CineLerra is designed from artists for artists.

Some of the main features of Cinelerra are:

  1. UI designed for professionals
  2. Build in frame-renderer
  3. Dual-Link
  4. Deck control
  5. CMX compliant EDL functionality
  6. Different effects
  7. Audio editing with unlimited amount of layers
  8. Render farm that renders and transcodes compressed and uncompressed frames

Installation of Cinelerra

For installation of Cinerella, use the instructions provided at official Cineralla installation instructions.

Cinerella Video Editor

Cinerella Video Editor

6. KDEnlive

Kdenlive is another open source video editing software. It relies on few other projects such as FFmpeg and MLT video framework. It is designed to cover basic needs to semi-professional tasks.

With Kdenlive you receive the following features:

  1. Mix video, audio and image formats
  2. Create custom profiles
  3. Support for wide range of comcorders
  4. Multitrack edition with a timeline
  5. Tools to crop, edit, move and delete video clips
  6. Configurable keyboard shortcuts
  7. Different effects
  8. Option to export to standard formats

Installation of Kdenlive

Kdenlive is available for download from the Ubuntu software center or alternately you can install by typing the following commands in a terminal:

$ sudo add-apt-repository ppa:sunab/kdenlive-release 
$ sudo apt-get update 
$ sudo apt-get install kdenlive

If you want to install it for Fedora/RHEL based operating systems, you can download the require page from Kdenlive download page.

Kdenlive Video Editor

Kdenlive Video Editor

7. Lightworks

Lightworks is a professional video editing tool designed for everyone. It has a free and paid version, both of which are quite feature rich. It’s multi-platform and can be used on Linux, Windows and Mac. It has plenty of features that you can use.

We will mention some of the highlights, but keep in mind that there are much more:

  1. Vimeo export
  2. Wide container support
  3. Import and export functions (batches supported as well)
  4. Transcode on import
  5. Drag-n-drop replace editing
  6. Replace, fit to fill
  7. Advanced realtime multicam editing
  8. Frame accurate capture tool
  9. Trimming
  10. Wide variety of effects

Installation of Lightworks

The installation of Lightworsks is completed via .deb or .rpm packages that can be downloaded from Lightworks for Linux page.

Lightworks Video Editor

Lightworks Video Editor

8. LiVES

LiVES is a video editing system designed to me powerful and yet simple for use. It can be used across multiple platforms and it is expendable via RFX plugins. You can even write your own plugins in Perl, C or C++ or python. Other languages are supported as well.

Here are some of the main features LiVES:

  1. Loading and editing of almost every video format via mplayer
  2. Smooth playback at variable rates
  3. Frame accurate cutting
  4. Saving and re-encoding of clips
  5. Lossless backup and restore
  6. Real time blending of clips
  7. Supports fixed and variable frame rates
  8. Multiple effects
  9. Customizable effects and transitions
  10. Dynamic loading of effects

Installation of LiVES

LiVES is available for download for different Linux operating systems. You can download the appropriate package from LiVES download page.

LiVES Video Editor

LiVES Video Editor

Conclusion

As you saw above, video editing in Linux is now a fact and even though not all Adobe products are supported in Linux, there are very good alternatives that are ready to provide same functionality.

If you have any questions or comments related to the video editing software described in this article, please do not hesitate to submit your opinion or comment in the comment section below.

Source

WP2Social Auto Publish Powered By : XYZScripts.com