Real Time Interactive IP LAN Monitoring with IPTraf Tool

There are number of monitoring tools available. Moreover, i came across a IPTraf monitoring tool which i find very useful and it’s a simple tool to monitor Inbound and Outbound network traffic passing through interface.

Install IPTraf Network Monitoring

Install IPTraf LAN Monitoring

IPTraf is an ncurses-based IP LAN monitoring tool (text-based) wherein we can monitor various connections like TCPUDPICMPnon-IP counts and also Ethernet load information etc.

This article guides you on how to install IPTraf monitoring tool using YUM command.

Installing IPTraf

IPTraf is part of the Linux distribution and can be installed on RHELCentOS and Fedora server’s using yum command from terminal.

# yum install iptraf

Under Ubuntu, iptraf can be installed using Ubuntu Software Center or ‘apt-get’ method. For example, use the ‘apt-get‘ command to install it.

$ sudo apt-get install iptraf
IPTraf Usage

Once IPTraf installed, run the following command from the terminal to launch an ascii based menu interface that will allow you to view current IP traffic monitoringGeneral interface statisticsDetailed interface statisticsStatistical breakdownsFilters and also provide some configure options where you can configure as per your need.

[root@tecmint ~]# iptraf

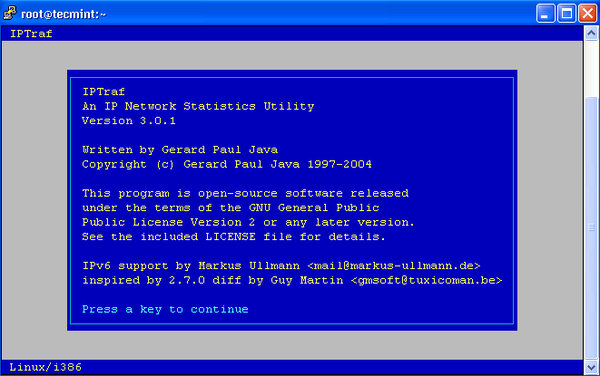
Start IPTraf

IPTraf Startup Screen

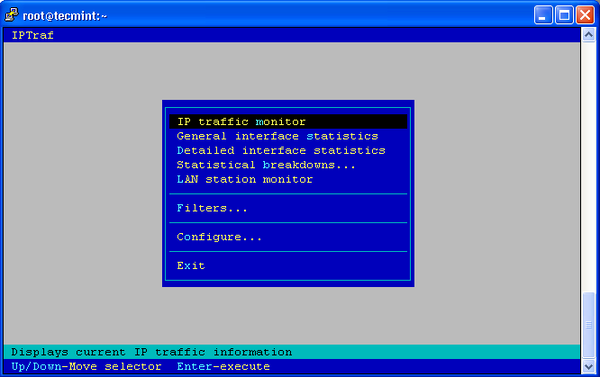
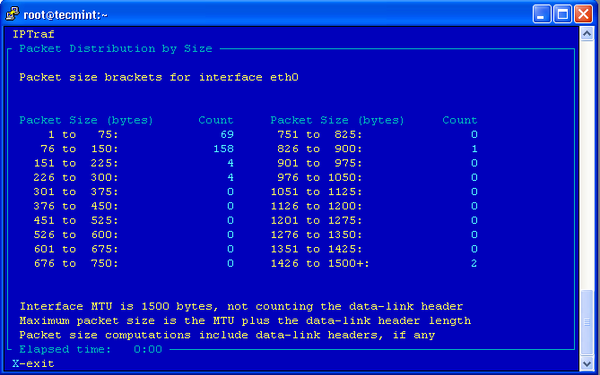
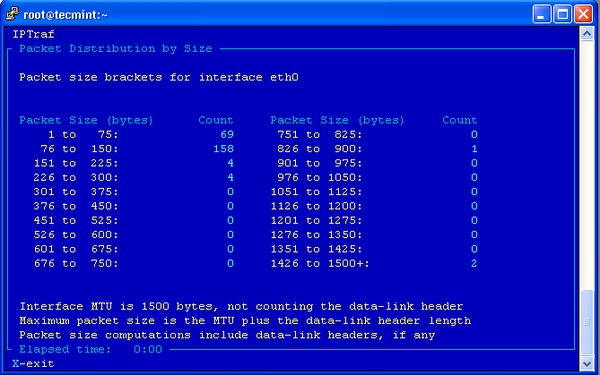
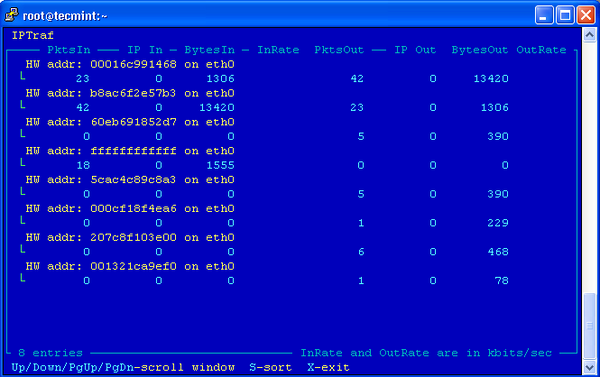
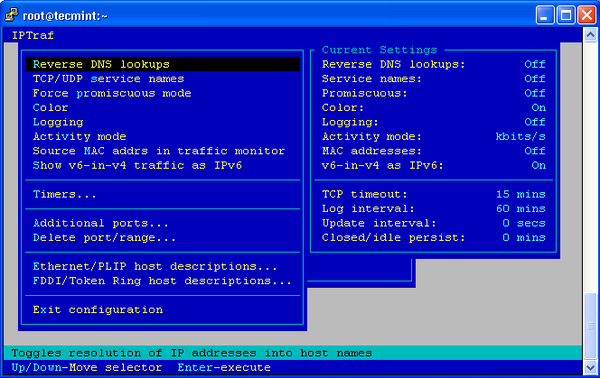
The iptraf interactive screen, displays a menu system with different options to choose from. Here are the some screenshots that shows real time IP traffic counts and interface statistics etc.

IPTraf System Menu

IPTraf System Menu

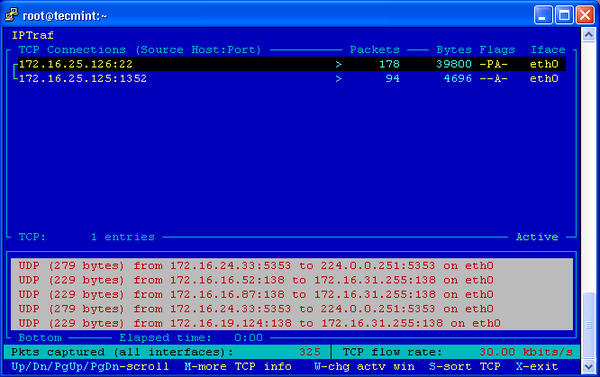
IP traffic monitor

IP Traffic Monitor

IP Traffic Monitor

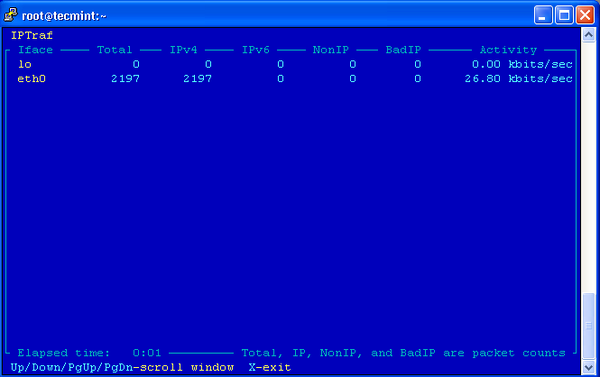
General interface statistics

IPTraf General interface statistics

IPTraf General interface statistics

Detailed interface statistics

IPTraf Detailed interface statistics

IPTraf Detailed interface statistics

Statistical breakdowns

IPTraf Statistical breakdowns

IPTraf Statistical breakdowns

LAN station monitor

IPTraf LAN station monitor

IPTraf LAN station monitor

Configure

IPTraf Configure

IPTraf Configure

IPTraf Options

Using “iptraf -i” will immediately start the IP traffic monitor on a particular interface. For example, the following command will start the IP traffic on interface eth0. This is the primary interface card that attached to your system. Else you can also monitor all your network interface traffic using argument as “iptraf -i all“.

# iptraf -i eth0

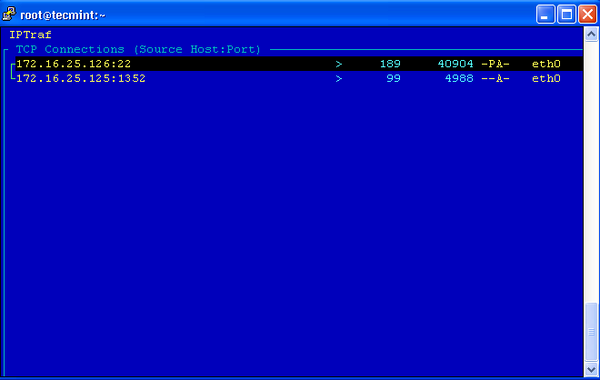
IPTraf Eth0 Monitoring

IPTraf Eth0 Monitoring

Similarly, you can also monitor TCP/UDP traffic on a specific interface, using the following command.

# iptraf -s eth0

IPTraf TCP/UDP Monitoring

IPTraf TCP/UDP Monitoring

If you want to know more options and how to use them, check iptraf ‘man page‘ or use the command as ‘iptraf -help‘ for more parameters. Fore more information visit the official project page.

Source

How to Find and Sort Files Based on Modification Date and Time in Linux

Usually, we are in habit of saving a lot of information in form of files on our system. Some, hidden files, some kept in a separate folder created for our ease of understanding, while some as it is. But, this whole stuff fills our directories; usually desktop, making it look like a mess. But, the problem arises when we need to search for a particular file modified on particular date and time in this huge collection.

Find and Sort Files by Date and Time in Linux

Find and Sort Files by Date and Time in Linux

People comfortable with GUI’s can find it using File Manager, which lists files in long listing format, making it easy to figure out what we wanted, but those users having habit of black screens, or even anyone working on servers which are devoid of GUI’s would want a simple command or set of commands that could ease out their search.

Real beauty of Linux shows here, as Linux has a collection of commands which if used separately or together can help to search for a file, or sort a collection of files according to their name, date of modification, time of creation, or even any filter you could think of applying to get your result.

Here, we will unveil the real strength of Linux by examining a set of commands which can help sorting a file or even a list of files by Date and Time.

Linux Utilities to Sort Files in Linux

Some basic Linux command line utilities that are just sufficient for sorting a directory based on Date and Timeare:

ls command

ls – Listing contents of directory, this utility can list the files and directories and can even list all the status information about them including: date and time of modification or access, permissions, size, owner, group etc.

We’ve already covered many articles on Linux ls command and sort command, you can find them below:

  1. Learn ls Command with 15 Basic Examples
  2. Learn 7 Advance ls Commands with Examples
  3. 15 Useful Interview Questions on ls Command in Linux

sort command

sort – This command can be used to sort the output of any search just by any field or any particular column of the field.

We’ve already covered two articles on Linux sort command, you can find them below:

  1. 14 Linux ‘sort’ Command Examples – Part 1
  2. 7 Useful Linux ‘sort’ Command Examples – Part 2

These commands are in themselves very powerful commands to master if you work on black screens and have to deal with lots of files, just to get the one you want.

Some Ways to Sort Files using Date and Time

Below are the list of commands to sort based on Date and Time.

1. List Files Based on Modification Time

The below command lists files in long listing format, and sorts files based on modification time, newest first. To sort in reverse order, use '-r' switch with this command.

# ls -lt

total 673768
-rwxr----- 1 tecmint tecmint  3312130 Jan 19 15:24 When You Are Gone.MP3
-rwxr----- 1 tecmint tecmint  4177212 Jan 19 15:24 When I Dream At Night - Marc Anthony-1.mp3
-rwxr----- 1 tecmint tecmint  4177212 Jan 19 15:24 When I Dream At Night - Marc Anthony.mp3
-rwxr----- 1 tecmint tecmint  6629090 Jan 19 15:24 Westlife_Tonight.MP3
-rwxr----- 1 tecmint tecmint  3448832 Jan 19 15:24 We Are The World by USA For Africa (Michael Jackson).mp3
-rwxr----- 1 tecmint tecmint  8580934 Jan 19 15:24 This Love.mp3
-rwxr----- 1 tecmint tecmint  2194832 Jan 19 15:24 The Cross Of Changes.mp3
-rwxr----- 1 tecmint tecmint  5087527 Jan 19 15:24 T.N.T. For The Brain 5.18.mp3
-rwxr----- 1 tecmint tecmint  3437100 Jan 19 15:24 Summer Of '69.MP3
-rwxr----- 1 tecmint tecmint  4360278 Jan 19 15:24 Smell Of Desire.4.32.mp3
-rwxr----- 1 tecmint tecmint  4582632 Jan 19 15:24 Silence Must Be Heard 4.46.mp3
-rwxr----- 1 tecmint tecmint  4147119 Jan 19 15:24 Shadows In Silence 4.19.mp3
-rwxr----- 1 tecmint tecmint  4189654 Jan 19 15:24 Sarah Brightman  & Enigma - Eden (remix).mp3
-rwxr----- 1 tecmint tecmint  4124421 Jan 19 15:24 Sade - Smooth Operator.mp3
-rwxr----- 1 tecmint tecmint  4771840 Jan 19 15:24 Sade - And I Miss You.mp3
-rwxr----- 1 tecmint tecmint  3749477 Jan 19 15:24 Run To You.MP3
-rwxr----- 1 tecmint tecmint  7573679 Jan 19 15:24 Roger Sanchez_Another Chance_Full_Mix.mp3
-rwxr----- 1 tecmint tecmint  3018211 Jan 19 15:24 Principal Of Lust.3.08.mp3
-rwxr----- 1 tecmint tecmint  5688390 Jan 19 15:24 Please Forgive Me.MP3
-rwxr----- 1 tecmint tecmint  3381827 Jan 19 15:24 Obvious.mp3
-rwxr----- 1 tecmint tecmint  5499073 Jan 19 15:24 Namstey-London-Viraaniya.mp3
-rwxr----- 1 tecmint tecmint  3129210 Jan 19 15:24 MOS-Enya - Only Time (Pop Radio mix).m

2. List Files Based on Last Access Time

Listing of files in directory based on last access time, i.e. based on time the file was last accessed, not modified.

# ls -ltu

total 3084272
drwxr-xr-x  2 tecmint tecmint       4096 Jan 19 15:24 Music
drwxr-xr-x  2 tecmint tecmint       4096 Jan 19 15:22 Linux-ISO
drwxr-xr-x  2 tecmint tecmint       4096 Jan 19 15:22 Music-Player
drwx------  3 tecmint tecmint       4096 Jan 19 15:22 tor-browser_en-US
drwxr-xr-x  2 tecmint tecmint       4096 Jan 19 15:22 bin
drwxr-xr-x 11 tecmint tecmint       4096 Jan 19 15:22 Android Games
drwxr-xr-x  2 tecmint tecmint       4096 Jan 19 15:22 Songs
drwxr-xr-x  2 tecmint tecmint       4096 Jan 19 15:22 renamefiles
drwxr-xr-x  2 tecmint tecmint       4096 Jan 19 15:22 katoolin-master
drwxr-xr-x  2 tecmint tecmint       4096 Jan 19 15:22 Tricks
drwxr-xr-x  3 tecmint tecmint       4096 Jan 19 15:22 Linux-Tricks
drwxr-xr-x  6 tecmint tecmint       4096 Jan 19 15:22 tuptime
drwxr-xr-x  4 tecmint tecmint       4096 Jan 19 15:22 xdm
drwxr-xr-x  2 tecmint tecmint      20480 Jan 19 15:22 ffmpeg usage
drwxr-xr-x  2 tecmint tecmint       4096 Jan 19 15:22 xdm-helper

3. List Files Based on Last Modification Time

Listing of files in directory based on last modification time of file’s status information, or the 'ctime'. This command would list that file first whose any status information like: owner, group, permissions, size etc has been recently changed.

# ls -ltc

total 3084272
drwxr-xr-x  2 tecmint tecmint       4096 Jan 19 15:24 Music
drwxr-xr-x  2 tecmint tecmint       4096 Jan 19 13:05 img
-rw-------  1 tecmint tecmint     262191 Jan 19 12:15 tecmint.jpeg
drwxr-xr-x  5 tecmint tecmint       4096 Jan 19 10:57 Desktop
drwxr-xr-x  7 tecmint tecmint      12288 Jan 18 16:00 Downloads
drwxr-xr-x 13 tecmint tecmint       4096 Jan 18 15:36 VirtualBox VMs
-rwxr-xr-x  1 tecmint tecmint        691 Jan 13 14:57 special.sh
-rw-r--r--  1 tecmint tecmint     654325 Jan  4 16:55 powertop-2.7.tar.gz.save
-rw-r--r--  1 tecmint tecmint     654329 Jan  4 11:17 filename.tar.gz
drwxr-xr-x  3 tecmint tecmint       4096 Jan  4 11:04 powertop-2.7
-rw-r--r--  1 tecmint tecmint     447795 Dec 31 14:22 Happy-New-Year-2016.jpg
-rw-r--r--  1 tecmint tecmint         12 Dec 18 18:46 ravi
-rw-r--r--  1 tecmint tecmint       1823 Dec 16 12:45 setuid.txt
...

If '-a' switch is used with above commands, they can list and sort even the hidden files in current directory, and '-r' switch lists the output in reverse order.

For more in-depth sorting, like sorting on Output of find command, however ls can also be used, but there 'sort' proves more helpful as the output may not have only file name but any fields desired by user.

Below commands show usage of sort with find command to sort the list of files based on Date and Time.

To learn more about find command, follow this link: 35 Practical Examples of ‘find’ Command in Linux

4. Sorting Files based on Month

Here, we use find command to find all files in root (‘/’) directory and then print the result as: Month in which file was accessed and then filename. Of that complete result, here we list out top 11 entries.

# find / -type f -printf "\n%Ab %p" | head -n 11

Dec /usr/lib/nvidia/pre-install
Dec /usr/lib/libcpufreq.so.0.0.0
Apr /usr/lib/libchromeXvMCPro.so.1.0.0
Apr /usr/lib/libt1.so.5.1.2
Apr /usr/lib/libchromeXvMC.so.1.0.0
Apr /usr/lib/libcdr-0.0.so.0.0.15
Dec /usr/lib/msttcorefonts/update-ms-fonts
Nov /usr/lib/ldscripts/elf32_x86_64.xr
Nov /usr/lib/ldscripts/elf_i386.xbn
Nov /usr/lib/ldscripts/i386linux.xn

The below command sorts the output using key as first field, specified by '-k1' and then it sorts on Month as specified by 'M' ahead of it.

# find / -type f -printf "\n%Ab %p" | head -n 11 | sort -k1M

Apr /usr/lib/libcdr-0.0.so.0.0.15
Apr /usr/lib/libchromeXvMCPro.so.1.0.0
Apr /usr/lib/libchromeXvMC.so.1.0.0
Apr /usr/lib/libt1.so.5.1.2
Nov /usr/lib/ldscripts/elf32_x86_64.xr
Nov /usr/lib/ldscripts/elf_i386.xbn
Nov /usr/lib/ldscripts/i386linux.xn
Dec /usr/lib/libcpufreq.so.0.0.0
Dec /usr/lib/msttcorefonts/update-ms-fonts
Dec /usr/lib/nvidia/pre-install

5. Sort Files Based on Date

Here, again we use find command to find all the files in root directory, but now we will print the result as: last date the file was accessed, last time the file was accessed and then filename. Of that we take out top 11 entries.

# find / -type f -printf "\n%AD %AT %p" | head -n 11

12/08/15 11:30:38.0000000000 /usr/lib/nvidia/pre-install
12/07/15 10:34:45.2694776230 /usr/lib/libcpufreq.so.0.0.0
04/11/15 06:08:34.9819910430 /usr/lib/libchromeXvMCPro.so.1.0.0
04/11/15 06:08:34.9939910430 /usr/lib/libt1.so.5.1.2
04/11/15 06:08:35.0099910420 /usr/lib/libchromeXvMC.so.1.0.0
04/11/15 06:08:35.0099910420 /usr/lib/libcdr-0.0.so.0.0.15
12/18/15 11:19:25.2656728990 /usr/lib/msttcorefonts/update-ms-fonts
11/12/15 12:56:34.0000000000 /usr/lib/ldscripts/elf32_x86_64.xr
11/12/15 12:56:34.0000000000 /usr/lib/ldscripts/elf_i386.xbn
11/12/15 12:56:34.0000000000 /usr/lib/ldscripts/i386linux.xn

The below sort command first sorts on basis of last digit of the year, then sorts on basis of last digit of month in reverse order and finally sorts on basis of first field. Here, ‘1.8‘ means 8th column of first field and ‘n’ ahead of it means numerical sort, while ‘r’ indicates reverse order sorting.

# find / -type f -printf "\n%AD %AT %p" | head -n 11 | sort -k1.8n -k1.1nr -k1

12/07/15 10:34:45.2694776230 /usr/lib/libcpufreq.so.0.0.0
12/08/15 11:30:38.0000000000 /usr/lib/nvidia/pre-install
12/18/15 11:19:25.2656728990 /usr/lib/msttcorefonts/update-ms-fonts
11/12/15 12:56:34.0000000000 /usr/lib/ldscripts/elf32_x86_64.xr
11/12/15 12:56:34.0000000000 /usr/lib/ldscripts/elf_i386.xbn
11/12/15 12:56:34.0000000000 /usr/lib/ldscripts/i386linux.xn
04/11/15 06:08:34.9819910430 /usr/lib/libchromeXvMCPro.so.1.0.0
04/11/15 06:08:34.9939910430 /usr/lib/libt1.so.5.1.2
04/11/15 06:08:35.0099910420 /usr/lib/libcdr-0.0.so.0.0.15
04/11/15 06:08:35.0099910420 /usr/lib/libchromeXvMC.so.1.0.0

6. Sorting Files Based on Time

Here, again we use find command to list out top 11 files in root directory and print the result in format: last time file was accessed and then filename.

# find / -type f -printf "\n%AT %p" | head -n 11

11:30:38.0000000000 /usr/lib/nvidia/pre-install
10:34:45.2694776230 /usr/lib/libcpufreq.so.0.0.0
06:08:34.9819910430 /usr/lib/libchromeXvMCPro.so.1.0.0
06:08:34.9939910430 /usr/lib/libt1.so.5.1.2
06:08:35.0099910420 /usr/lib/libchromeXvMC.so.1.0.0
06:08:35.0099910420 /usr/lib/libcdr-0.0.so.0.0.15
11:19:25.2656728990 /usr/lib/msttcorefonts/update-ms-fonts
12:56:34.0000000000 /usr/lib/ldscripts/elf32_x86_64.xr
12:56:34.0000000000 /usr/lib/ldscripts/elf_i386.xbn
12:56:34.0000000000 /usr/lib/ldscripts/i386linux.xn

The below command sorts the output based on first column of the first field of the output which is first digit of hour.

# find / -type f -printf "\n%AT %p" | head -n 11 | sort -k1.1n

06:08:34.9819910430 /usr/lib/libchromeXvMCPro.so.1.0.0
06:08:34.9939910430 /usr/lib/libt1.so.5.1.2
06:08:35.0099910420 /usr/lib/libcdr-0.0.so.0.0.15
06:08:35.0099910420 /usr/lib/libchromeXvMC.so.1.0.0
10:34:45.2694776230 /usr/lib/libcpufreq.so.0.0.0
11:19:25.2656728990 /usr/lib/msttcorefonts/update-ms-fonts
11:30:38.0000000000 /usr/lib/nvidia/pre-install
12:56:34.0000000000 /usr/lib/ldscripts/elf32_x86_64.xr
12:56:34.0000000000 /usr/lib/ldscripts/elf_i386.xbn
12:56:34.0000000000 /usr/lib/ldscripts/i386linux.xn

7. Sorting Ouptut of ls -l based on Date

This command sorts the output of 'ls -l' command based on 6th field month wise, then based on 7th field which is date, numerically.

# ls -l | sort -k6M -k7n

total 116
-rw-r--r-- 1 root root     0 Oct  1 19:51 backup.tgz
drwxr-xr-x 2 root root  4096 Oct  7 15:27 Desktop
-rw-r--r-- 1 root root 15853 Oct  7 15:19 powertop_report.csv
-rw-r--r-- 1 root root 79112 Oct  7 15:25 powertop.html
-rw-r--r-- 1 root root     0 Oct 16 15:26 file3
-rw-r--r-- 1 root root    13 Oct 16 15:17 B
-rw-r--r-- 1 root root    21 Oct 16 15:16 A
-rw-r--r-- 1 root root    64 Oct 16 15:38 C

Conclusion

Likewise, by having some knowledge of sort command, you can sort almost any listing based on any field and even its any column you desire. These were some of tricks to help you sort files based on Date or Time. You can have your own tricks build based on these. However, if you have any other interesting trick, you can always mention that in your comments.

Source

20 practical Python libraries for every Python programmer

Web apps, web crawling, database access, GUI creation, parsing, image processing, and lots more—these handy tools have you covered.

20 practical Python libraries for every Python programmer

Want a good reason for the smashing success of the Python programming language? Look no further than the massive collection of libraries available for Python, both native and third-party libraries. With so many Python libraries out there, though, it’s no surprise that some don’t get all the attention they deserve. Plus, programmers who work exclusively in one domain don’t always know about the goodies available to them for other kinds of work.Here are 20 Python libraries you may have overlooked but are definitely worth your attention. These gems run the gamut of usefulness, simplifying everything from file system access, database programming, and working with cloud services to building lightweight web apps, creating GUIs, and working with images, ebooks, and Word files—and much more besides. Some are well-known, others lesser-known, but all of these Python libraries deserve a place in your toolbox.

Apache Libcloud

What Libcloud does: Access multiple cloud providers through a single, consistent, unified API.

Why use Libcloud: If the above description of Apache Libcloud doesn’t make you clap your hands for joy, then you haven’t tried working with multiple clouds. Cloud providers all love to do things their way, making a unified mechanism for dealing with dozens of providers a huge timesaver and headache-soother. APIs are available for compute, storage, load balancing, and DNS, with support for Python 2.x and Python 3.x as well as PyPy, the performance-boosting JIT compiler for Python.

Arrow

What Arrow does: Cleaner handling of dates and times in Python.

Why use Arrow: Dealing with time zones, date conversions, date formats, and all the rest is already a headache and a half. Throw in Python’s standard library for date/time work, and you get two headaches and a half.

Arrow provides four big advantages. One, Arrow is a drop-in replacement for Python’s datetime module, meaning that common function calls like .now() and .utcnow() work as expected. Two, Arrow provides methods for common needs like shifting and converting time zones. Three, Arrow provides “humanized” date/time information—such as being able to say something happened “an hour ago” or will happen “in two hours” without much effort. Four, Arrow can localize date/time information without breaking a sweat.

Behold

What Behold does: Robust support for print-style debugging in Python.

Why use Behold: There is one simple way to debug in Python, or almost any programming language for that matter: Insert in-line print statements. But while print-debugging is a no-brainer in small programs, it’s not so easy to get useful results within large, sprawling, multi-module projects.

Behold provides a toolkit for contextual debugging via print statements. It allows you to impose a uniform look on the output, tag the results so they can be sorted via searches or filters, and provide contexts across modules so that functions that originate in one module can be debugged properly in another. Behold handles many common Python-specific scenarios like printing an object’s internal dictionary, unveiling nested attributes, and storing and reusing results for comparison at other points during the debugging process.

Bottle

What Bottle does: Lightweight and fast web apps.

Why use Bottle: When you want to throw together a quick RESTful API or use the bare bones of a web framework to build an app, capable yet tiny Bottle gives you no more than you need. Routing, templates, access to request and response data, support for multiple server types from plain old CGI on up, and support for more advanced features like WebSockets—it’s all here. The amount of work needed to get started is likewise minimal, and Bottle’s design is elegantly extensible when more advanced functions are needed. 

EbookLib

What EbookLib does: Read and write .epub files.

Why use EbookLib: Creating ebooks typically requires wrangling one command-line tool or another. EbookLib provides management tools and APIs that simplify the process. It works with EPUB 2 and EPUB 3 files, with Kindle support under development.

Provide the images and the text (the latter in HTML format), and EbookLib can assemble those pieces into an ebook complete with chapters, nested table of contents, images, HTML markup, and so on. Cover, spine, and stylesheet data are all supported, too. A plug-in system allows third parties to extend the library’s behaviors.

If you don’t need everything EbookLib has to offer, try Mkepub. Mkepub packs basic ebook assembly functionality in a library that is only a few kilobytes in size. One minor drawback of Mkepub is that it requires Jinja2, which in turn requires the MarkupSafe library.

Gooey

What Gooey does: Give a console-based Python program a platform-native GUI.

Why use Gooey: Presenting users, especially rank-and-file users, with a command-line interface is among the best ways to discourage use of your application. Few apart from the hardcore geek like figuring out what options to pass in and in what order. Gooey takes arguments expected by the argparse library and presents them to users as a GUI form, by way of the WxPython library. All options are labeled and displayed with appropriate controls (such as a drop-down for a multi-option argument). Very little additional coding—a single include and a single decorator—is needed to make it work, assuming you’re already using argparse.

Invoke

What Invoke does: ”Pythonic remote execution” – i.e., perform admin tasks using a Python library.

Why use Invoke: Using Python as a replacement for common shell scripting tasks makes a world of sense. Invoke provides a high-level API for running shell commands and managing command-line tasks as if they were Python functions, allowing you to embed those tasks in your own code or elegantly build around them.

Nuitka

What Nuitka does: Compile Python into self-contained C executables.

Why use Nuitka: Like CythonNuitka compiles Python into C. However, whereas Cython requires its own custom syntax for best results, and focuses mainly on math and statistics applications, Nuitka works with any Python program as-is, compiles it into C, and produces a single-file executable, applying optimizations where it can along the way. Nuitka is still in its early stages, and many of the planned optimizations are still to come. Nevertheless, it’s a convenient way to turn a Python script into a speedy command-line app.

Numba

What Numba does: Selectively speed up math-intensive functions.

Why use Numba: The Python world includes a whole subculture of packages for accelerating math operations. For example, NumPy works by wrapping high-speed C libraries in a Python interface, and Cython compiles Python to C with optional typing for accelerated performance. But Numba is easily the most convenient, as it allows Python functions to be selectively accelerated with nothing more than a decorator. For further speed boosts, you can use common Python idioms to parallelize workloads, or use SIMD or GPU instructions. Note that you can use NumPy with Numba, but in many cases Numba will outperform NumPy many times over.

Peewee

What Peewee does: A tiny ORM (object-relational mapper) that supports SQLite, MySQL, and PostgreSQL, with many extensions.

Why use Peewee: Not everyone loves an ORM; some would rather leave schema modeling on the database side and be done with it. But for developers who don’t want to touch databases, a well-constructed, unobtrusive ORM can be a godsend. And for developers who don’t want an ORM as full-blown as SQL AlchemyPeewee is a great fit.

Peewee models are easy to construct, connect, and manipulate. Plus, many common query-manipulation functions, such as pagination, are built right in. More features are available as add-ons including extensions for other databases, testing tools, and a schema migration system—a feature even an ORM hater could learn to love. Note that the Peewee 3.x branch (the recommended edition) is not completely backward-compatible with previous versions of Peewee.

Pillow

What Pillow does: Image processing without the pain.

Why use Pillow: Most Pythonistas who have performed image processing ought to be familiar with PIL (Python Imaging Library), but PIL is riddled with shortcomings and limitations, and it’s updated infrequently. Pillowaims to be both easier to use and code-compatible with PIL via minimal changes. Extensions are included for talking to both native Windows imaging functions and Python’s Tcl/Tk-backed Tkinter GUI package. Pillow is available through GitHub or the PyPI repository.

PyFilesystem

What PyFilesystem does: A Pythonic interface to any file system — any file system.

Why use PyFilesystem: The fundamental idea behind PyFilesystem couldn’t be simpler: Just as Python’s file objects abstract a single file, PyFilesystem’s FS objects abstract an entire file system. This doesn’t mean only on-disk file systems, either. PyFilesystem also supports FTP directories, in-memory files ystems, file systems for locations defined by the OS (such as the user directory), and even combinations of the above overlaid onto each other.

In addition to making it easier to write cross-platform code that manipulates files, PyFilesystem obviates the need to cobble together scripts from disparate parts of the standard library, mainly os and io. It also provides utilities that one might otherwise need to create from scratch, like a tool for printing console-friendly tree views of a file system.

Pygame

What Pygame does: Create video games, or game-quality front-ends, in Python.

Why use Pygame: If you think anyone outside of the game development world would ever bother with such a framework, think again. Pygame is a handy way to work with many GUI-oriented behaviors that might otherwise demand a lot of heavy lifting: drawing canvas and sprite graphics, dealing with multichannel sound, handling windows and click events, detecting collisions, and so on. Not every app—or even every GUI app—will benefit from being built with Pygame, but you ought to take a close look at what Pygame provides. You might be surprised!

Pyglet

What Pyglet does: Cross-platform multimedia and window graphics in pure Python.

Why use Pyglet: Pyglet provides handy access to items that are tedious to implement from scratch for a GUI application: window functions, OpenGL graphics, audio and video playback, keyboard and mouse handling, and working with image files. Note that Pyglet doesn’t provide UI widgets like buttons, toolbars, or menus, though.

All of this is done through the native platform capabilities in Windows, OS X, or Linux, so there are no binary dependencies; Pyglet is pure Python. It’s also BSD-licensed, so it can be included in any commercial or open source project.

PyInstaller

What PyInstaller does: Package a Python script as a stand-alone executable.

Why use PyInstaller: A common complaint with Python is that it’s harder than it ought to be to distribute a script to other users. PyInstaller lets you package any Python script—even scripts that include complex third-party modules with binaries, like NumPy—and distribute it as a single-folder or single-file application. PyInstaller tends to pack more into that folder or file than is really needed, so the final results can be bulky. But that tendency can be overcome with practice, and the sheer convenience PyInstaller provides is hard to beat.

PySimpleGUI

What PySimpleGUI does: Creating GUIs in Python with a minimum of fuss.

Why use PySimpleGUI: Python ships with the Tkinter library for creating GUIs, but Tkinter is not known for being easy to work with. PySimpleGUI wraps Tkinter with APIs that are far less exasperating. Many common effects, like a simple dialog box or pop-up menu, can be accomplished in a single line of code. The interfaces still have Tkinter’s trademark look, though. If you want a more sophisticated look and feel you’ll need to look elsewhere.

Python-docx

What Python-docx does: Programmatically manipulate Microsoft Word .docx files.

Why use Python-docx: In theory, it should be easy to write scripts that create and update XML-style Microsoft Word documents. In practice, it is far from simple, due to all of the internal complexities of the .docx format. Python-docx lets you do an end run around all of those complexities, by providing a high-level API for working with .docx files.

Python-docx lets you add or change text, images, tables, styles, document sections, and headers and footers. The library allows you to create new documents or change existing documents. Python-docx is a great way to pull raw text from Word files, or to avoid dealing with Word’s own built-in automation functions.

Scrapy

What Scrapy does: Screen scraping and web crawling.

Why use Scrapy: Scrapy makes scraping simple. Create a class that defines the items you want scraped and write some rules to extract that data from the page. The results can be exported as JSON, XML, CSV, or any number of other formats. The collected data can be saved raw or sanitized as it is imported.

Scrapy can be extended to handle many other tasks, such as logging into a website and handling session cookies. Images, too, can be scraped up by Scrapy and associated with the captured content. The latest versions add direct connections to cloud services for storing scraped data, re-usable proxy connections, and better handling of esoteric HTML and HTTP behaviors.

Sh

What Sh does: Call any external program, in a subprocess, and return the results to a Python program—using the same syntax as if the program in question were a native Python function.

Why use Sh: On any POSIX-compliant system, Sh is a godsend, allowing any command-line program available on that system to be used Pythonically. Not only are you freed from having to reinvent the wheel (why implement ping when it’s right there in the OS?), but you no longer have to struggle with adding that functionality elegantly to your application. However, be forewarned: Sh provides no sanitization of the parameters that are passed through. Be sure never to pass along raw user input.

Splinter

What Splinter does: Test web applications by automating browser actions.

Why you need it: Let’s face it, trying to automate web application testing is no one’s idea of fun. Splinter eliminates the low-level grunt work, invoking the browser, passing URLs, filling out forms, clicking buttons, and so on, automating the whole process from end to end.

Splinter provides drivers to work with Chrome and Firefox, and it can use Selenium Remote to control a browser running elsewhere. You can even manually execute JavaScript in the target browser.

Source

How to use the Linux timeout command

If you tend to issue commands and accidentally leave them running, you might want to employ the timeout command

How to use the Linux timeout command

It shows you how to use a built-in Linux command to keep you from accidentally leaving your commands running for hours on end.

Linux admins are notorious for depending on the command line. With good reason. The command line is incredibly powerful. There is no end to what you can do with Linux commands.

However, there are times when you want to run a command but don’t want the command to continue running until you forget it’s running and realize that the command has been gobbling up CPU cycles, filling up logs, or just generally doing its thing in the background, harming nothing.

How it works

Regardless of why you don’t want to allow a command to run forever, the how is quite simple—thanks to the timeout command. The timeout command should be installed by default and is very simple to use. Say you want to run a ping command, on google.com, for five seconds (because who hasn’t forgotten they’d run a ping command, only to come back hours later to see it still pinging the target address?).

To do this, log into your Ubuntu server or desktop, open a terminal window, and issue the command timeout 5 ping google.com. The ping command will do its thing for five seconds and stop. Or say you want to follow the syslog log file with tail for ten seconds. That command would be:

timeout 10 tail -f /var/log/syslog.

After the configured 10 seconds, the tail command will end. And that’s how you can automatically stop your commands, without having to resort to the old [Ctrl]+[C] keyboard combination. If you tend to issue commands and accidentally leave them running, you might want to start employing the timeout command, before your IT manager puts you in a timeout.

Also see

Source

Install RPM packages on Ubuntu

The Ubuntu repositories contain thousands of deb packages which can be installed from the Ubuntu Software Center or by using the apt command line utility. Deb is the installation package format used by all Debian based distributions including Ubuntu. Some packages are not available in the standard Ubuntu repositories but it can be easily installed by enabling the appropriate source.

In most cases when the software vendor does not provide a repository they will have a download page from where you can download and install the deb package or download and compile the software from sources.

Although not so often, some software may be distributed only as an RPM package. RPM is a package format used by Red Hat and its derivatives such as CentOS. Luckily, there is a tool called alien that allows us to install an RPM file on Ubuntu or to convert an RPM package file into a Debian package file.

This is not the recommended way to install software packages in Ubuntu. Whenever possible you should prefer installing software from the Ubuntu repositories.

Not all RPM packages can be installed on Ubuntu. Installing RPM packaged on Ubuntu may lead to package dependency conflicts.

You should never use this method to replace or update important system packages, like libc, systemd, or other services and libraries that are essential for the proper functioning of your system. Doing this may lead to errors and system instability.

Alien is a tool that supports conversion between Red Hat rpm, Debian deb, Stampede slp, Slackware tgz, and Solaris pkg file formats.

Before installing the alien package make sure the Universe repository is enabled on your system:

sudo add-apt-repository universe

Copy

Once the repository is enabled update the packages index and install the alien package with:

sudo apt updatesudo apt install alien

Copy

The command above will also install the necessary build tools.

To convert a package from RPM to DEB format use the alien command followed by the RPM package name:

sudo alien package_name.rpm

Copy

Depending on the package size the conversion may take some time. In most cases, you will see warning messages printed on your screen. If the package is successfully converted the output will indicate that the DEB package is generated:

package_name.deb generated

Copy

To install the deb package, you can either use the dpkg or apt utility:

sudo dpkg -i package_name.deb

Copy

sudo apt ./package_name.deb

Copy

The package should now be installed, assuming it’s compatible with your system and all dependencies are met.

You’ll need to be logged in as a user with sudo access to be able to install packages on your Ubuntu system.

Instead of converting and then installing the package you can use the -i option that will tell alien to install the RPM package directly.

sudo alien -i package_name.rpm

Copy

The command above will automatically generate and installed the package and remove the package file after it has been installed.

In this tutorial, you learned how to install RPM packages on Ubuntu.

If you have any question or feedback feel free to leave a comment.

Source
How to Automatically Empty the Trash in Ubuntu

If you want to set your Ubuntu system to automatically take care of your system Trash over a particular period of time, you can make use of the command line utility called autotrash. Autotrash is a utility that looks in a FreeDesktop.org Trash folder for information on its contents and then purges a part of the trash depending on your specified options.

In this article, we will explain how to install, seek help on, and use the autotrash utility. We will elaborate on the procedure by presenting some examples that will help you with the widely used functions of this utility.

We have run the commands and procedures mentioned in this article on a Ubuntu 18.04 LTS system.

Install Autotrash through the Command line

We will install the autotrash command line utility through the Terminal application. You can launch the Terminal either through the system application launcher search or the Ctrl+Alt+T shortcut. Please note that only an authorized user can add/update, remove and configure software in Ubuntu.

Step1: Update your system’s Repository Index

In order to install the latest version of a software available in Ubuntu’s Internet repositories, your system’s repository index needs to be up-to-date.

Run the following command as sudo in order to update your system’s local repository index with that of the Internet.

$ sudo apt-get update

Update Ubuntu Repository

The system might ask you for the password of sudo. Enter the password and your command will take action.

Step 2: Install autotrash

Now, you can install the autotrash utility by running the following command as sudo in your Terminal application:

$ sudo apt-get install autotrash

Install Autotrash

The system might prompt you with a Y/n option before starting the installation procedure. Please enter Y to continue.

Step 3: Verify autotrash installation (optional)

You can check the version number of your installed autotrash software and also verify if it is indeed installed on your system. Run the following command to do so:

$ autotrash --version

Or,

$ autotrash -V

Verify autotrash installation

You are now ready to use autotrash on your Ubuntu.

How to use autotrash? (with examples)

The autotrash help will tell you all you can do with this application. You can view the help as follows:

$ autotrash --help

Get help

For even more detailed information, you can view the manpage of autotrash by using the following command:

$ man autotrash

Now we will present some examples that will elaborate on how you can make the best use of this utility:

Example 1: Delete Files older than x number of days

This is the most widely used feature of autotrash. You can use the following command syntax to automatically remove the files residing in your system trash for x number of days:

$ autotrash -d [days]

For example, the following command will remove the files that have completed their 30 days in the trash can.

$ autotrash -d 30

Autotrash 30 days

This gives you enough time to restore any files that you might wish to, during 30 days.

The following usage of the command lets you apply this feature for not only your trashed files but also deleted files of all the users using the system:

$ autotrash -td [days]

Example:

$ autotrash -td 30

Example 2: Delete files based on free-space left

Max-free

You can only use autotrash to purge files if there is less than M megabytes of free space left at the trash location. As an example, if you set this to 1024, then autotrash will only start to work if there is less than 1GB of free space in the trash. Till that time, autotrash will just exit normally without scanning the Trash directory.

Example:

$ autotrash --max-free 1024 -d 30

Min-free

Similarly, you can use autotrash to make sure there is a minimum of M megabytes of free space.

Example:

$ autotrash --min-free 1024

You can even combine the two command to make sure that autotrash starts reading the trash if there is less than 2 GB of free space, and then keep a check on. The command will then remove files older than 30 days and also remove extra files to ensure that 1 GB of space is always available in the trash.

$ autotrash --max-free 2048 --min-free 1024 -d 30

Example 3: Delete M number of megabytes

You can use the utility to purge at least M number off megabytes, deleting oldest trash addition first. This feature uses trash entries rather than the individual files.This means that if your oldest trashed item is a 1GB directory, and you request at least 10MB to be removed (M=10), autotrash will remove 1GB.

$ autotrash –delete M

Example

$ autotrash --delete 1024

Now you do not need to worry about space wastage on your system because of the system trash The autotrash utility will automatically take care of clearing your unwanted files based on your defined criteria.

Source
Emacs git Integration – Linux Hint

How to use git in Emacs

Download and config

To get started using git in Emacs for version control, choose and install a chosen solution. In this article you will see the Magit mode. Many users have praised magit for it’s design. In fact, it has the power to teach you Git because it shows you the options when they are available. Later you will see this in action, for now let’s install it. The package is available from MELPA, though advanced users may download the source.

You can Download from MELPA or add use-package to have it installed by the setup script. To configure, the simplest is to add a global key-binding as per the below code.

(use-package magit
:config
(global-set-key (kbd “C-c m”) ‘magit-status))

The key-chord is up to you but most users have C-c m for magit, if C-c g for Git is more logical to you, go for it. You can add many more but the magit interface is so powerful you will probably want to use it as is.

Running magit

Once magit is installed, when you run it, it shows a nice menu to help you along. The best way to start is to write your first file in a directory that will be your repository. Emacs is brilliant here, in the sense that you can type the whole path of your file, including the file. Emacs will ask to create the directories for you. Magit is also smart in that if you have just a few files in a directory and you try to add files to a repository, it will ask if it should create a git repository. Answer ‘yes’ and magit will run git init in your directory.

After that is done, it is your turn to choose what you want to add to your repository. The most common is that you add all, since you created the directory for this purpose. Later on you will make sure to ignore some files. Now, to see some effects, you need to create new files and edit existing ones. Start by writing a README.md file. Put a few sentences in it so people know what the repository is for.

Staging

When you have some changes, they need to be prepared in git. This is called staging and makes it possible to check what is new before you commit it. In the magit interface, you have all files listed under a heading that reflects their current status. The sections will show depending on if you have any files there. The states are Unstaged, Staged, Commited, Unmerged, and Merged which shows the main stages for your files. The brilliance of magit shines through here; when you have opened the interface you can type ‘s’ to stage a file, ‘S’ to stage all files.

If you feel a little lost about what actions you have available, just hit ‘?’, the question mark. All commands and their respective key-bindings show up and you can choose accordingly. Staging happens on the current branch, this will be main if you just created the repository. In reality, you will usually work on a branch.

Branching

Branches are used to create new code while still allowing the main code to be downloaded and tested. When you want to create a new feature or fix a problem, you create a branch. In magit, you create branch from the interface by pressing ‘b’. After that you can choose ‘n’ to create but not start working on it’s code. The better and more common alternative is to choose ‘c’. When you have chosen the branch name, magit creates the branch and checks it for you. You are now changing the branch and can do your coding in piece.

Commit

A commit is when you put the latest update in the current branch. For the most of your time developing software, you will be working on a branch. You do this so you can test your own code on your own machine before you add it to the main tree. The rest of the team will see your code once you merge it. Which branch you merge it with will depend on the team you are working with and the task you have just solved.

In magit you reach the commit function by opening status and choosing ‘c’. You can choose a lot of options but most of the time you will just repeat ‘c’ again to commit for real. Note that magit will not allow a commit without a message, so you will be presented with a place to put your text and then you can commit with ‘C-c, C-c’.

Merge branches

When you have a nice branch that works the way you want, or looks good, you need to merge it with the main and then run tests. When that is done you need to push it to the remote repository. In magit, you have all this at your fingertips. It is easiest to checkout the branch you want to merge to before you merge. In the magit status window, you start by choosing merge, most times you will merge simply with the ‘m’ choice but you can also merge into.

Other options that are available includes to absorb, merge into and merge. The absorb is for when you have too many branches and you want to combine them into one. These options are something you need to work through a few times to see when it is appropriate to use them.

Remote

If you are using GitHub, you need to create your project on GitHub before you start. After the first file is on GitHub, you can do most things from Magit and Emacs. To clone any project of any git service, use M-x magit-clone. When you start it, you will be prompted to put in the remote repository. Paste in the URL, git or https both works well. Now you have the entire project stored locally and you can start changing it. To do this, you want to create a new branch. With magit, you start a new branch in the status screen by choosing ‘b’ and then ‘n’.

Choose where to start from and give a name to your new branch. Once the branch is created, you can change code, add files, remove files in the directory. Any changes you make to existing files will be tracked, new files you will have to add yourself.

Join existing projects

The most rewarding part of coding, especially in free and open source, is to contribute to other projects. This can also help you get a job as a developer, when potential employers see that you have contributed to a project, they know that you have experience. Many projects use Git for version control so with Magit in your toolkit you are golden. To contribute, you have a few things to do before you can get started. First, clone the repository. Second, make an upstream branch to work with. Another important thing to consider is how the project you are working with documents their code and commits. They usually have a style guide you need to consult before you commit. Now that you are prepared to contribute you need to create a branch, actually many branches. Let me clarify: you create a branch for each task, this is so that a pull request can be connected to i.e a trouble report. The branch naming is also important, each project has their own style. Where you branch from will also differ depending on the task. A patch will be a branch from the stable branch and new features will hang off the development branch. This way, the whole team can test in the right order. First, make the main branch stable, then add new features. Rinse and repeat.

Logging

When you feel that the code has steered of course, you will need to use the log. The git log will show the reference hash and the commit message by default, If the commit messages have been well written, this will be enough. However, many times they are not. For more advanced cases you can also view more information. You can choose to show the users, the branches and even get a graphical view of the branching. You also have the possibility to show the entire patch from the log, this will be a very long file though. The point is, you have many options to find what you are looking for.

Conclusion

Git has been around for a long time. Developed by Linus Torvalds it is made to work for really big projects while you have use of it from your very first project. When you start actual software projects, you will have to use some system to keep track of changes to the code. Git is one of the most common right now, so try it out.

Source
Linux Today – How to Restart Services on Ubuntu Command Line

Restarting a service is one of the administrative tasks that you will have to perform one time or the other while configuring software on your Ubuntu. In this article, we will explain how to restart a running service on your Ubuntu through the systemctl command. We will also explain some more service management systemctl commands that will help you further while working with services.

We have run the commands and procedures mentioned in this article on a Ubuntu 18.04 LTS system.

Restarting a Service with Systemctl

In this article, we will be using the Ubuntu command line, the Terminal, in order to explain how to restart a running service.

You can open the Terminal application on your Ubuntu either through the application launcher search bar or simply through the Ctrl+Alt+T shortcut.

The latest versions of Ubuntu use systemd to control and start services. To get a list of all enabled systemd units, run this command:

systemctl list-unit-files | grep enabled
Systemd Unit list

The list will help you in fetching the exact service name that you can later use to restart the service.

You can use the systemctl command in order to restart a service. This command is a relatively new tool that you can use to control systemd (init system) and services. This tool is the replacement of the sysV init manager. These days, most modern Linux distros have switched to systemd and thus systemctl.

Here is how you can use the systemctl command in order to restart a running service:

$ sudo systemctl restart [servicename]

For example, the following command can be used to restart the UFW( Uncomplicated Firewall) service on Ubuntu:

$ sudo systemctl restart ufw

Please note that you need to be an authorized user in order to manage system services.

Manage Services with Systemd

Not only you can restart services with systemctl, but you can also:

  • Check the status of a service

$ systemctl status [servicename]

  • Start a service

$ systemctl start [servicename]

  • Stop a service

$ systemctl stop [servicename]

  • Reload a service (reload service configuration)

$ systemctl reload [servicename]

  • Reload-or-restart a service (reloads a service/restarts if reload is not available)

$ sudo systemctl reload-or-restart [servicename]

  • Enable a service

$ systemctl enable [servicename]

  • Disable a service

$ systemctl disable [servicename]

  • Check if service is enabled/active

$ sudo systemctl is-active [servicename]

$ sudo systemctl is-enabled [servicename]

Through this simple, yet useful tool you can restart a service without having to restart your entire system. Not only that, you can perform more service management with the help of the command usage described in this article.

Source
MySQLDumper: A PHP and Perl Based MySQL Database Backup Tool

MySQL is one of the most popular database in the world. This database can be installed on the Microsoft Windows platform besides of Linux platform. Why this database is so popular? It may caused by its powerful feature and its free to use. As a database administrator, a database backup is really crucial to maintain the availability of the data. It will minimize the risk if something happens to our database.

Install MySQLDumper in Linux

Install MySQLDumper in Linux

Since MySQL is a popular database, there are many software that we can use to backup it. From the console mode to the web based software. Now we will give you a look of MySQLDumper as a tool for backup MySQL Database.

What is MySQLDumper?

MySQLDumper is a another open source web based tool for backing up MySQL databases. It built from PHP and Perl and can be easily dump and restore your MySQL data. It is especially suitable for shared hosting, where we don’t have access to Linux shell.
MySQLDumper Features

There are a lot of MySQLDumper features, but here are some features that may interest you.

  1. Easy installation; just make sure that you have a working web server and point your browser to MySQLDumper installation file.
  2. All parameters is shown before the backup is started; so you are sure what you are doing.
  3. Database-Overview; look at running processes/
  4. SQL-Browser: Access to your MySQL-Tables, delete tables, edit or insert data.
  5. Two type of backup method, using PHP or Perl.
  6. Complete log files.
  7. Automatic file-deletion of your old backups.
  8. Create directory protection.

Installation of MySQLDumper in Linux

Installing MySQLDumper is so easy. First we can download MySQLDumper from the following link.

  1. Download MySQLDumper

At the time of writing this article, the latest version is 1.24. So, download latest version under your working web server directory (i.e. /var/www or /var/www/html). Once you have it, you can extract MySQLDumper1.24.4.zip.

$ unzip MySQLDumper1.24.4.zip

Then you will find a ‘msd1.24.4‘ folder. This folder contain all MySQLDumper files. The next step, you just need to point your browser to MySQLDumper installation file. The file is ‘msd1.24.4/install.php’. Here are the steps of super easy MySQLDumper.

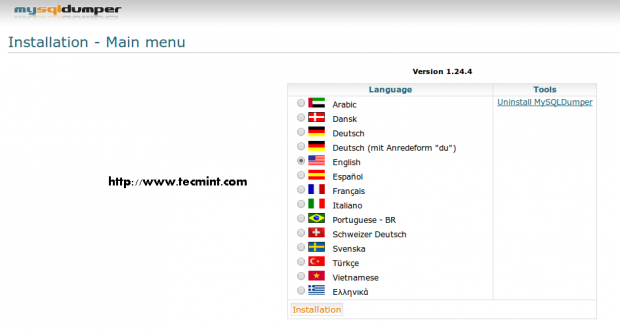
1. We need to choose installation Language.

Select Language

Select Language

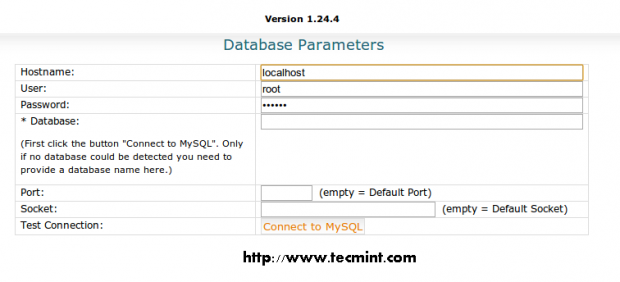
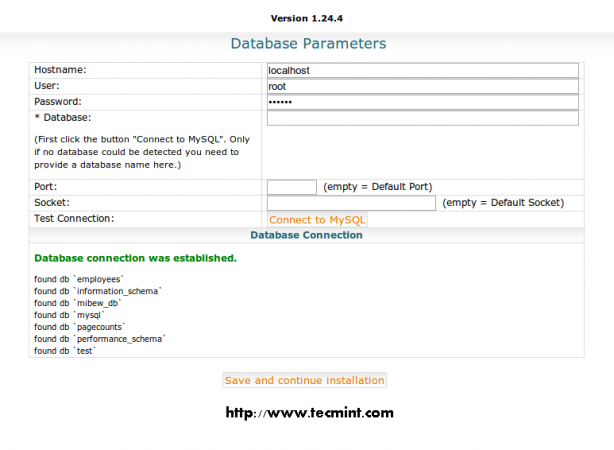
2. We need to fill some credentials such as hostname, user and MySQL password.

Database Parameters

Database Parameters

3. We can test the connection to the database by clicking Connect to MySQL button. If it succeed, then we will see a message saying that “Database connection was established”.

Test Database Connection

Test Database Connection

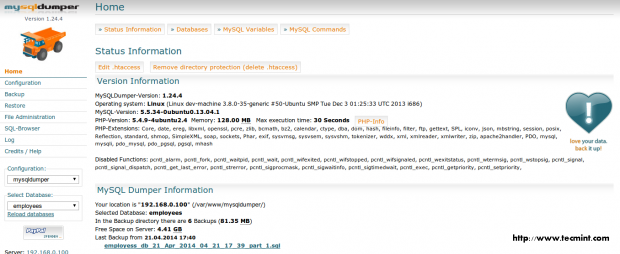
4. Once you got the message, click the ‘Save‘ and continue installation button. You will be taken into the home screen.

Home Screen

Home Screen

How to use MySQLDumper

As we can guess from its name, MySQLDumper main function is to backup your MySQL database. With this application, backup (and restore) MySQL database is very easy. Let’s start to take a look.

Backup Process using PHP

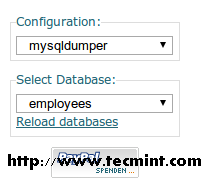
The function menu is located on the panel navigation on the left. First we need to select which database that we want to backup. We can see the option on the left menu.

Select Database

Select Database

In the screenshot above, we choose to backup a database named ‘employees‘.

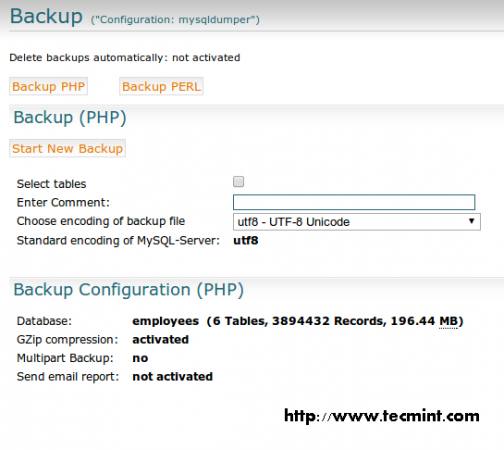
Then we can select ‘Backup‘ menu on the left. Then choose ‘Backup PHP‘ on the top area. We will have a screen like this.

Select Backup PHP

Select Backup PHP

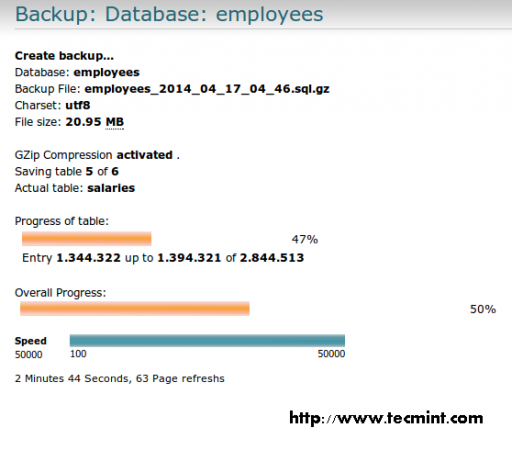
Then click on ‘Start New Backup‘. A progress of backup activity will show to you.

Database Backup Progress

Database Backup Progress

Once backup progress is finish, we can see the notification.

Backup Done

Backup Done

Backup Process using Perl

Another backup method that is supported by MySQLDumper is ‘Backup Perl’. With this method, we will use Perl as the backup engine.

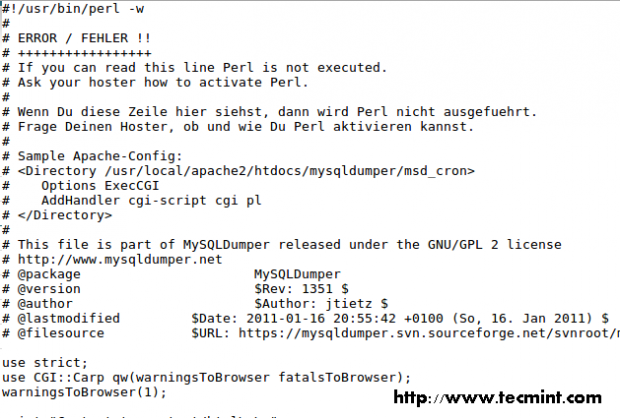
Please notice that your web server must support ‘Perl/CGI‘ script before running this backup method. Otherwise, you will see an error like this when you click on Test Perl button.

Test Perl Support

Test Perl Support

Same with PHP backup method, we need to select which database that we want to backup. Then choose Backup menu from the left navigation panel. Then click Backup Perl button.

Select Backup Perl

Select Backup Perl

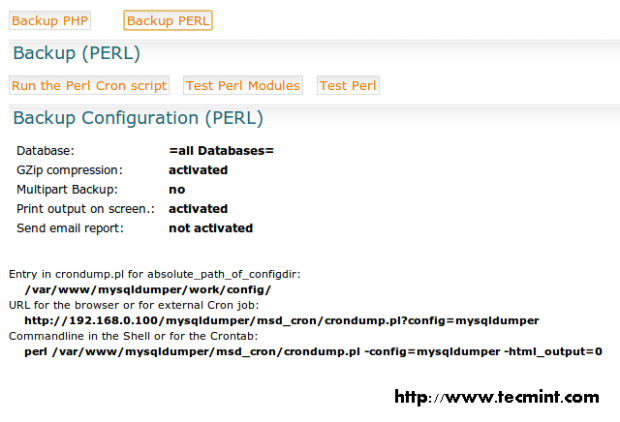
MySQLDumper will show you some active parameters on the bottom area. Then we can click ‘Run the Perl Cron‘ script button. Using this method, we will not see any progress bar appear. The duration of this backup process will be depend on the database which we are going to backup. If no error, then we will see a notification like this.

Perl CronDump Details

Perl CronDump Details

Restore Process

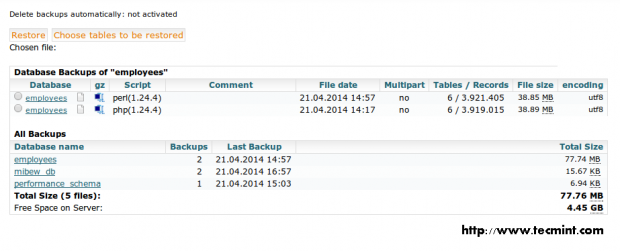
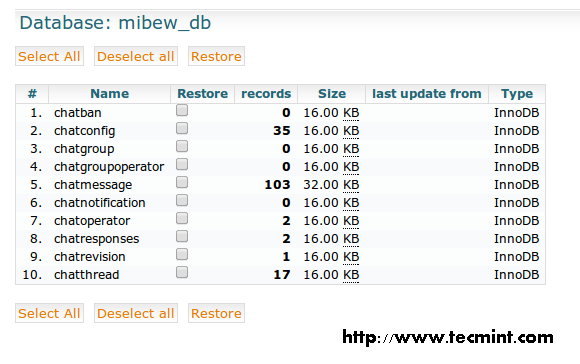
Restoring a backup is also easy using MySQLDumper. You can click on ‘Restore‘ menu from the navigation panel in the left. Unlike Backup activity, all backups are available at the bottom area of restore page.

Restore Database Backup

Restore Database Backup

When we need to select a backup, we can choose from there. At the above area is the selected backup which are ready to restore. If you want to do full restore, then click on the ‘Restore‘ button above. While if you want to restore some tables only, click on the ‘Choose tables‘ to be restored above.

Restore Database Tables

Restore Database Tables

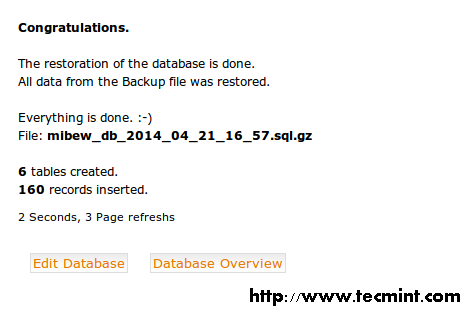
Once it done, click ‘Restore‘. Just wait for a moment to complete the restore progress.

Restore Progress

Restore Progress

Create a Directory Protection

By default, the home page of MySQLDumper can be accessed by anyone who know its URL. Using Directory Protection, we can create a this home screen protected by password. This Directory Protection utilizes ‘.htaccess‘ function on Apache web server.

To create it, just click Create directory protection button on the home screen.

Protect MySQLDumper

Protect MySQLDumper

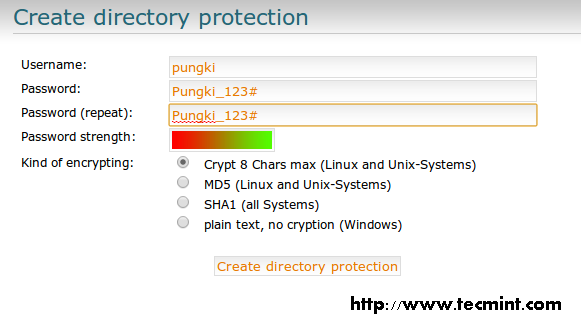
Then you will ask to provide some credential.

Enter Login Credentials

Enter Login Credentials

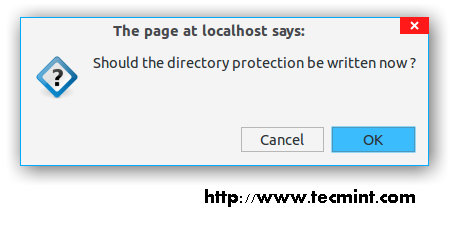
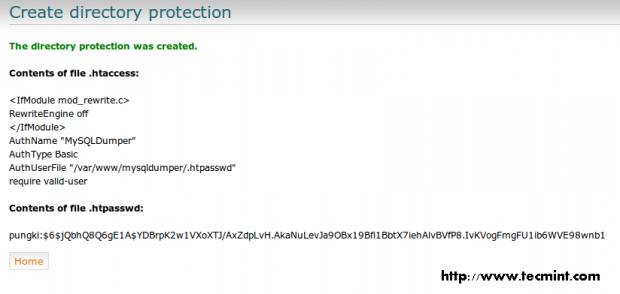
Once you finish with that, click Create directory protection button. After that, you will have a confirmation page about it.

Protect Confirmation

Protect Confirmation

If there is no error, a success message will be displayed.

Protection Success

Protection Success

Next time you visit the page, MySQLDumper will ask you a password before you see its home screen.

Enter Password

Enter Password

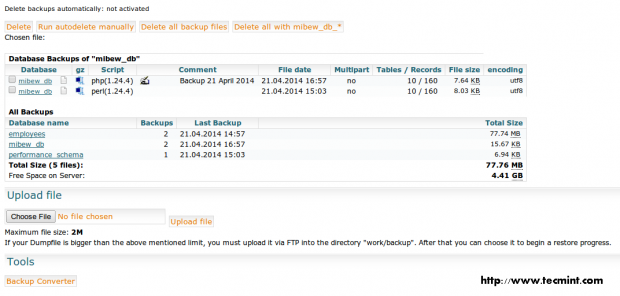
File Administration

This menu is used to maintain all available backups and restore.

All Database Backups

All Database Backups

Here are some activity that can be done in this page.

  1. Delete backup(s) ; use the Delete buttons at the top area.
  2. Download backup(s) ; click the backup name.
  3. Select backup(s) ; click the Database name in the All Backups area.
  4. Upload a big backup(s) to be restored.
  5. Convert database into MySQLDumper (MSD) format.

Note: When we tried to convert database without using any compression, we found that MySQLDumper create a database with ‘part_1.sql’ name. The size is smaller than the original source.

SQL-Browser

If you want to run specific SQL command, you can do it in this SQL-Browser page. But please you should know what you are doing.

SQL Browser

SQL Browser

Configuration

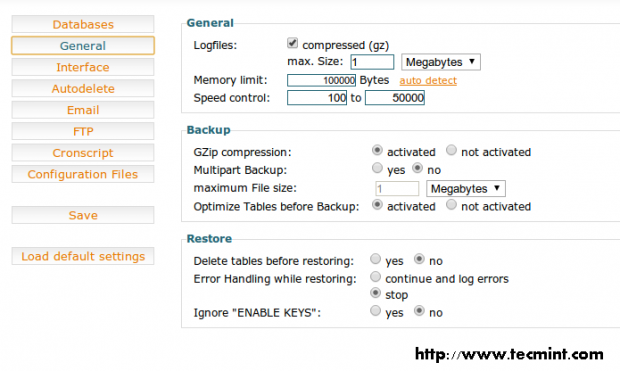
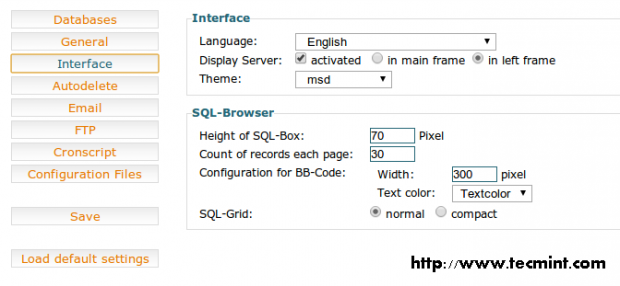
All function above can be configured from Configuration menu. Here are some sections that we can configure.

General

General Configuration

General Configuration

Interface

Interface Configuration

Interface Configuration

Autodelete

Autodelete Details

Autodelete Details

Email

Email Notification

Email Notification

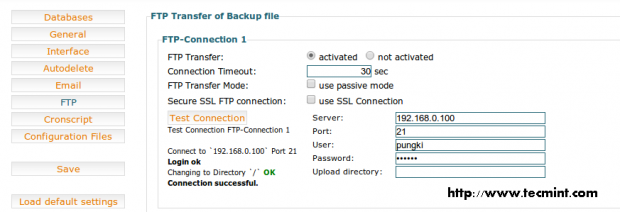
FTP

FTP Backup Transfer

FTP Backup Transfer

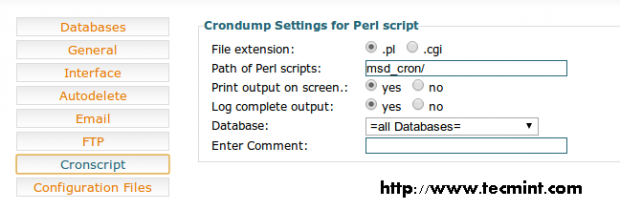
Cronscript

Crondump Settings

Crondump Settings

Log Management

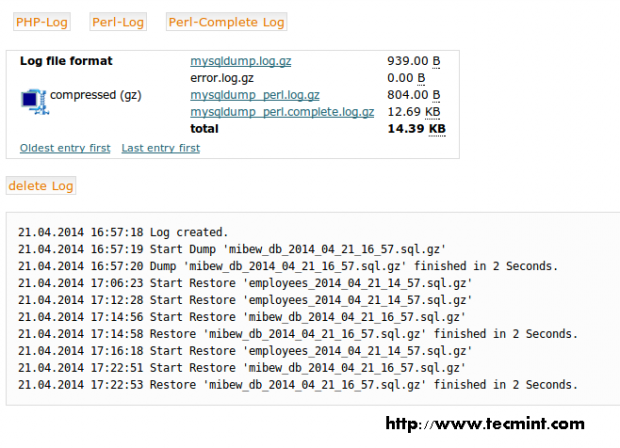
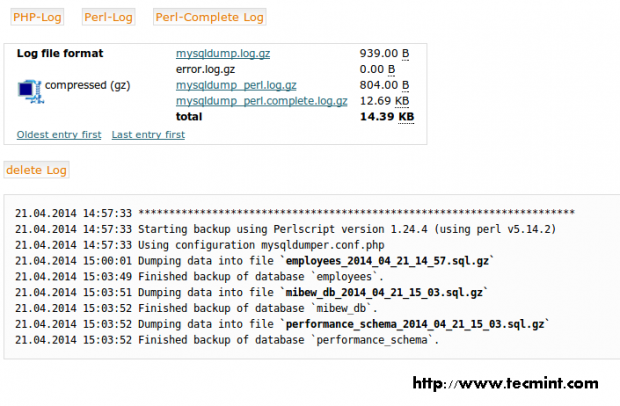
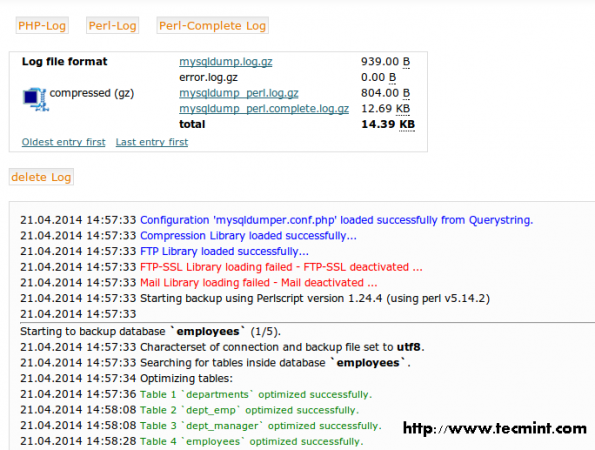
MySQLDumper also provide basic logs for us. So we can know when the backup-restore activity occurred. To access log page, just click ‘Log’ menu from the navigation panel on the left.

There are 3 kind of logs. PHP-LogPerl-Log and Perl-Complete Log.

PHP Log

PHP Log

Perl Log

Perl Log

Perl Complete Log

Perl Complete Log

Conclusion

MySQLDumper may not the best backup tool for MySQL. But with the ease of use of this application, people may start using this application. Unfortunately, I found that MySQLDumper is not equipped with offline documentation. But still, it is a great alternative tool for backup MySQL database.

http://www.mysqldumper.net/

Source

20 MySQL (Mysqladmin) Commands for Database Administration in Linux

mysqladmin is a command-line utility the comes with MySQL server and it is used by Database Administratorsto perform some basic MySQL tasks easily such as setting root password, changing root password, monitoring mysql processes, reloading privileges, checking server status etc.

In this article we’ve compiled some very useful ‘mysqladmin‘ commands that are used by system/database administrators in their day-to-day work. You must have MySQL server installed on your system to perform these tasks.

mysqladmin commands

20 mysqladmin commands examples

If you don’t have MySQL server installed or you are using older version of MySQL server, then we recommend you all to install or update your version by following our below article.

  1. Installation of MySQL 5.5.28 Server on RHEL/CentOS/Fedora

1. How to set MySQL Root password?

If you have fresh installation of MySQL server, then it doesn’t required any password to connect it as root user. To set MySQL password for root user, use the following command.

# mysqladmin -u root password YOURNEWPASSWORD

2. How to Change MySQL Root password?

If you would like to change or update MySQL root password, then you need to type the following command. For example, say your old password is 123456 and you want to change it with new password say xyz123.

mysqladmin -u root -p123456 password 'xyz123'

3. How to check MySQL Server is running?

To find out whether MySQL server is up and running, use the following command.

# mysqladmin -u root -p ping

Enter password:
mysqld is alive

4. How to Check which MySQL version I am running?

The following command shows MySQL version along with the current running status .

# mysqladmin -u root -p version

Enter password:
mysqladmin  Ver 8.42 Distrib 5.5.28, for Linux on i686
Copyright (c) 2000, 2012, Oracle and/or its affiliates. All rights reserved.

Oracle is a registered trademark of Oracle Corporation and/or its
affiliates. Other names may be trademarks of their respective
owners.

Server version          5.5.28
Protocol version        10
Connection              Localhost via UNIX socket
UNIX socket             /var/lib/mysql/mysql.sock
Uptime:                 7 days 14 min 45 sec

Threads: 2  Questions: 36002  Slow queries: 0  Opens: 15  Flush tables: 1  Open tables: 8  Queries per second avg: 0.059

5. How to Find out current Status of MySQL server?

To find out current status of MySQL server, use the following command. The mysqladmin command shows the status of uptime with running threads and queries.

# mysqladmin -u root -ptmppassword status

Enter password:
Uptime: 606704  Threads: 2  Questions: 36003  Slow queries: 0  Opens: 15  Flush tables: 1  Open tables: 8  Queries per second avg: 0.059

6. How to check status of all MySQL Server Variable’s and value’s?

To check all the running status of MySQL server variables and values, type the following command. The output would be similar to below.

# mysqladmin -u root -p extended-status

Enter password:
+------------------------------------------+-------------+
| Variable_name                            | Value       |
+------------------------------------------+-------------+
| Aborted_clients                          | 3           |
| Aborted_connects                         | 3           |
| Binlog_cache_disk_use                    | 0           |
| Binlog_cache_use                         | 0           |
| Binlog_stmt_cache_disk_use               | 0           |
| Binlog_stmt_cache_use                    | 0           |
| Bytes_received                           | 6400357     |
| Bytes_sent                               | 2610105     |
| Com_admin_commands                       | 3           |
| Com_assign_to_keycache                   | 0           |
| Com_alter_db                             | 0           |
| Com_alter_db_upgrade                     | 0           |
| Com_alter_event                          | 0           |
| Com_alter_function                       | 0           |
| Com_alter_procedure                      | 0           |
| Com_alter_server                         | 0           |
| Com_alter_table                          | 0           |
| Com_alter_tablespace                     | 0           |
+------------------------------------------+-------------+

7. How to see all MySQL server Variables and Values?
To see all the running variables and values of MySQL server, use the command as follows.

# mysqladmin  -u root -p variables

Enter password:
+---------------------------------------------------+----------------------------------------------+
| Variable_name                                     | Value                                        |
+---------------------------------------------------+----------------------------------------------+
| auto_increment_increment                          | 1                                            |
| auto_increment_offset                             | 1                                            |
| autocommit                                        | ON                                           |
| automatic_sp_privileges                           | ON                                           |
| back_log                                          | 50                                           |
| basedir                                           | /usr                                         |
| big_tables                                        | OFF                                          |
| binlog_cache_size                                 | 32768                                        |
| binlog_direct_non_transactional_updates           | OFF                                          |
| binlog_format                                     | STATEMENT                                    |
| binlog_stmt_cache_size                            | 32768                                        |
| bulk_insert_buffer_size                           | 8388608                                      |
| character_set_client                              | latin1                                       |
| character_set_connection                          | latin1                                       |
| character_set_database                            | latin1                                       |
| character_set_filesystem                          | binary                                       |
| character_set_results                             | latin1                                       |
| character_set_server                              | latin1                                       |
| character_set_system                              | utf8                                         |
| character_sets_dir                                | /usr/share/mysql/charsets/                   |
| collation_connection                              | latin1_swedish_ci                            |
+---------------------------------------------------+----------------------------------------------+

8. How to check all the running Process of MySQL server?

The following command will display all the running process of MySQL database queries.

# mysqladmin -u root -p processlist

Enter password:
+-------+---------+-----------------+---------+---------+------+-------+------------------+
| Id    | User    | Host            | db      | Command | Time | State | Info             |
+-------+---------+-----------------+---------+---------+------+-------+------------------+
| 18001 | rsyslog | localhost:38307 | rsyslog | Sleep   | 5590 |       |                  |
| 18020 | root    | localhost       |         | Query   | 0    |       | show processlist |
+-------+---------+-----------------+---------+---------+------+-------+------------------+

9. How to create a Database in MySQL server?

To create a new database in MySQL server, use the command as shown below.

# mysqladmin -u root -p create databasename

Enter password:
# mysql -u root -p

Enter password:
Welcome to the MySQL monitor.  Commands end with ; or \g.
Your MySQL connection id is 18027
Server version: 5.5.28 MySQL Community Server (GPL) by Remi

Copyright (c) 2000, 2012, Oracle and/or its affiliates. All rights reserved.

Oracle is a registered trademark of Oracle Corporation and/or its
affiliates. Other names may be trademarks of their respective
owners.

Type 'help;' or '\h' for help. Type '\c' to clear the current input statement.

mysql> show databases;
+--------------------+
| Database           |
+--------------------+
| information_schema |
| databasename       |
| mysql              |
| test               |
+--------------------+
8 rows in set (0.01 sec)

mysql>

10. How to drop a Database in MySQL server?

To drop a Database in MySQL server, use the following command. You will be asked to confirm press ‘y‘.

# mysqladmin -u root -p drop databasename

Enter password:
Dropping the database is potentially a very bad thing to do.
Any data stored in the database will be destroyed.

Do you really want to drop the 'databasename' database [y/N] y
Database "databasename" dropped

11. How to reload/refresh MySQL Privileges?

The reload command tells the server to reload the grant tables. The refresh command flushes all tables and reopens the log files.

# mysqladmin -u root -p reload;
# mysqladmin -u root -p refresh

12. How to shutdown MySQL server Safely?

To shutdown MySQL server safely, type the following command.

mysqladmin -u root -p shutdown

Enter password:

You can also use the following commands to start/stop MySQL server.

# /etc/init.d/mysqld stop
# /etc/init.d/mysqld start

13. Some useful MySQL Flush commands

Following are some useful flush commands with their description.

  1. flush-hosts: Flush all host information from host cache.
  2. flush-tables: Flush all tables.
  3. flush-threads: Flush all threads cache.
  4. flush-logs: Flush all information logs.
  5. flush-privileges: Reload the grant tables (same as reload).
  6. flush-status: Clear status variables.
# mysqladmin -u root -p flush-hosts
# mysqladmin -u root -p flush-tables
# mysqladmin -u root -p flush-threads
# mysqladmin -u root -p flush-logs
# mysqladmin -u root -p flush-privileges
# mysqladmin -u root -p flush-status

14. How to kill Sleeping MySQL Client Process?

Use the following command to identify sleeping MySQL client process.

# mysqladmin -u root -p processlist

Enter password:
+----+------+-----------+----+---------+------+-------+------------------+
| Id | User | Host      | db | Command | Time | State | Info             |
+----+------+-----------+----+---------+------+-------+------------------+
| 5  | root | localhost |    | Sleep   | 14   |       |					 |
| 8  | root | localhost |    | Query   | 0    |       | show processlist |
+----+------+-----------+----+---------+------+-------+------------------+

Now, run the following command with kill and process ID as shown below.

# mysqladmin -u root -p kill 5

Enter password:
+----+------+-----------+----+---------+------+-------+------------------+
| Id | User | Host      | db | Command | Time | State | Info             |
+----+------+-----------+----+---------+------+-------+------------------+
| 12 | root | localhost |    | Query   | 0    |       | show processlist |
+----+------+-----------+----+---------+------+-------+------------------+

If you like to kill multiple process, then pass the process ID‘s with comma separated as shown below.

# mysqladmin -u root -p kill 5,10

15. How to run multiple mysqladmin commands together?

If you would like to execute multiple ‘mysqladmin‘ commands together, then the command would be like this.

# mysqladmin  -u root -p processlist status version

Enter password:
+----+------+-----------+----+---------+------+-------+------------------+
| Id | User | Host      | db | Command | Time | State | Info             |
+----+------+-----------+----+---------+------+-------+------------------+
| 8  | root | localhost |    | Query   | 0    |       | show processlist |
+----+------+-----------+----+---------+------+-------+------------------+
Uptime: 3801  Threads: 1  Questions: 15  Slow queries: 0  Opens: 15  Flush tables: 1  Open tables: 8  Queries per second avg: 0.003
mysqladmin  Ver 8.42 Distrib 5.5.28, for Linux on i686
Copyright (c) 2000, 2012, Oracle and/or its affiliates. All rights reserved.

Oracle is a registered trademark of Oracle Corporation and/or its
affiliates. Other names may be trademarks of their respective
owners.

Server version          5.5.28
Protocol version        10
Connection              Localhost via UNIX socket
UNIX socket             /var/lib/mysql/mysql.sock
Uptime:                 1 hour 3 min 21 sec

Threads: 1  Questions: 15  Slow queries: 0  Opens: 15  Flush tables: 1  Open tables: 8  Queries per second avg: 0.003

16. How to Connect remote mysql server

To connect remote MySQL server, use the -h (host)  with IP Address of remote machine.

# mysqladmin  -h 172.16.25.126 -u root -p

17. How to execute command on remote MySQL server

Let’s say you would like to see the status of remote MySQL server, then the command would be.

# mysqladmin  -h 172.16.25.126 -u root -p status

18. How to start/stop MySQL replication on a slave server?

To start/stop MySQL replication on salve server, use the following commands.

# mysqladmin  -u root -p start-slave
# mysqladmin  -u root -p stop-slave

19. How to store MySQL server Debug Information to logs?

It tells the server to write debug information about locks in use, used memory and query usage to the MySQL log file including information about event scheduler.

# mysqladmin  -u root -p debug

Enter password:

20. How to view mysqladmin options and usage

To find out more options and usage of myslqadmin command use the help command as shown below. It will display a list of available options.

# mysqladmin --help

We have tried our best to include almost all of ‘mysqladmin‘ commands with their examples in this article, If still, we’ve missed anything, please do let us know via comments and don’t forget to share with your friends.

Source

WP2Social Auto Publish Powered By : XYZScripts.com