Steam Play versus Linux Version, a little performance comparison and more thoughts

Now that Steam has the ability officially to override a Linux game and run it through Steam Play instead, let’s take a quick look at some differences in performance.

Before I begin, let’s make something clear. I absolutely value the effort developers put into Linux games, I do think cross-platform development is incredibly important so we don’t end up with more lock-in. However, let’s be realistic for a moment. Technology moves on and it’s not financially worth it to keep updating old games, they just don’t sell as well as newer games (with exceptions of course). The intention with such comparisons is not to favour any developer or any method of gaming on Linux. It’s just to show what’s possible, what the differences are, what doesn’t work and so on. As the years go on, there will be more ways to run older games better and better, of that I’ve no doubt.

I’m not a zealot for any one particular method of gaming either and as a fan of all things gaming, software and technology, I thought it might be interesting and hopefully you do too.

Note: All tests done at 1080p on Ubuntu 18.10, with the NVIDIA 415.25 driver and my 980ti.

First up, let’s take a look at Tomb Raider (2013) which arrived on Linux back in 2016. Since Tomb Raider has a handy built-in benchmark tool, we will start off simply by showing the results:

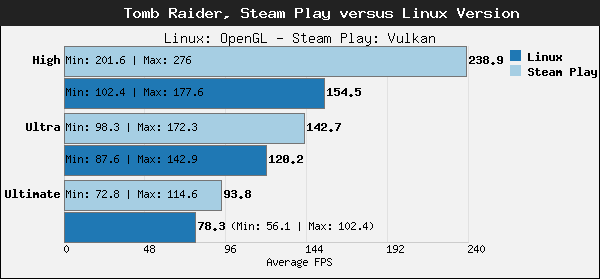
Benchmarks also only tell one part of the story. In the case of Tomb Raider, through Steam Play it needed to run through entirely at least once or there was quite a lot of stuttering which wasn’t the case in the Linux version. However, the Linux version has parts of the game where performance dives a lot and the Steam Play version is better there. To Feral Interactive’s credit (who ported it to Linux), their later ports are miles ahead of this.

Sidenote: For the videos, the titles “Steam Play” and “Linux” show their corresponding videos to the side, in case that wasn’t clear.

In the case of Cities: Skylines which released on Linux back in 2015 at the same time as the Windows version, testing out the “Benchmark” map from the Steam Workshop resulted in something I didn’t expect. The performance was very close but the Linux version was noticeably smoother with a couple of extra FPS.

Either way, a big city doesn’t perform well no matter how you do it. I should note here too, that even though the Linux versions performs slightly better it does eat up quite a bit more RAM.

Next up, MXGP3 a rather new Linux port from November 2018. Given how it’s quite new, I honestly would have thought it would do reasonably well. As noted in my previous article, the performance of the Linux version isn’t very good and Steam Play blows it out of the water.

Not a pretty picture, with the official Linux version struggling at times to even hit 30FPS it makes it difficult to control. It’s also not a very good game but that’s a different thing altogether…

Dying Light is up next, a personal favourite of mine. Also no benchmark mode I could find for the Linux version, so a comparison video keeping it as close as I could:

As you can see, both versions work quite well. I’ve completed the game more than once and I was actually happy enough with the performance of the Linux version, it was good enough and playable. However, the Steam Play version with Vulkan is at times around double the performance of the Linux version which is quite striking.

Next up, I tried Total War: WARHAMMER II. A Linux port from Feral Interactive released only in November last year. This would have been quite an exciting comparison, since the Linux version uses Vulkan. First issue encountered when trying it in Steam Play, is that it gives you a completely blank white launcher, so you need to opt into their new launcher beta which does work in Steam Play.

So you hit play on the fancy new launcher, guess what happens next? You get a brief moment of life, a glorious flash of black…and then it just quits to the desktop. Happens across both Proton 3.7 and 3.16. So, Total War: WARHAMMER II in Steam Play is a dud whereas the actual Linux version does work rather nicely.

The curious one is Rise of the Tomb Raider, I’ve been told this should work in Steam Play to do a comparison. However, it faced the same issue for me as Total War: WARHAMMER II. A black screen for a moment and then it quits on me. I have sent a log to the creator of DXVK for that, maybe it will help somewhere. Again, the Linux version from Feral works nicely.

The testing in this article was going to be longer, I had some grand plans for doing a lot of comparisons. However, Steam Play is still in beta and it has an uphill battle ahead of it. Rise of the Tomb Raider, Total War: WARHAMMER II, Civilization VI, Deus Ex: Mankind Divided and BioShock Infinite didn’t work at all in Steam Play across both Proton 3.16 and 3.7 but the Linux versions do work. Sad about not being able to test more, but it’s an example of how a supported release is the better option for certain games (especially multiplayer games like Darwin Project) and not the answer to everything as some claim. Great as an option but not quite ready for prime time overall, it will be fun to watch it evolve over this next year.

As I’ve said before though, with Steam Play it’s not just a case of squeezing out extra performance. It’s also a question of support and features of the Linux version (gamepad support, fullscreen issues, missing graphics options and so on). From a performance standpoint though, it shows clearly Linux can be a gaming platform that performs well.

The biggest question in my mind is: do you really get any true support with games you purchase to play in Steam Play? What exactly are you paying for? I don’t really have an answer for that. For a purchased game, the developer (you would think) would be focused on it and fix issues as they come up. With Steam Play though, it covers such a massive list you could end up waiting a while for a fix (if it’s possible at all). Thankfully, Valve has made a good step towards stopping Steam Play updates breaking games, since the latest Steam client beta no longer overrides the Proton version for a game in the whitelist.

I may do more tests in future, if readers want me to you will need to let me know what games you want to see tested (they have to have a benchmark mode in the Linux version). We still don’t have a decent amount of Linux games that actually do have a benchmark mode, so it does make such a thing rather tricky to get a lot of value out of it and comparison videos eat a huge amount of time for even the most basic rough editing.

If you wish to support GamingOnLinux, we have many options available see here.

Source

Linux Today – TLDR – Easy to Understand Man Pages for Every Linux User

One of the most commonly used and reliable ways of getting help under Unix-like systems is via man pages. Man pages are the standard documentation for every Unix-like system and they correspond to online manuals for programs, functions, libraries, system calls, formal standards and conventions, file formats and so on. However, man pages suffer from many failings one of which is they are too long and some people just don’t like to read too much text on the screen.

The TLDR (stands for “Too Long; Didn’t Read“. ) pages are summarized practical usage examples of commands on different operating systems including Linux. They simplify man pages by offering practical examples.

Read Also5 Useful Tools to Remember Linux Commands Forever

TLDR is an Internet slang, meaning a post, article, comment or anything such as a manual page was too long, and whoever used the phrase didn’t read it for that reason. The content of TLDR pages is openly available under the permissive MIT License.

In this short article, we will show how to install and use TLDR pages in Linux.

Requirements

  1. Install Latest Nodejs and NPM Version in Linux Systems

Before installing, you can try the live demo of TLDR.

How to Install TLDR Pages in Linux Systems

To conveniently access TLDR pages, you need to install one of the supported clients called Node.js, which is the original client for the tldr-pages project. We can install it from NPM by running.

$ sudo npm install -g tldr

TLDR also available as a Snap package, to install it, run.

$ sudo snap install tldr

After installing the TLDR client, you can view man pages of any command, for example tar command here (you can use any other command here):

$ tldr tar
View Tar Command Man Page

View Tar Command Man Page

Here is another example of accessing the summarized man page for ls command.

$ tldr ls
View ls Command Man Page

View ls Command Man Page

To list all commands for the chosen platform in the cache, use the -l flag.

$ tldr -l 
List All Linux Commands

List All Linux Commands

To list all supported commands in the cache, use the -a flag.

$ tldr -a

You can update or clear the local cache by running.

$ tldr -u	#update local cache 
OR
$ tldr -c 	#clear local cache 

To search pages using keywords, use the -s options, for example.

$ tldr -s  "list of all files, sorted by modification date"
Search Linux Commands Using Keyword

Search Linux Commands Using Keyword

To change the color theme (simple, base16, ocean), use the -t flag.

$ tldr -t ocean

You can also show a random command, with the -r flag.

$ tldr -r   
View Man Page for Random Linux Command

View Man Page for Random Linux Command

You can see a complete list of supported options by running.

$ tldr -h

Note: You can find a list of all supported and dedicated client applications for different platforms, in the TLDR clients wiki page.

TLDR Project Homepagehttps://tldr.sh/

That’s all for now! The TLDR pages are summarized practical examples of commands provided by the community. In this short article, we’ve showed how to install and use TLDR pages in Linux. Use the feedback form to share your thoughts about TLDR or share with us any similar programs out there.

Source

Download Beyond Compare Linux 4.2.9

Beyond Compare iconA powerful and cross-platform, yet commercial application for file and folder comparison and synchronization

Beyond Compare is a commercial, cross-platform and full featured graphical software that provides a file compare and directory synchronization utility for GNU/Linux, Microsoft Windows and Mac OS X operating systems.

Quickly compare any types of files

The software has been designed to allow users to easily and quickly compare any type of files, including text documents, images, MP3s, HEX data, or entire drives. It even supports folder comparison operations and can compare Adobe PDF (.pdf) and Microsoft Word (.doc) files.

Features powerful commands

Beyond Compare features powerful commands that allow you to ignore the differences you’re not interesting in and focus only on the ones you really want to view, merge changes, generate reports, as well as to synchronize your files across multiple devices.

Compare entire drives

With Beyond Compare, you will be able to quickly compare entire drives, directories and folders, check modified times and file sizes, integrate zip archives and FTP sites seamlessly, as well as to use byte-by-byte comparisons.

It is an intelligent application

Beyond Compare is an intelligent application that will automatically choose the best way to compare files and folders, displaying the results in the format you want. It allows you to view and edit text files with syntax highlighting, using comparison rules that have been created specifically for documents, HTML and source code.

Supports a wide range of Linux distributions

Beyond Compare supports a wide range of Linux distributions, including Red Hat Enterprise Linux, Ubuntu, Fedora, SUSE Linux Enterprise Server, openSUSE, Debian GNU/Linux, Mageia, Linux Mint, and any other DEB- or RPM-based operating system.

Runs on 32-bit and 64-bit platforms

Both 32-bit and 64-bit architectures are supported, but keep in mind that the latter requires 32-bit compatibility libraries, which will be installed automatically if you use the default package manager of your Linux distribution.

Source

How to keep a Debian Network installation up-to-date – Linux Hint

The Linux distribution Debian GNU/Linux [1] is made available as different CD/DVD ISO images. These images are prepared to fit to the needs of different interests and usage cases — desktop environment, server, or mobile devices. At present, the following image variants are offered from the website of the Debian project and the according mirror network:

  • a full set of CD/DVD images that contains all the available packages[2]
  • a single CD/DVD image with a selection of packages that are tailor-made for a specific desktop environment — GNOME [3], XFCE [4], and for the commandline, only.
  • a smaller CD image for network-based installation [5]
  • a tiny CD image for network-based installation [5]
  • a live CD/DVD [6] in order to test Debian GNU/Linux before installing it
  • a cloud image [7]

Downloading the right image file depends on your internet connection (bandwidth), which combination of packages fits your needs, and your level of experience in order to setup and maintain your installation. All the images are available from the mirror network behind the website of the Debian project [8].

What is Debian Netinstall?

As already briefly discussed above a Netinstall image is a smaller CD/DVD image with a size between 150Mb and 300Mb. The actual image size depends on the processor architecture used on your system. Solely, the image contains the setup routines (called Debian Installer) for both text-only and graphical installation as well as the software packages in order to setup a very basic but working Debian GNU/Linux installation. In contrast, the tiny image with a size of about 120Mb contains the Debian Installer, and the network configuration, only.

During the setup, the Debian Installer will ask you which Apt repository you would like to use. An Apt repository is a place that provides the Debian software packages. The tools for package management will retrieve the selected software packages from this location, and install them locally on your system. In this case as an Apt repository we do not use the CD/DVD but a so-called package mirror. This package mirror is a server that is connected to the internet, and that is why internet access is required during the setting up of your system. Furthermore, installing new software or updating existing software packages needs to meet the same technical requirements as above — the packages are retrieved from the same Apt repository too.

Choosing the desired package mirror in Debian GNU/Linux 9

Apt Repositories

The address of the chosen Apt repository is stored in the file /etc/apt/sources.list. In general, this is a text file and contains several entries. According to the previously chosen package mirror it looks as follows:

deb http://ftp.us.debian.org/debian/ stretch main contrib
deb-src http://ftp.us.debian.org/debian/ stretch main contrib

deb http://security.debian.org/ stretch/updates main contrib
deb-src http://security.debian.org/ stretch/updates main contrib

# stretch-updates, previously known as ‘volatile’
deb http://ftp.us.debian.org/debian/ stretch-updates main contrib

The first group of lines refers to regular software packages, the second group to the according security updates, and the third group to software updates for these packages. Each line refers to Debian packages (a line starting with deb), or Debian source packages (a line starting with deb-src). Source packages are of interest for you in case you would like to download the source code of the software you use.

The Debian GNU/Linux release is either specified by the alias name of the release — here it is Stretch from Toy Story [9] –, or its release state, for example stable, testing, or unstable. At the end of each line, main and contrib reflect the chosen package categories. The keyword main refers to free software, contrib refers to free software that depends on non-free software, and non-free indicates software packages that do not meet the Debian Free Software Guidelines (DFSG)[10].

Finding the right package mirror

Up until now our setup is based on static entries, only, that are not intended to change. This works well for computers that are kept mostly at the same place during their entire usage.

As of a Debian network installation, the right package mirror plays an important role. When choosing a package mirror take the following criteria into account:

  • your network connection
  • your geographic location
  • the desired availability of the package mirror
  • reliability

Experiences from managing Linux systems for the last decade show, that chosing a primary package mirror in the same country as the system works best. Such a package mirror should be network-wise nearby, and provide software packages for all the architectures we need. Reliability refers to the person, institute, or company that is responsible for the package mirror we retrieve software from.

A rather dynamic setup can be helpful for mobile devices such as laptops and notebooks. The two commands netselect [11] and netselect-apt [12] come into play. netselect simply expects a list of package mirrors, and validates them regarding availability, ping time as well as the packet loss between the package mirror and your system. The example below demonstrates this for five different mirrors. The last line of the output contains the result — the recommended package mirror is ftp.debian.org.

# netselect -vv ftp.debian.org http.us.debian.org ftp.at.debian.org download.unesp.br
ftp.debian.org.br netselect: unknown host ftp.debian.org.br
Running netselect to choose 1 out of 8 addresses.
………………………………………………………
128.61.240.89 141 ms 8 hops 88% ok ( 8/ 9) [ 284]
ftp.debian.org 41 ms 8 hops 100% ok (10/10) [ 73]
128.30.2.36 118 ms 19 hops 100% ok (10/10) [ 342]
64.50.233.100 112 ms 14 hops 66% ok ( 2/ 3) [ 403]
64.50.236.52 133 ms 15 hops 100% ok (10/10) [ 332]
ftp.at.debian.org 47 ms 13 hops 100% ok (10/10) [ 108]
download.unesp.br 314 ms 10 hops 75% ok ( 3/ 4) [ 836]
ftp.debian.org.br 9999 ms 30 hops 0% ok
73 ftp.debian.org
#

In contrast, netselect-apt uses netselect to find the best package mirror for your location. netselect-apt asks for the country (-c), the number of package mirrors (-t), the architecture (-a), and the release state (-n). The example below discovers the top-five package mirrors in France that offer stable packages for the amd64 architecture:

# netselect-apt -c france -t 5 -a amd64 -n stable
Using distribution stable.
Retrieving the list of mirrors from www.debian.org…

–2019-01-09 11:47:21— http://www.debian.org/mirror/mirrors_full
Aufl√∂sen des Hostnamen ¬ªwww.debian.org (www.debian.org)¬´… 130.89.148.14,
5.153.231.4, 2001:41c8:1000:21::21:4, …
Verbindungsaufbau zu www.debian.org (www.debian.org)|130.89.148.14|:80… verbunden.
HTTP-Anforderung gesendet, warte auf Antwort… 302 Found
Platz: https://www.debian.org/mirror/mirrors_full[folge]
–2019-01-09 11:47:22— https://www.debian.org/mirror/mirrors_full
Verbindungsaufbau zu www.debian.org (www.debian.org)|130.89.148.14|:443… verbunden.
HTTP-Anforderung gesendet, warte auf Antwort… 200 OK
L√§nge: 189770 (185K) [text/html]
In »»/tmp/netselect-apt.Kp2SNk«« speichern.

/tmp/netselect-apt.Kp2SNk 100%[==========================================>]
185,32K 1,19MB/in 0,2s

2019-01-09 11:47:22 (1,19 MB/s) – ¬ª¬ª/tmp/netselect-apt.Kp2SNk¬´¬´ gespeichert
[189770/189770

Choosing a main Debian mirror using netselect.
(will filter only for mirrors in country france)
netselect: 19 (19 active) nameserver request(s)
Duplicate address 212.27.32.66 (http://debian.proxad.net/debian/,
http://ftp.fr.debian.org/debian/); keeping only under first name.
Running netselect to choose 5 out of 18 addresses.
………………………………………………………………………….
The fastest 5 servers seem to be:

http://debian.proxad.net/debian/
http://debian.mirror.ate.info/
http://debian.mirrors.ovh.net/debian/
http://ftp.rezopole.net/debian/
http://mirror.plusserver.com/debian/debian/

Of the hosts tested we choose the fastest valid for HTTP:
http://debian.proxad.net/debian/

Writing sources.list.
Done.
#

The output is a file called sources.list that is stored in the directory you run the command from. Using the additional option “-o filename” you specify an output file with a name and path of your choice. Nevertheless, you can directly use the new file as a replacement for your original file /etc/apt/sources.list.

Software Strategy

Doing a setup from a smaller installation image gives you the opportunity to make decisions which software to use. We recommend to install what you need on your system, only. The less software packages are installed, the less updates have to be done. So far, this strategy works well for server, desktop systems, routers (specialized devices), and mobile devices.

Keeping your system up-to-date

Maintaining a system means taking care of your setup, and keeping it up-to-date. Install security patches and do software updates regularly, with the help of the package manager like apt.

Often the next step is forgotten — tidying up your system. This includes removing unused software packages, and cleaning the package cache that is located in /var/cache/apt/archives. In the first case the commands “apt autoremove”, “deborphan” [13] and “debfoster” [14] help — they detect unused packages, and let you specify which software shall be kept. Mostly, the removed packages belong to the categories library (lib and oldlib), or development (libdevel). The following example demonstrates this for the tool deborphan. The output columns represent the package size, the package category, the package name, and the package priority.

$ deborphan -Pzs
20 main/oldlibs mktemp extra
132 main/libs liblwres40 standard
172 main/libs libdvd0 optional

$

In order to remove the orphaned packages you can use the following command:

# apt remove $(deborphan)

#

Still, it will ask you to confirm before removal of the software packages. Next, cleaning the package cache needs to be done. You may either remove the files by “rm /var/cache/apt/archives/*.deb”), or use apt or apt-get as follows:

apt-get clean

Dealing with Release Changes

In contrast to other Linux distributions, Debian GNU/Linux does not have a fixed release cycle. A new release is available about every two years. Version 10 is expected to be published in mid-2019.

Updating your existing setup is comparable easy. Take the following thoughts into account and follow these steps:

  1. Read the documentation for the release change, the so-called Release Notes. They are available from the website of the Debian project, and also part of the image you have chosen before.
  2. Have your credentials for administrative actions at hand.
  3. Open a terminal, and run the next steps in a terminal multiplexer like screen [15] or tmux [16].
  4. Backup the most important data of your system, and validate the backup for being complete.
  5. Update your current package list using “apt-get update” or “apt update”.
  6. Check your system for orphans and unused software packages using deborphan, or “apt-get autoremove”. Unused packages do not need to be updated.
  7. Run the command “apt-get upgrade” to install the latest software updates.
  8. Edit the file /etc/apt/sources.list, and set the new distribution name, for example from Stretch to Buster.
  9. Update the package list using “apt update” or “apt-get update”.
  10. Start the release change by running “apt-get dist-upgrade”. All existing packages are updated.

The last step may take a while, but leads to a new Debian GNU/Linux system. It might be helpful to reboot the system once in order to start with a new Linux kernel.

Conclusion

Setting up a network-based installation, and keeping it alive is simple. Follow the recommendations we gave you in this article, and using your Linux system will be fun.

Links and References

* [1] Debian GNU/Linux, http://debian.org/
* [2] Debian on CDs/DVDs, https://www.debian.org/CD/index.en.html
* [3] GNOME, https://www.gnome.org/
* [4] XFCE, https://xfce.org/
* [5] Installing Debian via the Internet, https://www.debian.org/distrib/netinst.en.html
* [6] Debian Live install images, https://www.debian.org/CD/live/index.en.html
* [7] Debian Official Cloud Images, https://cloud.debian.org/images/cloud/
* [8] Debian mirror network, https://cdimage.debian.org/
* [9] Stretch at the Pixar Wiki, http://pixar.wikia.com/wiki/Stretch
* [10] Debian Free Software Guidelines (DFSG), https://wiki.debian.org/DFSGLicenses
* [11] netselect Debian package, https://packages.debian.org/stretch/netselect
* [12] netselect-apt Debian package, https://packages.debian.org/stretch/netselect-apt
* [13] deborphan Debian package, https://packages.debian.org/stretch/deborphan
* [14] debfoster Debian package, https://packages.debian.org/stretch/debfoster
* [15] screen, https://www.gnu.org/software/screen/
* [16] tmux, https://github.com/tmux/tmux/wiki

Source

Download SmartGit/Hg Linux 18.2.4

SmartGit/Hg iconAn easy-to-use and cross-platform Mercurial, Subversion and Git client software!

SmartGit/Hg is a free for non-commercial use software project, a web-based software repository client written in the Java programming language and designed to support the Git, Mercurial and Subversion distributed version control systems.

Features at a glance

With SmartGit/Hg you will have everything under control. The software can display repository-only directories and files, transactions, as well as annotated files. It is capable of performing various functions, including status, diff, log, push, pull, fetch, merge, cherry-pick merge, rebase, as well as stash, tag and branch management.

Additionally, it allows you to modify commits before pushing them, recover lost commits, as well as to commit individual lines within a file. It requires no additional tools and libraries, comes with a built-in SSH client (Secure Shell), a merge tool and a file compare tool.

It features a simple and user-friendly design

Focusing only on what’s really important, the SmartGit/Hg software features a simple and user-friendly design that will not bother users with stupid questions. It’s not a requirement to read a comprehensive manual in order to use this software.

Supports popular web services

Another interesting feature is the built-in support for a wide range of web services. This means that you can use SmartGit/Hg to clone from GitHub, Assembla, and many other hosting providers. In addition, you can review comments, as well as to create and resolve GitHub pull requests.

A cross-platform software supported on mainstream OSes

Being written in Java, SmartGit/Hg is a platform-independent application that runs on GNU/Linux, Microsoft Windows and Mac OS X operating systems. Ubuntu is the only officially supported Linux distributions, Both 32-bit and 64-bit architectures are supported at this time.

The best Git, Hg and SVN client

SmartGit/Hg is without no doubt the best Git, Hg and SVN client around. While it will help beginners to get things started in a quick and painless matter, it helps experts become more productive than ever before.

Source

Best 10 Git GUI Clients for Ubuntu – Linux Hint

I know most of the people reading this article are developers on Linux or Linux enthusiasts and don’t need any introduction to the Git. But for the noobs out there, Git is one of the most popular and most widely used version control systems available for software development and other similar kind of work. Basically Git is tool which can be managed and used through command line and it is one of the most easy to use command line version control tools available for Linux developers and users.With most of the developers nowadays using graphical tools for programming and development, there is no surprise they are also seeking for GUI tools which could prove to be efficient alternatives to Git command line tool. There are many Git GUI clients available for Linux and its distros like Ubuntu which offer most of the features of Git command line tool with more efficiency and reliability.

So today we’re going to have a look at best 10 Git GUI clients which you can install on Ubuntu and use them as version control tool for software development.

1. SmartGit

SmartGit is a cross-platform graphical Git client with seamless support for SVN, GitHub and Bitbucket. Apart from Windows and macOS, SmartGit can easily be used on Linux and its distros like Ubuntu. Good thing about SmartGit is it includes everything you need in one single package which includes graphical merge, commit history, Git-Flow, SSH-Client, file compare and file merge.

During the testing I have tried it for the first time and I have to admit that it doesn’t take me long to get used to it thanks to its simple and easy to use user interface.

SmartGit is a highly customizable graphical Git client with options at your hand such as set preferences for merging and rebasing, layout control, built-in Conflict Solver tool, keyboard shortcuts, toolbars, syntax coloring and you can choose between pair of light and dark themes.

Software developers will find this Git client very useful because it focuses on the difficulties faced by developers and tries to make workflow as simple as possible for developers.

SmartGit

2. Git Cola

Written in Python, Git Cola is completely free but very powerful graphical Git client for Ubuntu and other Linux distros. It is the one of the best and fast version control tools available out there for software developers. It is simple but powerful client with features like clone, merge, push, pull and many other useful features.

Git Cola is also a cross-platform graphical client for Git which supports Windows, macOS, Linux and its popular distros such as Ubuntu and LinuxMint. It is an open-source GUI client for Git and it is highly customizable Git client out there. I have tried few tweaks during testing and it has responded as expected.

You can customize its window settings, language settings and many other features to enhance the work experience and make it hassle free.

$ sudo apt-get install git-cola

3. GitEye

GitEye from CollabNet is an easy-to-use Git GUI client which comes bundled with some useful tools which helps you improve development productivity. It offers push-button cloning for repositories of GitHub, CloudForge and TeamForge.

GitEye offers seamless integration with other popular tools such as Bugzilla, Jira, Hudson, Jenkins and many others. GitEye has clean and very powerful graphical user interface which is very easy-to-use with everything placed perfectly so that user finds whatever he needs easily.

It comes bundled with integrated issue tracker client that works both in online and offline mode, also it is equipped with Gerrit Code Review that provides notifications if there is any change or update in code. Overall it is any all-rounder package and many developers find this Git client very useful.

GitEye

4. GitKraken

GitKraken is another graphical Git client which is powerful and reliable, which supports both Git and GitHub to work with. GitKraken ships-in with very modern looking user interface which is eye-catching and easy to navigate. I’ll recommend GitKraken to the developers who daily engage in tedious development workflow because it offers some really useful features that make this task quite easier and hassle free.

Some of the notable features in GitKraken are built-in code editor, split view, syntax highlighting and file minimap. It also offers seamless integration with popular Git hosting services such as GitHub, GitLab and BitBucket. If you opt for GitKraken Pro then you can connect GitHub Enterprise, GitLab Self-Hosted, BitBucket Server and Azure DevOps.

As compared to other Git clients, GitKraken has really fast and reliable workflow. Well that is what I have noticed during all the Git clients listed here in this article.

GitKraken

5. GitForce

GitForce is another cross-platform visual front-end to Git command line tool and it works on Windows and Linux and its distros like Ubuntu. It is very simple and easy to use but very powerful and reliable version control tool available for Ubuntu.

Written in C# and .NET 3.5 framework, the main objective of GitForce is to provide simple and easy-to-use graphical front-end to perform most common operations and software development tasks. Despite limited features, you can still rely on GitForce to perform task than getting engaged in Git command line tool.

Some of the features its offers are such as drag and drop, support for multiple repositories, scans local repositories easily and many basic features.

GitForce

6. Gitg

Gitg is a GNOME front-end for Git command line and it is a default graphical Git client on GNOME desktop environment. It offers many features such as staging, commit, open repository, clone repository and many more. It also enables GNOME shell integration which opens the way for various in app integrations and features for GNOME desktop users.

GNOMEs simple design doesn’t restrict Gitg from offering full-fledged features as it is one for the best Git GUI clients listed here. At first I have found its user interface quite confusing but once I got used to it, it was very satisfying experience.

Gitg

7. Giggle

Developed in 2007 as a part of hackathon, Giggle is free and easy to use Git GUI client which works exclusively on Linux and its various popular distributions. It is simple front-end tool which allows developers to browse and view there repositories in graphical interface.

It offers all the basic features you can expect in Git clients such as stag, commit, browse and many more. User interface is simple and you will get used to it in a fly.

$ sudo apt-get install giggle

8. UnGit

UnGit is not an application or client but it runs as a website in any web browser installed on your computer. It offers simple but very useful graphical user interface to replace Git command line tool. It comes with integration support for various plugins which enhance its workflow and performance.

UnGit can also be installed as a plugin in popular text editors such as Atom and Sublime Text.

$ sudo npm install –g ungit

9. Magit

Magit is a graphical interface for version control tool Git command line. It doesn’t offer separate interface but it is implemented as GNU Emacs package instead. It is not up to the ranks of various graphical Git clients listed here but it allows software developers to perform almost all the version control tasks within Emacs window.

Despite being a plugin it offers features you can expect in a separate application such as visualization, smooth workflow, rebasing and many more. It is a platform independent plugin and can be integrated with Emacs installed on Windows, macOS and Linux.

Magit

10. Egit

Just like Magit, Egit is a graphical Git version control plugin for Eclipse. It is implemented on the top JGit Java Implementation of Git. It is simple but very useful and reliable Git tool which offers all the basic features to accomplish almost all software development version control tasks.

Egit

So these are the best 10 Git GUI clients which are tested on Ubuntu 18.04 LTS and should work well on previous Ubuntu released too.

Source

Linux Today – ffsend: Secure File Share From The Command Line (Firefox Send Client)

ffsend: Secure File Share From The Command Line (Firefox Send Client)

ffsend command line Firefox Send client

ffsend is a command line Firefox Send client that’s currently in alpha, available for Linux, macOS and Windows (with only macOS and Linux binaries being available right now).

With ffsend you can easily and securely share files from the command line, by making use of a Send, a Firefox test pilot project.

Firefox Send is a file sharing experiment by Mozilla, which allows sending encrypted files to other users. ‘Send’ can be installed on your own server, or you can use the Mozilla-hosted send.firefox.com. The latter officially supports files up to 1 GB (but I could upload a 2GB file, as mentioned by the ffsend description), with each link expiring after a configurable download count (defaulting to 1 download) or 24 hours, while also deleting all the files from the Send server. Read more about the Send Firefox Test Pilot.

ffsend can both upload and download files, while the remote host can use either ffsend or a simple web browser (that doesn’t have to be Firefox) to download the file.

One could always use the send.firefox.com web interface to upload and download files, but ffsend is intended for usage in scripts, without interaction. You can also use it for a quick file upload or download that doesn’t require opening a web browser.

While ffsend uses client-side encryption, ensuring that all files are encrypted before they are uploaded to the remote host, anyone with the link can download the file, so make sure you don’t share it with unauthorized people. That’s because the encryption secret, which is used to decrypt the file when downloading it, is included in the share URL.

An extra level of protection is available – you can password protect the file by appending --password when uploading a file using ffsend, or by setting the password after a file was uploaded, by using ffsend password URL -p YOUR-PASSWORD.

ffsend features:

  • Upload and download files and directories. For directories, ffsend will offer to archive the contents before uploading it.
  • Can be used with send.firefox.com (this is the default) or with your own Send host
  • Client side encryption
  • Configurable download limits (allows the file to be downloaded between 1 and 20 times)
  • Password protection
  • Built-in archiving and extracting
  • History tracking of files for easy management
  • Inspect or delete shared files

Downloading and using ffsend

While ffsend supports Linux, macOS and Windows, there are only macOS and Linux binaries for download right now. For Debian, Ubuntu, Linux Mint and other DEB-based Linux distributions, all you have to do is download and install the ffsend DEB package.

On other Linux distributions, like Fedora, etc., you can download the generic binary. For 64bit (most users), download the ffsend binary ending in -linux-x64.tar.gz, extract it and install it somewhere in your $PATH, like /usr/local/bin. Let’s say you’ve extracted the .tar.gz in the current folder – in this case you can install the ffsend binary in /usr/local/bin using this command:

sudo install ffsend /usr/local/bin/

Now you can upload a file like this:

ffsend upload <file.ext>

Replace file.ext with the file you want to upload.

Want to download a file using ffsend? It’s just as easy:

ffsend download <URL>

ffsend defaults to allowing 1 download per shared file, after which the file is deleted from the servers. To change this, use --downloads NN (where NN is a number from 1 to 20) when uploading a file:

ffsend upload --downloads <NN> <file.ext>

You can also change the number of allowed downloads for already uploaded files. To be able to do this, you must know the URL of the file you want to modify. You can see all shared URLs using:

ffsend history

Here’s how the output looks like:

$ ffsend history
#  LINK                                                                  EXPIRY  
1  https://send.firefox.com/download/e84e67e23c/#DYyvhlM9h1x1TAC9lJNUbw  23h59m  
2  https://send.firefox.com/download/c7fa183352/#j90VHhSrcpx_2Xlb-LGeXg  5h20m  
3  https://send.firefox.com/download/65716755f4/#wQaXbCgC2HOXvLrJVFc-Lw  4h58m  
4  https://send.firefox.com/download/4fbd102676/#LocbOt6LEs-sQFG6CKPeLw  4h54m  
5  https://send.firefox.com/download/fbe2a90d5b/#fJJ8NKsoJq0RRTRMSD3cVQ  3h6m

As you can see, command only lists the URLs and their expiry times, but not the file names. You can use the info command for more detailed information on an URL, like this:

ffsend info <URL>

Here’s with output:

$ ffsend info https://send.firefox.com/download/4fbd102676/#LocbOt6LEs-sQFG6CKPeLw
ID:         4fbd102676  
Name:       Fedora-Workstation-Live-x86_64-29-1.2.iso  
Size:       1.80 GiB (1931477008 B)  
MIME:       application/octet-stream  
Downloads:  0 of 1  
Expiry:     4h53m (17613s)

Once you know the URL, you can change the allowed number of downloads until the link expires, by using this command:

ffsend parameters --download-limit <NN> <URL>

NN being the number of allowed downloads before the link expires (between 1 and 20), and URL the Send URL.

Fore more on ffsend, see its README and check out ffsend --help.

Source

Download Links Linux 2.18

Links iconThe Web browser of choice when you are using text mode console or the Linux Terminal

Links is an open source and completely free graphical/command-line web browser application, similar to the well-known Lynx program. It offers basic web browsing functionality for your terminal emulator, displaying tables, frames, downloads on the background, and using HTTP/1.1 keep-alive connections.

The text mode interface of Links can run on any UN*X console, as well as on any terminal emulator, including a VT100 terminal, XTerm, Telnet or SSH virtual terminals, and virtually any other text terminal. Colors and mouse are supported by Links in the terminal emulator.

A graphical interface is also provided

In addition to the command-line interface, a graphics mode is also provided, which can display PNG, JPEG, GIF, TIFF and XBM image files. It runs external bindings on other types, features anti-aliased font, supports smooth image zooming, supports 48-bit dithering, as well as gamma and aspect ratio correction.

The software can automatically reconnect if the Internet connection fails at a certains point during a web browsing session, it can lookup DNS (Domain Name System) asynchronous in the background, it integrates with external programs for opening certain file types, and offers numerous other interesting features that can be viewed at a glance on the project’s website.

Supports HTML 4.0 without CSS

Links supports HTML 4.0 (without CSS), supports bookmarks, supports background file downloads, supports tables, supports frames in both graphics and text mode interfaces, supports anti-advertising animation filter in animated GIFs, and supports JavaScript with full user control over script run.

It runs on many UNIX-like operating systems

The application is cross-platform, supporting all GNU/Linux distributions, as well as the BSD, OS/2, BeOS, Cygwin under Microsoft Windows, FreeMint, and AtheOS operating systems. At the moment, it has been successfully tested on computers supporting either of the 64-bit (x86_64) and 32-bit (x86) instruction set architectures.

Source

Elementary OS Challenge Day 1: Filling In The Audio App Gap

I’m 24 hours into the elementary OS Challenge, and I already have heaps of notes containing questions, pleasant surprises, discoveries and a couple bugs. For today’s content though, I wanted to focus on a few app recommendations to help new users flesh our their software library.

One of the unique things about elementary OS is the AppCenter. Not only is it a “pay what you want” model, but hundreds of the apps within are curated, developed specifically for the Pantheon desktop and this Linux distribution. Since I’m someone obsessed with music and podcasting, that’s where I wanted to start.

THE ELEMENTARY OS CONTENT HUB

Melody music software, available in elementary OS AppCenterJASON EVANGELHO

Melody

So, elementary OS 5 ships with a perfectly serviceable Music app visually reminiscent of a stripped-down iTunes, but there are better alternatives inside the AppCenter.

Melody by Artem Anufrij ($3 or pay what you want) doesn’t do everything under the sun, but what it does do works fast and works well.

Melody feels modern without feeling bloated, and also offers a sorting option that I appreciate: the ability to view your music library by artist, and then chronologically by album. It also remembers the position of your currently playing track if you close and reopen the software.

Something I need to point out about Music, and hopefully your experience is better: it has a tendency to be rather buggy, locking up on me several times in just a few hours. Perhaps it’s due to the size of my music library? Playback can be controlled from the speaker icon on the top panel, but the playback status will sometimes stay locked on “play” or “pause” regardless of a song’s status. Other times I couldn’t get the app to launch for reasons I’m uncertain of.

But one of the main reasons I gravitated toward Melody is that it tends to display album art way more frequently than elementary’s own Music app (see example image below). It also boasts a Dark Mode which is a borderline requirement for me these days. It scanned my fairly large (65GB) music library in just a few minutes, while another available AppCenter app, MuseIC, crashed when trying to import that same library.

Melody vs MusicJASON EVANGELHO

It’s not the best music app I’ve ever used. That honor belongs to, believe it or not, Microsoft‘s discontinued Zune Software. Another option for Linux distros is Amarok, but part of my personalelementary OS Challenge is exploring the software ecosystem that’s been created specifically for this OS. And Melody gets the job done elegantly.

Vocal: A Fantastic Podcast Client

Vocal gives you a ton of options for managing and enjoying your podcast library, and it’s presented cleanlyJASON EVANGELHO

Gnome has Podcasts, but elementary OS has one of the most robust and visually pleasing podcast clients out there. Vocal, developed by Needle & Thread, does everything I want it to do. It allowed me to import my podcast subscriptions from an OPML file generated by PocketCasts, supports both streaming and downloading of video and audio podcasts, allows you to set custom intervals for skipping forward or backward, can be set to delete played content and even has a searchable iTunes podcast store built in.

Heck, you can even change a podcast’s album artwork if your heart so desires. Beyond that, it remembers the playback position of each episode, and has full system integration, from media keys to native notifications.

Vocal simply looks greatJASON EVANGELHO

Vocal is, in a word, awesome. Another word is robust. I find myself wishing this was available on Android so that I could seamlessly listen to my podcast subscriptions everywhere.

While it’s not available for smartphones, it is available as a Flatpak for all Linux distributions. Go get it!

Give Me Lyrics!

Give Me Lyrics alongside elementary’s Music app.JASON EVANGELHO

Give Me Lyrics, developed by Murilo Venturoso, does exactly what its name implies and nothing more. It pulls from databases like Lyrics Wikia and API Seeds to instantly display lyrics for the song you’re currently listening to on your elementary OS machine, along with an album art thumbnail.

I tried it with a variety of songs played from both Music and Melody, and it just works (unless you’re listening to something decidedly obscure). It would be cool if you could dock it to your music app of choice, but that’s just me being picky.

That’s it for today! I encourage everyone to really dig into the AppCenter and share the gems you find. I’ll be back tomorrow with more observations and analysis from my own elementary OS Challenge, including some of the “little things” I’ve noticed that I appreciate about the OS. How’s your challenge going? Reach out to me on Twitter and let me know!

THE ELEMENTARY OS CONTENT HUB

MORE OF MY LINUX CONTENT AT FORBES:

Opinion

Guides

Reviews

Features

Since joining Forbes in 2012, I’ve also contributed to gaming and technology features on PCWorld and Computer Shopper.

Source

Introduction to Ubuntu’s LXD Containers

Containers are useful for many reasons. They isolate apps from the rest of the system. They are portable and easy to clone and/or move to other operating systems. And, in the case of Linux, they work the same way under any distribution, with no adaptations necessary. If you need to move a container from RedHat to Ubuntu, it should be just a simple copy operation.

Docker is a popular solution designed to contain a single application: for example, an MySQL database server. LXD is similar in some ways but designed to contain an entire operating system. This makes it useful for some scenarios. For example, you can spin up an LXD container, install a database server and an http server. You can then create a WordPress website inside. You can now switch from cloud to cloud by just moving this LXD container where it’s needed when you’re not happy with your previous provider. And since it’s easy to clone a container, you can even upload your website to multiple cloud providers to create a redundant, high-availability setup.

LXD doesn’t virtualize hardware like QEMU or VirtualBox do, which means it’s very fast, offering near-native speed of execution.

Install and Configure LXD

Open a terminal and install LXD, plus the ZFS utilities, which will help you speed up some operations and save disk space when working with containers.

lxd-apt-install

Start LXD configuration.

Press ENTER to select the default values.

For Size in GB of the new loop device (1GB minimum) [default=15GB], you can pick another value, like “50GB” if you know you’ll create a lot of containers.

lxd-init-questions

Find and Launch an LXD Distribution Image

To list all Ubuntu images:

lxd-ubuntu-images

There will be a lot of results. You can ommit arch=amd64 if you need images for other platforms, like ARM processors (Raspberry Pi devices use such architecture).

In the previous picture the results have been limited (with |head) to make it easier to read. The fingerprint of Ubuntu 18.04 (84a71299044b) has been highlighted. If you want to launch a container with that distribution, the command would be:

At the moment this would return a permission denied error. You need to be in the “lxd” group. Your user has been added to this group already, but to make it active you have to log out and log back in. If you want to avoid that, use this command, replacing “user” with your username:

lxd-user-active-groups

Now, lxc commands work without requiring sudo.

Launch LXD Containers with non-Ubuntu Distributions

This command will show you what other distributions are available:

To launch an image, instead of the fingerprint, you can also use an alias name if you see one available in that list.

lxd-launch-debian-9

If you append a string at the end, you can choose a name for your container:

Manage LXD Containers

To list all containers:

lxd-lxc-list

The “IPV4” column especially is important if you have any running services on that instance. For example, if an Apache http server would be running on the instance, entering “10.234.232.246” in the browser would display the website hosted in the container.

To stop a container:

This can take a very long time (or fail) with non-Ubuntu distributions. It’s better to get a shell to the container, and once inside, enter systemctl poweroff to stop it.

If all else fails, you can force a stop with:

To start it:

To move inside your container:

lxd-shell-debian

You can install programs with “sudo apt install” and do anything else you would do on a normal Linux distribution, e.g., configure an Apache server. When you want to exit from the container, simply type:

Transfer Files to/from LXD Containers

To upload a file to your container:

Include the name of the file to be created, not only the directory where you want to upload it. Here is an example:

To upload a directory instead of a file:

Example:

To download a directory from your container to your main operating system:

Example:

Conclusion

This covers the basic usage of LXD containers. There are more advanced features such as snapshots and rollbacks, imposing limits on resources such as CPU and RAM, cloning containers, and so on.

Source

WP2Social Auto Publish Powered By : XYZScripts.com