Kubernetes is a complex body of software. It is meant for a distributed cluster of compute nodes and is designed to withstand surges in workload, link failures and node failures. It is also a fast moving project with constant (and often backward incompatible) changes and third party dependencies.
Given all the complexity that underlies it, it is very difficult and expensive for an organization to self-host and maintain a Kubernetes cluster and run their applications on top of it. If you are not in the business of operating Kubernetes clusters, you may want to use Amazon’s Elastic Kubernetes Service (EKS) to deploy your applications. It will greatly reduce the cost of operation and you can rest easy knowing that experienced developers and operators are incharge of it, instead.
- An AWS account with console access and appropriate permissions. Contact your firm’s AWS operator to get the appropriate privileges.
- An AWS IAM user with programmatic access. We will be acting as this user when controlling our Kubernetes cluster. Here’s how you can install and configure AWS CLI for the account under which EKS cluster will be created.
- A basic understanding of Kubernetes
Creating a Kubernetes cluster
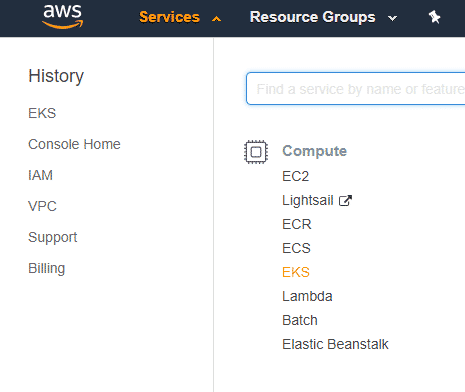
You can create the cluster via CLI as well, but most new users would find the graphical console friendlier. So we will be using that, instead. Assuming that you have logged into your AWS Console, we can get started by going to Services from the top right corner and clicking on EKS from the drop down menu:
Next menu will show AWS intro page, let’s go to the Clusters option underneath the EKS submenu.

Here you can see the list of all the Kubernetes clusters created under your account. As there is none, let’s create one.

Click on Create cluster. Give it a name, select the version of Kubernetes you want, at the time of this writing version 1.11 is supported by Amazon. Next click on Role name, because we need to create a Role that we need to provider to Amazon EKS so it can manage our cluster.

Creating and Assigning Role
Before we get started with that, let’s understand a key difference between Amazon EKS (an AWS Service) and your Kubernetes Cluster on AWS. AWS segregates responsibilities wherever it can, to give you a very fine-grained control over everything. If you wish to give yourself, or a third party, complete control over these resources you can do that as well.
Think of Amazon EKS as one such party that will manage your Kubernetes cluster (your EKS cluster) on your behalf, but it requires your explicit permission to do just that. To do that we will ‘create’ and assign the Role of managing EKS clusters under our AWS account and assign it to Amazon EKS.
In the new IAM tab, that has opened after clicking on Role name, you will see a few default roles for billing and support are already in place. Let’s create a new one for EKS. Click on Create Role.

Select the type of trusted entity as AWS service, for which the role would be created and then select EKS so your EKS cluster can talk directly to the Amazon EKS directly and perform optimally. Then click Next.

Now, you will be able to see the permissions and permission boundaries that are associated with this role. The default values are alright, just click on to next.

The next menu will prompt you to add tags (key-value pairs) to this role. It is completely optional, but quite useful if you are using the CLI to manage your AWS resources and there are a lot of different roles and resources to manage. We won’t be adding any tags, click Next and give your role a meaningful name and description.

And that’s it! Clicking on Create role and we can go back to our EKS cluster creation. The next time you want to create another cluster, you can reuse this very same role again.

Back to Cluster Creation
Even if your AWS account is brand new, there’s still default VPC ( Virtual Private Cloud) with a few subnets created within it. These are often spread across different AWS regions and you have to select at least two of them for it to be a cluster.
And select the default security group to allow most inbound and outbound traffic to go normally.

Click on Create and your Kubernetes cluster will be up and running in minutes. Once your cluster is created. You can always get an overview of it by going to EKS → Cluster → myCluster. Of course, the last part, the name of your cluster will be different.
Local Setup
The way EKS platform works is that it allows you to interact with the control plane at the plane’s API endpoint. Control plane is equivalent to the master nodes in vanilla Kubernetes clusters. It runs etcd, CAs and of course, the API server which you will use to control your Kubernetes cluster.

You will have to configure your kubectl and/or your dashboard to work with this API endpoint and once that is setup, you can start listing all your resources, deployments, etc, like you would do with a regular Kubernetes cluster.
If you don’t already have Kubectl installed on your computer, you can do so by following this link for Mac, Windows or your favorite Linux distro.
We would need an additional binary which would be AWS IAM authenticator binary for your platform. Download it from here and make it an executable.
$ sudo chmod +x ./aws-iam-authenticator
Add it to one of your $PATH folders for example /usr/bin or /sbin or /usr/local/sbin. Or you can do as Amazon recommends and just add it to within your home directory and make $HOME a part of your PATH variable.
$ cp ./aws-iam-authenticator $HOME/bin/aws-iam-authenticator &&
export PATH=$HOME/bin:$PATH
Next test if the binaries work.
$ kubectl version
$ aws-iam-authenticator help
Now, we need to configure these binaries so they can talk to our Kubernetes cluster securely. You can do it manually if you don’t want to set up AWS CLI, but that’s not a reliable approach. Which is why I mentioned in the prerequisites that AWS CLI was necessary. So, assuming you have installed it and configured it to work with your AWS account, run the following command:
Note:If you were already using kubectl to manage another Kubernetes cluster, with the configuration files at the default ~/.kube location. You might want to backup this folder before running the following command.
$ aws eks update-kubeconfig –name myCluster
The name of your cluster would be different from “myCluster”, substitute that instead. The update-kubeconfig command will actually update your kubectl configuration by editing the files in the ~/.kube folder. If that location doesn’t exist, then it will create a new one for you.
Now you are ready to interface with your cluster.
$ aws eks describe-cluster –name myCluster
Where to Next?
Now you are finally ready to add worker nodes using CloudFormation and deploy your application across all the regions you cluster’s VPC has access to. All this process can also be automated to the nth degree if you choose to use AWS CLI for everything from the creation of the cluster to deploying and scaling your apps.
Hope you found this tutorial helpful and insightful.
Source