Artificial Intelligence plays a big role in Android 9, the latest version of Google’s mobile operating system, released Monday.
Called “Android Pie,” the OS is designed to learn from its users’ behavior, and apply those lessons to simplify and customize their phone experiences.
“From predicting your next task so you can jump right into the action you want to take, to prioritizing battery power for the apps you use most, to helping you disconnect from your phone at the end of the day, Android 9 adapts to your life and the ways you like to use your phone,” noted Sameer Samat, Google’s vice president of product management for Android and Google Play.
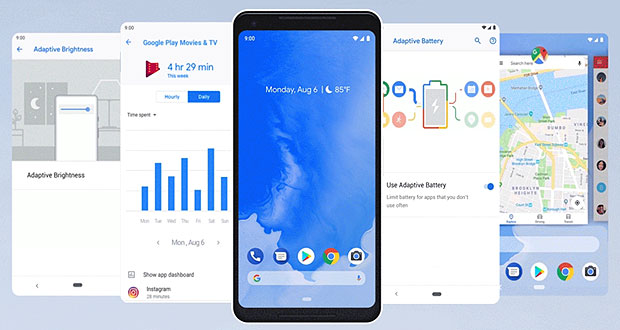
Adaptive Brightness and Adaptive Battery are two ways Android Pie uses AI to customize and improve a phone’s performance.
Adaptive Brightness learns what brightness levels a user likes in certain conditions and automatically adjusts the display to those settings when those conditions arise.
Adaptive Battery plugs into Google’s DeepMind systems and can learn a person’s phone usage patterns and make adjustments to optimize power usage.
“Users of the Android P beta program on Google Pixel phones found a 20 percent increase in battery life,” said David McQueen, research director for consumer devices in the London offices of ABI Research, a technology advisory firm.
“Battery life has always been a major pain point for the smartphone user, so this implementation of AI will be welcome relief,” he told TechNewsWorld.
Seeing Will Be Believing
The power management feature works without adding additional hardware, McQueen pointed out.
Huawei introduced performance-enhancing AI in its Mate 10 Pro product, he said, but to do it, the company had to add a chip to the device, which it called a “neural processing unit.”
“There’s not much going on in terms of new battery technology that can lengthen battery life, so Adaptive Battery could be a good thing,” suggested William Stofega, program director for mobile phones and drones at
IDC, a market analysis company based in Framingham, Massachusetts.
The Adaptive Battery feature appears to be compelling, acknowledged Tuong Nguyen,
a senior principal analyst at Gartner, a research and advisory company
based in Stamford, Connecticut. However, he is withholding judgment on the feature until the verdict from users comes in.
“We see a lot of power optimization announcements, and I’m sure they work well enough,” Nguyen told TechNewsWorld, “but my perception as a consumer is that I can never stay sufficiently charged and am always using too much battery.”
Screen Slices
Another new addition to Android is App Actions. It makes connections between when and how you use apps and makes suggestions based on those connections. For example, it’s 5:15 p.m. on a Monday. App Action may ask if you want to open the e-book you’ve been reading on your commute to and from work for the past week.
Google also announced a feature for Android Pie called “Slices,” which won’t appear in the OS until later this fall.
Slices shows relevant information from apps depending on a user’s screen activity. So if a user started typing Lyft into Google Search, Slice would display a slice of the Lyft app with information such as prices to a destination and the ETA for a driver.
“Slices is great because it brings us a step closer to the post-app world,” Nguyen said.
“Instead of searching through a dozen of apps and individually opening them,” he continued, “the UI allows me to use them with fewer steps.”
Better Security
Android Pie also sports a new single home button for simpler navigation.
In addition, Android’s Overview feature has been redesigned to display full screen previews of recently used apps. It also now supports Smart Text Selection, providing action suggestions based on selected text.
Security has been beefed up in Android 9. It has an improved security model for biometrics. It uses a secure, dedicated chip to enable hardware security capabilities that protect sensitive data, such as credit card information.
Android 9 chooses the TLS protocol by default, as well as DNS over TLS, to help protect all Web communications and keep them private.
Multi-Camera and HEIF Support
Android’s photographic capabilities are expanded in Pie. It supports multiple cameras, which enables developers to access streams from a number of physical cameras simultaneously.
“Multi-camera support is a potentially cool feature because it impacts the trajectory of immersive augmented reality, mixed reality and virtual reality experiences,” Nguyen said.
“Anything that advances immersive is exciting for me, but it’s a long road, so don’t expect to see something with a super impact immediately,” he added. “It’s more of a building block for bigger things to come.”
Android Pie also supports a new image format, HEIF. The format provides better compression than the widely used JPEG format without a loss in quality. Apple has been using the format for awhile.
A common complaint among consumers is a lack of storage on phones, Nguyen noted.
“I’m not familiar with the technical details on HEIF, but I think all consumers can appreciate having more room because of better compression,” he said.
Fighting Phone Addiction
With concerns rising about how much time people spend with their phones, Google decided to add some time management features to Android Pie.
“While much of the time we spend on our phones is useful, many of us wish we could disconnect more easily and free up time for other things,” observed Google’s Samat.
“In fact, over 70 percent of people we talked to in our research said they want more help with this,” he added. “So we’ve been working to add key capabilities right into Android to help people achieve the balance with technology they’re looking for. ”
The new “digital well-being” features that will be added to Android Pie this fall include the following:
- A Dashboard that helps users understand how they’re spending time on their devices;
- An App Timer that lets an operator set time limits on apps and grays out the icon on their home screen when the time is up;
- A Do Not Disturb mode, which silences all the visual interruptions that pop up on a screen; and
- Wind Down, which switches on Night Light and Do Not Disturb and fades the screen to grayscale before bedtime.
While the new digital health features may be embraced by some users, they could be annoying to others.
“I can see things like Wind Down and app timers getting in the way,” IDC’s Stofega told TechNewsWorld. “I thiink people want to use their devices whenever and however they want.”
Possible Pain Points
For many Android users, all the goodies in the latest version of the OS are likely to remain out of their hands for some time, since Pie works only on Pixel models, and a few other phones that participated in the beta program for the software.
“It will be telling how quickly Android P is able to migrate to Samsung and Huawei smartphones, and then on to those that run Android One,” McQueen said.
Even for those who are able to get their hands on the new OS, there could be challenges.
“The issue always is how quickly will people be able to recognize some of these new features,” and whether these devices are “getting too complex for their own good,” Stofega said.
“These devices are becoming Swiss Army knife-like,” he remarked. “Device makers have to figure out and adjust to what people really need versus what’s technically possible.”
![]()
 John P. Mello Jr. has been an ECT News Network reporter
since 2003. His areas of focus include cybersecurity, IT issues, privacy, e-commerce, social media, artificial intelligence, big data and consumer electronics. He has written and edited for numerous publications, including the Boston Business Journal, the
Boston Phoenix, Megapixel.Net and Government
Security News. Email John.