By Jack M. Germain
Sep 12, 2018 12:08 PM PT
Widespread use of unpatched open source code in the most popular Android apps distributed by Google Play has caused significant security vulnerabilities, suggests an
American Consumer Institute report released Wednesday.
Thirty-two percent — or 105 apps out of 330 of the most popular apps in 16 categories sampled — averaged 19 vulnerabilities per app, according to the
report, titled “How Safe Are Popular Apps? A Study of Critical Vulnerabilities and Why Consumers Should Care.”
Researchers found critical vulnerabilities in many common applications, including some of the most popular banking, event ticket purchasing, sports and travel apps.
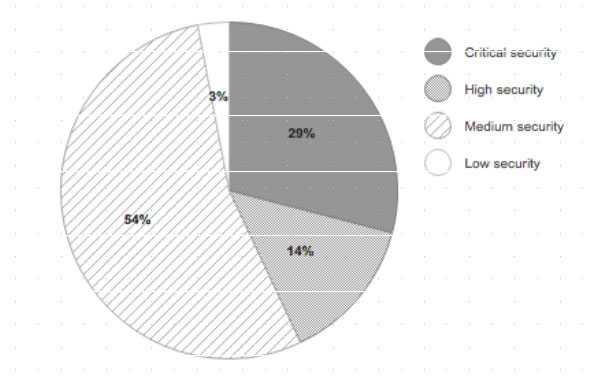
Distribution of Vulnerabilities Based on Security Risk Severity
ACI, a nonprofit consumer education and research organization, released the report to spearhead a public education campaign to encourage app vendors and developers to address the worsening security crisis before government regulations impose controls over Android and open source code development, said Steve Pociask, CEO of the institute.
The ACI will present the report in Washington D.C. on Wednesday, at a public panel attended by congressional committee members and staff. The session is open to the public.
“There were 40,000 known open source vulnerabilities in the last 17 years, and one-third of them came last year,” ACI’s Pociask told LinuxInsider. That is a significant cause for concern, given that 90 percent of all software in use today contains open source software components.
Pushing the Standards
ACI decided the public panel would be a good venue to start educating consumers and the industry about security failings that infect Android apps, said Pociask. The report is meant to be a starting point to determine whether developers and app vendors are keeping up with disclosed vulnerabilities.
“We know that hackers certainly are,” Pociask remarked. “In a way, we are giving … a road map to hackers to get in.”
The goal is to ward off the need for eventual government controls on software by creating a public dialog that addresses several essential questions. Given the study’s results, consumers and legislators need to know if app vendors and developers are slow to update because of the expense, or merely complacent about security.
Other essential unanswered questions, according to Pociask, include the following: Do the vendors notify users of the need to update apps? To what extent are customers updating apps?
Not everyone relies on auto update on the Android platform, he noted.
“Some vendors outsource their software development to fit their budget and don’t follow up on vulnerabilities,” Pociask said.
Having the government step in can produce detrimental consequences, he warned. Sometimes the solutions imposed are not flexible, and they can discourage innovation.
“It is important for the industry to get itself in order regarding privacy requirements, spoofing phone numbers and security issues,” said Pociask.
Report Parameters
Businesses struggle to provide adequate protection for consumer personal information and privacy. Governments in California and the European Union have been putting more aggressive consumer privacy laws in place. Americans have become more aware of how vulnerable to theft their data is, according to the report.
One seemingly indispensable device that most consumers and businesses use is a smartphone. However, the apps on it may be one of the most serious data and privacy security risks, the report notes.
Researchers tested 330 of the most popular Android apps on the Google Play Store during the first week in August. ACI’s research team used a binary code scanner — Clarity, developed by Insignary — to examine the APK files.
Rather than focus on a random sampling of Google Play Store apps, ACI researchers reported on the largest or most popular apps in categories. Most of the apps are distributed within the United States. Researchers picked 10 top apps in each of the 33 categories in the Play store.
Factoring the Results
Results were charted as critical, high, medium and low vulnerability scores. Of 330 tested apps, 105 — or 32 percent — contained vulnerabilities. Of those identified, 43 percent either were critical or high risk, based on the national vulnerability database, according to the report.
“We based our study on the most popular apps in each category. Who knows how much worse the untested apps are in terms of vulnerabilities?” Pociask asked.
In the apps sampled, 1,978 vulnerabilities were found across all severity levels, and 43 percent of the discovered vulnerabilities were deemed high-risk or critical. Approximately 19 vulnerabilities existed per app.
The report provides the names of some apps as examples of the various ways vendors deal with vulnerabilities. Critical vulnerabilities were found in many common applications, including some of the most popular banking, event ticket purchasing, sports and travel apps.
For example, Bank of America had 34 critical vulnerabilities, and Wells Fargo had 35 critical vulnerabilities. Vivid Seats had 19 critical and five high vulnerabilities.
A few weeks later, researchers retested some of the apps that initially tested way out of range. They found that the two banking apps had been cleaned up with updates. However, the Vivid Seats app still had vulnerabilities, said Pociask.
Indications for Remedies
More effective governance is critical to addressing “threats such as compromised consumer devices, stolen data, and other malicious activity including identity theft, fraud or corporate espionage,” states the report.
These results increasingly have been taking center stage, noted the researchers.
The ACI study recommends that Android app developers scan their binary files to ensure that they catch and address all known security vulnerabilities. The study also stresses the urgency and need for apps providers to develop best practices now, in order to reduce risks and prevent a backlash from the public and policymakers.
The researchers highlighted the complacency that many app providers have exhibited in failing to keep their software adequately protected against known open source vulnerabilities that leave consumers, businesses and governments open to hacker attacks, with potentially disastrous results.
Note: Google routinely scans apps for malware, but it does not oversee the vulnerabilities that could allow them.
“We want to create a lot more awareness for the need to update the vulnerabilities quickly and diligently. There is a need to push out the updates and notify consumers. The industries should get involved in defining best practices with some sort of recognizable safety seal or rating or certification,” Pociask said.
App Maker or User Problem?
This current ACI report, along with others providing
similar indications about software vulnerabilities, concerns an area many app users and vendors seem to ignore. That situation is exacerbated by hackers finding new ways to trick users into allowing them access to their devices and networks.
“Posing as real apps on an accredited platform like the Google Play Store makes this type of malicious activity all the more harmful to unsuspecting users,” said Timur Kovalev, chief technology officer at
Untangle.
It is critical for app users to be aware that hackers do not care who becomes their next victim, he told LinuxInsider.
Everyone has data and private information that can be stolen and sold. App users must realize that while hackers want to gain access and control of their devices, most also will try to infiltrate a network that the device connects to. Once this happens, any device connected to that network is at risk, Kovalev explained.
Even if an app maker is conscientious about security and follows best practices, other vulnerable apps or malware on Android devices can put users at risk, noted Sam Bakken, senior product marketing manager at
OneSpan.
“App makers need to protect their apps’ runtime against external threats over which they don’t have control, such as malware or other benign but vulnerable apps,” he told LinuxInsider.
Part of the Problem Cycle
The issue of unpatched vulnerabilities makes the ongoing situation of malicious apps more troublesome. Malicious apps have been a consistent problem for the Google Play Store, said Chris Morales, head of security analytics at
Vectra.
Unlike Apple, Google does not maintain strict control over the applications developed using the Android software development kit.
“Google used to perform basic checks to validate an app is safe for distribution in the Google Play Store, but the scale of apps that exists today and are submitted on a daily basis means it has become very difficult for Google to keep up,” Morales told LinuxInsider.
Google has implemented new machine learning models and techniques within the past year, he pointed out, in an effort to improve the company’s ability to detect abuse — such as impersonation, inappropriate content or malware.
“While these techniques have proven effective at reducing the total number of malicious apps in the Google Play Store, there will always be vulnerabilities in application code that get by Google’s validation,” noted Morales.
Developers still need to address the problem of malicious or vulnerable apps that could be exploited after being installed on a mobile device. That would be handled by applying machine learning models and techniques on the device and on the network. That would help to identify malicious behaviors that would occur after an app is already installed and bypassed the Google security checks, Morales explained.
Time for Big Brother?
Having government agencies step in to impose solutions may lead to further problems. Rather than a one-size-fits-all solution, ACI’s Pociask prefers a system of priorities.
“Let’s see if the industry can come up with something before government regulations are imposed. Getting a knee-jerk reaction right now would be the wrong thing to do in terms of imposing a solution,” he cautioned.
Still, personal devices are the user’s responsibility. Users need to take more accountability with regards to what apps they are allowing on their devices, insisted Untangle’s Kovalev.
“Government intervention at this time is likely not needed, as both users and Google can take additional actions to protect themselves against malicious apps,” he said.
Frameworks Exist
Dealing with unpatched Android apps may not need massive efforts to reinvent the wheel. Two potential starting points already are available, according to OneSpan’s Bakken.
One is the U.S. National Institute of Standards and Technology, or NIST. It has guidelines for vetting mobile apps, which lay out a process for ensuring that mobile apps comply with an organization’s mobile security requirement.
“This can help an enterprise, for example, to keep some vulnerable mobile apps out of their environment, but instituting such a program is no small feat. It’s also simply guidance at this point,” said Bakken.
The other starting point could be the Federal Institutions Examination Council, or FFIEC, which provides some guidance for examiners to evaluate a financial institution’s management of mobile financial services risk. It also provides some safeguards an institution should implement to secure the mobile financial services they offer, including mobile apps.
“In the end, the effectiveness of any government intervention really depends on enforcement. It’s likely that any intervention would focus on a specific industry or industries, meaning not all mobile app genres would be in scope,” Bakken said. “That means that developers of some mobile apps for consumers would not necessarily have any incentive to secure their apps.”
What Needs to Happen?
One major solution focuses on patching the Google Play platform. Joining the platform is straightforward, according to Kovalev. Developers complete four basic steps and pay a fee.
Once joined, developers can upload their apps. Google processes them through a basic code check. Often, malicious apps do not appear to be malicious, as they have been programmed with a time-delay for malicious code to be executed, he noted.
“To combat these malicious apps, Google has begun to implement better vetting techniques — like AI learning and providing rewards to white hat pros who hunt down and surface these malicious apps,” Kovalev said.
While these techniques have helped to pinpoint malicious apps, the apps should be vetted more thoroughly prior to being publicly available to unsuspecting users, he stressed.
Final Solution
The ultimate fix for broken Android apps rests with app makers themselves, OneSpan’s Bakken said. They are in the best position to lead the charge.
He offered this checklist for mobile app developers:
- Do threat modeling and include security in product requirements.
- Provide secure code training to Android developers.
- Do security testing of their apps on a regular basis as part of the development cycle.
- Fix identified vulnerabilities as they go.
- Submit their apps to penetration testing prior to release.
“And then, finally, they should proactively strengthen their app with app-shielding technology that includes runtime protection,” Baken said, “so the app itself is protected, even in untrusted and potentially insecure mobile environments, to mitigate external threats from malware and other vulnerable apps.”

 Jack M. Germain has been an ECT News Network reporter since 2003. His main areas of focus are enterprise IT, Linux and open source technologies. He has written numerous reviews of Linux distros and other open source software.
Email Jack.
Source

 Advantech has launched a rugged, Arm Linux based “WISE-6610” LoRaWAN gateway in 100- or 500-node versions with either 915MHz or 868MHz support. There’s also a “Wzzard LRPv2 Node” that can connect four sensors at once.


 FriendlyElec has launched a $45, Rockchip RK3399 based “NanoPi Neo4” SBC with a 60 x 45mm footprint, WiFi/BT, GbE, USB 3.0, HDMI 2.0, MIPI-CSI, a 40-pin header, and -20 to 70℃ support — but only 1GB of RAM.