Neoftech is a cross-platform and easy-to-use system information command line script that collects your Linux system information and display it on the terminal next to an image, it could be your distributions logo or any ascii art of your choice.
Recently, a new major version of Neofetch 3.0 released with large amount of breaking changes added to this update.
Neoftech is very similar to ScreenFetch or Linux_Logo utilities, but highly customizable and comes with some extra features as discussed below.
Its main features include: it’s fast, prints a full color image – your distributions logo in ASCII alongside your system information, it’s highly customizable in terms of which, where and when information is printed on the terminal and it can take a screenshot of your desktop when closing the script as enabled by a special flag.
Required Dependencies:
- Bash 3.0+ with ncurses support.
- w3m-img (occasionally packaged with w3m) or iTerm2 or Terminology for printing images.
- imagemagick – for thumbnail creation.
- Linux terminal emulator should support \033[14t [3] or xdotool or xwininfo + xprop or xwininfo + xdpyinfo .
- On Linux, you need feh, nitrogen or gsettings for wallpaper support.
How To Install Neofetch in Linux
Neofetch can be easily installed from third-party repositories on almost all Linux distributions by following below respective installation instructions as per your distribution.
On Debian
$ echo "deb http://dl.bintray.com/dawidd6/neofetch jessie main" | sudo tee -a /etc/apt/sources.list
$ curl -L "https://bintray.com/user/downloadSubjectPublicKey?username=bintray" -o Release-neofetch.key && sudo apt-key add Release-neofetch.key && rm Release-neofetch.key
$ sudo apt-get update
$ sudo apt-get install neofetch
On Ubuntu and Linux Mint
$ sudo add-apt-repository ppa:dawidd0811/neofetch
$ sudo apt-get update
$ sudo apt-get install neofetch
On RHEL, CentOS and Fedora
You need to have dnf-plugins-core installed on your system, or else install it with the command below:
$ sudo yum install dnf-plugins-core
Enable COPR repository and install neofetch package.
$ sudo dnf copr enable konimex/neofetch
$ sudo dnf install neofetch
On Arch Linux
You can either install neofetch or neofetch-git from the AUR using packer or Yaourt.
$ packer -S neofetch
$ packer -S neofetch-git
OR
$ yaourt -S neofetch
$ yaourt -S neofetch-git
On Gentoo
Install app-misc/neofetch from Gentoo/Funtoo’s official repositories. However, in case you need the git version of the package, you can install =app-misc/neofetch-9999.
How To Use Neofetch in Linux
Once you have installed the package, the general syntax for using it is:
$ neofetch
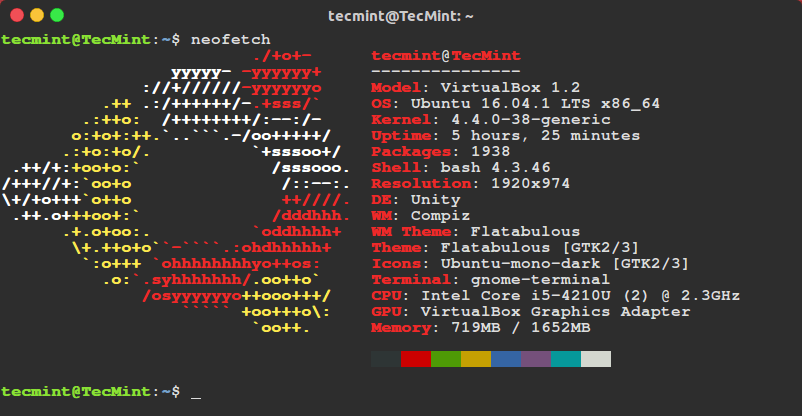
Note: If w3m-img or imagemagick is not installed on your system, screenfetch will be enabled by default and neofetch will display your ASCII art logo as in the image below.
Linux Mint Information
Linux Mint System Information
Ubuntu Information
Ubuntu System Information
If you want to display the default distribution logo as image, you should install w3m-img or imagemagick on your system as follows:
$ sudo apt-get install w3m-img    [On Debian/Ubuntu/Mint]
$ sudo yum install w3m-img        [On RHEL/CentOS/Fedora]
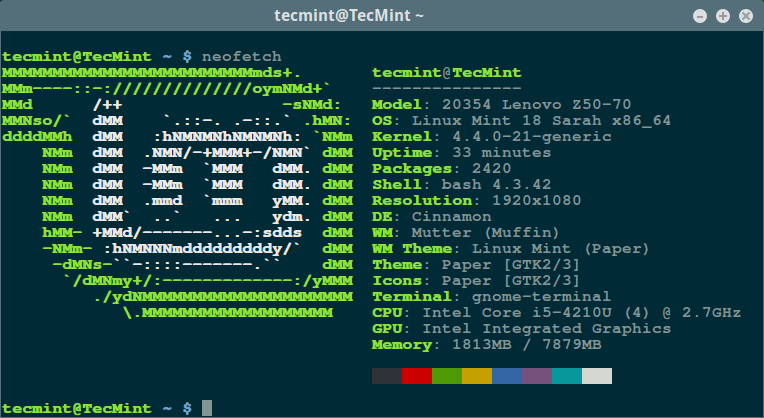
Then run neofetch again, you will see the default wallpaper of your Linux distributions as the image.
$ neofetch
![]()
Ubuntu System Information with Logo
After running neofetch for the first time, it will create a configuration file with all options and settings: $HOME/.config/neofetch/config.
This configuration file will enable you through the printinfo () function to alter the system information that you want to print on the terminal. You can type in new lines of information, modify the information lineup, delete certain lines and also tweak the script it using bash code to manage the information to be printed out.
You can open the configuration file using your favorite editor as follows:
$ vi ~/.config/neofetch/config
Below is an excerpt of the configuration file on my system showing the printinfo () function.
#!/usr/bin/env bash
# vim:fdm=marker
#
# Neofetch config file
# https://github.com/dylanaraps/neofetch

# Speed up script by not using unicode
export LC_ALL=C
export LANG=C

# Info Options {{{


# Info
# See this wiki page for more info:
# https://github.com/dylanaraps/neofetch/wiki/Customizing-Info
printinfo() {
    info title
    info underline

    info "Model" model
    info "OS" distro
    info "Kernel" kernel
    info "Uptime" uptime
    info "Packages" packages
    info "Shell" shell
    info "Resolution" resolution
    info "DE" de
    info "WM" wm
    info "WM Theme" wmtheme
    info "Theme" theme
    info "Icons" icons
    info "Terminal" term
    info "Terminal Font" termfont
    info "CPU" cpu
    info "GPU" gpu
    info "Memory" memory

    # info "CPU Usage" cpu_usage
    # info "Disk" disk
    # info "Battery" battery
    # info "Font" font
    # info "Song" song
    # info "Local IP" localip
    # info "Public IP" publicip
    # info "Users" users
    # info "Birthday" birthday

    info linebreak
    info cols
    info linebreak
}
.....
Type the command below to view all flags and their configuration values you can use with neofetch script:
$ neofetch --help
To launch neofetch with all functions and flags enabled, employ the --test flag:
$ neofetch --test
You can enable the ASCII art logo again using the --ascii flag:
$ neofetch --ascii
In this article, we have covered a simple and highly configuration/customizable command line script that gathers your system information and displays it on the terminal.
Remember to get in touch with us via the feedback form below to ask any questions or give us your thoughts concerning the neofetch script.
Last but not least, if you know of any similar scripts out there, do not hesitate to let us know, we will be pleased to hear from you.
Visit the neofetch Github repository.