How to do a Port Scan in Linux – Linux Hint

Port scanning is a process to check open ports of a PC or a Server. Port scanners are often used by gamers and hackers to check for available ports and to fingerprint services. There are two types of ports to scan for in TCP/IP Internet Protocol, TCP(Transmission Control Protocol) and UDP(User Datagram Protocol). Both TCP and UDP have their own way of scanning. In this article, we’ll look at how to do port scan in Linux environment but first we’ll take a look at how port scanning works. Note that port scanning is illegal in often countries, make sure to check for permissions before scanning your target.

TCP Scanning

TCP is stateful protocol because it maintains the state of connections. TCP connection involves a three-way handshaking of Server socket and client-side socket. While a server-socket is listening, the client sends a SYN and then Server responds back with SYN-ACK. Client then, sends ACK to complete the handshake for the connection

To scan for a TCP open port, a scanner sends a SYN packet to the server. If SYN-ACK is sent back, then the port is open. And if server doesn’t complete the handshake and responds with an RST then the port is closed.

UDP Scanning

UDP on the other hand, is a stateless protocol and doesn’t maintain the state of connection. It also doesn’t involve three-way handshake.

To scan for a UDP port, a UDP scanner sends a UDP packet to the port. If that port is closed, an ICMP packet is generated and sent back to the origin. If this doesn’t happen, that means port is open.

UDP port scanning is often unreliable because ICMP packets are dropped by firewalls, generating false positives for port scanners.

Port Scanners

Now that we’ve looked at how port scanning works, we can move forward to different port scanners and their functionality.

Nmap

Nmap is the most versatile and comprehensive port scanner available till now. It can do everything from port scanning to fingerprinting Operating systems and vulnerability scanning. Nmap has both CLI and GUI interfaces, the GUI is called Zenmap. It has a lot of varying options to do quick and effective scans. Here’s how to install Nmap in Linux.

sudo apt-get update
sudo apt-get upgrade -y
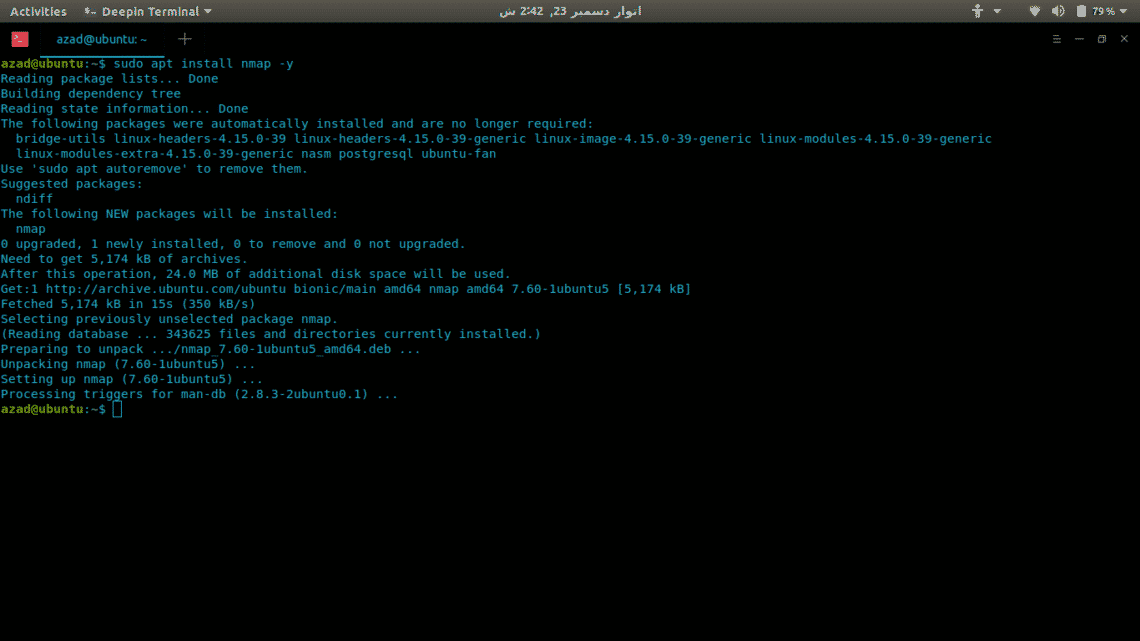
sudo apt-get install nmap -y

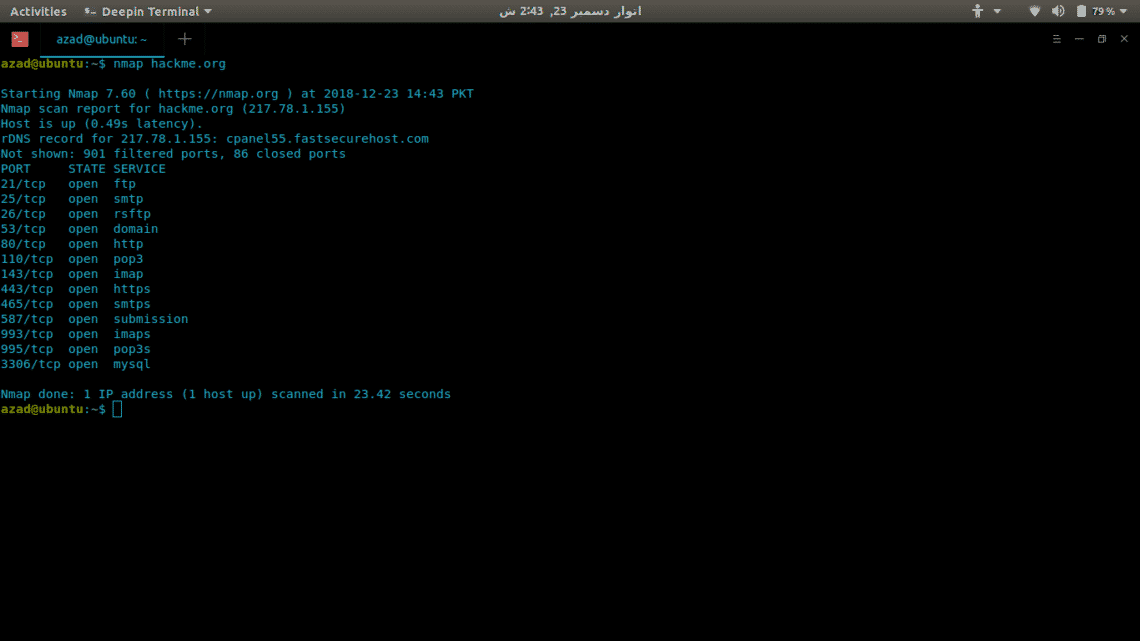
Now we’ll use Nmap to scan a server (hackme.org) for open ports and to list services available on those ports, its really easy. Just type nmap and the server address.

To scan for UDP ports, include -sU option with sudo because it requires root privileges.

There are a lot of other options available in Nmap such as:

-p- : Scan for all 65535 ports
-sT : TCP connect scan
-O : Scans for operating system running
-v : Verbose scan
-A : Aggressive scan, scans for everything
-T[1-5] : To set the scanning speed
-Pn : In case the server blocks ping

Zenmap

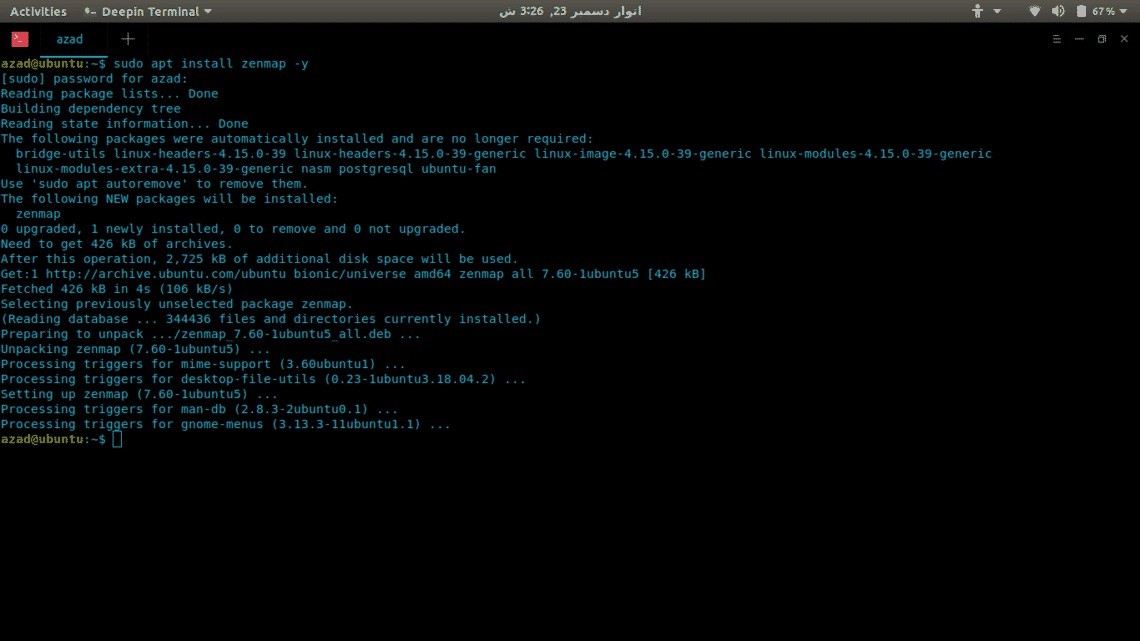
Zenmap is a GUI interface of Nmap for click-kiddies so that you won’t have to remember its commands. To install it, type

sudo apt-get install -y zenmap

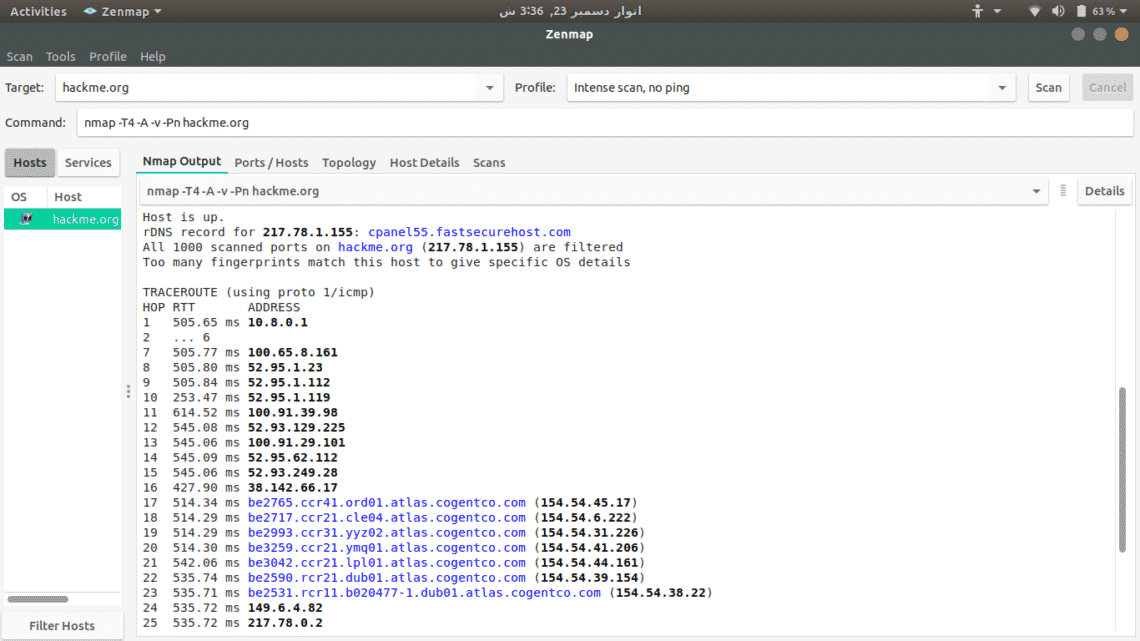
To scan a server, just type its address and select from available scan options.

Netcat

Netcat is a raw TCP and UDP port writer which can also be used as a port scanner. It uses connect scan that’s why it is not so fast like Network Mapper. To install it, type

ubuntu@ubuntu:~$ sudo apt install netcat-traditional -y

To check for an open port, write

ubuntu@ubuntu:~$ nc -z -v hackme.org 80
…snip…
hackme.org [217.78.1.155] 80 (http) open

To scan for a range of ports, type

ubuntu@ubuntu:~$ nc -z -nv 127.0.0.1 20-80
(UNKNOWN) [127.0.0.1] 80 (http) open
(UNKNOWN) [127.0.0.1] 22 (ssh) open

Unicornscan

Unicornscan is a comprehensive and fast port scanner, built for vulnerability researchers. Unlike Network Mapper, it uses its own User-land Distributed TCP/IP stack. It has a lot of features that Nmap doesn’t, some of them are given,

  • Asynchronous stateless TCP scanning with all variations of TCP Flags.
  • Asynchronous stateless TCP banner grabbing
  • Asynchronous protocol specific UDP Scanning (sending enough of a signature to elicit a response).
  • Active and Passive remote OS, application, and component identification by analyzing responses.
  • PCAP file logging and filtering
  • Relational database output
  • Custom module support
  • Customized data-set views

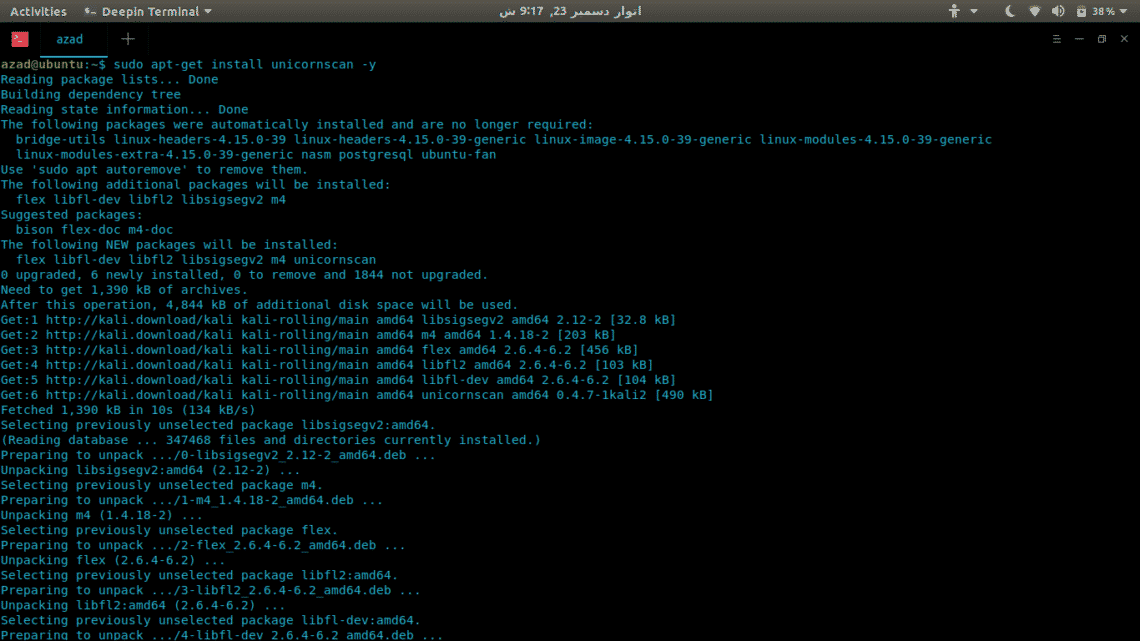
To install Unicornscan, type

ubuntu@ubuntu:~$ sudo apt-get install unicornscan -y

To run a scan, write

ubuntu@ubuntu:~$ sudo us 127.0.0.1
TCP open ftp[ 21] from 127.0.0.1 ttl 128
TCP open smtp[ 25] from 127.0.0.1 ttl 128
TCP open http[ 80] from 127.0.0.1 ttl 128
…snip…

Conclusion

Ports scanners come in handy whether you are a DevOp, Gamer or a Hacker. There is no real comparison between these scanners, none of them is perfect, each of them has its benefits and drawbacks. It completely depends upon your requirements and how you use them.

Source

The mantra for this year’s sysadmin: Work smarter, not harder

The mantra for this year’s sysadmin: Work smarter, not harder

These top articles cover containers, monitoring, networking, and more. Plus, learn how to be lazy.

Being a systems administrator is not an easy job. Sysadmins often have to design, build, monitor, and maintain a large array of disparate services running on a patchwork of platforms. Most sysadmins come into the field by happy accident, so they sometimes lack formal, organized training on the toolsets.

With these high demands and uneven starting points, it’s no wonder that many of 2018’s top sysadmin articles on Opensource.com take a look at tools sysadmins may already be familiar with. Most Linux admins already have some familiarity with the Bash shell, but it has a lot of configuration options. Who has time to explore them all? And most sysadmins know networking, but there’s always something new to learn there, too.

But this year’s articles aren’t just about leveling current sysadmins’ knowledge. The abstractions provided by containers and serverless environments mean that developers sometimes end up being their own sysadmins. This year’s best articles are valuable whether you’re a developer learning to administer your environment or a sysadmin looking for more insight on the cutting edge of modern computing.

Top 10 sysadmin tools, guides, and how to’s

tools in the cloud with security
Administering networks and systems can get very stressful when the workload piles up. Nobody really…
toolbox drawing
What you need to know to understand how containers work.
A sysadmin's guide to network management
A reference list of Linux utilities and commands makes managing servers and networks easier.
tools_osyearbook2016_sysadmin_cc.png
Learn how to save time doing updates with the Ansible IT automation engine.
Tips and tricks for making the Bash shell work better for you.
magnifying glass on computer screen, finding a bug in the code
Here’s what you need to know about time-series data and metrics aggregation tools.
a checklist for a team
There are many ways to automate common sysadmin tasks with Ansible. Here are several of them.
Serverless computing is transforming traditional software development. These open source platforms…
Person standing in front of a giant computer screen with numbers, data
How is metrics aggregation different from log aggregation? Can’t logs include metrics? Can’t log…
yawning cat
Work smarter, not harder, and still do your job well.

Source
Benchmarking OpenMandriva 4.0 Alpha – The First Linux OS With An AMD Zen Optimized Build

On Christmas Eve marked the long-awaited release of the OpenMandriva Lx 4.0 Alpha and with that new version of the Mandrake/Mandriva-derived operating system came an AMD Zen “Znver1” optimized Linux build. Of course that caught my interest and I was quickly downloading this first Linux distribution with an AMD Ryzen/EPYC optimized binaries to see how it compares to its generic x86_64 operating system installation.

The AMD Zen optimized version of OpenMandriva Lx 4.0 caters its compiler flags to these latest AMD processors and other tuning to try to improve the experience. (There are some more details on the design changes with their Znver1 build in our forums.) This AMD Zen optimized build not only has the stock OS image rebuilt for Zen but a copy of its entire package archive re-built with Zen optimizations as an alternative to their generic Intel/AMD x86_64 package repository. It perhaps would be interesting if they pursued Function Multi-Versioning (FMV) and other compiler techniques for optimizations moving forward. But for users, simply download and install the OpenMandriva Znver1 image and if you are off to the races with AMD Zen optimizations by default.

The concept of an optimized Linux OS build catered towards a particular CPU microarchitecture is not new, but the first time we are seeing a major Linux distribution offer such for AMD Zen. On the Intel side the most prominent example is Intel’s own Clear Linux platform out of their Open-Source Technology Center. With Clear Linux they take performance to the extreme of just not catering the CFLAGS/CXXFLAGS and other basic tunables towards recent Intel microarchitectures but with their engineering resources they have also worked on various patches to the Linux kernel, Glibc, GCC, and other key open-source components. The Intel OTC work also ends up landing back upstream in the respective projects but for finding the leading Intel Linux performance is generally first found on Clear Linux. In our comparisons where putting Clear Linux up against a variety of other major Linux distributions, it can usually beat out the competition at least 60% of the time in multi-way Linux OS comparisons when running on recent Intel hardware but even its performance on AMD hardware tends to pack quite a punch too. Thus with seeing the OpenMandriva Lx 4.0 Alpha 1 having a Znver1 build made me quite anxious to run some Christmas day benchmarks.
OpenMandriva Lx 4.0 Alpha 1 has the Linux 4.18 kernel, KDE Plasma 5.14.4, X.Org Server 1.20.3, Mesa 18.3.1 and EXT4 by default. But not all of the OpenMandriva Lx 4.0 tunables are in the name of performance as for example on both Alpha 1 builds they are defaulting to the CPUFreq conservative governor, which tends to be slower than the likes of CPUFreq performance or even ondemand.


For this initial OpenMandriva Lx 4.0 benchmarking, an AMD Ryzen Threadripper 2950X system was used for this testing powered by the Phoronix Test Suite.

Source
Install VirtualBox 6.0 on Ubuntu 18.04 – Linux Hint

VirtualBox is a free virtualization solution from Oracle. VirtualBox can virtualize Windows XP, Windows Vista, Windows 7, Windows 10, Ubuntu, Debian, CentOS and many other versions of Linux, Solaris, some BSD variants etc. Recently, VirtualBox 6.0, a major update of VirtualBox came out. In this article, I will show you how to install VirtualBox 6.0 on Ubuntu 18.04 LTS. This article mainly focuses on Ubuntu 18.04 LTS, but this article will also work for Ubuntu 16.04 LTS and later. So, let’s get started.

Enable Hardware Virtualization:

Before you install VirtualBox 6.0, make sure hardware virtualization is enabled. If you’re using an Intel processor, then you have to enable VT-x or VT-d from the BIOS of your computer. If you’re using a AMD processor, then you have to enable AMD-v from the BIOS of your computer. This is very important. Without hardware virtualization enabled, your virtual machines will perform very badly.

Adding VirtualBox Package Repository:

VirtualBox 6.0 is not available in the official package repository of Ubuntu 18.04 LTS. But we can easily add the package repository of VirtualBox on Ubuntu 18.04 LTS and install VirtualBox 6.0 from there. To add the official package repository of VirtualBox, run the following command:

$ echo “deb https://download.virtualbox.org/virtualbox/debian $(lsb_release -cs) contrib” | sudo tee /etc/apt/sources.list.d/virtualbox.list

Now, type in your login password and press <Enter>.

The official package repository of VirtualBox should be added.

Adding VirtualBox Public PGP Key:

Now, you have to add the public PGP key of VirtualBox official package repository to APT. Otherwise, you won’t be able to use the VirtualBox official package repository. To add the public PGP key of the official package repository of VirtualBox, run the following command:

$ wget -q https://www.virtualbox.org/download/oracle_vbox_2016.asc -O- | sudo apt-key add –

The public PGP Key should be added.

Installing VirtualBox 6.0:

Now that the official VirtualBox package repository is ready to use, we can install VirtualBox 6.0. First, update the APT package repository cache with the following command:

The APT package repository should be updated.

Now, install VirtualBox 6.0 with the following command:

$ sudo apt install virtualbox-6.0

Now, press y and then press <Enter> to continue.

The required packages are being downloaded.

VirtualBox 6.0 should be installed.

Running VirtualBox 6.0:

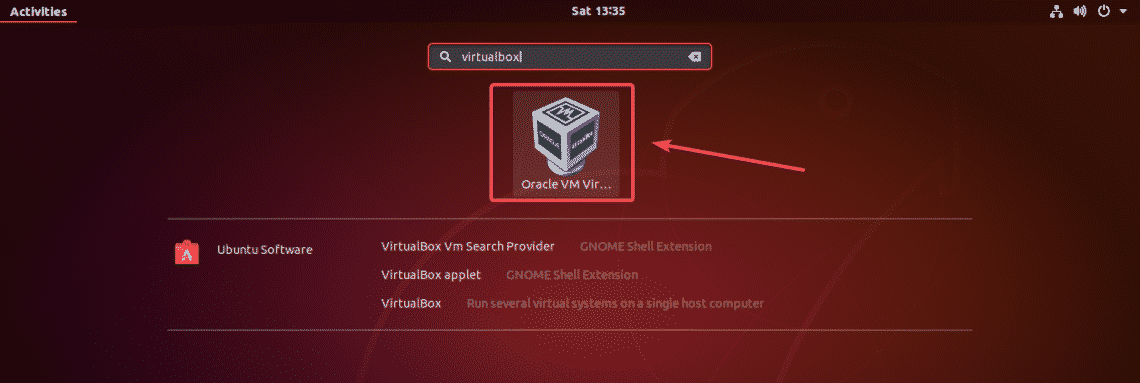
Now, you should be able to run VirtualBox 6.0 from the Application Menu as you can see in the screenshot below.

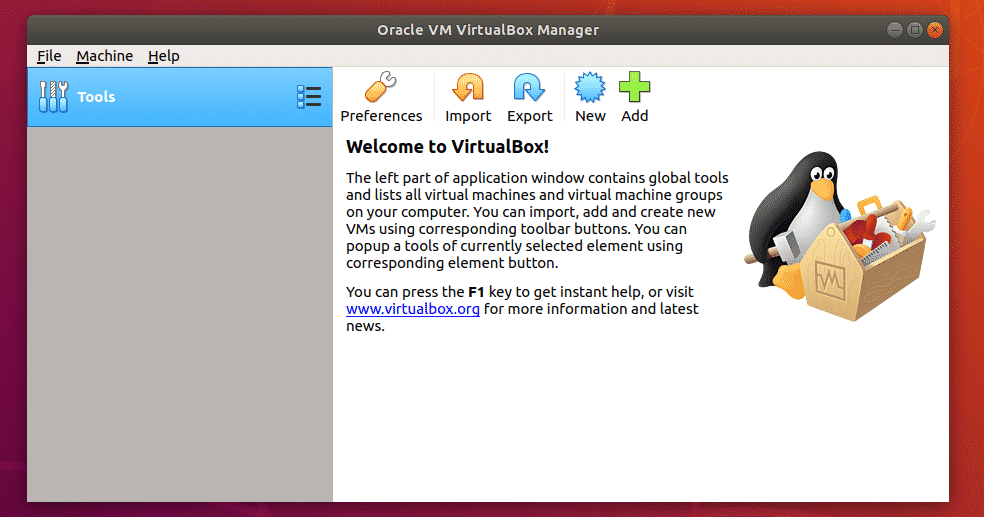
VirtualBox 6.0 dashboard.

As you can see, I am currently running VirtualBox 6.0.0. Note the VirtualBox version because you will need it when you will install VirtualBox Extension Pack.

Installing VirtualBox Extension Pack:

VirtualBox Extension Pack enables support for USB 2.0 and USB 3.0 devices, RDP, disk encryption, NVMe and PXE boot for intel cards and many more. It is a must have tool for any VirtualBox user.

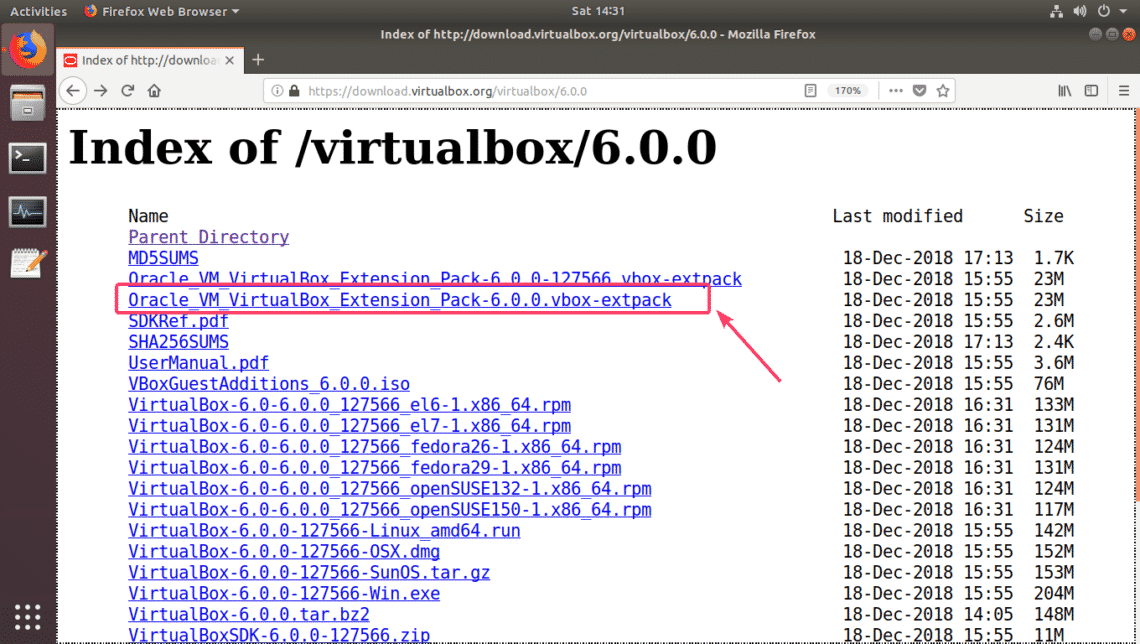
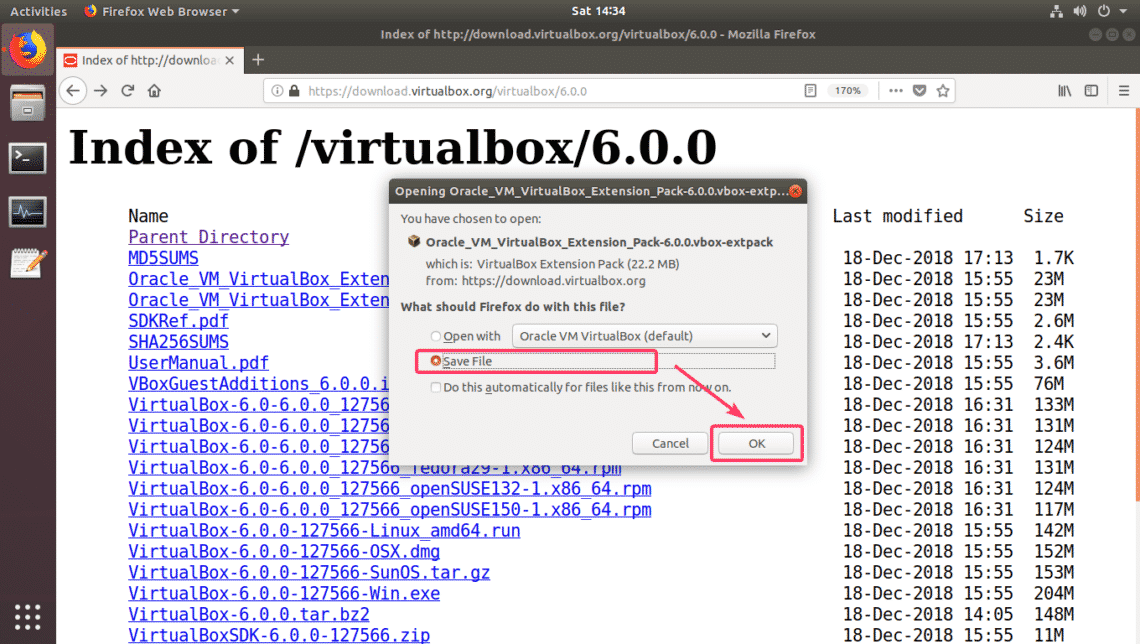
You have to download VirtualBox extension pack from the official website of VirtualBox and install it yourself in order to use these extra features in VirtualBox. First, to visit the official FTP directory of VirtualBox at https://download.virtualbox.org/virtualbox/6.0.0

Once the page loads, click on the “Oracle_VM_VirtualBox_Extension_Pack-6.0.0.vbox-extpack” file as marked in the screenshot below.

NOTE: Here, 6.0.0 is the version of the VirtualBox you installed. If it’s different for you, then replace 6.0.0 in the URL with the version you have.

Your browser should prompt you to save the file. Select Save File and click on OK.

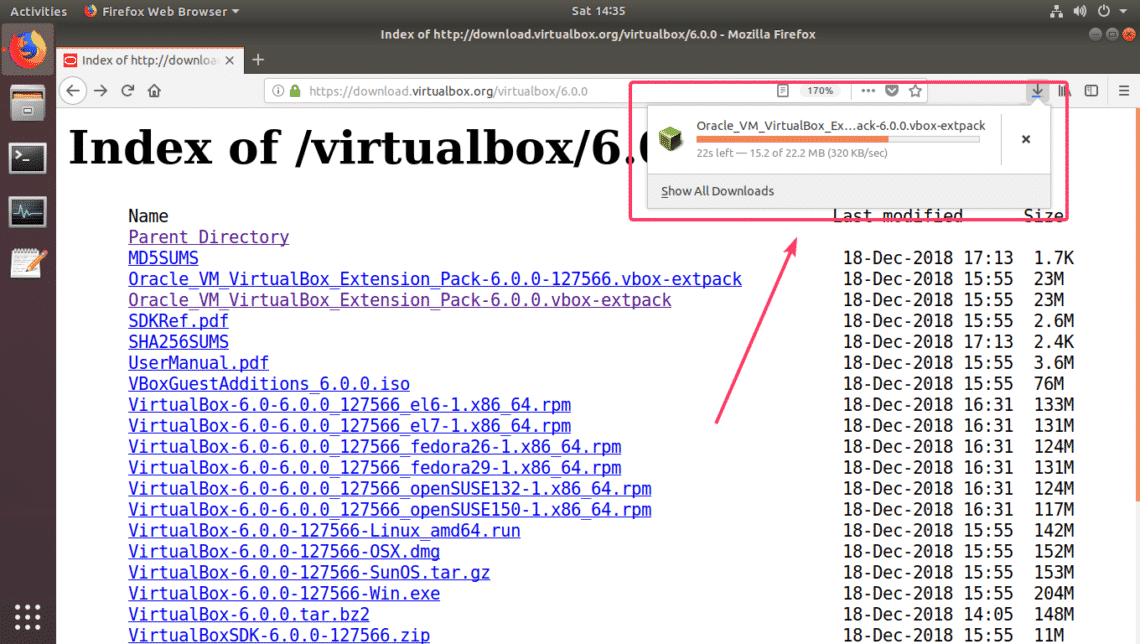
Your download should start.

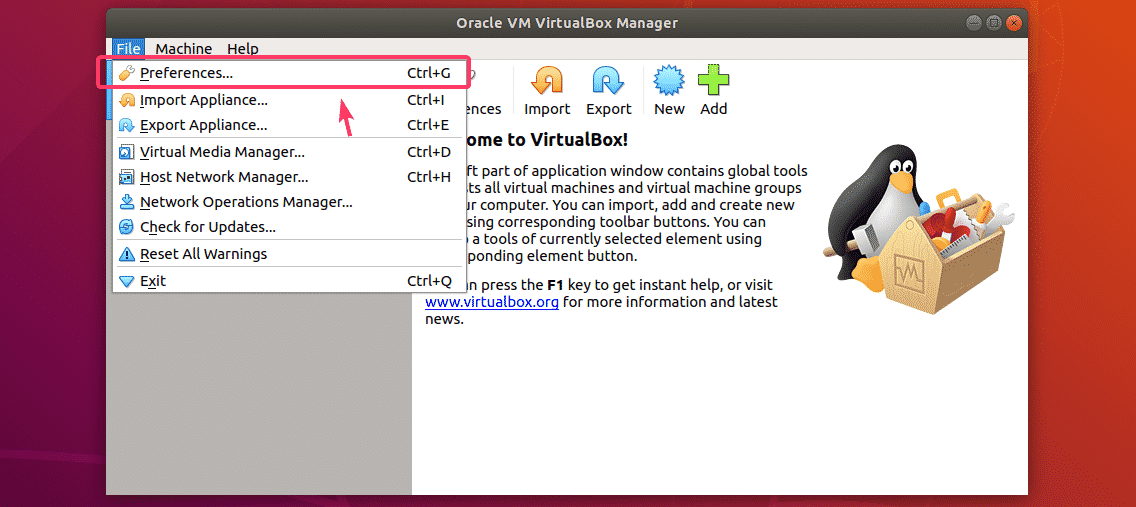
Once the download is complete, start VirtualBox 6.0 and go to File > Preferences…

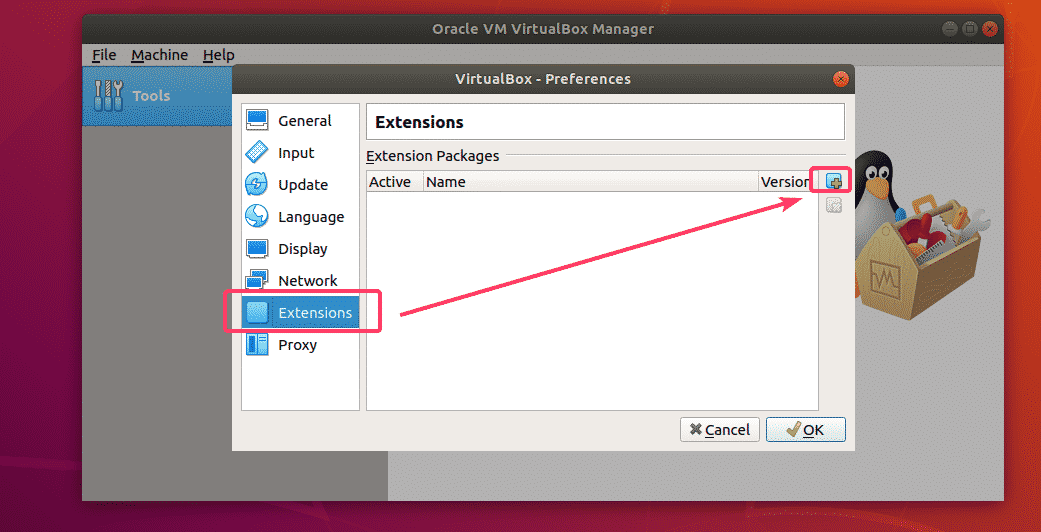
Now, go to the Extensions tab.

From the Extensions tab, click on the add icon as marked in the screenshot below.

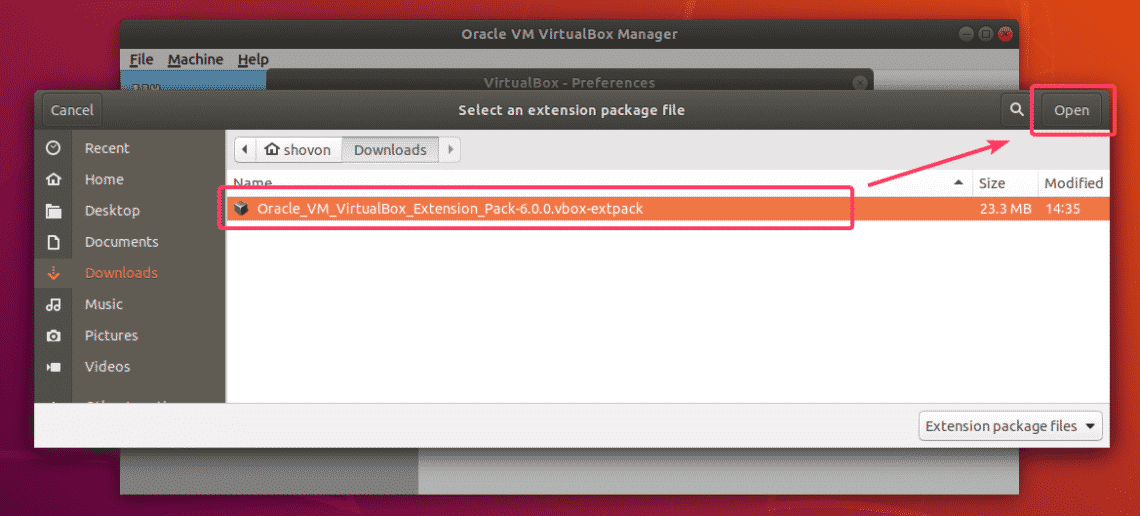
A file picker should be opened. Now, select the VirtualBox Extension Pack file you just downloaded and click on Open.

Now, click on Install.

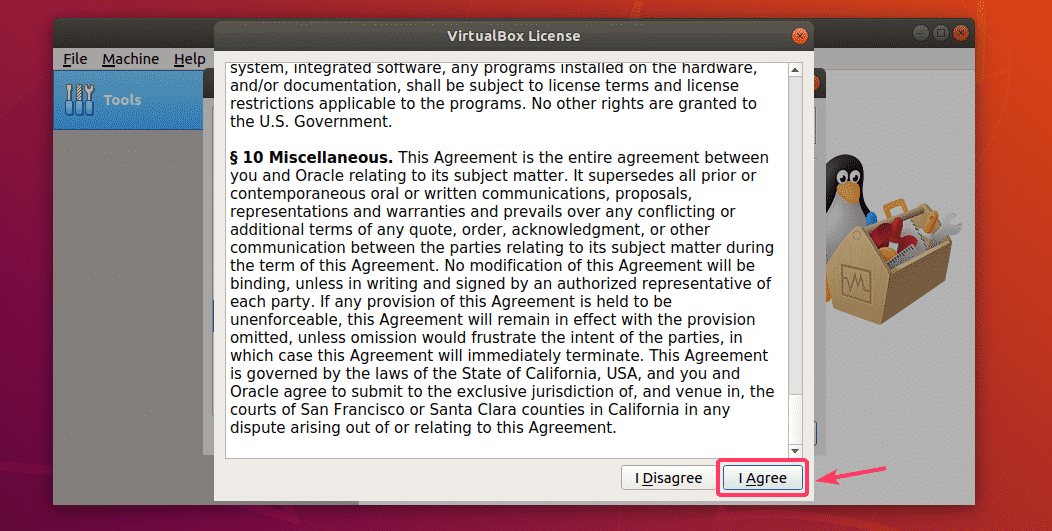
Now, you have to accept the VirtualBox License. To do that, scroll down and click on I Agree.

You need super user privileges in order to install VirtualBox Extension Pack. Type in the password for your login user and click on Authenticate.

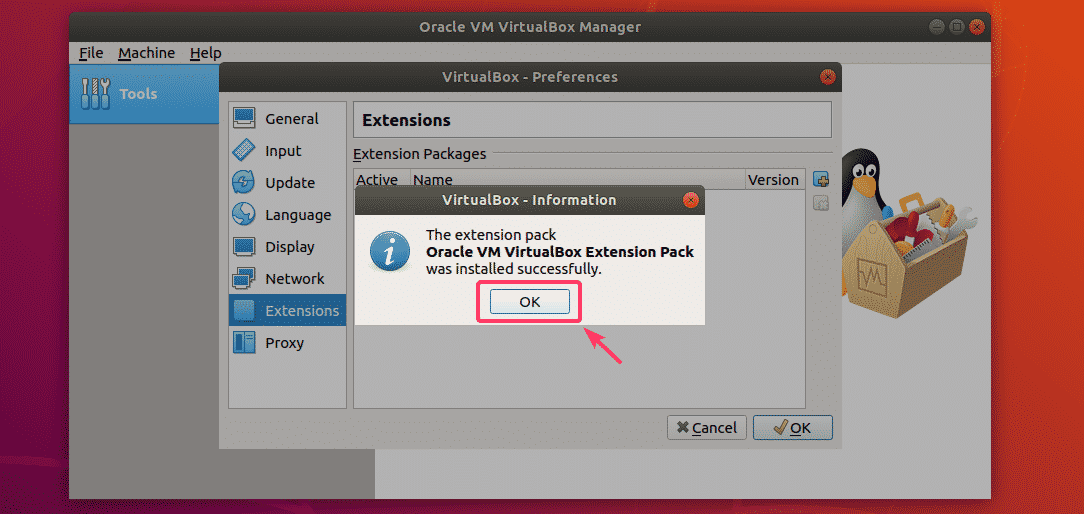
VirtualBox Extension Pack should be installed.

Finally, click on OK.

Now, you can start using VirtualBox 6.0 to create and run virtual machines of your favorite operating systems. So, that’s how you install VirtualBox 6.0 on Ubuntu 18.04 LTS. Thanks for reading this article.

Source
How to install Django Web Framework on Ubuntu 18.04

How to install Django on Ubuntu 18.04How to install Django on Ubuntu 18.04

Install Django on Ubuntu 18.04

Django is the most popular web framework which is designed to develop fully featured Python Web Applications. By using Django you can build secure, scalable and maintainable dynamic web applications. In this tutorial, you are going to install Django on Ubuntu 18.04 using Python Virtual Environment. The best thing to use Python Virtual Environment is you can create multiple Django Environments on a single computer without affecting other Django projects. It also will become easier to install a specific module for each project.

Prerequisites

Before you start to install Django on Ubuntu 18.04. You must have the non-root user account on your system with sudo privileges.

Install tree command to use it in further tutorial for better understanding.

sudo apt install tree

Confirm Python Installation and Install venv

Python 3.6 is by default installed on Ubuntu 18.04. Confirm the Python installation and check the Python version by typing following command.

python3 -V

Output should be as give below. Note version number may vary.

Output:
Python 3.6.7

By using venv module we can create virtual environments in Python 3.6. To get venv module we need to install python3-venv package to do so enter following command.

sudo apt install python3-venv

Now we can create Virtual Environment for Django Applications.

Create Virtual Environment

Create a new directory for your Django application and go inside the directory.

mkdir new_django_app && cd new_django_app

Now create virtual Environment by running following command. It will create directory named venv which includes supporting files, Standard python library, Python binaries, Pip package manager.

python3 -m venv venv

To start using the virtual environment we need to activate it. To activate the virtual environment run following command.

source venv/bin/activate
Now your path will change and it will show the name of your virtual environment (venv)

Install Django

Now install Django by using Pip (Python Package Manager).

pip install Django

Confirm the installation and Check the version typing following command.

python -m django –version

The output should be as given below. NOTE: you can get slightly different output.

Output:
2.1.4

Creating Django Project

Create a Django project by using django-admin utility named newdjangoapp. Enter following command to create new Django project.

django-admin startproject newdjangoapp

Now newdjangoapp directory will be created. Check the directory structure by using the following command. This directory has manage.py file used to manage the project and other Django specific files about database configuration settings, routes, and settings

tree newdjangoapp/

Output should be

newdjangoapp/
|– manage.py
`– mydjangoapp
|– __init__.py
|– settings.py
|– urls.py
`– wsgi.py

Now go inside newdjangoapp directory.

cd newdjangoapp

Now we need to migrate the database.

python manage.py migrate

Output should be:

Operations to perform:
Apply all migrations: admin, auth, contenttypes, sessions
Running migrations:
Applying contenttypes.0001_initial… OK
Applying auth.0001_initial… OK
Applying admin.0001_initial… OK
Applying admin.0002_logentry_remove_auto_add… OK
Applying admin.0003_logentry_add_action_flag_choices… OK
Applying contenttypes.0002_remove_content_type_name… OK
Applying auth.0002_alter_permission_name_max_length… OK
Applying auth.0003_alter_user_email_max_length… OK
Applying auth.0004_alter_user_username_opts… OK
Applying auth.0005_alter_user_last_login_null… OK
Applying auth.0006_require_contenttypes_0002… OK
Applying auth.0007_alter_validators_add_error_messages… OK
Applying auth.0008_alter_user_username_max_length… OK
Applying auth.0009_alter_user_last_name_max_length… OK
Applying sessions.0001_initial… OK

Create administrative user running following command.

python manage.py createsuperuser

NOTE: Above command can prompt you for Username, Password and Email Address for your user.

Testing the development server

Run development server using following command.

python manage.py runserver

The output should be:

Performing system checks…

System check identified no issues (0 silenced).
December 27, 2018 – 18:26:02
Django version 2.1.4, using settings ‘mydjangoapp.settings’
Starting development server at http://127.0.0.1:8000/
Quit the server with CONTROL-C.

NOTE: If you are using the virtual machine then you need to add your server IP address inside settings.py file.

Go to http://127.0.0.1:8000/ in your browser you will get following page.

django home pagedjango home page

You can go to admin page by visiting http://127.0.0.1:8000/admin/ page.

Enter username and password we have created recently after successful authentication you will be redirected to the administrative page.

django admin login pagedjango admin login page

Stop the development server pressing Ctrl+C in terminal.

Django home for adminDjango home for admin

Deactivate The Virtual Environment

To deactivate virtual environment after work run following command.

deactivate

Conclusion

You have successfully learned how to install Django Web Framework on Ubuntu 18.04. If you have any queries please don’t forget to comment below.

NOTE: You can create multiple development environments repeating above steps.

Source

How to Install latest Ruby on Rails on Ubuntu 18.04 LTS

RoR or Ruby on Rails is an open source, cross-platform web development framework that provides a structure to the developers for their code. It helps them create applications and websites by abstracting and simplifying the repetitive tasks faced during development. It is called Ruby on Rails because Rails is written in the Ruby programming language, exactly how Symfony and Zend are written in PHP and Django in Python. Rails provide default structures for databases, web servers, and web pages. Famous applications like Soundcloud, Github and Airbnb are all based on Rails.

Ruby on Rails is licensed under MIT and was first released in December 2005. All of its repositories are available on Github, including the latest release to date.

This tutorial explains a step-by-step process for installing and configuring Ruby on Rails with all its prerequisites. Later, we will explain how to install and configure the PostgreSQL Database in order to create your first Rails project.The article also explains how to create a simple CRUD interface, making your application more interactive and useful.

We have run the commands and procedures mentioned in this article on a Ubuntu 18.04 LTS system. We are using the Ubuntu command line, the Terminal, in order to install and configure Ruby on Rails. You can access the Terminal application either through the system Dash or the Ctrl+Alt+T shortcut.

Ruby on Rails Installation

In order to install Ruby on Rails, you first need to have the latest versions of some prerequisites installed and configured on your system, such as:

  • RVM-Ruby Version Manager
  • Ruby
  • Nodejs-Javascript runtime
  • Ruby Gems-Ruby Package Manager

In this section, we will first have our system ready by first installing all these step-by-step, setting up their latest versions, and then finally install Ruby on Rails.

1. Install Ruby Version Manager (RVM)

The Ruby Version Manager helps us in managing Ruby installation and configuring multiple versions of Ruby on a single system. Follow these steps in order to install the RVM package through the installer script:

Step1: Add the RVM key to your system

Run the following command in order to add the RVM key; this key will be used when you install a stable version of RVM:

$ gpg –keyserver hkp://keys.gnupg.net –recv-keys 409B6B1796C275462A1703113804BB82D39DC0E3
7D2BAF1CF37B13E2069D6956105BD0E739499BDB

Add the RVM key

Step2: Install Curl

We will be installing RVM through Curl. Since it does not come by default with the latest versions of Ubuntu, we will need to install it through the following commands as sudo:

$ sudo apt install curl

Please note that only authorized users can add/remove and configure software on Ubuntu.

Install Curl

The system will prompt you with a Y/n option in order to confirm the installation. Please enter Y to continue, after which, Curl will be installed on your system.

Step3: Install the RVM Stable version

Now run the following command in order to install the latest stable version of RVM.

$ curl -sSL https://get.rvm.io | bash -s stable –ruby

This command will also automatically install all the required packages needed to install RVM.

Install packages for RVM

The process will take some time depending on your Internet speed, after which RVM will be installed on your system.

Step4: Setup RVM source folder

Please note that the last few lines of the RVM installation output suggest running the following command:

$ source /usr/local/rvm/scripts/rvm

This is used to set the source folder to the one mentioned in the output. You need to run this command in order to start using RVM.

You might get the following output when setting up the source:

Setup RVM source folder

In that case, run the following commands on your system:

$ source ~/.rvm/scripts/rvm
$ echo “source ~/.rvm/scripts/rvm” >> ~/.bashrc
$ source ~/.bashrc

Fix RVM not found issue

Now the source for RVM is set. You can check the version number of RVM installed on your system through the following command:

$ rvm –version

Check RVM version

This output also ensures that RVM is indeed installed on your system.

2. Configure Latest Version of Ruby as System Default

When you install RVM, the latest version of Ruby is also installed on your system. What you need to do, however, is to set up your system to use the latest version of Ruby as the system default. Follow these steps to do so:

Step1: Setup RVM latest stable version

First, we need to update the RVM on our system with the latest stable version available on https://get.rvm.io

Run the following command to do so:

$ rvm get stable –autolibs=enable

Get latest stable RVM version

Step2: Get the list of all available Ruby versions

The following command gives you the list of all Ruby versions released till date:

$ rvm list known

Get a list of released Ruby versions

Through this list, please choose the latest version of Ruby available. As you can see in the output, Ruby 2.6.0 is the latest version available.

Step3: Install the latest Ruby version

Now install the latest version of Ruby that you have selected in the previous step, by running the following rvm command:

$ rvm install ruby-2.6

Install Ruby

The process may take some time depending on your Internet speed, after which the selected number of Ruby will be installed on your system.

Step4: Set the latest version of Ruby as default

The following rvm command will help you in setting the latest installed version of Ruby as the system default:

$ rvm –default use ruby-2.6

Set Ruby 2.6 as default version

You can see that now my system will be using Ruby 2.6.0-rc1 as the default Ruby version.

This can also be verified by running the following version command:

$ ruby -v

Check Ruby version

3. Install Nodejs and the gcc compiler

Before starting with the Rails development on Linux, we recommend using Nodejs as the Javascript runtime. It is a prerequisite for compiling Ruby on Rails asset pipeline.

Step1: Install the latest version of Nodejs

Use the following command in order to install the Nodesource repository to your system:

$ curl -sL https://deb.nodesource.com/setup_10.x | sudo -E bash –

Download Node.js

Now install the latest version of Nodejs through the following apt command as sudo:

$ sudo apt install -y nodejs

Install Node.js

The latest available version of Nodejs 10 will be installed on your system

Step2: Install the gcc compiler

The gcc compiler is another prerequisite that you need to install before performing any Rails development. Use the following command as sudo in order to install it:

$ sudo apt install gcc g++ make

Install gcc Compiler

4. Configure Latest Version of RubyGems as System Default

When you install RVM, RubyGems is also installed on your system. What we need to do, however, is to set up our system to use the latest version of RubyGems the system default. Ruby Gems is basically the Ruby on Rails package manager that comes with the command line tool-gem.

Run the following gem command in order to update the system to use the latest version:

$ gem update –system

Update gem

Now when you check the version number through the following command, you will see that your system is using the latest version of RubyGems in the command line:

$ gem -v

Check gem version

5. Install Ruby on Rails

Finally, after installing all the prerequisites, we can now install Ruby on Rails on our system by following these steps:

Step1: Look up for the latest available version

The RubyGems website maintains all the versions of Ruby on Rails till date, on the following link:

https://rubygems.org/gems/rails/versions

Choose the latest version of Ruby on Rails that you would like to install. At the time of writing this article, the latest available version is 5.2.2

Step2: Install the latest Ruby on Rails version

You can install the latest version of Ruby on Rails through the gem command line tool as follows:

$ gem install rails -v 5.2.2

Install the latest Ruby on Rails version with gem

The installation process might take some time depending on your Internet connection.

After the installation is complete, run the following command to view the Rails version installed on your system.

$ rails -v

Check Rails version

The command also verifies that Ruby on Rails is indeed installed on your system.

Rails Development

Ruby on Rails supports many databases such as SQLite, MySQL, and PostgreSQL. In this section, we will explain how to start with the Rails development with the PostgreSQL database. This will include:

  • Installing PostgreSQL Database
  • Configuring PostgreSQL and Creating Roles
  • Your First Rails application
  • Creating a simple CRUD with PostgreSQL database on Rails

1. Install and Setup PostgreSQL Database

Step1: Install PostgreSQL

Use the following apt command as sudo in order to install the PostgreSQL database and some other required packages:

$ sudo apt install postgresql postgresql-contrib libpq-dev -y

Install PostgreSQL

Step2: Start and enable the PostgreSQL service

Once PostgreSQL is installed, you need to start the ‘postgresql’ service through the following command:

$ systemctl start postgresql

Start PostgreSQL

The system will prompt you with an authentication dialog, as only an authorized user can enable services on Ubuntu. Enter the admin password and click the Authenticate button after which the service will start.

The next step is to enable the service through the following command:

$ systemctl enable postgresql

Enable PostgreSQL

The system will prompt you with a similar authentication dialog multiple times; enter the admin password each time and click the Authenticate button after which the service will be enabled.

Step3: Verify installation

$ Please run the following command in order to view a details stats report of your PostgreSQL installation:

$ dpkg –status postgresql

Check PostgreSQL Status

2. Configure PostgreSQL and Create Roles

PostgreSQL applications can be created by user or roles. By default, a “postgres” user exists which is a superuser and it can create and migrate databases and also manage other user roles.

Initially, you can log in as sudo on PostgreSQL through the following command:

$ sudo -u postgres psql

Use su to become postgres user

Here you can change the password of postgres as follows:

postgress=# password postgres

Change postgres password

Create a Role

A superuser can create a new user role through the following command:

$ create role “role_name” with createdb login password “‘password’”’ ;

Example:

postgress=# create role dev_rails with createdb login password ‘rockon123’ ;

We are creating a role by the name of “dev_rails”. This is a user that will create a db for our first Rails application.

Create posgres role

A superuser can view the list of roles existing on PostgreSQL as follows:

postgress=# du

List roles in PostgreSQL

Use Ctrl+z to exit PostgreSQL.

3. Your First Rails application

Now we will create our first Rails application with PostgreSQL as the default database. This involves the following steps:

Step1: Create a new Rails application

Create a new project by the name of “firstapp”, or any other name, through the following command and specify PostgreSQL as the database:

$ rails new firstapp -d postgresql

Create a new Ruby on Rails Application

This will create a project folder in your home folder as follows:

$ ls

Rails app creates, verify with ls command

Step2: Configure your Rails project to incorporate the PostgreSQL user role

Now we want the user role we created in PostgreSQL to be able to create a database in the Rails application. For this, you need to edit the database.yml file located in your newly created application’s folder in the /config/ folder.

Move to your first application and then the config folder as follows:

$ cd /firstapp/config

Here you will see the database.yml file. You can edit this file through your favorite text editor. We will be doing so through the Nano editor by using the following command:

$ nano database.yml

Change database settings

In this file, you will be able to see mainly three sections:

  • Development
  • Test
  • Production

We will need to configure the Development and Test sections of the file.

Make the following configurations in the Development section

database: firstapp_development

username: dev_rails

password: rockon123

host: localhost

port: 5432

Database configuration

And, the following in the Test section:

database: firstapp_test

username: dev_rails

password: rockon123

host: localhost

port: 5432

Note: Please make sure that the syntax is correct. Each line should be preceded by 2 spaces and NOT tabs.

Save the file by pressing Ctrl+X, then Y and then by hitting Enter.

Step3: Generate and then migrate the Database

Generate the database through the following rails command:

$ rails db:setup

Generate the database

Please make sure that there are no errors. Most errors are due to the wrong syntax in the database.yml file or the inconsistency in the username and password from the one you created in PostgreSQL.

After the successful generation, migrate the database through the following rails command:

$ rails db:migrate

Step4: Start the Puma Rails web server

After completing the application setup, please enter the following command in order to start the default Puma web server:

$ rails s -b localhost -p 8080

Or in our case,

$ rails s -b 127.0.0.1 -p 8080

Start Rails web server

After this command, your first Rails application is running on the local host at port 8080.

Step5: Open the default Rails Project Homepage

You can view your database successfully being hosted on the default Rails Project homepage by entering this URL in one of your web browsers:

http://localhost:8080/

You can also use your localhost IP, like us, in the above-mentioned URL:

Rails default homepage

You can not perform any CRUD operation on this simple application. Follow the article some more in order to make your application a little more interactive.

4. Create a simple CRUD with PostgreSQL database on Rails

Let us make our application more interactive by implementing a CRUD(Create, Read, Update, Delete) interface.

Step1: Create a Scaffold in Rails

Run the following command in order to create a scaffold in your Rails application folder

$ rails g scaffold Post title:string body:text

Then migrate the database by running the following command:

$ rake db:migrate

Create a simple CRUD with PostgreSQL database on Rails

Step2: Run the application on Puma Rails Web Server

Next, run your application on the localhost by running the Puma web server again through the following command:

$ rails s -b localhost -p 8080

You can also use your localhost IP, like us, for the above-mentioned command:

$ rails s -b 127.0.0.1 -p 8080

Run own application on Rails webserver

Step3: Open the ‘Posts’ page in Rails Project

You can view your database successfully being hosted on the Rails Project page by entering the URL in one of your web browsers:

http://localhost:8080/posts/

Or use a localhost IP like us:

http://127.0.0.1:8080/posts

You will be able to see a simple CRUD interface through which you can create, edit, show and destroy posts.

When I created a post using the New Post link, here is how my posts page looked like:

Test Posts app

You have now successfully completed the entire process of installing Ruby on Rails on your Ubuntu and then creating a sample application using the PostgreSQL database. This will serve as a basis for you to develop more productive and interactive database applications through Ruby on Rails.

Source

Apt Package Management Tool – Linux Hint

Your Linux machine is only as good as you make it. To make it into a powerful machine, you need to install the right packages, use the right configurations among a host of other things. Talking about packages; in this article I would be taking a primer on the APT package management tool. Similar to YUM for RHEL(RedHat Enterprise Linux) based Linux distributions—which was discussed here—APT(Advanced Packaging Tool) is for managing packages on Debian and Ubuntu based Linux distributions.This article isn’t planned to discuss all the powers of the APT package management tool, instead it is intended to give you a quick look into this tool and how you can use it. It would serve well for reference purposes and understanding how the tool works. Without much ado, let’s get started.

Location

Just like many Linux tools, apt is stored in the /etc directory—contains the configuration files for all the programs that run on Linux systems—and can be viewed by navigating to the directory.

Apt also has a configuration file which can be found in the /etc/apt directory with the file name apt.conf.

You would be doing a lot of package installations with apt, therefore it would go a long way to know that package sources are stored in a sources.list file. Basically, apt checks this file for packages and attempt to install from the list of packages—let’s call it a repository index.

The sources.list file is stored in the /etc/apt directory and there is a similar file, named sources.list.d. It isn’t actually a file, but a directory which keeps other sources.list files. The sources.list.d directory is used by Linux for keeping some sources.list files in a separate place—outside the standard /etc/apt directory.

The confusion: APT vs APT-GET

Yes, a lot of people actually mistake apt to be the same as apt-get. Here’s a shocker: they are not the same.

In truth, apt and apt-get work similarly however the tools are different. Let’s consider apt to be an upgrade on apt-get.

Apt-get has been in existence before apt. However apt-get doesn’t exist in isolation as it works together with other apt packages such as apt-cache and apt-config. These tools when combined are used to manage linux packages and have different commands as well. Also these tools are not the easiest to use as they work at a low level, which an average Linux user couldn’t care less about.

For this reason, apt was introduced. The version 1.0.1 of APT has the following on the man page, “The apt command is meant to be pleasant for end users and does not need to be backward compatible like apt-get.”

Apt works in isolation and doesn’t need to be combined with other tools for proper Linux administration, plus it is easy to use.

For an average Linux user, the commands are all that matter. Through the commands, tasks are executed and actual work can be done. Let’s take a look at the major apt commands.

Get Help

The most important of all the commands to be discussed in this article is the command used to get help. It makes the tool easy to use and ensures you do not have to memorize the commands.

The help provides enough information to carry out simple tasks and can be accessed with the command below:

You would get a list of various command combinations from the result, you should get something similar to the image below:

If you desire, you could check out the apt man pages for more information. Here’s the command to access the man pages:

Search for package

For a lot of operations, you would need to know the exact name of a package. This and many more uses are reasons to make use of the search command.

This command checks all the packages in the repository index, searches the keyword in the package descriptions and provides a list of all packages with the keyword.

Check package dependencies

Linux packages have dependencies, these dependencies ensure they function properly as the packages break when the dependencies break.

To view a package’s dependencies, you use the depends command.

apt depends <package name>

Display package information

Displaying a package’s dependencies is one information you would find useful. However, there are other package details you can get. For me, it would be less productive to memorize all the commands to access other details such as the package’s version, download size etc.

You can get all of a package’s information in one attempt using the apt command as seen below:

Install package

One of Linux’s strongest points is the availability of lots of powerful packages. You can install packages in two ways: either through the package name or through a deb file—deb files are debian software package files.

To install packages using the package name, the command below is used:

apt install <package name>

As stated earlier, you need to know the package name before using it. For example, to install Nginx the command would be apt install nginx.

The other means of installing packages is the through the deb file if available. When installing a package through its deb file, apt fetches the package dependencies itself and downloads it so you do not have to worry about them.

You can install deb files using the absolute path to the files with the command below:

apt install </path/to/file/file_name.deb>

Download package

If for some reason, you need to download a package without having it installed, you can do so using the download command.

This would download the package’s deb file into the directory where the command was run. You can download packages using the command below:

apt download <package name>

If you are then interested in installing the .deb file, you can then install using the install command.

Update repository index

Remember we talked about sources.list earlier? Well, when a new version of a package is released, your linux machine is not able to install it yet because it would not indicate. To have it indicate, it needs to reflect in the sources.list file and this can be done using the update command.

This command refreshes the repository index and keeps it up-to-date with the latest changes to the listed packages.

Remove packages

Packages break. Packages become obsolete. Packages need to be removed.

Apt makes it easy to remove packages. Here are different conditions to removing packages: removing the binary files and keeping the config files, removing the binary files and the config files.

To remove the binary files alone, the remove command is used.

apt remove <package name>

More than one package can be removed, so you can have apt remove nginx top to remove the Nginx and top packages at the same time.

To remove the configuration files, the purge command is used.

If you wish to do both at once, the commands can be combined as seen below:

apt remove –purge <package name>

Before proceeding, it should be known that when packages are removed, their dependencies remain i.e. they are not removed too. To remove the dependencies while uninstalling, the autoremove command is used as seen below:

apt autoremove <package name>

List packages

Yes, you can have the packages on your Linux machine listed. You can have a list of all packages in the repository index, installed packages and upgradeable packages.

Regardless what you intend doing, the list command would be used.

The command above is used to list all the packages available in the repository index.

The command above is used to list the packages installed on your Linux machine.

The command above is used to list the packages installed on your machine that have upgrades available.

Updating packages

When it comes to packages, it’s not all about installing and removing packages; they need to be updated too.

You can decide to upgrade a single package or all packages at once. To update a single package, the install command is going to be used. Surprising right? Yes, however we are going to be adding the –only-upgrade parameter.

apt install –only-upgrade <package name>

This works when you intend upgrading just one package. However, if you want to upgrade all the packages you would need to use the upgrade command.

The following command would be used to make such an upgrade:

It should be noted that the upgrade command doesn’t remove dependencies and even if the upgraded packages do not need them anymore i.e. they are obsolete.

System upgrade

Unlike the regular upgrade, the full-upgrade command to be discussed here performs a complete system upgrade.

With the full-upgrade command, obsolete packages and dependencies are removed and all packages (including system packages) are upgraded to their latest versions.

The command for doing this, is full-upgrade as seen below:

Conclusion

Apt is a powerful tool that makes the use of Debian and Ubuntu based Linux distributions a wonderful experience. Most of the apt commands listed here require root permissions, so you may need to add sudo to the start of the commands.

These commands are just a tip of the iceberg of the immense powers that the apt tool possesses, and they are powerful enough to get you comfortable with managing packages on your Linux machine.

Source

More Roman Numerals and Bash

When in Rome: finishing the Roman numeral converter script.

In my last article, I started digging in to a classic computer science puzzle: converting Roman numerals to
Arabic numerals. First off, it more accurately should be called Hindu-Arabic, and it’s worth
mentioning that it’s believed to have been invented somewhere between the first and fourth
century—a counting system based on 0..9 values.

The script I ended up with last time offered the basics of parsing a specified Roman numeral and
converted each value into its decimal equivalent with this simple function:

mapit() {
case $1 in
I|i) value=1 ;;
V|v) value=5 ;;
X|x) value=10 ;;
L|l) value=50 ;;
C|c) value=100 ;;
D|d) value=500 ;;
M|m) value=1000 ;;
* ) echo “Error: Value $1 unknown” >&2 ; exit 2 ;;
esac
}

Then I demonstrated a slick way to use the underutilized seq command to parse a string character by
character, but the sad news is that you won’t be able to use it for the final Roman numeral to
Arabic numeral converter. Why? Because depending on the situation, the script sometimes
will need to jump two ahead, and not just go left to right linearly, one character at a time.

Instead, you can build the main loop as a while loop:

while [ $index -lt $length ] ; do

our code

index=$(( $index + 1 ))
done

There are two basic cases to think about in terms of solving this algorithmic puzzle: the subsequent
value is greater than the current value, or it isn’t—for example, IX versus II. The first is 9
(literally 1 subtracted from 10), and the second is 2. That’s no surprise; you’ll need to know both the
current and next values within the script.

Sharp readers already will recognize that the last character in a sequence is a special case,
because there won’t be a next value available. I’m going to ignore the special case to start with,
and I’ll address it later in the code development. Stay tuned, sharpies!

Because Bash shell scripts don’t have elegant in-line functions, the code to get the current and
next values won’t be value=mapit(romanchar), but it’ll be a smidge clumsy with its use of the global
variable value:

mapit $
currentval=$value

mapit $
nextval=$value

It’s key to realize that in the situation where the next value isn’t greater than the current value
(for example, MC), you can’t automatically conclude that the next value isn’t going to be part of a
complex two-value sequence anyway. Like this: MCM. You can’t just say M=1000 and C=500, so let’s
just convert it to 1500 and process the second M when we get to it. MCM=1900, not 2500!

The basic logic turns out to be pretty straightforward:

if [ $nextval -gt $currentval ] ; then
sum=$(( $sum + $nextval – $currentval ))
else
sum=$(( $sum + currentval ))
fi

Done!

Or, um, not. The problem with the conditional code above is that in the situation where you’ve
referenced both the current and next value, you need to ensure that the next value isn’t again
processed the next time through the loop.

In other words, when the sequence “CM” is converted, the M shouldn’t be converted yet
again the second time through the loop.

This is precisely why I stepped away from the for loop, so you can have some passes through the loop
be a +1 iteration but others be a +2 iteration as appropriate.

With that in mind, let’s add the necessary line to the conditional statement:

if [ $nextval -gt $currentval ] ; then
sum=$(( $sum + $nextval – $currentval ))
index=$(( $index + 1 ))
else
sum=$(( $sum + currentval ))
fi

Remember that the very bottom of the while loop still has the index value increment +1. The above
addition to the conditional statement is basically that when the situation of next > current is
encountered, the script will process both values and jump ahead an extra character.

This means that for any given Roman numeral, the number of times through the loop will be equal to or
less than the total number of characters in the sequence.

Which means the problem is now solved except for the very last value in the sequence. What happens if
it isn’t part of a next-current pair? At its most simple, how do you parse “X”?

That turns out to require a bunch of code to sidestep both the conversion of nextval from the string
(which will fail as it’s reaching beyond the length of the string) and any test reference to
nextval.

That suggests a simple solution: wrap the entire if-then-else code block in a conditional that tests
for the last character:

if [ $index -lt $length ] ; then
if-then-else code block
else
sum=$(( $sum + $currentval ))
fi

That’s it. By George, I think you’ve got it! Here’s the full while statement, so you can
see how this fits into the overall program logic:

while [ $index -le $length ] ; do

mapit $
currentval=$value

if [ $index -lt $length ] ; then
mapit $
nextval=$value

if [ $nextval -gt $currentval ] ; then
sum=$(( $sum + $nextval – $currentval ))
index=$(( $index + 1 ))
else
sum=$(( $sum + $currentval ))
fi
else
sum=$(( $sum + $currentval ))
fi

index=$(( $index + 1 ))

done

It turns out not to be particularly complex after all. The key is to recognize that you need to parse the
Roman number in a rather clumped manner, not letter by letter.

Let’s give this script a few quick tests:

$ sh roman.sh DXXV
Roman number DXXV converts to Arabic value 525
$ sh roman.sh CMXCIX
Roman number CMXCIX converts to Arabic value 999
$ sh roman.sh MCMLXXII
Roman number MCMLXXII converts to Arabic value 1972

Mission accomplished.

In my next article, I plan to look at the obverse of this coding challenge, converting Arabic numerals to
Roman numeral sequences. In other words, you enter 99, and it returns XCIX. Why not take a stab at
coding it yourself while you’re waiting?

Source

How to use parted on Linux – Linux Hint

Parted is a command line tool for managing disk partitions on Linux. Parted can be used to work with both MSDOS and GPT partition tables. Parted can be used to do many low level partitioning tasks easily. In order to use parted correctly, you will need a lot of knowledge on the physical structure of the disk such as the block size of the disk. In this article, I will show you how to use parted on Linux. I will be using Ubuntu 18.04 LTS for the demonstration. So, let’s get started.

If you’re using Ubuntu or any Debian based Linux distributions, then you can easily install parted as it is available in the official package repository. First, update the APT package repository cache with the following command:

The APT package repository cache is updated.

Now, run the following command to install parted:

$ sudo apt install parted

Now, press y and then press <Enter> to continue.

Parted should be installed.

On CentOS/RHEL 7, you can install parted with the following command:

$ sudo yum install parted -y

Finding Storage Device Identifiers:

Before you can start working with parted, you have to know which storage device you need to partition.

You can run the following command to list all the attached storage devices on your computer:

$ sudo lshw -class disk -short

As you can see, I have 2 storage devices on my computer, /dev/sda and /dev/sdb. Here, /dev/sdb is my 32GB USB thumb drive. This is the one I want to partition.

Opening Storage Device with parted:

Now that you know which storage device you want to partition, you can open parted as follows:

NOTE: Make sure you change /dev/sdb to the storage device that you want to partition.

Parted should be opened. Now, you can run many of the parted commands to partition your desired storage device any way you want.

Switching to Different Storage Device:

You can also start parted without specifying which storage device to open beforehand as follows:

As you can see, parted is started. By default, /dev/sda, the first/primary storage device is selected.

You can list all the storage devices on your computer with the following parted command:

As you can see, the storage devices on my computer /dev/sda and /dev/sdb are listed along with their physical size.

Now, you can use the select parted command to select the storage device (let’s say /dev/sdb) that you want to partition as follows:

As you can see, /dev/sdb is selected.

Creating a New Partition Table:

You can create GPT and MSDOS partition table with parted.

To create a GPT partition table, run the following parted command:

To create a MSDOS partition table, run the following parted command:

I will go for MSDOS partition table as I am partitioning a USB thumb drive. The procedure for the GPT partition creation is the same.

Now, type in Ignore and press <Enter>.

When you create a new partition table, all the existing partitions will be erased. If you’re okay with it, type in Yes and then press <Enter>.

For some reason, the changes can’t be applied immediately. But it’s alright. Type in Ignore and press <Enter>.

A new partition table should be created.

Creating New Partitions:

You can create a new partition with the following parted command:

Now, type in either primary or extended depending on whether you want to create a primary or extended partition. Once you’re done, press <Enter>.

Now, type in a filesystem type that you want to use for the partition. I will go for ext4.

NOTE: You can find out what keywords you can use here with the following command:

$ grep -v nodev /proc/filesystems| cut -f2

Now, type in the location in megabyte (MB) where the partition starts. If it’s the first partition, then 1 (MB) is an acceptable value. Once you’re done, press <Enter>.

Now, type in the location in megabyte (MB) where the partition ends. The size of the partition will be the difference between the End and Start location. For example, let’s say, you want to create a 1GB/1024MB partition. So, the end will be 1024. Once you’re done, press <Enter>.

NOTE: You can’t put 1025 here due to alignment problems. Parted don’t align partitions automatically.

The partition will be created.

You can list all the partitions of your selected storage devices as follows:

As you can see, the newly created partition is listed.

NOTE: When you create multiple partitions with parted, you have to start the new partition from at least End+1 of the last partition. For example, the partition I created earlier ended in 1024MB. So, the next partition will start from 1025MB or more.

I created another partition to demonstrate how to remove partitions using parted in the next section.

Removing Partitions:

First, list all the partitions of your selected storage device as follows:

Let’s say, you want to delete the partition number 2 as marked in the screenshot below.

To do that, run the following parted command:

As you can see, partition number 2 no longer exists.

Changing the Unit:

When you create a new partition, you have to specify the Start and End section of your new partition. The default unit is MB. You can change it very easily in parted.

The supported units and keywords are:

Unit keyword
Sectors s
Bytes B
Cylinders cyl
cylinders, heads, sectors chs
Kilobytes KB
Mebibytes MiB
Megabytes MB
Gibibytes GiB
Gigabytes GB
Percentage %

NOTE: For more information on this, check the man page of parted with the following command:

You can use the unit command to change the default unit.

For example, let’s say you want to change the default unit MB to sectors, then run the following command:

As you can see, the display unit has changed as well.

Now, you can also create partitions with the newly set unit.

So, that’s how you use parted on Linux. Thanks for reading this article.

Source

Listen to the radio at the Linux terminal

You’ve found your way to our 24-day-long Linux command-line toys advent calendar. If this is your first visit to the series, you might be asking yourself what a command-line toy even is. It could be a game or any simple diversion that helps you have fun at the terminal.

Some of you will have seen various selections from our calendar before, but we hope there’s at least one new thing for everyone.

There are many ways to listen to music at the command line; if you’ve got media stored locally, cmus is a great option, but there are plenty of others as well.

Lots of times when I’m at the terminal, though, I’d really rather just zone out and not pay close attention to picking each song, and let someone else do the work. While I’ve got plenty of playlists that work for just such a purpose, after a while, even though go stale, and I’ll switch over to an internet radio station.

Today’s toy, MPlayer, is a versatile multimedia player that will support just about any media format you throw at it. If MPlayer is not already installed, you can probably find it packaged for your distribution. On Fedora, I found it in RPM Fusion (be aware that this is not an “official” repository for Fedora, so exercise caution):

$ sudo dnf install mplayer

MPlayer has a slew of command-line options to set depending on your situation. I wanted to listen to the local college radio station here in Raleigh (88.1 WKNC, they’re pretty good!), and so after grabbing the streaming URL from their website, all that took to get my radio up and running, no GUI or web player needed, was:

$ mplayer -nocache -afm ffmpeg http://wknc.sma.ncsu.edu:8000/wknchd1.mp3

MPlayer is open source under the GPLv3, and you can find out more about the project and download source code from the project’s website.

As I mentioned in yesterday’s article, I’m trying to use a screenshot of each toy as the lead image for each article, but as we moved into the world of audio, I had to fudge it a little. So today’s image was created from a public domain icon of a radio tower using img2txt, which is provided by the libcaca package.

Do you have a favorite command-line toy that you we should have included? Our calendar is basically set for the remainder of the series, but we’d still love to feature some cool command-line toys in the new year. Let me know in the comments below, and I’ll check it out. And let me know what you thought of today’s amusement.

Be sure to check out yesterday’s toy, Let you Linux terminal speak its mind, and come back tomorrow for another!

Source

WP2Social Auto Publish Powered By : XYZScripts.com