The 10 Best Wine and Steam Play Games on Linux

So, your favorite game isn’t available on Linux. What now? It might come as a surprise that there are plenty of excellent games that run on Linux through Wine or Steam’s new Steam Play feature. You can get up and running with them quickly, and enjoy decent performance.

Now, before you get started, Lutris is easily your best bet for handling Wine games outside of Steam. If the game is a Steam game, enable Steam Play on your account to play your Windows games like native through Steam for Linux.

Overwatch

Overwatch Overwatch may just be the most popular competitive first person shooter on the PC, and that’s really saying something considering the competition that it’s up against. Since it’s release, Overwatch has been wildly popular among casual and hardcore PC gamers alike. Its fun animated style paired with quick and varied gameplay makes it an instantly likable and accessible game to pick up.

It’s not just mindless fun, though. Overwatch is a major player in the eSports scene, proving that there’s a great deal of technical aptitude that goes into truly mastering the game. Whether you want to casually mess around or dive into the competitive ladder, Overwatch will have you engaged for years to come.

This one is available through a convenient Lutris installer that’s regularly updated.

Witcher III

Witcher IIIThis game was practically destined to be a beloved favorite for years to come. The Witcher series is easily one of the best in the modern RPG world, and with this third installment, it’s cemented itself in gaming history.

Witcher 3 is an 3rd person action RPG unlike any other. The world is open, alive, and allows you an insane degree of choice. The multiple stories running through this game are deep, meaningful, and really raise the bar in quality storytelling in games. Until recently, Witcher 3 has been a sore spot among Linux gamers(there was supposed to be a port), but Steam Play makes playing it a breeze.

Doom

DoomWhat’s not to love about DOOM. It’s got demons, explosions, space, and more gratuitous violence than you could ever need. It’s wonderful, and now, you can play it in all it’s gory glory on Linux.

DOOM lets you shoot your way through the hordes of hell in the single player campaign that brings you through a moderately challenging story filled with all sorts of demonic terrors. Since its release, DOOM has only added to the amount of single player content too. Multiplayer is a huge portion of any good FPS, and DOOM delivers here too. DOOM features several multiplayer modes packed with action and creative ways to blow up your friends.

DOOM is best played on Steam with Steam Play.

Dark Souls III

Dark Souls IIIThe Dark Souls franchise has earned a meme-worthy reputation for being impossibly difficult. While that might be an anomaly for younger gamers, grizzled veterans fondly remember the days when every game was punishingly hard, and it was a legitimate accomplishment to beat one. Dark Souls III brings back those glory days.

Dark Souls III is set in a Gothic fantasy world haunted with everything from animated skeletons to gigantic monsters just waiting to crush you like a tin can in your pathetic armor. This game is challenging in all the best ways, and it’ll keep you playing, however aggravated you may be.

Dark Souls III is playable through Steam Play.

Skyrim

Skyrim Skyrim has made the rounds to just about every platform and console you can think of except for Linux. That’s probably because it’s been playable with Wine for quite some time.

If you somehow haven’t heard of Skyrim by now, it’s the latest installment in the Elder Scrolls series, taking place in the Norse-inspired northern lands of Skyrim. Explore the epic open world as the Dragonborn, a legendary hero built for fighting dragons. It’s a good thing you’re there too, because Skyrim’s got a serious dragon problem. Aside from the nearly endless side quests that Skyrim offers, there is a massive and active modding community around the game, creating everything from the fantastic to the truly bizarre to keep your game fresh for years.

It’s easiest to play Skyrim through Steam Play.

No Man’s Sky

No Man's Sky No Man’s Sky is a game that pushed boundaries. It started off making lofty promises of an infinite universe and and limitless possibilities. Then, when it launched, the reception was mixed at best. Now, it’s fixing the things that weren’t well liked and shaping itself into a truly excellent game.

No Man’s Sky is a massive online exploration game that allows you to explore uncharted worlds with procedurally generated content and inhabitants, meaning that everything is dynamic, changing, and different. You’ll never find yourself “discovering” the same thing twice.

The game has a vibrant and striking art style and a ton do explore and do. This one is really just a gigantic sandbox, so if you’re more into story driven games, it might not be for you.

No Man’s Sky is supported by Steam Play.

StarCraft II

StarCraft II StarCraft is one of the longest running RTS games of all time, and it can be credited with the rise of eSports. StarCraft II is a massive game with two major expansion packs and a constantly growing single player content.

The real strength of StarCraft has always been its competitive play, and that’s still going strong. StarCraft II is one of the biggest eSports titles globally, and online play at every level is fun, challenging, and varied. There’s a lot that goes in to playing StarCraft well, and you can spend years exploring the depth of its systems.

StarCraft II can be easily installed and run through Lutris.

World of Warcraft

World of Warcraft World of Warcraft is the MMO juggernaut that doesn’t seem like it’s going to stop any time soon. WoW debuted 14 years ago, and it still has a large and active community now after its seventh expansion pack released in August.

A lot has changed in that time, but the breadth of content available for WoW players has only grown. Part of this game’s strength is its ability to allow players to decide how they want to play. Do you like raiding? Great! Would you rather beat the snot out of other players? That’s awesome too! Maybe you’d rather travel the world collecting pets and armor. Go for it! They’re all great ways to play WoW.

New quests, stories, and end game content is always coming for WoW, and that’s not slowing down. If you’re feeling nostalgic, the classic 2004 version of the MMO is arriving in the summer of 2019 and will be included in your WoW subscription, so step through the dark portal to your fond memories of Barrens chat whenever you like. WoW has been playable on Wine since the beginning. You can easily install and manage it with Lutris.

Fallout 4

Fallout 4 Fallout is another open world institution like The Elder Scrolls, only it’s set in a post apocalyptic world destroyed by nuclear war. You emerge from your underground vault and begin to rebuild and fight for your place with the new world.

Fallout 4 is an open world game with boundless room to explore and tons of side quests and interesting things to do in addition to the main storyline. Fallout 4 is a shooter with sci-fi elements and loads of way to customize your character’s weapons and armor.

Fallout 4 is best played on Steam with Steam Play.

Grand Theft Auto V

Grand Theft Auto VDo the Grand Theft Auto games even need an introduction anymore? GTA V has been a another sore spot for Linux gamers for a long time. Until very recently it wasn’t playable, despite its age.

GTA V, like the rest of the franchise is an open world criminal sandbox that lets you do pretty much anything you want in a thriving city. GTA V did take some steps to bring more substance to the storyline and customization elements of the game, allowing you an opportunity to get more invested in the game than just wanting to run people over with a stolen tank.

Like many of the games on this list, GTA V has an active modding community that pumps all sorts of awesome mods and cheats into the game to turn an already sprawling game into something bound only by imagination.

GTA V is playable with Steam Play.

Closing Thoughts

Clearly, Steam Play is already a big force in pushing Wine gaming forward. It’s only been around for a short while(still in beta as of writing this), and it’s already breaking down years old barriers for Linux gamers. It’s not too much of a stretch for future games to actually target Steam Play compatiblity, and that’s probably Valve’s intention.

While it’d be nice to have any of these games arrive natively on Linux, there’s no denying that playing them on Linux with Wine is a pretty close second.

Source

Best 25 Ubuntu News Websites and Blogs – Linux Hint

Linux is an open-source operating system and Ubuntu is one of its very popular distros which is rapidly increasing its user base. With Linux and its distros, one can learn and do a lot of things. In simple words, Linux is an ocean of knowledge and endless opportunities. Many people reading this article will claim that they know everything about Linux and they are expert at Ubuntu but this is not the case because there are many things you don’t know about Linux.

This article is dedicated to everyone using Ubuntu, right from the noobs to the Linux professionals. Today I am going to give you list of Top 25 Ubuntu news websites and blogs which you guys will find very helpful to learn more about Linux and its distros. The website listed here cover all the minor details such as How-to guides, news, tutorials and everything you need to know about Linux.

  1. OMG! Ubuntu!

Launched in 2009, OMG! Ubuntu! is one of the best Ubuntu news site available on the internet. It covers all the latest news from the Linux world such as new releases, updates, and application based articles. It keeps you updated with the reviews and the every minor news from the Linux world. It also covers some tutorials and How-to articles.

  1. TecMint

TecMint is another popular Linux blog on my list, it is very popular for its How-to articles, tutorials and in-depth guides to almost every question or concern about Linux and its distros. It also covers all the latest Linux news and updates. This website is an ocean of knowledge about Linux, it covers useful Linux commands and tricks which you will find very useful especially if you are new to Linux operating system.

  1. UbuntuPIT

If you’re not sure about which software to use or install on Ubuntu in particular category then UbuntuPit is the best website for you. It covers in-depth reviews of the various application softwares in different categories with comparison. It covers different articles in Top 10, Top 20, etc. categories which you will find useful to find what you need.

  1. MakeUseOf

MakeUseOf is basically a tech website which covers latest tech news and gadgets reviews. But is doesn’t stop there, it also covers Linux news and other reviews, How-to articles on regular basis. You will find some really interesting and engaging articles about Linux and its distros. There are some tips and tricks are also covered to boost your Ubuntu experience.

  1. It’s FOSS

It’s FOSS is another Linux and open-source dedicated news website on my list alongside OMG! Ubuntu!. It covers shell and kernel based articles which can be very useful for developers and Linux administrators. There is also good collection of How-to and application review articles for every Linux user.

  1. Linux And Ubuntu

Linux and Ubuntu should be the first Linux website on the every Linux noobs list, because it offers Linux courses which can be followed by beginners as well Linux professionals. Apart from that it also covers latest news from Linux and open-source world, app reviews and many engaging articles.

  1. Web Upd8

Web Upd8 is one of the most trusted Linux blogs when it comes to user interactions. It offers several PPAs for Ubuntu and many tutorials and How-to guides for various Linux applications and services. Web Upd8 will keep you updated with latest developments in Ubuntu and GNOME environments.

  1. Tips On Ubuntu

Tips On Ubuntu is simple but very useful website for Ubuntu users as it covers small and tiny articles featuring tips and tricks to improve Ubuntu experience for users. It also covers latest updates and releases of applications with guide to install them.

  1. Phoronix

Phoronix is another website on my list covering latest news from tech world with more focus on developments in the Linux and open-source world. It also provides hardware reviews, open-source benchmarks and monitors Linux performance.

  1. Tech Drive-In

Tech Drive-In is an all-in-one website for tech savvy peoples out there; it covers all the latest news from tech world with timely updates from Linux and its distros. It also covers gaming reviews focus on Linux and Steam. Its Distro Wars section is amazing as it covers round up of latest developments in various operating systems.

  1. UbuntuHandBook

UbuntuHandBook is the one stop for all the latest Linux News, Ubuntu PPAs and reviews on latest application releases. This website offers short and simple step-by-step guides to install applications and updates. Other Linux distros are also covered well on this website.

  1. Unixmen

Unixmen is another very useful Linux news website on my list which covers How-to articles, Tips and Tricks, tutorials and open-source news. It covers all the latest news and updates from most popular Linux distros such as Ubuntu, LinuxMint, Fedora, CentOS and others.

  1. Ubuntu Geek

Having a trouble running any application? Or don’t know actually how to use it? No worries, Ubuntu Geek has everything covered for you, right from the easy to understand tutorials to tips and tricks. It has many installation guides for various applications too, which are explained in simple way.

  1. Linux-News

Linux-News from the Blogosphere is a simple and useful blog for everything Linux and open-source. It covers installation guides, How-to articles and latest news as well as updates from Linux and open-source community.

  1. nixCraft

nixCraft offers some really good content which can be very useful for beginners as well as professionals. It offers in-depth Linux shell scripting tutorials, and other developer news and How-to articles.

  1. NoobsLab

I will recommend NoobsLab especially for those who are just beginners in development as it offers some really good tutorials for noobs.It also covers Python 3 tutorials, ebooks and themes for various Linux distros. It doesn’t stop there; it also covers latest from Linux and open-source world with some tips and tricks articles too.

  1. opensource

As the name suggests, opensource covers all the latest news and updates from open-source world. It has good collection of useful resources for Linux developers and administrators. This is the huge collection of endless knowledge which you will find very useful at any point of your professional career.

  1. Reddit Linux

Reddit Linux is more or less similar to community of developers and publishers, as it covers everything from Linux and GNU/Linux. It covers the roundup of latest software updates, latest releases of various Linux distros and all the latest developments from Linux and open-source world.

  1. Linux Journal

Linux Journal is a kind of magazine for all the latest news and update from Linux and its distros. You can also subscribe to its digital edition which lets you get connected to open-source community.

  1. Linux Scoop

Linux Scoop is all about latest releases and updates of Linux and its distributions. But there is one thing that makes this news blog different from the others listed here is that it doesn’t publish articles rather it offers short but very useful videos.

  1. Linux Insider

LinuxInsider is another tech blog on my list which covers Linux and other tech news as well as reviews from all corners of the world. It covers ample of updates from community, developers and enterprises.

  1. Fossbytes

Fossbytes is one of the best tech news and review website out there on the internet. It covers everything from tiny application updates to full gaming reviews on different gaming consoles and operating system platforms.

  1. LifeHacker Ubuntu

LifeHacker is another decent website to keep you up-to-date with all the latest news from Linux and open-source community. Installation guides and How-to articles are short and simple, Linux noobs will find them useful and easy to understand.

  1. Linux Magazine

Linux Magazine, you can buy this in .PDF file or read all the latest news articles directly from its website. Having more focus on news and updates from open-source developer community, it covers Linux and its distros too. System administrators and developers will find this interesting and useful.

  1. Linux Today

Linux Today is a simple blog which covers roundup of latest releases from Linux and other open-source communities. It also introduces you to various developer tools with beginner’s guides and tutorials.

Conclusion

So these are the Best 25 Ubuntu news and blogs you must follow to keep yourself updated with Ubuntu and its latest releases. If you guys follow any other blog or website other than those which are listed here, then feel free to share your thoughts at @LinuxHint & @SwapTirthakar.

Source

Qt Announces Qt for Python, All US Publications from 1923 to Enter the Public Domain in 2019, Red Hat Chooses Team Rubicon for Its 2018 Corporate Donation, SUSE Linux Enterprise 15 SP1 Released and Microsoft Announces Open-Source “Project Mu”

News briefs for December 20, 2018.

Qt introduces Qt for Python. This new offering allows “Python developers
to streamline and enhance their user interfaces while utilizing Qt’s
world-class professional support services”. According to the press release,
“With Qt for Python, developers can quickly and easily visualize the massive
amounts of data tied to their Python development projects, in addition to
gaining access to Qt’s world-class professional support services and
large global community.” To download Qt for Python, go here.

As of January 1, 2019, all works published in the US in 1923 will enter
the public domain. The Smithsonian
reports
that it’s been “21 years since the last mass expiration of
copyright in the U.S.” The article continues:
“The release is unprecedented, and its
impact on culture and creativity could be huge. We have never seen such a
mass entry into the public domain in the digital age. The last one—in
1998, when 1922 slipped its copyright bond—predated Google. ‘We have
shortchanged a generation,’ said Brewster Kahle, founder of the Internet
Archive. ‘The 20th century is largely missing from the internet.'”

Red
Hat chooses Team Rubicon for its 2018 US corporate holiday donation
.
The $75,000 donation will “will contribute to the organization’s efforts to
provide emergency response support to areas devastated by natural disasters.”
From Red Hat’s announcement: “By pairing the skills and experiences of
military veterans with first responders, medical professionals and technology
solutions, Team Rubicon aims to provide the greatest service and impact
possible. Since its inception following the 2010 Haiti earthquake, Team
Rubicon has launched more than 310 disaster response operations in the U.S.
and across the world—including 86 in 2018 alone.”

SUSE
Linux Enterprise 15 Service Pack 1 Beta 1 is now available
. Some of the
changes include Java 11 is now the default JRE, libqt was updated to 5.9.7,
LLVM was updated to version 7, and much more. According to the announcement,
“roughly 640 packages have been touched specifically for SP1, in addition to packages
updated with Maintenance Updates since SLE 15.” See the release
notes
for more information.

Microsoft yesterday announced “Project Mu” as an open-source UEFI alternative
to TianoCore. Phoronix
reports
that “Project Mu is Microsoft’s attempt at ‘Firmware as a
Service’ delivered as open-source. Microsoft developed Project Mu under the
belief that the open-source TianoCore UEFI reference implementation is ‘not
optimized for rapid servicing across multiple product lines.'”
See also the Microsoft
blog
for details.

Source

Install NextCloud on Ubuntu – Linux Hint

NextCloud is a free self-hosted file sharing software. It can be accessed from the web browser. Next cloud has apps for Android, iPhone and Desktop operating systems (Windows, Mac and Linux). It is really user friendly and easy to use.

In this article, I will show you how to install NextCloud on Ubuntu. So, let’s get started.

On Ubuntu 16.04 LTS and later, NextCloud is available as a snap package. So, it is very easy to install.

To install NextCloud snap package on Ubuntu 16.04 LTS and later, run the following command:

$ sudo snap install nextcloud

As you can see, NextCloud snap package is being installed.

NextCloud snap package is installed at this point.

Creating NextCloud Administrator User:

Now, you have to create an administrator user for managing NextCloud. To do that, you have to access NextCloud from a web browser.

First, find out the IP address of your NextCloud server with the following command:

As you can see, the IP address of my NextCloud server is 192.168.21.128. It will be different for you. Make sure you replace it with yours from now on.

Now, from any web browser, visit the IP address 192.168.21.128. Now, type in your Administrator username and password and click on Finish setup.

As you can see, you’re logged in. As you’re using NextCloud for the first time, you are prompted to download the Next Cloud app for your desktop or smart phone. If you don’t wish to download the NextCloud app right now, just click on the x button at the top right corner.

This is the NextCloud dashboard. Now, you can manage your files from the web browser using NextCloud.

Using Dedicated Storage for NextCloud:

By default, NextCloud stores files in your root partition where the Ubuntu operating system is installed. Most of the time, this is not what you want. Using a dedicated hard drive or SSD is always better.

In this section, I will show you how to use a dedicated hard drive or SSD as a data drive for NextCloud. So, let’s get started.

Let’s say, you have a dedicated hard drive on your Ubuntu NextCloud server which is recognized as /dev/sdb. You should use the whole hard drive for NextCloud for simplicity.

First, open the hard drive /dev/sdb with fdisk as follows:

/dev/sdb should be opened with fdisk partitioning utility. Now, press o and then press <Enter> to create a new partition table.

NOTE: This will remove all your partitions along with data from the hard drive.

As you can see, a new partition table is created. Now, press n and then press <Enter> to create a new partition.

Now, press <Enter>.

Now, press <Enter> again.

Press <Enter>.

Press <Enter>.

A new partition should be created. Now, press w and press <Enter>.

The changes should be saved.

Now, format the partition /dev/sdb1 with the following command:

$ sudo mkfs.ext4 /dev/sdb1

The partition should be formatted.

Now, run the following command to mount /dev/sdb1 partition to /mnt mount point:

$ sudo mount /dev/sdb1 /mnt

Now, copy everything (including the dot/hidden files) from the /var/snap/nextcloud/common/nextcloud/data directory to /mnt directory with the following command:

$ sudo cp -rT /var/snap/nextcloud/common/nextcloud/data /mnt

Now, unmount the /dev/sdb1 partition from the /mnt mount point with the following command:

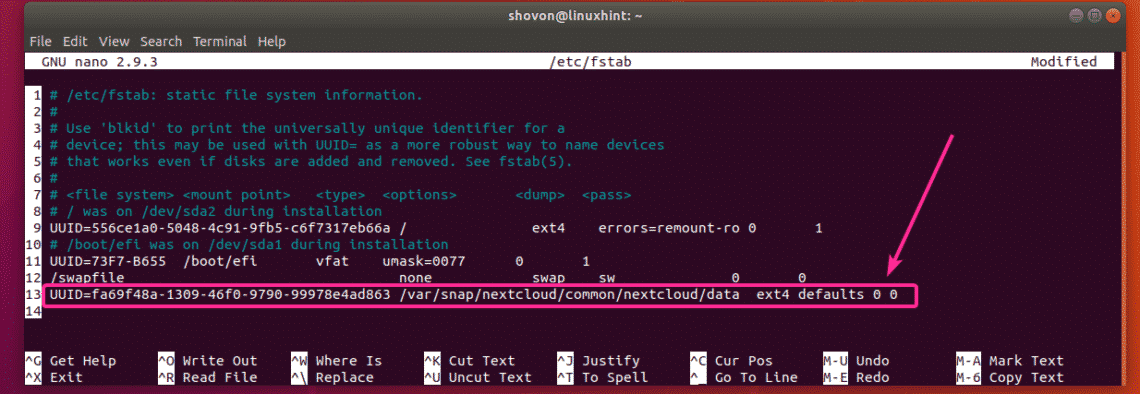
Now, you will have to add an entry for the /dev/sdb1 in your /etc/fstab file, so it will be mounted automatically on the /var/snap/nextcloud/common/nextcloud/data mount point on system boot.

First, run the following command to find out the UUID of your /dev/sdb1 partition:

As you can see, the UUID in my case is fa69f48a-1309-46f0-9790-99978e4ad863

It will be different for you. So, replace it with yours from now on.

Now, open the /etc/fstab file with the following command:

Now, add the line as marked in the screenshot below at the end of the /etc/fstab file. Once you’re done, press <Ctrl> + x, then press y followed by <Enter> to save the file.

Now, reboot your NextCloud server with the following command:

Once your computer boots, run the following command to check whether the /dev/sdb1 partition is mounted to the correct location.

$ sudo df -h | grep nextcloud

As you can see, /dev/sdb1 is mounted in the correct location. Only 70MB of it is used.

As you can see I uploaded some files to NextCloud.

As you can see, the data is saved on the hard drive that I just mounted. Now, 826 MB is used. It was 70MB before I uploaded these new files. So, it worked.

That’s how you install NextCloud on Ubuntu. Thanks for reading this article.

Source
How to Install Jetbrains PHPStorm on Ubuntu – Linux Hint

PHPStorm by JetBrains is one of the best PHP IDE. It has plenty of amazing features. It also has a good looking and user friendly UI (User Interface). It has support for Git, Subversion and many other version control systems. You can work with different PHP frameworks such as Laravel, CakePHP, Zend Engine, and many more with PHPStorm. It also has a great SQL database browser. Overall, it’s one of the must have tool if you’re a PHP developer.

In this article, I will show you how to install PHPStorm on Ubuntu. The process shown here will work on Ubuntu 16.04 LTS and later. I will be using Ubuntu 18.04 LTS for the demonstration. So, let’s get started.

PHPStorm has a snap package for Ubuntu 16.04 LTS and later in the official snap package repository. So, you can install PHPStorm very easily on Ubuntu 16.04 LTS and later. To install PHPStorm snap package on Ubuntu 16.04 LTS and later, run the following command:

$ sudo snap install phpstorm –classic

As you can see, the PHPStorm snap package is being downloaded.

At this point, PHPStorm snap package is installed.

You can also install PHPStorm manually on Ubuntu. But I recommend you use the snap package version as it has better integration with Ubuntu.

Initial Configuration of PHPStorm:

Now that PHPStorm is installed, let’s run it.

To run PHPStorm, go to the Application Menu and search for phpstorm. Then, click on the PHPStorm icon as marked in the screenshot below.

As you’re running PHPStorm for the first time, you will have to configure it. Here, select Do not import settings and click on OK.

Now, you will see the Jetbrains user agreement. If you want, you can read it.

Once you’re finished reading it, check I confirm that I have read and accept the terms of this User Agreement checkbox and click on Continue.

Here, PHPStorm is asking you whether you would like to share usage statistics data with JetBrains to help them improve PHPStorm. You can click on Send Usage Staticstics or Don’t send depending on your personal preferences.

Now, PHPStorm will tell you to pick a theme. Jetbrains IDEs has a Dark theme called Darcula and a Light theme. You can see in how each of the themes look like here. Select the one you like.

If you don’t want to customize anything else, and leave the defaults for the rest of the settings, just click on Skip Remaining and Set Defaults.

If you want to customize PHPStorm more, click on Next: Featured plugins.

Now, you will see some common plugins. If you want, you can click on Install to install the ones you like from here. You can do it later as well.

Once you’re done, click on Start using PhpStorm.

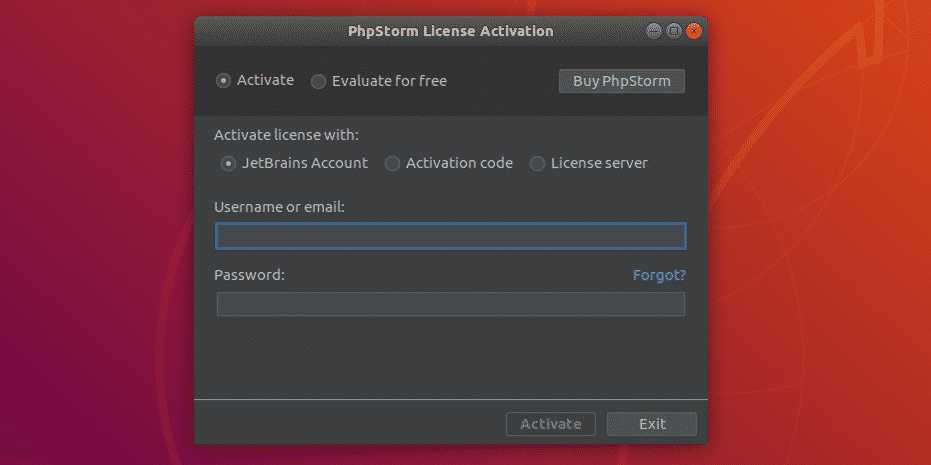
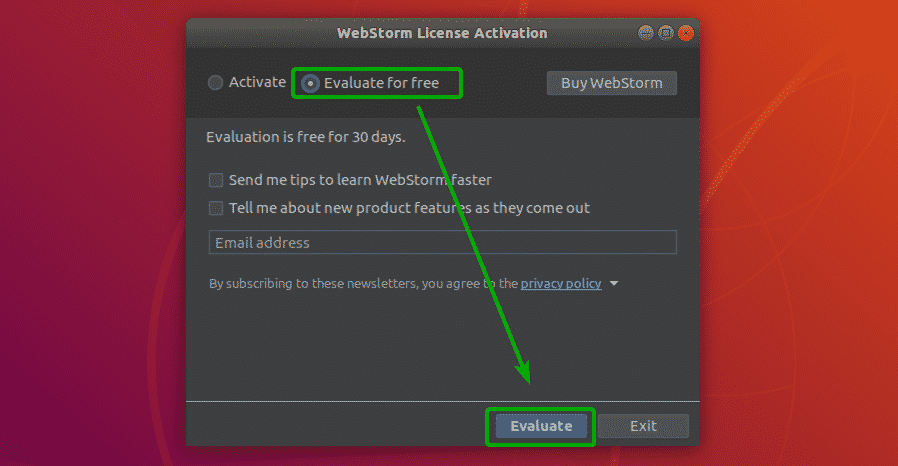
Now, you will be asked to activate PHPStorm. PHPStorm is not free. You will have to buy a license from JetBrains in order to use PHPStorm. Once you have the license, you can activate PHPStorm from here.

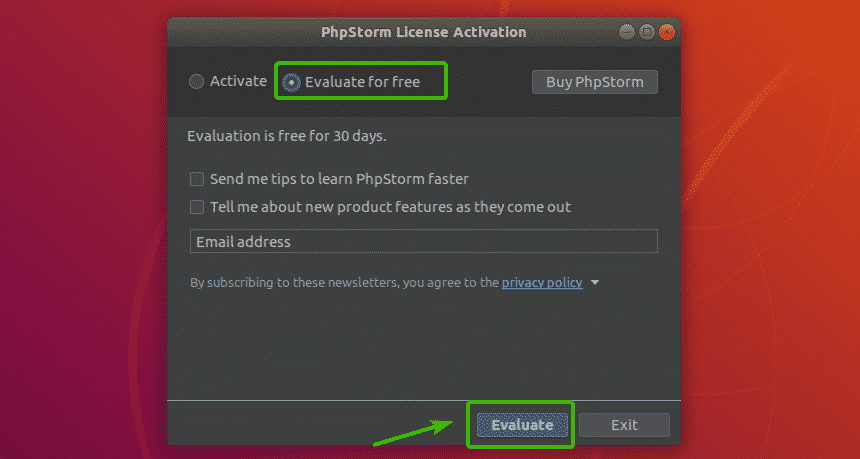
If you want to try out PHPStorm before you buy it, you can. Select Evaluate for free and click and Evaluate. This should give you a 30-day trial.

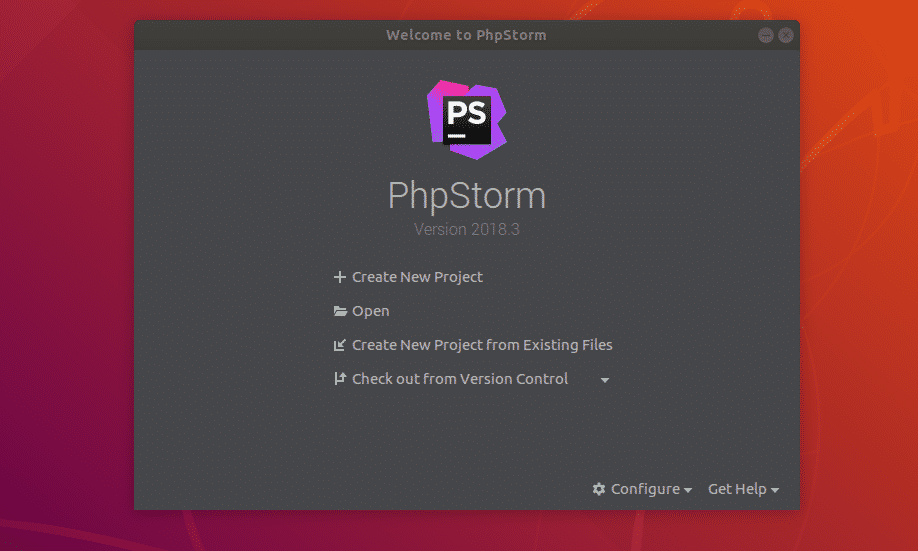
As you can see, PHPStorm is starting. It’s beautiful already.

This is the dashboard of PHPStorm. From here, you can create new projects or import projects.

Creating a New Project with PHPStorm:

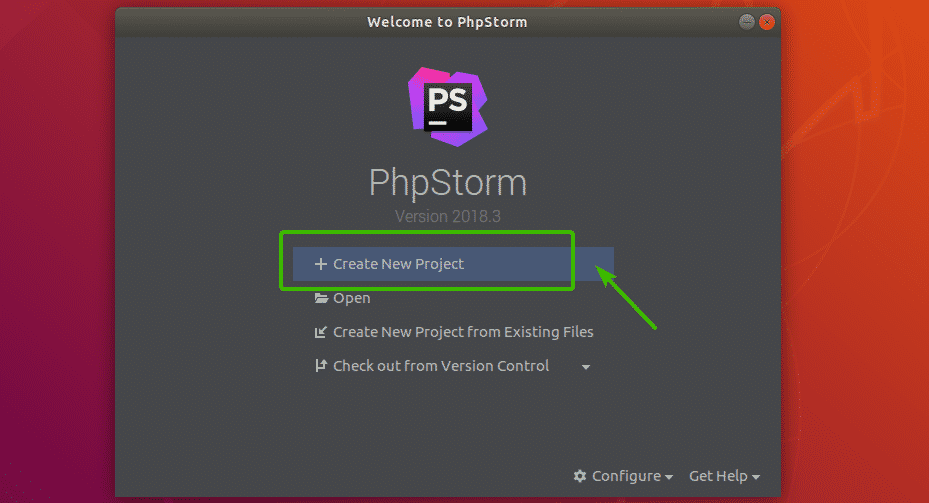
First, open PHPStorm and click on Create New Project.

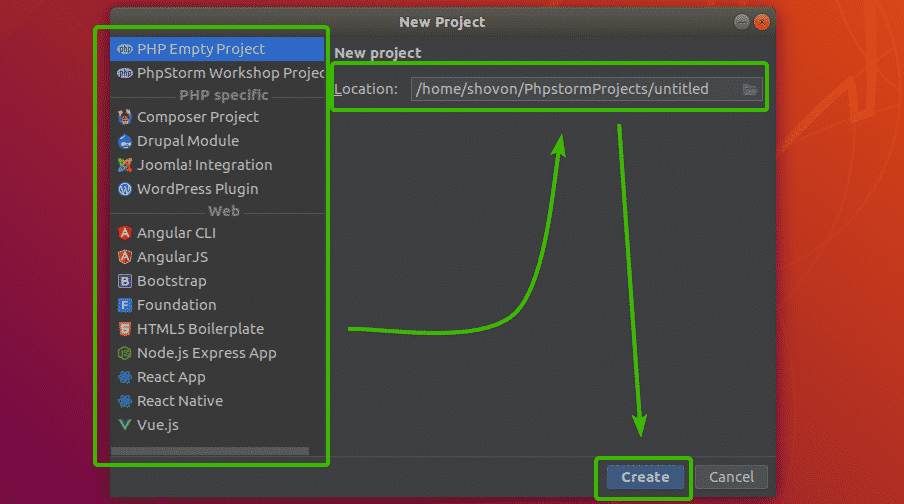
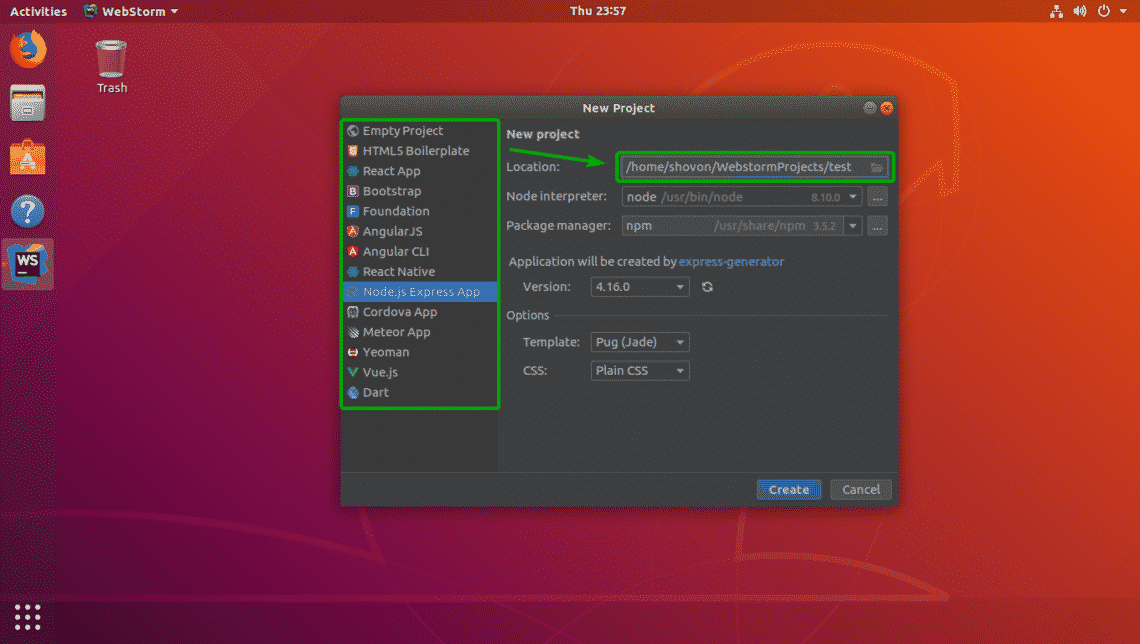
Now, select the project type and then select the location of where the files of your new projects will be saved. Then, click on Create.

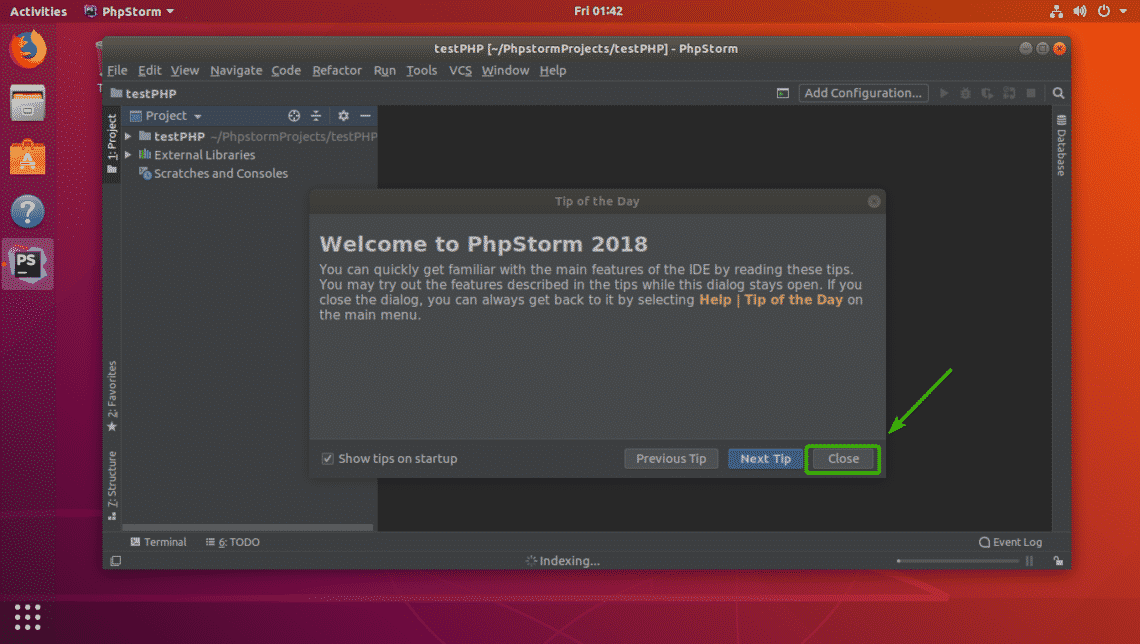
As you can see, a new project is created. Click on Close to close the Tip of the Day window.

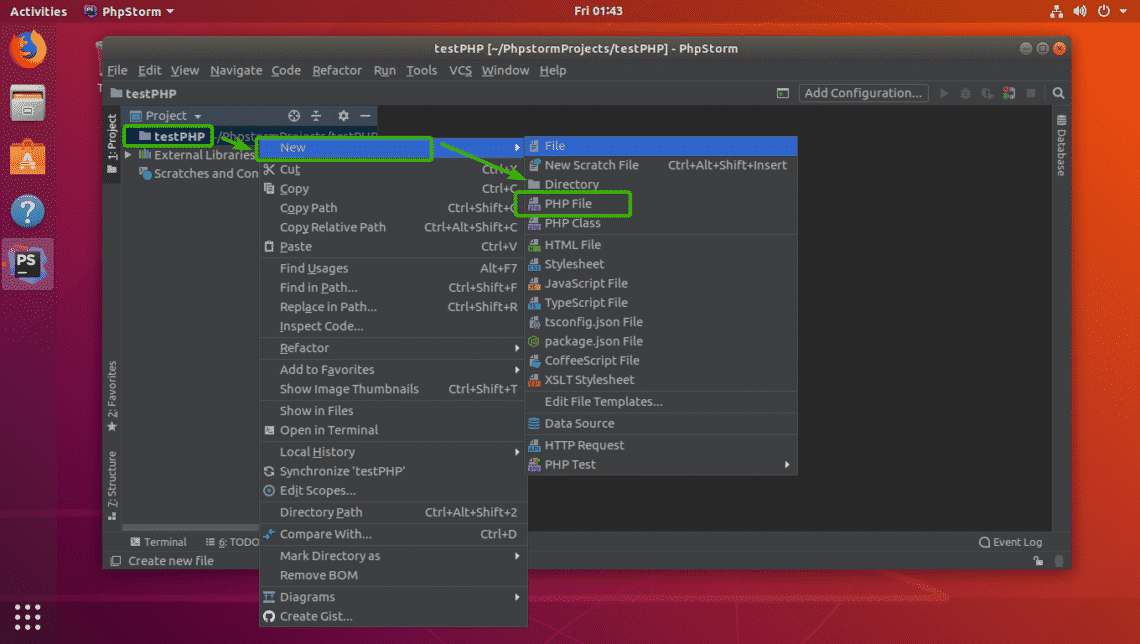
Now, you can create new files in your project as follows. Let’s create a PHP File.

Now, type in a File name and make sure the File extension is correct. Then, click on OK.

As you can see, a new PHP file hello.php is created. Now, you can start typing in PHP code here.

As you can see, you get auto completion when you type in PHP code. It’s amazing.

Changing Fonts and Font Size:

If you don’t like the default font or the font size is too small for you, you can easily change it from the settings.

Go to File > Settings. Now, expand Editor.

Now click on Font. From the Font tab, you can change the font family, font size, line spacing etc. Once you’re done, click on OK.

As you can see, I changed the fonts to 20px Ubuntu Mono and it worked.

Managing Plugins on PHPStorm:

Plugins adds new features or improve PHPStorm IDE. PHPStorm has rich set of plugins available for download and use.

To install plugins, go to File > Settings and then click on the Plugins section.

Here, you can search for plugins. Once you find the plugin you like, just click on Install to install the plugin.

Once you click on Install, you should see the following confirmation window. Just click on Accept.

The plugin should be installed. Now, click on Restart IDE for the changes to take effect.

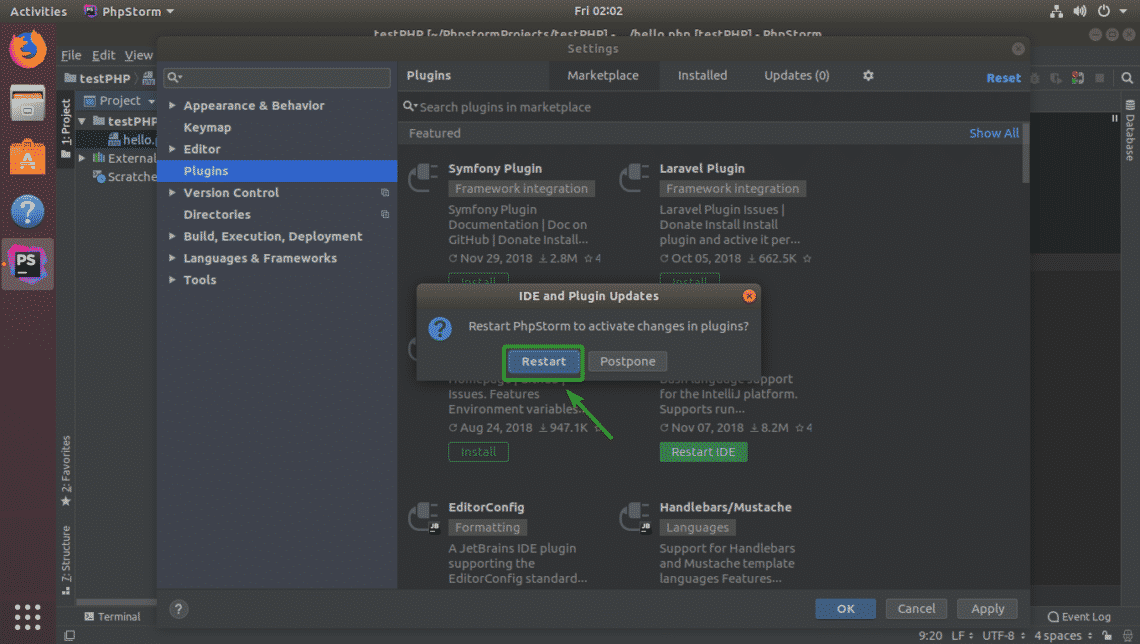
Click on Restart.

As you can see, the plugin I installed is listed in the Installed tab.

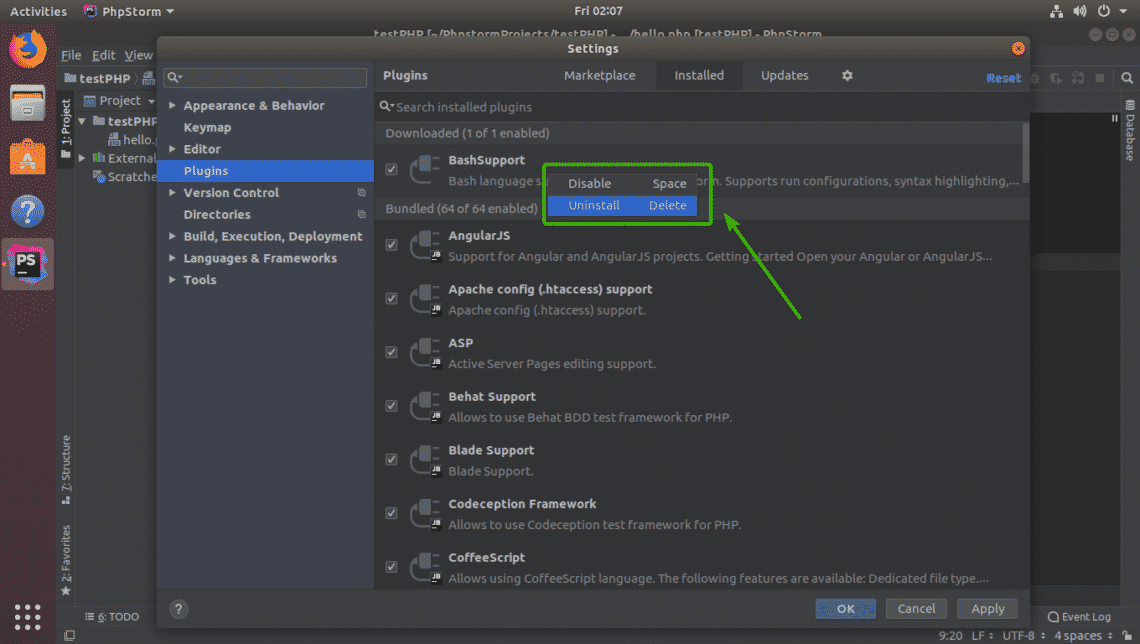
To uninstall a plugin, just select the plugin and press <Delete> or right click on the plugin and select Uninstall.

You can also disable specific plugins if you want. Just select the plugin you want to disable and press <Space Bar>. If you want to enable a disabled plugin, just select it and press the <Space Bar> again. It will be enabled.

So, that’s how you install and use JetBrains PHPStorm on Ubuntu. Thanks for reading this article.

Source

Sharing Docker Containers across DevOps Environments

Docker provides a powerful tool for creating lightweight images and
containerized processes, but did you know it can make your development
environment part of the DevOps pipeline too? Whether you’re managing
tens of thousands of servers in the cloud or are a software engineer looking
to incorporate Docker containers into the software development life
cycle, this article has a little something for everyone with a passion
for Linux and Docker.

In this article, I describe how Docker containers flow
through the DevOps pipeline. I also cover some advanced DevOps
concepts (borrowed from object-oriented programming) on how to use
dependency injection and encapsulation to improve the DevOps process.
And finally, I show how containerization can be useful for the
development and testing process itself, rather than just as a
place to serve up an application after it’s written.

Introduction

Containers are hot in DevOps shops, and their benefits from an
operations and service delivery point of view have been covered well
elsewhere. If you want to build a Docker container or deploy a Docker
host, container or swarm, a lot of information is available.
However, very few articles talk about how to develop inside the Docker
containers that will be reused later in the DevOps pipeline, so that’s what
I focus on here.

""

Figure 1.
Stages a Docker Container Moves Through in a Typical DevOps
Pipeline

Container-Based Development Workflows

Two common workflows exist for developing software for use inside Docker
containers:

  1. Injecting development tools into an existing Docker container:
    this is the best option for sharing a consistent development environment
    with the same toolchain among multiple developers, and it can be used in
    conjunction with web-based development environments, such as Red Hat’s
    codenvy.com or dockerized IDEs like Eclipse Che.
  2. Bind-mounting a host directory onto the Docker container and using your
    existing development tools on the host:
    this is the simplest option, and it offers flexibility for developers
    to work with their own set of locally installed development tools.

Both workflows have advantages, but local mounting is inherently simpler. For
that reason, I focus on the mounting solution as “the simplest
thing that could possibly work” here.

How Docker Containers Move between Environments

A core tenet of DevOps is that the source code and runtimes that will be used
in production are the same as those used in development. In other words, the
most effective pipeline is one where the identical Docker image can be reused
for each stage of the pipeline.

""

Figure 2. Idealized Docker-Based DevOps Pipeline

The notion here is that each environment uses the same Docker image and code
base, regardless of where it’s running. Unlike systems such as Puppet, Chef
or Ansible that converge systems to a defined state, an idealized Docker
pipeline makes duplicate copies (containers) of a fixed image in each
environment. Ideally, the only artifact that really moves between
environmental stages in a Docker-centric pipeline is the ID of a Docker image;
all other artifacts should be shared between environments to ensure
consistency.

Handling Differences between Environments

In the real world, environmental stages can vary. As a case point, your QA and
staging environments may contain different DNS names, different firewall
rules and almost certainly different data fixtures. Combat this
per-environment drift by standardizing services across your different
environments. For example, ensuring that DNS resolves “db1.example.com” and
“db2.example.com” to the right IP addresses in each environment is much more
Docker-friendly than relying on configuration file changes or injectable
templates that point your application to differing IP addresses. However, when
necessary, you can set environment variables for each container rather than
making stateful changes to the fixed image. These variables then can be
managed in a variety of ways, including the following:

  1. Environment variables set at container runtime from the command line.
  2. Environment variables set at container runtime from a file.
  3. Autodiscovery using etcd, Consul, Vault or similar.

Consider a Ruby microservice that runs inside a Docker container. The service
accesses a database somewhere. In order to run the same Ruby image in each
different environment, but with environment-specific data passed in as
variables, your deployment orchestration tool might use a shell script like
this one, “Example Mircoservice Deployment”:

# Reuse the same image to create containers in each
# environment.
docker pull ruby:latest

# Bash function that exports key environment
# variables to the container, and then runs Ruby
# inside the container to display the relevant
# values.
microservice () {
docker run -e STAGE -e DB –rm ruby
/usr/local/bin/ruby -e
‘printf(“STAGE: %s, DB: %sn”,
ENV[“STAGE”],
ENV[“DB”])’
}

Table 1 shows an example of how environment-specific information
for Development, Quality Assurance and Production can be passed to
otherwise-identical containers using exported environment variables.

Table 1. Same Image with Injected Environment Variables

Development Quality Assurance Production
export STAGE=dev DB=db1; microservice export STAGE=qa DB=db2; microservice export STAGE=prod DB=db3; microservice

To see this in action, open a terminal with a Bash prompt and run the commands
from the “Example Microservice Deployment” script above to pull the Ruby image onto your Docker
host and create a reusable shell function. Next, run each of the commands from
the table above in turn to set up the proper environment variables and execute
the function. You should see the output shown in Table 2 for each simulated
environment.

Table 2. Containers in Each Environment Producing Appropriate
Results

Development Quality Assurance Production
STAGE: dev, DB: db1 STAGE: qa, DB: db2 STAGE: prod, DB: db3

Despite being a rather simplistic example, what’s being accomplished is really
quite extraordinary! This is DevOps tooling at its best: you’re re-using the
same image and deployment script to ensure maximum consistency, but each
deployed instance (a “container” in Docker parlance) is still being tuned to
operate properly within its pipeline stage.

With this approach, you limit configuration drift and variance by ensuring
that the exact same image is re-used for each stage of the pipeline.
Furthermore, each container varies only by the environment-specific data or
artifacts injected into them, reducing the burden of maintaining multiple
versions or per-environment architectures.

But What about External Systems?

The previous simulation didn’t really connect to any services outside the
Docker container. How well would this work if you needed to connect your
containers to environment-specific things outside the container itself?

Next, I simulate a Docker container moving from development through other stages
of the DevOps pipeline, using a different database with its own data in each
environment. This requires a little prep work first.

First, create a workspace for the example files. You can do this by cloning
the examples from GitHub or by making a directory. As an example:

# Clone the examples from GitHub.
git clone
https://github.com/CodeGnome/SDCAPS-Examples
cd SDCAPS-Examples/db

# Create a working directory yourself.
mkdir -p SDCAPS-Examples/db
cd SDCAPS-Examples/db

The following SQL files should be in the db directory if you cloned the
example repository. Otherwise, go ahead and create them now.

db1.sql:

— Development Database
PRAGMA foreign_keys=OFF;
BEGIN TRANSACTION;
CREATE TABLE AppData (
login TEXT UNIQUE NOT NULL,
name TEXT,
password TEXT
);
INSERT INTO AppData
VALUES (‘root’,’developers’,’dev_password’),
(‘dev’,’developers’,’dev_password’);
COMMIT;

db2.sql:

— Quality Assurance (QA) Database
PRAGMA foreign_keys=OFF;
BEGIN TRANSACTION;
CREATE TABLE AppData (
login TEXT UNIQUE NOT NULL,
name TEXT,
password TEXT
);
INSERT INTO AppData
VALUES (‘root’,’qa admins’,’admin_password’),
(‘test’,’qa testers’,’user_password’);
COMMIT;

db3.sql:

— Production Database
PRAGMA foreign_keys=OFF;
BEGIN TRANSACTION;
CREATE TABLE AppData (
login TEXT UNIQUE NOT NULL,
name TEXT,
password TEXT
);
INSERT INTO AppData
VALUES (‘root’,’production’,
‘$1$Ax6DIG/K$TDPdujixy5DDscpTWD5HU0’),
(‘deploy’,’devops deploy tools’,
‘$1$hgTsycNO$FmJInHWROtkX6q7eWiJ1p/’);
COMMIT;

Next, you need a small utility to create (or re-create) the various SQLite
databases. This is really just a convenience script, so if you prefer to
initialize or load the SQL by hand or with another tool, go right ahead:

#!/usr/bin/env bash

# You assume the database files will be stored in an
# immediate subdirectory named “db” but you can
# override this using an environment variable.
: “$”
cd “$DATABASE_DIR”

# Scan for the -f flag. If the flag is found, and if
# there are matching filenames, verbosely remove the
# existing database files.
pattern='(^|[[:space:]])-f([[:space:]]|$)’
if [[ “$*” =~ $pattern ]] &&
compgen -o filenames -G ‘db?’ >&-
then
echo “Removing existing database files …”
rm -v db? 2> /dev/null
echo
fi

# Process each SQL dump in the current directory.
echo “Creating database files from SQL …”
for sql_dump in *.sql; do
db_filename=”$”
if [[ ! -f “$db_filename” ]]; then
sqlite3 “$db_filename” < “$sql_dump” &&
echo “$db_filename created”
else
echo “$db_filename already exists”
fi
done

When you run ./create_databases.sh, you should see:

Creating database files from SQL …
db1 created
db2 created
db3 created

If the utility script reports that the database files already exist, or if you
want to reset the database files to their initial state, you can call
the script again with the -f flag to re-create them from the associated .sql
files.

Creating a Linux Password

You probably noticed that some of the SQL files contained clear-text
passwords while others have valid Linux password hashes. For the
purposes of this article, that’s largely a contrivance to ensure that you have
different data in each database and to make it easy to tell which
database you’re looking at from the data itself.

For security though, it’s usually best to ensure that you have a
properly hashed password in any source files you may store. There are a
number of ways to generate such passwords, but the OpenSSL library makes
it easy to generate salted and hashed passwords from the command line.

Tip: for optimum security, don’t include your desired password or
passphrase as an argument to OpenSSL on the command line, as it could
then be seen in the process list. Instead, allow OpenSSL to prompt you
with Password: and be sure to use a strong passphrase.

To generate a salted MD5 password with OpenSSL:

$ openssl passwd
-1
-salt “$(openssl rand -base64 6)”
Password:

Then you can paste the salted hash into /etc/shadow, an SQL file, utility
script or wherever else you may need it.

Simulating Deployment inside the Development Stage

Now that you have some external resources to experiment with, you’re ready to
simulate a deployment. Let’s start by running a container in your development
environment. I follow some DevOps best practices here and use fixed image IDs
and defined gem versions.

DevOps Best Practices for Docker Image IDs

To ensure that you’re re-using the same image across pipeline stages,
always use an image ID rather than a named tag or symbolic reference
when pulling images. For example, while the “latest” tag might point to
different versions of a Docker image over time, the SHA-256 identifier
of an image version remains constant and also provides automatic
validation as a checksum for downloaded images.

Furthermore, you always should use a fixed ID for assets you’re
injecting into your containers. Note how you specify a specific version
of the SQLite3 Ruby gem to inject into the container at each stage. This
ensures that each pipeline stage has the same version, regardless of
whether the most current version of the gem from a RubyGems repository
changes between one container deployment and the next.

Getting a Docker Image ID

When you pull a Docker image, such as ruby:latest, Docker will report
the digest of the image on standard output:

$ docker pull ruby:latest
latest: Pulling from library/ruby
Digest:
sha256:eed291437be80359321bf66a842d4d542a789e
↪687b38c31bd1659065b2906778
Status: Image is up to date for ruby:latest

If you want to find the ID for an image you’ve already pulled, you can
use the inspect sub-command to extract the digest from Docker’s JSON
output—for example:

$ docker inspect
–format='{}’
ruby:latest
ruby@sha256:eed291437be80359321bf66a842d4d542a789
↪e687b38c31bd1659065b2906778

First, you export the appropriate environment variables for development. These
values will override the defaults set by your deployment script and affect the
behavior of your sample application:

# Export values we want accessible inside the Docker
# container.
export STAGE=”dev” DB=”db1″

Next, implement a script called container_deploy.sh that will simulate deployment across multiple
environments. This is an example of the work that your deployment pipeline or
orchestration engine should do when instantiating containers for each
stage:

#!/usr/bin/env bash

set -e

####################################################
# Default shell and environment variables.
####################################################
# Quick hack to build the 64-character image ID
# (which is really a SHA-256 hash) within a
# magazine’s line-length limitations.
hash_segments=(
“eed291437be80359321bf66a842d4d54”
“2a789e687b38c31bd1659065b2906778”
)
printf -v id “%s” “$”

# Default Ruby image ID to use if not overridden
# from the script’s environment.
: “$”

# Fixed version of the SQLite3 gem.
: “$”

# Default pipeline stage (e.g. dev, qa, prod).
: “$”

# Default database to use (e.g. db1, db2, db3).
: “$”

# Export values that should be visible inside the
# container.
export STAGE DB

####################################################
# Setup and run Docker container.
####################################################
# Remove the Ruby container when script exits,
# regardless of exit status unless DEBUG is set.
cleanup () {
local id msg1 msg2 msg3
id=”$container_id”
if [[ ! -v DEBUG ]]; then
docker rm –force “$id” >&-
else
msg1=”DEBUG was set.”
msg2=”Debug the container with:”
msg3=” docker exec -it $id bash”
printf “n%sn%sn%sn”
“$msg1”
“$msg2”
“$msg3”
> /dev/stderr
fi
}
trap “cleanup” EXIT

# Set up a container, including environment
# variables and volumes mounted from the local host.
docker run
-d
-e STAGE
-e DB
-v “$/db}”:/srv/db
–init
“ruby@sha256:$IMAGE_ID”
tail -f /dev/null >&-

# Capture the container ID of the last container
# started.
container_id=$(docker ps -ql)

# Inject a fixed version of the database gem into
# the running container.
echo “Injecting gem into container…”
docker exec “$container_id”
gem install sqlite3 -v “$SQLITE3_VERSION” &&
echo

# Define a Ruby script to run inside our container.
#
# The script will output the environment variables
# we’ve set, and then display contents of the
# database defined in the DB environment variable.
ruby_script=’
require “sqlite3”

puts %Q(DevOps pipeline stage: #)
puts %Q(Database for this stage: #)
puts
puts “Data stored in this database:”

Dir.chdir “/srv/db”
db = SQLite3::Database.open ENV[“DB”]
query = “SELECT rowid, * FROM AppData”
db.execute(query) do |row|
print ” ” * 4
puts row.join(“, “)
end

# Execute the Ruby script inside the running
# container.
docker exec “$container_id” ruby -e “$ruby_script”

There are a few things to note about this script. First and foremost, your
real-world needs may be either simpler or more complex than this script
provides for. Nevertheless, it provides a reasonable baseline on which you can
build.

Second, you may have noticed the use of the tail command when creating the
Docker container. This is a common trick used for building containers that
don’t have a long-running application to keep the container in a running
state. Because you are re-entering the container using multiple
exec commands,
and because your example Ruby application runs once and exits,
tail sidesteps a
lot of ugly hacks needed to restart the container continually or keep it
running while debugging.

Go ahead and run the script now. You should see the same output as listed
below:

$ ./container_deploy.sh
Building native extensions. This could take a while…
Successfully installed sqlite3-1.3.13
1 gem installed

DevOps pipeline stage: dev
Database for this stage: db1

Data stored in this database:
1, root, developers, dev_password
2, dev, developers, dev_password

Simulating Deployment across Environments

Now you’re ready to move on to something more ambitious. In the preceding
example, you deployed a container to the development environment. The Ruby
application running inside the container used the development database. The
power of this approach is that the exact same process can be re-used for each
pipeline stage, and the only thing you need to change is the database to
which the
application points.

In actual usage, your DevOps configuration management or orchestration engine
would handle setting up the correct environment variables for each stage of
the pipeline. To simulate deployment to multiple environments, populate an
associative array in Bash with the values each stage will need and then run
the script in a for loop:

declare -A env_db
env_db=([dev]=db1 [qa]=db2 [prod]=db3)

for env in dev qa prod; do
export STAGE=”$env” DB=”$”
printf “%sn” “Deploying to $ …”
./container_deploy.sh
done

This stage-specific approach has a number of benefits from a DevOps point of
view. That’s because:

  1. The image ID deployed is identical across all pipeline stages.
  2. A more complex application can “do the right thing” based on the value of
    STAGE and DB (or other values) injected into the container at runtime.
  3. The container is connected to the host filesystem the same way at each
    stage, so you can re-use source code or versioned artifacts pulled from Git,
    Nexus or other repositories without making changes to the image or
    container.
  4. The switcheroo magic for pointing to the right external resources is
    handled by your deployment script (in this case, container_deploy.sh) rather
    than by making changes to your image, application or
    infrastructure.
  5. This solution is great if your goal is to trap most of the complexity in your
    deployment tools or pipeline orchestration engine. However, a small refinement
    would allow you to push the remaining complexity onto the pipeline
    infrastructure instead.

Imagine for a moment that you have a more complex application than the one
you’ve been working with here. Maybe your QA or staging environments have large
data sets that you don’t want to re-create on local hosts, or maybe you need to point
at a network resource that may move around at runtime. You can handle this by
using a well known name that is resolved by a external resource instead.

You can show this at the filesystem level by using a symlink. The benefit of
this approach is that the application and container no longer need to know
anything about which database is present, because the database is always named
“db”. Consider the following:

declare -A env_db
env_db=([dev]=db1 [qa]=db2 [prod]=db3)
for env in dev qa prod; do
printf “%sn” “Deploying to $ …”
(cd db; ln -fs “$” db)
export STAGE=”$env” DB=”db”
./container_deploy.sh
done

Likewise, you can configure your Domain Name Service (DNS) or a Virtual IP
(VIP) on your network to ensure that the right database host or cluster is
used for each stage. As an example, you might ensure that db.example.com
resolves to a different IP address at each pipeline stage.

Sadly, the complexity of managing multiple environments never truly goes
away—it just hopefully gets abstracted to the right level for your
organization. Think of your objective as similar to some object-oriented
programming (OOP) best practices: you’re looking to create pipelines that
minimize things that change and to allow applications and tools to rely on a
stable interface. When changes are unavoidable, the goal is to keep the scope
of what might change as small as possible and to hide the ugly details from
your tools to the greatest extent that you can.

If you have thousands or tens of thousands of servers, it’s often better to
change a couple DNS entries without downtime rather than rebuild or
redeploy 10,000 application containers. Of course, there are always
counter-examples, so consider the trade-offs and make the best decisions you
can to encapsulate any unavoidable complexity.

Developing inside Your Container

I’ve spent a lot of time explaining how to ensure that your development
containers look like the containers in use in other stages of the pipeline.
But have I really described how to develop inside these
containers? It turns out I’ve actually covered the essentials, but you need to
shift your perspective a little to put it all together.

The same processes used to deploy containers in the previous sections also
allow you to work inside a container. In particular, the previous examples have
touched on how to bind-mount code and artifacts from the host’s filesystem
inside a container using the -v or –volume flags. That’s how
the container_deploy.sh script mounts database files on /srv/db inside the container. The
same mechanism can be used to mount source code, and the Docker
exec command
then can be used to start a shell, editor or other development process inside
the container.

The develop.sh utility script is designed to showcase this ability. When you
run it, the script creates a Docker container and drops you into a Ruby shell
inside the container. Go ahead and run ./develop.sh now:

#!/usr/bin/env bash

id=”eed291437be80359321bf66a842d4d54″
id+=”2a789e687b38c31bd1659065b2906778″
: “$”
: “$”
: “$”
: “$”

export DB STAGE

echo “Launching ‘$STAGE’ container…”
docker run
-d
-e DB
-e STAGE
-v “$”:/usr/local/src
-v “$/db}”:/srv/db
–init
“ruby@sha256:$IMAGE_ID”
tail -f /dev/null >&-

container_id=$(docker ps -ql)

show_cmd () {
enter=”docker exec -it $container_id bash”
clean=”docker rm –force $container_id”
echo -ne
“nRe-enter container with:nt$”
echo -ne
“nClean up container with:nt$n”
}
trap ‘show_cmd’ EXIT

docker exec “$container_id”
gem install sqlite3 -v “$SQLITE3_VERSION” >&-

docker exec
-e DB
-e STAGE
-it “$container_id”
irb -I /usr/local/src -r sqlite3

Once inside the container’s Ruby read-evaluate-print loop (REPL), you can
develop your source code as you normally would from outside the container. Any
source code changes will be seen immediately from inside the container at the
defined mountpoint of /usr/local/src. You then can test your code using the
same runtime that will be available later in your pipeline.

Let’s try a few basic things just to get a feel for how this works. Ensure
that you
have the sample Ruby files installed in the same directory as develop.sh. You
don’t actually have to know (or care) about Ruby programming for this exercise
to have value. The point is to show how your containerized applications can
interact with your host’s development environment.

example_query.rb:

# Ruby module to query the table name via SQL.
module ExampleQuery
def self.table_name
path = “/srv/db/#”
db = SQLite3::Database.new path
sql =<<-‘SQL’
SELECT name FROM sqlite_master
WHERE type=’table’
LIMIT 1;
SQL
db.get_first_value sql
end
end

source_list.rb:

# Ruby module to list files in the source directory
# that’s mounted inside your container.
module SourceList
def self.array
Dir[‘/usr/local/src/*’]
end

def self.print
puts self.array
end
end

At the IRB prompt (irb(main):001:0>), try the following code to make
sure everything is working as expected:

# returns “AppData”
load ‘example_query.rb’; ExampleQuery.table_name

# prints file list to standard output; returns nil
load ‘source_list.rb’; SourceList.print

In both cases, Ruby source code is being read from /usr/local/src, which is
bound to the current working directory of the develop.sh script. While working
in development, you could edit those files in any fashion you chose and then
load them again into IRB. It’s practically magic!

It works the other way too. From inside the container, you can use any tool
or feature of the container to interact with your source directory on the host
system. For example, you can download the familiar Docker whale logo and make
it available to your development environment from the container’s Ruby
REPL:

Dir.chdir ‘/usr/local/src’
cmd =
“curl -sLO ” <<
“https://www.docker.com” <<
“/sites/default/files” <<
“/vertical_large.png”
system cmd

Both /usr/local/src and the matching host directory now contain the
vertical_large.png graphic file. You’ve added a file to your source tree from
inside the Docker container!

""

Figure 3.
Docker Logo on the Host Filesystem and inside the Container

When you press Ctrl-D to exit the REPL, the develop.sh script informs you how to
reconnect to the still-running container, as well as how to delete the
container when you’re done with it. Output will look similar to the following:

Re-enter container with:
docker exec -it 9a2c94ebdee8 bash
Clean up container with:
docker rm –force 9a2c94ebdee8

As a practical matter, remember that the develop.sh script is setting Ruby’s
LOAD_PATH and requiring the sqlite3 gem for you when launching the first
instance of IRB. If you exit that process, launching another instance of IRB
with docker exec or from a Bash shell inside the container may not do what
you expect. Be sure to run irb -I /usr/local/src -r sqlite3 to
re-create that
first smooth experience!

Wrapping Up

I covered how Docker containers typically flow through the DevOps pipeline,
from development all the way to production. I looked at some common practices
for managing the differences between pipeline stages and how to use
stage-specific data and artifacts in a reproducible and automated fashion.
Along the way, you also may have learned a little more about Docker commands,
Bash scripting and the Ruby REPL.

I hope it’s been an interesting journey. I know I’ve enjoyed sharing it with
you, and I sincerely hope I’ve left your DevOps and containerization toolboxes
just a little bit larger in the process.

Source

mv Command in Linux: 7 Essential Examples

mv command in Linux is used for moving and renaming files and directories. In this tutorial, you’ll learn some of the essential usages of the mv command.

mv is one of the must know commands in Linux. mv stands for move and is essentially used for moving files or directories from one location to another.

The syntax is similar to the cp command in Linux however there is one fundamental difference between these two commands.

You can think of the cp command as a copy-paste operation. Whereas the mv command can be equated with the cut-paste operation.

Which means that when you use the mv command on a file or directory, the file or directory is moved to a new place and the source file/directory doesn’t exist anymore. That’s what a cut-paste operation, isn’t it?

cp command = copy and paste
mv command = cut and paste

mv command can also be used for renaming a file. Using mv command is fairly simple and if you learn a few options, it will become even better.

7 practical examples of the mv command

Let’s see some of the useful examples of the mv command.

1. How to move a file to different directory

The first and the simplest example is to move a file. To do that, you just have to specify the source file and the destination directory or file.

mv source_file target_directory

This command will move the source_file and put it in the target_directory.

2. How to move multiple files

If you want to move multiple files at once, just provide all the files to the move command followed by the destination directory.

mv file1.txt file.2.txt file3.txt target_directory

You can also use regex patterns to move multiple files matching a pattern.

For example in the above example, instead of providing all the files individually, you can also use the regex pattern that matches all the files with the extension .txt and moves them to the target directory.

mv *.txt target_directory

3. How to rename a file

One essential use of mv command is in renaming of files. If you use mv command and specify a file name in the destination, the source file will be renamed to the target_file.

mv source_file target_directory/target_file

In the above example, if the target_fille doesn’t exist in the target_directory, it will create the target_file.

However, if the target_file already exists, it will overwrite it without asking. Which means the content of the existing target file will be changed with the content of the source file.

I’ll show you how to deal with overwriting of files with mv command later in this tutorial.

You are not obliged to provide a target directory. If you don’t specify the target directory, the file will be renamed and kept in the same directory.

Keep in mind: By default, mv command overwrites if the target file already exists. This behavior can be changed with -n or -i option, explained later.

4. How to move a directory

You can use mv command to move directories as well. The command is the same as what we saw in moving files.

mv source_directory target_directory

In the above example, if the target_directory exists, the entire source_directory will be moved inside the target_directory. Which means that the source_directory will become a sub-directory of the target_directory.

5. How to rename a directory

Renaming a directory is the same as moving a directory. The only difference is that the target directory must not already exist. Otherwise, the entire directory will be moved inside it as we saw in the previous directory.

mv source_directory path_to_non_existing_directory

6. How to deal with overwriting a file while moving

If you are moving a file and there is already a file with the same name, the contents of the existing file will be overwritten immediately.

This may not be ideal in all the situations. You have a few options to deal with the overwrite scenario.

To prevent overwriting existing files, you can use the -n option. This way, mv won’t overwrite existing file.

mv -n source_file target_directory

But maybe you want to overwrite some files. You can use the interactive option -i and it will ask you if you want to overwrite existing file(s).

mv -i source_file target_directory
mv: overwrite ‘target_directory/source_file’?

You can enter y for overwriting the existing file or n for not overwriting it.

There is also an option for making automatic backups. If you use -b option with the mv command, it will overwrite the existing files but before that, it will create a backup of the overwritten files.

mv -b file.txt target_dir/file.txt
ls target_dir
file.txt file.txt~

By default, the backup of the file ends with ~. You can change it by using the -S option and specifying the suffix:

mv -S .back -b file.txt target_dir/file.txt
ls target_dir
file.txt file.txt.back

You can also use the update option -u when dealing with overwriting. With the -u option, source files will only be moved to the new location if the source file is newer than the existing file or if it doesn’t exist in the target directory.

To summarize:

  • -i : Confirm before overwriting
  • -n : No overwriting
  • -b : Overwriting with backup
  • -u : Overwrite if the target file is old or doesn’t exist

7. How to forcefully move the files

If the target file is write protected, you’ll be asked to confirm before overwriting the target file.

mv file1.txt target
mv: replace ‘target/file1.txt’, overriding mode 0444 (r–r–r–)? y

To avoid this prompt and overwrite the file straightaway, you can use the force option -f.

mv -f file1.txt target

If you do not know what’s write protection, please read about file permissions in Linux.

You can further learn about mv command by browsing its man page. However, you are more likely to use only these mv commands examples I showed here.

I hope you like this article. If you have questions or suggestions, please feel free to ask in the comment section below.

Source

Using the Linux ss command to examine network and socket connections

Want to know more about how your system is communicating? Try the Linux ss command. It replaces the older netstat and makes a lot of information about network connections available for you to easily examine.

The ss (socket statistics) command provides a lot of information by displaying details on socket activity. One way to get started, although this may be a bit overwhelming, is to use the ss -h (help) command to get a listing of the command’s numerous options. Another is to try some of the more useful commands and get an idea what each of them can tell you.

One very useful command is the ss -s command. This command will show you some overall stats by transport type. In this output, we see stats for RAW, UDP, TCP, INET and FRAG sockets.

$ ss -s
Total: 524
TCP: 8 (estab 1, closed 0, orphaned 0, timewait 0)

Transport Total IP IPv6
RAW 2 1 1
UDP 7 5 2
TCP 8 6 2
INET 17 12 5
FRAG 0 0 0

  • Raw sockets allow direct sending and receiving of IP packets without protocol-specific transport layer formatting and are used for security appliications such as nmap.
  • TCP provides transmission control protocol and is the primary connection protocol.
  • UDP (user datagram protocol) is similar to TCP but without the error checking.
  • INET includes both of the above. (INET4 and INET6 can be viewed separately with some ss commands.)
  • FRAG — fragmented

Clearly the by-protocol lines above aren’t displaying the totality of the socket activity. The figure in the Total line at the top of the output indicates that there is a lot more going on than the by-type lines suggest. Still, these breakdowns can be very useful.

If you want to see a list of all socket activity, you can use the ss -a command, but be prepared to see a lot of activity — as suggested by this output. Much of the socket activity on this system is local to the system being examined.

$ ss -a | wc -l
555

If you want to see a specific category of socket activity:

  • ss -ta dumps all TCP socket
  • ss -ua dumps all UDP sockets
  • ss -wa dumps all RAW sockets
  • ss -xa dumps all UNIX sockets
  • ss -4a dumps all IPV4 sockets
  • ss -6a dumps all IPV6 sockets

The a in each of the commands above means “all”.

The ss command without arguments will display all established connections. Notice that only two of the connections shown below are for external connections — two other systems on the local network. A significant portion of the output below has been omitted for brevity.

$ ss | more
Netid State Recv-Q Send-Q Local Address:Port Peer Address:Port
u_str ESTAB 0 0 * 20863 * 20864
u_str ESTAB 0 0 * 32232 * 33018
u_str ESTAB 0 0 * 33147 * 3257544ddddy
u_str ESTAB 0 0 /run/user/121/bus 32796 * 32795
u_str ESTAB 0 0 /run/user/121/bus 32574 * 32573
u_str ESTAB 0 0 * 32782 * 32783
u_str ESTAB 0 0 /run/systemd/journal/stdout 19091 * 18113
u_str ESTAB 0 0 * 769568 * 768429
u_str ESTAB 0 0 * 32560 * 32561
u_str ESTAB 0 0 @/tmp/dbus-8xbBdjNe 33155 * 33154
u_str ESTAB 0 0 /run/systemd/journal/stdout 32783 * 32782

tcp ESTAB 0 64 192.168.0.16:ssh 192.168.0.6:25944
tcp ESTAB 0 0 192.168.0.16:ssh 192.168.0.6:5385

To see just established tcp connections, use the -t option.

$ ss -t
State Recv-Q Send-Q Local Address:Port Peer Address:Port
ESTAB 0 64 192.168.0.16:ssh 192.168.0.6:25944
ESTAB 0 0 192.168.0.16:ssh 192.168.0.9:5385

To display only listening sockets, try ss -lt.

$ ss -lt
State Recv-Q Send-Q Local Address:Port Peer Address:Port
LISTEN 0 10 127.0.0.1:submission 0.0.0.0:*
LISTEN 0 128 127.0.0.53%lo:domain 0.0.0.0:*
LISTEN 0 128 0.0.0.0:ssh 0.0.0.0:*
LISTEN 0 5 127.0.0.1:ipp 0.0.0.0:*
LISTEN 0 10 127.0.0.1:smtp 0.0.0.0:*
LISTEN 0 128 [::]:ssh [::]:*
LISTEN 0 5 [::1]:ipp [::]:*

If you’d prefer to see port number than service names, try ss -ltn instead:

$ ss -ltn
State Recv-Q Send-Q Local Address:Port Peer Address:Port
LISTEN 0 10 127.0.0.1:587 0.0.0.0:*
LISTEN 0 128 127.0.0.53%lo:53 0.0.0.0:*
LISTEN 0 128 0.0.0.0:22 0.0.0.0:*
LISTEN 0 5 127.0.0.1:631 0.0.0.0:*
LISTEN 0 10 127.0.0.1:25 0.0.0.0:*
LISTEN 0 128 [::]:22 [::]:*
LISTEN 0 5 [::1]:631 [::]:*

Plenty of help is available for the ss command either through the man page or by using the -h (help) option as shown below:

$ ss -h
Usage: ss [ OPTIONS ]
ss [ OPTIONS ] [ FILTER ]
-h, –help this message
-V, –version output version information
-n, –numeric don’t resolve service names
-r, –resolve resolve host names
-a, –all display all sockets
-l, –listening display listening sockets
-o, –options show timer information
-e, –extended show detailed socket information
-m, –memory show socket memory usage
-p, –processes show process using socket
-i, –info show internal TCP information
–tipcinfo show internal tipc socket information
-s, –summary show socket usage summary
-b, –bpf show bpf filter socket information
-E, –events continually display sockets as they are destroyed
-Z, –context display process SELinux security contexts
-z, –contexts display process and socket SELinux security contexts
-N, –net switch to the specified network namespace name

-4, –ipv4 display only IP version 4 sockets
-6, –ipv6 display only IP version 6 sockets
-0, –packet display PACKET sockets
-t, –tcp display only TCP sockets
-S, –sctp display only SCTP sockets
-u, –udp display only UDP sockets
-d, –dccp display only DCCP sockets
-w, –raw display only RAW sockets
-x, –unix display only Unix domain sockets
–tipc display only TIPC sockets
–vsock display only vsock sockets
-f, –family=FAMILY display sockets of type FAMILY
FAMILY :=

-K, –kill forcibly close sockets, display what was closed
-H, –no-header Suppress header line

-A, –query=QUERY, –socket=QUERY
QUERY := [,QUERY]

-D, –diag=FILE Dump raw information about TCP sockets to FILE
-F, –filter=FILE read filter information from FILE
FILTER := [ state STATE-FILTER ] [ EXPRESSION ]
STATE-FILTER :=
TCP-STATES := |time-wait|closed|close-wait|last-ack|listening|closing}
connected := |time-wait|close-wait|last-ack|closing}
synchronized := |time-wait|close-wait|last-ack|closing}
bucket :=
big := |closed|close-wait|last-ack|listening|closing}

The ss command clearly offers a huge range of options for examining sockets, but you still might want to turn those that provide you with the most useful information into aliases to make them more memorable. For example:

$ alias listen=”ss -lt”
$ alias socksum=”ss -s”

Source

Working with tarballs on Linux

Tarballs provide a versatile way to back up and manage groups of files on Linux systems. Follow these tips to learn how to create them, as well as extract and remove individual files from them.

The word “tarball” is often used to describe the type of file used to back up a select group of files and join them into a single file. The name comes from the .tar file extension and the tar command that is used to group together the files into a single file that is then sometimes compressed to make it smaller for its move to another system.

Tarballs are often used to back up personal or system files in place to create an archive, especially prior to making changes that might have to be reversed. Linux sysadmins, for example, will often create a tarball containing a series of configuration files before making changes to an application just in case they have to reverse those changes. Extracting the files from a tarball that’s sitting in place will generally be faster than having to retrieve the files from backups.

How to create a tarball on Linux

You can create a tarball and compress it in a single step if you use a command like this one:

$ tar -cvzf PDFs.tar.gz *.pdf

The result in this case is a compressed (gzipped) file that contains all of the PDF files that are in the current directory. The compression is optional, of course. A slightly simpler command would just put all of the PDF files into an uncompressed tarball:

$ tar -cvf PDFs.tar *.pdf

Note that it’s the z in that list of options that causes the file to be compressed or “zipped”. The c specifies that you are creating the file and the v (verbose) indicates that you want some feedback while the command is running. Omit the v if you don’t want to see the files listed.

Another common naming convention is to give zipped tarballs the extension .tgz instead of the double extension .tar.gz as shown in this command:

$ tar cvzf MyPDFs.tgz *.pdf

How to extract files from a tarball

To extract all of the files from a gzipped tarball, you would use a command like this:

$ tar -xvzf file.tar.gz

If you use the .tgz naming convention, that command would look like this:

$ tar -xvzf MyPDFs.tgz

To extract an individual file from a gzipped tarball, you do almost the same thing but add the file name:

$ tar -xvzf PDFs.tar.gz ShenTix.pdf
ShenTix.pdf
ls -l ShenTix.pdf
-rw-rw-r– 1 shs shs 122057 Dec 14 14:43 ShenTix.pdf

You can even delete files from a tarball if the tarball is not compressed. For example, if we wanted to remove tile file that we extracted above from the PDFs.tar.gz file, we would do it like this:

$ gunzip PDFs.tar.gz
$ ls -l PDFs.tar
-rw-rw-r– 1 shs shs 10700800 Dec 15 11:51 PDFs.tar
$ tar -vf PDFs.tar –delete ShenTix.pdf
$ ls -l PDFs.tar
-rw-rw-r– 1 shs shs 10577920 Dec 15 11:45 PDFs.tar

Notice that we shaved a little space off the tar file while deleting the ShenTix.pdf file. We can then compress the file again if we want:

$ gzip -f PDFs.tar
ls -l PDFs.tar.gz
-rw-rw-r– 1 shs shs 10134499 Dec 15 11:51 PDFs.tar.gzFlickr / James St. John

The versatility of the command line options makes working with tarballs easy and very convenient.

Source
Best 10 Laptops for Linux – Linux Hint

We’re almost at the end of 2018 with festive season around the corner. If you are looking to buy a new laptop for yourself or gift it to someone then this article is for you. Linux is a flexible operating system and it can accommodate itself on any machine and alongside Windows too. Also Linux doesn’t need high-end computer hardware to run properly, hence if you have old laptops, they can also benefit from Linux.

So today we are going to have in-depth look at best 10 laptops available in market which can be used to run Linux operating system. Not all the laptops listed here have dedicated hardware required by Linux, but they will be able to run Linux directly or alongside Windows or Mac.

Many users moving towards Linux as it is more free, secure and reliable operating system as compared others. In addition to this Linux is best platform to work on personal projects and programming tasks.

Carved in machined aluminum, Dell XPS 13 is slick and slim portable laptop with eye-catching design. Dell claims it to be smallest laptop in the world, it comes with 13.3” 4K Ultra HD InfinityEdge touch display. The laptop is highly customizable and you can configure it according to your requirements.

Best thing about this laptop is that it comes with full-fledge Linux support which is always the case with Dell flagship machines and a big thumbs-up to Dell for that. It also has developer edition variant with comes with Ubuntu 16.04 LTS out of the box however this normal Dell XPS 13 variant can also be customized to come with Linux out of the box.

Key Specs

  • CPU : 8th Gen Intel Core i7-8550U Processor
  • RAM : 8GB/16GB DDR3 SDRAM
  • Storage : 512GB PCIe Solid State Drive
  • GPU : Intel UHD Graphics 620
  • Ports : 3 x USB Type-C Ports

Buy Here: Amazon Link

2. Lenovo ThinkPad X1 Carbon

Lenovo ThinkPad X1 Carbon is popular for its dedicated gaming hardware. Even though it comes with Windows 10 Pro out of the box, it can be customized to run Linux for personal or business use. The laptop is very light and durable with excellent build quality of carbon-fiber casing.

It has 14” display which comes in 1080p and 1440p variants, for later you have to pay extra bucks. Apart from that it ships in with Lithium Polymer Battery which offers almost 15 hours of power depending upon the usage. Also it comes with internal 4-cell battery which can be used for hot swap, which means you can swap batteries without turning off your laptop.

Key Specs

  • CPU : 8th Gen Intel Core i7-8650U Processor
  • RAM : 8GB/16GB LPDDR3
  • Storage : 512GB/1TB Solid State Drive
  • GPU : Intel UHD Graphics 620
  • Ports : 2 x USB Type-C and 2 x USB 3.0 Ports

Buy Here: Amazon Link

3. HP Spectre x360 15t

HP Spectre x360 is another powerful laptop on my list; it has an excellent build quality with all aluminum body which gives it a premium feel which can be compared to other flagship machines from competitors. It is 2-in-1 laptop which is slim and lightweight in terms of build quality, it also offers long lasting battery life.

(Source: HP)

This is one of the best performing laptop on my list with full-fledged support for Linux installation as well as high-end gaming. 8GB of RAM and extremely fast SSD with i7 process in the backing, this laptop proves to be a beast with seamless multitasking experience.

Key Specs

  • CPU : 8th Gen Intel Core i7-8705G Processor
  • RAM : 8GB LPDDR3
  • Storage : 256GB/512GB/1TB/2TB PCIe Solid State Drive
  • GPU : Intel UHD Graphics 620
  • Ports : 2 x USB Type-C and 1 x USB Type-A Ports

Buy Here: Amazon Link

4. Dell Precision 3530

Precision 3530 is recently launched mobile workstation from Dell. This is entry-level model which ships-in with pre-installed Ubuntu 16.04. Precision 3530 is a 15” powerful laptop specially built for high-end purpose. You can choose from various processors variants ranging from 8th Gen Core i5/i7 to Xeon 6-core processors.

It is fully customizable laptop to match all type of user’s requirements. It also comes with high resolution screen with bigger storage options.

Key Specs

  • CPU : 8th Gen Intel Core i5-8400H Processor
  • RAM : 4GB DDR4
  • Storage : 256GB Solid State Drive
  • GPU : Intel UHD Graphics 630/ NVIDIA Quadro P600

Buy Here: Dell

5. HP EliteBook 360

EliteBook 360 is thinnest and lightest business convertible laptop from HP. Laptop comes with 13.3” Full HD Ultra-Bright Touch Screen Display and HP sure view for secure browsing. EliteBook is high-end laptop which comes with Windows 10 Pro pre-installed, but one can easily install Linux on it alongside Windows.

(Source: HP)

Laptops audio output is also excellent and also it comes with premium quality keyboard. Latest Linux versions will run smoothly on this laptop thanks to its powerful hardware. The laptop supports fast charging using which you can charge up to 50% battery in just 30 minutes.

Key Specs

  • CPU : Intel Core i5-7300U Processor
  • RAM : 16GB LPDDR3
  • Storage : 256GB Solid State Drive
  • GPU : Intel UHD Graphics 620

Buy Here: Amazon Link

6. Acer Aspire 5

Acer Aspire 5 series laptop is packed with 15.6” Full HD screen, it is solid laptop with an excellent performance backed by 8GB DDR4 Dual Channel Memory. It comes with backlit keyboard which gives an eye-catching look to laptop while making it friendly to work in night time.

It is powerhouse of a laptop which can be used to install and run Ubuntu and other Linux distros alongside Windows by doing minor tweaks in security settings. You will be able to access content on the internet faster on this laptop thanks to the latest 802.11ac Wi-Fi.

Key Specs

  • CPU : 8th Gen Intel Core i7-8550U Processor
  • RAM : 8GB DDR4 Dual Channel Memory
  • Storage : 256GB Solid State Drive
  • GPU : NVIDIA GeForce MX150
  • Ports : 1 x USB 3.1 Type-C, 1 x USB 3.0 and 2 x USB 2.0 Ports

Buy Here: Amazon Link

7. ASUS ZenBook 3

Asus Zenbook 3 is a premium looking laptop which is crafted in aerospace-grade aluminum which makes it one of the thinnest laptops included in this article. The biggest attraction in this laptop is 4x Harman Kardon speakers and four-channel Amplifier for an excellent high-quality surrounded-sound audio output.

Zenbook 3 comes with extremely thin bezel which gives it a modern look and it also comes with decent keyboard and battery life. It ships-in with Windows 10 Home, but Linux can easily be installed alongside Windows without making any adjustments.

Key Specs

  • CPU : 7th Gen Intel Core i5-7200U Processor
  • RAM : 8GB DDR3 SDRAM
  • Storage : 256GB Solid State Drive
  • GPU : Intel HD Graphics
  • Ports : 1 x USB 3.1 Type-C Port

Buy Here: Amazon Link

8. Lenovo ThinkPad T480 Business Class Ultrabook

As the name suggests, Lenovo ThinkPad T480 is the best laptop for business or any other professional purpose. It comes with 14” HD Display and battery with capacity of up to 8 hours of screen on time.

This laptop ships-in with 64-bit Windows 7 Pro edition which can be upgraded to Windows 10, also Ubuntu and other Linux distros such as LinuxMint can be installed alongside Windows.

Key Specs

  • CPU : 6th Gen Intel Core i5-6200U Processor
  • RAM : 4GB DDR3L SDRAM
  • Storage : 500GB HDD
  • GPU : Intel HD Graphics 520
  • Ports : 3 x USB 3.0 Ports

Buy Here: Amazon Link

9. HP Envy 13

Envy 13 is another excellent laptop from HP to make it my list. With the thickness of just 12.9mm, it is one of the thinnest laptops available in the market. Apart from that is the very lightweight laptop weighing just 1.3Kg; it is portable laptop with great performance.

(Source: HP)

Considering it is very aggressively priced laptop, it doesn’t lack in any department with lag free performance even on heavy usage. Only concern is the battery life which is not consistent, it is heavily dependent on the usage pattern. It also comes with fingerprint reader for added security, but it only works with Windows as of now.
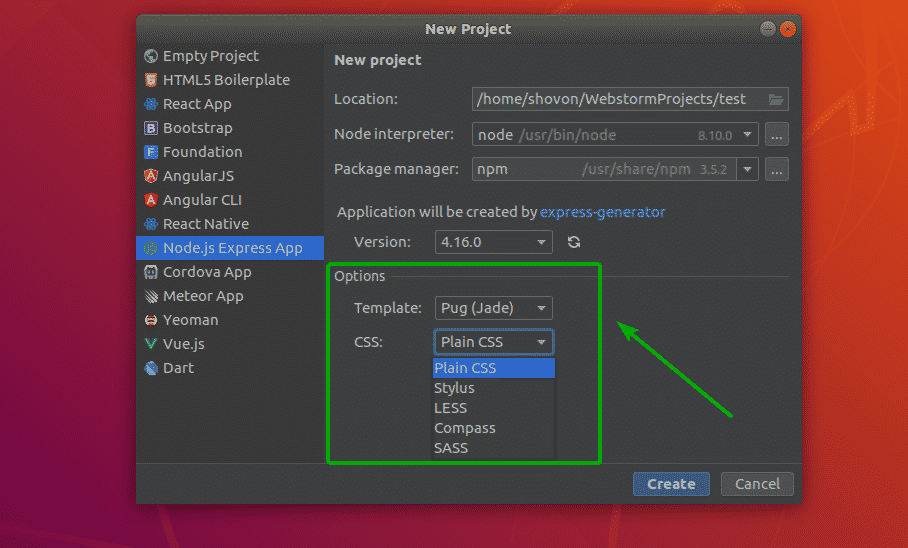
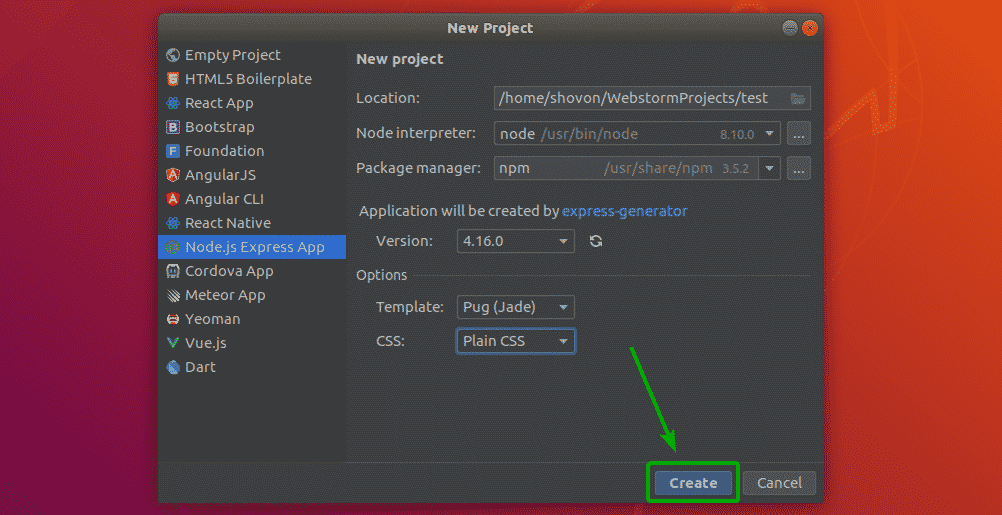
Key Specs

  • CPU : 7th Gen Intel Core i5-7200U Processor
  • RAM : 8GB LPDDR3 SDRAM
  • Storage : 256GB PCIe Solid State Drive
  • GPU : Intel HD Graphics 620
  • Ports : 1 x USB 3.1 Type-C and 2 x USB 3.1 Ports

Buy Here: Amazon Link

10. Lenovo IdeaPad 330s

Lenovo IdeaPad 330s is a powerful laptop with 15.6” 1366 x 768 HD display. Backed by 8th generation Intel Core i5 processor and 8GB of DDR4 RAM, IdeaPad 330s is one of the best performing laptops available in market. Apart from that it comes with built-in HD webcam and 2-cell lithium polymer battery with up to 7 hours of screen on time power backup.

IdeaPad 330s is a great machine to install latest version of Linux distros as it is loaded with powerful hardware. Graphics will not be the problem as it ships-in with Intel UHD Graphics 620 on the board.

Key Specs

  • CPU : 8th Gen Intel Core i5-8250U Processor
  • RAM : 8GB DDR4
  • Storage : 1TB HDD
  • GPU : Intel UHD Graphics 620
  • Ports : 1 x USB Type-C and 2 x USB 3.0 Ports

Buy Here: Amazon Link

So these are the 10 best laptops for Linux available in market. All the laptops listed here will be able to play all the latest Linux distros easily with some minor tweaks if required. Share your views or thoughts with us at @LinuxHint and @SwapTirthakar

Source

WP2Social Auto Publish Powered By : XYZScripts.com