
When it comes to writing, using the right tools can free you up to focus on your content.
Sooner or later, open source development comes to every field, and tools for working writers are no exception. However, if you search for the topic, you will find the lists of writing tools are full of apps that are no longer in development and have been dropped from most distributions.
Accordingly, here is a list of useful writing apps that are still available as of late 2018. Some have been around for a long time, while others are newer and little known.
Braindump
Over the last two decades, over half a dozen tools for brainstorming have been released. However, if the proprietary ones are ignored, few free-licensed ones have survived. Technically, Braindump is one of the casualties, having been removed from Calligra 3.0, apparently because of a lack of developers.
Fortunately, Braindump remains available in places like the Debian Stable repository. It remains useful in its current state for brainstorming maps that are almost as quick as pencil and paper (Figure 1). Its support for images, charts, and diagrams gives it a versatility that allows rapid, unimpeded development of ideas.
As an alternative, brainstormers might also want to look at VYM.
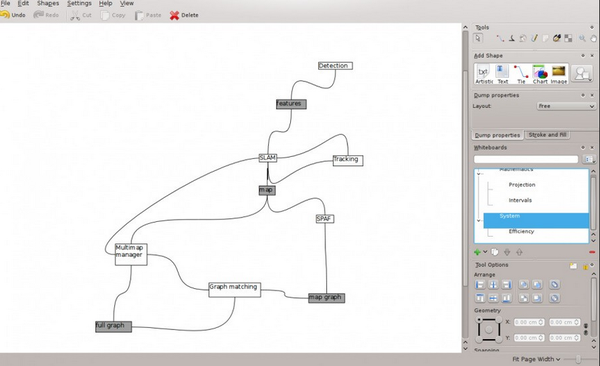
Figure 1: Originally part of Calligra Suite, Braindump is a brainstorming tool that is likely to be available for a while.
Zim
Longer works often require background material that the writer needs to know but which seldom finds its way into the story. This is especially true of fantasy. Often described as a desktop wiki, Zim is a convenient place to store such information and to link files together for quick reference. For example, I use Zim to store files with information such as character and historical background, as well as names for different cultures in my fantasy novel attempt (Figure 2).
KDE users might use BasKet instead. Although BasKet advertises itself more humbly as an advanced note taker, its capacities are similar to Zim’s.
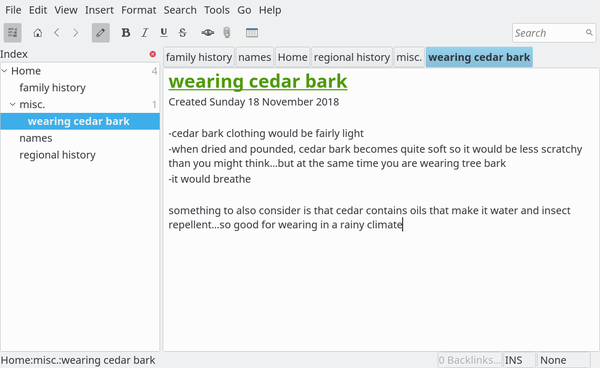
Figure 2: Zim is ideal for storing background material.
Artha
Artha promotes itself as an open source thesaurus. At first, I saw nothing in the app that suggested any benefit of being open source. Perhaps, I thought, open source’s influence will only become evident over time, possibly in the speed with which new words and meanings update it.
Meanwhile, Artha is a comprehensive, local thesaurus with some valuable features (Figure 3). Like the online Thesaurus.com, it includes antonyms and alternate meanings. However, Artha also includes jargon, related words, pertainyms (forms of the word that are parts of speech, such as an adverb based on a noun), and derivatives (for instance, “clearing” for “clear”), as well as sound-alikes and regular expressions. Best of all, when you enter a word for lookup, Artha displays a drop-down list of meanings instead of going directly to an arbitrarily defined core meaning.This drop-down list allows me to use Artha as a concept thesaurus – one based on categories of meaning rather than words – which is by far the most useful structure for writing, although it is rarely seen these days. If that is not enough, Artha also has a hot key feature, which allows users to get a definition of a highlighted word on the desktop.
After discovering all these feature, I only then realized that the evidence of Artha being open source lies in its comprehensiveness – a long-time open source tradition. As soon as I discovered all it could do, within moments Artha became my online thesaurus of choice.
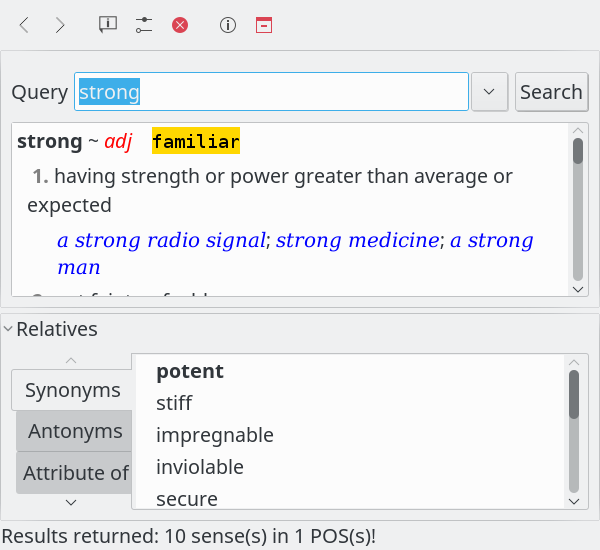
Figure 3: Artha is one of the most comprehensive thesauruses available online.
Klipper
Klipper is the clipboard in KDE (Figure 4). What makes it stand out is that it includes a buffer of previously copied or cut items to which it can revert with a couple of clicks on its icon in the system tray. This feature makes it ideal for copy editing when the same replacements are needed repeatedly. If necessary, items can be typed in to the buffer as needed. Why a similar buffer was not added to other desktops years ago is a mystery.
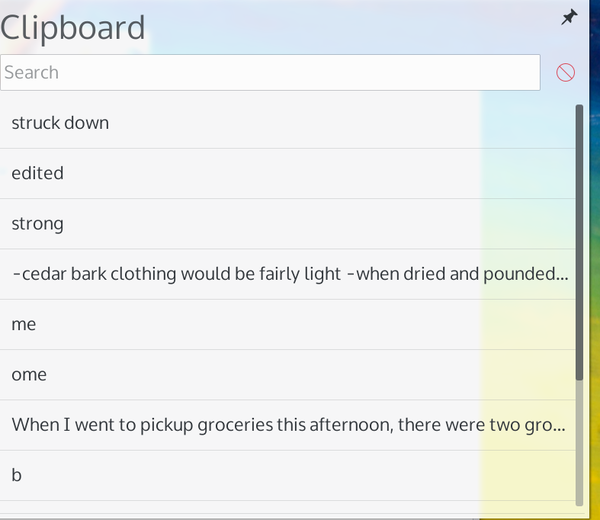
Figure 4: KDE’s long-time clipboard supports multiple items, which is useful in editing.
Diction
When I was a university instructor, I always told students that, if they had enough knowledge to use a grammar checker properly, then they had no need for one, except possibly to catch typos. Too often, the helpful suggestions can lead the unwary to further mistakes.
Diction is an exception to this rule – and a surprising one, considering that it runs from the command line (Figure 5). What makes Diction an exception is that it flags words that are common in grammatical errors and simply gives you the general rules associated with them, leaving you to decide whether to apply them or not. Instead of trustingly clicking a button to make a change, users have to stop and think whether each grammatical rule applies. Mistakes are less likely, and, confronted with these rules, users may actually learn a few points about grammar.
Starting with a plain text file, Diction has the options to flag words associated with common beginner’s mistakes and/or to suggest better wording. And Diction is thorough, averaging in my writing about 170 suggestions for about 2,000 words (most of which, I am happy to say, were false flags). In my experience, such thoroughness is unparalleled in grammar checkers, which makes the extra step of converting a file to plain text for the check well-worth it.

Figure 5: Diction shows where grammatical rules might apply, rather than suggesting changes.
Calibre
Many Linux users know Calibre as a convenient app for storing and launching ebooks. However, if you are producing ebooks yourself, Calibre is also a one-stop app for editing ebooks and exporting them to multiple formats (Figure 6).
The simplest way to edit ebooks is to write them in LibreOffice and export them to Calibre. Then, you can use Calibre to edit metadata, add graphics and tables of content, add new sections, and output the ebook to every major format. Armed with a knowledge of CSS, you can right-click to edit the raw code and validate it.
Calibre would be even more powerful if it included a guide to CSS tags. However, even so, it’s a basic necessity for writers who intend to self-publish online.
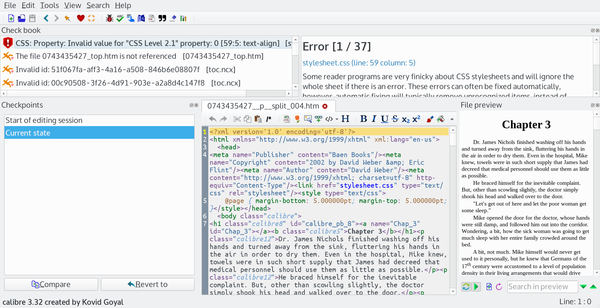
Figure 6: Besides being an ebook manager, Calibre also has tools for editing.
LibreOffice Writer
LibreOffice Writer may seem like an obvious choice, considering that it is a full-featured office suite. However, among those tools are several that are especially useful for professionals.
Admittedly, few editors accept manuscripts in LibreOffice’s default Open Document Format (ODT). However, formatting for manuscripts is simple enough that exporting files to MS Word format is no trouble. Moreover, Writer also exports to PDF (Figure 7), with enough options to give you full control over the process. The last few releases have even started to support exports to ePub, the leading free ebook format. Although the support for ePub within Writer is still limited, ODF files can be imported to the Calibre ebook manager and then converted with acceptable quality to ePub, Kindle’s MOBI, or any other popular ebook format.
In addition, Writer supports comments and tracking changes, two features that enable collaboration of exactly the kind that happens between writers and editors or critiquing readers. Using these tools, writers can accept or reject revisions and easily access revisions from within their manuscripts.
For those who are writing very long books, Writer has Master Documents, which are documents that consist of multiple files. These files can be edited separately, which reduces memory requirements and allows writers to work on different parts of the complete document at the same time.
Likewise, professionals may find features like AutoText and personal dictionaries for spell checking and hyphenation useful. Should you want to self-publish, either online or to hard copy, Writer also has the tools for professional layout and design unmatched by other word processors. With this array of tools, Writer is indispensable for serious writing.
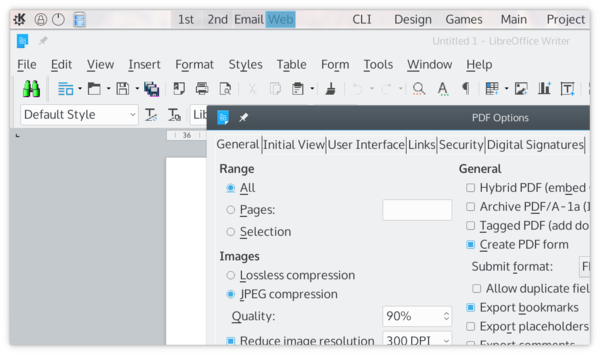
Figure 7: Extensive PDF options are one of several reasons for writers to prefer LibreOffice.
What’s Missing
This list of applications is what I consider the best of the best. For example, there are countless text editors and word processors that I might mention. However some are free to use, but do not have free licenses. Neither have I mentioned any online tools, for the simple reason that when you are a writer with deadlines, the risk of Internet connection problems is too great, even though this only occasionally happens. Local apps are simply more reliable.
Also, I have left out most so-called writers’ applications. Some, like FocusWriter, promise a distraction-free writing environment that I can get more conveniently in Bluefish or Vim, or even LibreOffice by using styles and templates – and at the expense of extra time spent reformatting for submission.
Another category I have left out are databases for fiction like bibisco. Such tools claim to help writers by peppering them with questions about characters, settings, unnecessary links, and organization. I remain deeply skeptical about such tools, because I have yet to hear of a professionally published writer who uses them. Just as importantly, they take much of the joy from writing for me, reducing the experience to something more akin to filling out a seemingly endless survey.
In the end, writing is about writing – or, failing that, streamlining necessary research so that you can return to writing as soon as possible. Properly used, the applications mentioned here should help you do just that.


 At the Embedded Linux Conference Europe, Leon Anavi compared the Alexa and Google Assistant voice platforms and looked into open source newcomer Mycroft Mark II.


