17 Fun Linux Commands to Run in the Terminal | Linux.com

The terminal is a very powerful tool, and it’s probably the most interesting part in Unix. Among the plethora of useful commands and scripts you can use, some seem less practical, if not completely useless. Here are some Bash commands that are fun, and some of them are useful as well.

Oneko

This command adds some spice to your terminal by adding a cat to your screen which will chase after your (mouse) cursor. Install it by running this script:

Type oneko to display the cat.

linux-fun-commands-oneko

figlet

Figlet is a command for those who love to write in ASCII art. It greatly simplifies this task as it automatically transforms any given string. It comes with a bunch of fonts by default at “/usr/share/figlet/fonts/,” and you can of course add your own.

figlet [-f path to the font] [string]

Read more at MakeTechEasier

Source

Introducing pydbgen: A random dataframe/database table generator

When you start learning data science, often your biggest worry is not the algorithms or techniques but getting access to raw data. While there are many high-quality, real-life datasets available on the web for trying out cool machine learning techniques, I’ve found that the same is not true when it comes to learning SQL.

For data science, having a basic familiarity with SQL is almost as important as knowing how to write code in Python or R. But it’s far easier to find toy datasets on Kaggle than it is to access a large enough database with real data (such as name, age, credit card, social security number, address, birthday, etc.) specifically designed or curated for machine learning tasks.

Wouldn’t it be great to have a simple tool or library to generate a large database with multiple tables filled with data of your own choice?

Aside from beginners in data science, even seasoned software testers may find it useful to have a simple tool where, with a few lines of code, they can generate arbitrarily large data sets with random (fake), yet meaningful entries.

For this reason, I am glad to introduce a lightweight Python library called pydbgen. In this article, I’ll briefly share some information about the package, and you can learn much more by reading the docs.

What is pydbgen?

Pydbgen is a lightweight, pure-Python library to generate random useful entries (e.g., name, address, credit card number, date, time, company name, job title, license plate number, etc.) and save them in a Pandas dataframe object, as an SQLite table in a database file, or in a Microsoft Excel file.

Source

Happy 15th Birthday, Fedora Linux!

Fedora is the best desktop Linux distribution for many reasons. Not only is it fast and reliable, but it is constantly kept up to date with fairly bleeding edge packages. Not to mention, it uses the greatest desktop environment, GNOME, by default. Most importantly, it respects and follows open source ideology. It is a pure Linux and FOSS experience that is an absolute joy to use. It’s no wonder Linus Torvalds — the father of Linux — chooses it.

With all of that said, Fedora didn’t get great overnight. It took years of evolution to become the exceptional operating system it is now. In fact, today, we celebrate the Linux distribution’s 15th birthday! Yes, it was way back in 2003 when Fedora Core 1 was released to the world, forever changing the course of history for the better.

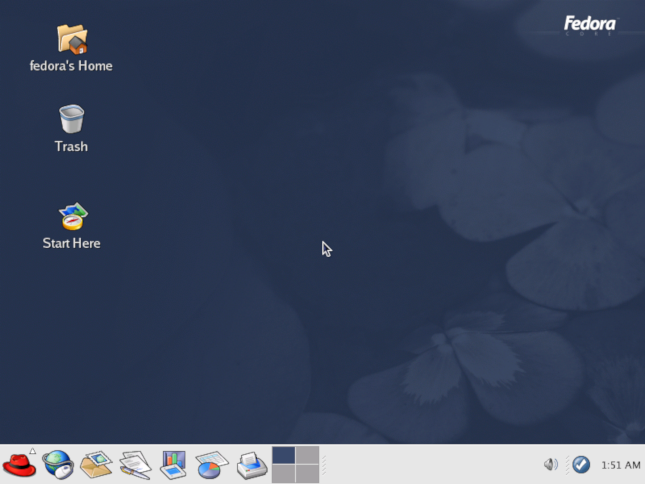
If you are feeling fairly nostalgic, the original announcement is archived, and you can view it here. Even better, the Fedora Project has created a Fedora Core 1 virtual disk image so you can easily try the retro operating system yourself! You simply load it into GNOME Boxes and you’re off to the races. What a great way to celebrate the 15th birthday, right? You can download the image here.

Link Dupont of the Fedora Project shares the following about the aforementioned virtual disk image.

Fedora is proud of its heritage. There is no better way to understand history than to experience it. Fortunately, modern virtualization software ships with Fedora Workstation by default! So why not try out Fedora Core 1 yourself? We’ve put together a virtual disk image of Fedora Core 1 (927 MB download) that can be imported directly into GNOME Boxes. It even points to the “current” update repositories so you can try out the “new” yum package manager yourself.
Whether you are currently using the excellent Fedora 29 or some other distro like Ubuntu, Manjaro, or Arch, you absolutely owe Fedora a debt of gratitude for all it has contributed to both the Linux and open source communities over the years. As the distribution enters a new chapter following the Red Hat acquisition by IBM, I hope and pray for another 15 years. Happy Birthday, Fedora!

Are you a fan of Fedora? Please tell me your fondest memories of the distribution in the comments below.

Source

Download GNOME Linux 3.30.2

GNOME is a complex and sophisticated desktop environment that can be used on any Linux distribution, on top of a window server, such as X11 or Wayland. It is a 100% free and open source project. It can be described in many ways, but the most important things to know when talking about GNOME is that it is usable, accessible, customizable, international, user-friendly, organized, supported, intuitive and very attractive.

The GNOME development platform

The GNOME development platform is also an important part of the GNOME desktop environment, providing an extensive, developer-friendly framework for building applications that integrate into the rest of the desktop. With GNOME, the user is in control of everything, as the desktop is simple and easy to use, helping you get things done quickly. It is finely crafted and gives you easy access to all of your data.

The default desktop environment of numerous Linux distributions

It is the default desktop environment of many well known Linux distributions, such as Fedora, Red Hat, Debian GNU/Linux, Ubuntu GNOME, as well as some BSD flavors, such as GhostBSD.

Default applications

Default applications include the Baobab disk usage analyzer, Brasero CD/DVD burning software, Cheese webcam utility, Empathy instant messenger, Devhelp documentation browser, Anjuta IDE, Evince document viewer, Eye of GNOME image viewer, File Roller archive manager, Evolution mail, contacts, and calendar suite, Totem media player, Seahorse PGP and SSH key-manager, Orca screen-reader, Vinagre VNC client, Gedit text editor, and Nautilus file manager.

In addition, the following GNOME apps are available: Gcalctool, Glade, Boxes, Color Manager, Contacts, Control Center, Dictionary Dictionary, Disks, Documents, Font Viewer, Keyring Manager, Screenshot, Sound Recorder, Logs, System Monitor, Terminal, Gucharmap, and an impressive collection of games.

Bottom line

Many recent desktop environments were inspired by GNOME, including Cinnamon and MATE. But the truth is that this is one of the best desktop environments for Linux-based operating systems. It is our preferred desktop environment.

Source

HPC Advances with Perlmutter and Sierra Supercomputers | Linux.com

There is a lot of activity and investment in the U.S supercomputer space now. After years of falling behind China for supercomputer superiority, the U.S is now storming back.

On Oct. 26, the Department of Energy’s National Nuclear Security Administration (NNSA) Lawrence Livermore National Laboratory (LLNL) formally dedicated the Sierra system, which is now the world’s third fastest supercomputer. The Sierra system is built with the same basic design as the IBM Summit system, which became the world’s most powerful supercomputer in June. Summit is a 200 petaflop system, while the newly dedicated Sierra currently tops out at 125 petaflops.

Sierra is a massive system spread out across 7,000 square feet of data center space. The system has 240 computing racks and 4,320 nodes.

Source

Top 5 CAD software available for Linux

If you’re an engineer then you must be familiar with the term

“CAD”

. Computer Aided Design is a term which is used to define the use of computer technology aimed at designing real or virtual objects. It is an essential part of many streams of engineering and often refers to the drafting of a product or a part. Whether it is architecture, space shuttle research, auto parts design, bridge construction even jewelry or clothing, CAD plays an important role. It may help you design curves and figures in two-dimension and in three-dimensions as well. The CAD world in Windows has already some of the most powerful AutoCAD software. Unfortunately, Lunix didn’t have its fair share of such software.

Whilst it is possible to run CAD software on Linux through an emulator like Wine, this article will specifically point out the top CAD software available for Linux. So let’s dive in!

The FreeCAD is an open source, free software and the best option for 3D solid and general purpose design. The software makes comprehensive use of open source libraries like OpenCascade, Qt, Python, and Coin3D. You can use FreeCAD on Mac OS X+, Linux and Windows. FreeCAD is favored by many users for small tasks. However, it cannot be deployed on large scale because it is still running on version 0.17. The good news is that the development has recently picked up the pace.

One of the few shortcomings of FreeCAD is that it is not suitable for organic shape animations and 2D drawings. However, you can easily benefit from its mechanical engineering designing abilities. You can find FreeCAD version 0.15 from Ubuntu repositories. Following are the commands that can help you install it.

The current version is 0.17. The software offers newer builds on daily basis which can be obtained by performing following commands:

  • Press (ctrl+alt+t) to open the terminal
  • Once terminal is open, enter and run the following commands:

sudo add-apt-repository ppa:freecad-maintainers/freecad-daily
sudo apt update
sudo apt install freecad-daily

2. OpenSCAD

OpenSCAD is a free 3D CAD Software that is light weighed and flexible. It is one of the most complicated tools since it is limited interactivity. It requires you to ‘program’ the model and then it renders a visual model corresponding to your code. If you think of it, it works like a compiler, taking commands from you, interpreting them and providing you the results. You cannot actually draw the model in this software, you can only describe it. It is however complicated to use but once you get hold of it, you’ll really love using it.

Install OpenSCAD on your system by performing these commands:

sudo apt-get install openscad

3. BRL-CAD

BRL-CAD is a complete package with powerful Constructive Solid Geometry (CSG). It is one of the oldest CAD tools with over 20 years of development and production us by U.S military and is still being developed actively. It comes with interactive 3D solid geometry editor, image and signal processing tools, a network-distributed symmetric, multiprocessing and high-performance ray-tracer, a network-distributed frame buffer support, animation capabilities, ray-tracing and numerical processing libraries and much more. Now it is not AutoCAD but is still used widely for transport studies such as ballistic penetration. This software finds numerous other uses in tasks like system benchmarking, medical visualization of objects, planning of radiation doses, education and training of computer graphics. You might keep all this in mind before installing it.

4. QCad

QCad is an application designed specifically for 2D computer-aided drafting with an intuitive user interface. If you are looking for software which can help you in designing your home interior, this software is best. It features technical drawings and diagrams related to building plans and mechanical parts as well. It is available in two editions: the commercial one and the free one called Community Edition. The difference between the two editions is mostly regarding the number of features they have to offer and the date of availability. It uses DXF and DWG as its standard input and output format, 35 CAD fonts, part library with over 4800 CAD parts, multi-document interface and object snaps.

5. LibreCAD

The two highlighting properties of LibreCAD are that it is open source software which allows 2D Computer Aided designing. CAD is usually a resource-intensive task which requires a rather modest hardware. The free LibreCAD tool is lightweight and does not put much strain on resource usage. This makes it a good choice for CAD. As a 2D tool, we cannot expect it to render 3D models and renderings. You get the backup of an autosave option if you ever have struggle with large files whilst using this software. Libre CAD wins the contest for being the best software for creating geometric sketches.

LibreCAD can be installed on Linux by running the following command

sudo apt install librecad

Conclusion

All the tools mentioned above are currently under constant development and we can expect great things for them in the future. What kind of software you should go with certainly depends on what you’re looking for. Although, Linux is now catching up with Windows, in our opinion you should stick with what your college prescribes (if you’re a student) which will most probably run on Windows only. Speaking of industry standards and advanced requirements, these software might fail to meet professional expectations. But we highly respect the work that is being put forward by the developers of the above-mentioned software.

Source

Top 30 OpenStack Interview Questions and Answers

Now a days most of the firms are trying to migrate their IT infrastructure and Telco Infra into private cloud i.e OpenStack. If you planning to give interviews on Openstack admin profile, then below list of interview questions might help you to crack the interview.

Q:1 Define OpenStack and its key components?

Ans: It is a bundle of opensource software, which all in combine forms a provide cloud software known as OpenStack.OpenStack is known as Stack of Open source Software or Projects.

Following are the key components of OpenStack

  • Nova – It handles the Virtual machines at compute level and performs other computing task at compute or hypervisor level.
  • Neutron – It provides the networking functionality to VMs, Compute and Controller Nodes.
  • Keystone – It provides the identity service for all cloud users and openstack services. In other words, we can say Keystone a method to provide access to cloud users and services.
  • Horizon – It provides a GUI (Graphical User Interface), using the GUI Admin can all day to day operations task at ease.
  • Cinder – It provides the block storage functionality, generally in OpenStack Cinder is integrated with Chef and ScaleIO to service block storage to Compute & Controller nodes.
  • Swift – It provides the object storage functionality. Generally, Glance images are on object storage. External storage like ScaleIO can work as Object storage too and can easily be integrated with Glance Service.
  • Glance – It provides Cloud image services, using glance admin used to upload and download cloud images.
  • Heat – It provides an orchestration service or functionality. Using Heat admin can easily VMs as stack and based on requirements VMs in the stack can be scale-in and Scale-out
  • Ceilometer – It provides the telemetry and billing services.
Q:2 What are services generally run on a controller node?

Ans: Following services run on a controller node:

  • Identity Service ( KeyStone)
  • Image Service ( Glance)
  • Nova Services like Nova API, Nova Scheduler & Nova DB
  • Block & Object Service
  • Ceilometer Service
  • MariaDB / MySQL and RabbitMQ Service
  • Management services of Networking (Neutron) and Networking agents
  • Orchestration Service (Heat)
Q:3 What are the services generally run on a Compute Node?

Ans: Following services run on a compute node,

  • Nova-Compute
  • Networking Services like OVS
Q:4 What is the default location of VMs on the Compute Nodes?

Ans: VMs in the Compute node are stored at “/var/lib/nova/instances”

Q:5 What is default location of glance images?

Ans: As the Glance service runs on a controller node, all the glance images are store under the folder “/var/lib/glance/images” on a controller node.

Read More : How to Create and Delete Virtual Machine(VM) from Command line in OpenStack

Q:6 Tell me the command how to spin a VM from Command Line?

Ans: We can easily spin a new VM using the following openstack command,

# openstack server create –flavor –image –nic net-id= –security-group –key-name <VM_Name>

Q:7 How to list the network namespace of a tenant in OpenStack?

Ans: Network namespace of a tenant can be listed using “ip net ns” command

~# ip netns list
qdhcp-a51635b1-d023-419a-93b5-39de47755d2d
haproxy
vrouter

Q:8 How to execute command inside network namespace in openstack?

Ans: Let’s assume we want to execute “ifconfig” command inside the network namespace “qdhcp-a51635b1-d023-419a-93b5-39de47755d2d”, then run the beneath command,

Syntax : ip netns exec <command>

~# ip netns exec qdhcp-a51635b1-d023-419a-93b5-39de47755d2d “ifconfig”

Q:9 How to upload and download a cloud image in Glance from command line?

Ans: A Cloud image can be uploaded in glance from command using beneath openstack command,

~# openstack image create –disk-format qcow2 –container-format bare –public –file .qcow2 <Cloud-Image-Name>

Use below openstack command to download a cloud image from command line,

~# glance image-download –file <Cloud-Image-Name> –progress <Image-ID>

Q:10 How to reset error state of a VM into active in OpenStack env?

Ans: There are some scenarios where some VMs went to error state and this error state can be changed into active state using below commands,

~# nova reset-state –active

Q:11 How to get list of available Floating IPs from command line?

Ans: Available floating ips can be listed using the below command,

~]# openstack ip floating list | grep None | head -10

Q:12 How to provision a virtual machine in specific availability zone and compute Host?

Ans: Let’s assume we want to provision a VM on the availability zone NonProduction in compute-02, use the beneath command to accomplish this,

~]# openstack server create –flavor m1.tiny –image cirros –nic net-id=e0be93b8-728b-4d4d-a272-7d672b2560a6 –security-group NonProd_SG –key-name linuxtec –availability-zone NonProduction:compute-02 nonprod_testvm

Q:13 How to get list of VMs which are provisioned on a specific Compute node?

Ans: Let’s assume we want to list the vms which are provisioned on compute-0-19, use below

Syntax: openstack server list –all-projects –long -c Name -c Host | grep -i

~# openstack server list –all-projects –long -c Name -c Host | grep -i compute-0-19

Q:14 How to view the console log of an openstack instance from command line?

Ans: Console logs of an instance can be viewed from the command line using the following commands,

First get the ID of an instance and then use the below command,

~# openstack console log show

Q:15 How to get console URL of an openstack instance?

Ans: Console URL of an instance can be retrieved from command line using the below openstack command,

~# openstack console url show

Q:16 How to create a bootable cinder / block storage volume from command line?

Ans: To Create a bootable cinder or block storage volume (assume 8 GB) , refer the below steps:

  • Get Image list using below

~# openstack image list | grep -i cirros
| 89254d46-a54b-4bc8-8e4d-658287c7ee92 | cirros | active |

  • Create bootable volume of size 8 GB using cirros image

~# cinder create –image-id 89254d46-a54b-4bc8-8e4d-658287c7ee92 –display-name cirros-bootable-vol 8

Q:17 How to list all projects or tenants that has been created in your opentstack?

Ans: Projects or tenants list can be retrieved from the command using the below openstack command,

~# openstack project list –long

Q:18 How to list the endpoints of openstack services?

Ans: Openstack service endpoints are classified into three categories,

  • Public Endpoint
  • Internal Endpoint
  • Admin Endpoint

Use below openstack command to view endpoints of each openstack service,

~# openstack catalog list

To list the endpoint of a specific service like keystone use below,

~# openstack catalog show keystone

Read More : Step by Step Instance Creation Flow in OpenStack

Q:19 In which order we should restart nova services on a controller node?

Ans: Following order should be followed to restart the nova services on openstack controller node,

  • service nova-api restart
  • service nova-cert restart
  • service nova-conductor restart
  • service nova-consoleauth restart
  • service nova-scheduler restart
Q:20 Let’s assume DPDK ports are configured on compute node for data traffic, now how you will check the status of dpdk ports?

Ans: As DPDK ports are configured via openvSwitch (OVS), use below commands to check the status,

[email protected]:~# ovs-appctl bond/show | grep dpdk
active slave mac: 90:38:09:ac:7a:99(dpdk0)
slave dpdk0: enabled
slave dpdk1: enabled
[email protected]:~#
[email protected]:~# dpdk-devbind.py –status

Q:21 How to add new rules to the existing SG(Security Group) from command line in openstack?

Ans: New rules to the existing SG in openstack can be added using the neutron command,

~# neutron security-group-rule-create –protocol <tcp or udp> –port-range-min <port-number> –port-range-max <port-number> –direction <ingress or egress> –remote-ip-prefix <IP-address-or-range> Security-Group-Name

Q:22 How to view the OVS bridges configured on Controller and Compute Nodes?

Ans: OVS bridges on Controller and Compute nodes can be viewed using below command,

~]# ovs-vsctl show

Q:23 What is the role of Integration Bridge(br-int) on the Compute Node ?

Ans: The integration bridge (br-int) performs VLAN tagging and untagging for the traffic coming from and to the instance running on the compute node.

Packets leaving the n/w interface of an instance goes through the linux bridge (qbr) using the virtual interface qvo. The interface qvb is connected to the Linux Bridge & interface qvo is connected to integration bridge (br-int). The qvo port on integration bridge has an internal VLAN tag that gets appended to packet header when a packet reaches to the integration bridge.

Q:24 What is the role of Tunnel Bridge (br-tun) on the compute node?

Ans: The tunnel bridge (br-tun) translates the VLAN tagged traffic from integration bridge to the tunnel ids using OpenFlow rules.

br-tun (tunnel bridge) allows the communication between the instances on different networks. Tunneling helps to encapsulate the traffic travelling over insecure networks, br-tun supports two overlay networks i.e GRE and VXLAN

Q:25 What is the role of external OVS bridge (br-ex)?

Ans: As the name suggests, this bridge forwards the traffic coming to and from the network to allow external access to instances. br-ex connects to the physical interface like eth2, so that floating IP traffic for tenants networks is received from the physical network and routed to the tenant network ports.

Q:26 What is function of OpenFlow rules in OpenStack Networking?

Ans: OpenFlow rules is a mechanism that define how a packet will reach to destination starting from its source. OpenFlow rules resides in flow tables. The flow tables are part of OpenFlow switch.

When a packet arrives to a switch, it is processed by the first flow table, if it doesn’t match any flow entries in the table then packet is dropped or forwarded to another table.

Q:27 How to display the information about a OpenFlow switch (like ports, no. of tables, no of buffer)?

Ans: Let’s assume we want to display the information about OpenFlow switch (br-int), run the following command,

[[email protected] ~]# ovs-ofctl show br-int
OFPT_FEATURES_REPLY (xid=0x2): dpid:0000fe981785c443
n_tables:254, n_buffers:256
capabilities: FLOW_STATS TABLE_STATS PORT_STATS QUEUE_STATS ARP_MATCH_IP
actions: output enqueue set_vlan_vid set_vlan_pcp strip_vlan mod_dl_src mod_dl_dst mod_nw_src mod_nw_dst mod_nw_tos mod_tp_src mod_tp_dst
1(patch-tun): addr:3a:c6:4f:bd:3e:3b
config: 0
state: 0
speed: 0 Mbps now, 0 Mbps max
2(qvob35d2d65-f3): addr:b2:83:c4:0b:42:3a
config: 0
state: 0
current: 10GB-FD COPPER
speed: 10000 Mbps now, 0 Mbps max
………………………………………

Q:28 How to display the entries for all the flows in a switch?

Ans: Flows entries of a switch can be displayed using the command ‘ovs-ofctl dump-flows‘

Let’s assume we want to display flow entries of OVS integration bridge (br-int),

[[email protected] ~]# ovs-ofctl dump-flows br-int

Q:29 What are Neutron Agents and how to list all neutron agents?

Ans: OpenStack neutron server acts as the centralized controller, the actual network configurations are executed either on compute and network nodes. Neutron agents are software entities that carry out configuration changes on compute or network nodes. Neutron agents communicate with the main neutron service via Neuron API and message queue.

Neutron agents can be listed using the following command,

~# openstack network agent list -c ‘Agent type’ -c Host -c Alive -c State

Q:30 What is CPU pinning?

Ans: CPU pinning refers to reserving the physical cores for specific virtual machine. It is also known as CPU isolation or processor affinity. The configuration is in two parts:

  • it ensures that virtual machine can only run on dedicated cores
  • it also ensures that common host processes don’t run on those cores

In other words we can say pinning is one to one mapping of a physical core to a guest vCPU.

Source

Facebook’s GraphQL Gets Its Own Open-Source Foundation

Facebook announced GraphQL back in 2012 and open sourced it in 2015. Today, it’s being used by companies that range from Airbnb to Audi, GitHub, Netflix, Shopify, Twitter and The New York Times . At Facebook itself, the GraphQL API powers billions of API calls every day. At its core, GraphQL is basically a language for querying databases from client-side applications and a set of specifications for how the API on the backend should present this data to the client. It presents an alternative to REST-based APIs and promises to offer developers more flexibility and the ability to write faster and more secure applications. Virtually every major programming language now supports it through a variety of libraries.

“GraphQL has redefined how developers work with APIs and client-server interactions. We look forward to working with the GraphQL community to become an independent foundation, draft their governance and continue to foster the growth and adoption of GraphQL,” said Chris Aniszczyk, vice president of Developer Relations at the Linux Foundation. As Aniszczyk noted, the new foundation will have an open governance model, similar to that of other Linux Foundation projects. The exact details are still a work in progress, though. The list of founding members is also still in flux, but for now, it includes Airbnb, Apollo, Coursera, Elementl, Facebook, GitHub, Hasura, Prisma, Shopify and Twitter.


Money can’t buy love, but it improves your bargaining position.
— Christopher Marlowe

Working…

Source

How to Install Nginx with Virtual Hosts and SSL Certificate

Nginx (short for Engine-x) is a free, open source, powerful, high-performance and scalable HTTP and reverse proxy server, a mail and standard TCP/UDP proxy server. It is easy to use and configure, with a simple configuration language. Nginx is now the preferred web server software for powering heavily loaded sites, due its scalability and performance.

In this article will discuss how to use Nginx as a HTTP server, configure it to serve web content, and set up name-based virtual hosts, and create and install SSL for secure data transmissions, including a self-signed certificate on Ubuntu and CentOS.

How to Install Nginx Web Server

First start by installing the Nginx package from the official repositories using your package manager as shown.

———— On Ubuntu ————
$ sudo apt update
$ sudo apt install nginx

———— On CentOS ————
$ sudo yum update
$ sudo yum install epel-release
$ sudo yum install nginx

After the Nginx package is installed, you need to start the service for now, enable it to auto-start at boot time and view it’s status, using the following commands. Note that on Ubuntu, it should be started and enabled automatically while the package is pre-configured.

$ sudo systemctl start nginx
$ sudo systemctl senable nginx
$ sudo systemctl status nginx

Start and Check Nginx Status

Start and Check Nginx Status

At this point, the Nginx web server should be up and running, you can verify the status with the netstat command.

$ sudo netstat -tlpn | grep nginx

Check Nginx Port Status

Check Nginx Port Status

If your system has a firewall enabled, you need to open port 80 and 443 to allow HTTP and HTTPS traffic respectively, through it, by running.

———— On CentOS ————
$ sudo firewall-cmd –permanent –add-port=80/tcp
$ sudo firewall-cmd –permanent –add-port=443/tcp
$ sudo firewall-cmd –reload

———— On Ubuntu ————
$ sudo ufw allow 80/tcp
$ sudo ufw allow 443/tcp
$ sudo ufw reload

The ideal method for testing the Nginx installation and checking whether it’s running and able to serve web pages is by opening a web browser and pointing to the IP of the server.

http://Your-IP-Address
OR
http://Your-Domain.com

A working installation should be indicated by the following screen.

Check Nginx Web Page

Check Nginx Web Page

How to Configure Nginx Web Server

Nginx’s configuration files are located in the directory /etc/nginx and the global configuration file is located at /etc/nginx/nginx.conf on both CentOS and Ubuntu.

Nginx is made up of modules that are controlled by various configuration options, known as directives. A directive can either be simple (in the form name and values terminated with a 😉 or block ( has extra instructions enclosed using {}). And a block directive which contains other directives is called a context.

All the directives are comprehensively explained in the Nginx documentation in the project website. You can refer to it for more information.

How to Serve Static Content Using Nginx in Standalone Mode

At a foundational level, Nginx can be used to serve static content such as HTML and media files, in standalone mode, where only the default server block is used (analogous to Apache where no virtual hosts have been configured).

We will start by briefly explaining the configuration structure in the main configuration file.

$ sudo vim /etc/nginx/nginx.conf

If you look into this Nginx configuration file, the configuration structure should appear as follows and this is referred to as the main context, which contains many other simple and block directives. All web traffic is handled in the http context.

user nginx;
worker_processes 1;
…..

error_log /var/log/nginx/error.log warn;
pid /var/run/nginx.pid;
…..

events {
…..
}

http {
server{
…….
}
…..
}

The following is a sample Nginx main configuration (/etc/nginx/nginx.conf) file, where the http block above contains an include directive which tells Nginx where to find website configuration files (virtual host configurations).

Nginx Configuration File

user www-data;
worker_processes auto;
pid /run/nginx.pid;

events {
worker_connections 768;
# multi_accept on;
}

http {
include /etc/nginx/mime.types;
default_type application/octet-stream;

include /etc/nginx/mime.types;
default_type application/octet-stream;

access_log /var/log/nginx/access.log;
error_log /var/log/nginx/error.log;

sendfile on;
#tcp_nopush on;
keepalive_timeout 65;
#gzip on;

include /etc/nginx/conf.d/*.conf;
}

Note that on Ubuntu, you will also find an additional include directive (include /etc/nginx/sites-enabled/*;), where the directory /etc/nginx/sites-enabled/ stores symlinks to the websites configuration files created in /etc/nginx/sites-available/, to enable the sites. And deleting a symlink disables that particular site.

Based on your installation source, you’ll find the default website configuration file at /etc/nginx/conf.d/default.conf (if you installed from official NGINX repository and EPEL) or /etc/nginx/sites-enabled/default (if you installed from Ubuntu repositories).

This is our sample default nginx server block located at /etc/nginx/conf.d/default.conf on the test system.

server {
listen 80 default_server;
listen [::]:80 default_server;
server_name _;
root /var/www/html/;
index index.html;
location / {
try_files $uri $uri/ =404;
}
}

A brief explanation of the directives in the above configuration:

  • listen: specifies the port the server listens on.
  • server_name: defines the server name which can be exact names, wildcard names, or regular expressions.
  • root: specifies the directory out of which Nginx will serve web pages and other documents.
  • index: specifies the type(s) of index file(s) to be served.
  • location: used to process requests for specific files and folders.

From a web browser, when you point to the server using the hostname localhost or its IP address, it processes the request and serves the file /var/www/html/index.html, and immediately saves the event to its access log (/var/log/nginx/access.log) with a 200 (OK) response. In case of an error (failed event), it records the message in the error log (/var/log/nginx/error.log).

Test Nginx Default Site

Test Nginx Default Site

To learn more about logging in Nginx, you may refer to How to Configure Custom Access or Error Log Formats in Nginx.

Instead of using the default log files, you can define custom log files for different web sites, as we shall look at later on, under the section “setting up name-based virtual hosts (server blocks)”.

How ot Restrict Access to a Web Page with Nginx

In order to restrict access to your website/application or some parts of it, you can setup basic HTTP authentication. This can be used essentially to restrict access to the whole HTTP server, individual server blocks or location blocks.

Start by creating a file that will store your access credentials (username/password) by using the htpasswd utility.

$ yum install httpd-tools #RHEL/CentOS
$ sudo apt install apache2-utils #Debian/Ubuntu

As an example, let’s add user admin to this list (you can add as many users as possible), where the -c option is used to specify the password file, and the -B to encrypt the password. Once you hit [Enter], you will be asked to enter the users password:

$ sudo htpasswd -Bc /etc/nginx/conf.d/.htpasswd admin

Then, let’s assign the proper permissions and ownership to the password file (replace the user and group nginx with www-data on Ubuntu).

$ sudo chmod 640 /etc/nginx/conf.d/.htpasswd
$ sudo chmod nginx:nginx /etc/nginx/conf.d/.htpasswd

As we mentioned earlier on, you can restrict access to your webserver, a single website (using its server block) or specific directory or file. Two useful directives can be used to achieve this:

  • auth_basic – turns on validation of user name and password using the “HTTP Basic Authentication” protocol.
  • auth_basic_user_file – specifies the credential’s file.

As an example, we will show how to password-protect the directory /var/www/html/protected.

server {
listen 80 default_server;
server_name localhost;
root /var/www/html/;
index index.html;
location / {
try_files $uri $uri/ =404;
}

location /protected/ {
auth_basic “Restricted Access!”;
auth_basic_user_file /etc/nginx/conf.d/.htpasswd;
}
}

Now, save changes and restart Nginx service.

$ sudo systemctl restart nginx

The next time you point your browser to the above directory (http://localhost/protected) you will be asked to enter your login credentials (username admin and the chosen password).

A successful login allows you to access the directory’s contents, otherwise you will get a a “401 Authorization Required” error.

How to Setup Name-based Virtual hosts (Server Blocks) in Nginx

The server context allows multiple domains/sites to be stored in and served from the same physical machine or virtual private server (VPS). Multiple server blocks (representing virtual hosts) can be declared within the http context for each site/domain. Nginx decides which server processes a request based on the request header it receives.

We will demonstrate this concept using the following dummy domains, each located in the specified directory:

  • wearetecmint.com – /var/www/html/wearetecmint.com/
  • welovelinux.com – /var/www/html/welovelinux.com/

Next, assign the appropriate permissions on the directory for each site.

$ sudo chmod -R 755 /var/www/html/wearetecmint.com/public_html
$ sudo chmod -R 755 /var/www/html/welovelinux.com/public_html

Now, create a sample index.html file inside each public_html directory.

<html>
<head>
<title>www.wearetecmint.com</title>
</head>
<body>
<h1>This is the index page of www.wearetecmint.com</h1>
</body>
</html>

Next, create the server block configuration files for each site inside the /etc/httpd/conf.d directory.

$ sudo vi /etc/nginx/conf.d/wearetecmint.com.conf
$ sudo vi /etc/nginx/conf.d/welovelinux.com.conf

Add the following server block declaration in the wearetecmint.com.conf file.

wearetecmint.com.conf

server {
listen 80;
server_name wearetecmint.com;
root /var/www/html/wearetecmint.com/public_html ;
index index.html;
location / {
try_files $uri $uri/ =404;
}

}

Next, add the following server block declaration in the welovelinux.com.conf file.

welovelinux.com.conf

server {
listen 80;
server_name welovelinux.com;
root /var/www/html/welovelinux.com/public_html;
index index.html;
location / {
try_files $uri $uri/ =404;
}

}

To apply the recent changes, restart the Nginx web server.

$ sudo systemctl restart nginx

and pointing your web server to the above addresses should make you see the main pages of the dummy domains.

http://wearetecmint.com
http://welovelinux.com

Test Nginx Virtual Hosts Websites

Test Nginx Virtual Hosts Websites

Important: If you have SELinux enabled, its default configuration does not allow Nginx to access files outside of well-known authorized locations (such as /etc/nginx for configurations, /var/log/nginx for logs, /var/www/html for web files etc..).

You can handle this by either disabling SELinux, or setting the correct security context. For more information, refer to this guide: using Nginx and Nginx Plus with SELinux on the Nginx Plus website.

How to Install and Configure SSL with Nginx

SSL certificates help to enable secure http (HTTPS) on your site, which is essential to establishing a trusted/secure connection between the end users and your server by encrypting the information that is transmitted to, from, or within your site.

We will cover how to create and install a self-signed certificate, and generate a certificate signing request (CSR) to acquire an SSL certificate from a certificate authority (CA), to use with Nginx.

Self-signed certificates are free to create and are practically good to go for testing purposes and for internal LAN-only services. For public-facing servers, it is highly recommended to use a certificate issued by a CA (for example Let’s Encrypt) to uphold its authenticity.

To create a self-signed certificate, first create a directory where your certificates will be stored.

$ sudo mkdir /etc/nginx/ssl-certs/

Then generate your self-signed certificate and the key using the openssl command line tool.

$ sudo openssl req -x509 -nodes -days 365 -newkey rsa:2048 -keyout /etc/nginx/ssl-certs/nginx.key -out /etc/nginx/ssl-certs/nginx.crt

Let’s briefly describe the options used in the above command:

  • req -X509 – shows we are creating a x509 certificate.
  • -nodes (NO DES) – means “don’t encrypt the key”.
  • -days 365 – specifies the number of days the certificate will be valid for.
  • -newkey rsa:2048 – specifies that the key generated using RSA algorithm should be 2048-bit.
  • -keyout /etc/httpd/ssl-certs/apache.key – specifies the full path of the RSA key.
  • -out /etc/httpd/ssl-certs/apache.crt – specifies the full path of the certificate.

Create SSL Certificate and Key for Nginx

Create SSL Certificate and Key for Nginx

Next, open your virtual host configuration file and add the following lines to a server block declaration listening on port 443. We will test with the virtual host file /etc/nginx/conf.d/wearetecmint.com.conf.

$ sudo vi /etc/nginx/conf.d/wearetecmint.com.conf

Then add the ssl directive to nginx configuration file, it should look similar to below.

server {
listen 80;
listen [::]:80;
listen 443 ssl;
listen [::]:443 ssl;

ssl on;
ssl_certificate /etc/nginx/ssl-certs/nginx.crt;
ssl_trusted_certificate /etc/nginx/ssl-certs/nginx.crt;
ssl_certificate_key /etc/nginx/ssl-certs/nginx.key;

server_name wearetecmint.com;
root /var/www/html/wearetecmint.com/public_html;
index index.html;
location / {
try_files $uri $uri/ =404;
}

}

Now restart the Nginx and point your browser to the following address.

https://www.wearetecmint.com

Check Nginx SSL Website

Check Nginx SSL Website

If you would like to purchase an SSL certificate from a CA, you need to generate a certificate signing request (CSR) as shown.

$ sudo openssl req -newkey rsa:2048 -nodes -keyout /etc/nginx/ssl-certs/example.com.key -out /etc/nginx/ssl-certs/example.com.csr

You can also create a CSR from an existing private key.

$ sudo openssl req -key /etc/nginx/ssl-certs/example.com.key -new -out /etc/nginx/ssl-certs/example.com.csr

Then, you need to send the CSR that is generated to a CA to request the issuance of a CA-signed SSL certificate. Once you receive your certificate from the CA, you can configure it as shown above.

Read Also: The Ultimate Guide to Secure, Harden and Improve Performance of Nginx Web Server

Summary

In this article, we have explained how to install and configure Nginx; covered how to setup name-based virtual hosting with SSL to secure data transmissions between the web server and a client.

If you experienced any setbacks during your nginx installation/configuration process or have any questions or comments, use the feedback form below to reach us.

Source

Amazon Inspector Adds Amazon EC2 Instance Details to Security Findings

Amazon Inspector security findings now include the Amazon Machine Image (AMI) ID, instance tags, auto scaling group, hostname, IP addresses, DNS names, and subnet ID of the Amazon EC2 instance that has the vulnerability or insecure configuration. You can view these fields by clicking the ‘Show Details’ button while reviewing a finding in the management console. These fields are also available when you describe findings through the AWS API and CLI.

Amazon Inspector automatically assesses applications for vulnerabilities or deviations from best practices. After performing an assessment, Amazon Inspector produces a detailed list of security findings prioritized by level of severity. These additional fields help you filter, group, and prioritize your security findings based on the image, network location, tags, or other attributes of vulnerable EC2 instances.

Amazon Inspector is available in the following eleven regions: US East (Northern Virginia), US East (Ohio), US West (Northern California), US West (Oregon), EU (Frankfurt), EU (Ireland), Asia Pacific (Mumbai), Asia Pacific (Seoul), Asia Pacific (Sydney), Asia Pacific (Tokyo), and AWS GovCloud (US).

To learn more about Amazon Inspector or to start your free trial, please visit Amazon Inspector.

Source

WP2Social Auto Publish Powered By : XYZScripts.com