How to Easily Remove Packages Installed From Source in Linux

How to Easily Remove Packages Installed From Source in Linux

How to Easily Remove Packages Installed From Source in Linux

In one of our previous articles, we’d shown you how to install and uninstall software in Linux outside the regular package managers. In that, we also saw that well-constructed software comes with built-in uninstallers. This way, you can remove the packages as easily as you install them.

Unfortunately, this isn’t always the case. There are plenty of packages out in the wild which don’t allow for clean removal. Sometimes you have no choice but to use a package like this because you need the functionality. However, there is a solution to the problem. In this article, we’ll show you how to use the software called “stow” to easily remove packages installed from in Linux.

Step 1: Install Stow

The “stow” package should be available in your regular package repositories. In this example, we are using CentOS so we need the extended EPEL libraries. You can install them using the command:

yum install epel-release

And after that, install stow like this:

yum install stow

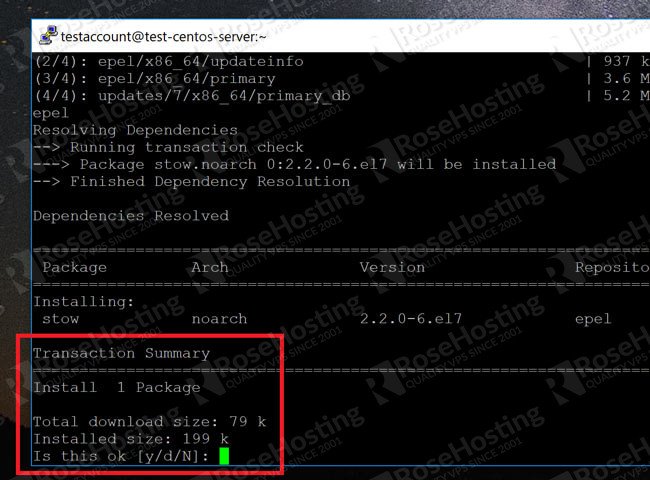
Press yes to confirm the installation:

Installing Stow

Now that stow is installed, we have to choose where to store our package files.

Step 2: Choose Where to Store Package Files

The normal “make install” command copies the package files into a variety of places. Stow works by keeping them all in one place in a single directory, and then creating symlinks to where they should have gone originally.

So we need to choose a directory for where stow keeps all the package files. By convention, this is usually:

/usr/local/stow/

And in this location, we have one single directory for each package. So if we want to install the “hello” program that we used as an example in the previous article, the files will be stored in:

/usr/local/stow/hello

But this location can be anything. Just to show, we’ll be storing the files in the following location:

/home/bhagwad/stow/

Step 3: Using “make install” with the “prefix” Option

We saw in the previous article that installing from source requires these commands:

./configure
make
make install

To install with stow, we just change the last step to:

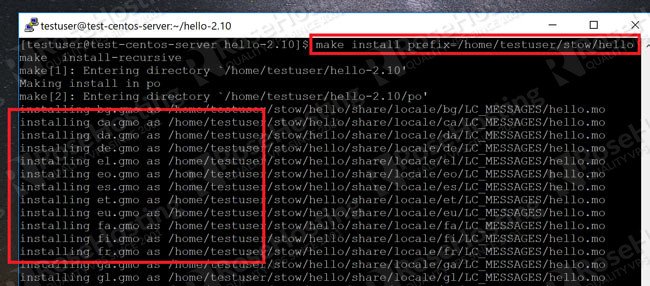
make install prefix=/home/testuser/stow/hello

The “prefix” option tells us to place the packages in the given location. This location is nothing but the selected directory in Step 2 with the package name added on as a separate folder. This causes the files to be installed into the given location as shown here:

Installing Files in Stow Directory

Now we have all the files required for the package in a folder in the stow directory. Time for the magic to happen!

Step 4: Completing the Installation with stow

To install the package, first “cd” into the stow directory like this:

cd /home/testuser/stow

Ensure that the folder with the files is just one directory below your current location. Now type:

stow hello

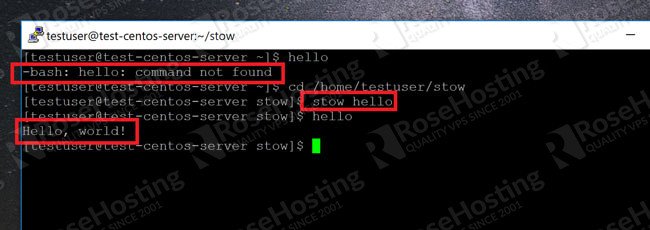
That’s it! The package is now installed on your system. Here’s a screenshot of the “hello” command working as intended:

Installing with Stow

But wait. The real benefit is yet to come. Uninstallation.

Step 5: Removing Packages

The coolest part about stow is how easy it is to remove packages from the system. No need to keep the source packages or anything. Just navigate to the stow directory as in Step 4 and type:

stow –delete hello

And it’s done! You can see below that the command no longer works after this step:

Removing Software with Stow

As far as the system is concerned, the package has been completely removed! It’s good to remember that the files haven’t actually vanished. They’re still in the “hello” directory. You could just as easily install the package again with the stow command. If you don’t require the files anymore, just delete the “hello” folder and your system is clean!

We recommend using stow every single time you install a package from source. It’s not worth the risk to have a badly written package spray your system with files everywhere, and which are a nuisance to remove afterward. Stow ensures that they’re all neatly contained in one location, then keeps track of the symlinks and deletes them afterward. It’s a fantastic solution!

Of course, if you are one of our Managed VPS hosting customers, you don’t have to remove packages installed from source, simply ask our admins, sit back and relax. Our admins will do this for you immediately.

PS. If you liked this post about how to easily remove packages installed from source in Linux, please share it with your friends on the social networks using the buttons below or simply leave a comment in the comments section. Thanks.

Source

Intel updates embedded toolsuite — but says it’s scaling back its IoT effort

Intel launched Intel System Studio 2019, updating the Linux-friendly embedded toolsuite with improved performance and enhanced I/O analysis. Meanwhile, due to soaring demand for Intel’s Core and Xeon sales, it’s scaling back its lower-end IoT business.

Intel has a habit of launching and the discontinuing special projects outside its core processor business, but one experiment that has stuck around is Intel System Studio. A lot has changed since we last checked on the Intel System Studio (ISS) development toolsuite when it launched in 2013. For example, while initially targeting both mobile and embedded software development for Linux and Android running on Intel processors, with the dissolution of Intel’s mobile business, it is now focused on optimizing embedded IoT applications running on its Atom, Core, and Xeon processors.

Intel System Studio 2019 architecture

Here we give the new 2019 version a look-see on ISS 2019, which is available in both a commercial version and a free, community-backed release. Our ISS update is followed by a report on Intel’s plans to scale back its embedded business.

Inside Intel System Studio 2019

The ISS toolsuite is designed to simplify “bring-up and improve system and IoT device application performance on Intel platforms,” says the company. The software includes platform-tuned libraries and compilers help optimize software, as well as domain-specific routines and system-wide visual performance analysis that can “quickly identify issues and reduce optimization time.”

Other features include debugging, tracing, and analyzing tools. ISS is now cross-platform, with support for Linux, Windows and Mac host desktops, as well as Linux, Windows, Android, VxWorks, and FreeBSD targets.

Intel announced the beta version of ISS 2019 back in June. However, it left it to InfoWorld to announce the final release on Oct. 30.

ISS 2019 adds a new workflow and simplified setup to one of the suite’s key components: Intel Vtune Amplifier. Vtune offers insights into CPU and GPU performance, threading performance and scalability, bandwidth, and caching. It supplies tools such as hotspots, call counts, annotated source code, and activity graphs.

Intel Vtune Amplifier screen

The suite’s

Intel Advisor

software, which provides vectorization, threading, and optimization tools, features much improved performance and enhanced I/O analysis. It adds support for JIT profiling and “containers like Docker,” and makes various embedded platforms and accelerator improvements.

ISS 2019 provides an updated OpenCL framework that supports heterogeneous computing, says InfoWorld. The framework allows code to be offloaded to Intel processors and GPUs, making it easier to build, debug, and analyze OpenCL apps while also enabling customized kernel code with Intel computer vision and media software.

Finally, there’s a new Eclipse plug-in for Wind River Linux and its underlying Yocto Project code. The plug-in lets developers create or import application projects or platform projects for Yocto Project-compatible targets.


Interim Intel
CEO Bob Swan

Intel to scale back embedded business

In other Intel news, the chipmaker solidly beat analyst expectations with its latest Q3 results. Due to shortages of its increasingly popular Intel Core and Xeon chips for the datacenter, Intel interim CEO and CFO Bob Swan told investors that Intel is prioritizing production for those product lines. According to a report in The Motley Fool, Swan went on to say that as a result of this prioritization, “by definition, the lower end of PC and the [Internet of Things] business is being constrained.”

Intel’s IoT Group (IoTG) comprised about 4.8 percent of Intel’s sales and grew 8 percent on a year-over-year basis last quarter. However, Intel projects that revenue will decline by 15 percent in the fourth quarter versus 3Q levels, with sales of around $781 million for a year-over-year decline of around 11 percent. That decline, however, also reflects Intel’s divestiture of Wind River, which had been part of IoTG.

If low-end Core and lower-end Gemini Lake chips fall into short supply, this would open an opportunity for AMD to grab market share in the IoT space. Yet, AMD also appears to be focusing on the high end with its popular Ryzen processors. AMD’s Ryzen Embedded V100 successor to the R-Series is off to a strong start in competing with high-end tom and lower-end, embedded focused Core chips, but the Intel rival has yet to release its much-delayed “Banded Kestrel” follow-on to the lower-end G-Series. This opens more opportunities for Arm vendors that can tolerate the narrower margins of the embedded chip business.


Former Intel CEO
Brian Krzanich

Intel’s Swan took over as CEO a few months ago after former CEO Brian Krzanich resigned after admitting to violating company policy by having an affair with an Intel employee prior to becoming CEO. Swan was previously a CFO at eBay and then again at Intel, where he still holds the position.

Krzanich oversaw the strengthening of Intel’s datacenter chip sales, as well as its successful defense against Arm server chips. He also led Intel through the successful acquisition of FPGA maker Altera.

Yet, Krzanich also led the company’s failed mobile SoC experiment, as well as the discontinuation of the wearable Curie and embedded Joule modules. In addition, Intel has become more of a follower than a leader in the slow-motion march toward 10nm and 7nm chips. The resurgent AMD and a variety of Arm chip vendors are now leading the way.

Further information

Intel System Studio 2019 is available in a free community license backed by community forum support. You can renew the license every 90 days without limits. There are also a variety of paid license arrangements that give you greater access to Intel tech support. More information may be found on the Intel System Studio product page.

Source

How to Type Indian Rupee Symbol in Ubuntu 18.04

Last updated November 3, 2018

This step by step tutorial shows you how to type Indian Rupee Symbol on Ubuntu 18.04 with GNOME desktop. This procedure can also be applied to other desktop environments as well as other Linux distributions.

In 2010, the government of India unveiled the ₹ symbol for its currency, the Indian rupee. It has the unicode character U+20B9.

Over the time, the ₹ symbol started appearing on keyboards, both Indian and international. It is placed on the key 4 with US Dollar $.

Now typing $ is pretty straightforward. You use Shift+4 and you get $ symbol. But that’s not the case with ₹. It’s the third symbol on the key 4 and the question arises, how to type ₹?

To use the third symbol on any key (like the € on key 5), you have to use the AltGr (or the right Alt) key with the symboled key. So if you use right Alt+4, you should get the ₹ symbol.

But that doesn’t happen all the time. You have to do a few changes in order to type ₹ sign on Ubuntu.

Typing Indian Rupee Symbol (₹) on Ubuntu 18.04

Try Right Alt+4 key first and see if it works by default. If it doesn’t, you can follow the rest of the tutorial to get the ₹ support on your Ubuntu system.

Step 1: Adding the correct keyboard

In order to type ₹ on Ubuntu, you need to use the Indian English keyboard with Rupee.

No, I am not asking you to buy a brand new keyboard that has ₹ displayed on the key 4. I am suggesting to add this keyboard layout on your operating system. Let me show you how to do that.

Just so that you know, the same steps could be applied to other desktop environments like MATE, KDE Plasma etc. The screenshots won’t look the same though, so you would need to find your way through on your own.

In Ubuntu GNOME, press Windows key and search for Settings:

Ubuntu 18.04 System SettingsGo to Settings

In the Settings, look for Region & Languages and in here click on the + symbol under the Input Sources. This is the way to add a new keyboard layout.

Adding a new keyboard in Ubuntu

Click on the three vertical dot symbol to display more keyboard layouts.

Adding a new keyboard in Ubuntu

The search option may not work. So, you may have to scroll down and look for English (India). Click on it.

Adding a new keyboard in Ubuntu

You would expect that it will add the English (India) keyboard immediately but that doesn’t happen. You’ll have plenty of keyboard options under English (India).

Look for English (India, with rupee). You can also search with rupee here. Once you have found this keyboard, click on Add button to add this layout.

Add Indian keyboard with rupee symbol in Ubuntu

Step 2: Change the keyboard layout

Now that you have added the English (India, with rupee) keyboard, it’s time to use it.

You can use the Windows + Space keyboard shortcut in Ubuntu 18.04. to change the input source i.e. to change the keyboard.

Use Windows + Space to change keyboard in use

If you are going to use the Rupee symbol all the time, you should make English (India, with rupee) the default keyboard. You can do that in the Settings by moving it up the order.

Add Indian keyboard with rupee symbol in UbuntuMove the keyboard up the order

Note: You may have to log out or reboot after changing the default keyboard so that these changes take into effect.

Step 3: Using keyboard shortcut to type ₹ on Ubuntu

Now that you have made sure that you are using English (India, with rupee) keyboard layout, use either of the following keys combinations to type ₹:

  • If you have the AltGr key on your physical keyboard: AltGr+4
  • Else, use the Alt key on the right hand side: Right Alt+4

Typing Indian Rupee Symbol on Ubuntu

This will type the ₹ symbol.

Note that you don’t need to have the ₹ symbol on the key 4 on your physical keyboard in order for this to work. It will work irrespective of whatever physical keyboard you are using.

I hope you were able to type rupee symbol after following this tutorial. If you have any questions or suggestions, please use the comment section below.

Source

Download Bitnami CiviCRM Stack Linux 5.6.1-0

Bitnami CiviCRM Stack is a freely distributed and multi-platform software project that provides users with all-in-one native installers, virtual machines, cloud Images and a Docker container that simplify the installation and hosting of the CiviCRM application, as well as of its runtime dependencies.

What is CiviCRM?

CiviCRM is an open source, platform-independent and free CRM (Customer Relationship Management) application for the non-profit and non-governmental sectors. Key features include support for managing events, advocacy campaigns, contacts, fundraisers and communications, as well as integration with various CMS systems, such as Drupal, Joomla! and WordPress.

Installing Bitnami CiviCRM Stack

Bitnami’s native installers automate the setup of web-based application and their runtime dependencies on the GNU/Linux, Microsoft Windows and Mac OS X operating systems. To install CiviCRM on your personal computer, you will have to first download the package that corresponds to your PC’s architecture (32-bit or 64-bit), run it and follow the on-screen instructions.

Run CiviCRM in the cloud

Thanks to Bitnami, you will also be able to run the CiviCRM application in the cloud with your own hosting platform or by using a pre-built cloud image for either the Windows Azure or Amazon EC2 cloud hosting providers.

Virtualize CiviCRM on VMware and VirtualBox

In addition to running CiviCRM in the cloud or deploy it on personal computers, you can also virtualize it on the VMware ESX, ESXi and Oracle VirtualBox virtualization software, thanks to Bitnami’s virtual appliance based on the latest LTS release of the Ubuntu Linux distribution.

The Bitnami CiviCRM Module and Docker container

Besides the Bitnami CiviCRM Stack product reviewed here, users can also download modules for Bitnami’s LAMP (Linux, Apache, MySQL and PHP), MAMP (Mac, Apache, MySQL and PHP) and WAMP (Windows, Apache, MySQL and PHP) stacks, as well as CiviCRM Docker container. Bitnami CiviCRM Module is available for download on Softpedia, free of charge.

Source

Command Line – Impressive » Linux Magazine

Contrary to conventional wisdom, a command-line presentation app can be easy to use. Impressive does just that and gives you more flexibility to boot.

Called on to do a presentation, most Linux users will reach for LibreOffice’s Impress. Impress is a thoroughly modern slide show app, comparable to Microsoft PowerPoint, and more than enough for most purposes. So why would anyone use a command-line presentation app like Impressive [1]?

The answer is simple: Impress and PowerPoint slide shows have limited options for design or presentation. By contrast, Impressive offers users more formatting options. Impressive also has a small, but effective set of practical tools to make a presentation more effective.

A large part of Impressive’s advantage is that slides can be any shape or size, with any design elements a user chooses. Impressive slides can be made in any app, from LibreOffice to Krita, and then saved in a graphics format to a common directory and named numerically or alphabetically. Alternatively, the slides can be placed one per page in a single PDF file. Since Impressive was originally designed for use with PDFs, they work most efficiently if you choose to customize, but any common graphics format will do. The slide show can be run by pointing the command to the directory that contains the files:

[…]

Use Express-Checkout link below to read the full article (PDF).

Source

KDE has been deprecated in RHEL 7.6 and future version of RHEL

Red Hat Enterprise Linux is well known to set defaults across the industry. For example, RHEL pushed systemd so hard that all other Linux distro adopted for good or bad reasons. Now Red Hat announced that KDE Plasma Workspaces (KDE) been deprecated from RHEL 7.6 and all future version of RHEL.

KDE has been deprecated

KDE has been deprecated in RHEL 7.6 and future version of RHEL
From the RHEL 7.6 release note:

KDE Plasma Workspaces (KDE), which has been provided as an alternative to the default GNOME desktop environment has been deprecated. A future major release of Red Hat Enterprise Linux will no longer support using KDE instead of the default GNOME desktop environment.

Don’t worry. KDE is not dead yet!

Red Hat is moving KDE to EPEL (Extra Packages for Enterprise Linux) repo. To install KDE on a CentOS or RHEL or Fedora, you need to setup EPE repo. Fedora act as a test bed and upstream distro for RHEL. However, Red Hat is not going to put engineering and Software quality assurance (SQA) resources in KDE. The official Red Hat policy for to EPEL repo is as follows:

  1. The following information has been provided by Red Hat, but is outside the scope of the posted Service Level Agreements and support procedures.
  2. Installing unsupported packages does not necessarily make a system unsupportable by Red Hat Global Support Services. However, Red Hat Global Support Services will be unable to support or debug problems with packages not shipped in standard RHEL channels.
  3. Installing packages from EPEL is done at the user’s own risk.
  4. The EPEL repository is a community supported repository hosted by the Fedora Community project.
  5. The EPEL repository is not a part of Red Hat Enterprise Linux and does not fall under Red Hat’s Production Support Scope of Coverage. The repository is considered an optional repository and is not tested by Red Hat quality engineers.

Above rules indicate that, KDE is unsupported by Red Hat. It makes me nervous as other Linux distro follows Red Hat policies.

Gnome for Linux business users

RHEL and CentOS mostly used by business users who wants stability over cutting-edge software. You get a long-term support contract with RHEL. Red Hat has made up its mind. They are going to support one desktop environment. As a sysadmin, I find this is useful as I no longer have to support other DEs. Red Hat is also one of main sponsors of GNOME 3 desktop. It makes sense like other products to support GNOME 3 out of the box especially RHEL 7.6 workstation:

Designed for advanced Linux users working on more powerful hardware, Red Hat Enterprise Linux Workstation is optimized for high-performance graphics, animation, and scientific activities. It includes all the capabilities and apps from Red Hat Enterprise Linux Desktop, plus development tools for provisioning and administration.

Options for KDE users/fans

The virtue of open source resides in the fact that its code is free and can always be edited, modified, and customized to your needs. Don’t like change? Get a Linux distro that supports KDE out of the box. KDE project will continue to develop software without any support from Red Hat. RHEL/CentOS 7.6+ users can either use EPEL repo or switch other Linux distros such as Ubuntu, Debian, and others.

Conclusion

The power of the defaults plays a significant role in the Linux ecosystem. Again take the example of systemd. Most users tend to stick to the defaults and defaults are incredibly powerful tools for setting up future of the Linux desktop. I don’t like this kind of manipulation. It is not healthy for anyone in the long run. What do you think? Add your thoughts in the comments section.

(via theregister)

Posted by: Vivek Gite

The author is the creator of nixCraft and a seasoned sysadmin, DevOps engineer, and a trainer for the Linux operating system/Unix shell scripting. Get the latest tutorials on SysAdmin, Linux/Unix and open source topics via RSS/XML feed or weekly email newsletter.

Source

Normalizing Filenames and Data with Bash | Linux.com

URLify: convert letter sequences into safe URLs with hex equivalents.

This is my 155th column. That means I’ve been writing for Linux Journal for:

$ echo “155/12” | bc
12

No, wait, that’s not right. Let’s try that again:

$ echo “scale=2;155/12” | bc
12.91

Yeah, that many years. Almost 13 years of writing about shell scripts and lightweight programming within the Linux environment. I’ve covered a lot of ground, but I want to go back to something that’s fairly basic and talk about filenames and the web. …

So purely as an exercise in scripting, let’s write a script that converts any string you hand it into a “web-safe” sequence. Before starting, however, pull out a piece of paper and jot down how you’d solve it.

Normalizing Filenames for the Web

My strategy is going to be easy: pull the string apart into individual characters, analyze each character to identify if it’s an alphanumeric, and if it’s not, convert it into its hexadecimal ASCII equivalent, prefacing it with a “%” as needed.

Read more at Linux Journal

Source

How To Embed Google Calendar On Your Linux Desktop Background

Google Calendar embedded in desktop background on Linux

This article explains how to embed Google Calendar on your Linux desktop background. It also includes some customization hints.
Conky and gcalcli are used to display your Google Calendar events on top of your desktop wallpaper:

  • Conky is a tool that displays information on your desktop. It can act as a system monitor, having some built-in functions to display the CPU usage, RAM, etc., as well as display custom commands output, among others.
  • gcalcli is a command line interface for Google Calendar. Using OAuth2 to connect with your Google account, the tool can list your Google Calendars, add, edit and delete calendar events, and much more.

Related: MineTime: Desktop Calendar App With Google Calendar, Outlook.com, Microsoft Exchange, iCloud And CalDAV Support

Follow the steps below to install Conky and gcalcli, and use these tools to embed Google Calendar on the desktop background. There are optional steps for customizing Conky, the calendar colors, and more, as well as adding this widget to startup.

The Conky configuration file in this article uses the Conky 1.10 syntax. You’ll need Conky 1.10 or newer to use the Conky configuration below.

1. Install gcalcli and Conky.
In Debian, Ubuntu or Linux Mint, use:

sudo apt install gcalcli conky-all
You’ll also need to install the Ubuntu Mono font (or you can change the font in the .conkyrc code below). This should be installed by default in Ubuntu.

2. Connect gcalcli with your Google account.
You need to run gcalcli with any option to start the OAuth2 authentication process. Let’s run the list command, like this:

gcalcli list
gcalcli should open a new page in your default web browser which asks if you want to authorize gcalcli with your Google account. Allow it and proceed to the next step.

3. Create and populate the Conky configuration file (~/.conkyrc).
Create a file called .conkyrc in your home folder (use Ctrl + H to toggle between hiding and showing hidden files and folders) and paste the following in this file:

conky.config = {
background = true,
update_interval = 1.5,
cpu_avg_samples = 2,
net_avg_samples = 2,
out_to_console = false,
override_utf8_locale = true,
double_buffer = true,
no_buffers = true,
text_buffer_size = 32768,
imlib_cache_size = 0,
own_window = true,
own_window_type = ‘desktop’,
own_window_argb_visual = true,
own_window_argb_value = 120,
own_window_hints = ‘undecorated,below,sticky,skip_taskbar,skip_pager’,
border_inner_margin = 10,
border_outer_margin = 0,
xinerama_head = 1,
alignment = ‘top_right’,
gap_x = 90,
gap_y = 90,
draw_shades = true,
draw_outline = false,
draw_borders = false,
draw_graph_borders = false,
use_xft = true,
font = ‘Ubuntu Mono:size=12’,
xftalpha = 0.8,
uppercase = false,
default_color = ‘#FFFFFF’,
own_window_colour = ‘#000000’,
minimum_width = 0, minimum_height = 0,
};

conky.text = [[
$
]];
Now run Conky with this configuration by typing this in a terminal:

conky
You should now see Google Calendar embedded in your desktop background, like this:

Conky Google Calendar

If you already have a Conky configuration, name the file as

.conkyrc2

(or

.conkyrc3

, etc.), and each time you see a “conky” command in this article (when running it or adding it to startup), append

-c ~/.conkyrc2

(or whatever you’ve named the file). For example, to run a second Conky instance that uses

~/.conkyrc2

as its configuration file, use this command:

conky -c ~/.conkyrc2
In case you want to close all running Conky instances, use:

killall -9 conky4. (Optional) Customize gcalcli and ConkyI. Basic Conky configuration
You can modify the contents of the .conkyrc file to suit your needs. The Google Calendar displayed on your desktop using Conky should be automatically updated each time you save the .conkyrc configuration file. In case this does not happen, kill all running Conky processes by using killall -9 conky, then run Conky again.

For example, change the gap_x and gap_y values to move the calendar that’s displayed on your desktop more close or further away from the top right corner. The top right corner position is given by the alignment = ‘top_right’ option, so change that to move the calendar to a different corner of the screen.

Most options are self explanatory, like the font value, which is set to Ubuntu Mono in the Conky code above. Make sure you have the Ubuntu font installed or change the font value to a monospaced font you have installed on your system.

If you have multiple monitors and you want to move the calendar to a different monitor, change the xinerama_head value.

Other than that, the values used in the sample Conky configuration from step 3 should just work for most users. Consult the Conky help (conky –help) for more info.

II. Changing the calendar colors
Using the .conkyrc code listed on step 3, the Google calendar is displayed using the default gcalcli values. The colors can be changed though.

For example, you can add –nocolor to the execpi ~/.conkyrc line (before last line) to not use any gcalcli colors, and rely on Conky for the text color, by changing the line to look like this:

$
Then you can specify the calendar text color by changing the default_color value (you can use hex or color names) from the ~/.conkyrc file. Here’s how it looks like using default_color = ‘green’ for example:

Conky Google Calendar green

This only allows using one color for the whole calendar though. If you want to change individual colors, like the color of the date, the now marker, etc., make sure you don’t add

–nocolor

to the excepci line, and instead add these options with the color you want to use:

–color_border: Color of line borders
(default: ‘white’)
–color_date: Color for the date
(default: ‘yellow’)
–color_freebusy: Color for free/busy calendars
(default: ‘default’)
–color_now_marker: Color for the now marker
(default: ‘brightred’)
–color_owner: Color for owned calendars
(default: ‘cyan’)
–color_reader: Color for read-only calendars
(default: ‘magenta’)
–color_writer: Color for writable calendars
(default: ‘green’)
There aren’t many supported colors though. A comment on this bug report mentions black, red, green, yellow, blue, magenta, cyan and white as being supported.

For example, to change the calendar color for the now marker to blue, and the date color to white, while the other elements keep their default colors, you could change the execpi line to this:

$III. gcalcli options
gcalcli has a large number of options. The –monday option for example, which is added to our .conkyrc file sets the first day of the week to Monday. Remove it from the execpi line (in the .conkyrc file) to set the first day of the week to Sunday.

The calm option sets gcalcli to display the current month agenda in a calendar format. To display the current week instead of month, use calw instead of calm, like this:

$
This is how it will look on your desktop:

gcalcli conky week view

Another possible view is

agenda

, which defaults to starting in the current day at 12am (and displays events for the next 5 days), but can accept custom dates. Replace calm with agenda to use it, and also remove –monday

if it’s there (there’s no need for it in this view, and gcalcli will throw an error), like this:

$
This is how it looks like with only 1 event in the next 5 days:

gcalcli agenda

You can also display both the current month calendar and a 5day agenda on top of it, by adding two execpi lines instead of one to the

~/.conkyrc

file, like this:

conky.text = [[
$
$
]];
This is how it looks like on the desktop:

gcalcli month view and agenda

For even more customization, check the gcalcli –help and the GitHub project page.
As a side note, gcalcli is ran using PYTHONIOENCODING=utf8 to avoid some possible issues with the calendar display – you can remove this if the calendar is displayed correctly for you. Also, I used the –nolineart gcalcli option, which disables line art, because Conky can’t display gcalcli’s line art properly.

5. (Optional) Add the Google Calendar Conky desktop widget to startup.
To add it to startup, open Startup Applications or equivalent from your application launcher, add a new startup program, enter Conky Google Calendar as its name, and use the following in the command field:

conky –daemonize –pause=5
Alternatively you can create a file called conky.desktop in ~/.config/autostart/ with the following contents:

[Desktop Entry]
Type=Application
Exec=conky –daemonize –pause=5
Hidden=false
NoDisplay=false
X-GNOME-Autostart-enabled=true
Name=Conky Google Calendar

Source

WP2Social Auto Publish Powered By : XYZScripts.com