Command Line – Impressive » Linux Magazine

Contrary to conventional wisdom, a command-line presentation app can be easy to use. Impressive does just that and gives you more flexibility to boot.

Called on to do a presentation, most Linux users will reach for LibreOffice’s Impress. Impress is a thoroughly modern slide show app, comparable to Microsoft PowerPoint, and more than enough for most purposes. So why would anyone use a command-line presentation app like Impressive [1]?

The answer is simple: Impress and PowerPoint slide shows have limited options for design or presentation. By contrast, Impressive offers users more formatting options. Impressive also has a small, but effective set of practical tools to make a presentation more effective.

A large part of Impressive’s advantage is that slides can be any shape or size, with any design elements a user chooses. Impressive slides can be made in any app, from LibreOffice to Krita, and then saved in a graphics format to a common directory and named numerically or alphabetically. Alternatively, the slides can be placed one per page in a single PDF file. Since Impressive was originally designed for use with PDFs, they work most efficiently if you choose to customize, but any common graphics format will do. The slide show can be run by pointing the command to the directory that contains the files:

[…]

Use Express-Checkout link below to read the full article (PDF).

Source

KDE has been deprecated in RHEL 7.6 and future version of RHEL

Red Hat Enterprise Linux is well known to set defaults across the industry. For example, RHEL pushed systemd so hard that all other Linux distro adopted for good or bad reasons. Now Red Hat announced that KDE Plasma Workspaces (KDE) been deprecated from RHEL 7.6 and all future version of RHEL.

KDE has been deprecated

KDE has been deprecated in RHEL 7.6 and future version of RHEL
From the RHEL 7.6 release note:

KDE Plasma Workspaces (KDE), which has been provided as an alternative to the default GNOME desktop environment has been deprecated. A future major release of Red Hat Enterprise Linux will no longer support using KDE instead of the default GNOME desktop environment.

Don’t worry. KDE is not dead yet!

Red Hat is moving KDE to EPEL (Extra Packages for Enterprise Linux) repo. To install KDE on a CentOS or RHEL or Fedora, you need to setup EPE repo. Fedora act as a test bed and upstream distro for RHEL. However, Red Hat is not going to put engineering and Software quality assurance (SQA) resources in KDE. The official Red Hat policy for to EPEL repo is as follows:

  1. The following information has been provided by Red Hat, but is outside the scope of the posted Service Level Agreements and support procedures.
  2. Installing unsupported packages does not necessarily make a system unsupportable by Red Hat Global Support Services. However, Red Hat Global Support Services will be unable to support or debug problems with packages not shipped in standard RHEL channels.
  3. Installing packages from EPEL is done at the user’s own risk.
  4. The EPEL repository is a community supported repository hosted by the Fedora Community project.
  5. The EPEL repository is not a part of Red Hat Enterprise Linux and does not fall under Red Hat’s Production Support Scope of Coverage. The repository is considered an optional repository and is not tested by Red Hat quality engineers.

Above rules indicate that, KDE is unsupported by Red Hat. It makes me nervous as other Linux distro follows Red Hat policies.

Gnome for Linux business users

RHEL and CentOS mostly used by business users who wants stability over cutting-edge software. You get a long-term support contract with RHEL. Red Hat has made up its mind. They are going to support one desktop environment. As a sysadmin, I find this is useful as I no longer have to support other DEs. Red Hat is also one of main sponsors of GNOME 3 desktop. It makes sense like other products to support GNOME 3 out of the box especially RHEL 7.6 workstation:

Designed for advanced Linux users working on more powerful hardware, Red Hat Enterprise Linux Workstation is optimized for high-performance graphics, animation, and scientific activities. It includes all the capabilities and apps from Red Hat Enterprise Linux Desktop, plus development tools for provisioning and administration.

Options for KDE users/fans

The virtue of open source resides in the fact that its code is free and can always be edited, modified, and customized to your needs. Don’t like change? Get a Linux distro that supports KDE out of the box. KDE project will continue to develop software without any support from Red Hat. RHEL/CentOS 7.6+ users can either use EPEL repo or switch other Linux distros such as Ubuntu, Debian, and others.

Conclusion

The power of the defaults plays a significant role in the Linux ecosystem. Again take the example of systemd. Most users tend to stick to the defaults and defaults are incredibly powerful tools for setting up future of the Linux desktop. I don’t like this kind of manipulation. It is not healthy for anyone in the long run. What do you think? Add your thoughts in the comments section.

(via theregister)

Posted by: Vivek Gite

The author is the creator of nixCraft and a seasoned sysadmin, DevOps engineer, and a trainer for the Linux operating system/Unix shell scripting. Get the latest tutorials on SysAdmin, Linux/Unix and open source topics via RSS/XML feed or weekly email newsletter.

Source

Normalizing Filenames and Data with Bash | Linux.com

URLify: convert letter sequences into safe URLs with hex equivalents.

This is my 155th column. That means I’ve been writing for Linux Journal for:

$ echo “155/12” | bc
12

No, wait, that’s not right. Let’s try that again:

$ echo “scale=2;155/12” | bc
12.91

Yeah, that many years. Almost 13 years of writing about shell scripts and lightweight programming within the Linux environment. I’ve covered a lot of ground, but I want to go back to something that’s fairly basic and talk about filenames and the web. …

So purely as an exercise in scripting, let’s write a script that converts any string you hand it into a “web-safe” sequence. Before starting, however, pull out a piece of paper and jot down how you’d solve it.

Normalizing Filenames for the Web

My strategy is going to be easy: pull the string apart into individual characters, analyze each character to identify if it’s an alphanumeric, and if it’s not, convert it into its hexadecimal ASCII equivalent, prefacing it with a “%” as needed.

Read more at Linux Journal

Source

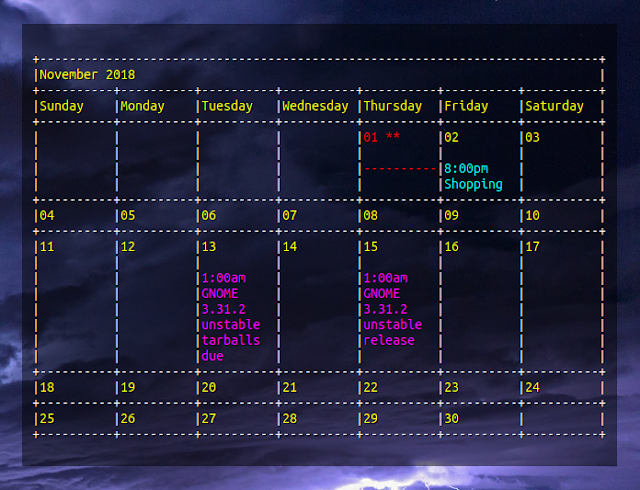
How To Embed Google Calendar On Your Linux Desktop Background

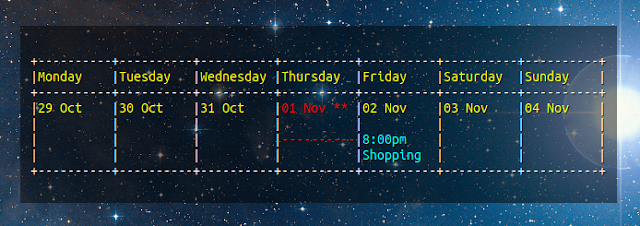
Google Calendar embedded in desktop background on Linux

This article explains how to embed Google Calendar on your Linux desktop background. It also includes some customization hints.
Conky and gcalcli are used to display your Google Calendar events on top of your desktop wallpaper:

  • Conky is a tool that displays information on your desktop. It can act as a system monitor, having some built-in functions to display the CPU usage, RAM, etc., as well as display custom commands output, among others.
  • gcalcli is a command line interface for Google Calendar. Using OAuth2 to connect with your Google account, the tool can list your Google Calendars, add, edit and delete calendar events, and much more.

Related: MineTime: Desktop Calendar App With Google Calendar, Outlook.com, Microsoft Exchange, iCloud And CalDAV Support

Follow the steps below to install Conky and gcalcli, and use these tools to embed Google Calendar on the desktop background. There are optional steps for customizing Conky, the calendar colors, and more, as well as adding this widget to startup.

The Conky configuration file in this article uses the Conky 1.10 syntax. You’ll need Conky 1.10 or newer to use the Conky configuration below.

1. Install gcalcli and Conky.
In Debian, Ubuntu or Linux Mint, use:

sudo apt install gcalcli conky-all
You’ll also need to install the Ubuntu Mono font (or you can change the font in the .conkyrc code below). This should be installed by default in Ubuntu.

2. Connect gcalcli with your Google account.
You need to run gcalcli with any option to start the OAuth2 authentication process. Let’s run the list command, like this:

gcalcli list
gcalcli should open a new page in your default web browser which asks if you want to authorize gcalcli with your Google account. Allow it and proceed to the next step.

3. Create and populate the Conky configuration file (~/.conkyrc).
Create a file called .conkyrc in your home folder (use Ctrl + H to toggle between hiding and showing hidden files and folders) and paste the following in this file:

conky.config = {
background = true,
update_interval = 1.5,
cpu_avg_samples = 2,
net_avg_samples = 2,
out_to_console = false,
override_utf8_locale = true,
double_buffer = true,
no_buffers = true,
text_buffer_size = 32768,
imlib_cache_size = 0,
own_window = true,
own_window_type = ‘desktop’,
own_window_argb_visual = true,
own_window_argb_value = 120,
own_window_hints = ‘undecorated,below,sticky,skip_taskbar,skip_pager’,
border_inner_margin = 10,
border_outer_margin = 0,
xinerama_head = 1,
alignment = ‘top_right’,
gap_x = 90,
gap_y = 90,
draw_shades = true,
draw_outline = false,
draw_borders = false,
draw_graph_borders = false,
use_xft = true,
font = ‘Ubuntu Mono:size=12’,
xftalpha = 0.8,
uppercase = false,
default_color = ‘#FFFFFF’,
own_window_colour = ‘#000000’,
minimum_width = 0, minimum_height = 0,
};

conky.text = [[
$
]];
Now run Conky with this configuration by typing this in a terminal:

conky
You should now see Google Calendar embedded in your desktop background, like this:

Conky Google Calendar

If you already have a Conky configuration, name the file as

.conkyrc2

(or

.conkyrc3

, etc.), and each time you see a “conky” command in this article (when running it or adding it to startup), append

-c ~/.conkyrc2

(or whatever you’ve named the file). For example, to run a second Conky instance that uses

~/.conkyrc2

as its configuration file, use this command:

conky -c ~/.conkyrc2
In case you want to close all running Conky instances, use:

killall -9 conky4. (Optional) Customize gcalcli and ConkyI. Basic Conky configuration
You can modify the contents of the .conkyrc file to suit your needs. The Google Calendar displayed on your desktop using Conky should be automatically updated each time you save the .conkyrc configuration file. In case this does not happen, kill all running Conky processes by using killall -9 conky, then run Conky again.

For example, change the gap_x and gap_y values to move the calendar that’s displayed on your desktop more close or further away from the top right corner. The top right corner position is given by the alignment = ‘top_right’ option, so change that to move the calendar to a different corner of the screen.

Most options are self explanatory, like the font value, which is set to Ubuntu Mono in the Conky code above. Make sure you have the Ubuntu font installed or change the font value to a monospaced font you have installed on your system.

If you have multiple monitors and you want to move the calendar to a different monitor, change the xinerama_head value.

Other than that, the values used in the sample Conky configuration from step 3 should just work for most users. Consult the Conky help (conky –help) for more info.

II. Changing the calendar colors
Using the .conkyrc code listed on step 3, the Google calendar is displayed using the default gcalcli values. The colors can be changed though.

For example, you can add –nocolor to the execpi ~/.conkyrc line (before last line) to not use any gcalcli colors, and rely on Conky for the text color, by changing the line to look like this:

$
Then you can specify the calendar text color by changing the default_color value (you can use hex or color names) from the ~/.conkyrc file. Here’s how it looks like using default_color = ‘green’ for example:

Conky Google Calendar green

This only allows using one color for the whole calendar though. If you want to change individual colors, like the color of the date, the now marker, etc., make sure you don’t add

–nocolor

to the excepci line, and instead add these options with the color you want to use:

–color_border: Color of line borders
(default: ‘white’)
–color_date: Color for the date
(default: ‘yellow’)
–color_freebusy: Color for free/busy calendars
(default: ‘default’)
–color_now_marker: Color for the now marker
(default: ‘brightred’)
–color_owner: Color for owned calendars
(default: ‘cyan’)
–color_reader: Color for read-only calendars
(default: ‘magenta’)
–color_writer: Color for writable calendars
(default: ‘green’)
There aren’t many supported colors though. A comment on this bug report mentions black, red, green, yellow, blue, magenta, cyan and white as being supported.

For example, to change the calendar color for the now marker to blue, and the date color to white, while the other elements keep their default colors, you could change the execpi line to this:

$III. gcalcli options
gcalcli has a large number of options. The –monday option for example, which is added to our .conkyrc file sets the first day of the week to Monday. Remove it from the execpi line (in the .conkyrc file) to set the first day of the week to Sunday.

The calm option sets gcalcli to display the current month agenda in a calendar format. To display the current week instead of month, use calw instead of calm, like this:

$
This is how it will look on your desktop:

gcalcli conky week view

Another possible view is

agenda

, which defaults to starting in the current day at 12am (and displays events for the next 5 days), but can accept custom dates. Replace calm with agenda to use it, and also remove –monday

if it’s there (there’s no need for it in this view, and gcalcli will throw an error), like this:

$
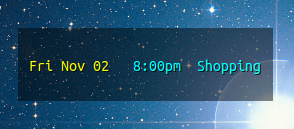
This is how it looks like with only 1 event in the next 5 days:

gcalcli agenda

You can also display both the current month calendar and a 5day agenda on top of it, by adding two execpi lines instead of one to the

~/.conkyrc

file, like this:

conky.text = [[
$
$
]];
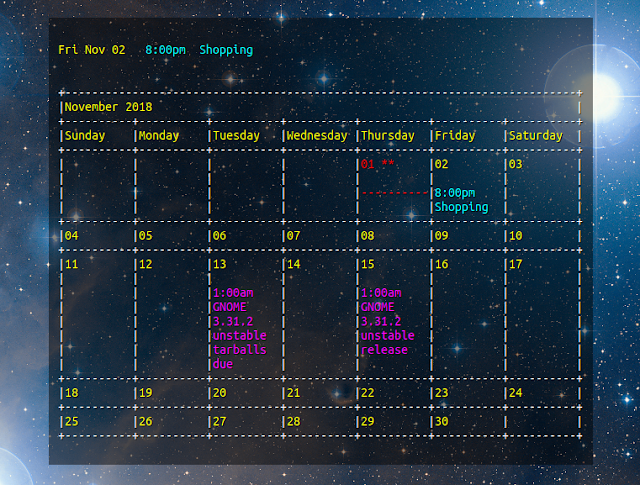
This is how it looks like on the desktop:

gcalcli month view and agenda

For even more customization, check the gcalcli –help and the GitHub project page.
As a side note, gcalcli is ran using PYTHONIOENCODING=utf8 to avoid some possible issues with the calendar display – you can remove this if the calendar is displayed correctly for you. Also, I used the –nolineart gcalcli option, which disables line art, because Conky can’t display gcalcli’s line art properly.

5. (Optional) Add the Google Calendar Conky desktop widget to startup.
To add it to startup, open Startup Applications or equivalent from your application launcher, add a new startup program, enter Conky Google Calendar as its name, and use the following in the command field:

conky –daemonize –pause=5
Alternatively you can create a file called conky.desktop in ~/.config/autostart/ with the following contents:

[Desktop Entry]
Type=Application
Exec=conky –daemonize –pause=5
Hidden=false
NoDisplay=false
X-GNOME-Autostart-enabled=true
Name=Conky Google Calendar

Source

Download Bitnami CMS Made Simple Module Linux 2.2.8-1

Bitnami CMS Made Simple Module is a multiplatform and free software project that helps you to deploy the CMS Made Simple application on top of a Bitnami LAMP, MAMP or WAMP stacks. It is supported on the Linux, Microsoft Windows and Mac OS X operating systems.

What is CMS Made Simple?

CMS Made Simple Magento is a web-based, free, open source, fast, and platform-independent CMS (Content Management System) software that helps anyone who wishes to manage the content of their website(s) with as minimal effort as possible.

Installing Bitnami CMS Made Simple Module

Just like the Bitnami CMS Made Simple Stack product, Bitnami CMS Made Simple Module is distributed as native installers built using BitRock’s cross-platform installer tool and designed to run on all GNU/Linux distributions.

To install the CMS Made Simple application on top of your Bitnami’s LAMP (Linux, Apache, MySQL and PHP) Stack, you will have to download the package that corresponds to your computer’s hardware architecture, run it and follow the instructions displayed on the screen.

Host CMS Made Simple in the cloud or virtualize it

Users can run their own CMS Made Simple application in the cloud, supporting the Amazon EC2 and Windows Azure, as well as many other cloud hosting services, thanks to Bitnami’s pre-build cloud images. In addition, CMS Made Simple can be virtualized on the VMware ESX, ESXi and VirtualBox virtualization software, thanks to the Ubuntu-based virtual appliance offered for download on the project’s website.

The Bitnami CMS Made Simple Stack and Docker container

Besides the Bitnami CMS Made Simple Module product reviewed here, you can also download an all-in-one solution that greatly simplifies the installation and hosting of the CMS Made Simple application, as well as of its server-related requirements on desktop computers and laptops. Bitnami CMS Made Simple Stack can be downloaded from Softpedia, free of charge. A CMS Made Simple Docker container is also available for download on the project’s homepage.

Source

Safe Cube » Linux Magazine

By isolating complete work environments in virtual machines, Qubes OS offers a significant security boost.

Linux users with an eye on security often turn to Live systems such as Tails [1]. One significant limitation of the leading security distros is that they offer little protection at runtime: All applications run in a common context.

Qubes OS [2] takes a different approach. Security in Qubes is the result of isolation. Chief developer and security researcher Joanna Rutkowska [3] assumes that, with the millions of lines of code and instructions in today’s applications, no perfectly error-free desktop user environment can exist. She calls Qubes OS a “reasonably secure operating system.”

Isolation has been an option within the Linux scene for years. Technologies such as sandboxes, containers, and virtual machines (VMs) all offer some means to limit an application’s access to the system. If isolation is deployed effectively, an intruder who takes over the application won’t be able to access the rest of the operating system. Qubes OS is designed with the goal of building this isolation into the user environment, so it is extremely easy to implement. In fact, there is no excuse not to implement it.

[…]

Use Express-Checkout link below to read the full article (PDF).

Source

The Asus Eee: How Close Did the World Come to a Linux Desktop?

It was white, not much bigger than my hands held side by side, weighed
about as much as a bottle of wine, and it came in a shiny, faux-leather case. It
was the $199 Asus Eee 901, and I couldn’t believe that a computer could be
that powerful, that light and that much fun.

This is the story of the brief, shining history of the Asus Eee, the
first netbook—a small, cheap and mostly well-made laptop that dominated
the computer industry for two or three years about a decade go. It’s not so
much that the Eee was ahead of its time, which wasn’t that difficult in an
industry then dominated by pricey and bulky laptops that didn’t always have
a hard drive and by desktop design hadn’t evolved much past the first IBM
8086 box.

Rather, the Eee was ahead of everyone’s time. It ran a Linux
operating system with a tabbed interface and splashy icons, and the hardware
included wireless, Bluetooth, a webcam and an SSD hard drive—all in a
machine that weighed just 2.5 pounds. In this, it teased many of the concepts
that tech writer Mark Wilson says we take for granted in today’s cloud,
smartphone and Chromebook universe.

The Eee was so impressive that even Microsoft, whose death grip on the
PC world seemed as if it would never end, took notice. As everyone from Dell to
HP to Samsung to Toshiba to Sony to Acer to one-offs and “never-weres” raced
netbooks into production, Microsoft offered manufacturers a version of Windows
XP (and later a truncated Windows 7) to cram onto the machines. Because we
can’t have the masses running a Linux OS, can we?

“The Eee gave regular people something they couldn’t have
before”, says Dan Ackerman, a longtime section editor at CNET who wrote
some of the website’s original Eee and netbook reviews. “Laptops had
always been ridiculously expensive. The Eee wasn’t, and it gave regular
people a chance to buy a laptop that was smaller and more portable and that
they could be productive with. I always gave Asus credit—they understood
the role of form and function.”

Netbook History

The computer world never had really seen anything like the first Eee,
which didn’t even have a name when it was launched in 2007 (although it
later would be called both the 701 and the 4G). In fact, say those who reviewed the
701, it wasn’t so much a product but a proof of concept—that Asus
could make something that small and that cheap that worked.

There had been small laptops before, of course, like the Intel
Classmate PC and the OLPC X0-1, each part of the One Laptop per Child project.
But those were specialized machines designed to bring computing and the
internet to students throughout the world, and not necessarily consumer
products.

The netbook’s immediate predecessors were probably the palmtop and
the personal digital assistant, or PDA. These were handheld devices like the
Psion 7 and the HP Jornada 720 that did some computer things, including word
processing and email (and faxes in the late 1990s models). But they were slow
and under-powered (remember Windows CE?), and it wasn’t easy to work with the
tiny screens. In many ways, they were unsophisticated smartphones that
couldn’t make phone calls.

I used a Jornada 720 around the turn of the century. It was cheaper and
more reliable than my previous two laptops, which were buggy, crash-prone and
always seemed to have something wrong with the disk drive. I could sort of type
on the Jornada’s downsized QWERTY keyboard, and it synced with my desktop
(though the modem never really worked).

But the netbook’s true predecessor was almost certainly Radio
Shack’s legendary TRS-80 model 100—or as we lovingly called in in the
newspaper business, the Trash 80. It ran on Microsoft Basic and had a more or
less full-sized keyboard, a monochromatic screen that displayed about ten lines
of type and a 300-baud modem. The Trash 80 weighed about three pounds, and I
lugged it to football games, bike races and city council meetings in the late
1980s. There, I would write the story, hook the modem up to a phone jack
(acoustic couplers before that) and send it to the paper by hitting a
combination of buttons located just above the keyboard. Would that any of my
laptops had worked that well.

In other words, there hadn’t been anything quite like the Eee 701
in 20 years.

“I can’t say I remember exactly walking into the room when Asus
showed us the first Eee, but I do remember that I had never seen anything quite
like it”, says Ackerman. “It was an amazing accomplishment for the
price.”

Yes, the price. In 2005, the average laptop cost about $1,000, and you
didn’t get all that much for a grand—an HDD drive, wireless, a
touchpad and maybe an optical drive. But you also got a bulky machine that
weighed five or six pounds with crummy battery life—often as little as two
hours.

The 701, on the other hand, cost $199, weighed half as much as the
$1,000 laptop, sometimes had better battery life, and it came with some of the
same hardware (minus the optical drive). And, you could argue that its tiny SSD
drive was an improvement over the era’s 20 and 30GB laptop hard
drives—quieter, less power hungry and more nimble. Yes, the processor
wasn’t as fast, it had less RAM, and the screen was smaller, but that
didn’t seem to matter.

“It was a crazy concept, but there was an incredible response”,
says Wilson, today a senior writer at Fast Company. “Within six months, it
seemed like every computer maker was cloning it.”

Get Me Linux

How did Asus get the price so low? Cutting the weight helped. Using
cheaper materials for the body, keyboard and screen made a difference too, as
did the less expensive processor and memory. But one of the most important
factors was substituting Linux for Windows.

An Asus spokesman did not respond to several requests for information
for this story, but those with knowledge of the company’s thinking said
choice of operating system was crucial in lowering the Eee’s price. A
Microsoft license, depending on who you talk to, could have cost almost as much
as the netbook’s suggested retail price. Even if Asus had absorbed some of
the license fee, it would have been almost impossible to hit $199, then
considered the sweet spot for pricing.

Enter Xandros, the operating system that Asus used on the Linux-powered
versions of the Eee. It was perhaps the machine’s greatest asset and its
biggest weakness. Since it was Linux, there was no Microsoft licensing fee,
making it easier for Asus to hit $199. But Xandros was not quite open-source
Linux—it was a commercial product from the same-named British company
whose revenue came from “partnering” with OEMs. Which, of course, is
what Microsoft did.

And, as anyone who knows anything about the Linux community will tell
you, any open-source company with a Microsoft-like business plan can’t
really be open-source or true to the spirit of Linux. In this, Asus alienated
the people who should have been the Eee’s biggest supporters. Look on
bulletin board and Reddit posts, and you’ll still see some of the
resentment at the choice of Xandros.

Xandros’ other problem? It was just a little too Linux for the
millions of people who bought it and who were used to Windows. It’s not to
say that Xandros didn’t try—the company’s mission was to be a
Windows-like interface to Linux, and it was based on Debian, just like Ubuntu
and Linux Mint.

But those of us who came to Linux through the Eee had never seen
anything quite like Xandros. It was was funky, to say the least, and this comes
from someone who had had his fill of Windows by then (Windows ME, anyone?). I
was desperate to run something that didn’t make me pound the keyboard in
frustration at every crash, Control-Alt-Delete and hanging screen.

Today, a browser-based OS like Chrome is second nature; in 2007, it
could be befuddling to anyone who grew up pointing and clicking in Windows 95.
Xandros, save for the word processor, email and browser, was a
mystery—to this day, I still don’t know what something called mediaU was supposed
to do. It was almost impossible to add new software, and if you wanted to do
anything other than basic software updates, you had to use the command line. I
had been through that with DOS—I didn’t want to do it again. And, of
course, support was non-existent.

To be fair, Asus was limited in its choices. Mint was still in its
early stages, Ubuntu wouldn’t release its netbook OS until 2009, and Fedora
probably wasn’t quite right for something like this. But, as Wilson says
with a laugh: “Xandros was the kind of Linux that reminded people why they
didn’t want to use Linux.”

Running Scared

It’s almost impossible to believe, a decade later, how popular
netbooks were in the wake of the Eee. Way past popular, actually: the netbook
was the best-selling computer in the world in 2009, with seven-fold growth from
2008 and some 20 million sold. That accounted for almost 10% of the
entire computer market at a time when the recession saw desktop computer sales
fall 12%, the worst decline in its history.

Asus gloried in the Eee’s success. It updated the netbook every
couple of months, adding power and improving screen size and resolution. CNET
reviewed eight versions in 12 months, and even the most expensive cost one-half
of a typical laptop of the time.

The 900, the first real production model, had a 9″ screen, a 4GB
SSD and 1 GB of RAM. I literally wore it out, using it until I cracked the
keyboard and broke the A key off. I replaced it with the Eee 1005 a year
later, which had a 10″ screen, 2GB of RAM, a 160GB HHD and four hours of
battery life. I still have it, and it works as well as it ever did. The 1101,
meanwhile, had an 11.6″ screen and a 160GB HDD and still weighed just
three pounds.

Netbooks and the Eee were so successful, in fact, that research
analysts who followed Apple—whose top executives had famously called the
machines “junk”—warned the company that it had better do
something to compete. Mac sales fell in 2008, the first decline in five and
a half
years, and an analyst told Computerworld: “Vendors are waking up to the
fact that people respond to so-called ‘good-enough’ computing. They
don’t really need all the power of a Core 2 Duo CPU most of the time.”

But Apple wasn’t the only company that saw the netbook as a threat.
So did Microsoft, whose abhorrence of Linux was part of the company’s DNA
(remember “Linux is a cancer”?). A Microsoft spokesman did not respond
to several requests for information for this story, so it’s difficult to
know exactly what the company thought. But, says Wilson, “though I
don’t presume to speak for Microsoft, for about six months to a year, they
had to be worried. There were not a lot of phenomenons in the laptop world at
the time.”

The Microsoft dilemma: it was phasing out Windows XP, which could and
did run on some early netbooks, in favor of Windows Vista. But, reported the
New York Times in April 2009, it was “downright embarrassing that Vista is
too tubby to run well on on the best-selling laptops in the market”. Hence,
Microsoft had to find a way to cram the desktop version of Windows 7 onto a
netbook.

Which it did, though the results left much to be desired. I
“activated” the so-called Windows 7 Starter version on a friend’s
netbook; it literally took all night to install, clacking and churning and
rebooting. And then rebooting some more. “They got Windows working on
netbooks”, says Ackerman, “and if it didn’t work well, it worked
well enough”.

More important, Microsoft cut the Windows 7 licensing fee for
netbooks by one-third. It was $75 a copy for a desktop, but only $25 for
netbooks (which it had apparently charged for XP on netbooks too).

This was the beginning of the end. Wrote the Times: “[C]onsumers
have shown their preference for Windows on netbooks….Linux went from
almost 100 percent share on netbooks in the early days to just 20 percent after
Microsoft started offering Windows XP on the systems.”

A Fond Memory

So much for Linux for the masses. But worse was yet to come for the
Eee: Apple released and refined the iPad and the iPod Touch during the next
couple years. Even more important, it unveiled the iPhone 3GS in June 2009.
One million 3GSes were sold in three days, and consumers—thanks to
the revolutionary Apple app store—discovered they didn’t need a
computer to send email, listen to music or browse the web. And, at $99, the
3GS undercut the Eee on price. The modern smartphone had arrived.

The Eee and netbooks didn’t go away immediately, of course. Genuine
efforts were made to keep it relevant—Asus released the $500 1201 in
2010, with a 12.1″ screen and more-or-less desktop resolution. The Linux
community, meanwhile, offered operating systems like Ubuntu netbook,
EasyPeasy/Ubuntu Eee, Joliecloud and Peppermint OS. But the 1201 wasn’t so
much a netbook as the forerunner to the ultrabook, and only those of us who
wanted to run Linux instead of Windows would spend the time to install one of
the new OSes over Windows and the few Xandros machines that were still
being sold.

The end came in 2012, when Acer said it would stop production, and Asus
discontinued the Eee. Tellingly, more tablets were sold than netbooks that
year. But the Eee lives on, and not just because those of us who still have one
or two will pop a thumbdrive into one of its slots, load Puppy or Antix or
Lubuntu, and give it a whirl.

Today’s high-end laptops adapted the Eee’s strengths—battery life and
weight, among others—and combined it with high-end
specs. And, frankly, anyone who has negotiated a smartphone home screen,
flicking those big, shiny icons, is doing about what we did with Xandros and
its home screen on the Eee 901.

And it lives on in the Chromebook: a simple, inexpensive and
lightweight laptop that does what most people need a computer to do—send
email, browse the internet and do word processing. And it does it all through
a browser window without the blue screen of death, Control-Alt-Delete, and
updates that need to reboot and reboot and reboot. And then reboot again.

And isn’t that what computing should be about?

Source

Two Open Source Mobile App Development Frameworks To Make Mobile Dev Easier | Linux.com

Mobile apps have been a boon for developers. With Android the most widely used platform on the planet, it makes perfect sense for developers to ply their trade in the mobile market. Not only do developers have the chance to get their work seen, they can make money from the Google Play Store or the iOS App Store. For those who have yet to delve into the mobile development market, however, the process may be a bit daunting. What tools are available? More importantly, what open source tools are available? After all, if you’re developing on the Linux platform, you probably don’t want to work with proprietary software.

So, to get started creating the greatest mobile app on the planet, you need to get the right tools. One such tool is a framework. In programming terms, a framework is an abstraction in which common code (that provides a generic or general functionality) can be used and rewritten to provide a specific functionality. Say you need Function X for your app, but you don’t want to write all the necessary code for that function. You can use a framework that offers Function X and modify that function so it perfectly fits your needs. In other words, a framework is a way to make development easier and more efficient.

Are there open source frameworks available for mobile development? There certainly are. Let’s take a look at two tools available for this particular task.

Ionic

Ionic is both 100 percent free and open source. This project, licensed under MIT, enables you to build fully cross-platform, progressive web and native mobile apps for every major app store… all from a single codebase. You can develop Ionic apps on any platform you like. Of course, our platform of choice is Linux. Fortunately, Ionic offers a simple command-line interface (CLI) that can be used to create, build, test, and deploy your apps to any platform. Ionic also features:

  • Ionic Native, which allows you to unlock native APIs (and other features), by wrapping Cordova plugins in TypeScript.
  • Live Reload, which allows you to compile and re-deploy an app at every development step.
  • Ionicons, which is an icon pack that includes hundreds of the most common app icons (all MIT licensed and ready to use).
  • Deeplinking, which allow you to start your app from a web link (and can even load a specific view out of the box).
  • AoT Compiling, which helps your apps to load faster.

Create a free Ionic account here and then install Ionic on your distribution. For example, if you’re using Ubuntu as your development platform, to install Ionic you must first install Node.js and npm like so:

  1. Open a terminal window.
  2. Issue the command sudo apt install curl
  3. Add the necessary repository with the command curl -sL https://deb.nodesource.com/setup_10.x | sudo bash –
  4. Install node.js and npm with the command sudo apt install nodejs

Install Ionic with the command:

sudo npm install -g ionic

You can now begin creating and working with your project. To create a new project, issue the command:

ionic start PROJECT_NAME blank –type ionic1

where PROJECT_NAME is the name of your project. You should see a newly created folder (with the same name as your project), that includes a number of new files and folders (Figure 1).

For more information on using the Ionic CLI, check out the official Ionic Guide.

PhoneGap

PhoneGap is an open source distribution of Adobe Cordova that makes it possible to develop your mobile app using web development technologies (e.g., HTML, CSS, and JavaScript) in just a few minutes. If you don’t want to work from the command line, PhoneGap does offer a desktop app (which is only available for macOS and Windows). The desktop app uses the same libraries found in the CLI, but it makes it a bit less daunting for those who prefer a more point and click-friendly method of app development.

PhoneGap includes the following:

  • PhoneGap Developer is a mobile app to connect your devices to your development machine (to see changes you make instantly).
  • PhoneGap Build enables you get app-store ready apps without having to maintain native SDKs for each mobile environment.
  • Plugin Library gets you access to a robust library of plugins to extend the capability of your mobile apps.
  • Third party tools is where you can find additional tools, created by the PhoneGap community, to help test, debug, and manage apps.
  • Developer community allows you to connect to thousands of developers working with PhoneGap.
  • Mobile App helps you pair your mobile device to the desktop app, so you can preview your new app.

To install the PhoneGap CLI tool, you’ll need jode.js and npm installed (as described above). Once that is taken care of, you can install the PhoneGap CLI tool with the command:

sudo npm install -g phonegap@latest

Once you’ve install the CLI, issue the command phonegap to see the help file (and show that the tool was successfully installed—Figure 2).

You might find you run into a permissions issue, when running the phonegap command. To resolve that, issue the command:

sudo chown -R USER:USER ~/.config/configstore

Where USER is your Linux username.

You should now be able to create your first project with the command:

phonegap create PROJECT_NAME

Where PROJECT_NAME is the name of your project.

To find out more on how to use the PhoneGap CLI, check out this reference.

There’s more to be found

There are plenty more open source mobile developer frameworks to be found. These two tools, however, can be thought of as a great launching point to help you get started with your mobile development journey. They are certainly not the only players on the field, but offer quite a lot in the way of power, flexibility, and feature sets. Give one of these tools a try and see if it doesn’t empower your mobile app development with the help of open source.

Learn more about Linux development in the Introduction to Open Source Development, Git, and Linux training course, and sign up now to start your open source journey.

Source

The First Social Network » Linux Magazine

Before the web as we know it existed, Usenet performed the same tasks now done by web forums and social networks. Despite its declining popularity, Usenet is still employed to publish articles, sustain mailing lists, and even upload files.

Usenet, is a gigantic Internet forum with thousands of subforums. The Usenet system is designed as a federated network, which means you just need to connect to one Usenet server in order to have access to all of Usenet. The most common tool for connecting to Usenet is a Network News Transfer Protocol (NNTP) client. See the box titled “The Nature of Federated Networks” for more information.

The Usenet network is a giant bulletin board that is divided into hierarchical sections, called newsgroups. Newsgroups are to Usenet what subforums are to web-based forums, and each one deals with a particular topic. For example, rec.sport.soccer is dedicated to discussions about soccer. Usenet netizens are supposed to use their clients to subscribe to the newsgroups they want to be active in, in much the same way they would subscribe to a mailing list. Subscribing to a newsgroup means that your client will pull new messages from the newsgroups each time you connect or at regular intervals, depending on your client. Despite the name, newsgroups are actually discussion groups. Newsgroups got their name because they were originally intended to host news.

Any user can post an article to a newsgroup. An article can receive answers from other Usenet users, thus creating discussion threads, much like a mailing list. Some newsgroups are moderated, and posts need to be approved by the newsgroup administrator before publication.

[…]

Use Express-Checkout link below to read the full article (PDF).

Source

WP2Social Auto Publish Powered By : XYZScripts.com