
Published October 28, 2018
Wine 3.19 is out with improved 32bit .NET on 64bit and plenty of fixes
Grab a glass and get ready to pour another as the Wine 3.19 development release has been officially released.
Coming in hot for the 3.19 release are these highlights:
- Support for file I/O completion modes.
- WaitOnAddress synchronization primitives.
- Better support for 32-bit .NET binaries on 64-bit.
- Improved recovery on broken RPC connection.
As always, there’s a plethora of bugs that have been solved as well, with 31 noted as fixed as of this release. The usual note applies: Not all bugs were fixed in this specific release, some were found from earlier releases and only just now marked as solved with some re-testing.
They noted fixes for the S.T.A.L.K.E.R. Call Of Prypyat DX11 benchmark, Project CARS 2 should no longer hang on startup, Assassin’s Creed got a fix for freezing when looking around along with other various fixes for games and applications.
Additionally, Wine 3.19 was updated against Vulkan 1.1.88.
How to Create M3U Playlists in Linux [Quick Tip]
Brief: A quick tip on how to create M3U playlists in Linux terminal from unordered files to play them in a sequence.

I am a fan of foreign tv series and it’s not always easy to get them on DVD or on streaming services like Netflix. Thankfully, you can find some of them on YouTube and download them from YouTube.
Now there comes a problem. Your files might not be sorted in a particular order. In GNU/Linux files are not naturally sort ordered by number sequencing so I had to make a .m3u playlist so MPV video player would play the videos in sequence and not out of sequence.
Also sometimes the numbers are in the middle or the end like ‘My Web Series S01E01.mkv’ as an example. The episode information here is in the middle of the filename, the ‘S01E01’ which tells us, humans, which is the first episode and which needs to come in next.
So what I did was to generate an m3u playlist in the video directory and tell MPV to play the .m3u playlist and it would take care of playing them in the sequence.
What is an M3U file?
M3U is basically a text file that contains filenames in a specific order. When a player like MPV or VLC opens an M3U file, it tries to play the specified files in the given sequence.
Creating M3U to play audio/video files in a sequence
In my case, I used the following command:
$/home/shirish/Videos/web-series-video/$ ls -1v |grep .mkv > /tmp/1.m3u && mv /tmp/1.m3u .
Let’s break it down a bit and see each bit as to what it means –
ls -1v = This is using the plain ls or listing entries in the directory. The -1 means list one file per line. while -v natural sort of (version) numbers within text
| grep .mkv = It’s basically telling ls to look for files which are ending in .mkv . It could be .mp4 or any other media file format that you want.
It’s usually a good idea to do a dry run by running the command on the console:
ls -1v |grep .mkv
My Web Series S01E01 [Episode 1 Name] Multi 480p WEBRip x264 – xRG.mkv
My Web Series S01E02 [Episode 2 Name] Multi 480p WEBRip x264 – xRG.mkv
My Web Series S01E03 [Episode 3 Name] Multi 480p WEBRip x264 – xRG.mkv
My Web Series S01E04 [Episode 4 Name] Multi 480p WEBRip x264 – xRG.mkv
My Web Series S01E05 [Episode 5 Name] Multi 480p WEBRip x264 – xRG.mkv
My Web Series S01E06 [Episode 6 Name] Multi 480p WEBRip x264 – xRG.mkv
My Web Series S01E07 [Episode 7 Name] Multi 480p WEBRip x264 – xRG.mkv
My Web Series S01E08 [Episode 8 Name] Multi 480p WEBRip x264 – xRG.mkv
This tells me that what I’m trying to do is correct. Now just have to make that the output is in the form of a .m3u playlist which is the next part.
ls -1v |grep .mkv > /tmp/web_playlist.m3u && mv /tmp/web_playlist.m3u .
This makes the .m3u generate in the current directory. The .m3u playlist is nothing but a .txt file with the same contents as above with the .m3u extension. You can edit it manually as well and add the exact filenames in an order you desire.
After that you just have to do something like this:
mpv web_playlist.m3u
The great thing about MPV and the playlists, in general, is that you don’t have to binge-watch. You can see however much you want to do in one sitting and see the rest in the next session or the session after that.
I hope to do articles featuring MPV as well as how to make mkv files embedding subtitles in a media file but that’s in the future.
Download Kubuntu 18.04.1 LTS / 16.04.5 LTS
Kubuntu is a special version of Ubuntu that replaced the controversial Unity user interface with the KDE desktop environment. It is known among the Ubuntu community as the official KDE flavor of Ubuntu Linux.
The Wily Werewolf edition of Kubuntu will be officially released on October 22, 2015 and it will be supported by Canonical and the Kubuntu community with software updates and security patches for 9 months, until July 2016.
Distributed as 32-bit and 64-bit Live DVDs
Kubuntu 15.10 is distributed as two Live DVD ISO images, one for legacy 32-bit (i386) computers and another one for modern 64-bit (x86_64) machines. Both ISOs are hybrid, which means that you will be able to write them on either a USB flash drive or a DVD disc.
Boot options
The boot options are identical with those that were present in previous versions of the distribution, which means that, by default, the Live DVD will boot automatically in approximately 10 seconds from the moment the users boots the ISO image from the BIOS of the PC.
Available boot options include the ability to start Kubuntu with default settings, support for testing the memory of the PC, the ability to boot an existing operating system from the local disk drive, as well as support for checking the integrity of the bootable medium (only if booting from a DVD disc).
Additionally, you can choose a different language, enable various accessibility options, change the keyboard layout, select a different mode, and activate various other useful functions that will ensure your special hardware is supported.
The next-generation KDE Plasma by default
Kubuntu 15.10 is the first ever version of the operating system to feature the next-generation KDE Plasma desktop environment by default, replacing the old-school KDE 4 user interface. It includes all the KDE packages and applications that are distributed as part of the KDE Applications 15.04 software suite, as well as all the other KDE5 technologies, including KDE Frameworks 5.
When booting the Live DVD, users will be asked if they want to try the live session of start installing the operating system on their computers. Choosing the live mode will allow you to test drive Kubuntu without installing anything on your computer. The desktop environment features the same traditional layout consisting of a single taskbar located on the bottom edge of the screen and a Desktop Folder widget on the desktop.
Offers the same great collection of software and apps
Probably the best thing about Kubuntu 15.10 is that it offers the same great collection of software and apps that were available in previous editions of the operating system. Besides all those great KDE apps, the distribution comes with the Mozilla Firefox web browser and the entire LibreOffice office suite.
IBM To Buy Red Hat, the Top Linux Distributor, For $34 Billion


Posted on Sunday October 28, 2018 @03:00PM
The purchase, announced on Sunday afternoon, is the latest competitive step among large business software companies to gain an edge in the fast-growing market for Internet-style cloud computing. In June, Microsoft acquired GitHub, a major code-sharing platform for software developers, for $7.5 billion. IBM said its acquisition of Red Hat was a move to open up software development on computer clouds, in which software developers write applications that run on remote data centers.
From a press release:
This acquisition brings together the best-in-class hybrid cloud providers and will enable companies to securely move all business applications to the cloud. Companies today are already using multiple clouds. However, research shows that 80 percent of business workloads have yet to move to the cloud, held back by the proprietary nature of today’s cloud market. This prevents portability of data and applications across multiple clouds, data security in a multi-cloud environment and consistent cloud management.
IBM and Red Hat will be strongly positioned to address this issue and accelerate hybrid multi-cloud adoption. Together, they will help clients create cloud-native business applications faster, drive greater portability and security of data and applications across multiple public and private clouds, all with consistent cloud management. In doing so, they will draw on their shared leadership in key technologies, such as Linux, containers, Kubernetes, multi-cloud management, and cloud management and automation. IBM’s and Red Hat’s partnership has spanned 20 years, with IBM serving as an early supporter of Linux, collaborating with Red Hat to help develop and grow enterprise-grade Linux and more recently to bring enterprise Kubernetes and hybrid cloud solutions to customers. These innovations have become core technologies within IBM’s $19 billion hybrid cloud business. Between them, IBM and Red Hat have contributed more to the open source community than any other organization.
The world is no nursery.
– Sigmund Freud
Working…
Understanding Linux Links: Part 2 | Linux.com
In the first part of this series, we looked at hard links and soft links and discussed some of the various ways that linking can be useful. Linking may seem straightforward, but there are some non-obvious quirks you have to be aware of. That’s what we’ll be looking at here. Consider, for example, at the way we created the link to libblah in the previous article. Notice how we linked from within the destination folder:
cd /usr/local/lib
ln -s /usr/lib/libblah
That will work. But this:
cd /usr/lib
ln -s libblah /usr/local/lib
That is, linking from within the original folder to the destination folder, will not work.
The reason for that is that ln will think you are linking from inside /usr/local/lib to /usr/local/lib and will create a linked file from libblah in /usr/local/lib to libblah also in /usr/local/lib. This is because all the link file gets is the name of the file (libblah) but not the path to the file. The end result is a very broken link.
However, this:
cd /usr/lib
ln -s /usr/lib/libblah /usr/local/lib
will work. Then again, it would work regardless of from where you executed the instruction within the filesystem. Using absolute paths, that is, spelling out the whole the path, from root (/) drilling down to to the file or directory itself, is just best practice.
Another thing to note is that, as long as both /usr/lib and /usr/local/lib are on the same partition, making a hard link like this:
cd /usr/lib
ln -s libblah /usr/local/lib
will also work because hard links don’t rely on pointing to a file within the filesystem to work.
Where hard links will not work is if you want to link across partitions. Say you have fileA on partition A and the partition is mounted at /path/to/partitionA/directory. If you want to link fileA to /path/to/partitionB/directory that is on partition B, this will not work:
ln /path/to/partitionA/directory/file /path/to/partitionB/directory
As we saw previously, hard links are entries in a partition table that point to data on the *same partition*. You can’t have an entry in the table of one partition pointing to data on another partition. Your only choice here would be to us a soft link:
ln -s /path/to/partitionA/directory/file /path/to/partitionB/directory
Another thing that soft links can do and hard links cannot is link to whole directories:
ln -s /path/to/some/directory /path/to/some/other/directory
will create a link to /path/to/some/directory within /path/to/some/other/directory without a hitch.
Trying to do the same by hard linking will show you an error saying that you are not allowed to do that. And the reason for that is unending recursiveness: if you have directory B inside directory A, and then you link A inside B, you have situation, because then A contains B within A inside B that incorporates A that encloses B, and so on ad-infinitum.
You can have recursive using soft links, but why would you do that to yourself?
Should I use a hard or a soft link?
In general you can use soft links everywhere and for everything. In fact, there are situations in which you can only use soft links. That said, hard links are slightly more efficient: they take up less space on disk and are faster to access. On most machines you will not notice the difference, though: the difference in space and speed will be negligible given today’s massive and speedy hard disks. However, if you are using Linux on an embedded system with a small storage and a low-powered processor, you may want to give hard links some consideration.
Another reason to use hard links is that a hard link is much more difficult to break. If you have a soft link and you accidentally move or delete the file it is pointing to, your soft link will be broken and point to… nothing. There is no danger of this happening with a hard link, since the hard link points directly to the data on the disk. Indeed, the space on the disk will not be flagged as free until the last hard link pointing to it is erased from the file system.
Soft links, on the other hand can do more than hard links and point to anything, be it file or directory. They can also point to items that are on different partitions. These two things alone often make them the only choice.
Next Time
Now we have covered files and directories and the basic tools to manipulate them, you are ready to move onto the tools that let you explore the directory hierarchy, find data within files, and examine the contents. That’s what we’ll be dealing with in the next installment. See you then!
Learn more about Linux through the free “Introduction to Linux” course from The Linux Foundation and edX.
Iptables Introduction and Examples – LinuxAdmin.io
Iptables is a firewall service included in CentOS, in CentOS 7 its offered as a alternative firewalld is offered as well. Iptables uses netfilter to filter chains. Essentially you create a chain of filter rules to process how incoming and outgoing data is handled. You can view more about iptables on Netfilter
Iptables rule format
The iptables rules format is pretty simplistic when using basic rules to allow or deny traffic.
iptables -t <type> <direction> <pattern> -j <action>
Type
for -t <type> there are two basic type options filter and nat
filter – creates a rule for filtering traffic.
nat – this creates a nat(network address translation) rule.
Direction
–append – Adds a rule to the end of the chain. You also want to specify INPUT (incoming packets) or OUTPUT (outgoing packets) when appending rules.
–delete – Deletes a rule from the chain. You also want to specify INPUT (incoming packets) or OUTPUT (outgoing packets) when deleting rules.
–list – lists the current rules
–flush – flushes all the rules
Pattern
–source <ip_address> – Rule only applies to packets coming from this source IP address.
–destination <ip_address> – Rule only applies for packets going to this destination IP address.
Action
DROP – packets are dropped
REJECT – packets are dropped and a error message sent back
ACCEPT – packets are allowed
Iptables Service Management
How to manage the IPtables service itself.
To start iptables:
service iptables start
To stop iptables:
service iptables stop
To ensure iptables starts on reboot:
CentOS 6:
chkconfig –add iptableschkconfig iptables on
Centos 7:
systemctl enable iptables
Restore saved ruleset:
iptables-restore < /etc/sysconfig/iptables
Save new rules permamently:
iptables-save > /etc/sysconfig/iptables
Example rules:
Samples of different functions you can perform to block or accept traffic based on IP addresses and Ports.
Block a IP with Iptables:
iptables -A INPUT -s 1.2.3.4 -j DROP
Allow a IP
iptables -A INPUT -s 1.2.3.4 -j ACCEPT
Block a PORT:
iptables -A INPUT -p tcp –dport 21 -j DROP
Allow a IP to a specific port:
iptables -A INPUT -s 1.2.3.4 -p tcp –dport 21 -j ACCEPT
There is much more that you can do with iptables this is just a basic introduction.
Linux-friendly company System76 shares more open source Thelio computer details
System76 has been making big news in the Linux community lately with its upcoming open source Thelio computer. Many Linux users have been clamoring for System76 to make its own hardware, and that dream will soon be a reality.
Unfortunately, not much is known about Thelio hardware other than it is definitely a desktop computer that is built with open source ideology. Today, however, System76 shares new details and images about the computer with those that signed up for its email list. Probably the most exciting is the promise of an open source “daughter board” that will apparently strip the proprietary aspects from a typical motherboard — this has me seriously intrigued.
“Creating an open desktop is a giant step for us, not only as a company, but as a team of Linux enthusiasts and contributors who are passionate about the future of open source. We hope that Thelio will open many new doors for people to build their own open hardware, develop their own utilities, and design a computer that reflects who they are,” says System76.
ALSO READ: System76 releases Ubuntu-based Pop!_OS 18.10 Linux distribution
The famed company further says, “We will be unveiling Thelio Systems on Thursday, November 1st. From there you’ll be able to customize your own Thelio desktops for preorder. As our most faithful fans, you can enjoy some extra computer clues and a sneak peek at our manufacturing process leading up to the release. We’re grateful for all of your passion and enthusiasm, and we can’t wait to share this next phase of our journey with you.”
System76 shares the following teaser images of the computer. As we can see, it uses DDR4 memory, which is to be expected. I also spot a SATA SSD — hopefully an NVMe drive will be an option too. With that said, I really like how 2.5-inch SATA drives will mount — it looks very convenient (and pretty).


There will be three variants of Thelio, and below is what we know so far.
- Thelio (Up to 32GB RAM, 24TB Storage)
- Thelio Major (Up to 128GB RAM, 46TB Storage)
- Thelio Massive (Up to 768GB ECC RAM, 86TB Storage)
Carl Richell, System76 CEO, shares the following statement.
Creating a computer that is open-source, from the physical design to the OS, is the next step in our mission to empower our customers and the community. We believe that by leading with open source design, the rest of the industry will have to follow.
Are you excited to see Thelio revealed on November 1? Will you pre-order? Please tell me in the comments below.
Debian Turns 25! Here are Some Interesting Facts About Debian GNU/Linux
One of the oldest Linux distribution still in development, Debian has just turned 25.
10 Interesting facts about Debian Linux

The facts presented here have been collected from various sources available from the internet. They are true to my knowledge, but in case of any error, please remind me to update the article.
1. One of the oldest Linux distributions still under active development
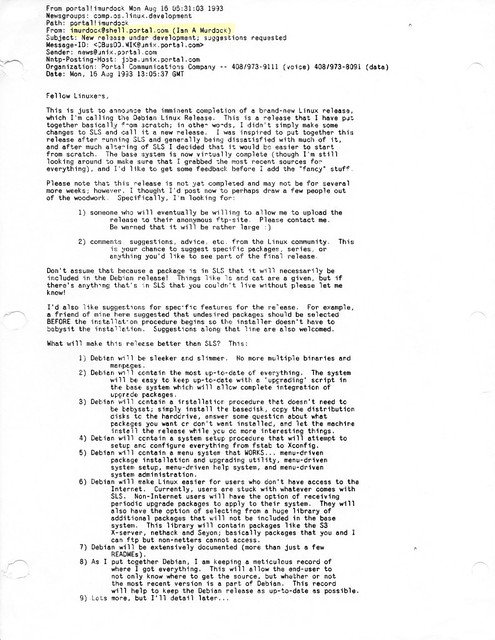
Debian project was announced on 16th August 1993 by Ian Murdock, Debian Founder. Like Linux creator Linus Torvalds, Ian was a college student when he announced Debian project.
2. Some people get tattoo while some name their project after their girlfriend’s name
The project was named by combining the name of Ian and his then-girlfriend Debra Lynn. Ian and Debra got married and had three children. Debra and Ian got divorced in 2008.
3. Ian Murdock: The Maverick behind the creation of Debian project
 Ian Murdock
Ian Murdock led the Debian project from August 1993 until March 1996. He shaped Debian into a community project based on the principals of Free Software. The Debian Manifesto and the Debian Social Contract are still governing the project.
He founded a commercial Linux company called Progeny Linux Systems and worked for a number of Linux related companies such as Sun Microsystems, Linux Foundation and Docker.
Sadly, Ian committed suicide in December 2015. His contribution to Debian is certainly invaluable.
4. Debian is a community project in the true sense
Debian is a community based project in true sense. No one ‘owns’ Debian. Debian is being developed by volunteers from all over the world. It is not a commercial project, backed by corporates like many other Linux distributions.
Debian Linux distribution is composed of Free Software only. It’s one of the few Linux distributions that is true to the spirit of Free Software and takes pride in being called a GNU/Linux distribution.
Debian has its non-profit organization called Software in Public Interest (SPI). Along with Debian, SPI supports many other open source projects financially.
5. Debian and its 3 branches
Debian has three branches or versions: Debian Stable, Debian Unstable (Sid) and Debian Testing.
Debian Stable, as the name suggests, is the stable branch that has all the software and packages well tested to give you a rock solid stable system. Since it takes time before a well-tested software lands in the stable branch, Debian Stable often contains older versions of programs and hence people joke that Debian Stable means stale.
Debian Unstable codenamed Sid is the version where all the development of Debian takes place. This is where the new packages first land or developed. After that, these changes are propagated to the testing version.
Debian Testing is the next release after the current stable release. If the current stable release is N, Debian testing would be the N+1 release. The packages from Debian Unstable are tested in this version. After all the new changes are well tested, Debian Testing is then ‘promoted’ as the new Stable version.
There is no strict release schedule for Debian.
7. There was no Debian 1.0 release
Debian 1.0 was never released. The CD vendor, InfoMagic, accidentally shipped a development release of Debian and entitled it 1.0 in 1996. To prevent confusion between the CD version and the actual Debian release, the Debian Project renamed its next release to “Debian 1.1”.
8. Debian releases are codenamed after Toy Story characters

Debian releases are codenamed after the characters from Pixar’s hit animation movie series Toy Story.
Debian 1.1 was the first release with a codename. It was named Buzz after the Toy Story character Buzz Lightyear.
It was in 1996 and Bruce Perens had taken over leadership of the Project from Ian Murdock. Bruce was working at Pixar at the time.
This trend continued and all the subsequent releases had codenamed after Toy Story characters. For example, the current stable release is Stretch while the upcoming release has been codenamed Buster.
The unstable Debian version is codenamed Sid. This character in Toy Story is a kid with emotional problems and he enjoys breaking toys. This is symbolic in the sense that Debian Unstable might break your system with untested packages.
9. Debian also has a BSD ditribution
Debian is not limited to Linux. Debian also has a distribution based on FreeBSD kernel. It is called Debian GNU/kFreeBSD.
10. Google uses Debian
Google uses Debian as its in-house development platform. Earlier, Google used a customized version of Ubuntu as its development platform. Recently they opted for Debian based gLinux.
Happy 25th birthday Debian

I hope you liked these little facts about Debian. Stuff like these are reasons why people love Debian.
I wish a very happy 25th birthday to Debian. Please continue to be awesome. Cheers 🙂
Download Xubuntu 18.04.1 LTS / 16.04.5 LTS
Welcome to Xubuntu, an official flavor of the world’s most popular free operating system, Ubuntu Linux, built around the lightweight Xfce graphical desktop environment. It is oriented towards low-end machines and computers with old hardware components.
Distributed as 64-bit and 32-bit Live DVDs
This Xubuntu edition is distributed as Live DVD ISO images that contain software packages optimized for both both 32-bit (x86) and 64-bit (x86_64) instruction set architectures. Both ISOs have approximately 1 GB in size and can be deployed on either USB thumb drives or DVD discs.
The boot options are standard
The Live DVD boot menu is unchanged from previous Xubuntu releases, allowing the user to try the distribution without installing it, to check the bootable medium for errors (only if booting from a DVD media), start the installer directly, run a memory diagnostic test, as well as to boot an existing OS from the first disk drive detected by the BIOS.
Please note that if you don’t press a key on your keyboard in ten seconds from the moment you boot the ISO image from the BIOS of your computer, the Live DVD will automatically start and drop you to the graphical session.
Xfce is in charge of the graphical session
As mentioned, Xubuntu is built around the Xfce desktop environment, which is quite lightweight and low on resources, suitable for computers with old or semi-old hardware components. It offers a classic layout comprised of a panel located on the upper part of the screen and a traditional main menu with built-in search functionality.
Comes pre-loaded with lightweight apps
Being designed from the ground up to be as low on resources as possible, Xubuntu comes pre-loaded with lightweight apps, among which we can mention the AbiWord word processor, Gnumeric spreadsheet editor, gmusicbrowser audio player, Mozilla Thunderbird email and news client, Xfburn CD/DVD burning software, Parole media player, Pidgin multi-protocol insant messenger, as well as the Mozilla Firefox web browser.