
What is LVM
Logical Volume Managment (LVM) is an abstraction layer between physical devices and the file systems which they create. This can make disk management easier by adding abilities to shrink or expand filesystems by just adding additional physical devices no longer being limited to a single physical device as the volume can span over multiple physical devices.
Terminology:
Physical Volume (PV) – This is the physical device to be used with LVM
Volume Group (VG) – A storage pool made up of PGs
Logical Volume(LV) – A logical volume is a portion of a volume group, this is the usable space to the file system
Find And Create The Physical Volume
First make sure you have the right disk. In this example we are going to use /dev/vdd (a virtual disk on a KVM virtual machine)
# fdisk -l /dev/vdd
Disk /dev/vdd: 8589 MB, 8589934592 bytes, 16777216 sectors
Units = sectors of 1 * 512 = 512 bytes
Sector size (logical/physical): 512 bytes / 512 bytes
I/O size (minimum/optimal): 512 bytes / 512 bytes
Disk label type: dos
Disk identifier: 0x000b9af0
Device Boot Start End Blocks Id System
/dev/vdd1 2048 16777215 8387584 83 Linux
Next use parted to create partition.
# parted /dev/vdd
(parted) mklabel
New disk label type? msdos
Warning: The existing disk label on /dev/vdd will be destroyed and all data on this disk will be lost. Do you want to continue?
Yes/No? Yes
(parted) mkpart
Partition type? primary/extended? primary
File system type? [ext2]? xfs
Start? 0%
End? 100%
To use the entire disk, you will want to enter 0% to start and 100% to end. Then enter ‘print’ to verify the partition details
(parted) print
Model: Virtio Block Device (virtblk)
Disk /dev/vdd: 8.00GiB
Sector size (logical/physical): 512B/512B
Partition Table: msdos
Disk Flags:
Number Start End Size Type File system Flags
1 0.00GiB 8.00GiB 8.00GiB primary xfs
Go ahead and quit out of parted. You will now want to use pvcreate to create the physical volume
pvcreate /dev/vdd1
WARNING: xfs signature detected on /dev/vdd1 at offset 0. Wipe it? [y/n]: y
Wiping xfs signature on /dev/vdd1.
Physical volume “/dev/vdd1” successfully created.
Create The LVM Volume Group
You will use vgcreate to create the volume group. The syntax is vgcreate <volume-group-name> <partition>. The volume group name can be whatever you want.
# vgcreate vg02 /dev/vdd1
Volume group “vg02” successfully created
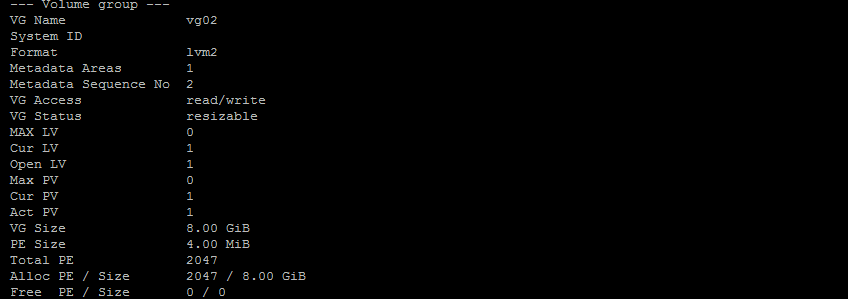
Then do a vgdisplay to find the amount of Physical extents in the disk:
# vgdisplay vg02
— Volume group —
VG Name vg02
System ID
Format lvm2
Metadata Areas 1
Metadata Sequence No 2
VG Access read/write
VG Status resizable
MAX LV 0
Cur LV 1
Open LV 1
Max PV 0
Cur PV 1
Act PV 1
VG Size 8.00 GiB
PE Size 4.00 MiB
Total PE 2047
Alloc PE / Size 2047 / 8.00 GiB
Free PE / Size 0 / 0
VG UUID NHX1cN-9Ujw-dnXf-hSfo-srIc-6do6-mFnCba
Create The LVM Logical Volume
You will then use lvcreate to create the logical volume based on the number of physical extents found in vgdisplay. The -n flag allows you to name the volume, this is again whatever you would like to describe the logical volume.
# lvcreate -l 2047 vg02 -n logvol1
Logical volume “logvol1” created.
After it has been created, perform a lvdisplay to verify.
# lvdisplay
— Logical volume —
LV Path /dev/vg02/logvol1
LV Name logvol1
VG Name vg02
LV UUID eZCOf2-9adr-KIMx-LxZi-hDDi-ss1L-8LMfnK
LV Write Access read/write
LV Creation host, time centos7-vm1, 2017-05-15 21:28:15 -0400
LV Status available
# open 0
LV Size 8.00 GiB
Current LE 2047
Segments 1
Allocation inherit
Read ahead sectors auto
– currently set to 8192
Block device 253:2
Format the LVM logical volume
In this example, we are going to format the logical volume as xfs using mkfs.xfs so it can be mounted
mkfs.xfs /dev/vg02/logvol1
meta-data=/dev/vg02/logvol1 isize=512 agcount=4, agsize=524032 blks
= sectsz=512 attr=2, projid32bit=1
= crc=1 finobt=0, sparse=0
data = bsize=4096 blocks=2096128, imaxpct=25
= sunit=0 swidth=0 blks
naming =version 2 bsize=4096 ascii-ci=0 ftype=1
log =internal log bsize=4096 blocks=2560, version=2
= sectsz=512 sunit=0 blks, lazy-count=1
realtime =none extsz=4096 blocks=0, rtextents=0
Once that has been completed it can now be mounted and added to /etc/fstab to persist during reboots.
May 15, 2017LinuxAdmin.io

 Braiins has released an open source, OpenWrt based ASIC bitcoin miner stack called Braiins OS, featuring AsicBoost to reduce power usage. It’s compatible with Antminer and Dragonmint mining rigs and works with Braiins’ Slush Pool mining pool.

