The name may not be a familiar one to everyone,
but Eren Niazi can be credited with
laying the foundation and paving the way to the many software-defined and
cloud-centric technologies in use today.
When considering the modern data center, it’s difficult to imagine a time when
open-source technologies were considered taboo or not production-grade, but
that time actually existed. There was a time when the data center meant closed
and propriety technologies,
developed and distributed by some of the biggest names in the industry—the days when EMC, NetApp, Hewlett Packard (HP), Oracle or even Sun
Microsystems owned your data center and the few applications upon which you
heavily relied.
It also was a time when your choice was limited to one vendor, and you would invest
big into that single vendor. If you were an HP shop, you bought HP. If you were
an EMC shop, you
bought EMC—and so on. From the customer’s point of
view, needing to interact with only a single vendor for purchasing, management
and support was comforting.
However, shifting focus back to the present, the landscape
is quite different. Instead, you’ll find an environment of mixed
offerings provided by an assortment of vendors, both large and small.
Proprietary machines work side by side with off the shelf commodity devices
hosting software-defined software, most of which are built on top of
open-source code. And half the applications are hosted in virtual machines
over a Hypervisor or just spun up in one or more containers.
These changes didn’t happen overnight. It took visionaries like Eren Niazi
to identify the full potential of open-source software technologies. He saw
what others did not and, in turn, proved to an entire industry that open
source was not merely production-ready, but he also used that same technology to
redefine the entire data center.
His story is complicated, filled with ups and downs. Eren faced his
fair share of trials and tribulations that gave him everything, just to have it
all taken away. But, let’s begin at the beginning.
Born in Sunnyvale, California, a little more than 40 years ago, Eren grew up down the
street from Steve Jobs, and on many occasions, he engaged the legendary
Apple co-founder in inspiring conversations. The two shared many
characteristics. Neither ever finished college. Both are
entrepreneurs and inventors. Niazi and Jobs each were driven from their own
companies, only to return again. Around age 12, Eren became
fascinated with computers and learned how to develop code. However, his
adventures in open-source technologies didn’t truly start until the year
1998.
Jim Truong took the young Niazi, a teenager with no college education, under
his wing over at AMAX Engineering, a server and cluster computing company.
Founded in 1979, AMAX Engineering Corporation designs and engineers customized
platforms for data centers. Today, it has expanded to provide solutions to
host cloud, big data and high-performance parallel computing workloads.
At age 19, Niazi was working diligently on architecting
supercomputers for large account customers, which included the federal
government and Linux Networx. By the end of his career with AMAX, Eren had
risen to the level of OEM group manager.
I was fortunate in that I was able to reach Jim for comment:
I met Eren back in 1999 when I hired him at AMAX Engineering. Even then, at 19,
he was extremely passionate about technology. He was self-taught and even
learned to write code on his own. Eren was very motivated and wanted to learn
everything. The question was never about how, but how fast. Once he set his
sights on a goal, Eren would be 110% committed.
Deep down, I always knew that he was going to be an entrepreneur. I just never
imagined that he would go on to accomplish so much in the open source space. At
the time, everyone else was treating open source software as a pet project and
configuring machines to run simple tasks out of their homes. Eren took that
same technology and proved it to be production grade. He used it to compete
with Enterprise level solution providers in the data storage space but at a
large fraction of the cost.
While Eren was at AMAX, he took notice of a trend in the technology of this
sector and observed the path in which it was heading. This would lead to a
unique vision for open source integration. The vision may not sound so unique
today, but at the time it went against the norms just enough to be considered
revolutionary. In 2001, he created Open Source Storage, Inc., which focused on
leveraging commodity off-the-shelf hardware and pairing it with open source
software while pushing into Enterprise space.
In 2001, Eren left AMAX and founded Open Source
Storage, Incorporated, or OSS. At the time, “open-source” anything was
still considered somewhat controversial—even more so in the professional
workplace. But, that did not stop or dissuade the young Eren from pressing on.
Some might even say that Eren could be credited with coining the terms open source
<fill in the blank>. The same sentiment was both expressed
and validated by Jim Truong of AMAX:
“Eren worked hard to pave the way for the open source storage movement (a term
he coined), and he can probably be credited for getting us to where we are
today. Not many individuals can achieve what he did.”
And there probably is some truth to this. Eren Niazi continues to hold many
domain names, most of which were acquired 17 or more years ago. For example, a
whois on opensourcesystems.com dates back to 1999, while a
whois on a
opensourcestorage.com shows a creation year of 2001:
$ whois opensourcesystems.com|grep Creation|head -n1
Creation Date: 1999-01-01T05:00:00Z
$ whois opensourcestorage.com|grep Creation|head -n1
Creation Date: 2001-12-06T03:19:35Z
Niazi still holds the ownership of those same domains.

Figure 1. A Few Domains Owned by
Eren Niazi
A trademark for Open Source Storage was filed on January 5, 2004 and registered
on June 21, 2005.

Figure 2. Serial Number: 78347754 and
Registration Number: 2963234
OSS hit the ground running. The company did the unthinkable by marrying both
open-source software with commodity off-the-shelf hardware and, in turn, sold it
as a cheaper alternative to the big players and newcomers to the industry.
Friendster, one of the original social-networking sites, was one of the early
OSS customers. The social network needed both hardware and a scalable platform.
OSS was able to fill that void and at a very competitive price. It wouldn’t
be long before the Friendster employees left for the new kid on the block,
Facebook. Those former Friendster employees provided OSS with a wonderful
business opportunity. Facebook was growing, and it was growing fast. The year
was 2004. With its foot already in the door, OSS deployed its software
stack on top of 3500 systems and was with Facebook during its early growth
years—at least until 2007.
Note: Friendster is currently a social gaming site, but that wasn’t always the
case. Friendster was originally founded as a social networking site in 2002.
The relaunch into the social gaming platform occurred much later in
2011.
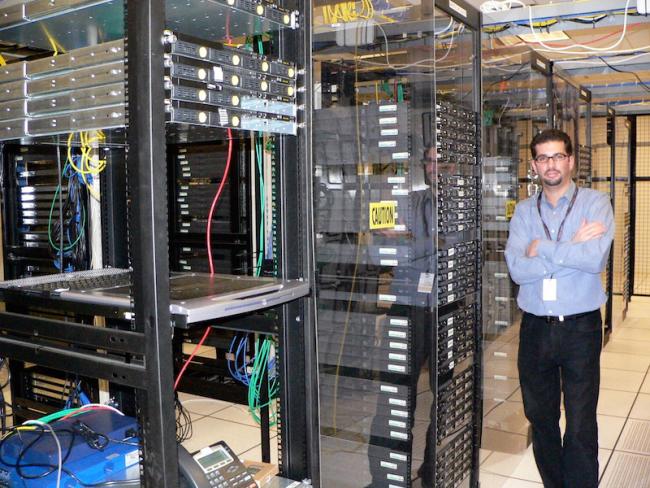
Figure 3. Niazi Standing in Front of
Server Cabinets in the Early Facebook Data Center
Stories circulated stating how Mark Zuckerberg had invited Eren
Niazi to accompany him to the Nasdaq on the day he rang the opening bell to
mark Facebook’s IPO. While Niazi and Zuckerberg were very close, this story was
nothing more than just a simple rumor. Regardless of that fact, Eren did take
advantage of the opportunity by purchasing pre-sale Facebook IPO stock via a
registered stock broker.
Open Source Storage had accomplished the unthinkable and commercialized open-source software. Open source was ready for enterprise. Taking notice, the
industry shifted toward it. By the year 2007, the company’s list of
customers grew to include the following:
- Friendster
- Facebook
- NASA
- Shutterfly
- FriendFinder
- Yahoo
- eBay
- Shopping.com (later acquired by eBay)
- USGS
- Lockheed Martin
- US Army
- And more…
When reached for comment, the former OSS warehouse manager Marty Wallach
validated the above list of customers. In his brief, almost two-year tenure
with the company, Marty wore many hats. His main responsibilities
circulated around inventory, logistics and vendor or client orders. He secured
the components and hardware prior to it being assembled and shipped to
customers like Facebook. He also took many trips to the old Facebook offices
located on University Avenue and even to Shutterfly.
With regard to his time spent working with Eren, he said “I have known Eren a long time and he has always been up to date with the
technology. His background has always been impressive and he has tremendous
drive.”
Although I’ve gone on about the high-profile customers OSS accumulated
through the years, I’d like to take a step back and look at the actual product. By
today’s standards, it isn’t anything new. Today, people use the term
“software-defined” to label what OSS had done a decade earlier.
Software-defined solutions were not a thing in those days, and yet, it was
exactly what OSS was building and selling. The software was a CentOS Linux
respin. A Kickstart machine would load the predefined operating system image
and the minimum set of packages required.
Note: software-defined solutions involve the coupling of special-purpose software
with commodity off-the-shelf hardware. Coined around 2009 (maybe a little
later), it has been a hot and trending technology in today’s data
center.
Initially, Open Source Storage was building its own hardware (using
off-the-shelf components), all based on the open standards of the time. This
did provide its advantages. For example, the high-efficiency power supplies
were generating 50% less heat and consuming significantly less energy (between
30%–50%). To enable the hardware that OSS provided to early
customers, the motherboard’s BIOS needed to be rewritten, and the company
worked
closely with both Intel and AMD to accomplish this. In fact, the first OSS
office was located across the street from Intel in Santa Clara, California.
The internet exploded with a plethora of services, applications and platforms
of entertainment. Data centers were only getting bigger with a lot more
hardware. There was a constant need to reduce heat and, in turn, save on
cooling costs. The Gemini 2U was one of the more-green offerings of its time.
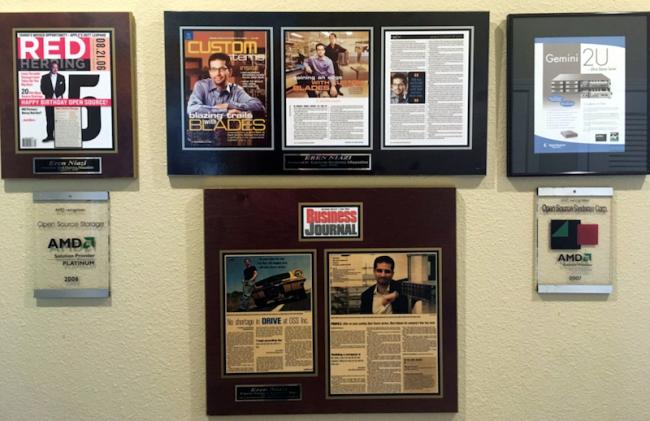
Figure 4. Open Source Storage
Recognition and Awards from the Early Years
Labeled as the Gemini 2U, the ultimate system was fixed with dual
motherboards and other fixtures, located in the same enclosure. A patent was
filed in 2006 and accepted in 2008 (US 20080037214):
According to this embodiment, the chassis features a chassis base, first and
second bays for first and second motherboards, a fan assembly for mounting
fans, a backplane for I/O connections mounted to the chassis base, and at least
two compartments for electronic components. The first bay and the second bay
are laterally adjacent so that, when in use, the first and second motherboards
are in substantially the same plane.

Figure 5. The Gemini 2U’s
Patent Design Number US 20080037214
Note: a U is a form of measurement designating the height of a computer enclosure and
data center rack cabinet. A single U measures at 1.75 inches in height.
Therefore a 2U would equate to 3.5 inches. At around this time frame, single 2U
enclosure would be capable of holding up to 12 3.5″ spinning hard disk
drives (HDDs).
It wouldn’t take long for companies like HP and Supermicro to copy this
unique twin-server design, but because OSS did not have the money to litigate,
those hardware vendors continued to sell the design in their respective
product lines. In the case of HP, the design was first introduced in its
Proliant series.

Figure 6. An Advertisement for the Gemini
2U
As OSS’s operations grew, the need for a larger facility became
increasingly important. In 2004, the company moved its headquarters to the
former 33,000 square foot Atari facility located at 1195 Borregas Avenue in
Sunnyvale, California. The company continued to operate from that location until
2007.
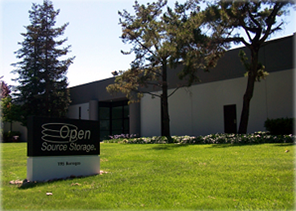
Figure 7. OSS Headquarters in
Sunnyvale, California (2004–2007)
Business was booming, and OSS was seeing an annual run rate of $40
million—not
bad when think about the fact that the entire business was built with credit
cards and a minimal amount of money to bootstrap itself. Eren and OSS were
turning heads, and an entire industry took notice.

Figure 8. Open Source Storage
Featured in Silicon Valley Business Journal

Figure 9. Open Source Storage
Featured in Custom Systems Magazine
The company did very well until 2007. It grew so rapidly, it needed to
get additional capital from investors, and then the recession hit. Once the
recession hit, the investors wanted Niazi to sell, but he wouldn’t budge.
As a result, those same investors pulled out of the company.
Here’s Eren Niazi on this topic:
It was never about the money. Over the years, I was given many opportunities to
sell OSS and refused to sell the business to Oracle, HP or IBM.
It was never a business. It was a movement. To
this day, I would take a bullet for the company.
With little to no capital left, Open Source Storage filed for bankruptcy. And
although OSS was going through its own financial crisis, it did not impact the
entire business—meaning, OSS continued to maintain its clients, but a
strategic move was required.
By 2007 and following the bankruptcy, the business model needed to change, and it
did in order to focus more on enterprise-grade turnkey open-source software solutions
intended for public, private and hybrid cloud deployments.
To put this in perspective, it was in 2006 that Amazon’s subsidiary,
Amazon Web Services (AWS) first introduced its Elastic Compute Cloud (EC2).
The decision was made to focus only on the software and not the hardware with
an additional emphasis on Agile development. In fact, the industry already
was starting to trend toward this model. Niazi and his team looked beyond the complete
operating system model to develop more of the middleware needed by their
customers—a majority of which were migration tools to ease the transition from
proprietary platforms and to their open-source counterparts. For instance, why
continue spending big dollars with Oracle and Sun Microsystems when you can
cut your costs by 80% and instead host that same data with MySQL on top of
FreeNAS? Customers enjoyed the idea of getting away from these data center
monopolies. Needless to say, this eventually created tension between OSS
and Oracle.
In parallel, the new customers being catered to under this model were
startups—about 75 of them to be exact. OSS was contracted to build “apps” for
them. The process began with soft coding and prototyping to fill the initial
requirements requested by the customer, and when the startup was fully funded,
OSS then would build the hardened application. In-house, there were more than 200
developers (contractors) commissioned to handle the bulk of this work. It was a
relatively large operation.
One satisfied OSS customer (in around 2014), who I’ll refer to as William G.,
provided the following testimony:
We were introduced to Eren through a mutual friend and shortly thereafter flew
out to California to meet the team. Our company was building an interactive
Music Trading Card platform. Open Source Storage accomplished exactly what we
needed, and we were very happy with them. They built an open source platform
that scaled and within the agreed upon time frame.
It would take a creative genius to see the true potential in open-source
software and prove to an entire industry that was it production-grade and fully
capable of hosting consumer workloads. This piece of history was only the
beginning. A prosperous Niazi begins to
buckle under the pressure, the effects of which impact OSS and the very
movement he began more than a decade earlier. The rest of his turbulent
story will unfold in Part II.
The revolution in the data center had taken place, and the foundation
was laid for what was about to come. Stay tuned.
Source


 Changing slideshow interval


 Map keyboard shortcut with Flameshot