
Published October 19, 2018
Source
When the Problem Is the Story
Linux isn’t a story anymore.
That’s a good thing, but not an interesting one. Let me explain.
Journalism’s main product is the story. In newsrooms, the three words uttered most often by editors to reporters are “What’s the story?”
As I was taught by an editor long ago—and as I have found to be true constantly ever since—all stories are about three things:
- A character. Usually human, but not always. Could be a cause. A sports team. A political party. Could be good, or bad, or neither. All that matters is that the character is interesting. You can also have more than one, but a single one is better.
- A problem or conflict. A situation that challenges the character, or characters, further defining them and making them more interesting. Problems and conflict keep people interested, so they keep reading, watching, listening, turning pages, talking to others about it, and “move the narrative along” (as the news watchers like to say).
- Movement toward resolution. Doesn’t matter if the end never arrives. Hell, look at soap operas. You just have to keep the story moving in the direction of conclusion. Newsroom aphorism: “No story ever starts with ‘Happily ever after’.” Another: “If your team is up forty points with five minutes left, your new story is about how you get out of the parking lot ahead of traffic.”
All three of those are why Linux isn’t much of a story any more, even though it’s bigger in the world than it has ever been.
Linux had character when it was easy to cast as an underdog operating system, and the problem was beating Windows. Linus Torvalds, the father of Linux, did his best not to be interesting, but his fans made him interesting anyway:

Us included. The above is from a slide show that was featured in a story I wrote back in 2002 that’s off-web at the moment, but also beside the point, which is that Linus and his penguins were characters in stories that were interesting at the time and aren’t anymore.
That’s because Linux has achieved the world domination it longed for in the early years.
Yes, Linus as a character got interesting for a few minutes last month (top results in a Google News search for “Linus Torvalds” range from 22 to 29 days old), but that story is too stale to be interesting now, even though the issues around it still matter.
And that’s my point here. Lots of subjects matter that stories do a lousy job of telling.
But to journalism, and to the human beings journalism addresses, stories matter more than anything. Stories are clearly the base format of human interest.
And now, here in the digital world we now co-occupy with the physical one, it’s easier to tell stories than ever. Those who tell stories well, or who are fully interesting as characters, or who know how to “move the narrative along,” are winning at the new game that journalism has become.
Exhibit A through X for that case is the character who now runs the United States. He’s hard to beat as a character, causes and amplifies conflict (or what appears to be conflict, and in journalism there is often not much difference), and keeps new conflicts moving forward pretty much constantly. Never mind the politics or the particulars. Just look at the three elements that comprise a story and you’ll see why this one character and what he does utterly dominates the journalistic world right now.
Meanwhile fully important and consequential stuff just lies there, being uninteresting—except to specialists like our readers here, who still care about this operating system that has become as elemental to the technical world as oxygen is to the living one.
This is a topic that needs a lot of visiting by people who care about journalism, and not necessarily by Linux geeks.
But I’m not sure we’ll ever get past the basic flaws inherent in journalism’s stock-in-trade, meaning also in human nature itself. Stories are just too damned interesting.
Speaking of which, this whole topic was the subject of my first TED talk, given at TEDx Santa Barbara last month, and titled The story isn’t the whole story.
And I’m hardly close to my own conclusions on the topic. I just want to share my own thoughts and observations, so far, using Linux as an example.
By the way, that top photo is from Linux World Expo in 2005, and kind of explains itself.
How to Disable Ctrl-Alt-Delete in Ubuntu ?
Having a physical access to the keyboard can simply use the Ctrl+Alt+Delete key combination to reboot the server without having to logged on, But we can prevent the use of this key combination on a production server for an accidental reboots.
To disable the reboot action taken by pressing the Ctrl+Alt+Delete key combination,
Comment out the following line in the file /etc/init/control-alt-delete.conf
$ sudo vi /etc/init/control-alt-delete.conf
Or
$sudo gedit /etc/init/control-alt-delete.conf
Find line that read as follows:
exec shutdown -r now “Control-Alt-Delete pressed”
delete configuration line or comment out line by prefixing # symbol
#exec shutdown -r now “Control-Alt-Delete pressed”
Save and close the file.
But In 16.04
In the systemd world, Ctrl+Alt+Delete is handled by ctrl-alt-del.target
ctrl-alt-del.target systemd starts this target whenever Control+Alt+Del is pressed on the console. Usually, this should be aliased (symlinked) to reboot.target.
Disable Ctrl+Alt+Delete using following command
$systemctl mask ctrl-alt-del.target
$systemctl daemon-reload
how long server has been up in linux using uptime command ?
Both Linux and Unix-like systems comes with various command to find out server uptime command. Under Linux file /proc/uptime has uptime information and file /var/run/utmp has information about who is currently logged on. However, information from /proc or utmp file is not directly readable by humans so you need to use the uptime command.
uptime – Tell how long the system has been running.
UNIX / Linux uptime command
Open a command-line terminal and then type the following commands:
#uptime
Sample outputs:
uptime
12:04:44 up 8 days, 19:42, 3 users, load average: 1.56, 2.56, 1.96
Note: The uptime command gives a one line display of the following information.
1). The current time
2). How long the system has been running
3). How many users are currently logged on
4). The system load averages for the past 1, 5, and 15 minutes
See uptime in pretty format pass the -p option to the uptime command
#uptime -p
Sample outputs:
uptime -p
up 1 week, 1 day, 19 hours, 47 minutes
See uptime in system up since, in yyyy-mm-dd MM:HH:SS format pass the -s option to the uptime command
#uptime -s
uptime -s
2017-12-27 16:22:09
How To Install And Test Go On CentOS
Go also known as golang, is a compiled computer programming language developed by google. It is loosely based on the C language but designed to overcome some of its short comings. It is a general purpose language and can be used from server-side development to games and streaming media. It can easily be installed on a CentOS system. This guide assumes you have at least a basic working installation of a Linux system.
Install Go on CentOS
Clean up repositories
yum clean all
Ensure everything is up to date
yum update
Change directories
cd /usr/src
Download the compiled package, you can find the most recent release on the downloads page.
wget https://storage.googleapis.com/golang/go1.8.3.linux-amd64.tar.gz
Uncompress the archive
tar xfvz go1.8.3.linux-amd64.tar.gz
Move the binary and its applicable files to /usr/local
mv go /usr/local/
Export the following
export GOROOT=/usr/local/go
GOROOT defines the path you placed the Go package in
export GOPATH=$HOME/go-project
GOPATH tells go where your project is located, this can be anywhere
export PATH=$GOPATH/bin:$GOROOT/bin:$PATH
This appends both the GOPATH and GOROOT to your $PATH. You can also add this to your .bash_profile to automatically export these variables upon logging in.
Verify Go Installation
By typing ‘go version’ it will give you a print out of the version you currently have running
# go version
go version go1.8.3 linux/amd64
By typing ‘go env’ it will show the environment variables that are currently in use.
# go env
GOARCH=”amd64″
GOBIN=””
GOEXE=””
GOHOSTARCH=”amd64″
GOHOSTOS=”linux”
GOOS=”linux”
GOPATH=”/root/go-project”
GORACE=””
GOROOT=”/usr/local/go”
GOTOOLDIR=”/usr/local/go/pkg/tool/linux_amd64″
GCCGO=”gccgo”
CC=”gcc”
GOGCCFLAGS=”-fPIC -m64 -pthread -fmessage-length=0 -fdebug-prefix-map=/tmp/go-build167939199=/tmp/go-build -gno-record-gcc-switches”
CXX=”g++”
CGO_ENABLED=”1″
PKG_CONFIG=”pkg-config”
CGO_CFLAGS=”-g -O2″
CGO_CPPFLAGS=””
CGO_CXXFLAGS=”-g -O2″
CGO_FFLAGS=”-g -O2″
CGO_LDFLAGS=”-g -O2″
Test a Go project
Create the project directory you exported earlier:
mkdir $HOME/go-project
Change to that directory:
cd $HOME/go-project
Create a new file:
nano hello.go
Insert the following lines:
package main
import “fmt”
func main() {
fmt.Println(“hello world”)
}
Execute the file:
go run hello.go
The file should print the following
# go run hello.go
hello world
That’s it, you should now have a working Go installation.
Aug 7, 2017LinuxAdmin.io
FBI Investigates Attack on Critical Water Utility
Source: InfoSecurity – Posted by Brittany Day
![]()
According to a media release from Onslow Water and Sewer Authority (ONWASA) issued on October 15, 2018, a critical water utility in North Carolina was targeted in a cyber-attack. Federal and state officials are now working with the water utility as part of the investigation into the attack on some of its computer systems. In the wake of the Hurricane Florence disaster…ONWASAs internal computer system, including servers and personal computers, were subjected to what was characterized as ‘a sophisticated ransomware attack,’ wrote Jeffrey Hudson, CEO, ONWASA.
Read this full article at InfoSecurity
Only registered users can write comments.
Please login or register.
Powered by AkoComment!
How to Password Protect a File in Vim Editor
The Vim editor can be called a programmer’s text editor. It is upwards compatible with the Vi editor and can be used to write and edit plain files and programs. Along with the many enhancements it provides, Vim Editor can be used to password protect your text files. In this article, we will explain the installation of the Vim Editor and then using it to create and open encrypted files. These files can be used for privacy purposes and are only accessible through Vim when you know the password to them.
The commands and procedures mentioned in this article have been run on an Ubuntu 18.04 LTS system.
Password protect a file in Vim
Install the Vim Editor
Let us first install the Vim editor on our Ubuntu system. Vim is available on repositories of all major Linux distributors. Open your Linux Terminal either through the system Dash or the Ctrl+Alt+T shortcut. Then enter the following command as root to install the Vim text editor:
$ sudo apt-get install vim

The installation procedure requires your confirmation to proceed through a Y/n prompt; enter y in order to continue installation.
Create a Password Protected File
After the installation is complete, let us proceed with creating a password protected file. Enter the following command in order to do so:
Syntax:
$ vim -x [filename].txt
Example:
$ vim -x privatefile.txt
When you create a text file through the above command, the -x switch indicates that you want to encrypt your file. Therefore, you will be displayed the following message where you can provide an encryption key and then re-confirm it:
When you enter the encryption key and hit enter, a blank file by the specified name will open in the Vim editor. You can insert some text here by first pressing the ‘i’ key. You can then quit and save the file by pressing Esc+wq.
Now, you have successfully created a password protected text file through the Vim editor.
Open a Password Protected File
If you try to open it through any other text editor, you will see some encrypted characters rather than the text you wrote. For example, we tried to open our file through the Nano editor through the following command:
$ nano privatefile.txt
This is how our encrypted file looks like:
Lets us quit and try to open the file through the Vim editor because a file encrypted through Vim can only be opened in Vim.
Enter the following command to open the file:
Syntax:
$ vim [filename].txt
Example:
$ vim privatefile.txt
Since it is a password protected file, the system will ask you to enter the encryption key.
When you enter the encryption key once and then hit Enter, your file will open in the Vim editor displaying its original contents in decrypted form as follows:
So you have seen how an encrypted file can be created and opened through the Vim editor based on the simple steps described in this article.
Kali Linux 2017.1 MATE Installation on Oracle VirtualBox
 |
| Kali Linux 2017.1 MATE Installation on Oracle VirtualBox |
This video tutorial shows
Kali Linux 2017.1 MATE installation
on
Oracle VirtualBox
step by step. This tutorial is also helpful to install Kali Linux 2017 MATE on physical computer or laptop hardware. We also install Guest Additions on Kali Linux 2017 for better performance and usability features such as Automatic Resizing Guest Display, Shared Folder, Seamless Mode and Shared Clipboard, Improved Performance and Drag and Drop.
Kali Linux 2017.1 MATE Desktop Installation Steps on VirtualBox:
- Create Virtual Machine on Oracle VirtualBox
- Start Kali Linux 2017.1 MATE Installation
- Setup Kali Linux MATE Networking
- Install Lightdm Display Manager
- Install Guest Additions
- Test Guest Additions Features: Automatic Resizing Guest Display and Shared Clipboard
Installing Kali Linux 2017.1 MATE on Oracle VirtualBox
Kali Linux 2017.1 New Features and Improvements
Kali Linux
is a Debian-based distribution which features several security and forensics tools. Kali Linux 2017.1 features drivers for RTL8812AU wireless chipsets, improved GPU support and there are now Azure and AWS images of Kali Linux for cloud instances.
Kali Linux 2017.1
brings with it a bunch of exciting updates and features. As with all new releases, you have the common denominator of updated packages, an updated kernel that provides more and better hardware support, as well as a slew of updated tools.
Kali Linux Website:
What is MATE Desktop?
The MATE Desktop Environment is the continuation of GNOME 2. It provides an intuitive and attractive desktop environment using traditional metaphors for Linux and other Unix-like operating systems. MATE is under active development to add support for new technologies while preserving a traditional desktop experience.
MATE Desktop Website:
VirtualBox Guest Additions Features
The Guest Additions offer the following features below:
- Improved Video Support: While the virtual graphics card which VirtualBox emulates for any guest operating system provides all the basic features, the custom video drivers that are installed with the Guest Additions provide you with extra high and non-standard video modes as well as accelerated video performance.
- Mouse Pointer Integration: This provides with seamless mouse support. A special mouse driver would have to be installed in the guest OS, which would exchange information with the actual mouse driver on the host. The special mouse driver then allows users to control the guest mouse pointer.
- Time Synchronization: With the Guest Additions installed, VirtualBox can ensure that the guest’s system time is better synchronized with that of the host.
- Shared Folders: These provide an easy way to exchange files between the host and the guest.
- Seamless Windows: With this feature, the individual windows that are displayed on the desktop of the virtual machine can be mapped on the host’s desktop, as if the underlying application was actually running on the host.
- Shared Clipboard: With the Guest Additions installed, the clipboard of the guest operating system can optionally be shared with your host operating system.
Hope you found this Kali Linux 2017.1 MATE installation on Oracle VirtualBox tutorial helpful and informative. Please consider sharing it. Your feedback and questions are welcome!
Install nornir Python Library on Ubnutu
Nornir
is a Python library for automating network connected devices. You can compare it to Ansible, which is mainly used to automate configuration and management of Linux servers. The same way, you can use
Nornir
to automate the configuration and management of network connected devices. The reason it is exceptional is that with Nornir, you can use the power of Python programming language to do things in your own way. You can control every aspect of the automation process and collect data if required.
In this article, I will show you how to install Nornir Python library on Ubuntu 18.04 LTS and use it for network automation. I will automate tasks on 3 Linux servers with Python Nornir library just to show you how it works. Let’s get started.
PIP is really easy to install on Ubuntu 18.04 LTS. It is available in the official package repository of Ubuntu 18.04 LTS.
First, update the APT package repository cache of your Ubuntu 18.04 LTS machine with the following command:
If you want to use PIP to install Nornir for Python 2.x, then you have to install PIP for Python 2.x. To do that, run the following command:
$ sudo apt install python-pip

Now press y and then press <Enter> to continue.
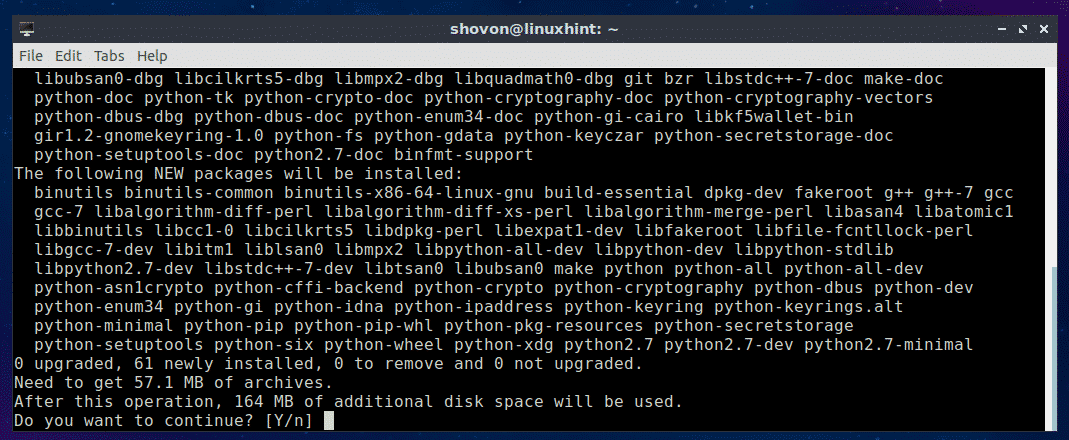
PIP for Python 2.x should be installed.

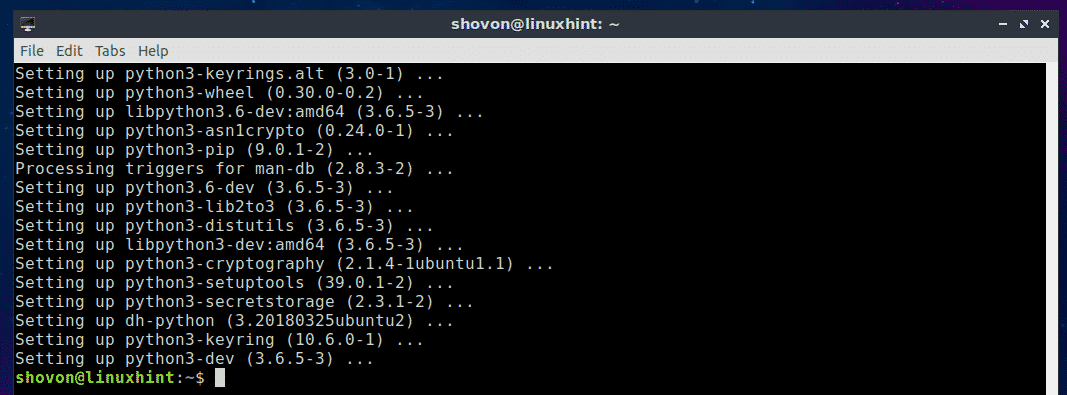
If you want to use PIP to install Nornir for Python 3.x, then you have to install PIP for Python 3.x. To do that, run the following command:
$ sudo apt install python3-pip

Now press y and then press <Enter> to continue.
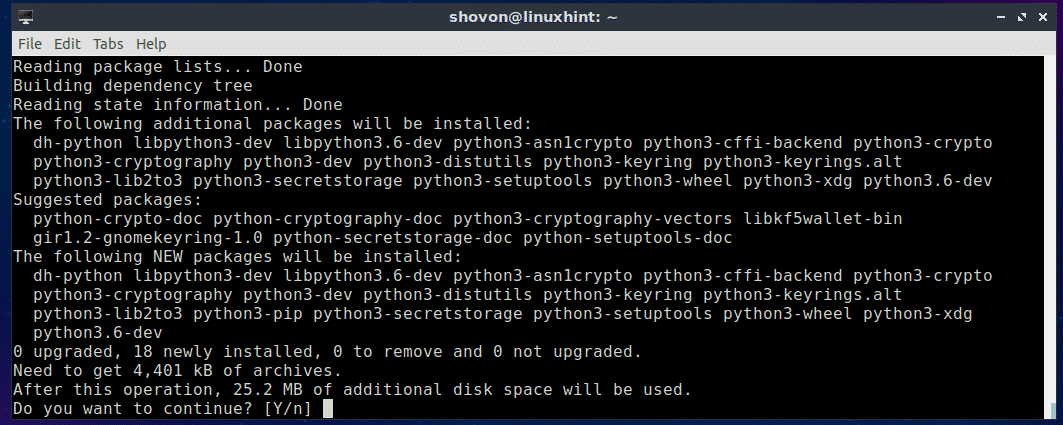
PIP for Python 3.x should be installed.
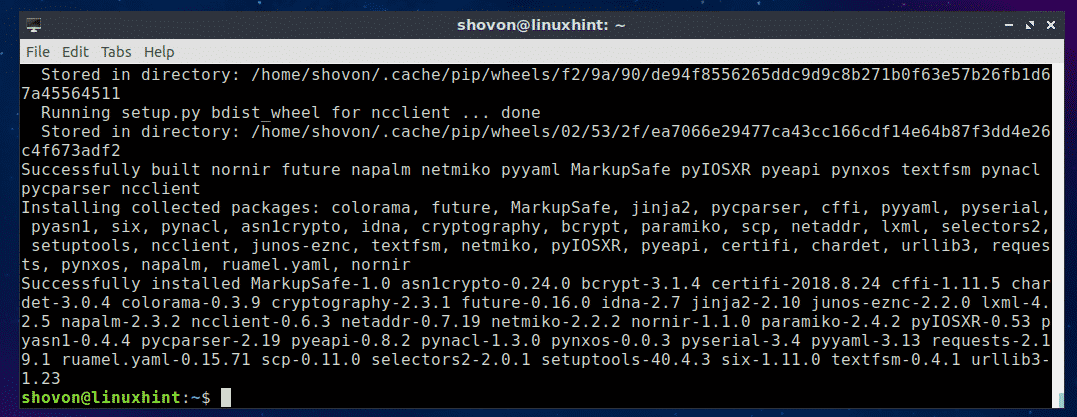
Installing nornir Python Library Using PIP:
You can easily install Nornir on Ubuntu 18.04 using Python PIP.
For Python 3.x:
If you want to use Nornir on Python 3.x (recommended), then install Nornir with the following command:
$ sudo pip3 install nornir

Nornir for Python 3.x should be installed.
For Python 2.x:
If you want to use Nornir on Python 2.x (not recommended), then install Nornir with the following command:
Nornir for Python 2.x should be installed.
Now you can test whether Nornir was installed correctly and is working with the following command:
For Python 3.x:
$ python3 -c ‘from nornir.core import InitNornir’
For Python 2.x:
$ python -c ‘from nornir.core import InitNornir’
If it was installed correctly and is working, then you won’t see any output when you run any of these commands above as you can see in the screenshot below.

If it was not installed correctly, running the above commands would display errors as shown in the screenshot below.

Using Nornir Python Library:
In this section, I will show you how to run commands on Linux servers and workstation with Nornir python library.
First, create a new directory (let’s call it nornir) for the project with the following command:

Now navigate into the nornir/ directory with the following command:

Now create 2 YAML files with the following command:
$ touch hosts.yaml groups.yaml

Now add the following lines to the hosts.yaml file:

Add the following lines to the groups.yaml file:

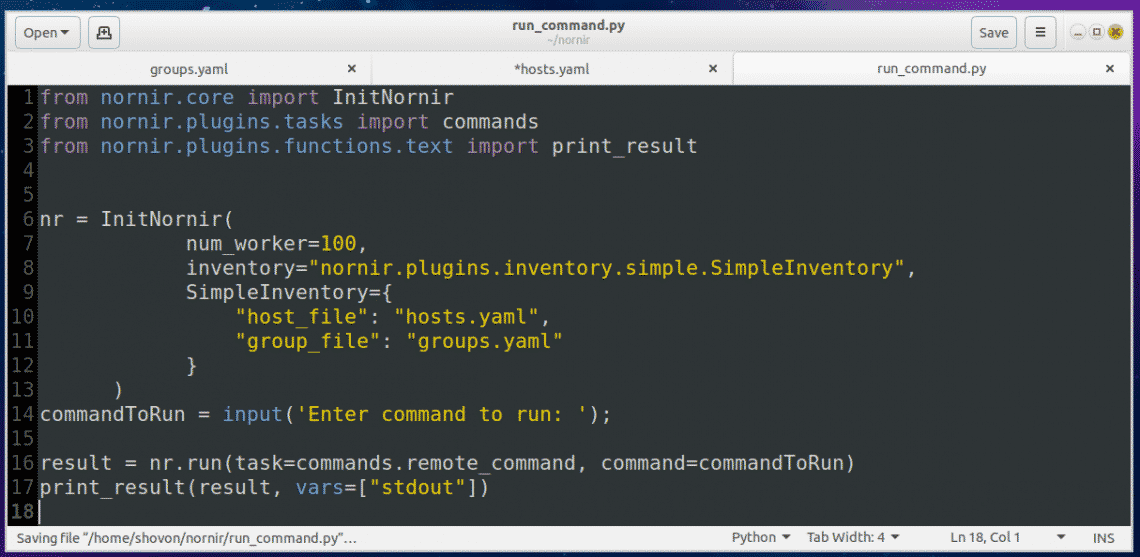
Now create a new Python script run_command.py with the following command:
Then add the following lines of codes to the run_command.py file:
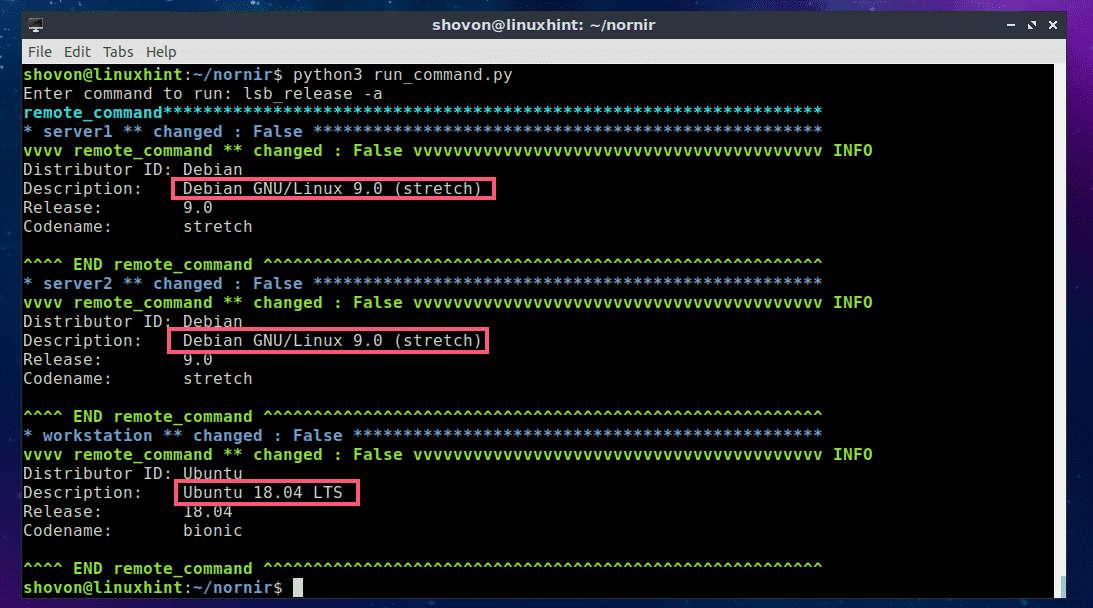
Now run the Python script with the following command:

Now type in the command that you want to run on all the servers and workstation defined in the hosts.yaml file and press <Enter>.

For example, I would like to see what operating system the servers and workstations are running. So I typed in the lsb_release -a command.

As you can see, the command was executed on each of the servers and workstations defined in the hosts.yaml file and the output is printed on the screen (in my case the terminal).
As you can see, I ran another command and listed all the installed storage devices and partitions of the servers and workstations.
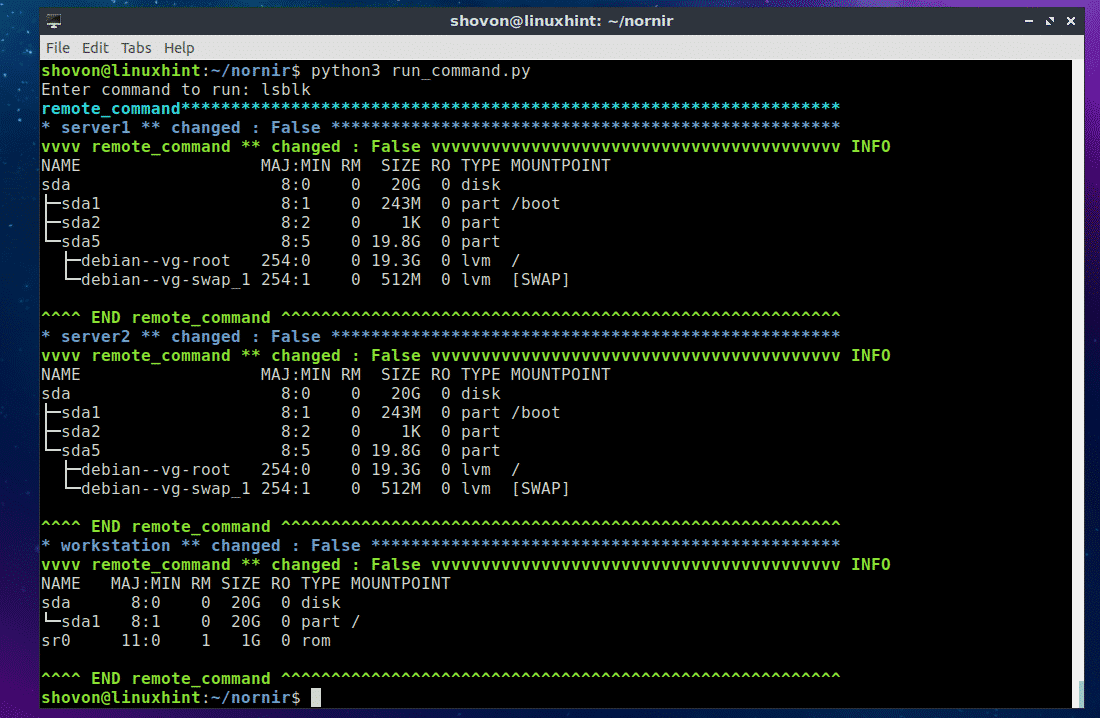
Really easy!
Understanding hosts.yaml and groups.yaml Configuration Files:
The main part of the run_command.py script is hosts.yaml and groups.yaml files. Using these files, you create an Inventory object, which is used to create a Nornir object.
On the following hosts.yaml file, server2 and workstation (on line 5 and line 9 respectively) are identifiers. You may use the hostname of your server or workstation as identifiers. That way, it will be easy for you to remember what the entries are.

On line 6-8, additional parameters/key-value pairs are defined for the server2 identifier. The nornir_host is the IP address or hostname of the server2 server.
groups tells the hosts.yaml file which group or groups to use from groups.yaml file. If some parameters are common to many identifiers, then it can be grouped and only the group name needs to be added in the hosts.yaml file. So you don’t have to type the same thing again and again. All the parameters in the defined group or groups will be automatically imported.
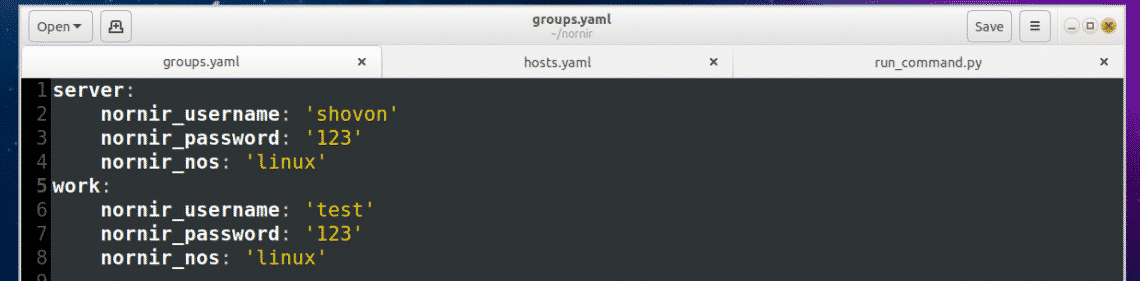
The format of the groups.yaml file is the same as the hosts.yaml file. So I don’t think you need further explanation of it. I will just explain the parameters in the groups.yaml file.
Here, nornir_username and nornir_password is the username and password used to login to the servers. Here, nornir_nos defines the operating system the servers have installed. As I am connecting to Ubuntu and Debian servers, the nornir_nos is linux.
Understanding the run_command.py Python script:
The run_command.py script is simple.
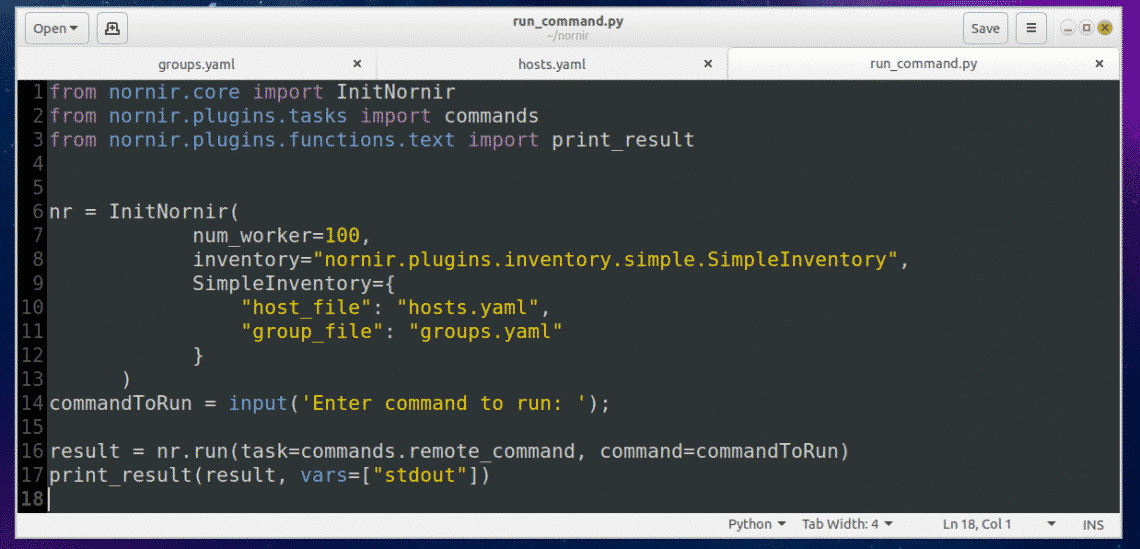
On line 1-3, nornir specific functions and classes are imported.
On line 6, a Nornir object is created using the InitNornir function. Here, the second parameter is used to tell InitNornir what type of inventory you would like to create. I created a SimpleInventory inventory. The third parameter tells InitNornir the location of the host (in my case hosts.yaml) file and group (in my case groups.yaml) file.
On line 14, Python’s build in input() function is used to input the command to run.
On line 16, the command is executed and the result is stored in the result variable.
Finally, on line 17, the contents of the result variable is printed on the screen.
For more information on Nornir, please check the official GitHub page of Nornir at https://github.com/nornir-automation/nornir
So that’s the basic of using Nornir Python library on Ubuntu 18.04 LTS. Thanks for reading this article.
Jetson TX2, Gemini Lake, and Kaby Lake based mini-PCs run Linux
Oct 19, 2018 — by Eric Brown
 Cirrus7 unveiled an “AI-Box TX2” mini-PC with a Jetson TX2 module and -20 to 70°C support. The company also offers four, similarly Linux-friendly Kaby Lake-based mini-PCs and a new Gemini Lake model.
Cirrus7 is a German manufacturer of Intel Core based mini-PCs that are available barebone or with pre-installed Ubuntu, Linux Mint, or Windows. Now the company has stepped into the Arm world with a mini-PC based on Nvidia’s Jetson TX2 module.
The AI-Box TX2 has the same rugged, passively cooled hardware design as its earlier 7th Gen Kaby Lake based mini-PCs but is the smallest yet at 155 x 120 x 49mm. It’s also the only one listed with extended temperature (-20 to 70°C) support. The other systems include the Cirrus7 Nimbus v2, Cirrus7 One, and Cirrus7 Nimbini v2, which is also available in an Intel Gemini Lake model (see farther below for details).


AI-Box TX2 from both sides
(click images to enlarge)
The AI-Box TX2 is built around the Jetson TX2 module, which is equipped with dual high-end “Denver 2” Arm cores and 4x Cortex-A57 cores. The 256-core Pascal GPU and it associated CUDA libraries enable a variety of AI and machine learning algorithms used in applications such as drones, robotics, and machine vision.
The Jetson TX2 also supplies the AI-Box TX2 with its memory: 8GB 128-bit LPDDR4 and 32GB eMMC. The AI-Box TX2 offers further storage possibilities with an optional microSD slot and a standard M.2 M-key 2280 slot with SATA and PCIe 2.0 x4, supported with an optional NVMe SSD. It’s unclear if the optional 802.11ac (WiFi 5) with Bluetooth module uses the same slot. In any case, dual SMA connectors are available for antennas.
The AI-Box TX2 is further equipped with GbE, USB 2.0, and 2x USB 3.0 ports. A mini-HDMI 2.0 port supports 4K displays, and there are optional CAN, UART, and I2C interfaces.
The IP40 protected system has an optional redundant power input for a second supply or UPS, as well as an optional DIN-rail power supply. Mounting options include DIN-rail, VESA arm, and wall mounting. The system runs at 8-10W, with a less than 4W idle, says Cirrus7. The highly configurable system can be further customized by special order.
Other Cirrus7 mini-PCs
The other Cirrus7 mini-PCs offer a range of Intel 7th Gen Kaby Lake with the exception one of the three Nimbini v2 models, which instead ships with an Intel Gemini Lake chip. We list them here by ascending size:
- Cirrus7 Nimbini v2 Gemini Edition — All the Nimbini v2 models have the same 157 x 157 x 81mm dimensions and are built on Intel NUC baseboards with support for dual 4K displays. The Gemini Edition differs in that instead of Kaby Lake, it offers a choice of Intel Gemini Lake SoCs — the follow-on to the Apollo Lake Atoms. The Nimbini v2 Gemini Edition ships with a GbE port, 4x USB 3.0 ports, a mini-Toslink digital audio jack, and 2x HDMI 2.0a ports for up to [email protected] video.


Nimbini v2 Gemini Edition from both sides
(click images to enlarge)The Gemini Edition starts at 299 Euros ($344) with a dual-core, 2GHz Celeron J4005 with Linux, but no RAM, storage, WiFi/BT module, or mounting options. A minimally configured model with 4GB DDR4 and 120GB SSD would go for 357 Euros, or $410.
If you move up to a quad-core, 1.5GHz Pentium Silver J5005, you’d add another 69 Euros for a total of $426. RAM options go up to 16GB and storage to 2TB. You can add a SATA drive in addition to the standard M.2 slot, or you can swap out the M.2 for one or two SATA drives.
- Cirrus7 Nimbini v2 Business Edition and Media Edition — Starting at 499 Euros ($573) with a 7th Gen, dual-core, 2.4GHz Core i3-7100U and 4GB DDR4, the Media and Business Edition models share the GbE port, 4x USB 3.0 ports, and M2 storage slots of the Gemini Edition. The Business Edition offers 2x HDMI 2.0a ports while the Media Edition has a single HDMI 2.0a and a USB 3.1 Gen2 port with support for DisplayPort (with i3 models) or Thunderbolt 3 (i5). The Media Edition also provides standard WiFi-ac with Bluetooth 4.2, and you get a choice of Intel Iris Plus Graphics 640 in addition to the standard Intel Ultra HD 620 GPU.


Nimbini v2 Media Edition (left) and rear view of Nimbini v2 Business Edition
(click images to enlarge)The Media Edition offers additional optional USB 2.0 ports, while the Business Edition instead offers optional serial ports or a serial/USB combo. Like the Gemini Edition, the Business Edition lets you add a SATA drive or swap out the M.2 to enable one or two SATA drives while the Media Edition is limited to adding a single SATA drive to the standard M.2. The Business Edition also adds Intel vPro for remote access and security tasks.
- Cirrus7 Nimbus v2 — This 220 x 220 x 65mm mini-PC offers a choice of Kaby Lake chips and starts at 499 Euros ($573) with a 2.7GHz dual-core Celeron G3930T and 4GB DDR4. The system is equipped with 2x GbE, 4x USB 3.0, 4x USB 2.0, and single 4K ready DisplayPort 1.2 and HDMI (with audio) ports. It offers the same M.2/SATA storage options as the Nimbini Gemini and Business editions, and also provides RAID 0/1 support. Options include extended and extreme cooling systems, WiFi/BT, a serial port, and VESA.


Nimbus v2 (left) and One
(click images to enlarge) - Cirrus7 One — The One is the largest and most expensive member of the Cirrus7 family. The 218 x 218 x 108mm system starts at 689 Euros ($792) starting with a 7th Gen, dual-core 2.9GHz Celeron G3930, which has a 51W TDP instead of 35W on the Nimbus’ base level Celeron G3930T. The base price also includes 8GB DDR4, expandable up to 32GB.The only standard ports that are listed are HDMI 1.4a and DisplayPorts with audio and 4K support plus a dual-link DVI port. However, the photo shows other ports, which appear to include a GbE port, 6x USB ports, a PS/2 port, eSATA, and audio jacks. Two antenna connectors are onboard for the standard WiFi/BT 4.0 module. There’s a standard DVD/DC burner tray, and you can load up to three 2.5-inch SSDs or HDDs with RAID 0/1/1+/5. You can even choose an LED effect lighting option.


Further information
At publication time there was still no product page for the AI-Box TX2, but the company informs us it is available upon request starting at 800 Euros ($919) plus shipping. Pricing for the Cirrus7 Nimbini v2, Nimbus v2, and One systems are shown farther above, as well as in the product pages linked to from the Cirrus7 website.