We’re going to use Puppet to install and configure a Graylog server.
This article is part of the Homelab Project with KVM, Katello and Puppet series. See here (CentOS 7) and here (CentOS 6) for blog posts on how to configure a Graylog server manually.
Homelab
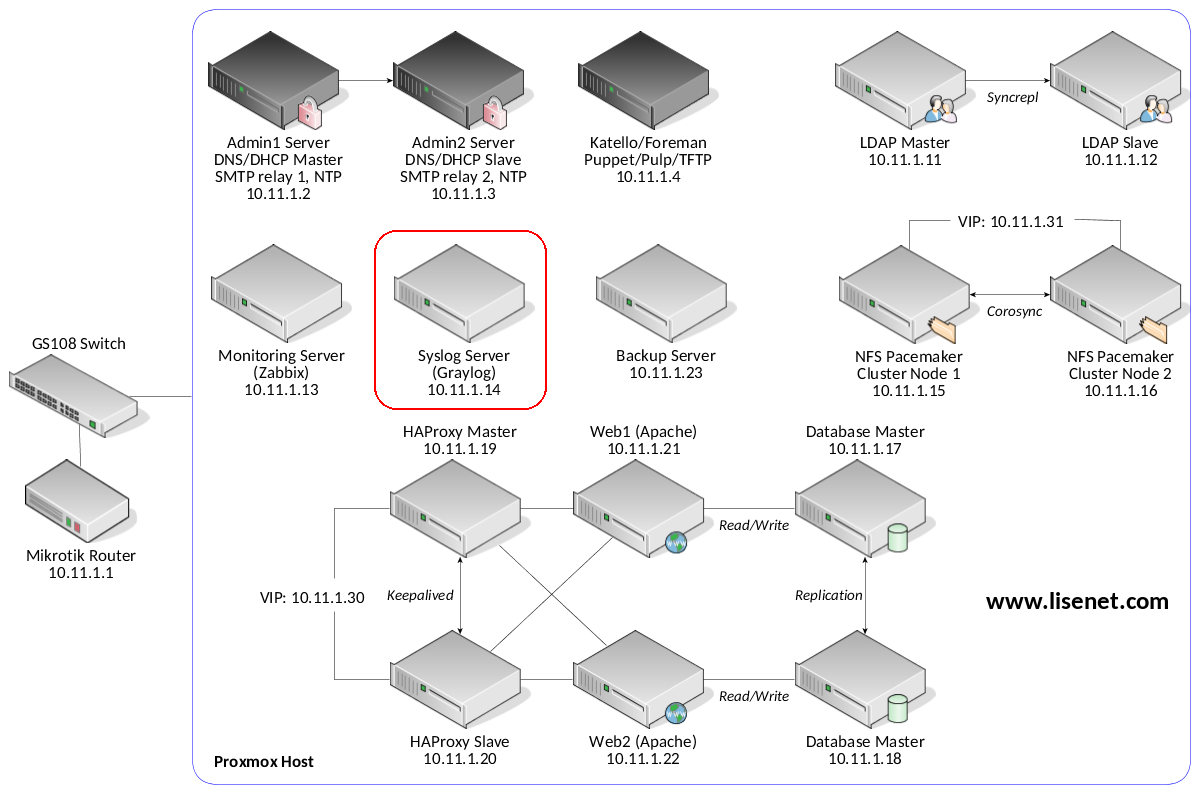
We have a CentOS 7 VM installed which we want to configure as a Graylog server:
syslog.hl.local (10.11.1.14) – Graylog/Elasticsearch/MongoDB with Apache frontend
SELinux set to enforcing mode.
See the image below to identify the homelab part this article applies to.
Configuration with Puppet
Puppet master runs on the Katello server.
Puppet Modules
We use graylog-graylog Puppet module to configure the server. The module only manages Graylog itself. We need other modules to install the required dependencies like Java, MongoDB, Elasticsearch and Apache (as a reverse proxy):
- puppetlabs-java
- elastic-elasticsearch
- puppet-mongodb
- puppetlabs-apache
- saz-rsyslog
Please see each module’s documentation for features supported and configuration options available.
Katello Repositories
Repositories for Graylog, Elasticsearch and MongoDB are provided by Katello (we configured them here).
Note that Graylog 2.4 does not work with Elasticsearch 6.x, we’ll therefore use Elasticsearch 5.x.
Install MongoDB
class { ‘mongodb::globals’:
## Use Katello repository
manage_package_repo => false,
}->
class { ‘mongodb::server’:
ensure => ‘present’,
restart => true,
bind_ip => [‘127.0.0.1’],
port => 27017,
smallfiles => true,
}
Install Elasticsearch
class { ‘elasticsearch’:
ensure => ‘present’,
status => ‘enabled’,
## Use Katello repository
manage_repo => false,
restart_on_change => true,
}->
elasticsearch::instance { ‘graylog’:
config => {
‘cluster.name’ => ‘graylog’,
‘network.host’ => ‘127.0.0.1’,
},
jvm_options => [
‘-Xms512m’,
‘-Xmx512m’
]
}
Install Java and Graylog
include ::java
class { ‘graylog::server’:
enable => true,
ensure => ‘running’,
config => {
‘is_master’ => true,
‘password_secret’ => ‘3jC93bTD…OS7F7H87O’,
‘root_password_sha2’ => ‘008e3a245354b…f0d9913325f26b’,
‘web_enable’ => true,
‘web_listen_uri’ => ‘http://syslog.hl.local:9000/’,
‘rest_listen_uri’ => ‘http://syslog.hl.local:9000/api/’,
‘rest_transport_uri’ => ‘http://syslog.hl.local:9000/api/’,
‘root_timezone’ => ‘GMT’,
}
}->
##
## Use a script to automatically create
## UDP Syslog/GELF inputs via Graylog API.
##
file { ‘/root/syslog_inputs.sh’:
ensure => file,
source => ‘puppet:///homelab_files/syslog_inputs.sh’,
owner => ‘0’,
group => ‘0’,
mode => ‘0700’,
notify => Exec[‘create_syslog_inputs’],
}
exec {‘create_syslog_inputs’:
command => ‘/root/syslog_inputs.sh’,
refreshonly => true,
}
The content of the file syslog_inputs.sh can be seen below.
We create two Graylog inputs, one for syslog to bind to UDP 1514, and one for GELF. See the section below for port redirection from UDP 514 to UDP 1514 as Graylog cannot bind to UDP 514 unless run as root.
#!/bin/bash
GRAYLOG_URL=”http://admin:[email protected]:9000/api/system/inputs”;
GRAYLOG_INPUT_SYSLOG_UDP=’
{
“global”: “true”,
“title”: “Syslog UDP”,
“configuration”: {
“port”: 1514,
“bind_address”: “0.0.0.0”
},
“type”: “org.graylog2.inputs.syslog.udp.SyslogUDPInput”
}’;
GRAYLOG_INPUT_GELF_UDP=’
{
“global”: “true”,
“title”: “Gelf UDP”,
“configuration”: {
“port”: 12201,
“bind_address”: “0.0.0.0”
},
“type”: “org.graylog2.inputs.gelf.udp.GELFUDPInput”
}’;
curl -s -X POST -H “Content-Type: application/json” -d “$” $ >/dev/null;
curl -s -X POST -H “Content-Type: application/json” -d “$” $ >/dev/null;
exit 0;
Configure Firewall
Configure firewall to allow WebUI, syslog and GELF traffic. Also configure port redirection as Graylog cannot bind to UDP 514 unless run as root.
firewall { ‘007 allow Graylog HTTP/S’:
dport => [80, 443, 9000],
source => ‘10.11.1.0/24’,
proto => tcp,
action => accept,
}->
firewall { ‘008 allow Syslog’:
dport => [‘514’, ‘1514’],
source => ‘10.11.1.0/24’,
proto => udp,
action => accept,
}->
firewall { ‘009 redirect Syslog 514 to Graylog 1514’:
chain => ‘PREROUTING’,
jump => ‘REDIRECT’,
proto => ‘udp’,
dport => ‘514’,
toports => ‘1514’,
table => ‘nat’,
}->
firewall { ‘010 allow Gelf’:
dport => [‘12201’],
source => ‘10.11.1.0/24’,
proto => udp,
action => accept,
}
Apache Reverse Proxy with TLS
Install Apache as a reverse proxy for Graylog.
class { ‘apache’:
default_vhost => false,
default_ssl_vhost => false,
default_mods => false,
mpm_module => ‘prefork’,
server_signature => ‘Off’,
server_tokens => ‘Prod’,
trace_enable => ‘Off’,
}
include apache::mod::proxy
include apache::mod::proxy_http
include apache::mod::rewrite
include apache::mod::ssl
include apache::mod::headers
apache::vhost { ‘graylog_http’:
port => 80,
servername => ‘syslog.hl.local’,
rewrites => [
{ rewrite_rule => [‘(.*) https://%%’],
rewrite_cond => [‘% off’],
},
],
docroot => false,
manage_docroot => false,
suphp_engine => ‘off’,
}
apache::vhost { ‘graylog_https’:
port => 443,
servername => ‘syslog.hl.local’,
docroot => false,
manage_docroot => false,
suphp_engine => ‘off’,
ssl => true,
ssl_cert => ‘/etc/pki/tls/certs/hl.crt’,
ssl_key => ‘/etc/pki/tls/private/hl.key’,
ssl_protocol => [‘all’, ‘-SSLv2’, ‘-SSLv3’],
ssl_cipher => ‘HIGH:!aNULL!MD5:!RC4’,
ssl_honorcipherorder => ‘On’,
## Pass a string of custom configuration directives
custom_fragment => ‘
ProxyRequests Off
<Proxy *>
Require ip 10.11.1.0/24
</Proxy>
<Location />
RequestHeader set X-Graylog-Server-URL “https://syslog.hl.local/api/”
ProxyPass http://syslog.hl.local:9000/
ProxyPassReverse http://syslog.hl.local:9000/
</Location>
‘,
}
Configure Log Forwarding on All Servers
We want to configure all homelab servers to forward syslog to Graylog.
This needs to go in to the main environment manifest file /etc/puppetlabs/code/environments/homelab/manifests/site.pp so that configuration is applied to all servers.
class { ‘rsyslog::client’:
log_remote => true,
log_local => true,
remote_servers => false,
server => ‘syslog.hl.local’,
port => ‘1514’,
remote_type => ‘udp’,
remote_forward_format => ‘RSYSLOG_SyslogProtocol23Format’,
}
The result should be something like this:
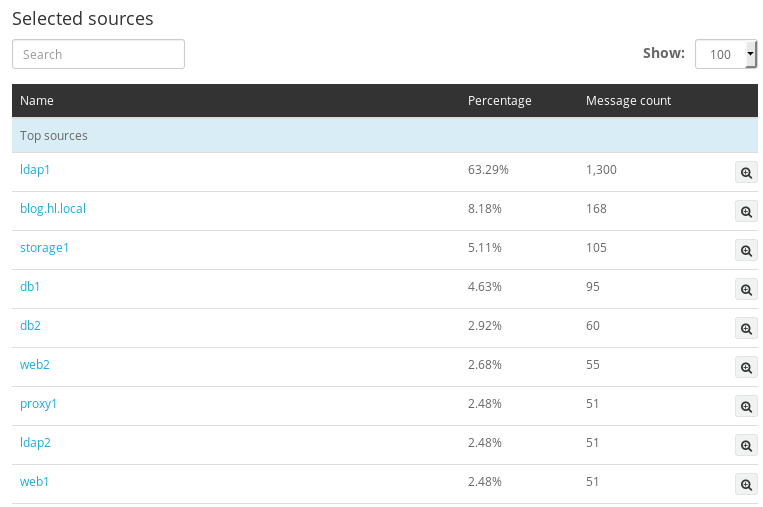
All servers forward logs to Graylog.
Source