If you are yet to have a Kali instance running on your machine, then you have quite a dilemma ahead of you. There are three ways to go about running Kali, each with their own advantages and disadvantages. In this article, I’ll tell you what exactly the terms Dual Boot, Live Boot, and Virtual machine installation mean, how easy/difficult these are to perform, and what are the advantages/disadvantages of each of them. In the end, I’ll tell you how to find guides for doing all of these.
PS: This guide (and the blog) is focused on Kali, but everything in this post is applicable to Linux in general. Certain parts are related to hacking, but you can take networking lessons from them regardless, even if you aren’t interested in hacking per se.
Dual Boot
Most of you would be running a single operating system on your system right now. However, that doesn’t have to be the case. We can partition our hard disk, and install multiple operating systems alongside each other.
Think of how you have multiple partitions in your Windows (C,D,E,F drives). All your Windows system files would usually be in C (local disk). What if you let go of drive F (copy it’s content to C,D,E first), and decide to install Kali’s system files on it (you can install Kali’s system files on your computer using the .iso file of Kali that is available for download). Now, you will have 3 drives of Windows format (NTFS), and one drive with Linux format (ext4). C drive (NTFS), will have Windows installed, and F drive (ext4, and it’s name isn’t really F drive anymore), has Linux.
But since your computer loads the system files during bootup, it needs to know whether to load files from C drive or from the “formerly F” drive. This is handled by the bootloader.
This was a gross oversimplification. Here’s a nice article on
HowToGeek
that explains stuff in more details.
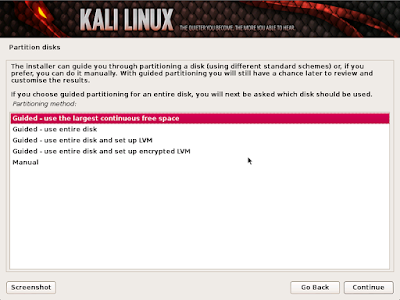 |
This is when Kali installer asks where it should install the OS.
In the sample explanation, you should install it where the “F” drive of
Windows is. If you instead install it over the “C” drive, you’ll lose
Windows, and will only have Kali in your system. |
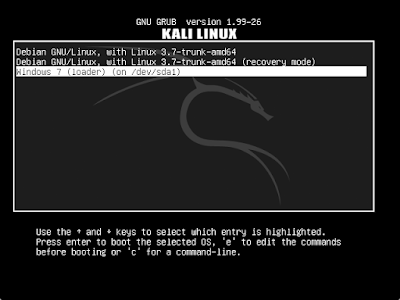 |
Once you have installed Kali on a system which already had Windows,
the bootloader (GRUB) will ask you which of them to boot from. |
USB Boot
In the above example, we had Windows on our C,D,E,F partitions. The C partition had the system files, while D,E,F had other files. We decided to overwrite F and install Kali’s system files over there. When we wanted to run Windows, we booted from C, and when we wanted to run Kali, we booted from the “former F drive” (of course we didn’t know what exactly we are booting for, GRUB handles that for us, we just have to choose).
So, can we, instead of installing Kali on our F drive, install it on an external Hard Disk, and then boot from that external hard disk? The answer is yes. Well, you may ask, the size of Kali’s ISO is <4 GB. What if I have a 16 GB USB flash drive. Surely, the installed OS will not take more than 16GB. Why use a hard disk, let me just install the OS on a USB flash drive.
Well, the answer to that is yes too. You can but 10 USB flash drives, and install 10 different operating systems on each of them, and then plug in whichever one you want, boot from it, and if your OS supports the filesystem of your hard disks, you can use your computers hard disks as well. You actually don’t even need hard disks at all. You can run your computer from a flash drive itself.
However, remember how I said
install the OS on the USB flash drive
. Turns out, you don’t even have to install the OS. In general, for most software, there is ‘an installer’, and after the installer finishes it’s job, we have the software installed and then can use it. For example, take a simple game. Suppose it has a setup.exe file on the CD drive you bought. When you run that, you can’t yet play the game, and you instead need to install it on your hard disk, after which it can be played. This is true for operating systems as well. If you plug in a Windows installation CD/DVD/USB into your computer, it will do what the name says, install Windows on your computer. Upon installation, you can run Windows.
But with some Linux distributions, we have the ability to run the OS without installation(live boot). You can take the ISO, burn it to a DVD drive, and “live boot” it. It will not touch your hard disk, and everything will run directly on your primary memory (RAM). Hence, the installer also acts as the installed software.
So, simply download Kali Linux’ iso, and copy it to a USB, and you are done. Except for a little problem, USB drives are not bootable by default. So you need a little software which will properly perform the copying of the iso to the USB drive, such that it can be booted from.
In summary, download the ISO, use a tool to intelligently copy the ISO to a flash drive, plug in the flash drive, and boot from it. It will ask you whether you want to Install the OS, or start running it right away (live boot). Just select the live boot option, and Kali is up and running, without any installation. However, since everything happens in volatile primary memory (RAM), changes are lost. So, everytime you boot into the live USB, it would be like running a fresh install (which can be both a good and a bad thing). With persistence mode, even this limitation is overcome, and you can have changes which persist across boots.
 |
These are the choices offered when you boot from Kali’s installer on a USB
You can run it live, run it live with persistence, or install the OS. |
Virtual Machine
Suppose you only have Windows on your machine. How do you go from a powered off system to having a fully functional Windows running on your machine. Actually, a more useful question is, what all do you need to go from nothing to functional OS running. Here are a few things I can think of-
- System files that run the OS (or in other words, system files that basically the OS).
- A small core utility which can load the system files into memory from the hard disk (bootloader) when the computer is presently in a void like situation.
- Memory where the system files are loaded.
- Processing power which runs the OS.
- Hard Disk space, where you can store stuff, Networking so that you can access the internet, and so on.
So, from a powerless state, in the presence of all the above, we can move to a state where we have a functional Windows instance running on our system. The question I want to ask you is, from a state where we have a functional Windows instance running on our system, can we move to a state where we have two functional OSs running on our system?
The answer should be, why not, if we have all the requirements that can result in a transition from 0 to 1, then if same requirements are met again, we can go from 1 to 2. In other words, if we have-
- System files that run the second OS
- A different core utility which can load the system files into memory from the hard disk (bootloader) when we have an OS running on the system already (as opposed to being in a void like situation)
- Memory, separate from the already runnning OS’s memory, where the system files of this OS are loaded.
- Processing power, separately for this OS, which runs the OS.
- Hard Disk space, separately for this OS, where you can store stuff, Networking so that you can access the internet, and so on.
The above discussion should tell you that it would indeed be possible to run multiple OSs together, by somehow dividing the memory, hard disk space, processor power, etc. into two, and letting both OSs run on their share.
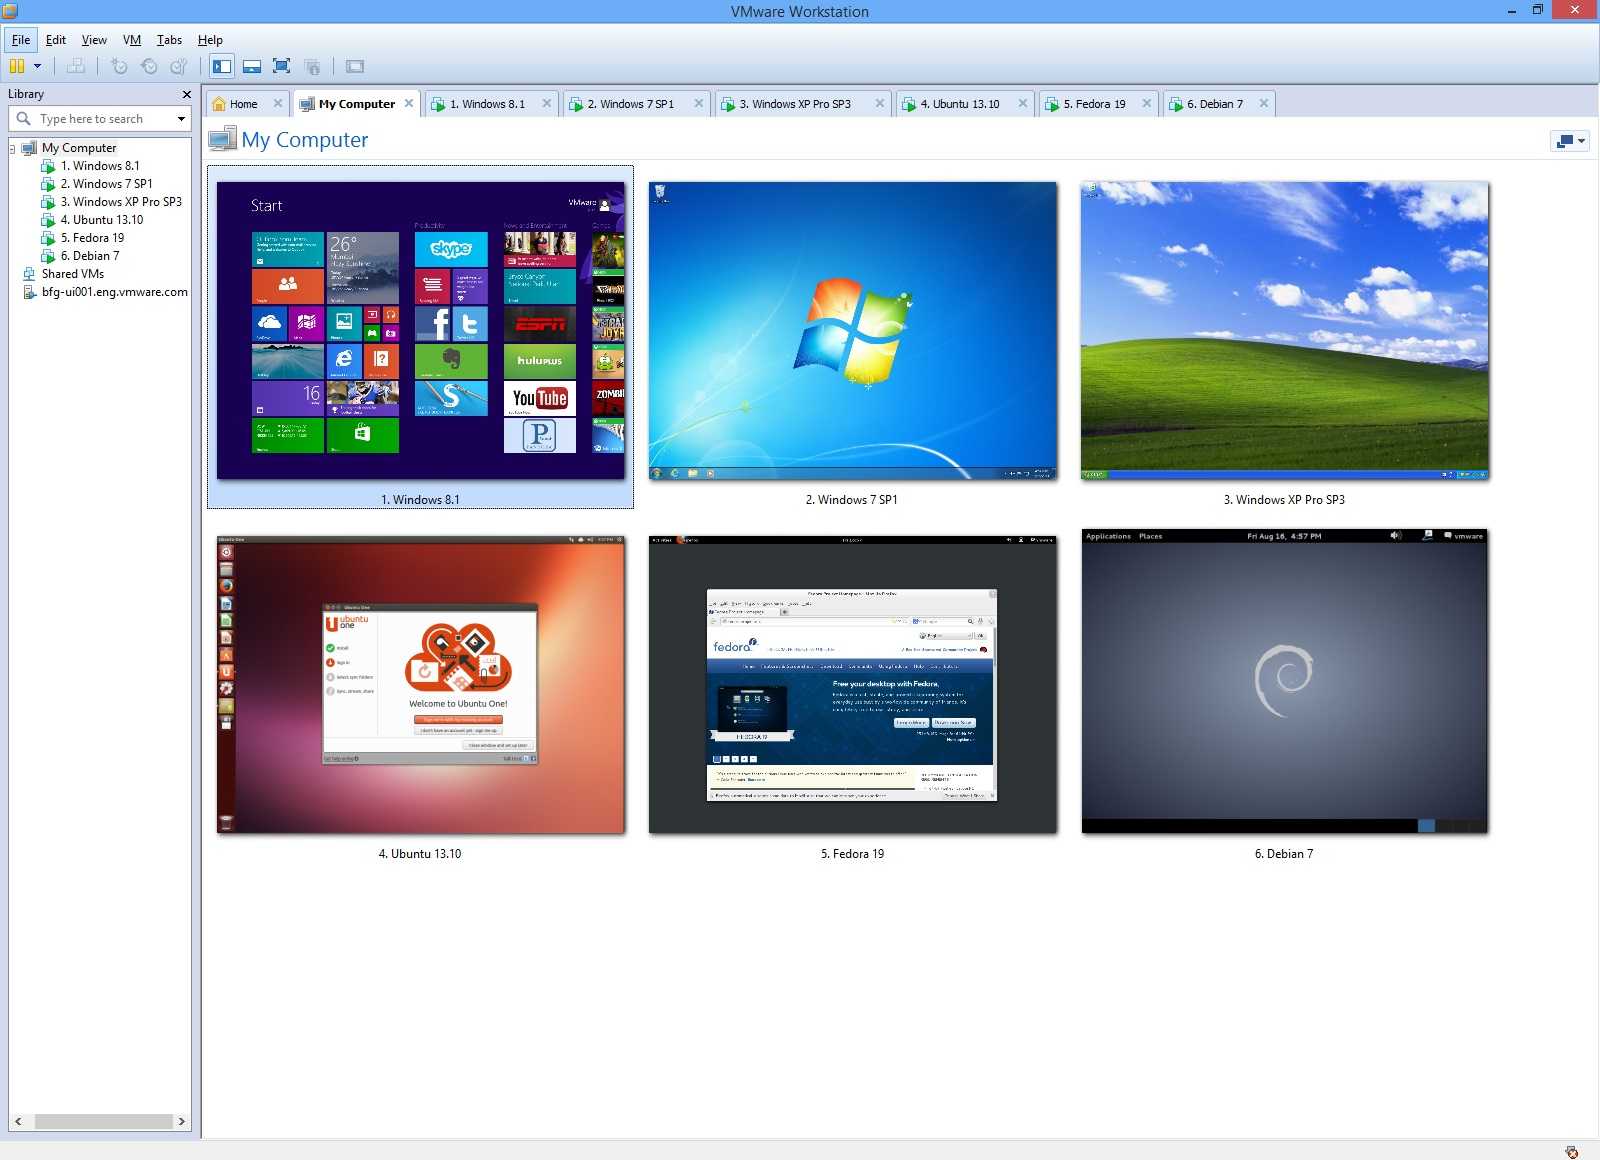
Without going into too much detail, let me just tell you that using hypervisors, this has indeed been achieved, and now we can run multiple OS inside one OS, given that there are enough resources to sustain the needs of all the simultaneously running OSs. VMware has been a pioneer in this technology, but they only offer limited capability VMWare player for free, while VMWare workstation will cost you. On the other hand, VirtualBox provides free open source products.
Now that you know about all the different ways to run Kali, be it alongside Windows, inside Windows (virtually), or live without installation, let me tell you about advantages and disadvantages of these methods.
 |
Multiple Operating systems can run simultaneously as virtual machines.
In the picture, you can see VmWare workstation and various virtual machines on it. |
Comparison
Live Boot V/S Dual Boot
Dual boot performs faster than live boot, and has persistence (though live boot with persistence is also available, but that is limited persistence). If you are using live USB, then you have to keep updating the ISO version on the USB frequently (download a new ISO, then write that ISO to the USB). If you have dual boot, then you’ll update Kali the usual way (using apt-get update, upgrade, and dist-upgrade).
I have put this point of comparison first because this is the only point of difference between live boot and dual boot. The two are identical in every other aspect, and from here on, I’ll use live boot to refer to both live boot and dual boot.
Hardware access
In live booting, when you are running Kali, it would be the sole owner of all the resources that the computer offers (except hard disk space which is occupied by Windows, which is not a major concern). Not only that, it will have access to internal wireless card of your machine. We’ll get a better idea of what hardware advantages we are getting by looking at what we don’t get when we are inside Virtual Machine.
When Kali is running from inside a virtual machine, it doesn’t have access to-
- Full CPI / GPU power (because processor needs to be shared between the two simultaneously running OSs) – So, this will mean slower cracking (processor intensive task like cracking WPA-2 4-way handshake will suffer here).
- No direct access to internal hardware, only bridged access – What this means for you is that you can’t access the internal wireless adapter of your laptop. So, for wireless hacking, you will need to purchase an external wireless adapter if you are working inside a VM. (even if you are live/dual booting, you may need to purchase an external wireless card, because internal wireless cards are weaker, have less driver support, and sometimes don’t support injection, which is needed in many attacks).
So, for wireless hacking, Virtual Machine isn’t the best way to go.
Networking
In live booting, you are a direct part of the local network you are connected to. In virtual booting, your host computer is a part of that network, and you are part of internal network which contains only you, your host, and other guests.
First, let me explain some technical jargon-
- Internal network – When you connect to your wifi router, you, along with other connected devices (your iphone, android phone, macbook, PC, etc.) become part of a local network. The internet knows only about your router. Every communication must be sent via the router to the internet, the internet will respond to router, and router will return the response to the appropriate system on the local network.
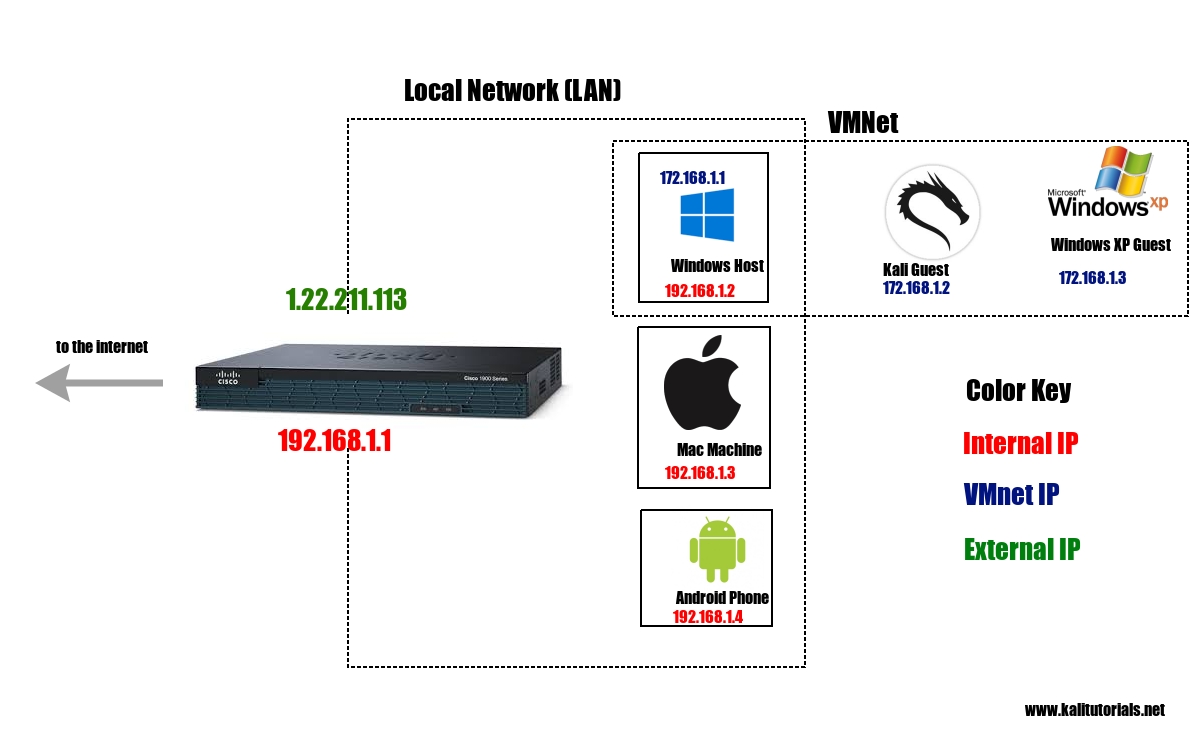
- VMnet – This is an equivalent of internal network, with the guest virtual machines, and the host machine a part of it.
- Host machine – The machine on which Vmware/virtualbox is installed, and inside which the virtual machines are running.
- Guest machine – The machines inside virtualbox/vmware.
- Internal IP – Your IP on the local network
- VMnet IP – Your IP on the Virtual network (VMnet) [This is not a standard term, internal and external IPs are standard terms, this I’m using for convenience]
- External IP – Your IP on the internet.
If any of the machine make a request to the internet, their external IP would be the same. To check this, open your smartphone, and search “Whats my IP on google”. Repeat this from all your other devices connected to the same router. Each one will have the same IP. Internally, all the devices have a different internal IP (the router has an internal IP too, like any other device on the local network).
Similarly, when you send a request from any of the VM guests to a machine outside the VMNet, but inside the local network, you’ll carry the internal IP of your VM host (i.e. the Windows machine). Internally, all the guests have a VMnet IP (the host has one too, and inside the VMnet, behaves like guests).
Let me explain this a bit further with pictures.
 |
Here, the kali machine is a part of VMNet, and can’t directly contact
the mac machine and android machine. To reach them, it has to go via the Windows machine.
The router doesn’t know about the existence of Kali Machine (or the Windows XP machine).
The path to the internet involves both the host machine, and the router. |
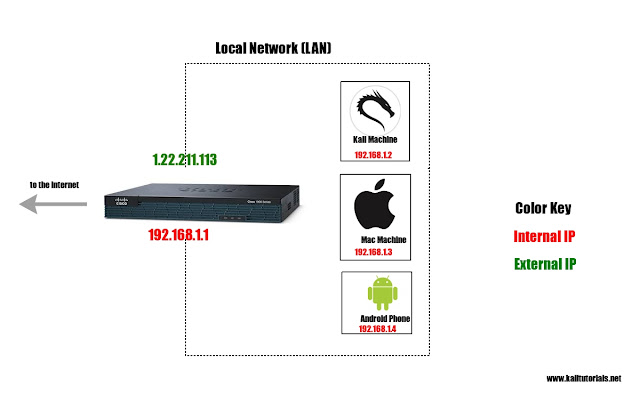 |
Here, Kali is directly a part of the Local network. Here, the router knows about the Kali Machine.
Also, the path to the internet involves only the router. |
So, what does this mean for us?
- If you want to practice penetration testing, VMs can be great. You can have a Windows host, and Kali running as a virtual machine. Alongside, you can have Windows XP running as another guest VM. Now, these are a part of VMNet and directly connected. So, you can easily perform any attacks from Kali to this machine.
- If you want to do real life pentesting, your target is probably over the internet. In that case, having Kali inside a virtual machine doesn’t help. Firstly, even if you are live booting Kali, you are a part of the local network, and to communicate with your target over the internet, you need to “forward” your requests through the router (this is called port forwarding). This, in itself, can sometimes be a pain in the ass. If you are inside a VM, your path to your target would involve your router, your host machine, and then the Kali Machine. This is quite inconvenient. So, if you want to attack someone over the internet, being in a virtual machine sucks.
In other words, your guest machine (Kali) does not have access to your laptop’s network card. It has bridged access to it. In theory, you can still use most of the functionality of the card, but in practice, it’s a painstakingly hard job. You can, however, add an external card and give it to the Kali guest instead of the windows host, mitigating this problem. Read the food for thought below for more-
Food For Thought
When you are inside a virtual machine, you are using your host to connect to the internet. But that doesn’t have to be the case. You can plug in an external wireless card, and connect to the router directly. That would mean, that you are now a part of VMNet, as well as a part of LAN (your wlan0 card gets allocated an internal IP on the LAN (WLAN), say 192.168.1.5. Now, you don’t need your host for internet access, and as far as the router is concerned, you are a separate computer. So, this does solve the problem that being inside a virtual machine causes. (I’m too lazy to draw a diagram for that, but in this case, the diagram will have Kali as a part of both the internal network dotted box, and the VMnet dotted box. This is exactly equivalent to the condition Windows 8/10 machine in the first diagram. It will also have two IPs, one for VMnet, and one for LAN).
Ease/Risk
Live boot is the easiest to perform, and the least risky.
Virtual machine is a bit harder, but still not risky.
Dual boot is tough, and you run the risk of losing your data/ getting rid of your original OS, etc.
Also, sometimes Dual Booting can be next to impossible. For example, some laptops with Microsoft signature (the 2-in-1, laptop+tablet types usually) addition don’t let you dual boot anything alongside Windows.
Forensics
Live booting doesn’t leave behind many traces, other two methods do.
How to find installation guides
For finding guides, keep the following pointers in mind-
- Consult multiple resources before doing anything. There are thousands of guides for installing Kali, and there’s no ‘best’ guide.
- Make sure to read the official documentation.
- Make sure not to limit yourself to just written tutorials, or just YouTube videos. Both has their own advantages and disadvantages.
- Consult tutorials for your precise versions of software (how to install Kali Rolling alongside Window 10), not simply Kali alongside Windows. There are only a few minor difference across the various releases, and their install instructions, but when you’re doing it for the first time, these minor differences are important.
- Live USB is the easiest, go for it first. Go for Virtual machine if you’re interested in practicing Penetration Testing.
- Even the easiest method, Live USB, isn’t trivial. If you’re a beginner, even that will require some efforts (changing boot order/ choosing USB as boot device, finding a proper software for making bootable USB, etc.). Don’t get discouraged.
Extra Advice
- For wireless hacking, don’t even think about anything, go for live boot, it’s a no brainer.
- For pentesting, when you’re just getting started and need to practice on local targets, go for Virtual machine.
- When you’re comfortable with Linux, and feel that you can use Kali for usual stuff, only then install Kali alongside Windows. Still, I won’t suggest using Kali as your primary OS.
- If you love Linux, and love challenges, then install Kali as your primary OS. If you do, see if you’re able to figure out how to install Skype on Kali rolling release (if you succeed, please let me know. I haven’t been able to do it so far, and anyways, skype web works fine).
The last point tells me that I’m getting carried away now, and this post needs to come to and end. Hope you learnt a lot. Let me know if you feel that there’s something important worth inclusion that I missed.
Source


 Pi Supply is Kickstartering Iot LoRa Gateway and IoT LoRa Node pHAT add-ons for the Raspberry Pi, as well as a LoRa Node that works with the Micro:bit. An Arduino node is also in the works.


 Ibase has launched the first network appliance based on AMD’s Epyc Embedded 3000 SoC. The 1U rackmount “FWA8800” appliance features 16 or 32 GbE ports and is built on a new “MBN806” ATX board.


 Jack M. Germain has been an ECT News Network reporter since 2003. His main areas of focus are enterprise IT, Linux and open source technologies. He has written numerous reviews of Linux distros and other open source software.