Many thanks to all the people who donate to us. Numbers were lower than normal last month but we’re still getting a tremendous amount of support. We’re at an average of $10,000 per month. Although that average decreased slightly over the last three years it is very high, it covers all our expenses, when we need something money is never an issue (whether it’s to scale slowly, invest in security, hosting, CI services or to tackle an emergency) and it allows us to send money upstream when needed and to donate funds internally within our moderation and development teams. We’re able to facilitate development and boost our productivity by making tools available and delegate aspects which would otherwise get in the way. It’s a real help for us, I know I say it every month but I don’t think we’ll ever be thankful enough. If you’re helping us, thank you.
Now, without further ado, let’s talk about development. With Mint 19 and LMDE 3 officially released our hands are now free to develop and improve our software on top of the new bases (respectively Ubuntu 18.04 and Debian Stretch).
Nemo
Nemo 4.0 is lightning fast.
Michael Webster reviewed the Cinnamon file manager and optimized it in many ways. Here are some of his notes when working on it. Throughout the commits below, he asks a new instance of nemo to list the content of /usr/bin after dropping all caches:
Nemo startup time: 3.488751 seconds
Folder load time: 2.644505 seconds
Idle…Folder load time: 2.874406 seconds
Generate tooltips for icon items on-demand, instead of when the view loads:
Nemo startup time: 2.510636 seconds
Folder load time: 1.596948 seconds
Idle…Folder load time: 1.654450 seconds
Optimize icon lookups by GIcon:
Nemo startup time: 2.011817 seconds
Folder load time: 1.158854 seconds
Idle…Folder load time: 1.226699 seconds
Decrease minimum update interval:
Nemo startup time: 1.797009 seconds
Folder load time: 0.937992 seconds
Idle…Folder load time: 0.973764 seconds
The result is very impressive. Nemo feels extremely light and browsing directories is a breeze. It’s never been that fast before and it’s immediately noticeable.
Michael also improved icon sizes and spacing to make Nemo look better.
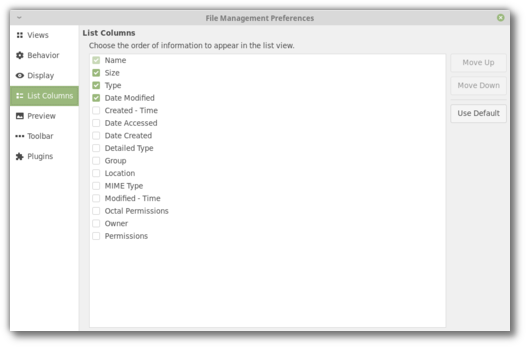
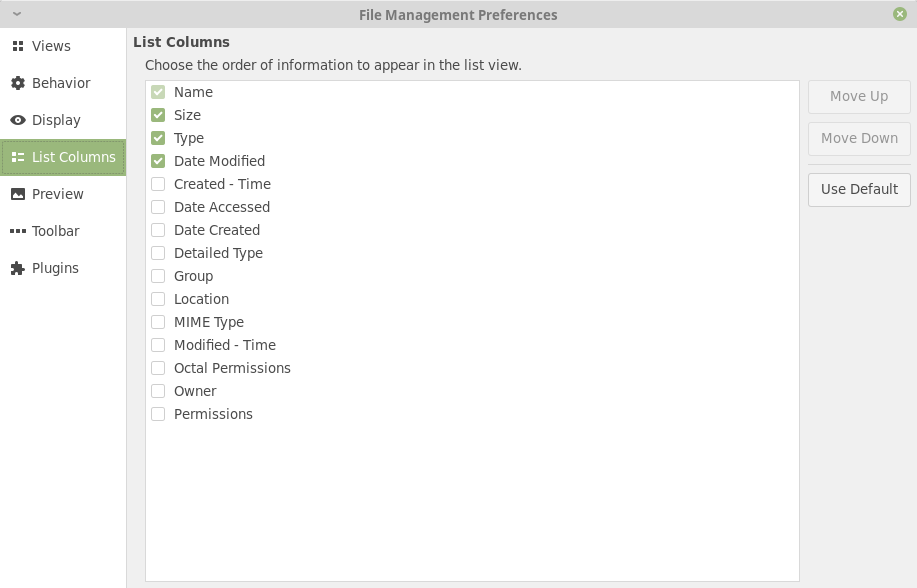
Nemo is now able to show file creation times (note that this requires ext4, a kernel 4.15 or above and it doesn’t work within an encrypted home directory).
Nemo-python and all Nemo python extensions were ported to Python 3.
XappStackSideBar
Joseph Mccullar, who was involved in the UI revamp of the Welcome Screen in Linux Mint 19, and lead the UI revamp of the Software Sources for the upcoming Linux Mint 19.1, created a new widget in libxapp called XappStackSideBar.
This streamlines icon sidebars and makes it really easy to use them within applications. We’re able to design these sidebars from a click of the mouse in Glade, connect them to a GTK stack and design their pages really easily.
The existing XappPreferencesWindow now also makes use of it.
Here’s how it looks for instance in Nemo 4.0:
Cinnamon
The star of the month within the Cinnamon team is Jason Hicks. Last month we talked about VSYNC, input lag and performance improvements within the muffin window manager. This is now a reality and it’s all been merged in preparation for muffin 4.0.
Input lag was reduced on NVIDIA cards and the window manager feels more responsive when moving windows. You now also have the possibility to turn off VSYNC in the System Settings. This basically delegates VSYNC to your GPU driver (which needs to handle it otherwise you get screen tearing) and if that driver performs well, it can eliminate input lag and boost performance.
Jason also ported a huge amount of upstream changes from the GNOME project:
- Similar to Mutter, Muffin now uses its own embedded version of COGL and Clutter, which received most of the patches applied to the one in GNOME.
- Many Mutter performance improvements were applied to Muffin.
- CJS received many commits from GNOME’s GJS, including improvements to its garbage collection.
With so many fixes and improvements applied and performance which depends greatly on the GPU being used, results may vary and we might experience some regressions during the BETA phase. Our own experience is quite positive. Cinnamon 4.0 rarely ventures past 250MB RAM on NVIDIA, it feels more responsive than 3.8 and it looks like some of the long standing rendering issues might be a thing of the past.
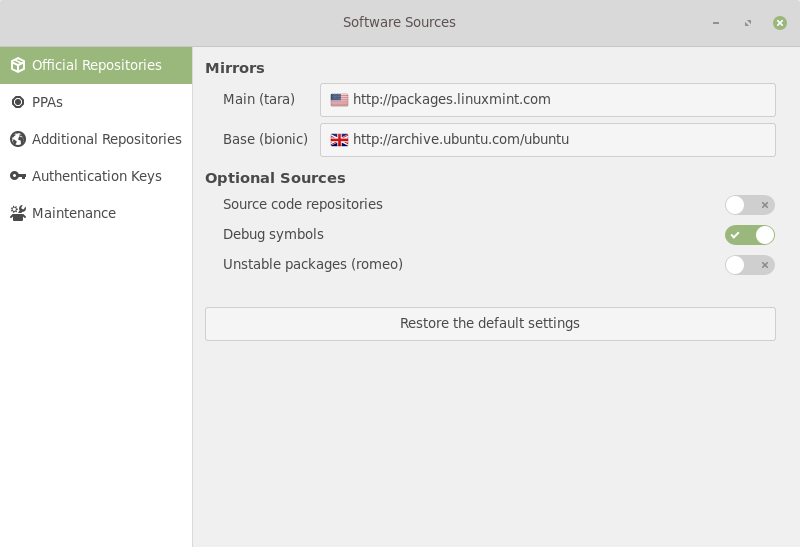
Software Sources
When software crashes tools such as mintreport produce a stack trace our developers can look at to understand the cause of the crash. This is the first step towards fixing such a bug. For the stack trace to be meaningful, users need to have debug symbols installed.
In an effort to reduce bandwidth for their mirrors, Debian decided to move debug symbols outside of the main repositories. This decision affected not only Debian and LMDE but also Ubuntu and Linux Mint and made it much more difficult for users to install these symbols.
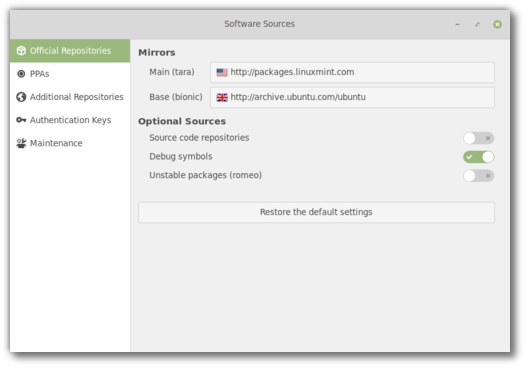
To simplify this process we added support for debug symbols into the Software Sources tool. You’ll be able to add debug symbol repositories with a click of the mouse.
A new button was also added within the “Maintenance” tab to remove duplicate entries in your repositories.
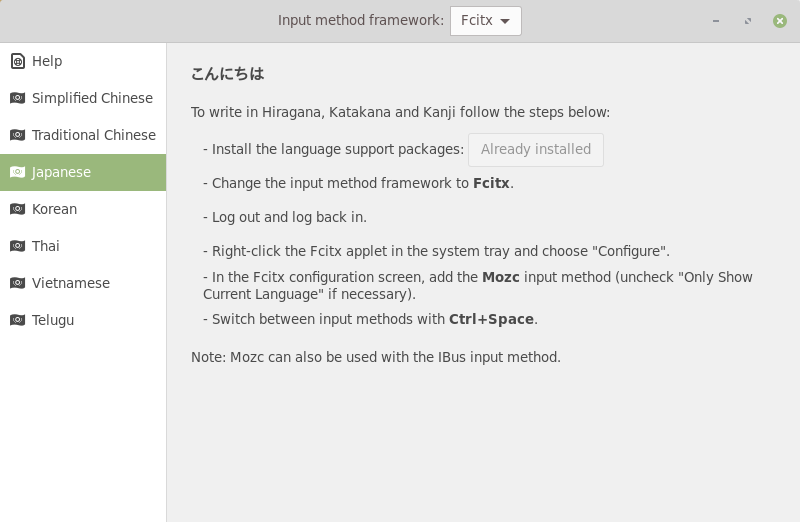
こんにちは!
There are a few areas where, although a solution is easy to implement, we, the developers, don’t know what needs to be done, what users need and how to provide it. We rely on feedback when it’s about something we don’t really understand or something we can’t really reproduce. We can buy exotic hardware specifically to fix niche issues (Optimus laptops, ATI cards, Wacom tablets etc..), but when the varying factor isn’t the hardware, but us personally, it can get a little difficult. Some of these areas include RTL support, accessibility and input methods.
Well, we still can’t speak Arabic or Hebrew but two of us in the team now know the basics of Japanese. It didn’t take much to see what was missing but when you know what you need it’s much easier to make it happen.
So, the first improvement is that the Language Settings and the Input Methods are now two separate applications.
The user interface for the Input Methods tool was revamped. It uses an icon sidebar and now shows a dedicated page for each supported language.
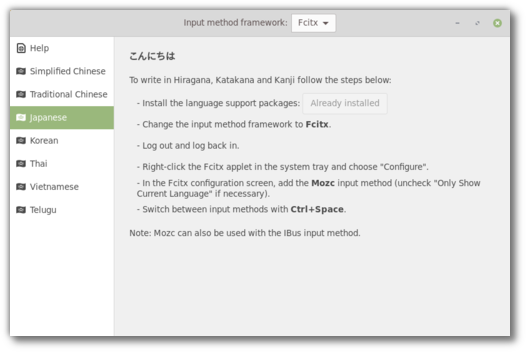
With the gained space we’re able to show clearer instructions and to accompany the user through not only installing support packages but also selecting the right input method framework and the right input method within it.
Cinnamon 4.0 also received better Fcitx support. Its keyboard applet will hide when Fcitx is running, similar to what it currently does with DBus.
Text Editor
Small things matter. The text editor now indicates in the status bar whether it’s in spaces or tabs mode.
Sponsorships:
Linux Mint is proudly sponsored by:
Donations in August:
A total of $7,067 were raised thanks to the generous contributions of 384 donors:
 $109 (3rd donation), Claudia K.
 $109, J S.
$109, Konrad S.
 $109, Peter I.
 $100 (11th donation), Samson S. aka “Samtastic”
$100 (10th donation), Philip W.
 $100 (6th donation), Trevor H.
$100 (2nd donation), Matthew C.
$100, Mountain Computers, Inc
$100, Walter D.
 $100, Ali H.
$100, Henry G.
 $100, מיקי גוטמן
$100, Michael M.
 $60 (2nd donation), Быков А.
$54 (5th donation), Derek L.
 $54 (3rd donation), Florian P.
$54 (2nd donation), Tobias S.
$54 (2nd donation), Christian G.
$54 (2nd donation), Stefan H.
 $54, Hubertus S.
$54, Angelo S.
$54, Ted L.
$54, Johan P.
$50 (27th donation), Anthony C. aka “ciak”
$50 (8th donation), Jason H aka “jaszhix”
 $50 (6th donation), Anonymous User
 $50 (2nd donation), Peter U.
$50, John L.
$50, Steve L.
$50, Bogdan P.
$50, Timothy M.
$50, Peter J.
$50, Karl B.
$50, Terry C.
$50, Yuval G.
$40 (2nd donation), Saransh C.
$40 (2nd donation), Bruce I.
$40 (2nd donation), Joe K.
$40, Vincent T.
$35 (3rd donation), Paul C.
 $33 (102th donation), Olli K.
$33 (2nd donation), Hendrik G.
$33, Nadia F.
$33, Ballivet D.
$33, Karine S.
$33, Kai-michael K.
 $33, Seamus Y.
 $33, Gwenole L. C.
$33, Alpo P.
 $33, Maciej F.
$33, Thomas S.
$33, Rainer H.
 $33, 許 博堯
$31.06 (5th donation), M. J. Stewart aka “Mason”
$30 (5th donation), Mark E.
$30 (2nd donation), Devon B.
$29.99 (2nd donation), John S.
$27 (5th donation), Jan B.
$27 (5th donation), Michael S.
$27 (2nd donation), John J.
$27 (2nd donation), Xtant Logic Ltd aka “Xtant Audio”
$27, Dirk J. L.
$27, Bernhard M.
$27, Anne L.
$27, Lukas
$25 (84th donation), Ronald W.
$25 (7th donation), Jack C.
$25 (5th donation), Joseph G.
 $25 (2nd donation), Daniel S. C. O.
$25 (2nd donation), Robert V
$25 (2nd donation), Rojer T.
$25 (2nd donation), Charles B.
$25 (2nd donation), Neal C.
$25, Peter H.
$25, William M.
$25, George R. A.
$25, Charles C.
$25, Patti C.
$25, Alan M.
$25, James H.
$25, Michael M.
$25, Frank F.
$25, George M.
$25, Carl J. V.
$25, Harold W.
$25, Leon F.
$25, Jacques T.
$23, Sascha S.
$22 (4th donation), CySoTec
$22 (3rd donation), Roger H.
$22 (2nd donation), Ulf-andreas S.
$22 (2nd donation), Malcolm P. aka “madmick”
 $22 (2nd donation), Gordon T.
$22, Wolfram F.
 $22, Elias A. aka “Biker”
 $22, Theodore S.
$22, Rafael S.
$22, Magnus J.
 $22, Massimo F.
 $22, Juan A. S. T.
$22, Alexander Z.
 $22, Mike Shiyan
$22, Thorsten J.
$22, Rudolf W.
$20 (42th donation), Curt Vaughan aka “curtvaughan ”
$20 (17th donation), Mike C.
$20 (7th donation), Hubert Banas
$20 (6th donation), Donald M.
$20 (6th donation), Brent S. aka “AFineMan”
 $20 (6th donation), Nicklas L.
$20 (5th donation), Efran G.
$20 (4th donation), Charles O. .
$20 (4th donation), John B.
$20 (3rd donation), Rod B
$20 (3rd donation), Paul W.
$20 (3rd donation), Headphonesrepair.com
$20 (3rd donation), Ralph C.
$20 (3rd donation), K6BUK
$20 (2nd donation), James W.
$20 (2nd donation), Patrick V. R.
$20 (2nd donation), Stacey B.
$20, Jenny S.
$20, Tim K.
$20, Bernard A.
$20, Roy J.
$20, Neil M.
$20, Patrick S.
$20, Thomas R.
$20, Gregory Z.
$20, Thomas C.
$20, William T.
$20, Christopher S.
$20, Peter L.
$20, Gregory S.
$20, Jeremy K.
$20, Wim W.
$20, Patrick R.
 $20, OBD super
$20, Gene S.
 $20, Sebastian C.
$20, Robin P.
$20, Daniel L.
$20, Andrew S.
$18 (14th donation), Ray
$16 (19th donation), Andreas S.
$16 (12th donation), Ib O. J.
$16 (9th donation), Lance M.
$16 (8th donation), Martin C.
 $16 (5th donation), Catalin Toader aka “catatoa”
$16 (5th donation), Derek T.
$16 (4th donation), Alain P.
$16 (2nd donation), Kai K.
$16, Christian B.
$16, Papagianopoulos G.
$16, Lionel G.
$16, Nicht W.
$15 (5th donation), Greg W.
$15 (2nd donation), Franklin P.
$15 (2nd donation), Bogdan M. U.
$15 (2nd donation), Susan S.
 $15 (2nd donation), Kiyokawa E.
$15, Bayview BOOM
$15, Jay D.
$15, Bryan F.
$15, Cesar D. S.
$13 (7th donation), Frederic S.
$13 (4th donation), D. B. .
$12 (89th donation), Tony C. aka “S. LaRocca”
$12 (34th donation), JobsHiringNearMe
$12 (19th donation), Johann J.
$12 (9th donation), Raymond M. (retired)
$12 (8th donation), Laura NL aka “lauranl”
 $11 (9th donation), Eskild T.
$11 (6th donation), Mark C
$11 (5th donation), Frank B. aka “poypoyfrank”
$11 (3rd donation), Finn H.
$11 (3rd donation), Vittorio F.
$11 (3rd donation), Sebastian B.
$11 (3rd donation), K. T. .
$11 (3rd donation), Caspar F.
 $11 (2nd donation), Emmanouil T.
$11 (2nd donation), Alexander P.
$11 (2nd donation), Alexandre Andreae
$11 (2nd donation), Bo H.
$11, Boris D.
$11, Giacomo A. C.
$11, Jari K.
$11, Evaldas K.
$11, Mr J. W.
 $11, Marek M.
$11, Philippe A. aka “Phreezoo”
$11, Nick H.
$11, Antonio aka “pengu73”
$11, Sebastian N.
$11, Lukas W.
$11, Musaro G.
$11, Heinrich G. J.
$11, Robert B.
$11, Giorgio S.
$11, Chousein G.
$11, Hendrik T. B.
$11, Serge A.
$11, Claus Moller
$11, Gerhard H.
$11, Manuel S.
$11, Mauro G. aka “Maughe”
$11, Nicolaas C.
$11, Théo L. P.
$11, Long Nguyen
$11, Thorsten S.
$11, Dietmar A.
$11, Terry V. E.
$10 (33rd donation), Thomas C.
$10 (31st donation), Jt Spratley aka “Go Live Lively”
$10 (24th donation), Frank K.
$10 (22nd donation), Paul O.
$10 (20th donation), Todd A aka “thobin”
$10 (20th donation), Jim A.
$10 (16th donation), Dinu P.
$10 (13th donation), Dmitry P.
$10 (13th donation), Terrance G.
$10 (10th donation), hotelsnearbyme.net
 $10 (6th donation), Dohaeng L.
$10 (4th donation), Peter R.
$10 (4th donation), David H. aka “DRHan”
 $10 (3rd donation), อนล ธรรมตระการ aka “ฮอง”
$10 (3rd donation), Anthony F.
$10 (3rd donation), John T.
$10 (3rd donation), John B.
$10 (2nd donation), Timothy L.
$10 (2nd donation), Christopher C.
 $10 (2nd donation), Artem K.
$10 (2nd donation), Donald S.
$10 (2nd donation), John K.
$10 (2nd donation), Jason R.
$10 (2nd donation), Ishiyama T.
$10 (2nd donation), Michael D.
$10, James C.
$10, mini-split AC
$10, Chris G.
$10, Tony H.
$10, Lennart S.
$10, Laurence D.
$10, Igor I.
$10, David B.
 $10, Sarat K. B.
$10, Marc C.
$10, Mark O.
$10, Brinda
$10, 近藤 正博
$10, Picprojects
$10, Cole B.
$10, John Cardell’s Premium Plugins aka “Amsoil Dealer”
$10, Saito S.
$10, Chee C. A.
 $10, Quang L.
$10, Issac H.
$10, Eduardo D.
$10, John H.
$10, Anthony T.
$10, Somak D.
$10, Vanderlei G. D. S.
$10, Larry W.
$9 (2nd donation), Jimmy D. V.
$9, Francesco M.
$8 (2nd donation), Yuji O. aka “ogaty”
$8, Albert H.
$6.8 (2nd donation), Kamil Ł.
$6 (6th donation), gmq
$6 (5th donation), gmq
$6, Mints M.
$6, David C.
 $5.67 (18th donation), Paul B. aka “Dude”
$5 (27th donation), Eugene T.
$5 (13th donation), Kevin O. aka “Kev”
 $5 (11th donation), Arvis Lacis aka “arvislacis”
$5 (11th donation), Olaf B.
$5 (11th donation), Guillaume G. aka “Tidusrose”
$5 (6th donation), Benjamin T.
$5 (6th donation), Joseph G.
$5 (6th donation), Халилова А.
$5 (4th donation), Russell S.
$5 (4th donation), Jan Miszura
$5 (4th donation), Ian E.
$5 (4th donation), Pokies Portal
$5 (3rd donation), Mik aka “mikstico”
$5 (2nd donation), Jan I.
$5 (2nd donation), Andrew I.
$5 (2nd donation), Wanda J.
$5 (2nd donation), Alain P.
$5 (2nd donation), Darryl M.
 $5 (2nd donation), Igor Simić
$5 (2nd donation), Артемьев С. aka “SerdjRua”
$5 (2nd donation), Julius K.
$5 (2nd donation), Georgios A.
$5 (2nd donation), Remus F. B.
$5, Glebs M.
$5, Niranjan Ravindra Upasani
$5, Online Mobile Parts
$5, George M.
$5, Alessandro R.
$5, Vittorio P.
$5, Patty G.
$5, Maurilio D. S. P.
$5, Arnaud B.
$5, Jehanzeb R.
$5, Leon L.
$5, William J. D.
 $5, Maksim T.
$5, ipvanish coupon
$5, Катанцев С.
$5, Treigh P.
$5, Sharath C.
$5, Darren A.
$5, Jan I.
$5, Rajshri Mohan K S aka “rajshrimohanks”
$5, Raynard J.
$5, Rytis V.
$5, Konstantinos L.
$5, Artists Of Instagram
$5, Régis P.
$5, Matthew P.
$5, Demian K.
 $5, Povilas C.
$5, Žygimantas T.
$5, Roy R.
$5, Alexandre R. D. S.
$4 (27th donation), Thomas F.
 $4 (8th donation), nordvpn coupon
$4 (7th donation), nordvpn coupon
$4 (4th donation), Jason N. aka “IggyNelix”
$4, Shelley R.
$3 (6th donation), Takatosi A.
$3 (4th donation), Antonio C. L. S.
$3 (3rd donation), Thomas W.
$3 (2nd donation), I migliori Casino AAMS
$3, Anthony T.
$3, Ершов А.
$3, Marc T.
$2 (12th donation), Sportten
$2 (3rd donation), Pokies Portal
$2 (2nd donation), Rowdy A.
$2 (2nd donation), Melissa M.
 $2, Aleksandar R.
$2, Моругин В.
$2, piorek aka “perkos”
$2, Shangqing Z.
$2, Kristopher S.
 $2, Bayu P.
$2, Clark E.
$2, Jonas Ö.
$2, Mihir V.
$31 from 31 smaller donations
If you want to help Linux Mint with a donation, please visit http://www.linuxmint.com/donors.php
Rankings:
- Distrowatch (popularity ranking): 2432 (2nd)
- Alexa (website ranking): 3884
Source

 Now on Kickstarter: Libre Computer’s smaller “La Frite” version of its Le Potato SBC offers a quad -A53, HD-only Amlogic S805X, a Raspberry Pi A+ footprint and GPIO connector, and mainline Linux support.


 Jack M. Germain has been an ECT News Network reporter since 2003. His main areas of focus are enterprise IT, Linux and open source technologies. He has written numerous reviews of Linux distros and other open source software.
 Satya Nadella quoted this after buying GitHub for $7.5 billion