Udev (userspace /dev) is a Linux sub-system for dynamic device detection and management, since kernel version 2.6. It’s a replacement of devfs and hotplug.
It dynamically creates or removes device nodes (an interface to a device driver that appears in a file system as if it were an ordinary file, stored under the /dev directory) at boot time or if you add a device to or remove a device from the system. It then propagates information about a device or changes to its state to user space.
It’s function is to 1) supply the system applications with device events, 2) manage permissions of device nodes, and 3) may create useful symlinks in the /dev directory for accessing devices, or even renames network interfaces.
One of the pros of udev is that it can use persistent device names to guarantee consistent naming of devices across reboots, despite their order of discovery. This feature is useful because the kernel simply assigns unpredictable device names based on the order of discovery.
In this article, we will learn how to use Udev for device detection and management on Linux systems. Note that most if not all mainstream modern Linux distributions come with Udev as part of the default installation.
Learn Basics of Udev in Linux
The udev daemon, systemd-udevd (or systemd-udevd.service) communicates with the kernel and receives device uevents directly from it each time you add or remove a device from the system, or a device changes its state.
Udev is based on rules – it’s rules are flexible and very powerful. Every received device event is matched against the set of rules read from files located in /lib/udev/rules.d and /run/udev/rules.d.
You can write custom rules files in the /etc/udev/rules.d/ directory (files should end with the .rulesextension) to process a device. Note that rules files in this directory have the highest priority.
To create a device node file, udev needs to identify a device using certain attributes such as the label, serial number, its major and minor number used, bus device number and so much more. This information is exported by the sysfs file system.
Whenever you connect a device to the system, the kernel detects and initializes it, and a directory with the device name is created under /sys/ directory which stores the device attributes.
The main configuration file for udev is /etc/udev/udev.conf, and to control the runtime behavior the udev daemon, you can use the udevadm utility.
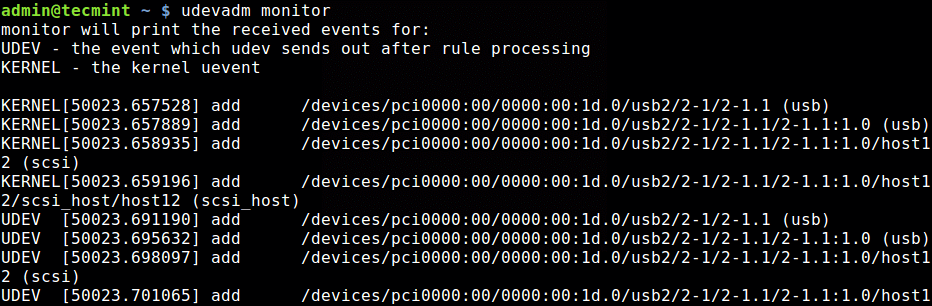
To display received kernel events (uevents) and udev events (which udev sends out after rule processing), run udevadm with the monitor command. Then connect a device to your system and watch, from the terminal, how the device event is handled.
The following screenshot shows an excerpt of an ADD event after connecting a USB flash disk to the test system:
$ udevadm monitor
Monitor Device Events in Linux
To find the name assigned to your USB disk, use the lsblk utility which reads the sysfs filesystem and udev db to gather information about processed devices.
$ lsblk
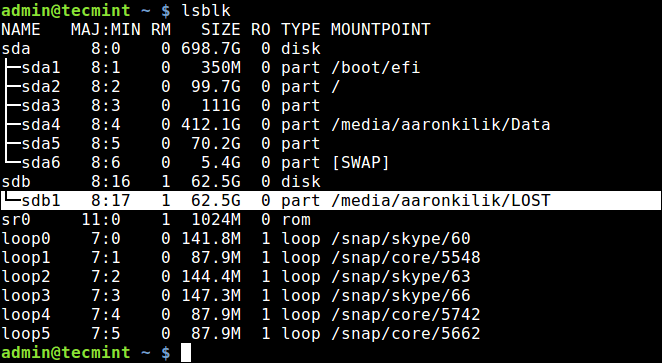
List Block Devices in Linux
From the output of the previous command, the USB disk is named sdb1 (absolute path should be /dev/sdb1). To query the device attributes from the udev database, use the info command.
$ udevadm info /dev/sdb1
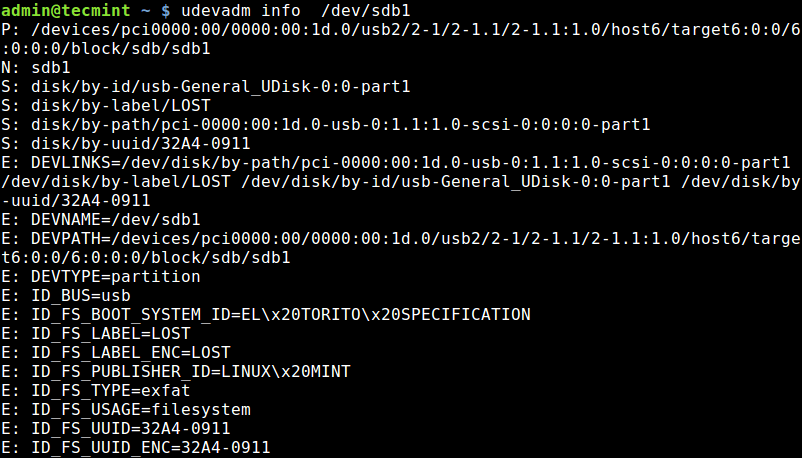
Query Device Attributes from Udev DB in Linux
How to Work with Udev Rules in Linux
In this section, we will briefly discuss how to write udev rules. A rule comprises of a comma-separated list of one or more key-value pairs. Rules allow you to rename a device node from the default name, modify permissions and ownership of a device node, trigger execution of a program or script when a device node is created or deleted, among others.
We will write a simple rule to launch a script when a USB device is added and when it is removed from the running system.
Let’s start by creating the two scripts:
$ sudo vim /bin/device_added.sh
Add the following lines in the device_added.sh script.
#!/bin/bash
echo "USB device added at $(date)" >>/tmp/scripts.log
Open the second script.
$ sudo vim /bin/device_removed.sh
Then add the following lines to device_removed.sh script.
#!/bin/bash
echo "USB device removed  at $(date)" >>/tmp/scripts.log
Save the files, close and make both scripts executable.
$ sudo chmod +x /bin/device_added.sh
$ sudo chmod +x /bin/device_removed.sh
Next, let’s create a rule to trigger execution of the above scripts, called /etc/udev/rules.d/80-test.rules.
$ vim /etc/udev/rules.d/80-test.rules
Add these two following rules in it.
SUBSYSTEM=="usb", ACTION=="add", ENV{DEVTYPE}=="usb_device",  RUN+="/bin/device_added.sh"
SUBSYSTEM=="usb", ACTION=="remove", ENV{DEVTYPE}=="usb_device", RUN+="/bin/device_removed.sh"
where:
"==": is an operator to compare for equality."+=": is an operator to add the value to a key that holds a list of entries.- SUBSYSTEM: matches the subsystem of the event device.
- ACTION: matches the name of the event action.
- ENV{DEVTYPE}: matches against a device property value, device type in this case.
- RUN: specifies a program or script to execute as part of the event handling.
Save the file and close it. Then as root, tell systemd-udevd to reload the rules files (this also reloads other databases such as the kernel module index), by running.
$ sudo udevadm control --reload
Now connect a USB drive into your machine and check if the device_added.sh script was executed. First of all the file scripts.log should be created under /tmp.
$ ls -l /tmp/scripts.log

Check Scripts Log After Adding USB
Then the file should have an entry such as “USB device removed at date_time”, as shown in the screenshot.
$ cat /tmp/scripts.log

Check Scripts Log After Removing USB
For more information on how to write udev rules and manage udev, consult the udev and udevadm manual entries respectively, by running:
$ man udev
$ man udevadm
Summary
Udev is a remarkable device manager that provides a dynamic way of setting up device nodes in the /devdirectory. It ensures that devices are configured as soon as they are plugged in and discovered. It propagates information about a processed device or changes to its state, to user space.