Release 11g (11.1.1)
Part Number E13881-01
Contents
Previous
Next
| Oracle Fusion Middleware Report Designer's Guide for Oracle Business Intelligence Publisher Release 11g (11.1.1) Part Number E13881-01 | Contents | Previous | Next |
| View PDF |
This chapter covers the following topics:
Oracle BI Publisher can retrieve data from multiple types of data sources.
To create a new data set:
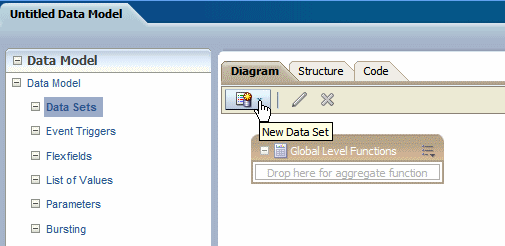
On the component pane of the data model editor click Data Sets.
Click New Data Set.
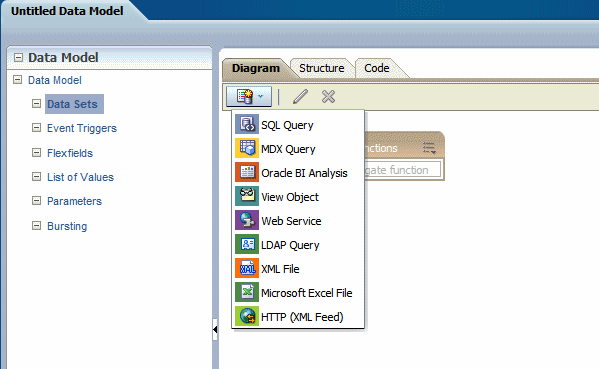
Select the data set type from the list to launch the appropriate dialog.
Complete the required fields to create the data set. See the corresponding section in this chapter for information on creating each data set type.
Click the New Data Set icon and then click SQL Query. The Create Data Set - SQL dialog launches.
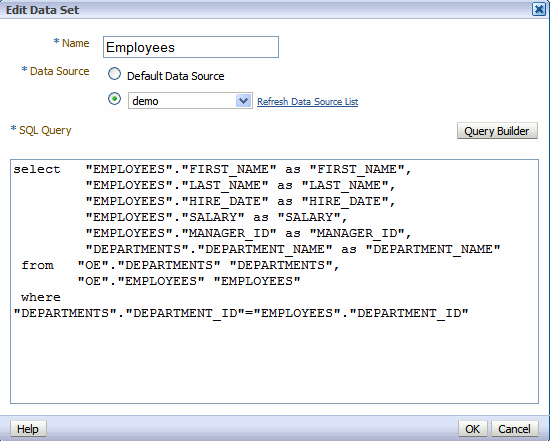
Enter a name for this data set.
If you are not using the default data source for this data set, select the Data Source from the list.
Enter the SQL query or select Query Builder. See Using the Query Builder for information on the Query Builder utility.
If you are using Flexfields, bind variables, or other special processing in your query, edit the SQL returned by the Query Builder to include the required statements.
Note: If you include lexical references for text that you embed in a SELECT statement, then you must substitute values to get a valid SQL statement.
After entering the query, click OK to save. BI Publisher will validate the query.
Use the Query Builder to build SQL queries without coding. The Query Builder enables you to search and filter database objects, select objects and columns, create relationships between objects, and view formatted query results with minimal SQL knowledge.
The Query Builder page is divided into two sections:
Object Selection pane contains a list of objects from which you can build queries. Only objects in the current schema display.
Design and output pane consists of four tabs:
Model - displays selected objects from the Object Selection pane.
Conditions - enables you to apply conditions to your selected columns.
SQL - displays the query
Results - displays the results of the query
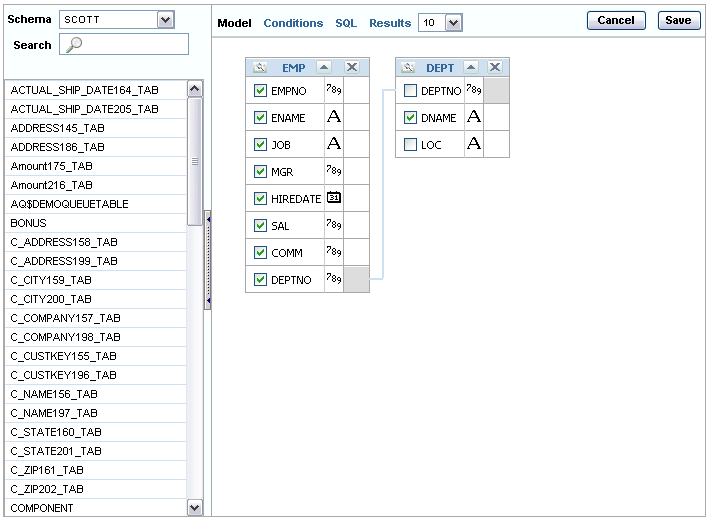
To build a query, perform the following steps:
Select objects from the Object Selection pane.
Add objects to the Design pane and select columns.
Optional: Establish relationships between objects.
Add a unique alias name for any duplicate column.
Optional: Create query conditions.
Execute the query and view results.
In the Object Selection pane you can select a schema and search and filter objects.
To hide the Object Selection pane, select the control bar located between it and the Design pane. Select it again to unhide it.
The Schema list contains all the available schemas in the data source. Note that you may not have access to all that are listed.
Use the Search field to enter a search string. Note that if more than 100 tables are present in the data source, you must use the Search feature to locate and select the desired objects.
The Object Selection pane lists the tables, views, and materialized views from the selected schema (for Oracle databases, synonyms are also listed). Select the object from the list and it displays on the Design pane. Use the Design pane to identify how the selected objects will be used in the query.
Columns of all types display as objects in the Design pane. Note the following column restrictions:
You can select no more than 60 columns for each query.
Only the following column types are selectable:
VARCHAR2, CHAR
NUMBER
DATE, TIMESTAMP
Note: The data type TIMESTAMP WITH LOCAL TIMEZONE is not supported.
BLOB
Note: The BLOB must be an image. When you execute the query in the Query Builder, the BLOB will not display in the Results pane, however, the query will be constructed correctly when saved to the data model editor.
Select an object.
The selected object displays in the Design pane. An icon representing the datatype displays next to each column name.
Select the check box for each column to include in your query.
When you select a column, it appears on the Conditions tab. Note that the Show check box on the Conditions tab controls whether a column is included in query results. Be default, this check box is selected.
To select the first twenty columns, click the small icon in the upper left corner of the object and then select Check All.
To execute the query and view results, select Results.
Tip: You can also execute a query using the key strokes CTRL + ENTER.
As you select objects, you can resize the Design and Results panes by selecting and dragging the gray horizontal rule dividing the page.
To remove an object, select the Remove icon in the upper right corner of the object.
To temporarily hide the columns within an object, click the Show/Hide Columns icon.
Conditions enable you to filter and identify the data you want to work with. As you select columns within an object, you can specify conditions on the Conditions tab. You can use these attributes to modify the column alias, apply column conditions, sort columns, or apply functions. The following figure shows the Conditions tab:
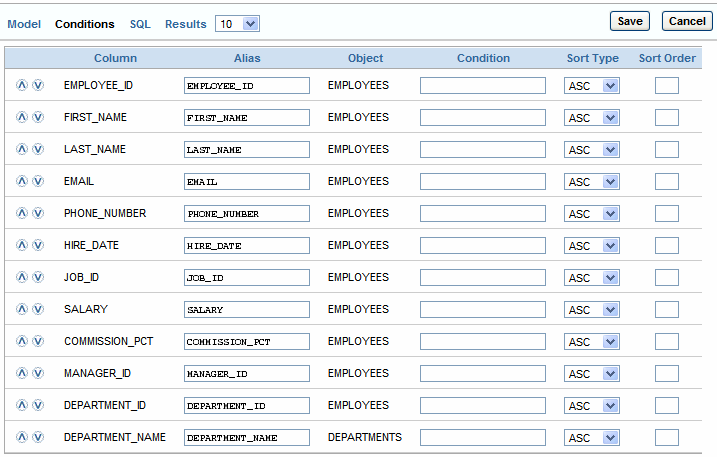
The following table describes the attributes available on the Conditions tab:
| Condition Attribute | Description |
|---|---|
| Up and Down Arrows | Controls the display order of the columns in the resulting query. |
| Column | Displays the column name. |
| Alias | Specify an optional column alias. An alias is an alternative column name. Aliases are used to make a column name more descriptive, to shorten the column name, or prevent possible ambiguous references. Note that multibyte characters are not supported in the alias name. |
| Condition | The condition modifies the query's WHERE clause. When specifying a column condition, you must include the appropriate operator and operand. All standard SQL conditions are supported. For example: >=10 ='VA' IN (SELECT dept_no FROM dept) BETWEEN SYSDATE AND SYSDATE + 15 |
| Sort Type | Select ASC (Ascending) or DESC (Descending). |
| Sort Order | Enter a number (1, 2, 3, and so on) to specify the order in which selected columns should display. |
| Show | Select this check box to include the column in your query results. You do not need to select Show if you need to add a column to the query for filtering only. For example, suppose you wish to create following query: To create this query in Query Builder:
|
| Function | Available argument functions include:
|
| Group By | Specify columns to be used for grouping when an aggregate function is used. Only applicable for columns included in output. |
| Delete | Deselect the column, excluding it from the query. |
As you select columns and define conditions, Query Builder writes the SQL for you.
To view the underlying SQL, click the SQL tab
You can create relationships between objects by creating a join. A join identifies a relationship between two or more tables, views, or materialized views.
When you write a join query, you specify a condition that conveys a relationship between two objects. This condition is called a join condition. A join condition determines how the rows from one object will combine with the rows from another object.
Query Builder supports inner, outer, left, and right joins. An inner join (also called a simple join) returns the rows that satisfy the join condition. An outer join extends the result of a simple join. An outer join returns all rows that satisfy the join condition and returns some or all of those rows from one table for which no rows from the other satisfy the join condition.
Note: See Oracle Database SQL Reference for information about join conditions.
Create a join manually by selecting the Join column in the Design pane.
From the Object Selection pane, select the objects you want to join.
Identify the columns you want to join.
You create a join by selecting the Join column adjacent to the column name. The Join column displays to the right of the datatype. When your cursor is in the appropriate position, the following help tip displays:
Click here to select column for join
Select the appropriate Join column for the first object.
When selected, the Join column is darkened. To deselect a Join column, simply select it again or press ESC.
Select the appropriate Join column for the second object.
When joined, line connects the two columns. An example is shown in the following figure:
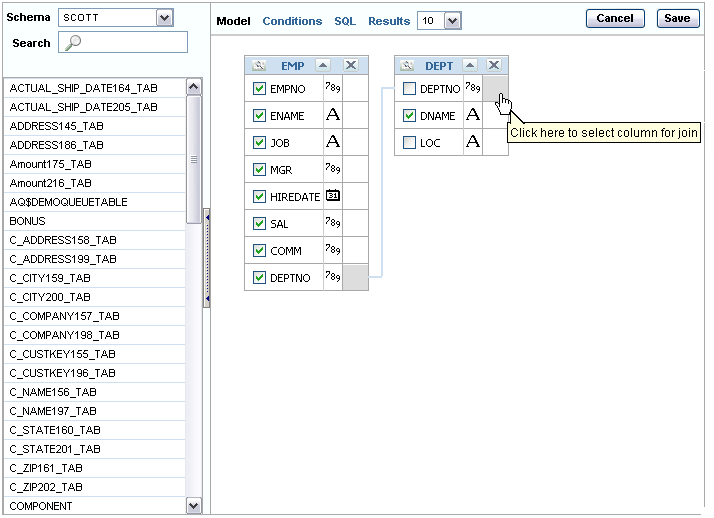
Select the columns to be included in your query. You can view the SQL statement resulting from the join by positioning the cursor over the join line.
Click Results to execute the query.
Once you have built the query, click Save to return to the data model editor. The query will appear in the SQL Query box. Click OK to save the data set.
To link the data from this query to the data from other queries or modify the output structure, see Structuring Data.

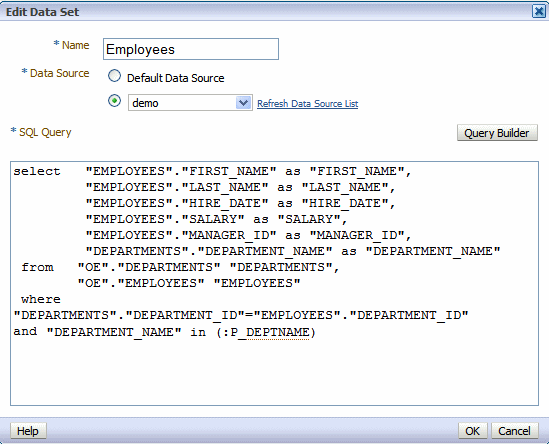
Now you have your basic query, but in your report you want your users to be able to pass a parameter to the query to limit the results. For example, in the employee listing, you want users to be able to choose a specific department.
To do this, add the following after the where clause in your query:
and "DEPARTMENT_NAME" in (:P_DEPTNAME)where P_DEPTNAME is the name you choose for the parameter. This is shown in the following figure:
When you select Save the data model editor will ask if you want to create the parameter you entered with the bind variable syntax:
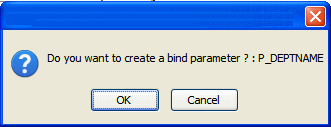
Click OK to have the data model editor create the parameter entry for you.
To add the parameter, see Adding Parameters and Lists of Values.
Important: After manually editing the query, the Query Builder will no longer be able to parse it. Any further edits must also be made manually.
Once you have saved the query from the Query Builder to the data model editor, you may also use the Query Builder to edit the query:
Select the SQL data set.
Click the Edit Selected Data Set toolbar button.
This launches the Edit Data Set dialog. Click Query Builder to load the query to the Query Builder.
Note: If you have made modifications to the query, or did not use the Query Builder to construct it, you may receive an error when launching the Query Builder to edit it. If the Query Builder cannot parse the query, you can edit the statements directly in the text box.
Edit the query and click Save.
BI Publisher supports Multidimensional Expressions (MDX) queries against your OLAP data sources. MDX lets you query multidimensional objects, such as cubes, and return multidimensional cellsets that contain the cube's data. See your OLAP database documentation for information on the MDX syntax and functions it supports.
Note: Ensure that in your OLAP data source that you do not use Unicode characters from the range U+F900 to U+FFFE to define any metadata attributes such as column names or table names. This Unicode range includes half-width Japanese Katakana and full-width ASCII variants. Using these characters will result in errors when generating the XML data for a BI Publisher report.
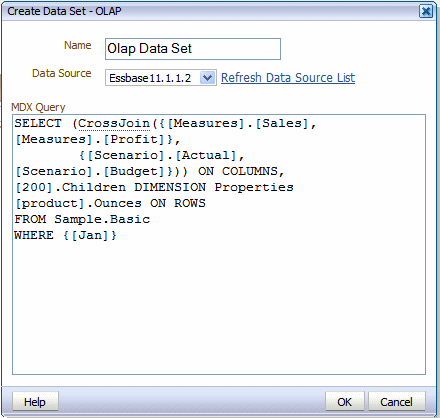
Click the New Data Set toolbar button and select OLAP. The Create Data Set - OLAP dialog launches.
Enter a name for this data set.
Select the Data Source for this data set. Only data sources defined as OLAP connections will display in the list.
Enter the MDX query by direct entry or by copying and pasting from a third-party MDX editor.
Click OK.
To link the data from this query to the data from other queries or modify the output structure, see Creating Structured XML Data Sets.
BI Publisher supports queries against Lightweight Directory Access protocol (LDAP) data sources. You can query user information stored in LDAP directories and then use the data model editor to link the user information with data retrieved from other data sources.
For example, suppose you want to generate a report that lists employee salary information that is stored in your database application and include on the report employee e-mail addresses that are stored in your LDAP directory. You can create a query against each and then link the two in the data model editor to display the information in a single report.
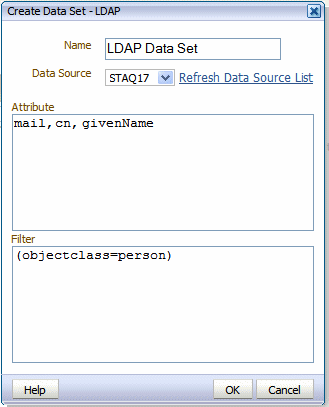
Click the New Data Set toolbar button and select LDAP. The Create Data Set - LDAP dialog launches.
Enter a name for this data set.
Select the Data Source for this data set. Only data sources defined as LDAP connections will display in the list.
In the Attributes entry box, enter the attributes whose values you want to fetch from the LDAP data source.
For example:
mail,cn,givenNameTo filter the query, enter the appropriate syntax in the Filter entry box. The syntax is as follows: .
(Operator (Filter) (Filter))For example:
(objectclass=person)LDAP search filters are defined in the Internet Engineering Task Force (IETF) Request for Comments document 2254, "The String Representation of LDAP Search Filters," (RFC 2254). This document is available from the IETF Web site at http://www.ietf.org/rfc/rfc2254.txt
To link the data from this query to the data from other queries or modify the output structure, see Structuring Data.
To use a Microsoft Excel file as a data source, place the file in a directory that your administrator has set up as a data source (see Setting Up a Connection to a File Data Source, Oracle Fusion Middleware Administrator's and Developer's Guide for Oracle Business Intelligence Publisher).
The Microsoft Excel files must be saved in the Excel 97-2003 Workbook (*.xls) format.
Following are guidelines for the support of Microsoft Excel files as a data set type in BI Publisher:
The source Excel file may contain a single sheet or multiple sheets.
Each worksheet may contain one or multiple tables. A table is a block of data that is located in the continuous rows and columns of a sheet.
In each table, BI Publisher always considers the first row to be a heading row for the table.
The data type of the data in the table may be number, text, or date/time.
If multiple tables exist in a single worksheet, the tables must be identified with a name for BI Publisher to recognize each one. See Guidelines for Accessing Multiple Tables per Sheet.
If all tables in the Excel file are not named, only the data in the first table (the table located in the upper most left corner) will be recognized and fetched.
If your Excel worksheet contains multiple tables that you wish to include as data sources, you must define a name for the table in Excel.
Important: The name that you define must begin with the prefix: "BIP_", for example, "BIP_SALARIES".
To define a name for the table in Excel:
Insert the table in Excel.
Define a name for the table as follows:
Using Excel 2003: Select the table. On the Insert menu, click Name and then Define.
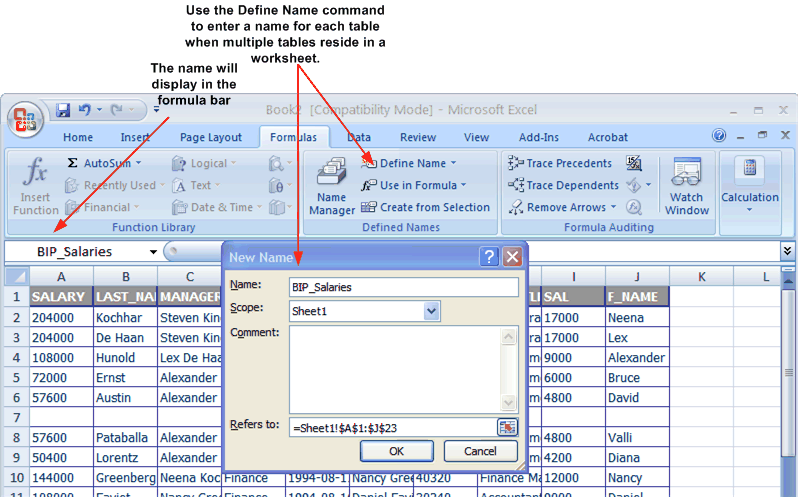
Using Excel 2007: Select the table. On the Formulas tab, in the Defined Names group, click Define Name, then enter the name in the Name field. The name you enter will then appear on the Formula bar.
Tip: You can learn more about defined names and their usage in the Microsoft Excel 2007 document: "Define and use names in formulas."
The following figure shows how to use the Define Name command in Microsoft Excel 2007 to name a table "BIP_Salaries".
Note that if you want to include parameters for your data set, you must define the parameters first, so that they are available for selection when defining the data set. See Adding Parameters and Lists of Values.
Important: The Excel data set type supports one value per parameter. It does not support multiple selection for parameters.
Click the New Data Set toolbar button and select Microsoft Excel File. The Create Data Set - Excel dialog launches.
Enter a name for this data set.
Select the Data Source where the Excel File resides.
Click the browse icon to connect to browse for and select the Microsoft Excel file.
If the Excel file contains multiple sheets or tables, select the appropriate Sheet Name and Table Name for this data set.
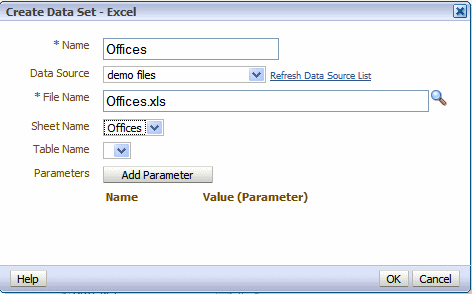
If you added parameters for this data set, click Add Parameter. Enter the Name and select the Value. The Value list is populated by the parameter Name defined in the Parameters section. See Adding Parameters and Lists of Values.
Click OK.
To link the data from this query to the data from other queries or modify the output structure, see Structuring Data.
If you have enabled integration with Oracle Business Intelligence, then you can access the Oracle Business Intelligence Presentation catalog to select an Oracle BI analysis as a data source. An analysis is a query against an organization's data that provides answers to business questions. A query contains the underlying SQL statements that are issued to the Oracle BI Server.
For more information on creating analyses, see the Oracle Fusion Middleware User's Guide for Oracle Business Intelligence Enterprise Edition.
Click the New Data Set toolbar button and select Oracle BI Analysis. The Create Data Set - Oracle BI Analysis dialog launches.
Enter a name for this data set.
Click the browse icon to connect to the Oracle BI Presentation catalog.
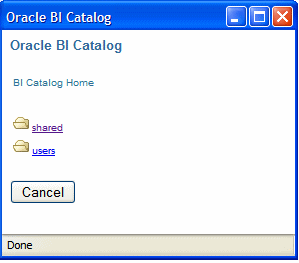
When the catalog connection dialog launches, navigate through the folders to select the Oracle BI analysis you wish to use as the data set for your report.
Enter a Time Out value in seconds. If BI Publisher has not received the analysis data after the time specified in the time out value has elapsed, BI Publisher will stop attempting to retrieve the analysis data.
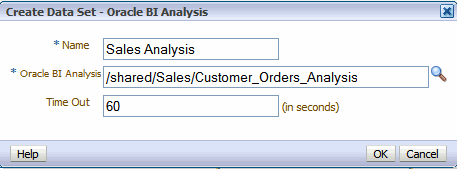
Click OK.
Parameters and list of values will be inherited from the BI analysis and they will show up at runtime.
The BI Analysis must have default values defined for filter variables. If the analysis contains presentation variables with no default values, it is not supported as a data source by BI Publisher.
If you wish to structure the data based on Oracle BI Analysis Data Sets, the group breaks, data links and group-level functions are not supported
The following are supported:
Global level functions
Setting the value for elements if null
Group Filters
BI Publisher enables you to connect to your custom applications built with Oracle Application Development Framework and use view objects in your applications as data sources for reports.
This procedure assumes that you have created a view object in your application.
Click the New Data Set toolbar button and select View Object. The Create Data Set - View Object dialog launches.
Enter a name for this data set.
Select the Data Source from the list. The data sources that you defined in the providers.xml file will display.
Enter the fully qualified name of the application module (for example: example.apps.pa.entity.applicationModule.AppModuleAM).
Click Load View Objects.
BI Publisher calls the application module to load the view object list.
Select the View Object.
Any bind variables defined will be retrieved. Create a parameter to map to this bind variable See Adding Parameters and Lists of Values.
Click OK to save your data set.
If you wish to structure data based on view object data sets, the group breaks, data links and group-level functions are not supported.
The following are supported:
Global level functions
Setting the value for elements if null
Group Filters
BI Publisher supports Web service data sources that return valid XML data.
Important: Additional configuration may be required to access external Web services depending on your system's security. If the WSDL URL is outside your company firewall, see Configuring Proxy Settings, Oracle Fusion Middleware Administrator's and Developer's Guide for Oracle Business Intelligence Publisher.
If the Web service is protected by Secure Sockets Layer (SSL) see Configuring BI Publisher for Secure Socket Layer Communication, Oracle Fusion Middleware Administrator's and Developer's Guide for Oracle Business Intelligence Publisher.
BI Publisher supports Web services that return both simple data types and complex data types. You must make the distinction between simple and complex when you define the Web service data model. See Adding a Simple Web Service and Adding a Complex Web Service for descriptions of setting up each type.
Note that if you want to include parameters for the Web service method, you must define the parameters first, so that they are available for selection when setting up the data source. See Adding Parameters and Lists of Values.
Multiple parameters are supported. Ensure the method name is correct and the order of the parameters matches the order in the method. If you want to call a method in your Web service that accepts two parameters, you must map two parameters defined in the report to those two. Note that only parameters of simple type are supported, for example, string and integer.
Enter the WSDL URL and the Web Service Method.
Important: Only document/literal Web services are supported.
To specify a parameter, select the Add link. Select the parameter from the list.
Note: The parameters must already be set up in the Parameters section of the report definition See Adding Parameters and Lists of Values.
This example shows how to add a Web service to BI Publisher as a data source. The Web service returns stock quote information. The Web service will pass one parameter: the quote symbol for a stock.
The WSDL URL is:
http://www.webservicex.net/stockquote.asmx?WSDLIf you are not already familiar with the available methods and parameters in the Web service that you want to call, you can open the URL in a browser to view them. This Web service includes a method called GetQuote. It takes one parameter, which is the stock quote symbol.
To add the Web service as a data source:
Click the New Data Set toolbar button and select Web Services. The Create Data Set - Web Service dialog launches.
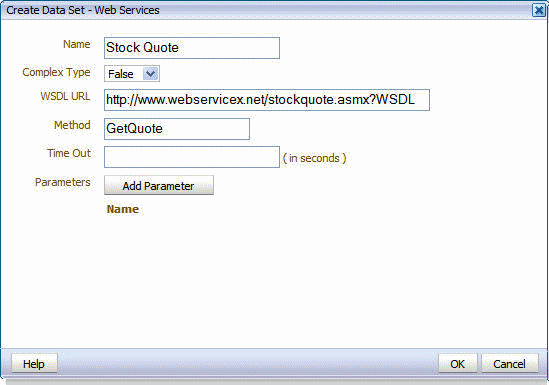
Enter a name for this data set.
Enter the Data Set information:
Select False for Complex Type.
Enter the WSDL URL: http://www.webservicex.net/stockquote.asmx?WSDL
Enter the Method: GetQuote
If desired, enter a Time Out period in seconds. If the BI Publisher server cannot establish a connection to the Web service, the connection attempt will time out after the specified time out period has elapsed.
Define the parameter to make it available to the Web service data set.
Select Parameters on the Data Model pane and click the Create New Parameter button. Enter the following:
Identifier - enter an internal identifier for the parameter (for example, Quote).
Data Type - select String.
Default Value - if desired, enter a default for the parameter (for example, ORCL).
Parameter Type - select Text
In the Text Setting region, enter the following:
Display label - enter the label you want displayed for your parameter (for example: Stock Symbol).
Text Field Size - enter the size for the text entry field in characters.
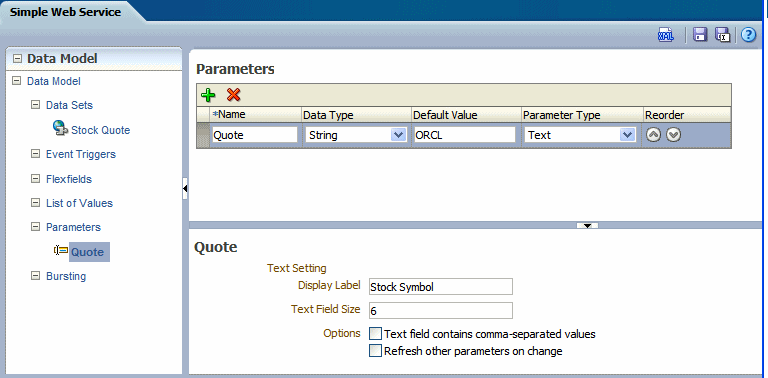
Select the options you wish to apply:
Text field contains comma-separated values - select this option to enable the user to enter multiple comma-separated values for this parameter.
Refresh other parameters on change - performs a partial page refresh to refresh any other parameters whose values are dependent on the value of this one.
Return to your Web service data set and add the parameter.
Click the data set name Stock Quote. Click Add Parameter. The Quote parameter you specified is now available from the list.
Click the Edit Selected Data Set button.
In the Edit Data Set dialog, click Add Parameter. The Quote parameter will display.
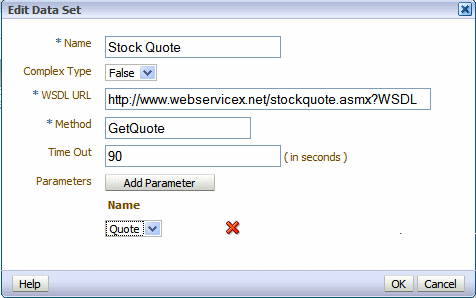
Click OK to close the data set.
Click Save.
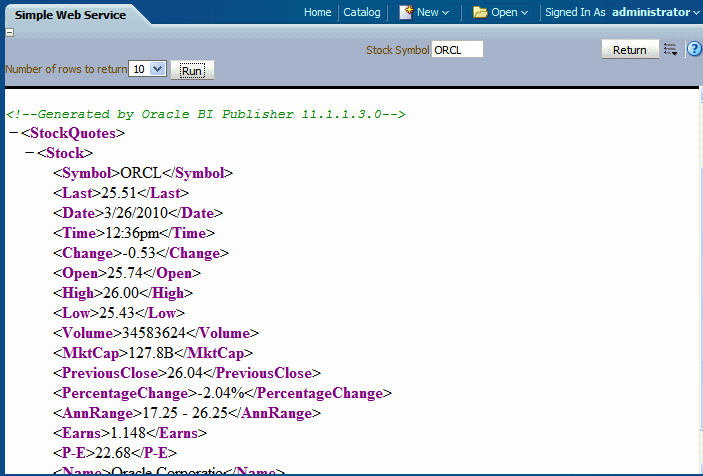
To view the results XML, select Get XML Output.
Enter a valid value for your Stock Symbol parameter, select the number of rows to return, and click the Run button.
A complex Web service type internally uses soapRequest / soapEnvelope to pass the parameter values to the destination host.
To use a complex Web service as a data source, select Complex Type equal True, then enter the WSDL URL. After loading and analyzing the WSDL URL, the Data Model Editor will display the available Web services and operations. For each selected operation, the Data Model Editor will display the structure of the required input parameters. By choosing Show Optional Parameters, you can see all optional parameters as well.
If you are not already familiar with the available methods and parameters in the Web service that you want to call, open the WSDL URL in a browser to view them.
To add a complex Web service as a data source:
Enter the Data Set information:
Enter a Name for the Data Set and select Web Service as the Type.
Select True for Complex Type.
Select a security header:
Disabled - does not insert a security header.
2002 - enables the "WS-Security" Username Token with the 2002 namespace: http://docs.oasis-open.org/wss/2004/01/oasis-200401-wss-wssecurity-secext-1.0.xsd
2004 - enables the "WS-Security" Username Token with the 2004 namespace:
http://docs.oasis-open.org/wss/2004/01/oasis-200401-wss-username-token-profile-1.0#PasswordText
Username and Password - enter the username and password for the Web service, if required.
If desired, enter a Time Out period in seconds. If the BI Publisher server cannot establish a connection to the Web service, the connection attempt will time out after the specified time out period has elapsed.
Enter a WSDL URL. When you enter the WSDL, the Web Service list will populate with the available Web services from the WSDL.
Choose a Web Service from the list. When you choose a Web service from the list, the Method list will populate with the available methods.
Select the Method. When you select the method, the Parameters will display. If you wish to see optional parameters as well, select Show Optional Parameters.
Response Data XPath - if the start of the XML data for your report is deeply embedded in the response XML generated by the Web service request, use this field to specify the path to the data that you wish to use in your BI Publisher report.
Define the parameter to make it available to the Web service data set.
Select Parameters on the Report definition pane and click New to create a new parameter. Enter the following:
Name - enter an internal identifier for the parameter.
Data Type - select the appropriate data type for the parameter.
Default Value - if desired, enter a default value for the parameter.
Parameter Type - select the appropriate parameter type.
Display label - enter the label you want displayed for your parameter.
Text Field Size - enter the size for the text entry field in characters.
Return to your Web service data set and add the parameter.
Select the Web service data set and then click
Edit Selected Data Set to launch the Edit Data Set dialog.
In the entry field for the Parameter, enter the following syntax: ${Parameter_Name} where Parameter_Name is the value you entered for Name when you defined the parameter to BI Publisher.
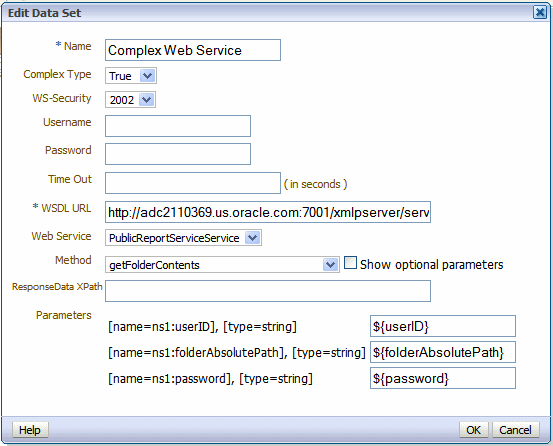
To test the Web service, see Testing Data Models and Generating Sample Data.
There is no metadata available from Web service data sets.
When you set up data sources you can define a file directory as a data source (see Setting Up a Connection to a File Data Source, Oracle Fusion Middleware Administrator's and Developer's Guide for Oracle Business Intelligence Publisher). You can then place XML documents in the file directory to access directly as data sources for your reports.
Click the Create new toolbar button and select XML. The Create Data Set - File dialog launches.
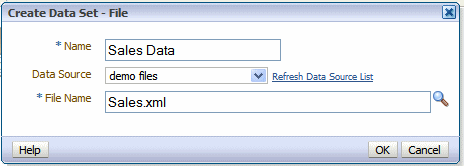
Enter a name for this data set.
Select the Data Source where the XML file resides. The list is populated from the configured File Data Source connections.
Click Browse to connect to the data source and browse the available directories. Select the file to use for this report.
Click OK.
There is no metadata available from file data sets.
Using the HTTP data source type you can create reports from RSS feeds over the Web.
Important: Additional configuration may be required to access external data source feeds depending on your system's security. If the RSS feed is protected by Secure Sockets Layer (SSL) see Configuring BI Publisher for Secure Sockets Layer Communication, Oracle Fusion Middleware Administrator's and Developer's Guide for Oracle Business Intelligence Publisher.
Note that if you want to include parameters for an HTTP (XML feed), you must define the parameters first, so that they are available for selection when defining the data set. See Adding Parameters and Lists of Values.
Click the New Data Set toolbar button and select HTTP. The Create Data Set - HTTP dialog launches.
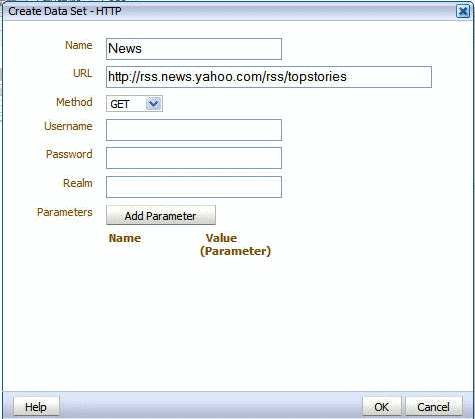
Enter a name for this data set.
Enter the URL for the XML feed.
Select the Method: Get or Post.
Enter the Username, Password, and Realm for the URL, if required.
To add a parameter, click Add Parameter. Enter the Name and select the Value. The Value list is populated by the parameter Name defined in the Parameters section. See Adding Parameters and Lists of Values.
Click OK to close the data set dialog.
There is no metadata available from HTTP data sets.
The Data Model Editor enables you to test your data model and view the output to ensure your results are as expected. After running a successful test, you can choose to save the test output as sample data for your data model, or export the file to an external location. If your data model fails to run, you can view the data engine log.
To test your data model:
Click the Get XML Output toolbar button. This will launch the XML Output page.
Select the number of rows to return. If you included parameters, enter the desired values for the test.
Click Run to display the XML returned by your data model.
To save your test data set as sample data for your data model:
After your data model has successfully run, click the Options toolbar button and then click Save as Sample Data. This sample data will be saved to your data model.
To export the test data:
After your data model has successfully run, select the Options toolbar button and then select Export XML. You will be prompted to save the file.
To view the data engine log:
Select the Options toolbar button and then select Get Data Engine Log. You will be prompted to open or save the file. The data engine log file is an XML file.
BI Publisher stores information about the current user that can be accessed by your report data model. The user information is stored in system variables as follows:
| System Variable | Description |
|---|---|
| xdo_user_name | User ID of the user submitting the report. For example: Administrator |
| xdo_user_roles | Roles assigned to the user submitting the report. For example: XMLP_ADMIN, XMLP_SCHEDULER |
| xdo_user_report_oracle_lang | Report language from the user's account preferences. For example: ZHS |
| xdo_user_report_locale | Report locale from the user's account preferences. For example: en-US |
| xdo_user_ui_oracle_lang | User interface language from the user's account preferences. For example: US |
| xdo_user_ui_locale | User interface locale from the user's account preferences. For example: en-US |
To add the user information to your data model, you can define the variables as parameters and then define the parameter value as an element in your data model. Or, you can simply add the variables as parameters then reference the parameter values in your report.
The following example limits the data returned by the user ID:
select  EMPLOYEES.LAST_NAME as LAST_NAME,
  EMPLOYEES.PHONE_NUMBER as PHONE_NUMBER,
  EMPLOYEES.HIRE_DATE as HIRE_DATE,
 :xdo_user_name as USERID
from   HR.EMPLOYEES EMPLOYEES
where lower(EMPLOYEES.LAST_NAME) = :xdo_user_name
Notice the use of the lower() function , the xdo_user_name will always be in lowercase format. BI Publisher does not have a user_id so you need to go with the user name and either use it directly in the query or maybe go against a lookup table to find a user id.
![]()
Copyright © 2004, 2010, Oracle and/or its affiliates. All rights reserved.