| Oracle® Enterprise Manager Ops Center Feature Reference Guide 12c Release 1 (12.1.1.0.0) Part Number E27511-04 |
|
|
PDF · Mobi · ePub |
| Oracle® Enterprise Manager Ops Center Feature Reference Guide 12c Release 1 (12.1.1.0.0) Part Number E27511-04 |
|
|
PDF · Mobi · ePub |
This chapter includes the following information:
Oracle Solaris Zones, also known as Oracle Solaris Containers, is used to virtualize operating systems and provide an isolated and secure environment for running software applications. A zone is a virtualized operating system environment created within a single instance of the Oracle Solaris operating system.
You can think of a zone as a box with flexible, software-defined walls. One or more applications can run in this box without interacting with the rest of the system. Because zones isolate software applications or services, applications that are running in the same instance of the Oracle Solaris OS can are managed independently of each other. For example, different versions of the same application can be run in separate zones.
Zones can be used on machine that is running Oracle Solaris 10 or later release.
The global zone is the default operating system and has control over all the processes. A global zone always exists even when no other zones are configured. The global zone is used for system-wide administrative control.
Non-global zones, or simply zones, are configured inside the global zone. Zones are isolated from the physical hardware by the virtual platform layer. A zone cannot detect the existence of other zones.
You can create different types of non-global zone for different purposes.
Sparse Root Zone – Contains a read/write copy of a portion of the file system that exists on the global zone. Other file systems are mounted read-only from the global zone as loop-back virtual file systems. When a sparse root zone is created, the global administrator selects which file systems to share with the sparse root zone in addition to the default read-only file systems: /usr, /lib, /sbin, and /platform. All packages that are installed on the global zone are available to the sparse root zone; a package database is created and all files in the mounted file system are shared with the zone.
Note:
Sparse root zone is not available from Oracle Solaris 11 onwards. You can create sparse root zones only in Oracle Solaris 10.Whole Root Zone – Contains a read/write copy of the entire file system that exists on the global zone. When a whole root zone is created, all packages that are installed on the global zone are available to the whole root zone; a package database is created and all files are copied onto the whole root zone for the dedicated and independent use of the zone.
Branded Zone – The non-global zone runs the same operating system software on the global zone. The branded zone facility is used to create non-global branded zones that contain operating environments different from that of the global zone. For example, you can install Oracle Solaris 8, 9, or 10 in a branded zone.
The following table lists the tasks and the role required to complete the task. Contact your administrator if you do not have the necessary role or privilege to complete a task. See Oracle Enterprise Manager Ops Center Administration Guide for information about the different roles and the permissions they grant.
Table 14-1 Oracle Solaris Zones Roles and Permissions
| Task | Role |
|---|---|
|
Create, manage, update, and delete zones |
Virtualization admin |
|
Provision and manage virtualization host |
Virtualization admin |
|
Discover and manage virtualization hosts |
Asset admin |
|
Create and manage zone profiles and plans |
Profile and plan admin |
|
Create and manage IPMP groups |
Network admin |
|
Create and manage Link Aggregation |
Network admin |
|
Set monitor thresholds |
Asset admin |
Oracle Enterprise Manager Ops Center provides the following solution for managing your zones environment in a data center:
Create zones using profiles and deployment plan.
Discover and manage existing zone environments.
Perform zones functions such as booting, rebooting, shutting down, cloning, migrating and delete zones from the software UI.
Manage zone configuration such as file systems, storage, and networks from the UI.
Aggregate your NICs or create IPMP groups.
Create zones server pool for balancing available resources and provide the infrastructure support for virtual datacenter creation.
Use UI and native CLI interchangeably to create and manage zones.
Complete support for managing Oracle Solaris 11 zones.
Options to upload scripts to manage the unmanaged file system and zone dependencies.
The global zone is the default operating system installed on a system. The OS can be Oracle Solaris 10 or 11 version. When you have provisioned systems, you can discover in Oracle Enterprise Manager Ops Center using Add Assets or find Assets option. When you want to provision the system with Oracle Solaris OS, refer to Chapter 12, "Operating Systems" for detailed procedures.
You must prepare your global zones with the required network and storage resources that need to be used for the zones. You must associate the required storage libraries with the global zone. You must also attach networks to the global zone. You can also aggregate the interfaces or create IPMP groups in the global zone before you connect them to the zones. The use of IPMP and link aggregated interfaces results in enhanced network availability for the zones.
This section covers the following topics:
You can associate or disassociate libraries from a global zone. When you associate a library with the global zone, the libraries are available to all the zones in the hierarchy of the global zone.
You can associate the following types of storage libraries to a global zone:
Filesystem storage – NAS libraries
Block storage – SAN and Dynamic storage libraries
For the zones, all the libraries associated with the global zone are available for association.
To Associate a Library With the Global Zone
Select the global zone in the Assets tree.
Click Associate Libraries in the Actions pane.
The Associate Library window lists the libraries that are not associated with the global zone.
Select one or more libraries to add.
Click Associate Libraries.
A job is submitted to associate the libraries with the global zone.
When you disassociate a library from global zone:
The libraries are disassociated from the global zone.
The libraries are not available to new zones.
The libraries remain associated to existing non-global zones in that global zone.
To Disassociate Libraries From Global Zone
Select the global zone in the Assets tree.
Select the Libraries tab in the center pane.
The associated libraries with the global zone are listed.
Select a library from the list.
The Disassociate Library icon is enabled.
Click the Disassociate Library icon. The Disassociate Library window is displayed.
Click Disassociate Library to confirm unmounting the library.
You can attach one or more networks to global zone using the option Attach Networks. When your networks are grouped as network domains in Oracle Enterprise Manager Ops Center, then select the domain and choose the corresponding networks to be attached.
When you assign a network to a stand-alone global zone, you must define the mode of the network, either Shared IP or Exclusive IP:
In Shared IP mode, the global zone shares its network interface with one or more zone. You must define the network interface when you assign the network to the global zone.
In Exclusive IP mode, a dedicated network interface is allocated to the zone. You can choose the network interface when you assign the network to a zone.
A network that is assigned as shared on a global zone can be assigned as exclusive on another global zone. For a global zone, a network has only one mode. For non-global zones, a network that is used in a shared mode for one zone cannot be used in exclusive mode for another zone.
While you attach networks to a global zone, you can deploy IP Multipathing (IPMP) to obtain better network performance or link aggregation to provide increased reliability, availability, and network performance for systems with multiple physical interfaces.
For stand-alone global zones with Oracle Solaris 10 OS, network can be attached in shared or exclusive IP mode. Whereas with Oracle Solaris 11 OS, the network is always attached in exclusive IP mode. This is because a virtual NIC or VNIC is created when the zone boots and deleted when the zone is halted.
This scenario is different for attaching networks to global zones that are in a server pool. See Attach Networks for more information about attaching networks in a zones server pool.
Oracle Enterprise Manager Ops Center provides the option to configure one or more physical interfaces into an IP multipathing group, or IPMP group. You can configure IPMP in the global zone and extend the functionality to the non-global zone.
You can create IPMP groups on Oracle Solaris 10 and 11 OS. When you attach network in exclusive IP mode, you can create IPMP groups. Whereas, you cannot create IPMP groups for shared IP mode networks.
When you attach networks to a global zone in a shared IP mode, you can select to create an IPMP group. Define the number of members for the IPMP group. Select the NICs that are part of the IPMP group. The NICs selected are placed in the IPMP group. You can select the standby interface, and provide the test address when you want probe-based detection. For the active interface, provide the data address and choose whether failover must be enabled for the interface for uninterrupted access to the network. This is applicable for Oracle Solaris 10 OS. It is inherent in Oracle Solaris 11 OS.
When you create a zone or connect a network to a zone, the IPMP group is displayed in the NIC list. Select the IPMP group from the list to connect to the selected network. The IPMP group can be used by multiple shared IP zones.
Several interfaces in a system can be aggregated into a single logical link. The aggregation is done as per the standard defined in IEEE802.3ad. When interfaces have been aggregated, they are treated as a single network interface. Oracle Enterprise Manager Ops Center displays the link aggregation in the list of available NICs as if it were an individual interface. You can assign a network with a link aggregation to a non-global zone, and select the link aggregation from the NIC list.
When you attach a network to a global zone, you can aggregate the physical interfaces and attach to the network. Link aggregation is available for both shared and exclusive IP network stack.
To Attach a Network to Global Zone
When you attach a network to a global zone, you can choose to create IPMP group or aggregate link. As per the selection, you are taken through the required steps to provide the information.
Follow the given procedure to attach a network to a stand-alone global zone:
Select the global zone in the Assets tree.
Click Attach Network in the Actions pane.
The Attach Network wizard displays.
Select the network domain and the corresponding networks that are not yet connected to the asset are displayed in the network list. Select a network from the list.
You can attach one or more networks to the global zone. Click Next to configure the networks.
For each selected network, select the following information:
Select the IP stack as shared or exclusive.
The global zone shares the network interface with the zones that uses shared IP network. For zones that use exclusive IP network, has a dedicated network interface. For networks defined as shared, you must configure the network interfaces of the global zone. The networks defined as exclusive, you can configure the interfaces later when you connect a zone to the exclusive network.
Select the network configuration as IPMP, Link Aggregation or None. For exclusive IP stack, only Link Aggregation network configuration is available.
When you select None, you are taken to Step 8 to configure the network interfaces for shared IP stack or to the summary step.
When you select IPMP network configuration, you are taken through the steps for IPMP configuration.
When you select Link Aggregation configuration, you are taken through the steps to configure the aggregation.
Enter the number of connections for each network.
The number of connections depend on the Oracle Solaris OS version. For Oracle Solaris 10 OS, you cannot make multiple connections. For Oracle Solaris 11 OS, you can make multiple network connections.
Click Next to specify the link aggregation.
Provide the following information for link aggregation:
The link aggregation name.
Select the load balancing policy.
Click Next to configure the link aggregation.
Specify the following information for link aggregation:
LACP mode and timer
MAC address policy and the MAC address if required.
Specify the IPMP group details.
IPMP group name
Number of members of the IPMP group
Select whether the probe-based failure detection must be enabled.
Click Next to configure the interfaces.
For IPMP group, provide the following information:
The NICs that are member of the group.
Select the interfaces that will be standby interface. You must have at least one active interface.
Click Next to specify the data addresses.
Configure the interfaces for networks that do not have network configuration:
Specify the NIC and the IP address for the network connection.
You can select System Allocated for the NIC and Assign by DHCP for the system to take care of the NIC and IP address allocation.
You can select Do Not Allocate IP for the IP address, when you do not want to allocate IP address for the network connection.
Enter the data addresses that must be used for the active network interfaces. Also, specify whether failover must be enabled for the interface. You must have more than one interface to allow failover.
Review the information provided for attaching a network to the global zone and click Finish to attach the network.
You must ensure that you enter the correct information for different versions of Oracle Solaris OS. Otherwise, the attach network job fails.
You can also directly create IPMP groups on the global zone without using the attach network option. From the network tabs, you have the option to create and manage the IPMP groups in the selected Oracle Solaris OS.
IPMP provides physical interface failure detection, transparent network access failover, and packet load spreading for systems with multiple interfaces. Oracle Enterprise Manager Ops Center provides option to create IPMP groups. One or more interfaces can be configured into an IPMP group. The group functions like an IP interface with data addresses to send and receive network traffic. When an underlying interface in the group fails, the data addresses are redistributed among the remaining underlying active interfaces in the group. Thus, the group maintains network connectivity despite an interface failure. With IPMP, network connectivity is always available, provided that a minimum of one interface is usable for the group. It also provides load spreading for the outbound network traffic across the network interfaces in the group.
To create an IPMP group, you must the define the parameters for the group like:
The active and the standby interfaces of the group. By default, an interface added to an IPMP group is active. You can configure as many standby interfaces as you want for the group.
The link-based failure detection is enabled by default. You must select whether you want to enable Probe-Based failure detection. For probe-based failure detection, you must provide the test address to track the interface status.
You must assign the data addresses for the physical interfaces in the IPMP group. Data traffic flow use the data addresses that are hosted on the IPMP interface and flow through the active interfaces of that group.
Select the Network tab in the center pane.
Select IPMP Groups subtab in the pane.
Existing IPMP groups in the OS are listed.
Click the Create IPMP Group icon to create an IPMP group.
The Create IPMP Group wizard displays.
Enter the following details for the IPMP group:
Provide a name for the IPMP group.
Select a network from the list.
The list of available network interfaces in the global zone are displayed.
The Link-Based failure detection is always enabled by default. Select whether you want to enable Probe-Based failure detection.
Select the interfaces that are part of the IPMP group.
Click Next to specify the NIC settings.
When you have enabled probe-based failure detection, then enter the test address for the NICs in the group.
Select the interfaces that are in standby mode.
You must have at least one active interface in the group. Click Next to specify the data address.
Enter the data address that will be used on the active interfaces of the group and select whether the interface has a failover.
Click Next to view the summary.
Review the information and click Finish to create the IPMP group.
Note:
For Oracle Solaris 11 OS, you cannot create IPMP groups. Instead, you can aggregate the links.You can also create link aggregation directly on the Oracle Solaris OS. to create link aggregation, you must define the following details:
Load balancing policy
LACP mode and timer
MAC address policy and if required, the MAC address
Select the Network tab.
Select the subtab Link Aggregation.
Click the Create Link Aggregation icon.
The Create Link Aggregation wizard displays.
Enter the name of the link aggregation.
The name starts with "aggr" by default. Append a number to make the name unique.
Select the NICS that will be part of the link aggregation.
Click Next to configure the link aggregation.
Specify the following information for link aggregation:
Select the load balancing policy.
LACP mode and timer.
MAC address policy and MAC address if required.
Click Next to view the summary.
Review the information and click Finish to create the link aggregation.
You can modify the network connection that are attached to the network except for the management network. The modify and unbind network options are available in the Network tab.
Select the Network tab of the selected global zone in the Assets section. Click the Modify Physical Connectivity icon.
You can change the permanent IP address or change the allocation method.
Note:
When the network interface is an IPMP group, you cannot modify the network interface.When you unbind a network from a global zone, the global zone's non-global zones are also disconnected from the network. Select the global zone and click the Unbind Network icon to remove the network.
When you discover a global zone which has already zones in it, then the zones are also automatically discovered and displayed on the UI. The option to deploy the agent on the global zone is inherited to the zones.
The following steps provide an outline of the procedure to discover and manage existing zones:
Use the option Add Assets to discover a global zone.
In the Add Assets wizard, select whether you want to deploy the agent on the global zone or you want agentless management.
All the non-global zones in the selected global zone are automatically discovered.
When you want to deploy the agent on the global zone, the agent is installed on all the zones that are in running state. When you want to deploy the agent for the zones in shutdown state, boot them and use the option Switch Management Access. Using this option you can change the state from agentless management to managed by agent mode.
You can always use the option Switch Management Access to switch between managed by agent and agentless management mode.
You cannot create zones on a global zone that is managed agentless. For an agentless managed zone, you can boot, shutdown, halt and delete the zone. Agent is required on the zone when you want to use the full range of OS update actions on the OS.
When you use the native CLI to create a zone, the new zone is automatically reflected in the UI. You can interchangeably use the CLI and the UI to perform zone functions. The UI reflects the change in the zone configuration and state.
You can also other options like Find Asset to discover an asset with Service Tags. See Chapter 2, "Asset Management" for more information about discovering and managing an asset in Oracle Enterprise Manager Ops Center.
The discovered zones are displayed in the UI and the following actions are enabled for the zone.
You can see that the options Migrate Zone and Add Storage options are not enabled as the zone storage source is unmanaged. To have these actions enabled, you must move the storage source to managed using the option Move Storage.
Refer to the section for Zone Management Functions for more information about performing zone management operations.
When you delete or unmanage the global zone, all the non-global zones under it are also automatically unmanaged.
You need not require to unmanage the non-global zones first and then the global zone. See Chapter 2, "Asset Management" for more information about deleting an asset.
When you discover and manage existing zones, Oracle Enterprise Manager Ops Center handles the zone metadata and networks except for the zone storage. The metadata of the existing zones is stored in the local storage of the global zone. Whereas, the zone's storage is considered to be unmanaged storage source.
Even for the zones that were created using Oracle Enterprise Manager Ops Center, when you add a storage or file system manually using the native CLI, then it becomes an unmanaged storage or file system.
See Move Storage for more information about how to move the unmanaged storage to managed storage.
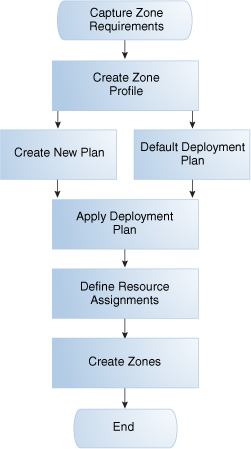
Using Oracle Enterprise Manager Ops Center, you create zone profiles that captures the zone configuration. Use the profile in a deployment plan to create one or more zones simultaneously. The benefit of using a profile is that you can create multiple zones with consistent configuration.
Note:
When you create or migrate a zone using Oracle Enterprise Manager Ops Center, you cannot use Oracle Solaris Live Upgrade and an alternate boot environment (ABE) to update the zone.Create a zone profile that captures all the zone configurations. Then, create a deployment plan with the zone profile. The deployment plan is a single step plan which covers only the zone profile. During the application of the deployment plan, select the number of zones to create. In the plan deployment, you can correct the storage and network details as required.
Before you create a zone profile, determine the requirements for the zone. The requirements varies according to the Oracle Solaris OS version and the type of zone. Refer to the following section according to the Oracle Solaris OS version on which you create the zones:
You can create sparse root, whole root, and branded zones on Oracle Solaris 10 OS. While creating the zone profile, select the appropriate options and provide the required resources for a successful zone creation.
Requirements for a Whole Root Zone
A whole root zone contains a read/write copy of the global zone's file system and has the following requirements:
Minimum size of the file system is 5 GB.
Minimum size of the virtual disk for the storage library is 6 GB.
Requirements for a Sparse Root Zone
A sparse root zone contains a read/write copy of a portion of the global zone's file system and shares the global zone's/usr, /lib, /sbin, and /platform directories in read-only mode. A sparse root zone has the following requirements:
Minimum size of the file system is 1 GB.
Minimum size of the virtual disk for the storage library is 1 GB.
Requirements for a Branded Zone
A branded zone emulates the user environment of earlier versions of Oracle Solaris. For example, you can create a branded zone to run Oracle Solaris 8 applications on your Oracle Solaris 10 system. Use the following procedure to prepare to create a branded zone:
Download the images for the operating system, as shown in Table 14-2.
Import the images into one of the software libraries associated with the global zone.
During the process of creating a branded zone, you install the images in the global zone. For instructions, see the README files in the Oracle Solaris 8 or 9 Containers bundle.
Table 14-2 Packages for Branded Zones
You can install zones in Oracle Solaris 11 OS either using the IPS packages in the default Oracle Solaris 11 Package Repository or using an image of an installed system running the Oracle Solaris release.
To install zones using images, you must have an Oracle Solaris 10 image in flash archive format or from an existing Oracle Solaris 11 OS image in gzip format. See http://www.oracle.com/technetwork/documentation/solaris-11-192991.html for how to prepare your installed Oracle Solaris 10 or 11 systems, and create the flar or gzip image. Upload these images to the storage libraries and install branded zones in Oracle Solaris 11 OS.
Requirements for Installing Zones Using Repository
To install zones from the repository, configure your Oracle Solaris 11 Software Update Library in the Enterprise Controller to synchronize with the Oracle Solaris 11 Package Repository. When you install from repository, the default software group, solaris-small-server group is used. This occupies less space. The zones are whole root type only.
Requirements for Oracle Solaris 10 Branded Zone
You can migrate an Oracle Solaris 10 OS into an Oracle Solaris 11 environment. Create an archive of the Oracle Solaris 10 instance that you would like to migrate. In the Enterprise Controller software library, import an ISO image of Oracle Solaris 10 OS that has the same architecture of the instance to be migrated, for example, SPARC or x86 architecture. Then, import the flar archive with the parent as the ISO image imported previously.
For Oracle Solaris 11 OS, create an archive in the format of gzip file using cpio command. Import the archive into Enterprise Controller software library with the reference to the parent ISO image.
You can migrate only systems that have Oracle Solaris 10 10/09 or later versions. To migrate earlier versions, install the kernel patch 141444-09 (SPARC) or 141445-09 (x86/x64), or later version, on the original system.
Since zones do not nest, existing zones in the original system is detected and a warning is issued that nested zones are not usable and that the disk space can be recovered.
To use the Oracle Solaris 10 package and patch tools in your Oracle Solaris 10 Container, install patches 119254-75 (SPARC) and 119255-75 (x86/x64) on your source system before the image is created. The P2V process works without the patches, but the package and patch tools do not work properly within the solaris10 branded zone.
To use Oracle Solaris 10 zones on your system, the system/zones/brand/s10 package must be installed on the system running Oracle Solaris 11 OS.
When you create a zone profile, you can provide zone configuration details such as CPU model, memory caps, priority value, network mode, and storage resources for the zone.
Zone name – Specify a unique name for the zone. Do not use names that start with global or SUNW.
Autoboot – Specify whether the zone must boot immediately after you create it and whenever the global zone boots.
Shared CPU – A zone with a shared CPU gets its CPU resources by the number of shares you allocate to it from the resource pool, which is also used by other zones. The new zone is added to the Fair Share Scheduling automatically. You have the option to set a maximum value for the CPU resources. The CPU cap limits the amount of CPU resources that can be used by one zone. For example, a CPU cap value of 1 means 100% of a CPU.
Dedicated CPU – A zone with a dedicated CPU gets exclusive use of the available CPU resources. You specify the minimum and maximum number of CPUs available to the new zone. A temporary resource pool is created and dedicated to the zone.
Importance – This parameter is available when you select dedicated CPU. Set the priority of the zone. Assign an importance value for the zone so that when there are not enough CPU resources to satisfy all zones, the zone with the greater importance value receives a larger share of the available CPU resources.
Priority of recovery – When you enable automatic recovery for the zone, the priority of recovery value decides which zone must be migrated first during a global zone failure in a server pool. Set the priority of recovery between 0 to 100.
Memory Caps – Set the maximum value for physical, swap and lock memory resources.
Naming Service – Specify the name service that the zone uses to communicate with network objects. You can select the DNS, NIS, NIS+ or LDAP naming service. To specify the name service, you require the domain name and the IP address of the name server.
Shared IP Address or Exclusive IP Address
A zone with a shared IP address uses its global zone's IP layer configuration and state. The zone has a logical network interface to the IP address.
A zone with an exclusive IP has its own dedicated IP layer configuration and state. The zone has its own set of network interfaces. You must configure the network interfaces using the same network configuration methods applied to all Oracle Solaris OS configurations.
For Oracle Solaris 11 OS, only exclusive IP mode is supported for the network.
Oracle Enterprise Manager Ops Center provides option to create profile that captures the zone configuration. Use the zone profile in a deployment plan and apply to create one or more zones simultaneously.
Select Plan Management section in the UI.
Click Oracle Solaris Zone in the Profiles and Policies tree.
Click Create Profile in the Actions pane.
The Create Profile – Oracle Solaris Zone wizard displays.
Enter a name and description for the profile identification.
Select whether you want to create a deployment plan automatically using this profile.
Select the OS version of the zone.
You must ensure that you apply the plan on correct target to create the zone. See Table 14-3 for more information.
Table 14-3 Oracle Solaris Zones Targets
Click Next to specify the zone identity.
You can create one or more zones using the profile. To identify the zones, provide a zone prefix name and a number to start the series.
Each zone created uses the prefix name appended with the number that will be incremented. For example, if the prefix name is Myzone and the number to start from is 1, then the zones will be created with names Myzone1, Myzone2, and Myzone3.
Enter the description and tags for the zones. This is common for all the zones created using this profile.
Click Next to specify the zone installation source.
According to the OS version selected, the page displays the following information:
Oracle Solaris 10
Select whether you want to create whole root, sparse root, or branded zone. For branded zone, provide the following information:
Select the architecture as x86 or SPARC
Select the branded zone image. You must have created a flash archive image of an installed Oracle Solaris 10 OS and uploaded to the software library in Oracle Enterprise Manager Ops Center. These images are listed in the Branded Zone Image list.
Enter the prefix for the Host ID and the starting number.
Select the machine type as sun4u or sun4v.
Oracle Solaris 11
You must select the installation source for installing Oracle Solaris 11 zones. You have the following options to select:
Install from repository. You must have configured your Oracle Solaris 11 Software Update Library in Oracle Enterprise Manager Ops Center in synchronization with the Oracle Solaris 11 Package Repository. This option installs the solaris-small-server software group by default. This is also referred to as the whole root zone for Oracle Solaris 11 OS.
Install from selected image. You must have created gzip archive image of an installed Oracle Solaris 11 OS and uploaded to software libraries in Oracle Enterprise Manager Ops Center. Select an image from the list. The gzip archive formats can be created using cpio or zfs command options.
Oracle Solaris 8 and 9
You can install Oracle Solaris 8 and 9 as branded zones on Oracle Solaris 10 OS only.
Download the images of Oracle Solaris 8 or 9 a and upload them to a software library. Refer to Requirements for Zones on Oracle Solaris 10 OS for more information about requirements for branded zones.
Click Next to specify the zone configuration details.
Specify the CPU type and memory thresholds. The CPU type can be either Shared or Dedicated. Set the memory thresholds and verify that the locked memory threshold value is less than or equal to the physical memory threshold.
You can enable automatic recovery option for the zone. Set the priority of recovery value between 0 to 100. This value decides which zone must be recovered first when the global zone fails.
Click Next to specify the zone file system.
The zone is created with a default root file system which is the zone path. You cannot delete this file system or change its read and write access. You can add more file systems from original zone's list of file systems. Set the size and access to the file system.
For each file system added, specify whether it is managed or unmanaged. When it is unmanaged, enter the mount point for the file system.
The Reserved size is the size of the file system that the user can reserve. The Quota size is the maximum size that the file system can utilize.
Click Next to configure the zone's storage.
Select the storage library for the zone and its metadata.
You can store the zone metatdata in the local or NAS library only. To migrate a zone, it is required that you store the zone metadata in a NAS storage library.
All the libraries that are available in the Oracle Enterprise Manager Ops Center are listed. Select the library type and the corresponding libraries are listed. Select the library and the virtual disk for the zone. You can select library types such as NAS, SAN, Local, Local Devices, and Dynamic Storage.
Note:
When you specify a local storage library, you cannot migrate the zone in the future.Caution:
An Oracle Solaris Zone running with a zone path on a NFS share is not a supported configuration. When you specify this type of storage, do not use the zone for production or non-experimental workload.When the library is local or NAS storage, specify the virtual disk name and size of the disk. For SAN library, select a LUN from the available list. You cannot change the size of the LUN and the size of the local devices.
For Dynamic Storage, select the Dynamic library that is available for the discovered storage servers in Oracle Enterprise Manager Ops Center. You can select the existing LUNs or create new LUN. Select Create LUN in the drop-down list of the column LUN/Virtual Disk Name and select the volume group. The size of the volume group is automatically displayed.
Click Next to specify the zone networks.
Select the networks that you want to connect to the zone. Also, specify the number of connections to the zone for each network. The actual binding of the networks takes place during deployment of a plan with this profile.
Click Next to specify the zone setup parameters.
Specify the following setup parameters:
Language, time zone, terminal-type and root password for the zone.
Provide a domain name for the NFSv4 Domain Name or accept the default value dynamic to allow the naming service that you specify in Step 14 to determine the NFSv4 domain at run time.
Set the boot properties for the zone. You can set the zone to boot after it is created or whenever the global zone boots.
For Oracle Solaris 10 version, you can select whether to install the agent on the zone or not. When the agent is not installed, the global zone access the zone through zlogin.
Click Next to specify the naming services.
Specify the naming service for the zone: DNS, NIS, NIS+ or LDAP naming service. You can also choose not to specify a naming service.
DNS – Enter the domain name of the DNS server and the IP address of the DNS server You can enter up to three IP addresses in the Name Server field. To specify additional domains to search, enter up to six domain names for the Domain Name Search List. The total length of each entry cannot exceed 250 characters.
NIS and NIS+ – Enter the domain name of the NIS or NIS+ server. When you know the NIS server details, choose the Specify an NIS Server option to provide the NIS server host name and its IP address. When you do not have the NIS server information, select the Find an NIS Server option.
LDAP – Enter the domain name of the LDAP server. Specify the name of the LDAP Profile. Enter the IP address of the LDAP Profile Server. You can also provide the Proxy Bind Distinguished Name and Password.
NONE – Select this option so that no name server is configured.
Click Next to view the summary of the selected parameters for creating a zone profile.
Review the information and click Finish to create the zone profile.
The zone profile is created with version 1 and a corresponding deployment plan also with version 1. Apply the deployment plan to create one or more zones of consistent configuration.
Apply the zone deployment plans on the required number of targets. When you apply the deployment plan, you are required to provide the resource assignments for storage and network. When there are resources that are provided from the profile are not available or not accessible, it is flagged in red and you must re-assign the resources to continue further.
Use zone deployment plans to modify the parameters such as storage, networks, and zone name. The zone deployment plan is a single step plan which collects details of the number of zones to be created. You can also create your own zone deployment plans.
To Create a Zone Deployment Plan
In the Plan Management section, expand Deployment Plans and select Oracle Solaris Zone.
Click Create Plan from Template in the Actions pane.
Enter a name and description for the plan.
Select the failure policy.
In the Deployment Plan Steps, select the Oracle Solaris Zone profile.
Enter the number of zones to create.
Click Save to save the deployment plan.
When you modify the zone profile, you can choose to update the deployment plan with the correct version of the zone profile.
Zone deployment allows you modify the parameters such as storage, networks, and zone name. When you apply the zone deployment plan, resource assignments that are not available is marked in red and it must be corrected.
Select the zone deployment plan and click Apply Deployment Plan in the Actions pane.
Select the target asset from the list and click Add to Target List.
You can add more than one asset to the list.
Select how to apply the plan.
You can either apply the plan with minimal interaction or override the profile values. When you select to override the profile values, you are taken through each step of the profile. Otherwise, you will be directed to provide only the required resource assignments. In this procedure the minimal interaction is taken into consideration. Click Next.
In the Specify Storage Step, correct the storage resources defined in the profile if required.
For example, when the selected storage libraries in the profile are not associated with the target global zone., then you must modify the storage resources accordingly.
Click Next to specify the zone networks.
The IP stack for the zone can be Shared or Exclusive. Select the IP stack and the network list are updated accordingly.
For Shared IP network:
Select a network from the list.
The address allocation method is Use Static IP only. This is fixed for shared IP networks.
Enter the IP address. When you create more than one zone, enter the IP addresses either in the form of range, separated by comma or both. For example, 192.168.1.2 - 192.168.1.5, or 192.168.1.10, 192.168.1.210, 192.168.1.167.
For Exclusive IP network:
Select a network from the list.
Enter the number of times that the zone will be connected to the network. This is applicable only for exclusive IP networks.
Note:
For Oracle Solaris 11 OS, you can connect to networks configured as exclusive IP stack only.Select the type of address allocation. Use static IP or DHCP allocated.
When the allocation is static, then the IP range for the zones is proposed. The range depends on the number of zone and number of connections for each zone. You can modify the IP range as required.
Click Next to define the network resource assignment.
Modify zone host name and network assignment as required. You can also add or remove the network assignment to a zone.
For each network connection of the zone, the NIC and the individual IP address is displayed. Each zone's host name is also editable. Modify the zone resource assignment as required.
Click Next to schedule the job.
Select either to run the zone creation job now or schedule to a later time.
Click Next to view the summary.
Review the information provided for creating zones. Click Apply to start the zone creation tasks.
Creating zones with Oracle Enterprise Manager Ops Center results in the following operations which run automatically in the background:
The file systems of the zones are implemented as ZFS file systems.
A zpool is created for each zone with the name of the zone metadata.
The storage that is allocated to the zone is pooled in a zpool and used by all the file systems.
You can modify the configuration of a zone to change the CPU or memory resources, scheduler, and the identity of the zone. When you modify the CPU and memory configuration, you must reboot the zone for the changes to take effect.
You can modify the following properties of a zone:
CPU Model – The CPU model can be shared or dedicated. For a shared CPU, you can modify the number of CPU shares allocated to the zone. For a dedicated CPU, you can edit the minimum and maximum dedicated CPU numbers. You can also set the relative importance of the zone compared to other zones when contending for CPUs.
Memory Caps – You can specify caps on various aspects of memory used by the zone. You can modify the caps set for physical, swap, and locked memory.
Scheduler – For shared CPU model, the scheduler is assigned to Fair Share Scheduler (FSS). For a dedicated CPU model, you can set the following scheduler attributes:
Fair Share Scheduler (FSS)
Fixed Priority (FX)
Interactive (IA)
Real-time (RT)
Timer Sharing (TS)
LightWeight Processes (LWP) – You can set the maximum number of LWPs simultaneously available to a zone.
Message IDs – Set the maximum number of message queue IDs.
Semaphore IDs – Set the maximum number of semaphore IDs.
Shared Memory IDs – Set the maximum number of shared memory IDs.
Shared Memory – Set the maximum amount of shared memory.
Automatic Recovery – Set the value of priority of recovery. Zone with highest priority will be recovered first when the server fails.
Use the option Edit Attributes to modify the description and tags of the zone. You can also add new tags to the zone.
After creating the zones, you can perform various operations such as boot, reboot, shut down, and halt on the zone. Oracle Enterprise Manager Ops Center provides all these options to be performed from the UI. The UI updates the status of the zone when you perform these operations from the CLI.
Select the global zone Summary tab in the center pane. The actions available for the zone are displayed as in Figure 14-7.
The same actions are available in the Actions pane when you select the zone.
Simple zone operations that can be performed from the UI are as follows:
Booting a zone places the zone in the running state, using the current configuration. This option is enabled only when the zone is in the ready or installed state. The zone boots whenever the global zone boots depending on the autoboot properties set during zone creation.
You can reboot a zone that is in the running state. The zone is shut down and then booted. This is different from the zoneadm reboot command in which the zone is first halted and then booted.
When you halt a zone, it removes both the application environment and the virtual platform of the zone. Halting a zone changes the zone's state to Installed, all processes are killed, devices are unconfigured, network interfaces are unplumbed, file systems are unmounted, and the kernel data structures are destroyed.
Shut a zone down in a graceful manner so that it is in a state that can be restarted.
When you delete a running zone, the zone is halted, uninstalled, then deleted from the global zone. The following changes are also made:
Zone root file system is deleted.
Other file systems that were added to the zone are deleted.
Zone metadata is deleted from the storage library.
The zpool for the zone is deleted and the storage is made available.
Exclusive IPs that were assigned to the zone are available for re-use.
Use this option to copy an existing zone so that you can provision a new zone on the same system efficiently. The process of cloning a zone is similar to the process of creating a zone because you can accept each of the original zone's specification or change it before you create the copied zone.
Select the zone that you want to clone in the Assets tree.
Click Replicate Zone in the Actions pane.
The Replicate Zone wizard displays.
Enter a different zone name and description for the zone.
Select a library from the list of libraries that are associated with the global zone to store the cloned zone's image and metadata.
Click Next.
The CPU shares that are allocated in the original zone are displayed. You can edit the changes for the cloned zone.
Click Next.
Accept or change the attributes of the original zone: language, timezone, terminal type, host name and root password.
Click Next.
Set the boot properties for the cloned zone. You can set the properties so that the new zone boots after it is created and whenever the global zone boots.
Click Next.
Configure the file systems for the cloned zone. The new zone has a default root file system which is the zone path. You cannot delete this file system or change its read and write access. You can add more file systems from original zone's list of file systems. Accept or change the size and access to the file system. The Reserved size is the size of the file system that the user can reserve. The Quota size is the maximum size that the file system can utilize.
Click Next.
Note:
Make sure that the cloned zone has the same or more size for its file system than the size of the original zone's file system. When the cloned zone's file system is smaller than the original zone's file system, the clone operation cannot complete and the job fails. Do not modify the root file system of the new zone to a size less than the source zone root file system. Do not modify the system file system if it is defined in the source zone.Accept or change the storage library. The library can be either a NAS storage or Fibre Channel library. When the library is NAS storage, specify the virtual disk name and size of the disk. For SAN library, select a LUN from the available list of LUNs in the library. The size of the selected LUN is displayed. You cannot change the size of the LUN.
The accumulated size of the storage is displayed as Currently Accumulated Storage. The required storage is displayed as Recommended Storage Size. Click the Add icon to configure more storage resources to the zone if the Currently Accumulated Storage is less than the Recommended Storage Size. When you have defined the Currently Accumulated Storage size as at least equal to the Recommended Storage size, click Next.
Assign at least one network to the zone. Select the zone IP type as Shared or Exclusive.
For Shared IP networks:
Select a network from the list of networks that use the Shared IP mode and are assigned to the global zone.
Select a NIC from the list of shared Network Interface Cards (NIC).
Specify the management interface for the N IC. When the network has a defined IP range, the Auto Allocate IP option is displayed with the zone's IP address from the range. When the network does not have a defined IP range, the Use Static IP option is displayed. Type an IP address for the zone in the Zone IP field.
For Exclusive IP networks
Select a network from the list of networks that are assigned to the global zone and are not used by other zones.
Select a NIC from the list of the selected network's NICs that are not bound or assigned to other networks.
Specify the management interface for the NIC. When the selected network has a defined IP range, the Auto Allocate IP option is displayed in the Management Interface and the zone's IP address is populated with an IP address from the defined range.
When the network does not have a defined IP range, you must either provide the IP address or specify a DHCP server to provide one. To provide an IP address, select the Static IP option and type the IP address in the Zone IP field. To designate a DHCP server, select the Assigned by ext. DHCP option. The Zone IP field contains the Automatically Allocated value.
Click Next.
Click Finish to launch the job for replicating a zone.
You can add storage to zones dynamically. The storage is added to the zpool that is created for the zone. You cannot delete the storage from the zpool.
The storage libraries that are associated with the global zone are available for the zone. The libraries can be of the type file system storage or block storage. The filesystem storage that can assigned to a zone are NAS libraries. The block storage that can be assigned to a zone are SAN, and Dynamic storage libraries.
Apart from these storage libraries, you can also add the local storage on the global zone and local devices that are attached to the system.
See Chapter 6, "Storage Libraries" and Chapter 5, "Software Libraries" for more information about setting up your storage servers and software libraries.
Select the zone in the Assets tree.
Click Add Storage in the Actions pane. As an alternative, select the Storage tab and click the Add Storage to Zone icon under Zpool and Storage.
The Add Storage to the Zone window displays.
Click the Add icon to add storage.
The storage libraries associated with the global zone are displayed in the Library list. The library can be a local storage, NAS, local device, Dynamic Storage, or SAN library.
Select a library from the list.
The selection of virtual disks varies according to the library selected.
Local and NAS library – Enter a virtual disk name and specify the size of the disk.
For SAN and iSCSI libraries – Select a LUN from the list. The size of the LUN displays automatically.
For Dynamic Storage Library – Either select a LUN from the list or create new LUN. When you create a new LUN, select the volume group from the list and specify the size of the new LUN.
The Additional Storage Specified shows the additional storage added to the zone.
Click Add Storage to add the specified storage to the zone.
The specified storage is added to the zone.
Some of the management and monitoring functions of the zone might be disabled depending on the managed resources of the zone. For example, the zone migration option is disabled when the zone file system is not on a shared storage.
To enable the storage management and monitoring functions of the zone, you must move the zone's existing storage to a shared storage. This provides the following options to you to manage the storage and zpools:
Convert the local storage to shared storage so that you can migrate zones.
Convert the experimental NFS file systems into local or shared storage.
Combine small ZFS pools per zone into a single ZFS pool.
Split a single ZFS pool hosting zones into ZFS pools dedicated to each zone.
Oracle Enterprise Manager Ops Center provides the option Move Storage to convert the storage of the zones. You can use this option to manage your unmanaged storage resources of the zone. However, you cannot move a managed storage to unmanaged storage. You also cannot alter the root file system of the zone.
When you discover and manage existing zone environments in Oracle Enterprise Manager Ops Center, the storage is considered to be unmanaged. You can move this storage from unmanaged state to managed using this option.
Select the zone for which you want to move the storage.
Click Move Storage in the Actions pane.
A warning message displays that the zone will be shutdown during this process and you can use this option to move the zone metadata to a shared storage and unmanaged file systems to the dedicated zpool of the zone.
Figure 14-9 Warning Message for Move Storage
Click Continue Move to proceed with the move storage process.
The Move Storage wizard displays. The zone details are displayed.
You can edit the description and tags of the zone.
If required, you can change the library in which you have stored the zone metadata. All the libraries associated with the global zone are listed. Select the library from the list.
Click Next.
Select the file systems that you want to be managed.
When there are unmanaged file systems in the zone, you can select the option Managed and provide the Reserved and Quota size of the file system. These are added as new ZFS file systems on the existing zpool for the zone.
When you want to move the root file system to a managed storage, a dedicated zpool is created for the zone and you must proceed to configure the virtual disks for the file systems.
You can also modify the size of the file systems except for the root file system.
You can leave some of the unmanaged file systems as such and move only those you require.
You cannot move a managed storage to unmanaged storage.
Click Next to configure the virtual disk storage when you move the root file system from unmanaged to managed state.
Select the library and the virtual disk for the zone's storage.
The libraries associated with the global zone are listed. You can select NAS, SAN and Dynamic Storage library from the list.
For NAS library, provide a virtual disk name and enter the size of the disk.
For SAN, select a LUN from the list.
For Dynamic Storage library, either select a LUN or create new LUN from the list. When you create a new LUN, select the volume group and enter the size of the LUN.
Click Next to view the summary.
Review the information and click Finish to move the zone storage from unmanaged to managed.
You can add file systems to zones. The zone must be in shut down state to add file systems. The storage source for the file system can be either managed or unmanaged storage source. For unmanaged storage source, you must provide the mount point of the storage.
Provide the Reserved and Quota size for the file system. Boot the zone for the changes to take effect. The file system is added to the existing zpool of the zone.
To Add a File System to a Zone
Select the zone in the Assets tree.
Click Add File Systems in the Actions pane.
The Add File Systems window displays.
Click the Add icon to add file system.
Enter the file system.
Select whether the storage is managed or unmanaged.
When it is not managed, enter the mount point of the storage source.
Enter the Reserved and Quota size for the new file system.
Click Add File Systems.
Boot the zone for the changes to take effect.
You can connect and disconnect networks from non-global zones. The networks attached to the corresponding global zone are available for the zones. The shared IP zones can connect to only networks that are specified for shared IP mode. The exclusive IP zones can connect to only exclusive IP networks.
Select the network and click the connect or disconnect icon as required.
Use the options Enable Automatic Recovery and Disable Automatic Recovery to set the recovery option of created zones. To set automatic recovery for the zone, select the option Enable Automatic Recover. Edit the zone configuration to set the priority of recovery. The zone with highest value will be recovered first. See Recovering Zonesto manually recover the zones.
In Oracle Enterprise Manager Ops Center, zone migration is a cold migration because the zone is shut down, all applications are stopped, the migration occurs, and then the zone is restarted.
To enable migration action for a zone, the zone storage must be on a shared storage. When a zone uses local storage, use the Move Storage option to change the storage from local to shared.
This section describes the procedure for the following types of migration:
Migrating an Oracle Solaris system into a new non-global zone. This is referred to as physical to virtual (P2V) conversion. See Migrating a Physical Oracle Solaris System into a Zone
Migrating a non-global zone from one global zone to another global zone, when all components are managed by Oracle Enterprise Manager Ops Center. See Migrating Zones to a Different Machine
Migrating a non-global zone that has dependencies that are not managed by Oracle Enterprise Manager Ops Center. This process uses a script to perform the migration. To migrate unmanaged file systems, see Script to Migrate a Zone With Dependencies
Note:
When you migrate a zone, the Alternate Boot Environment (ABE) is not supported.A "physical to virtual" (P2V) conversion moves an existing Oracle Solaris system into a new non-global zone on the target system's global zone.
Figure 13–3 diagrams the steps for a P2V conversion.
Figure 14-10 Workflow for Migrating an Existing Oracle Solaris System Into a Zone
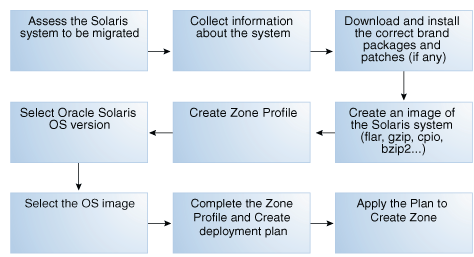
Ensure the following before migrating the zone:
Assess the system to be migrated and collect information.
See http://docs.oracle.com/cd/E19683-01/817-1592/ for information about collecting information about the source system.
The system image to be installed in the non-global zone must not be newer than the target global zones's operating system release or the installation fails.
The destination global zone must be running at least Oracle Solaris 10 8/07 OS.
The supported branded zones are Oracle Solaris 8 and 9. For the branded zones to be supported on the destination global zone, remove the following brand packages from the global zone:
SUNWs8brandu
SUNWs8brandr
SUNWs9brandu
SUNWs9brandr
For instructions to download and install the correct brand packages, refer http://docs.oracle.com/cd/E22645_01/index.html
Using Oracle Enterprise Manager Ops Center you can migrate one or more zones simultaneously. You can either migrate the zone to an individual global zone or to a zones server pool. When you migrate zones to a server pool, the target global zone depends on the server pool placement policy.
When you migrate a zone, perform a trial run before submitting the migration job to verify that the target global zone has the correct configuration to host the non-global zones.
The target global zone must have same or later versions of the following operating system packages and patches that are installed on the non-global zone.
Packages that deliver files under an inherit-pkg-dir resource
Packages where SUNW_PKG_ALLZONES=true
Other packages and patches, such as those for third-party products, can be different.
When the source and target global zone do not have the same patches and packages during migration, then you can either update the zones patches and packages to match the target global zone or migrate without updating the zone patches and packages.
When the target global zone has later versions of the zone-dependent packages or patches, update those packages in the non-global zone before the migration to match the target global zone. When the target global zone supports the update on attach capability, it checks the non-global zone for packages that must be updated and only those packages are updated. The rest of the packages, and their associated patches, can vary from zone to zone.
You cannot downgrade the patches and packages of the zones to a lower version. In such cases, the update option fails.
The patches that must be backed out of the zone before the update are also listed. You must remove the patches manually and run the migration job again.
You can change the Name, Description, Tags, and NIC details of the non-global zone but, when you change other configuration, a warning message indicating that to change the zone configuration you must execute the sys-unconfigure command on the zone.
After you migrate a zone, you cannot use an alternate boot environment (ABE) to upgrade the zone.
Compatible Global Zones for Migration
When you click the Migrate Zone option in the Actions pane, Oracle Enterprise Manager Ops Center checks all global zones for compatibility with the source global zone. When there are compatible global zones, the Migrate Zone wizard displays.
Otherwise, the following pop-up window displays.
Figure 14-11 Message Displayed When No Global Zones are Compatible
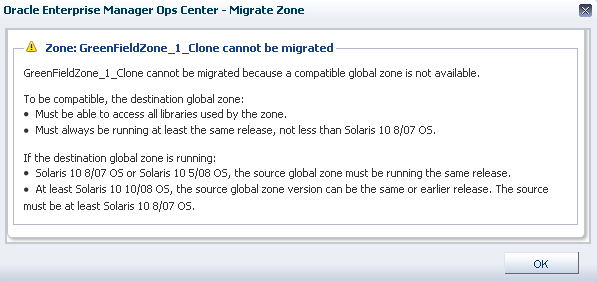
Table 14-4 shows the compatible global zones, depending on the operating system release.
Table 14-4 Compatible Global Zones
| Source Global Zone | Compatible Target Global Zone |
|---|---|
|
Oracle Solaris 10 8/07 |
Oracle Solaris 10 8/07 Oracle Solaris 10 10/08 Oracle Solaris 10 5/09 Oracle Solaris 10 10/09 Oracle Solaris 10 9/10 Oracle Solaris 10 8/11 |
|
Oracle Solaris 10 5/08 |
Oracle Solaris 10 5/08 Oracle Solaris 10 10/08 Oracle Solaris 10 5/09 Oracle Solaris 10 10/09 Oracle Solaris 10 9/10 Oracle Solaris 10 8/11 |
|
Oracle Solaris 10 10/08 |
Oracle Solaris 10 10/08 Oracle Solaris 10 5/09 Oracle Solaris 10 10/09 Oracle Solaris 10 9/10 Oracle Solaris 10 8/11 |
|
Oracle Solaris 10 5/09 |
Oracle Solaris 10 5/09 Oracle Solaris 10 10/09 Oracle Solaris 10 9/10 Oracle Solaris 10 8/11 |
|
Oracle Solaris 10 10/09 |
Oracle Solaris 10 10/09 Oracle Solaris 10 9/10 Oracle Solaris 10 8/11 |
|
Oracle Solaris 10 9/10 |
Oracle Solaris 10 9/10 Oracle Solaris 10 8/11 |
|
Oracle Solaris 10 8/11 |
Oracle Solaris 10 8/11 |
|
Oracle Solaris 11 |
Oracle Solaris 11 Oracle Solaris 11 Update 1 |
|
Oracle Solaris 11 Update 1 |
Oracle Solaris 11 Update 1 |
Verify the following conditions
The source and target global zones are compatible.
The source and target global zones have access to all the libraries associated with the non-global zone.
The non-global zone's metadata is not stored in the source global zone's local library.
The non-global zone's data is not stored in the source global zone's local library. The zone must use a shared storage library.
The non-global zone is in the running state.
For a server pool, it must have at least one compatible global zone for migration.
When you migrate the zone, a warning message indicates that when you change the zone configuration except for Name, Description, Tags, and NIC details, you must execute the sys-unconfigure command on the zone. Also, when the NIC names are changed for a zone that uses exclusive IP mode, the /etc/hostname.itf and /etc/dhcp.itf file are renamed accordingly.
When the target global zone does not support backout on attach capability, you must remove or downgrade the patches and packages manually before you can continue with the migration. Create an update profile that includes the patches that must be removed. Run an update job with this update profile. Repeat the migration job on the zone after the removal of the patches and packages.
Click Migrate Zone in the Actions pane.
A warning message indicating that when you change the zone configuration except for Name, Description, Tags, and NIC details, you must execute the sys-unconfigure command on the zone. Also, when the NIC names are changed for a zone that uses exclusive IP mode, the /etc/hostname.itf and /etc/dhcp.itf file are renamed accordingly.
Click Continue Migration.
The Migrate Zone wizard displays.
Select an individual global zone or server pool as the target.
The compatible global zones list the number of zones that are already running, total CPUs, and available dedicated CPUs. The server pools list the average usage of CPU and memory.
Click Next. The zone migration test starts.
Review the migration test result. Select an update option to continue the migration on the target global zone or server pool:
Update the patches and packages of the zone to match the target and then migrate the zone.
Migrate the zone without updating its patches and packages.
Click Save Test Result As to save the migration test result. When you want to change the target, click Previous and select another target to run the migration test.
Click Next to review the zone identification.
When the zone name already exists in the target global zone, you must change the zone name.
Click Next to specify the zone setup.
Select the language, timezone, and terminal type for the zone. The host name is the zone name as defined.
The dynamic value for NFSv4 domain name enables the domain name to be derived dynamically from the naming service configuration. To hard code the value for NFSv4 domain, provide a domain name.
Leave the password fields empty to use the existing password. Click Next to define the network interfaces.
You must have at least one network interface for the migration to continue. The network interfaces that are not accessible to the target global zone are displayed in yellow. Specify a new network interface for the inaccessible networks or select Do Not Connect to that network.
Select the network which is marked in yellow color. The network interface details are displayed under Network Interface.
Select a new network interface from the Network list or select Do Not Connect. The selected network can be either shared or dedicated. Enter the required network interface information for the selected network.
Click Next to specify the naming service.
Specify the naming service for the zone: DNS, NIS, NIS+ or LDAP naming service. You can also choose not to specify a naming service.
DNS – Enter the domain name of the DNS server and the IP address of the DNS server You can enter up to three IP addresses in the Name Server field. To specify additional domains to search, enter up to six domain names for the Domain Name Search List. The total length of each entry cannot exceed 250 characters.
NIS and NIS+ – Enter the domain name of the NIS or NIS+ server. When you know the NIS server details, choose the Specify an NIS Server option to provide the NIS server host name and its IP address. When you do not have the NIS server information, select the Find an NIS Server option.
LDAP – Enter the domain name of the LDAP server. Specify the name of the LDAP Profile. Enter the IP address of the LDAP Profile Server. You can also provide the Proxy Bind Distinguished Name and Password.
NONE – Select this option so that no name server is configured.
Click Next.
Review the summary of the migration job. When there are no patches and packages to be backed out, continue with the migration. When there are patches or patches that must be removed, a warning is displayed.
When the target global zone supports backout on attach capability, a warning is displayed that the a list of patches have been removed or downgraded.
When the target global zone does not support backout on attach, the patches and packages on the zone must be removed or downgraded manually so that the source zone matches the destination global zone. Cancel the migration or select a new target global zone.
Click Finish to submit the migration job.
Select the global zone from which you want to migrate the zones.
Click Migrate Zones in the Actions pane.
The Migrate Zones wizard displays. The list includes the zones running in the global zone.
Select one or more zones from the list. Click Next.
Select an individual global zone or server pool to which you can migrate the zones.
The table displays the list of eligible global zones and server pool to which you can migrate the zones. The target global zone in the server pool depends on the server pool placement policy.
Select an update option to continue with migration.
The source and the target global zones might not be in the same patch level. Either you can select to update the patches and packages of zone to match the target global zone or continue migration without updating the zone.
Review the details and click Finish to migrate the zones.
You can migrate zones even when the zone has dependencies that are not managed by Oracle Enterprise Manager Ops Center, for example, when the zone uses storage that is not part of the zpool. You can use scripts to extend the zone migration feature to include the migration of the dependencies such as storage or other resources that is not managed by Oracle Enterprise Manager Ops Center.
You can lose the additional unmanaged file systems of a zone during migration. To avoid this, use this script to migrate the file systems.
You can also develop your own scripts to migrate the dependencies and place it on the source and target global zone before migration.
The script for migrating the dependencies is executed in the following way:
The migration job checks for a script placed on both the source and target global zones. The migration job is aborted when the script is found only on one of the global zone.
When you create zones server pool, ensure that you upload the script to handle the unmanaged storage. The script is placed in all the global zones in the server pool and thus the migration of zone dependencies are taken care.
The job checks whether the script has zero on exit. A non-zero exit is a failure and the migration job fails.
The script is called on the global zone six times when the migration job is executed.
Table 14-5 Script Call to Environmental Variables
During rollback phase, the same sequence is executed in reverse order. The environment variables values change accordingly:
PREOPERATION becomes PREROLLBACK
POSTOPERATION becomes POSTROLLBACK
The script must be executable and follow these conventions:
Good error checking and clean-up within the script
Standard exit code conventions
Non-zero exit indicates that an error has occurred
Informational messages are in stdout
Error messages are in stderr
The script must be named as guest-operations and placed in the /var/opt/sun/oc/public directory on both the source and target global zone.
See the Sample Script for migrating the additional inherited file systems of an adopted zone. The sample script is based on the assumption that /opt/ file system is the additional inherited file system. The script re-configures /opt/ file system on the target global zone before rebooting the zone. The script reconfigures the user-inherited file systems during POSTOPERATION_NOTRUNNING phase
#!/bin/sh

do_migration_action() {

 echo "executing migration action for zone ${OEMOC_ZONENAME}"

 if [ ${OEMOC_PHASE} != "POSTOPERATION_NOTRUNNING" ]; then
       exit 0
 fi

 #
 # for migration action, before starting the zone on the target GZ
 # add to /opt inherited filesystem.

 /usr/sbin/zoneadm -z ${OEMOC_ZONENAME} detach >/dev/null 2>&1
 if [ $? -ne 0 ] ;then
       echo "unable to detach ${OEMOC_ZONENAME}"
       exit 1
 fi

 echo "add inherit-pkg-dir" >/tmp/tmp-$$.txt
 echo "set dir=/opt" >>/tmp/tmp-$$.txt
 echo "end" >>/tmp/tmp-$$.txt

 /usr/sbin/zonecfg -z ${OEMOC_ZONENAME} -f /tmp/tmp-$$.txt >/dev/null 2>&1
 if [ $? -ne 0 ] ;then
       echo "unable to add inherit filesystem for ${OEMOC_ZONENAME}"
       exit 1
 fi

 /usr/sbin/zoneadm -z ${OEMOC_ZONENAME} attach -u >/dev/null 2>&1
 if [ $? -ne 0 ] ;then
       echo "unable to attach ${OEMOC_ZONENAME}"
       exit 1
 fi
}

echo ${OEMOC_ZONENAME}
echo ${OEMOC_PHASE}
echo ${OEMOC_OPERATION}

if [ ${OEMOC_OPERATION} = "MIGRATION" ] ;then
       do_migration_action
fi
exit 0
When the global zone crashes or must be halted, its non-global zones can be migrated to another global zone. However, this zone recovery procedure is not the same as zone migration because Oracle Enterprise Manager Ops Center cannot get access to the information in the global zone and therefore cannot perform compatibility checks. The procedure to move non-global zones from the source global zone to the target global zone is a forced attachment of the non-global zone.
The zone recovery procedure uses the Command Line Interface for the Oracle Enterprise Manager Ops Center.
See the Chapter 19, "Command Line Interface" for instructions on getting access to the CLI and the available CLI commands.
Verify that the zone metadata is on the NAS storage library.
Verify that both the source and target global zones have the same network connectivity.
Verify that the source and the target global zones have the shared storage.
Verify that the target global zone has access to t he same libraries associated with the non-global zone.
Verify that the non-global zone's metadata and operational data is not stored in a local library.
Verify that JDK version 6 is used. In the Enterprise Controller command prompt, enter the following command:
export JAVA_HOME=/usr/jdk/latest
Connect to the Oracle Enterprise Manager Ops Center CLI using the following command:
/opt/SUNWoccli/bin/oc
Connect to the local Enterprise Controller.
xvmSh > connect

localhost >
Enter the virtualization mode.
localhost > virtualization
localhost [virtualization] >
List the available global zones.
localhost [virtualization] >list_hosts

Name                  Type                  Health        Reachable     ObjectName
---------------------------------------------------------------------------------------------------------------------------------------------
gzhost36              zone                  OK            False         com.sun.hss.domain:type=xVMServer,name=NORM-NORM-localhost
gzhost44              zone                  OK            True          com.sun.hss.domain:type=xVMServer,name=NORM-NORM-localhost-4
List the zones that are running in the source global zone. For example, when the source global zone is gzhost36, then enter the following command.
Note:
Do not use the user-friendly name of the zone in the commands.localhost [virtualization] >list_hosts -C com.sun.hss.domain:type=xVMServer,name=NORM-NORM-localhost Name Type State Migratable ObjectName ---------------------------------------------------------------------------------------------------------------------------- test ZONE RUNNING True com.sun.hss.domain:type=Server,name=NORM-07e91405-8313-43ec-9671-dc320989866e
Select the destination global zone and start the zone on it. For example, when the destination global zone is gzhost44, execute then execute the following command to start the test zone on it.
localhost [virtualization] >startup -Z <source global zone> -D <target global zone>

localhost [virtualization] >startup -Z com.sun.hss.domain:type=Server,name=NORM-07e91405-8313-43ec-9671-dc320989866e -D com.sun.hss.domain:type=xVMServer,name=NORM-NORM-localhost-4

submitted job : <Ecname>-1.17
A job is submitted. You can view the status of the job in the Jobs pane.
After the zone is migrated to the target global zone, the zone is a managed zone of the target global zone. The zone might continue to be displayed under source global zone. This is because the status of the source global zone is not updated. After the source global zone is rebooted, the zone does not appear as one of its managed zones.
You can create server pool for zones in Oracle Enterprise Manager Ops Center. Pooling your virtualization hosts provides the capability for load balancing the virtualization servers, high availability and minimize power consumption.
All the information about creating and managing zones server pools are described in Chapter 17, "Server Pools".
Oracle Enterprise Manager Ops Center enables you to update the global and non-global zones. You can also patch zones that are running on a supported configuration. The installation of the patches on the zones depend on the package parameters and the attribute set for the patch commands. This section describes the parameters for installation of the packages and patches. The concepts involved in updating global and non-global zones, and the procedures to update the zones are described in this section.
Note:
When you use Oracle Solaris Live Upgrade to update the OS in a zone, you cannot use Oracle Enterprise Manager Ops Center to manage the zone. Alternate Boot Environment (ABE) is not supported for zones that were created using Oracle Enterprise Manager Ops Center.A patch is a collection of files and directories that replace existing files and directories that are preventing proper execution of the software.
You can install packages and patches on a zone. The patchadd and pkgadd commands operate in the background to install a patch and package respectively. However, the installation of packages on zones also depends on the parameters SUNW_PKG_ALLZONES, SUNW_PKG_HOLLOW, and SUNW_PKG_THISZONE. These parameters control whether a package can be installed on global zones or non-global zones. The actions for the parameters are as follows:
SUNW_PKG_ALLZONES – If the value is true, the package is installed on all zones, both global and non-global.
SUNW_PKG_HOLLOW – If the value is true, the package information is propagated to the non-global zones, but the package is not installed.
SUNW_PKG_THISZONE – If the value is true, the package is installed only in that zone.
In Oracle Enterprise Manager Ops Center, the patchadd, pkgadd, patchrm, and pkgrm commands are implemented without the -G switch by default. To install updates or packages only on the current zone, enable the -G switch by editing the .uce.rc file.
Note:
There is auce.rc file and a .uce.rc file. The uce.rc file is the default file an must not be edited. Verify that you are editing the .uce.rc file.Open the .uce.rc file in the /SUNWuce/agent/bin directory in the managed system.
Add the following lines to the .uce.rc file:
( all ) (invisible.__is_patchadd_g_specified, false)
( all ) (invisible.__is_patchremove_g_specified, false)
( all ) ( invisible.__is_pkgadd_g_specified, false)
Set the -G parameter to true for the action that you want to perform.
Save and close the file.
For this change to take effect, restart the services using the following commands:
svcadm disable -s update-agent
svcadm enable -s update-agent
In Oracle Enterprise Manager Ops Center, when a package or patch is installed, the patchadd and pkgadd commands are implemented in the background as shown in the following example:
patchadd <patchid>
pkgadd <pkgname>
You can change the way that these commands are implemented by enabling the -G switch. You can enable the -G switch to cause the patch or package to be installed to the target zone only if the package parameter SUNW_PKG_THISZONE is set to true. See Installing Packages and Patches on Zones for information about configuring the patchadd and pkgadd commands on the managed systems.
See the following scenarios when you are updating a global zone. The result for each scenario determines whether the update job is successful, depending on the package information.
Table 14-6 Updating a Global Zone Scenarios
| SUNW_PKG_ALLZONES | SUNW_PKG_THISZONE | SUNW_PKG_HOLLOW | Impact | Impact with -G Configuration |
|---|---|---|---|---|
|
False |
False |
False |
The package will be installed on the global zone, and all the non-global zones |
The package is installed only on the global zone. |
|
True |
False |
False |
The package is installed on the global zone and all the non-global zones. |
The |
|
True |
False |
True |
The package is installed on the global zone and the package information is made available on all the non-global zones. |
The |
|
False |
True |
False |
The package is installed only on the global zone. |
The package is installed only on the global zone. |
Patches are sets of updates to packages. When you install a patch, the patch is installed on the global zone and the non-global zones, depending on the package parameters as shown in the previous table.
Note:
Use caution while enabling the-G option on a host with sparse zones. Packages that are inherited from the global zone that are not SUNW_ALL_ZONES cannot be patched within a sparse zone.As a virtualization administrator, you can install packages and patches on non-global zones. The patchadd and pkgadd command must be used without options. Do not configure the -G switch to the commands while updating the non-global zones.
See the following scenarios when you are updating a non-global zone. The results of each scenario determine whether the update job is successful, depending on the package information.
Note:
The-G switch does not have effect on installing packages or patches in a non-global zone.Table 14-7 Updating Non-Global Zones Scenarios
| SUNW_PKG_ALLZONES | SUNW_PKG_THISZONE | SUNW_PKG_HOLLOW | Impact |
|---|---|---|---|
|
False |
False |
False |
The package is installed only on the target non-global zone. |
|
True |
False |
False |
The package installation fails. |
|
True |
False |
True |
The package installation fails. |
|
False |
True |
False |
The package is installed only on the target non-global zone. |
Note:
When the patch is installed only on the non-global zone, ensure that autoboot property is set to true for the zone. Otherwise, single user mode patches fail to apply as the zone does not come up after the reboot.Patches are sets of packages that must be installed. When one of the packages has the SUNW_PKG_ALLZONES parameter set to true, then the patch installation fails. For a successful patch installation, ensure that none of the packages have SUNW_PKG_ALLZONES parameter set to true.
Note:
Packages that deliver to read-only inherit directories do not install on sparse root zones. These packages must be installed from the global zone with the-G switch disabled. When a package has the parameter SUNW_PKG_THISZONE=true, it does not appear as installed from the sparse zone and the software might not function correctly. In this case, a whole root zone must be used. Packages with SUNW_PKG_THISZONE=true must not deliver to read-only inherit directories.The number of zones that can be patched in parallel when you patch a global zone can be viewed from the Summary page of a global zone. When the agent is installed on the Oracle Solaris OS, the number of zones that can be patched in parallel is calculated as 1.5 times the number of CPU cores in the server. For example, if you have a 2 CPU core machine, then the number of zones that can be patched in parallel are 3. This is set and displayed on the UI.
Oracle Solaris 10 and 11 OS version displays this information in the Summary page. When the update capability is not enabled on the OS, then the zone parallel patching is also not enabled.
You can refer to the following chapters in this guide for other operations that are common for many resources:
See Chapter 6, "Storage Libraries" for setting up your storage resources.
See Chapter 7, "Networks" for setting up your network infrastructure.
See Chapter 8, "Plans and Profiles" for managing your zone profiles and deployment plans.
See Chapter 12, "Operating Systems" for monitoring your resources and setting up boot environments.
See Chapter 2, "Asset Management" for managing your discoveries and registering your assets.
See Chapter 17, "Server Pools" for creating and managing zones server pools.
For instructions in performing actions or to learn more about the role of this feature, go to one of the following resources:
See http://docs.oracle.com/cd/E19044-01/sol.containers/817-1592/ for Oracle Solaris Resource Management and Oracle Solaris Zones documentation.
Complete Oracle Solaris 10 documentation set at http://docs.oracle.com/cd/E19253-01/index.html.
See http://docs.oracle.com/cd/E23824_01/html/E24456/transzone-1.html for creating flar images of Oracle Solaris 10 OS.
See http://docs.oracle.com/cd/E19082-01/819-6990/index.html for administration of your network interfaces.
|
Copyright © 2007, 2012, Oracle and/or its affiliates. All rights reserved. Legal Notices |
|