Release 12.1.0.1.0
Part Number E28715-03
Contents
Previous
Next
| Oracle Application Management Pack for Oracle E-Business Suite Guide Release 12.1.0.1.0 Part Number E28715-03 | Contents | Previous | Next |
Setup Manager is the next generation of an existing Oracle E-Business Suite tool called Oracle iSetup. Setup Manager extends the capabilities of Oracle iSetup in a number of important ways, including the ability to create reusable templates and projects, enforce dependencies, and perform simultaneous, multi-node loads, among others.
Setup Manager allows you to do the following:
Migrate functional configuration/setup data across point releases of Oracle E-Business Suite. Group extracts, loads, transforms, and reports into projects for easier management and reuse.
Use out-of-box project templates to quick-start an implementation based on project types.
Use out-of-box support to orchestrate loads on an instance based on template dependency.
Orchestrate extracts, loads, transforms, and reports that are dependent on each other.
Set simple or advanced filters to narrow down the extracted records.
Manage multiple extracts, transforms, reports, and loads on the same instance or on different instances.
Transform the extracts offline using Microsoft Excel templates and reuse and load on the same or difference instances.
Cascade the changes from the master to detail objects while transforming the extracts.
Create your own attribute mapping to cascade attribute values from master to detail setup objects in addition to default ones.
Synchronize Oracle E-Business Suite instances at regular intervals.
Share the Projects with other users.
Attach project-related documents to projects.
Upload extracts from your desktop.
Notify users of the status of the project plan execution.
Execute same project plan multiple times.
Schedule a project plan for a future date.
Control administrator access to functions using the Enterprise Manager security features of privileges and roles
Control administrator actions on Oracle E-Business Suite targets using the role-based access control (RBAC) of the targets themselves
You must assign the 'LCM EM' Client responsibility to the Oracle E-Business Suite users whose Preferred Credentials would be provided in Oracle Enterprise Manager for Setup Manager. You must also assign the 'Oracle iSetup' responsibility (for Release 11i) or the 'iSetup' (for Release 12) responsibility to those users as well.
Ensure that you have followed the steps for "Importing an Oracle E-Business Suite SSL Certificate to the OMS" in the section Configuring Monitoring of HTTPS/SSL Targetsif your Oracle E-Business Suite instances are SSL-enabled.
There are two types of instances used with Setup Manager:
Source instance: The instance from which data is extracted.
Target instance: The instance where data is to be loaded.
A project is defined as a grouping of related extracts, transforms, loads, and reports. Projects are a key enhancement in Setup Manager and are designed to dramatically reduce the amount of time and effort associated with the management of configuration/setup data. A key feature of projects is the ability to sequence individual loads into the target instance, thus enforcing the proper order that respects the relationships that exist between configuration/setup data. A project can be scheduled to execute at a future specified time. The same project can be executed multiple times. Project executions are integrated with the change approval system.
You can create a project plan to add one or more tasks as you choose. A project plan binds the various tasks together so that they can be executed together multiple times. A project plan gives you the ability to orchestrate the tasks according to your needs.
You can define Extract (including Uploaded Extracts and Transformed Extracts) tasks, Load tasks, and Report tasks.
A selection set is a logical set of related configuration/setup data. Oracle creates, delivers, and supports over 15 different selection sets in Releases 11i and 12, for data from multiple products, including Oracle Application Object Library, Financials, Human Resources, and Manufacturing. You use selection sets to define which type of configuration data that you want to extract from a source instance, and then load the resultant extract into one or more target instances.
You can create selection set by selecting setup objects of your choice. Custom selection sets are useful when you want to sequence load order of setup objects or pull setup objects across product families such as Financials and Manufacturing.
Extracts are specific sets of data extracted from a source instance, according to the definition of the selection set used.
You can download extract zip files from Setup Manager to your desktop to archive or to manipulate the enclosed files. These files can then be re-zipped and uploaded back into Setup Manager for a project. You can reuse these uploaded extracts when creating a project plan. Alternatively, you can also upload an extract from a stage directory.
Transforms are editable extracts in which data is presented to you as reusable Microsoft Excel templates. You can make changes to setup data offline and upload it back to Setup Manager. Setup Manager can create extracts out of the modified Microsoft Excel data and this modified data can be loaded to the same Oracle E-Business Suite instance or other Oracle E-Business Suite instances.
A load is extracted or transformed data being loaded into a target instance.
Reporting is a powerful aspect of Setup Manager. Reports can be created in one of several formats (Microsoft Excel, PDF, and RTF), and types (deployment reports, standard, and comparison).
In addition, standard reports (in PDF and RTF formats) support the BR100 style, called the "Setup Document Style", used in Oracle iSetup.
You can add project-related documents as attachments to a project.
The instance of an execution of a project is referred to as an execution. You can execute a project multiple times. You can also schedule the project execution as needed. Project execution is integrated with the change approval system, which means you can control who executes which project.
Execution Sequence is the sequence in which the tasks are executed. Tasks having the same execution sequence are executed in parallel in a batch. The next batch would start only after successful completion of the current batch. You can also update the execution sequence while submitting the project for execution.
You can create a project with tasks to be executed as jobs running in parallel. . If you do so, the maximum number of threads for the Standard Manager or Concurrent Manager on the Oracle E-Business Suite instance (the target on which the project is created) must be at lease one greater than the number of jobs submitted. Otherwise, the project will always be in Running status because the threads will wait for each other.
For example, say a project is defined to have two extract tasks and two report tasks to be executed in parallel. When the execution request is submitted, four jobs will be submitted in parallel. In this case the maximum number of threads for the Standard Manager or Concurrent Manager on the Oracle E-Business Suite instance (the target on which the project is created) must be at least five, or one greater than the number of jobs submitted (four).
Typically, the default value for the number of threads for the Standard Manager or Concurrent Manager is three, so projects with two tasks in parallel can be executed without issues.
Note that if the tasks are submitted in sequence by the use of prerequisites, then the tasks are executed sequentially and there is no issue. The maximum number of threads defined for the manager is typically only an issue with parallel execution with three or more tasks.
To update the maximum number of threads (worker threads) for the Standard Manager, follow these steps:
Log in to the Oracle E-Business Suite instance that is the target given for the project in Setup Manager as a user with the System Administrator responsibility.
Navigate to System Administrator > Concurrent > Manager > Define.
Query up the Standard Manager.
Click on Work Shifts.
For the row where Work Shift is "Standard", change the value in the Processes column. This value must be at least 1 greater than the number of jobs to be submitted.
Save your work.
You should run diagnostic tests on your system in preparation for using Setup Manager to ensure your system is set up correctly. These tests can be accessed from the Diagnostics dashboard, available from the Pack Diagnostics link on the Oracle Applications page. For more information on running diagnostic tests, see: Running Pack Diagnostics Tests.
The following tables list tests related to Setup Manager:
| Step | Test Group | Description | Notes/Expected Results/Corrective Measures |
|---|---|---|---|
| EMGC | CheckForPOILibrary | Check if the Apache POI library is present on the OMS. | The Apache POI Library is shipped by Apache and is used for reading and writing Microsoft Excel files through Java. These Microsoft Excel files are used in the transformation functionality. |
| EMGC | CheckOMSStage | Determine if a stage directory is defined on the OMS. Determine if the OMS owner has read/write permissions to that directory. | Expected results are: the OMS Stage Directory Location and the OMS user with read/write permissions. |
| EMGC | Summary | A summary of all of the diagnostic tests that have been executed, in the following groups: Successful, Failed, With Warning, Aborted, and Total. | |
| EBS | CheckAgentStage | Check if the stage directory is defined and has the right permissions. | |
| EBS | Check Setup Manager Patches for 12.0.X Release | Check for the required patch: 9444540:R12.AZ.A for Setup Manager on the Oracle E-Business Suite instance. | For Release 12.0.X targets |
| EBS | Check Setup Manager Patches for 12.1.X Release | Check for the required patch: 9444535:R12.AZ.B for Setup Manager on the Oracle E-Business Suite instance. | For Release 12.1.X targets |
| EBS | CheckAgentHome | Check permissions within the Agent home directory. | |
| EBS | CheckEBSHome | Check permissions for APPL_TOP. | |
| EBS | CheckRESTHealth | Ensure that all the required interop patches are applied and REST services are available. | |
| EBS | Summary | A summary of all of the diagnostic tests that have been executed, in the following groups: Successful, Failed, With Warning, Aborted, and Total. |
| Step | Test Group | Description | Notes/Expected Results/Corrective Measures |
|---|---|---|---|
| EBS | CheckPrivilege | Check if the logged-on user has the SM_RAISE_REQ_EBS privilege. | |
| EBS | CheckPrivilege | Check if the logged-on user has the SM_APPRV_REQ_EBS privilege. | |
| EBS | CheckEBSResponsibilities | Check for the iSetup responsibility on the Oracle E-Business Suite instance. | |
| EBS | CheckEBSRole | Check for the LCM EM Client role on the Oracle E-Business Suite instance. | |
| EBS | CheckEBSGlobalCred | Check Oracle E-Business Suite preferred credentials. It is required to set the APPS schema user and Applications Login User credentials. | |
| EBS | Summary | A summary of all of the diagnostic tests that have been executed, in the following groups: Successful, Failed, With Warning, Aborted, and Total. |
You can search for a project from the Setup Manager section of the Change Management Dashboard or the main Projects page. Search on the project name in Simple Search or on the name and/or release in the Advanced Search page (Advanced Search is only accessible from main Projects Page).
A Super Administrator is able to see all projects created by all users.
Use the Create Project pages to create a project.
To begin, navigate to the Projects page within Setup Manager and select the Create button.
Note: You can create a project with tasks to be executed as jobs running in parallel. . If you do so, the maximum number of threads for the Standard Manager or Concurrent Manager on the Oracle E-Business Suite instance (the target on which the project is created) must be at least 1 greater than twice the number of jobs submitted. Otherwise, the project will always be in Running status because the threads will wait for each other. For more information, see Execution Sequence.
To create a project
Enter General information for the project:
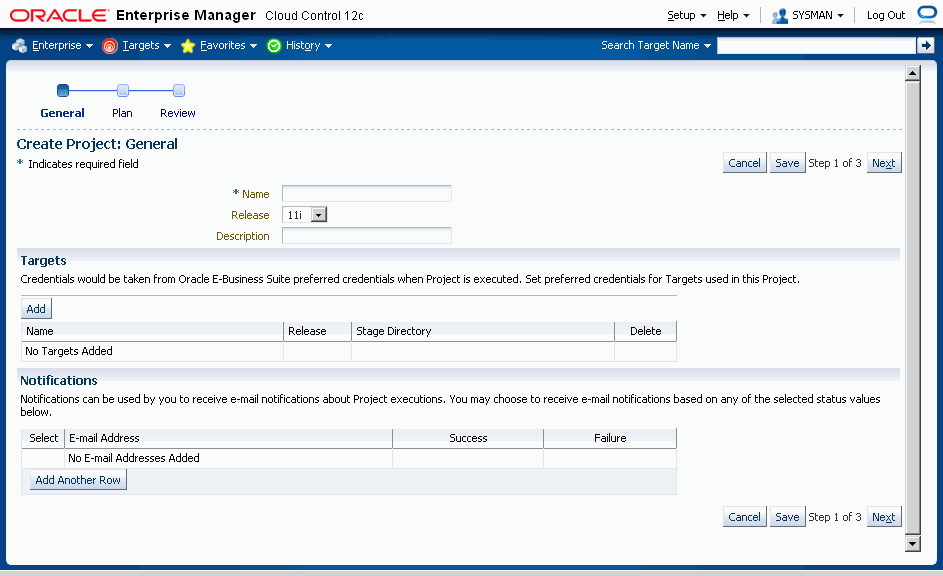
Name - User-defined name for the project.
Release - Either 11i or R12.
Description - User-defined description of the project.
Targets - Add all of the instances, both source and target, that might be involved in this project. The instances that have been discovered and available to you based on your role privileges will appear in the LOV field.
For Super Administrators, all discovered targets for a particular release would be displayed.
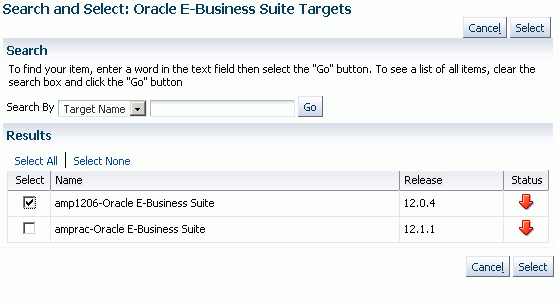
Enter a Stage Directory for each target.
Notifications - Add the e-mail addresses for users who should be notified when a project is completed with the status of Success and/or Failure.
Click on Next to create the project plan.
Create the project plan. The first step to creating a project plan is defining the type of extract. The five options are:
Selection Set - This will be the most common type. You can create your extract based on the delivered Selection Sets.
Custom Selection Set - You can choose individual entities to create a unique combination of extracts.
Uploaded Extracts - You can use an uploaded extract to define the operation.
Transform - You can add a transform which has been created using extracts.
Execution - You can use an extract from an execution.
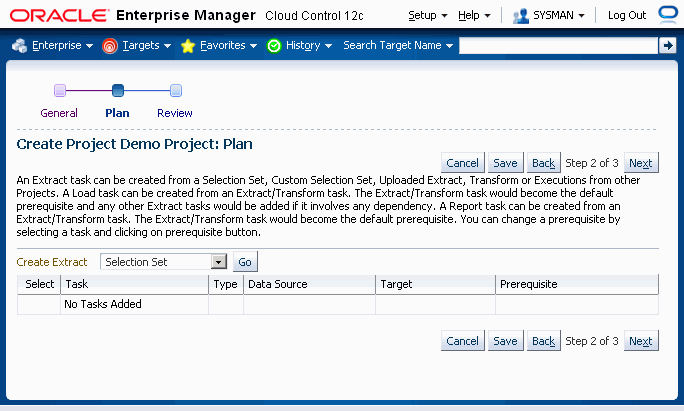
Detailed information on creating an extract task is in the section Creating an Extract Task. For information on adding a transform to a project, see: Adding a Transform to a Project Plan.
Once you have created the first project plan that contains the extract task as mentioned above, you can take the following additional actions on the existing project:
Update - Update an existing extract, transform, load, or report.
Delete - Delete an existing extract, transform, load, or report.
Prerequisite - Modify the order in which the project will execute its contents.
Load - Create a Load for a designated extract/transform.
Report - Create a Report for a designated extract/transform.
Compare - Create a Comparison Report for two designated extracts/transforms.
Create Extract - By selecting an option from the Create Extract list and clicking the Go button, you can create additional extracts for your project.
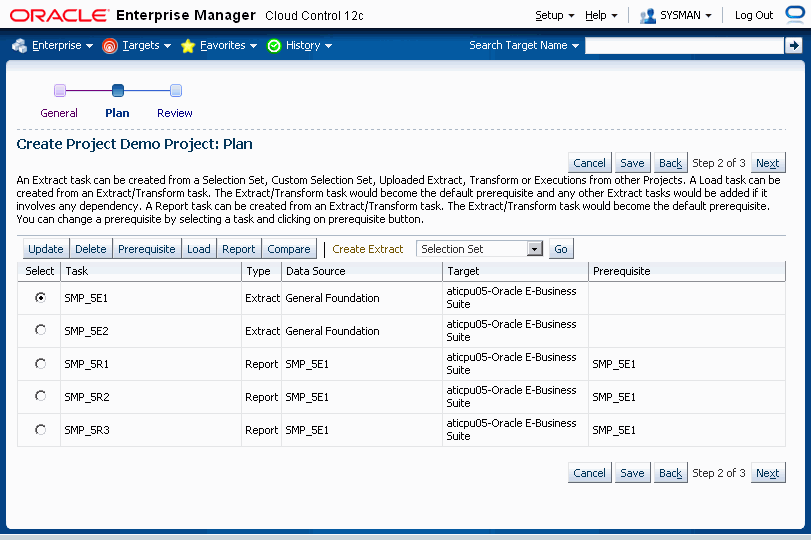
Click on Next to review the Project Details.
Review the project details and select Finish.
You can create an extract using any one of the following procedures:
Creating from a Selection Set
Creating from a Custom Selection Set
Creating from an Uploaded Extract
Using a Transform (described in the next section)
Creating from an Execution
To create an extract from a Selection Set
Use these steps to create an extract using a predefined selection set.
Select "Selection Set" from the Create Extract list and click Go.
In the Plan: Create Extract Task from Selection Set page, select the desired selection set template for the implementation and click the Continue button.
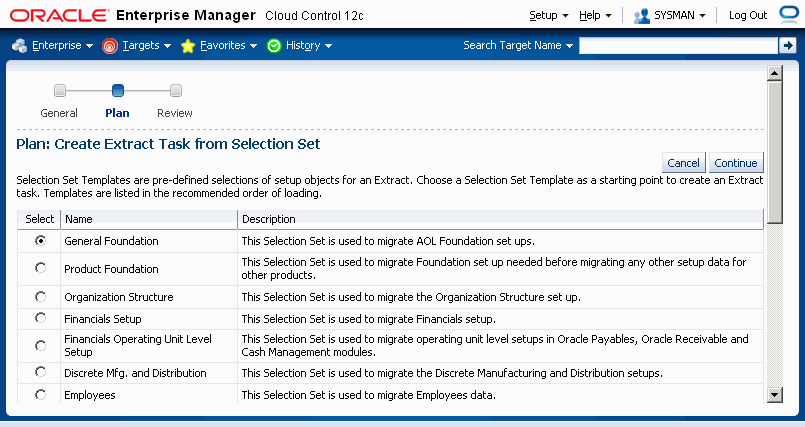
In the next page, you can view and/or update information on the selection set:
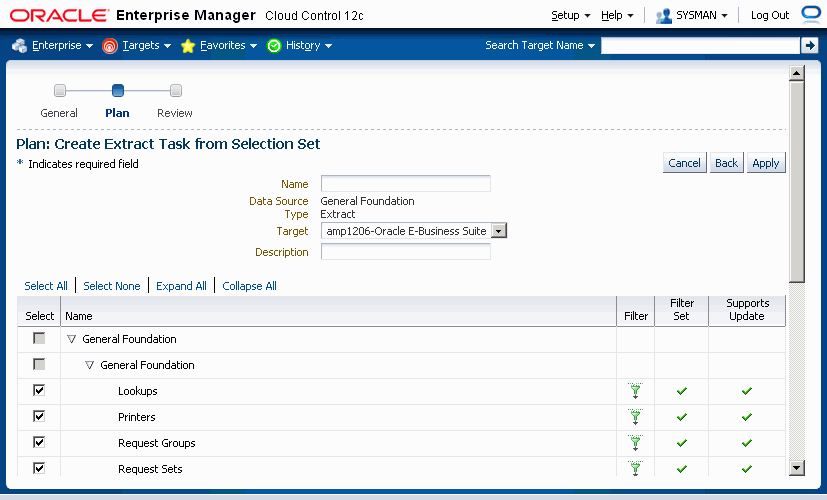
Name - User-defined name for the extract.
Data Source - The name of the Selection Set that you are using. This field cannot be updated.
Type - "Extract" will be displayed. This field cannot be updated.
Target - The instance that you want to extract the data from (that is, the source instance).
Description - User-defined description of the extract.
Selection Set components - All the configuration/setup data components that comprise of the Selection Set will be displayed in a table. You can then perform the following steps:
Select which entities need to be included in the extract.
Use the filter icon (to the right of each component) to further refine and tailor the configuration or setup data that you want to extract by using predefined filtering parameters or by providing your own filtering criteria.
Note: If you are using Internet Explorer and find that the Set Filter page is not loading, use the following workaround:
Navigate to Tools, then select Developer Tools.
Select the Scripts tab.
Click on Start Debugging.
The Set Filter page should then load.
In the Set Filter page you can click on the Advance Filter button and set your own WHERE clause.
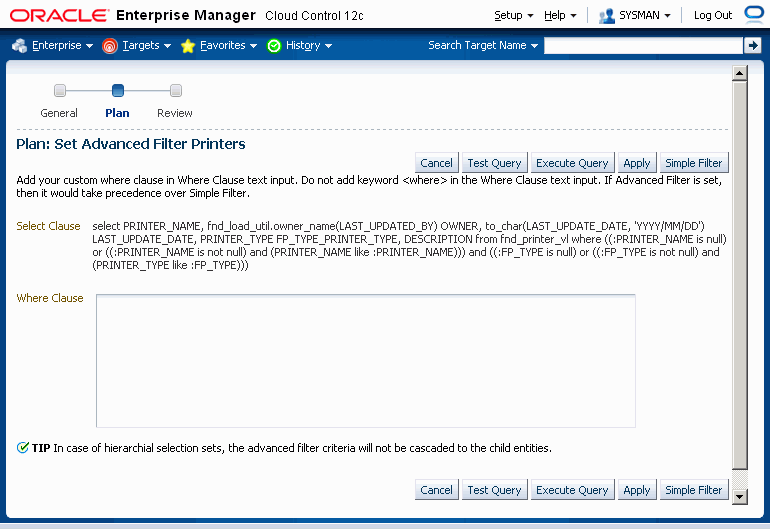
The Advanced Filter setting would take precedence over Simple Filter if it has been set. Avoid using the Advanced Filter setting in a hierarchical selection set such as Financial Operating Unit Level Setup and Payroll Element where automatic cascading of filter values would not happen for advanced filter values.
Use the Test Query button to test if your WHERE clause produces a well-formed query. Note that this button only tests whether the clause is well-formed, and not whether the desired results are returned.
Use the Execute Query button to preview what your query results would be. When you execute the query here, the first 200 records for the query are returned, and you can check if they match what you expect from the query.
Click Apply to save your changes and go back to the Create Project Page.
To create an extract from Custom Selection Set
You can create an extract using a custom selection set. You might want to do this if you have different APIs from multiple existing selection sets that you want to mix and match for a custom selection set.
Select "Custom Selection Set" from the Create Extract list and click Go.
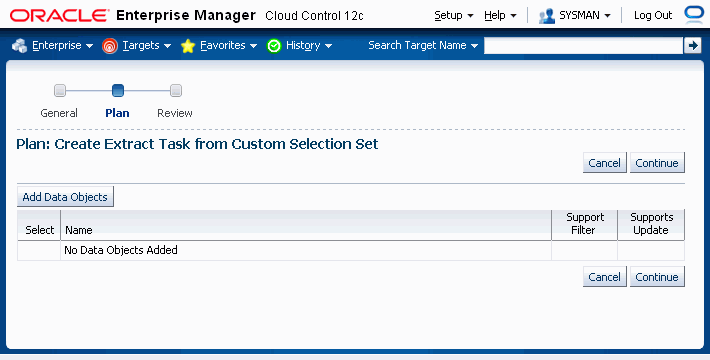
Click the Add Data Objects button and select the individual components that you wish to add.
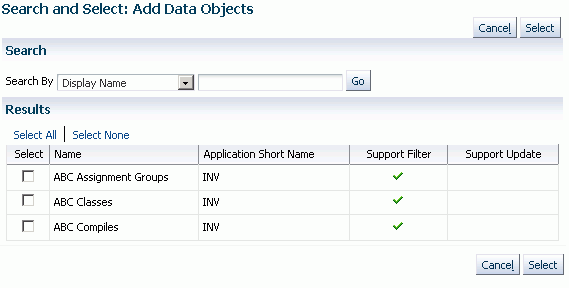
Click Continue.
In the next page, you can view and/or update information on the selection set:
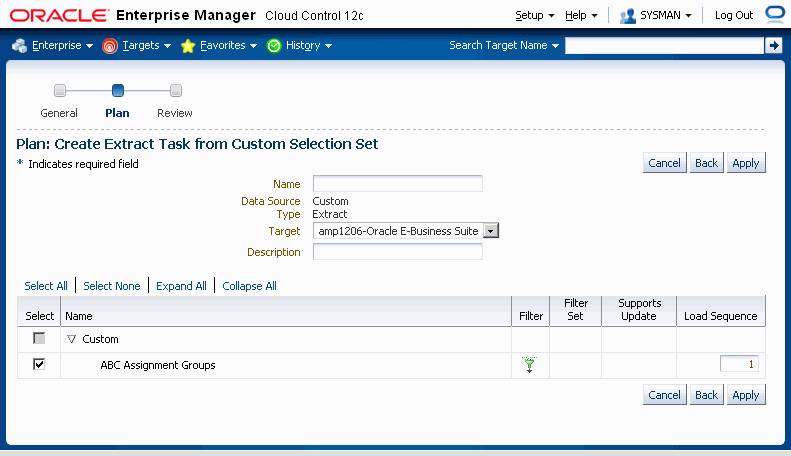
Name - User-defined name for the extract.
Data Source - "Custom" will be displayed. This field cannot be updated.
Type - "Extract" will be displayed. This field cannot be updated
Target - The instance that you want to extract the data from (that is, the source instance)
Description - User-defined description of the extract.
Setup Objects/Components - All the setup objects that were selected will be displayed in a table. The filter feature allows you to refine and tailor the configuration/setup data that you want to extract by using predefined filtering parameters or by providing your own filtering criteria. The Load Sequence, which controls the order in which loading of data objects will occur, can be updated.
Click Apply to save your changes and go back to the Create Project Page.
To create an extract from an Uploaded Extract
You can create an extract based on a previously-uploaded extract. Note that you cannot change the setup objects selected. A scenario in which you might want to do this is if your existing extract complies with a complex security policy, and you want your new extract to comply with the same security policy. Creating the new extract based on the old uploaded extract helps you accomplish this task.
For information on uploaded extracts, see: Managing Uploaded Extracts.
Select "Uploaded Extract" from the Create Extract list and click Go.
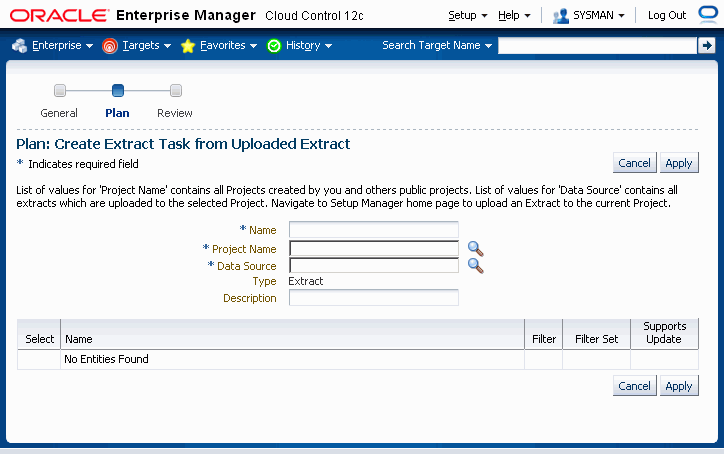
In the next page, you can view and/or update the following information
Name - User-defined name for the extract.
Project Name - Use the LOV to find projects created by you and public projects created by others.
Data Source - Use the LOV to choose from the list of extracts that are uploaded to the selected Project.
Type - "Extract". This field cannot be updated.
Description - User-defined description of the extract.
Selection Set Details of the uploaded extract. These cannot be updated.
Click Apply to save your changes and go back to the Create Project Page.
To create an extract from an Execution
You can create an extract task from an existing project plan execution. This method offers the following benefits:
You can reuse extracts that have been already executed, instead of fetching the same extract data again from the Oracle E-Business Suite instance
The new extract task gets the data from the execution and not the Oracle E-Business Suite instance.
This method is the most efficient method for getting the extract data for a selection set, if a corresponding extract execution is already available.
Note: The selection set and filtering parameters for the new extract will be the same as that in the execution's definition, and cannot be modified.
Because the data in the new extract task is not fetched from the Oracle E-Business Suite instance, the extract data might not be synchronized with the Oracle E-Business Suite instance.
Select "Execution" from the Create Extract list and click Go.
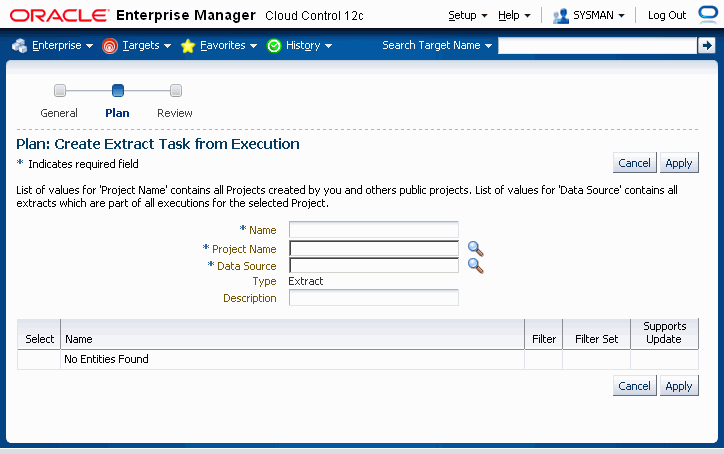
In the next page, enter the following information:
Name - User-defined name for the extract.
Project Name - Use the LOV to find projects created by you and public projects created by others.
Data Source - Use the LOV to choose from the list of executions of the selected project.
Type - "Extract". This field cannot be updated.
Description - User-defined description of the extract.
Note that you cannot change the setup objects selected.
Click Apply to save your changes and go back to the Create Project Page.
To add a transform to a project plan
You can add a task to add a transform to a project plan. Note that you can add only Transforms that are in the Freeze state to a project plan. The Transform LOV restricts searches by Release and Published status by default. A Super Administrator would be able to select any transform.
In the Project Plan page, navigate to the option in the Create Extract list to add a transform to a project plan. Select "Transform" and click Go.
In the Add Transform Task Page, provide the details listed below.
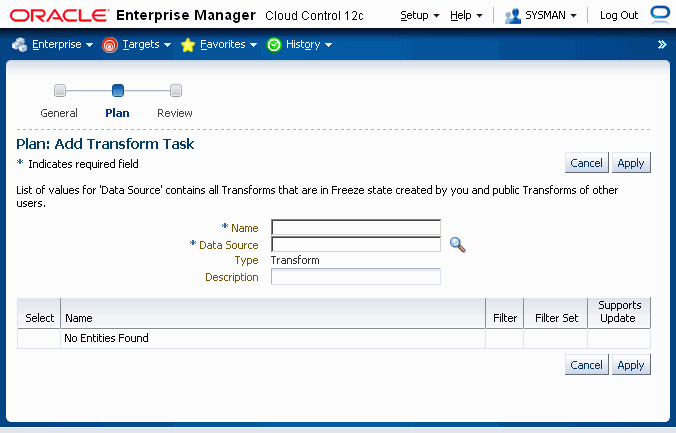
Name - Name of the transform task.
Data Source - The data source is the transform that you created earlier. Only transforms that are in the Freeze state and are for belong to the same release as the current project appear in the LOV. This search will also bring up other users' Published transforms in the Freeze state. A Super Administrator is able to add any transform in the Freeze state (regardless of the user associated with it).
For more information on transforms, see Managing Transforms and Templates and subsequent sections in this chapter.
Description - Description of the extract.
Setup Objects - All the setup objects of the template selected above are displayed. You can view the template and save it in creating a task.
Click Apply. You will be redirected to the Project Create Page. The transform task is similar to any other extract tasks, so you are able to create Load, Report, and Comparison Report tasks on it.
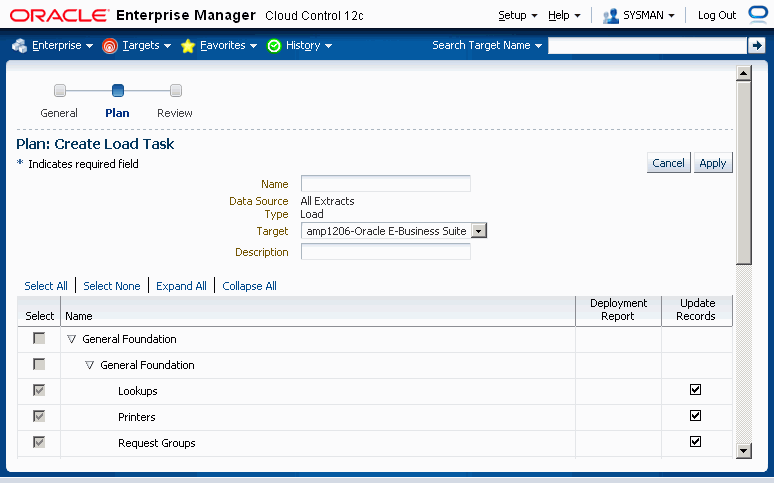
Load tasks are created within an existing project, and after the corresponding extract has been defined.
To create a load task
To create a load task, select any one of the extracts or transforms in the current project and click Load.
In the Create Load Task page, enter into the following fields:
Name - Enter a user-friendly name for the load.
Data Source - The name of the extract or transform that you selected in Step 1. This field cannot be updated.
Type - "Load". This field cannot be updated.
Target - The instance name where you want to load the data (that is, the Target instance).
Description - Enter a description of the load.
Setup Objects/Components - Setup objects/components of the extract or transform will be displayed in the HGrid. Some but not all setup objects/components support a Deployment Report. For each setup object/component that supports it, you can select a check box to enable a Deployment Report. The Update Records check box, when checked, indicates that if a record exists, then the system will update the existing data.
Click Apply to save your changes and go back to the Create Project page.
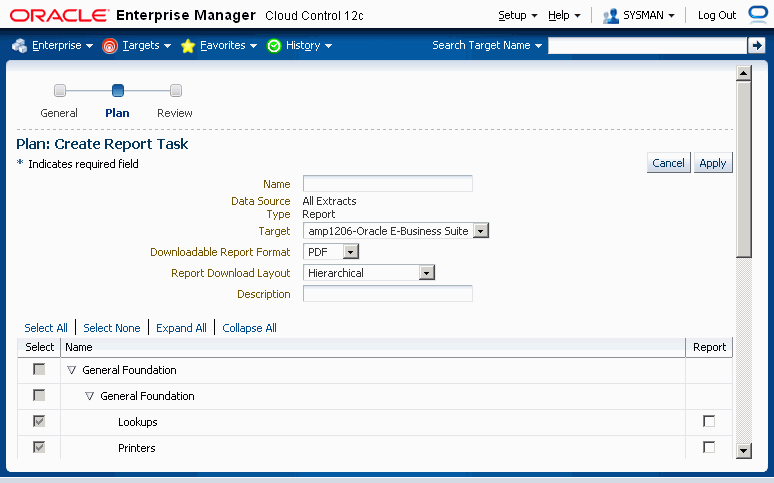
Report tasks are based on existing extracts or transforms. Report tasks are created within an existing project and after the respective extract or transform has been defined.
To create a report task
To create a report task select any one of the extracts or transform in the current project and click on the Report button.
Enter in the following information:
Name - User-defined name for the standard report.
Data Source - The name of the extract or transform that you selected in Step 1. This is display-only.
Type - "Report". This is display-only.
Target - The instance name where you want to run the report.
Downloadable Report Format - Choose PDF, RTF, or Excel.
Report Download Format - If you have chosen a report format of PDF or RTF above, you can choose between "Hierarchical" or "Setup Document Style" (BR100 style) for this field.
Description - User-defined description of the report.
Specify which components you want included in the report in the Report column of the HGrid. Only components that were in the original extract or transform are available here.
Click Apply to save your changes and go back to the Create Project page.
Comparison report tasks are based on existing extracts or transforms. Two extract or transform tasks are required for comparison. A comparison report task is created within an existing project after the respective extracts or transforms have been defined.
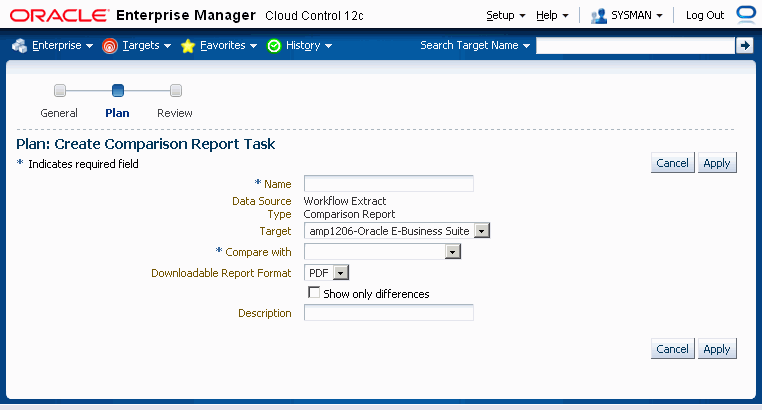
To create a comparison report task
To create a comparison report task, select any one of the extracts or transforms in the current project and click on the Compare button.
Enter in the following information:
Name - Enter a name for the comparison report task.
Data Source - The name of the first extract or transform that is selected for comparison (Step 1). This is display-only.
Type - "Comparison Report". This is display-only.
Target - The instance on which you want to run the comparison report.
Compare with - The name of the "second" extract or transform. The comparison report will compare the "first" and "second" extracts/transforms.
Downloadable Report Format - Choose PDF or RTF.
Show only differences - This check box instructs the comparison report to display only those records that are different in the extracts or transforms.
Description - Enter a description for the comparison report task.
Click Apply to save your changes and go back to the Create Project page.
You can provide instructions so that project tasks execute in a certain order or sequence. Tasks can execute both in parallel and serially. Note that a task can have multiple prerequisite tasks.
The instructions for the sequence can be set within the project, or they can be modified just prior to executing the project.
The instructions in this section illustrate how to provide sequencing instructions from within the project.
To edit prerequisites
Select a task. Click on Prerequisite.
A window with a list of the other project tasks appears. Select the task that must precede the task specified in Step 1.
Click OK. The prerequisite task will appear in the project plan table.
After you edit prerequisites, you can review your project details and check the execution sequence. You can simply save your project, or save and execute it, and then return to the main Projects page.
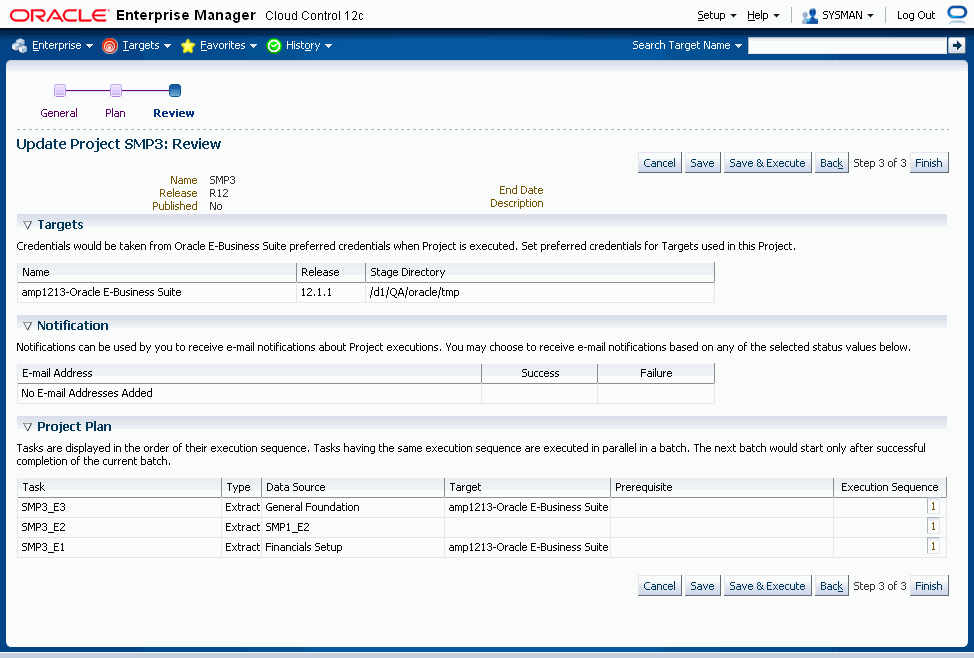
You can upload extracts that are needed for the project.
To upload an extract from your desktop
From the Setup Manager landing page, select a saved project and click the Upload Extracts from Desktop button.
Alternatively, select a saved project and click the Uploaded Extracts icon for that project to access the Uploaded Extracts page find any extracts already uploaded for the project. Then click the Upload Extract from Desktop button to upload extracts from this page.
Enter the following:
Name - A name for the extract.
Data Source - Location and name of the file that you want to upload.
Description
Click Upload.
To upload an extract from a stage directory
From the Setup Manager landing page, select a saved project and click the Uploaded Extracts icon. Here you can see all the uploaded extracts for the project. Click on the Upload Extract from Stage Directory button.
Enter the following:
Name - A name for the extract.
Stage Directory on Server - The absolute zip file path.
Description
Click Upload.
To view uploaded extracts for a project
From the Setup Manager landing page, click on the Uploaded Extracts icon for the project.
The next page will list the extracts uploaded for the project.
Click on the filename link in the Download column to download the uploaded extract.
To delete an uploaded extract for a project
From the Setup Manager landing page, click on the Uploaded Extracts icon for the project.
The next page will list the extracts uploaded for the project.
Select an uploaded extract and click the Delete button.
You can attach one or more documents that are relevant to the project (for example, background, Project Contents, pre/post instructions, advice, and so on).
To add an attachment
From the Setup Manager landing page, select a saved project and click the Add Attachment button.
Enter in the following:
Name - A name of the attachment.
Data Source - Location and name of the file that you want to attach.
Description.
Click Upload.
To view attachments for project
From the Setup Manager landing page, click on the Attachments icon for the project.
The next page will list the attachments for the project.
Click on the link in the Download column to download the attachment.
To delete an attachment for a project
From the Setup Manager landing page, click on the Attachments icon for the project.
The next page will list the attachments for the project.
Select an attachment and click the Delete button.
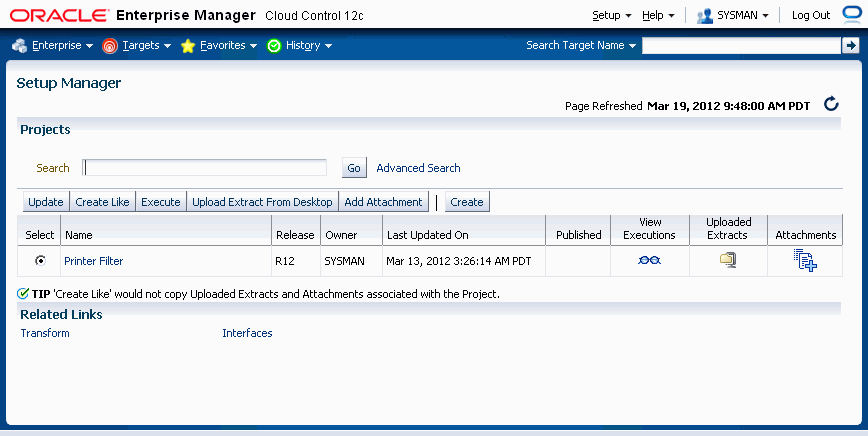
The Setup Manager landing page displays the saved projects in a grid with the following columns.
Name - Project name.
Release - 11i or R12. Defined when creating the project.
Owner - The name of the user that created the project.
Last Updated On - The date (and time) on which the project was last updated.
Published - Denotes if a certain project is accessible to all users. If a project is not published, then the project is accessible to only the owner and any Super Administrator.
View Executions - View historical runtime executions of a project.
Uploaded Extracts - View uploaded extracts (in ZIP format) in the Setup Manager secure repository, or upload new extracts.
Attachments - View/Attach additional document(s) for a specific project.
From the Setup Manager landing page, you can perform the following actions on the selected projects.
Please note that other users can update or execute a public project only if those users have privileges on the targets used in that project. Other users cannot add targets to public projects.
Update - Many of the components of an existing project can be modified or changed, notably targets and Selection Sets.
You can add new targets to your own projects only; not the projects of other users. The exception to this rule is that Super Administrators can add targets to other users' projects.
Create Like - This feature allows you to create a new project based on an existing project. This feature is useful if the majority of the parameters of the project are the same, and you wish to change only a few selections. Also, if the project owner had published the current project, then another user can create a new project using the "Create Like" feature.
Execute - Execute a selected project.
Upload Extract From Desktop - Upload a Setup Manager or Oracle E-Business Suite Extract zip file from the desktop into the Setup Manager repository.
Add Attachment - Add an attachment to a project.
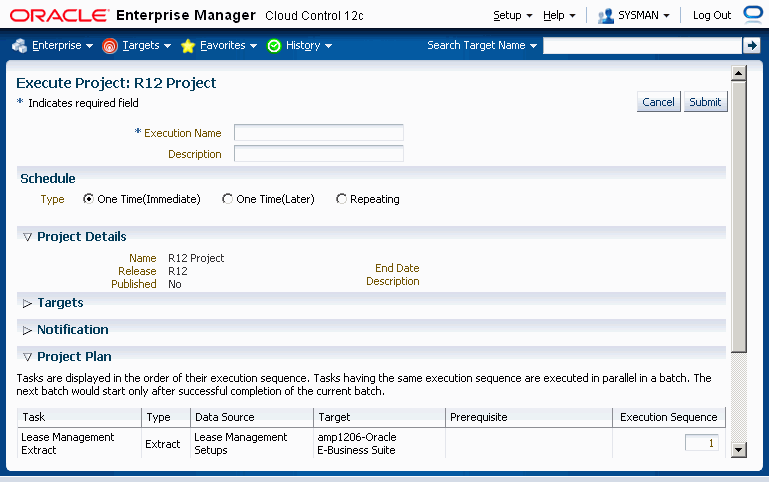
Please note the following about executing Projects:
All executions would be audited even if Approval is turned off.
There can be only one execution request in "Pending Approval". A user is not allowed to submit a new approval request until the old one has been approved or rejected by an approver. To execute an approved request, user should navigate to Execution Summary screen and submit from there by selecting the request.
Only a Super Administrator can delete completed executions.
The drilldown capability to Transform > Generate templates is available from the Execution Detail > View Task Extract page. This button would appear only for successful executions.
A Project cannot be executed after its end date. If there are any schedules associated with the Project, then those schedules which appear after the end date will not be picked up.
If the current user does not have the necessary approval role, the above screen will show a "Submit For Approval" button instead of a "Submit" button.
To execute a project
From the Project Search page, select a project and click the Execute button. Alternatively, click on a project name (link) and click Execute on the View Project page.
Enter an Execution Name and description for the execution of the project. You can review information on the project as well, and if needed, update the Execution Sequence numbers for the tasks.
The execution can also be scheduled with the following available Schedules
One Time (Immediate)
One Time (Later)
Repeating
Click Submit.
After you submit an execution request, the View Execution page appears.
Click on the execution name link to view details for the execution.
You can perform the following tasks for a selected execution:
View log - View the log file for the execution.
Restart - Start another execution of this project if and only if the prior execution has failed.
Delete - Delete the execution. This capability is available only for a Super Administrator.
View task details and download any ZIP files generated by the task.
You can download the extract content ZIP file and deployment report file from the View Execution Details page. You can also download any standard report or comparison report files as well from this page.
Click on the task name to see the task details. For an extract task, the task details page will show the total number of records extracted and loaded.
Transforms are simply editable extracts. Setup Manager can provide you the XML or LDT configuration data as an XSL template so that you can edit and transform the functional configuration data offline. The Setup Manager framework handles the conversion of an XML/LDT files to an XLS file and vice versa. Note that this transformation capability is restricted to Generic Loader and iSetup framework APIs only.
The following sections describe how you can transform, edit, or add functional configuration data offline and then add the transform to a project plan.
A Super Administrator can see all transforms created by all users. Other users can delete and "unshare" public transforms they created. Transforms added to a project plan will not be overwritten by changes that are later done to the original transform.
Navigation: From the Change Management Dashboard, select the Transform link from the Setup Manager region.
The following list outlines some of the restrictions for working with an Excel workbook for a transformation.
All attribute values in Excel are of type plain text only even though some may have the attribute data type of Number or Date in the database. Therefore it is highly recommended that you not change these to any type other than text.
Do not format Dates.
The number of records per Excel workbook is 10000.. If the actual record count exceeds 10K, then the data would be written in multiple Excel workbooks. The maximum value that can be given is 65536 as the maximum number of rows allowed in Microsoft Excel 2000 is 65536.)
Bandwidth between the master and details IDs is 1000000.
A maximum of 4K characters is supported per Excel sheet and if a column value exceeds 4K, then SM_LONG_COLUMN would be shown in Excel. If a user overrides the SM_LONG_COLUMN with other text, then the user-entered text would be considered.
The first five columns that appear in the Excel sheet are metadata columns: -ID, PARENT ID, STATUS, TRANSFORMED, DELETE. The actual data column will proceed after these columns.
Editing the Excel header which contains the attribute names is not supported. The first row must be the attribute names and users must not modify this row.
Users must ensure validity of IDs * Parent IDs. If the appropriate link is not provided, then newly/edited records will not be considered when Setup Manager creates an extract file from the transformed values.
This page allows you to search for a transform, as well as generate a template for a new transform and upload a template.
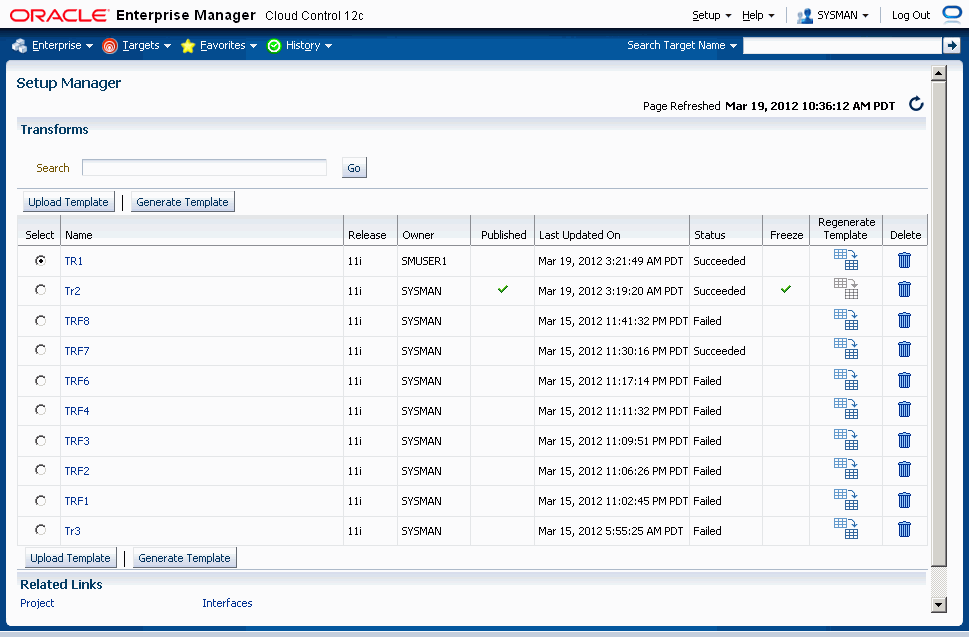
To search for a transform
Navigate to the Transform Search page from the Setup Manager section of the Change Management Dashboard. Alternatively, click on the Transform link under Related Links on the Setup Manager home page.
Enter a name of a transform and click Go.
The search results will be shown in the table. The following columns are shown:
Name - Name of the transform.
Release - The Oracle E-Business Suite release on which the transform was created.
Owner - The owner of the project.
Published - If another user can access the transform, then a tick would appear.
Last Updated On - The date (and time) the transform was last updated.
Status - The status of the transform.
Freeze - This column indicates the Freeze state of the transform. Transforms that are in the Freeze state can be added to a project plan for the same release.
Regenerate Template - Click on this icon to regenerate templates again.
Delete - Click on this icon to delete a Transform.
To generate a template
Provide information in this step that Setup Manager will collect while generating the template in a transform.
Navigate to Transform Search page. Click on the Generate Template button on Transform Search table.
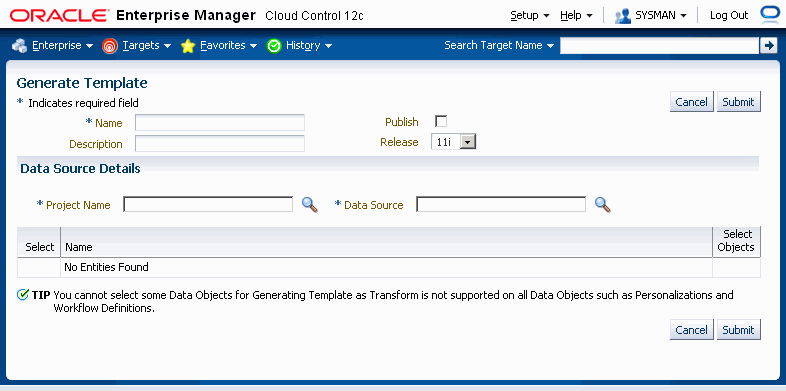
Enter in the following information for the template:
Name - Name for the transform.
Description - Description for the template.
Publish - Select the check box if you want to share the transform with other users.
Release - Choose the Oracle E-Business Suite release for which data is to be migrated.
Project Name - Use the LOV to pick a project.
Data Source - Use the LOV to pick uploaded extracts or executions from the selected project.
The Transform Objects Hgrid has the following headers:
Select - Indicates if the entity is selected for the transform.
Name - Name of the entities.
Select Objects - Indicates if objects should be selected for the transform.
To regenerate a template
Setup Manager collects the information provided in this step while regenerating the template in a transform.
Navigate to Transform Search page. Click on the Regenerate Template icon for a transform in the Transform Search table.
Enter in the following information for the template.
Publish - Select the check box if you want to share the transform with other users.
Description - Description for the template.
Select objects for the transform under Data Source Details.
Click Save to save your template definition, or Submit to submit a request to regenerate the template.
To download a transform
Click on the name of the transform in the Transforms page.
In the Transform Details page, click on the ZIP file in the Download Template column.
Save the ZIP file to your desktop.
To update a transform
Navigate to the Transform page by clicking the Transforms link under Setup Manager from the Change Management Home page, then selecting a Transform.
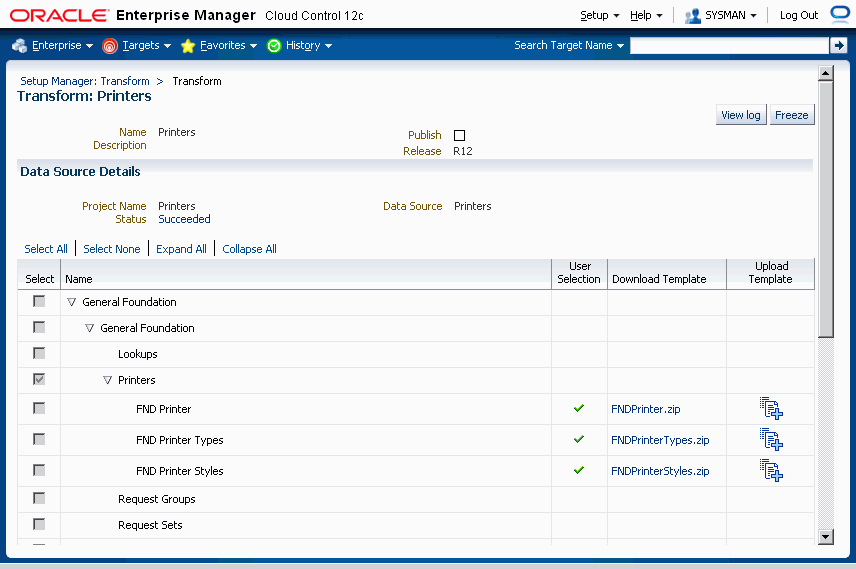
The next few sections describe how to update a transform.
To upload a template
You can select a Template from your Desktop and upload it. You can choose Cascade Changes from the current entity down to its children. This option appears only in the case of a hierarchical selection set.
To upload a template, click on the Upload Template icon for a given entity listed on the Transform page.
If desired, select the Cascade Changes option.
The Cascade Changes option applies only to root setup objects.
Attribute values would be cascaded from master to detail data objects as they appear in the selection set. Attribute values would not be cascaded between sibling data objects in the selection set even if you have provided an Attribute Mapping using the Cascade Changes option.
By default, the value would be cascaded for the setup objects having one or more child setup objects even if they appear in a flat selection set. For example, the Accounting Calendar has Period Types and Period Sets as child objects. If a user changes an attribute value in Period Types and uploads it back, then if there is a valid attribute mapping between Period Types and Period Sets, then the attribute value would flow from Period Types to Period Sets if the criteria match.
Select a Data Source.
Click Upload.
This section describes an example of editing a Microsoft Excel spreadsheet for transformation of a financial operating unit level selection set. The extract contains Operating Units and Inventory Organizations APIs. The transform is created using this extract. After the transform is completed successfully, a ZIP file is created for each entity in the extract, named "OperatingUnits.zip" and "InventoryOrganizations.zip", respectively.
Perform the following steps to download and edit the transform Excel spreadsheet.
Navigate to the Transforms page and select the transform. In this example the transform contain is for a financial operating unit level selection set.
In the Transform page, click the ZIP file name to download the OperatingUnits ZIP file to the desktop and unzip it.
The downloaded template ZIP file has the following contents:
driver.xml
One or more Excel files (Here, HR_OU_1.xls)
Click on the .xls file. The Excel workbook appears as shown in the figure below:
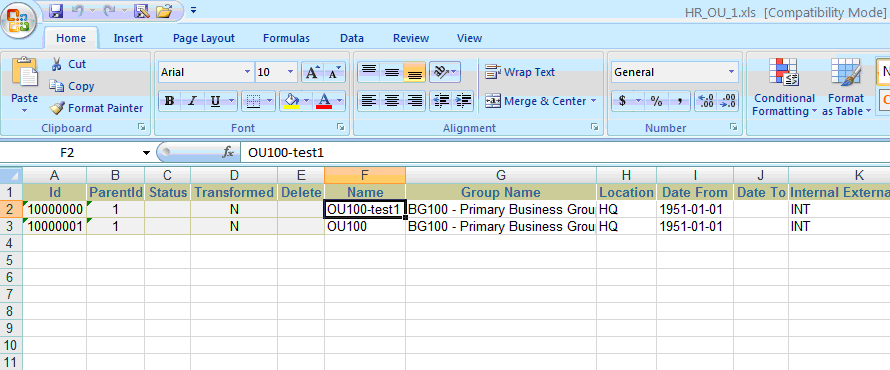
The "OperatingUnits" workbook has four sheets, one for each data source for Operating Unit API (Operating Unit, Classification, Classification Type and Organization Tl).
The structure of the Operating Unit API is as follows:
Operating Unit
Classification
Classification Type
Organization Tl
The first five columns in the Excel sheet are metadata columns: ID, ParentID, Status, Transformed and Delete:
ID - Unique Identifier for a record in the API
ParentID - ID of the Parent record
Status - Status of the record in the Transform. It can be Updated, Inserted, Updated with Warning, or Inserted with Warning
Transformed - Y or N. Y if any of the attributes in that particular record is transformed.
Delete - Yes or No. To delete records, select Yes.
Next to the metadata columns are the attribute names for a data source.
The following three operations can be performed and are described below:
Update existing records
Insert new records
Delete existing records
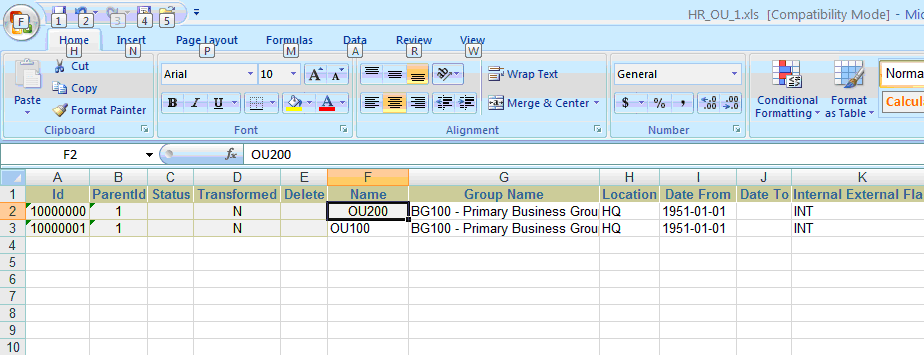
To update existing records in the database, just update the value in the Excel sheet.
For example, in the Operating Unit data source, the operating unit name has to be changed from OU100-test1 to OU200, as shown in the figure below.
Zip the files (One or more Excel files along with driver.xml) and upload it by clicking on Upload Template icon corresponding to Operating Units in the Transform page.
Select the Cascade Changes box if the changes need to be cascaded down to Inventory Organizations API.
Select your ZIP file as the Data Source.
Click Upload.
Cascade changes between two Interfaces can occur if and only if there is an attribute mapping defined between these two Interfaces.
Cascade changes happen within the master entity object (for example, Operating Units) as well as to the detail entity object (for example, Inventory Organizations). There are two types of cascade operations that take place:
Cascade due to attribute mapping
Cascade due to name-value match
Here is an example: The following figure shows the attribute mappings between Operating Units and Inventory Organizations. The navigation path for this page is Setup Manager home (or region on the Change Management Dashboard) > Interfaces > Interface Dependencies icon for a specific interface > Update icon for a specific dependent interface.
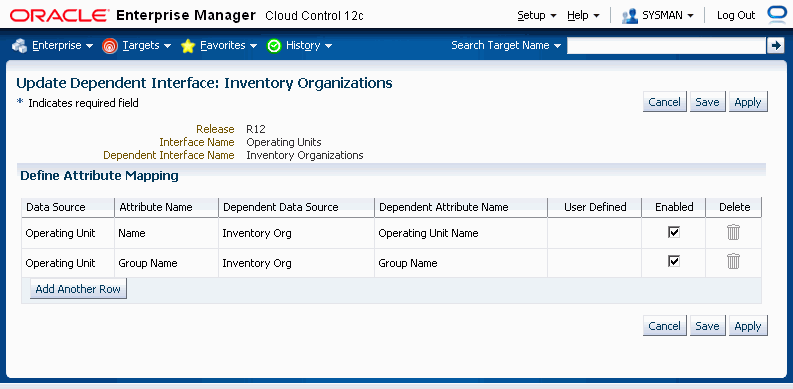
The Name and Group Name of Operating Unit are mapped to Operating Unit Name and Group Name, respectively.
In this example, if you open the Inventory Organization Excel sheet, you see that the Operating Unit Name was changed to OU200 for the records having IDs '10000000', '10000001' and '10000002', as shown in the figure below.

Within the API, the system does a name and value match to find out if there are any eligible records to be transformed. For example, within the Operating Unit API: Operating Unit and Organization TL are linked through a view link. Even though there is no attribute mapping defined between these two entities, the transform does a name-value match between these two data sources, finds out the mapping, and cascades the data.
Also, across the APIs within a hierarchical selection set, a name and value match is performed during the transform for the attributes that have been changed.
To insert a new record to the API, first the record needs to be inserted at the master object level (Operating Unit), then at the detail level (Organization Tl, Classification, Classification Type). If any records are inserted at the detail without inserting records at master, the details records will be 'Skipped'. Also, if the records are inserted only at the master and not inserted at the detail level, then the records at the master will have the status as ‘Inserted with Warning’.
While inserting new record to any data source, both the unique ID and proper ParentID need to be specified.
In the above example, say we insert new operating unit OU300. As the Operating Unit already have records with ID '10000000' and '10000001', the new record should be given an ID as '10000002' and an ParentID as '1', as shown in the figure below:

Now the detail information needs to be added to Organization Tl, Classification, and Classification Type data sources with the proper ID and ParentID. The data appears as follows after insertion.
For Classification, note in the figure below the record with ID '20000002', ParentID '10000002', and Status 'Inserted'.
Classification
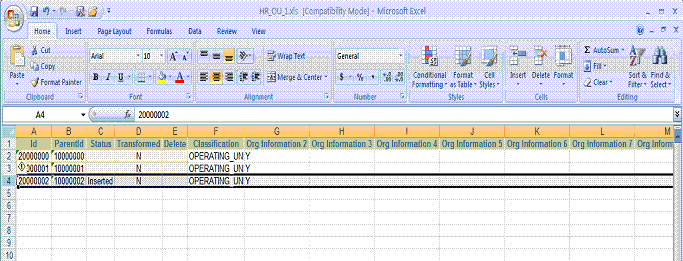
For Classification Type, the following records are inserted, as shown in the figure below:
ID '30000004', with ParentID '20000002', Status 'Inserted', and Classification Type 'Operating Unit Information'
ID '30000005', with ParentID '20000002', Status 'Inserted', and Classification Type 'ASO_ORG_INFO'
Classification Type

For Organization Tl, note the record with ID '40000002', ParentID '10000002', Status 'Inserted', and Name 'OU300', as shown in the figure below:
Organization Tl
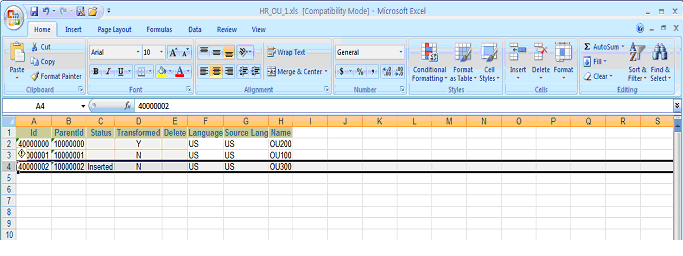
Zip the files (One or more Excel files along with driver.xml) and upload it by clicking on the Upload Template icon for Operating Units.
To delete existing records from the extract select 'Yes' from the delete dropdown list box in the Excel file for the IDs that need to be deleted. After the deletion is selected at the master level, the detail records are also deleted. If we delete the record with Name 'OU100' (for example, with ID '10000001' in Operating Unit), the related detail records in Classification, Classification Type, and Organization Tl are also deleted.
Select 'Yes' in the dropdown Delete Column for the ID '1000000' in Operating Unit.
Zip the files (One or more Excel files along with driver.xml) and upload it by clicking on Upload Template icon for Operating Units.
In the following example, the record with the ID '10000001' is marked with "Yes" in the Delete column as shown in the figure below.
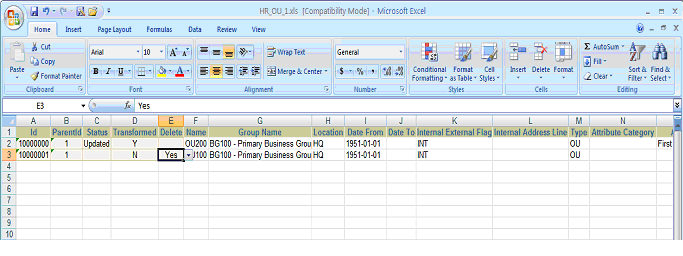
After the transform is completed successfully, the data looks as shown in the following figures for Operating Unit, Organization Tl, Classification, and Classification Type data sources. Note that the record with the ID '10000001' is no longer listed in the Operating Unit figure below.
Operating Unit
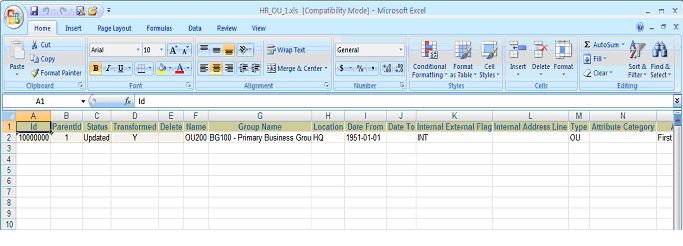
For Organization Tl, note that the record with the Parent ID of '10000001' is not listed in the figure below.
Organization Tl
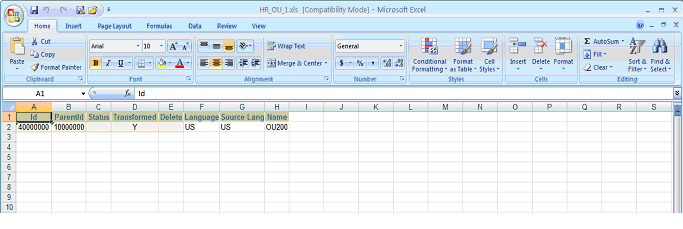
The related detail record for Classification is deleted, as shown in the figure below.
Classification

The related detail record for Classification Type is also deleted, as shown in the figure below.
Classification Type
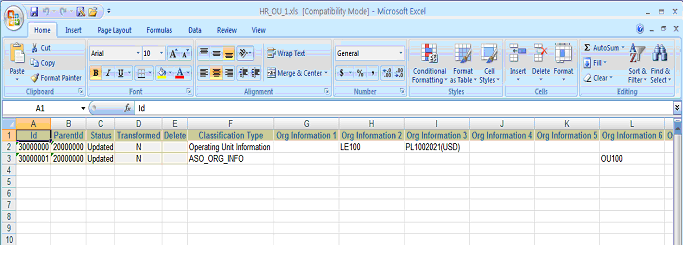
To freeze a Transform
If you are finished with the transform process, you can freeze the transform by clicking the Freeze button. Transforms that are in a Freeze state can be added to a project plan for the same release.
You cannot edit a transform in the Freeze state, but you can unfreeze a transform for further progress. However, these later changes do not affect the transform content added previously to a project plan.
Note: If any errors occur while uploading or cascading the transform and if you still wish to continue with the Freeze option, then XML data from the original extract will be copied for those setup objects that have errors.
Click View Log to view details of the job in which the transform was done.
To discover Interface Metadata
Before creating a transform, you must discover the interface metadata for the specific Oracle E-Business Release. To do this, perform the steps below for the Discover Interface Metadata page.
You can also use the Discover Interface Metadata to manage your Interface Metadata targets.
You can refresh the Interface Metadata by selecting any target and clicking on the Rediscover button on the Discover Interface Metadata page. The currently selected refreshed target will then become active.
Note: You can add multiple Release 11i or Release 12 targets but at any given time only one Release 11i target and one Release 12 target would be active.
Navigate to Interfaces > Discover Interface Metadata.
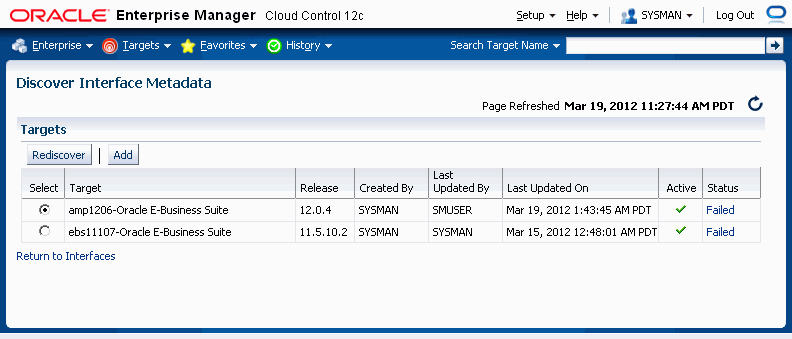
Click Add to add a target.
On the next page, specify the Release of the target. Use the LOV to specify the Target Name.
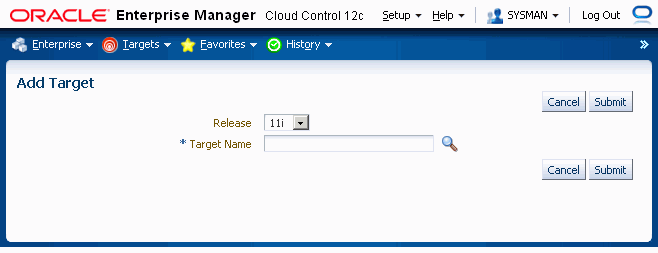
Click Submit.
Only one request to discover Interface Metadata can be in the status Pending or Running at a time.
An Interface Attribute mapping can be created between data sources of same or related (dependent) interfaces; for example, Base Data Source -> Translated Data Source.
Attribute mapping between two interfaces will not be used if the two interfaces appear in the Selection Set as siblings.
A dependent Interface Attribute Mapping is used between master to detail interfaces as they appear in hierarchical selection sets such as the Oracle Financials Operating Unit Level Setup and Payroll Element. To define the relation between two interfaces, a minimum of one attribute mapping is mandatory.
Dependent Interface Mappings are not user specific; that is, a mapping created by one user can be used in another user's transform. If a user does not want to use some or all interface mappings, he or she can uncheck the Enabled box in the Define Attribute Mapping screen.
User-defined mappings can be deleted by any user. Seeded mappings can only be enabled or disabled; they cannot be deleted.
Use the following procedure to search for interfaces.
To search for an interface
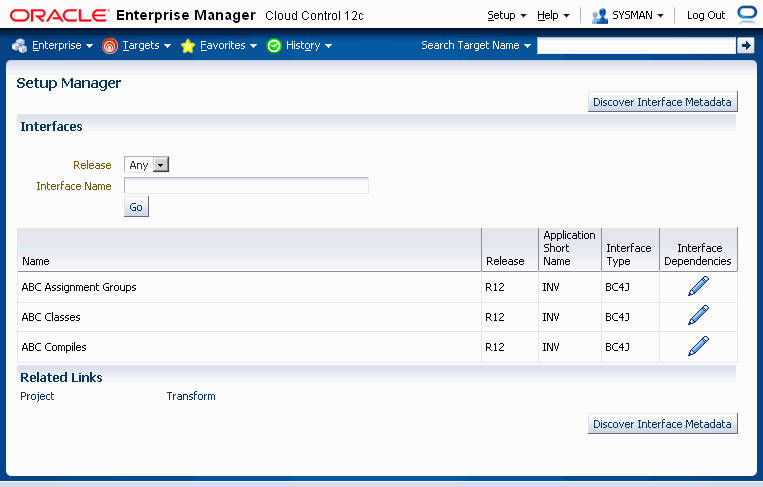
You can search for an interface on the following:
Release - You can search for interfaces on Release 11i, Release 12, or both. The search results will include only records for configured releases.
Interface Name - Name of the interface.
The results table has the following columns:
Name - Name of the interface.
Release - Oracle E-Business Suite release to which this API belongs.
Application Short Name - Application Short Name.
Interface Type - BC4J indicates iSetup framework. FNDLOAD indicates Generic Loader.
Interface Dependencies - Icon to update or add more dependent interfaces and to provide more attribute mappings between the required and the dependent interfaces.
To update interface dependencies
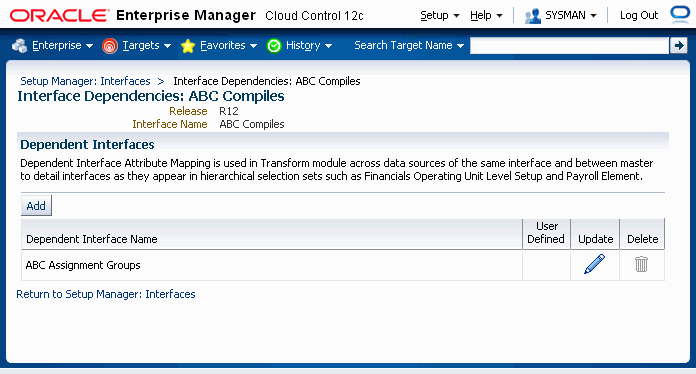
You can navigate to this page from the Interface Search page by clicking on the Interface Dependencies icon for an interface.
This page lists dependent interfaces for the selected interface. Table columns are:
Dependent Interface Name - Name of the dependent interface.
User Defined - Tick mark would appear if a user has created it.
Update - The icons in this column allow you to update or add an attribute mapping between the current interface and the dependent interface.
Delete - The icons in this column allow you to delete a dependent interface.
The icons in this column are disabled for seeded interface dependencies.
You can add an additional dependent interface by clicking the Add button.
To update a dependent interface
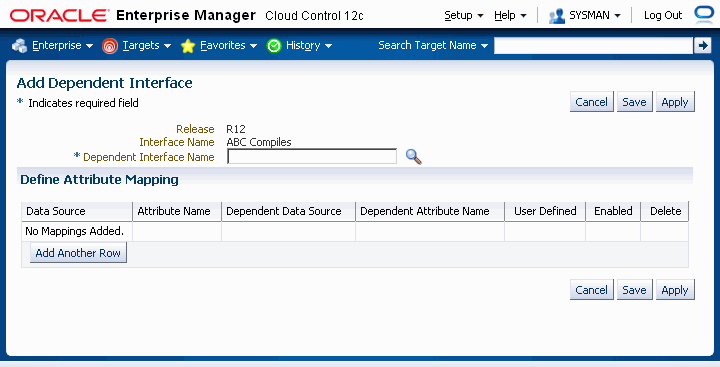
Navigate to the Interfaces page and then click the Interface Dependencies icon for a specific interface. The dependent interfaces are listed in the Interface Dependencies: [Interface Name] page.
Click the Update icon for a specific dependent interface to update it.
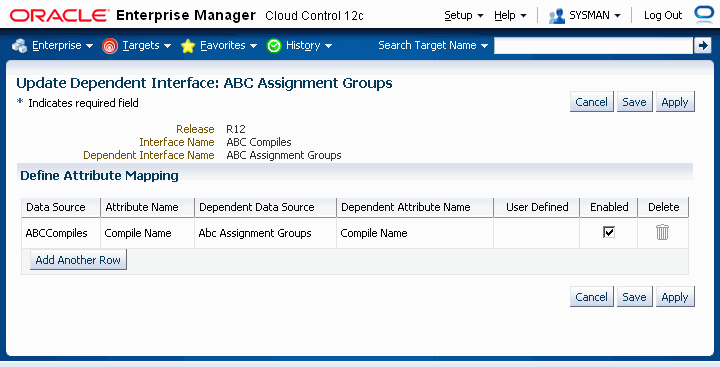
You can disable an attribute mapping by de-selecting the Enabled box.
Click Add Another Row to add a new attribute mapping.
To define an attribute mapping
Click on the Add Another Row button in the Define Attribute Mapping region in the Update Dependent Interfaces page.
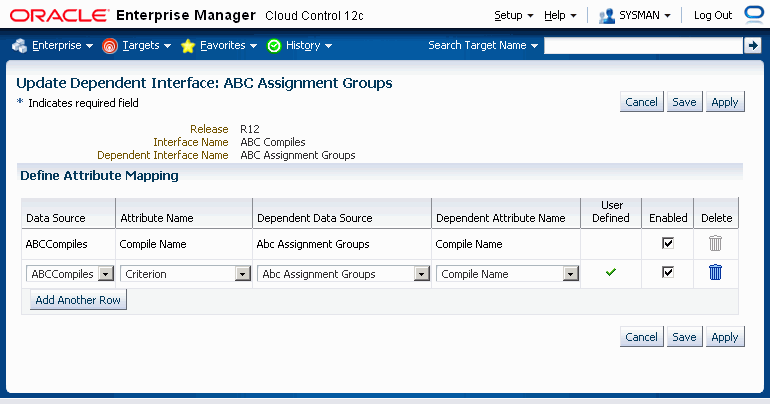
Enter the following:
Data Source - Data source of the required interface. The data source is a Java/SQL object that contains the SQL query for extraction. The system gets the SQL query from the data source and uses it as a query against the database. Then the system iterates over the records and writes them as XML or LDT depending on the nature of the API. In other words, a data source is simply a combination of one or more tables using data which is extracted. A data source can be compared to a table.
Attribute Name - Attribute name of the data source of the required interface. An attribute name can be compared to a table column name.
Dependent Data Source - Data source of the dependent interface.
Dependent Attribute Name - Attribute name of the data source of the dependent interface.
User Defined - A tick mark appears for those rows for which you have created a mapping.
Enabled - You can enable or disable an attribute mapping. If you have disabled a mapping, then it will not be used at the time for cascading a value from master to detail.
For example, say there are two setup objects named Employee and Department. The Department table's column 'department_name' is linked to the Employee table's column 'department_name'. If you change the value of department_name in the Department Microsoft Excel file and upload it, then the cascade feature works in one of two ways: If you have enabled attribute mapping between the Department table's and the Employee table's column department_name, then the value that you have changed in the Department table would automatically be reflected in the Employee table. If you have disabled attribute mapping, then this cascading would not happen.
Delete - You can delete only user-defined attribute mappings.
Click Save to save your changes and remain on this page. Alternatively, you can click Apply to save your changes and go back to the previous page. Click Cancel to cancel your updates and return back to the previous page.
![]()
Copyright © 2007, 2012, Oracle and/or its affiliates. All rights reserved.