| Oracle® Enterprise Manager Lifecycle Management Administrator's Guide 12c Release 2 (12.1.0.2) Part Number E27046-08 |
|
|
PDF · Mobi · ePub |
| Oracle® Enterprise Manager Lifecycle Management Administrator's Guide 12c Release 2 (12.1.0.2) Part Number E27046-08 |
|
|
PDF · Mobi · ePub |
Patching is one of the important phases of the product lifecycle that enables you to keep your software product updated with bug fixes. Oracle releases several types of patches periodically to help you maintain your product. However, patching has always been the most challenging phase of the lifecycle because it is complex, risky, time consuming, and involves downtime. Although you can use several approaches to identify the patches and patch your databases, the challenges still remain the same, unfortunately.
This chapter describes how Oracle Enterprise Manager Cloud Control's (Cloud Control) new patch management solution addresses these patch management challenges. In particular, this chapter covers the following:
This section describes the following:
Before you understand the new patch management solution offered by Cloud Control, take a moment to review some of the tools you might be using currently to patch your databases, and the challenges you might be facing while using them (Table 24-1).
Table 24-1 Current Patch Management Tools and Challenges
| Approach | Description | Challenges |
|---|---|---|
|
OPatch |
Oracle proprietary tool that is installed with Oracle products like like Oracle Database, Management Agent, SOA, and so on. |
|
|
Custom Scripts |
User-created scripts developed around OPatch, SQLPlus, and so on. |
|
|
deployment procedures |
Default procedures offered by Cloud Control for automating the patching operations |
|
Cloud Control addresses the challenges described in Overview of the Current Patch Management Challenges with its much-improved patch management solution that delivers maximum ease with minimum downtime. The new patch management solution offers the following benefits:
Integrated patching workflow with My Oracle Support, therefore, you see recommendations, search patches, and roll out patches all using the same user interface.
Complete, end-to-end orchestration of patching workflow using Patch Plans, including automated selection of deployment procedures and analysis of the patch conflicts, therefore, there is minimal manual effort required. For more information on patch plans, see Overview of Patch Plans.
Clear division of responsibilities between designers and operators - Designers can focus on creating patch plans, testing them on a test system, and saving them as patch templates. Operators can focus on creating patch plans out of the template for rolling out the patches on a production system.
Easy review of patches for applicability in your environment, validation of patch plans, and automatic receipt of patches to resolve validation issues.
Saving successfully analyzed or deployable patch plans as patch templates, which contain a predetermined set of patches and deployment options saved from the source patch plan.
Out-of-place patching for standalone (single-instance) database targets and Oracle Grid Infrastructure targets that are part of Oracle Exadata.
Flexible patching options such as rolling and parallel, both in offline and online mode.
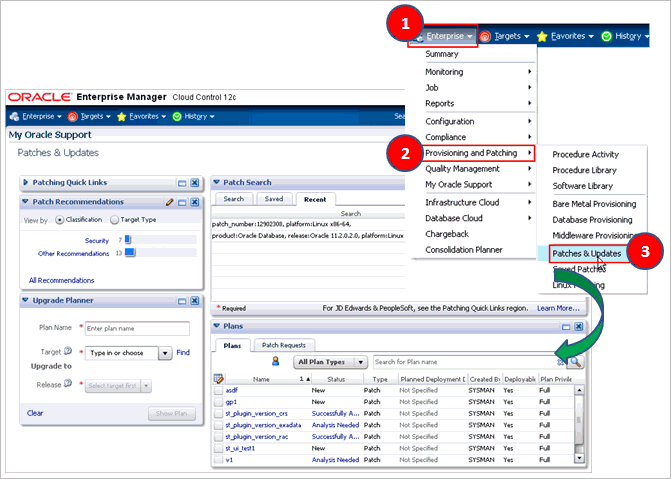
Figure 24-1 shows you how you can access the Patches and Updates screen from within Cloud Control console.
This section describes the following:
Patch plans help you create a consolidated list of patches you want to apply as a group to one or more targets. Patch plans have states (or status) that map to key steps in the configuration change management process. Any administrator or role that has view privileges can access a patch plan.
Patch plan supports the following types of patches:
Patch Sets
Note:
Patch Sets for Oracle Database Release 10g Release 2 (10.2.0.x) and Release 11g Release 1 (11.1.0.x). However, note that Patch Sets for Oracle Database Release 11g Release 2 (11.2.0.x) are complete installs (or full releases) and you must use the Database Upgrade feature to install them as they follow out-of-place patching approach.
Patch Sets are not supported on Oracle WebLogic Server targets, Oracle Fusion Application targets, and Oracle SOA Infrastructure targets.
Patches (One-Off)
Interim Patches that contain a single bug fix or a collection of bug fixes provided as required. Also include one-offs for customer-specific security bug fixes.
Diagnostic Patches, intended to help diagnose or verify a fix or a collection of bug fixes.
Patch Set Updates (PSU), contain a collection of high impact, low risk, and proven fixes for a specific product or component.
Critical Patch Updates (CPU), contain a collection of security bug fixes.
Note:
You cannot add both patch sets and patches to a patch plan. Instead, you can have one patch plan for patch sets, and another patch plan for patches.A patch can be added to a target in a plan only if the patch has the same release and platform as the target to which it is being added. You will receive a warning if the product for the patch being added is different from the product associated with the target to which the patch is being added. The warning does not prevent you from adding the patch to the plan.
You can include any patch for any target in a plan. The plan also validates Oracle Database, Fusion Middleware, and Cloud Control patches against your environment to check for conflicts with installed patches.
The patch plan, depending on the patches you added to it, automatically selects an appropriate deployment procedure to be used for applying the patches. For information on the patching deployment procedures used for various database target types, see Table 24-2.
Note:
Patch plans are currently not available for hardware system or operating system patching.
Any administrator or role that has view privileges can access a patch plan. For information on roles and privileges required for patch plans and patch templates, see Creating Administrators with the Required Roles.
If you are patching an Oracle Grid Infrastructure target, which is part of Oracle Exadata, then you can add only one patch (Oracle Exadata patch) per patch plan. For all other target types, you can add as many patches as you want, as long as the patches are of the same release and platform as the targets being patched.
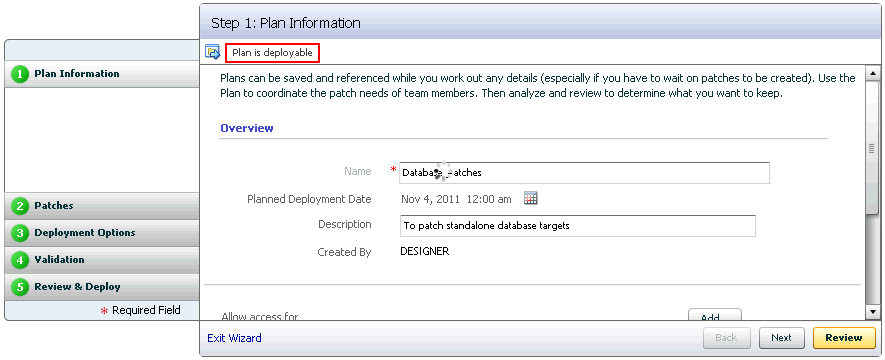
A patch plan can be either deployable or nondeployable.
A patch plan is deployable when:
It contains only patches of the same type (homogenous patches).
It contains targets that are supported for patching, similarly configured, and are of the same product type, platform, and version (homogeneous targets).
There are no other conflicts within the plan.
A patch plan that does not meet any of the conditions listed for a deployable plan is a nondeployable plan. If your patch plan is not deployable, you cannot deploy the patches using the patch plan, but you can perform some analysis and checks, download the patches, and manually apply the them.
Figure 24-2 shows the Create Plan Wizard that enables you to create, view, and modify patch plans.
The wizard has the following screens:
Screen 1: Plan Information
Enables you to provide basic information about the plan, such as a unique name for the plan, a planned deployment date, a brief description. Also enables you to add an administrator or a role that can access the patch plan.
Screen 2: Patches
Enables you to view the patches already part of the patch plan, and manually add additional patches to the plan and associate targets that need to be patched.
Screen 3: Deployment Options
Enables you to configure the patch plan with deployment options that suit your needs. Although this step is common for all target types, the deployment options offered by this step depend on the target types selected in the patch plan.
For all target types, you can select a customized deployment procedure for deploying the patches, and specify the credentials to be used. For database targets, you can specify a nondefault staging location for storing patches and skip the staging process if the patches are already staged. For standalone databases, you can choose between out-of-place patching and in-place patching. For Oracle RAC databases and Oracle Grid Infrastructure targets, you can choose to apply the patches in rolling or parallel mode in order to control the downtime of the system.
Enables you to validate the patch plan and determine whether the patches can be rolled out without any issues. Essentially, it enables you to perform the following checks using the patch information from Oracle, the inventory of patches on your system (gathered by the configuration manager), and the information from candidate patches.
Patch Conflict Checks
Conflict between the patches added to the patch plan and the patches already present in the Oracle home
Conflict among patches within the patch plan
Target Sanity Checks
Target status and configuration checks
OPatch and OUI checks
Inventory sanity checks, such as locks, access, and so on
Hard disk space checks
Cluster verification checks (cluvfy, srvctl config)
SQLPlus checks (with sample SQL)
Note:
For Oracle WebLogic targets, instead of the OPatch and OUI check, you must perform the SmartUpdate version check.In addition to checking for conflicts, it enables you to check for patch conflicts between the patches listed in the plan.
Screen 5: Review & Deploy
Enables you to review the details you have provided for the patch plan, and then deploy the plan. The page also enables you to review all the impacted targets so that you understand what all targets are affected by the action you are taking.
This section describes the following:
Patch templates are another important aspect of the patch management solution. Patch templates help you create predesigned plans based on an existing successfully analyzed or deployable patch plan, however without any targets selected. A patch template contains a predetermined set of patches and deployment options saved from the source patch plan, and enables you to select a completely new set of targets.
This way, as a Patch Designer, you can create a patch plan with a set of patches, test them in your environment, save the successfully analyzed patch plan as a patch template, and publish them to Patch Operators. As a Patch Operator, who can create patch plans out of the templates, add another set of targets, and roll out the patches to the production environment in a recursive manner.
This way, you reduce the time and effort required to create new patch plans, and as a Patch Designer, you expose only the successfully analyzed and approved plans to Patch Operators.
Note:
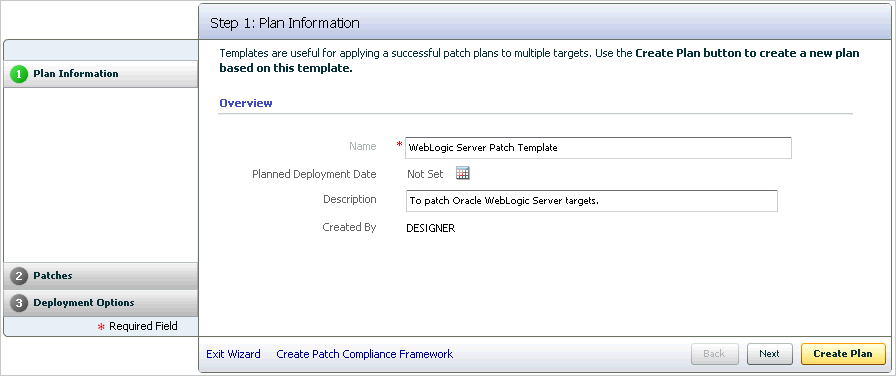
An administrator or role that has the privileges to create a patch template and view a patch plan, which is being used to create a template, can create a patch template.Figure 24-3 shows the Edit Template Wizard that enables you to view the contents of a patch plan template and modify the description.
When you view or modify a patch plan template, the Patch Plan Template opens. The wizard has the following screens:
Screen 1: General Information
Enables you to view general information about the template, and modify the description and the deployment date.
Screen 2: Patches
Enables you to view a list of patches part of the patch plan template. The patches listed here are the patches copied from the source patch plan that you selected for creating the template.
Screen 3: Deployment Options
Enables you to view the deployment options configured in the patch plan template.
Table 24-2 lists the targets and their releases you can patch on different platforms using the new patch management solution, and the default deployment procedures that the patch plans automatically select depending on the target type. The deployment procedures are supported only through patch plans. Although they are exposed in the deployment procedure Manager page, you cannot select and run them independently; you must always create a patch plan to run them.
Note:
You need to meet the following prerequisites before patching Oracle WebLogic Server targets:Ensure that you have applied the Enterprise Manger Bundle Patch 1 on the OMS and the Management Agents monitoring the Oracle WebLogic Server targets.
Ensure that you have applied MOS 12.1.0.2 plug-in on the OMS. This must be applied to all of the OMS instances in a multi-OMS environment.
Ensure that you have applied Oracle Fusion Middleware 12.1.0.2 plug-in on the OMS and the Management Agent monitoring the Oracle WebLogic Server targets.
Table 24-2 Supported Targets and Releases for Patching
| Supported Target Type | Supported Targets and Releases | Supported Platform | Supported Default deployment procedure |
|---|---|---|---|
|
Oracle Database |
Oracle Database (standalone) 10g Release 1 to 11g Release 2 |
All Platforms |
Patch Oracle Database |
|
Oracle Automated Storage Management (Oracle ASM) 10g Release 1 to 11g Release 2 |
All Platforms |
Patch Standalone Oracle ASM |
|
|
Oracle Real Application Cluster (Oracle RAC) 10g Release 1 to 11g Release 2 |
All Platforms |
|
|
|
Oracle Exadata RAC DatabasesFoot 1 11g Release 2 (11.2.0.1, 11.2.0.2, and 11.2.0.3) |
All Platforms |
No default deployment procedure; it is built dynamically |
|
|
Oracle Restart 10g Release 1 to 11g Release 2 |
All Platforms |
Patch Oracle Restart |
|
|
Oracle Clusterware 10g Release 1 to 11g Release 1 |
All platforms except for Microsoft Windows |
|
|
|
Oracle Grid Infrastructure 11g Release 2 |
All Platforms |
|
|
|
Oracle WebLogic Server |
Oracle WebLogic Server 10g Release 3 (10.3.1), (10.3.2), (10.3.3), (10.3.4), (10.3.5), (10.3.6), and 12c Release 1 (12.1.1) |
All Platforms |
|
|
Oracle Fusion Applications |
Oracle Fusion Applications 11g Release 1 (11.1.1.5.1) and (11.1.2.0.0) (RUP1) |
All Platforms |
Patch Oracle Fusion Applications |
|
Oracle Application Server |
Oracle Application Server 10g Release 1 |
All Platforms |
Patch Application Server |
|
Oracle SOA Infrastructure |
Oracle SOA Infrastructure 11g Release 1 (11.1.1.1.0 - 11.1.1.6.0) |
All Platforms |
|
Footnote 1 Exclusively tested for Oracle Exadata Database Machine recommended bundle patches.
Note:
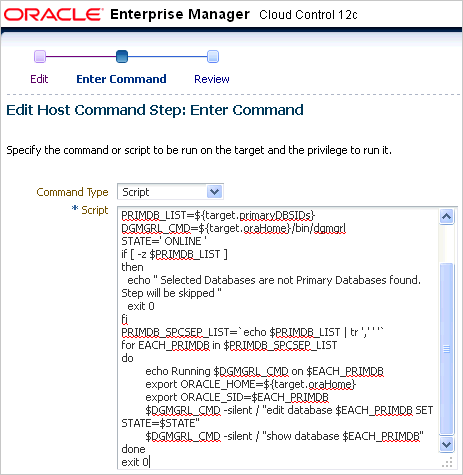
You can also patch primary and standby databases configured with Oracle Data Guard. However, to patch such targets, you must use a customized patching deployment procedure. For more information, see Patching Primary and Standby Databases Configured with Oracle Data Guard.This section describes the following patching modes:
You have the flexibility to choose between online and offline modes of patching.
Online Mode is useful when Cloud Control can connect to My Oracle Support using an Internet connection. Using this mode, you can see recommendations from Oracle for the patches to be applied, and manually search patches directly on My Oracle Support and add them to your patch plan. In addition, you can access community information, knowledge articles, service requests, and so on, and also automatically resolve patch conflicts with a merge patch directly from My Oracle Support.
Offline Mode is useful when Cloud Control cannot connect to My Oracle Support. Using this mode, you can search patches that were manually uploaded to the Software Library, and add them to your patch plan. In offline mode, you cannot do the following:
Search and download patches from My Oracle Support
View additional information about the patch
Access community information, knowledge articles, service requests
View the Related Activity region
Note:
By default, the patching mode is set to online. If you want to switch the mode to offline, then from the Setup menu, select Proxy Settings. On the Patching Setup page, click the Online and Offline Settings tab, and in the Settings section, select Offline.You have the flexibility to choose between in-place and out-of-place patching modes.
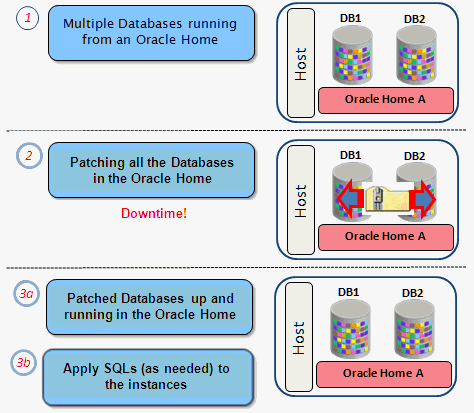
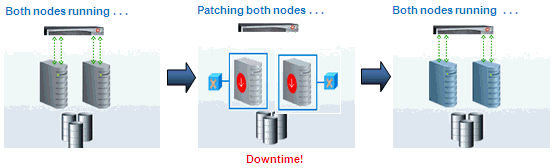
In-place mode of patching is a patching mechanism where you directly patch the database home. In this mode, before applying the patch, you actually bring down all the database instances running out of that database home, which means there will be a downtime. And after applying the patch, you restart all the database instances. All database instances will and must be patched in the same manner. Note that in this mode, recovery takes longer if there is a problem because the Oracle home that you patched is the original database home, not its copy.
Figure 24-4 illustrates how multiple database instances running from an Oracle home get patched in-place patching mode.
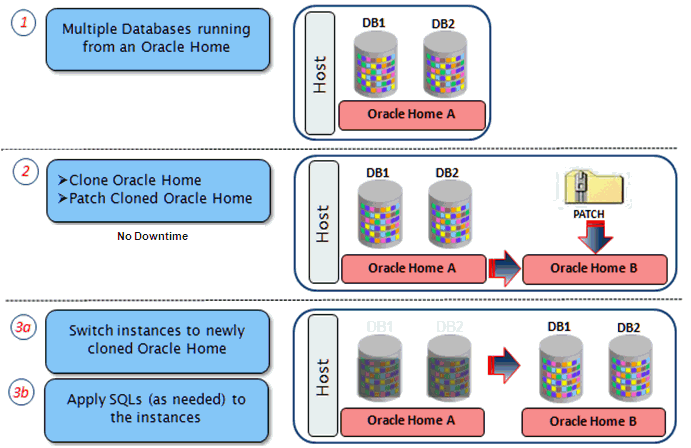
Out-of-place mode of patching is a patching mechanism that clones the existing database home, and patches the cloned home instead of the original home. Once the cloned home is patched, you can migrate the database instances to run from the cloned home, which means there will be minimal downtime while switching over the instances, but not a significant downtime.
Note:
Out-of-place mode of patching is currently supported only for standalone (single-instance) databases targets and Oracle Grid Infrastructure targets that are part of Oracle Exadata. For more information on how the patching is performed, see Patching Oracle Exadata.While migrating the database instances, you can choose to migrate all of the instances or only some of them depending on the downtime you can afford to have in your data center. If you choose to migrate only a few instances in one session, then ensure that you migrate the rest in the next session. This way, you can control the downtime in your data center as you divide the migration activity. This is particularly useful when you have multiple database instances running out of an Oracle home.
Note:
You select the database instances you want to migrate, in the patch plan. The selected database instances are migrated when the patch plan is in the Deploy state. If you selected only a few instances to be migrated, then to migrate the remaining instances, create another patch plan, on the Deployment Options page, select the existing home, and then select the remaining instances that need to be migrated.Oracle always recommends out-of-place patching because the downtime is minimal and recovery in case of a problem is easy; you can always switch back to the original database home in case of a problem with the clone home.
Note:
If you patched an Oracle Grid Infrastructure target, which is part of Oracle Exadata, in out-of-place patching mode, then you can switch back to the original home directly from the Create Plan Wizard—the wizard provides a Switchback button that enables you to perform the operation. However, this button is not available for any other target type.Figure 24-5 illustrates how multiple database instances running from an Oracle home get patched in out-of-place patching mode.
While patching Oracle Real Application Cluster (Oracle RAC) targets, Oracle Grid Infrastructure targets (whether or not they are part of Oracle Exadata), Oracle WebLogic Server targets, Oracle Fusion Application targets, or Oracle SOA Infrastructure targets you can choose to patch the instances of the cluster either in rolling or parallel mode.
Rolling Mode refers to the patching methodology where the nodes of the cluster are patched individually, that is, one by one. For example, if you are patching a clusterware that has five nodes, then the first node is shut down, patched, and restarted, and then the process is rolled over to the next node until all the nodes are patched successfully.
Note:
The ReadMe of the patch clearly states whether or not you can use the Rolling Mode to apply your patches. Therefore, use this mode only if it is stated in the ReadMe.Figure 24-6 illustrates how a two-node Oracle RAC gets patched when rolling mode is used.
Parallel Mode refers to the patching methodology where all the nodes are patched at a time, collectively. In this methodology, all the nodes are shut down and the patch is applied on all of them at the same time.
Figure 24-7 illustrates how a two-node Oracle RAC gets patched when parallel mode is used.
Note:
For all other database target types, the default patching mode is rolling mode.The following illustration describes the overall workflow of the patch management solution offered through the integrated functionality within the Cloud Control console.

| Step | Step Name | Description | Reference Links |
|---|---|---|---|
| Step 1 | Set Up Infrastructure | Meet the prerequisites and set up the infrastructure for rolling out patches. Essentially, create admin roles for creating Patch Plans and Patch Templates, meet other mandatory and optional prerequisites, make online or offline patching settings. | Setting Up Infrastructure for Patching |
| Step 2 | Identify the Patches | View the recommendations made by Oracle on the patches to be applied, and identify the ones you want to apply. Access community information (from innumerous customers). | Identifying Patches to Be Applied |
| Step 3 | Apply Patches | Create patch plans with patches and associated targets, perform prerequisite checks, analyze the patches for conflicts and resolve the issues, and then save the successfully analyzed plan as a patch template. Then, create a new patch plan out of the patch template and use that to deploy the patches in your environment. | Applying Patches |
This section describes how you can set up the infrastructure for patching. Meet these prerequisites before you start rolling out the patches.
 |
This section is mainly for Patch Administrators or Patch Designers who want to keep the infrastructure ready for rolling out patches. This is mostly a one-time task if you have decided on the way (online or offline) you want to patch. |
This section covers the following:
Setting Up Infrastructure for Patching in Online Mode (Connected to MOS)
Setting Up Infrastructure for Patching in Offline Mode (Not Connected to MOS)
Meet the basic infrastructure requirements as described in Chapter 2. The chapter describes both mandatory and optional requirements.
Table 24-3 describes the roles and the minimum privileges required for using patch plans and patch templates. These roles are default roles available in Cloud Control. You need not create them, but you must explicitly create administrators based on these roles. For instructions, see Creating Enterprise Manager User Accounts.
Table 24-3 Roles and Privileges for Using Patch Plans and Patch Templates
| Role | Patch Plan Scope | Patch Template Scope | Patch Plan and Patch Templates Privileges | Target Privileges | Resource Privileges | Implementation Recommendation |
|---|---|---|---|---|---|---|
|
Patch Administrator |
Create, View, Modify, Delete |
Create, View, Modify, Delete |
FULL_ANY_PATCH_PLAN FULL_ANY_PLAN_TEMPLATE GRANT_PRIV_PATCH_PLAN |
Operator any Target (alternatively, you can select a particular target you want to patch and grant operator privilege to it) |
|
Required if you want to create and manage Patch Designer and Patch Operator roles. You can also create these roles directly as a SUPER ADMIN or SYSMAN. |
|
Patch Designer |
Create, View |
Create, View |
FULL_PATCH_PLAN FULL_PLAN_TEMPLATE |
- do - |
- do - |
Required when you want to grant the access and also have restrictions. Alternatively, you can create an EM user with Patch Designer role. |
|
Patch Operator |
Create |
View |
CREATE_PATCH_PLAN VIEW_ANY_PLAN_TEMPLATE |
- do - |
- do - |
- do - |
If you choose to patch your targets when Cloud Control is online, that is, when it is connected to My Oracle Support, then meet the following setup requirements:
Note:
This is the default mode for patching in Cloud Control. Therefore, you do not have to manually set this up the first time. However, if you have set it to offline mode for a particular reason, and if you want to reset it to online mode, then follow the steps outlined in this section.To patch the targets in online mode, you must set the connection setting in Cloud Control to Online mode. To do so log in with Super Administrator privileges, and follow these steps:
From the Setup menu, select Proxy Settings.
On the Proxy Settings page, click the Online and Offline Settings tab.
On the Online and Offline Settings tab, in the Settings section, select Online.
In online mode, Cloud Control connects to My Oracle Support to download patches, patch sets, ARU seed data such as products, platforms, releases, components, certification details, and patch recommendations. For this purpose, Cloud Control uses the Internet connectivity you have on the OMS host to connect to My Oracle Support. However, if you have a proxy server set up in your environment, then you must register the proxy details.
Besides connecting to My Oracle Support, Cloud Control requires Internet connectivity between the OMS and the Management Agents, so the Management Agents can upload configuration details via the OMS to the Management Repository. However, if the OMS and the Management Agents are in different network domains with the same or different proxy servers set up, then you must register the proxy details.
To register the proxy server settings for OMS, follow these steps:
From the Setup menu, select Proxy Settings.
On the My Oracle Support and Proxy Connection tab, do the following:
In the My Oracle Support section, by default, Patch Search URL displays https://updates.oracle.com as the URL where the patches will be searched. If you want to verify the connectivity to My Oracle Support, then click Test.
If the credentials are valid and if Cloud Control is able to connect to My Oracle Support successfully, then a status message is displayed to this effect.
In the My Oracle Support Connection Setting section, select Manual Proxy Configuration. Enter the proxy settings for the HTTPS protocol—enter the name of the proxy server, the port, the realm (if the credentials are configured for realm), and the credentials (if the credentials are required for authentication).
Note:
Ensure that your proxy allows connectivity toaru-akam.oracle.com, ccr.oracle.com, login.oracle.com, support.oracle.com, and updates.oracle.com.
NTLM (NT LAN Manager) based Microsoft Proxy server is not supported. To enable access add the above URLs to the Unauthenticated Sites Properties of the NTLM/Microsoft Proxy server.
The Connection Configuration subsection shows the default values set for Timeout and Number of Retries. Timeout indicates the time in milliseconds after which it should automatically time out if the connection takes unusually long time to connect to My Oracle Support. Number of Retries indicates the number of times it should retry connecting to My Oracle Support after timing out. Change the default values to higher values only if required.
In the Agent Connection Setting section, select the settings to be considered for all Management Agent-related communications.
If you want to use the settings specified in the My Oracle Support Connection String, then select Use My Oracle Support Connection Settings.
If you want to enter a new set of proxy details, then select Manual Proxy Configuration and, provide the details for HTTPS protocol. Specify the name of the proxy server, port, sites for which proxy must not be used, realm (if credentials are configured for realm), and credentials (if credentials are required for authentication).
Note:
REALM is mandatory if the authentication credentials are required to access the proxy server. Check with your network administrator for the correct value.In the Test URL section, to verify whether the Management Agent is reachable, specify a valid Management Agent URL and click Test. If the URL is valid and if Cloud Control is able to reach the Management Agent successfully, then a status message is displayed to this effect.
Click Apply.
If you choose to patch your targets when Cloud Control is offline, that is, when it is not connected to My Oracle Support, then meet the following setup requirements:
Downloading Enterprise Manager Catalog Zip File From Another Host With Internet Connectivity
Uploading Enterprise Manager Catalog Zip File from your Host With No Internet Connectivity
To patch the targets in offline mode, you must set the connection setting in Cloud Control to offline mode. To do so, follow these steps:
From the Setup menu, select Proxy Settings.
On the Proxy Settings page, click the Online and Offline Settings tab.
On the Online and Offline Settings tab, in the Online and Offline section, select Offline.
In offline mode, you must use another host that has Internet connection and manually download the em_catalog.zip files from My Oracle Support. Use the following URL to download the latest catalog file:
https://updates.oracle.com/download/em_catalog.zip
The information about the targets affected by the latest patches, and the patch you have to manually download is available in the catalog zip file.
After downloading the metadata XML files as described in the preceding section, ensure that you transfer the download (latest) em_catalog.zip file back to your host machine using FTP or any other file transfer methodology. From you local host, you can then log into Enterprise Manager Cloud Control to upload the zip file. To do so, follow these steps:
From the Setup menu, select Proxy Settings.
On the Proxy Settings page, click the Online and Offline Settings tab.
On the Online and Offline Settings tab, in the Online and Offline section, click Browse to upload the latest em_catalog.zip file to the Management Repository. Wait for the files to get uploaded properly.
Once the Enterprise Manager Catalog zip (em_catalog.zip) file is uploaded as described in the preceding section, a default, dedicated job called Refresh From My Oracle Support is run periodically for the following reasons:
To extract information from the metadata XML files and display them in Cloud Control.
To update the metadata tables with information about new products, releases, certifications, and so on.
However, if you want to extract the information from the metadata files immediately after uploading the files, that is, on an on-demand basis, then you must create a new Refresh From My Oracle Support job.
Note:
In offline mode, the job does not actually connect to My Oracle Support. Instead, it looks for the metadata XML files you manually downloaded and stored in the Management Repository to compute the patch recommendations.
In online mode, the job actually connects to My Oracle Support and automatically downloads the metadata XML files, and then computes the patch recommendations based on the inventory information collected.
To create a new Refresh From My Oracle Support job, follow these steps:
From the Enterprise menu, select Job, then select Activity.
On the Job Activity page, from the Create Job list, select Refresh From My Oracle Support and click Go.
Cloud Control displays the Create 'Refresh From My Oracle Support' Job page.
On the Create 'Refresh From My Oracle Support' Job page, enter a name for this job, schedule it to run immediately, and grant access to roles that must have access to this job.
Click Submit.
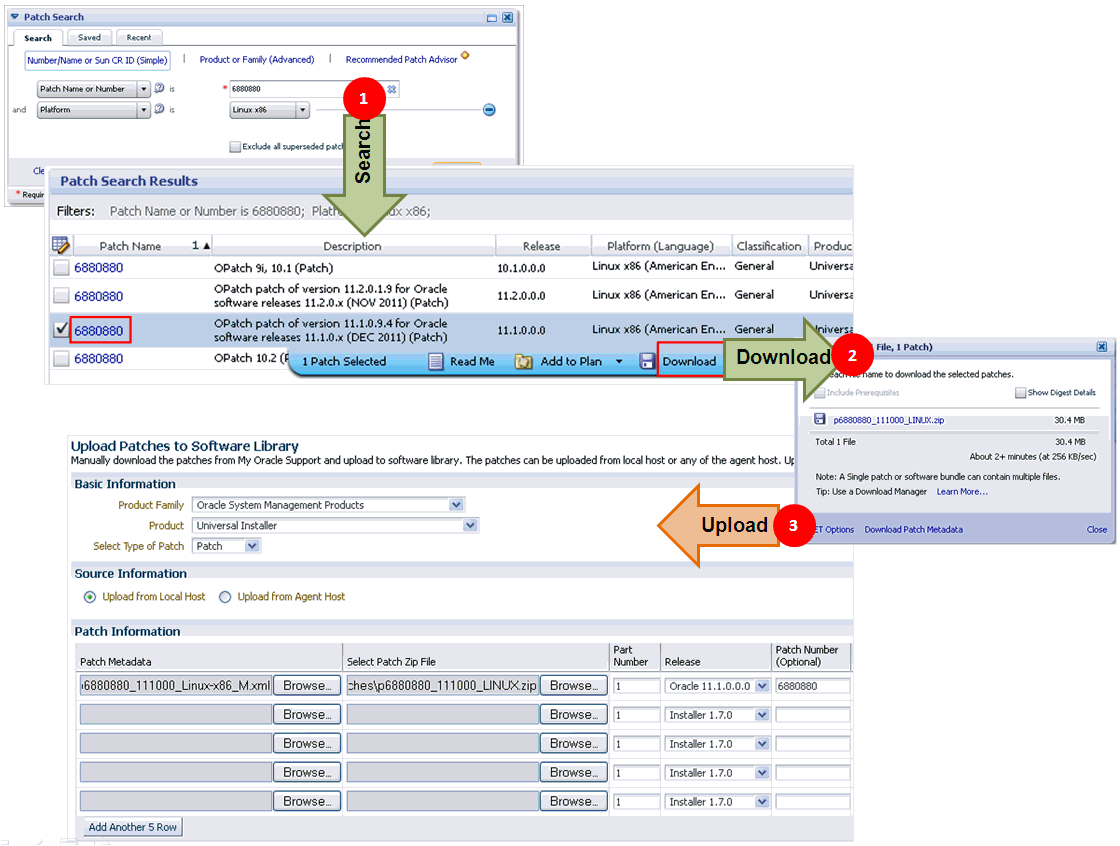
From My Oracle Support, manually download patch 6880880 and its metadata file to a host monitored by Cloud Control (essentially, that host must have a Management Agent installed.) Ensure that you download the patch for the required platform and the version of the target you are patching. This is a platform-specific patch, so you will have to carefully select the platform while downloading this patch.
Note:
Unlike OUI installed products, Oracle WebLogic Server uses SmartUpdate tool for patching its targets. To ensure that you have the latest version of the SmartUpdate tool in your environment, you need to download patch 12426828, and its metadata file to a host monitored by Cloud Control.Then, upload it to the Software Library as described in Uploading Patches to Oracle Software Library. While uploading the patch using the Upload Patches to Software Library page, in the Basic Information section, ensure that you select Oracle System Management Products as the Product Family and Universal Installer as the Product List.
Figure 24-8 illustrates how you can download the 11.1.0.0.0 release of patch 6880880 for Linux x86 platform, and upload it to the Software Library for patching Oracle Database 11g Release 1 (11.1.0.0.0) that is running on Linux x86.
For patching targets in offline mode, you must have already stored the patches and their metadata files in the Software Library so that they can be searched, selected, and added to the patch plans from the Software Library.
For this purpose, you must first manually download the patches and their metadata files from My Oracle Support, and then upload them to the Software Library. While uploading the patches and their metadata files, you must enter some information related to the patches in the Upload Patches to Software Library page, so while downloading the patches from My Oracle Support, Oracle recommends you to identify and make note of all the required details.
This section describes the following:
To download a patch and its metadata file from My Oracle Support, and to identify the details that you need to provide while uploading a patch to the Software Library, follow these steps:
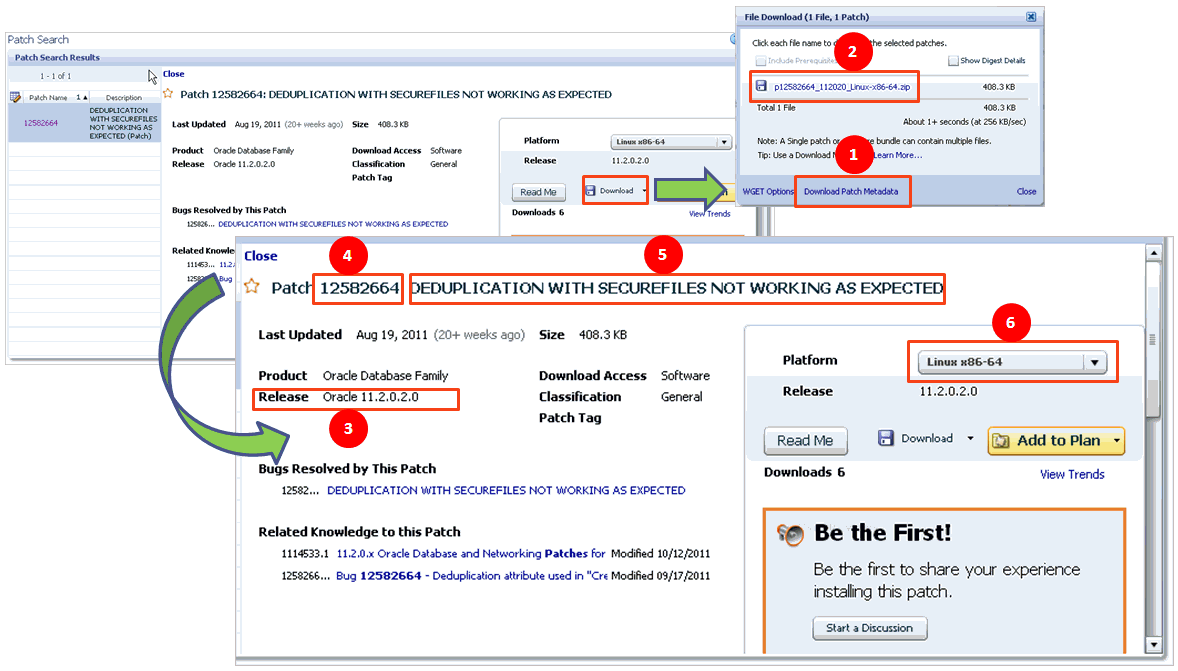
Log in to My Oracle Support, and click the Patches & Updates tab.
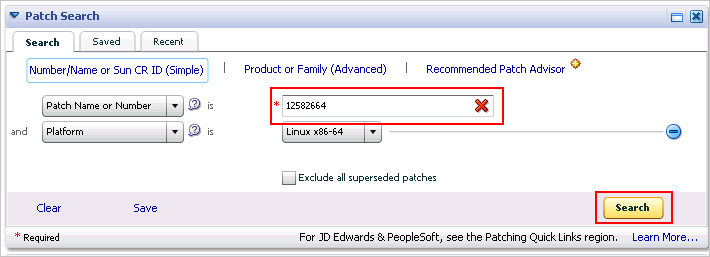
On the Patches & Updates page, in the Patch Search section, enter the patch number you want to search for as shown in Figure 24-9, and click Search.
On the Patch Search Results page, click the patch number. Cloud Control displays details of the patch in a collapsible frame as shown in Figure 24-10.
Also click Download and select Desktop. In the File Download dialog, click Download Patch Metadata, and then in the Download Patch Metadata dialog, click Download to download the patch metadata file as shown in Figure 24-10.
Note:
Oracle recommends that you transfer the patch ZIP file and the metadata XML file to the Management Agent host, where the Management Agent could be an agent on an OMS machine, or on the target host. Upload these files from the Management Agent host to the Software Library.Make a note of the details highlighted in Figure 24-10. You will need to enter these details on the Upload Patch page while uploading the patch.
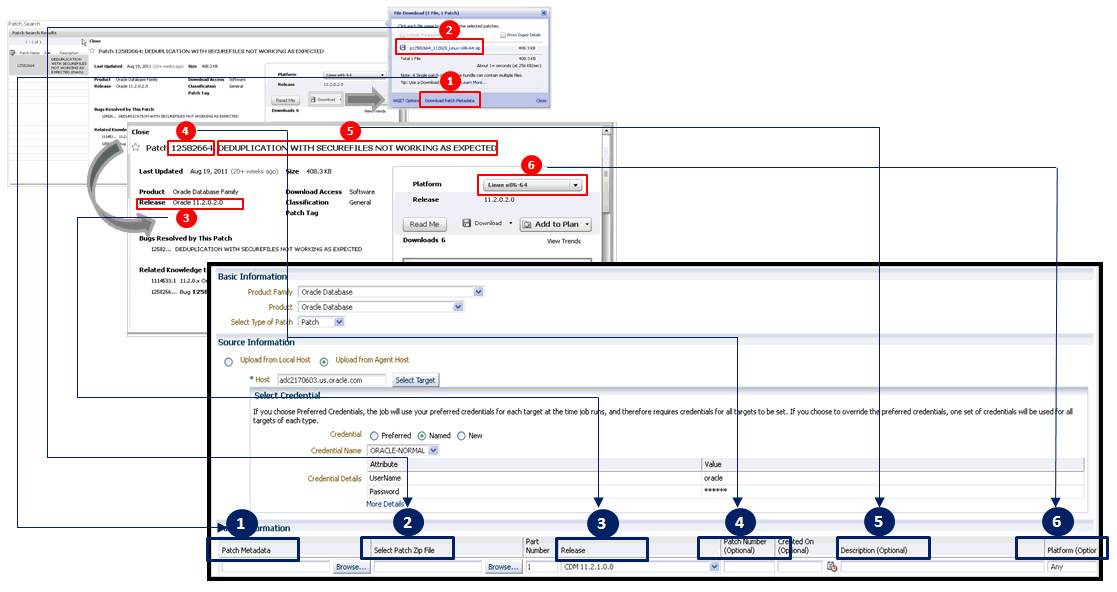
To upload a patch to the Software Library, follow these steps:
From the Enterprise menu, select Provisioning and Patching, then select Saved Patches.
On the Patching page, click Upload.
On the Upload Patches to Software Library page, in the Basic Information section, do the following:
From the Product Family list, select the product family for which you are uploading the patch as shown in Figure 24-11.
For example, if you want to patch an Oracle WebLogic Domain, then select the product family it belongs to, that is, Oracle Fusion Middleware. You must have made a note of this information according to Step (3) of Downloading a Patch from My Oracle Support and Identifying the Details Required for Uploading a Patch to Software Library.
From the Product list, select the product for which you are uploading the patch. For example, select Oracle WebLogic Server.
From the Select Type of Patch, select either Patch or Patch Set depending on the type of patch you are uploading.
Patch Sets are not supported on Oracle WebLogic Server targets.
In the Source Information section, do the following:
Select Upload from Agent Host.
Click Select Target and select the name of the agent host where the patches are temporarily stored.
In the Select Credential subsection, select Named, and from the Credential Name list, select the named credential you want to use to access the agent host.
In the Patch Information section, enter the absolute path to the patch metadata XML file and the patch ZIP file, and provide details of the patch in the other columns—part number, release, patch number, creation date, description, platform, and language—as shown in Figure 24-11.
Note:
Part number identifies multiple files of the same patch. For example, Patch 6890831 has two zip files, p6890831_111070_AIX5L_1of2.zip (Part number is 1) and p6890831_111070_AIX5L_2of2.zip (Part number is 2).Click Upload.
Figure 24-11 graphically explains the steps outlined in this section, and describes how you can enter the patch details you noted in Downloading a Patch from My Oracle Support and Identifying the Details Required for Uploading a Patch to Software Library (Figure 24-10). Map the numbered items in this illustration with the numbered items in Figure 24-10.
Before you create a patch plan and patch your targets, Oracle recommends you to run the Patchability Report to analyze the environment and identify whether the targets you want to patch are suitable for a patching operation.
If they are not suitable, then you can diagnose and find out whether they are not suitable due to missing properties or unsupported configuration, and also resolve them based on the recommendations provided for those issues.
To run the patchability report, follow these steps:
From the Enterprise menu, select Reports, then select Information Publisher Reports.
On the Information Publisher Reports page, in the table, expand Deployment and Configuration, then expand Patching Automation Reports, and then select EM Target Patchability Report.
Note:
If you see missing property-related errors, then resolve the errors with workarounds described in Workarounds for Missing Property Errors. If you see unsupported configuration-related errors, then resolve the errors with workarounds described in Workarounds for Unsupported Configuration Errors.Table 24-4 describes the possible missing property errors and the workarounds you can try to resolve them.
Table 24-4 Missing Properties Error and Workarounds
| Problem | Workaround |
|---|---|
|
Empty target property version |
The target is not properly configured or maybe the target is unavailable. Reconfigure the target or check for metric collection errors. |
|
Inadequate or incomplete target information collected by Oracle Management Agent. |
To resolve this issue, recompute the dynamic properties and refresh the host configuration so that the Management Repository is updated with the latest configuration of the host. To do so, follow these steps:
|
|
Targets are not properly discovered because of inadequate or incomplete target information collected during discovery. |
To resolve this issue, rediscover the domain so that all the targets in the domain are discovered effectively. To do so, follow these steps:
|
Table 24-5 describes the possible unsupported configuration errors and the workarounds you can try to resolve them.
Table 24-5 Workarounds for Unsupported Configuration Errors
| Problem | Workarounds |
|---|---|
|
Oracle RAC Instance does not have an associated Oracle RAC Database |
Rediscover the Oracle RAC target and add the Oracle RAC instance to the Oracle RAC database. |
|
The database is not mediated by the OMS |
The target discovery is not appropriate. Remove the target from Cloud Control, and rediscover on all the Management Agents in the cluster. |
This section describes how you can identify the patches to be applied.
|
This section is mainly for Patch Designers who want to keep track of the various patch releases, look for recommendations from Oracle, and identify the ones they want to roll out in the environment. |
This section covers the following:
Patch recommendations are proactive notifications of potential system issues and recommendations that help you improve system performance and avert outages.
The Patch Recommendations region provides a portal to all recommended patches. From the bar graph, you can drill down to a list of recommended patch, view details about those patches, download the patches, or add them to a Patch Plan. A bar graph summarizes the number of issues found (one issue = one recommendation for one target).
Patches mentioned in the Patch Recommendation section are a collection of patches offered within MOS which can be applied as a group to one or more targets. To keep the Patch Recommendation section updated with the latest patches for your environment, there is a step called the Config Collection step that runs as a part of the patch plan when a patching job is submitted. Essentially, Config collection enables to collect the changes that happen due to application of a patch or a rollback. These updates are communicated to the OMS through the Management Agents, which ultimately help in updating the patch recommendation region.
Note:
Starting with Enterprise Manager 12c, the Config Collection that is triggered at the end of patch application happens asynchronously, which means that collection may not complete when the plan completes execution. In such cases, you might need to recalculate the patch recommendations for your enterprise. Also, if the target collection has not happened properly, then too you might have to recalculate the patch recommendations.To do so, follow these steps:
Run the following EM CLI commands to get the target information of a patch plan:
emcli get_patch_plan_data -name=<name of the plan>
Perform the following steps to determine the time when the plan was deployed on the targets:
From Enterprise menu, select Provisioning and Patching, and then click Patches and Updates.
On the Patches and Updates page, from the Plans section, select the patch plan.
From the Create Plan Wizard, select Review and Deploy.
Click the link to the track the details of the deployment.
Note down the start time of the job from the Job UI page.
On the Config Management side, use the following attributes to calculate the collection time stamp using MGMT$ECM_CURRENT_SNAPSHOTS view as follows:
start_timestamp  - timestamp of the collection (in target timezone)
last_upload_timestamp (in DB timezone) when a collection was processed for this snapshot type.
A combination of the start timestamp and last uploaded timestamp attributes help you determine when the collection has happened, and thereby lets you determine if the information available i the patch recommendation region is up-to-date.
The Recommended Patches region appears by default on the Patch & Updates page. You can edit this region to filter its contents.
To view details of a recommended patch, follow these steps:
From the Enterprise menu, select Provisioning and Patching, then select Patches & Updates.
On the Patches & Updates page, in the Patch Recommendations region, click on the bar graph pertaining to the desired patches.
Note:
If you do not see the Patch Recommendations region, click Customize Page from the top-right corner, and then drag the Patch Recommendations region to the page.Alternatively, click All Recommendations to display all recommendations in the Patch Recommendation page. The Patch Recommendation page displays all the recommendations currently available for the Cloud Control targets.
On the Patch Recommendations page, select a recommended patch to view the context menu appears. From the context menu, click Full Screen.
Knowledge articles are documents published on My Oracle Support. These articles can either be announcements or workarounds to known issues.
Some of the knowledge articles that describe workarounds to known issues have patch numbers mentioned. You can choose to make a note of this patch number and search it on My Oracle Support or Oracle Software Library as described in (Online) Searching Patches on My Oracle Support or (Offline) Searching Patches in Oracle Software Library, respectively.
Alternatively, you can click the patch number in the knowledge article. This takes you to the Patch Search page. On the Patch Search page, from the context menu of the patch, click Add to Plan, and select either Add to New if you want to add the patch to a new patch plan, or Add to Existing if you want to add the patch to an existing patch plan.
Service requests are support requests raised on My Oracle Support to report and track issues, and receive online assistance from Oracle in resolving those issues.
Some of the service requests that describe workarounds to known issues have patch numbers mentioned. You can choose to make a note of this patch number and search it on My Oracle Support or Oracle Software Library as described in (Online) Searching Patches on My Oracle Support or (Offline) Searching Patches in Oracle Software Library, respectively.
Alternatively, you can click the patch number in the knowledge article. This takes you to the Patch Search page. On the Patch Search page, from the context menu of the patch, click Add to Plan, and select either Add to New if you want to add the patch to a new patch plan, or Add to Existing if you want to add the patch to an existing patch plan.
If you already know about the existence of a patch from external sources such as blogs, Oracle technology forums, or from colleagues, then use the search functionality to search for those patches. The search functionality enables you to perform more flexible and advanced searches, and offers capabilities such as saving a search that is used routinely, and searching based on existing saved searches. All of this lets you perform searches more quickly and efficiently.
To search a patch on My Oracle Support, follow these steps:
From the Enterprise menu, select Provisioning and Patching, then select Patches & Updates.
On the Patches & Updates page, in the Patch Search region, enter the search parameters you want to use and click Search.
Note:
If you do not see the Patch Search region, click Customize Page from the top-right corner, and then drag the Patch Search region to the page.Alternatively, you can use the Saved tab to search any previously save searches. You can also use the Recent tab to access any recently performed identical (or similar) search.
Once the patch search is complete, the results appear in the Patch Search Results page. On this page, you can select a patch and download it either to the local host (desktop) or to the Software Library.
Note:
To understand the other ways of searching patches on My Oracle Support, see My Oracle Support Help.By default, when you search a patch on the Patches & Updates screen, the Cloud Control connects to My Oracle Support using the Internet connectivity available on that host, and searches the requested patch in My Oracle Support. This is because the search functionality is set to perform in online mode by default.
However, if your host does not have Internet connectivity, then you must switch over to offline mode so that the search can be performed in Oracle Software Library (Software Library).
To switch over to offline mode, follow these steps:
From the Setup menu, select Proxy Settings.
On the Proxy Settings page, click the Online and Offline Settings tab.
In the Online and Offline Settings tab, in the Settings section, select Offline.
Note:
In offline mode, you cannot:Search and download patches from My Oracle Support
Resolve patch conflicts with merge patches
View the Related Activity region
Access Quicklinks
View or create upgrade plans
To search a patch in the Software Library, follow these steps:
From the Enterprise menu, select Provisioning and Patching, then select Patches & Updates.
On the Patches & Updates page, in the Patch Search region, enter the search parameters you want to use and click Search.
Note:
If you do not see the Patch Search region, click Customize Page from the top-right corner, and then drag the Patch Search region to the page.Once the patch search is complete, the results appear in the Patch Search Results page.
This section describes how you can create a patch plan with patches, save the patch plan as a patch template, create a new patch plan out of that template, and then apply the patches.
This section covers the following:
Switching Back to the Original Oracle Home After Deploying a Patch Plan
Saving Successfully Analyzed or Deployed Patch Plan As a Patch Template
(Optional) Creating a Patch Plan from a Patch Template and Applying Patches
Note:
To be able to access the SQL application functionality as a part of SOA Infrastructure patching, you must ensure that you apply the patch no XYZ before creating a SOA patch plan. |
This section is mainly for Patch Designers who want to create patch plans. |
To create a patch plan, follow these steps:
From the Enterprise menu, select Provisioning and Patching, then select Patches & Updates.
On the Patches & Updates page, identify the patches you want to apply as described in Identifying Patches to Be Applied.
On the Patch Recommendations page or on the Patch Search page (depending on how you identified the patch), select a patch you want to add to the Patch Plan.
From the context menu, click Add to Plan, and select Add to New.
Note:
If you have already created a patch plan, and if you want to add patches to that patch plan, then you can select Add to Existing.In the Create a New Plan window, enter a unique name for your Patch Plan, and click Create Plan.
The patch you select and the target it is associated with get added to the plan.
Note:
If the patch you selected impacts other targets, then you are prompted to add the impacted targets as well.
When you create a Patch Plan, you can add a target that is a member of any system target in Cloud Control. When doing so, the other member targets of that system are automatically added to the Patch Plan. A system is a set of infrastructure components (hosts, databases, application servers, and so on) that work together to host your applications. In Cloud Control, a system and each of the components within it are modeled as individual target types that can be monitored.
For Oracle WebLogic Server, using a single patch plan, you can patch only one domain. However, if it is a shared domain, then the Administration Servers and Managed Servers running on different domains, which are shared with the domain being patched, are automatically added into the same plan.
For Oracle SOA Infrastructure targets, all the SOA WebLogic domains that must be shutdown to patch the SOA targets are added to the patch plan as impacted targets. Therefore, the Administration Server and the Managed Servers running in each of these domains also are affected, and form the Other impacted targets when creating a patch plan.
|
This section is mainly for Patch Designers who want to access the patch plans they have created. |
To access the patch plan you created in Creating a Patch Plan, use one of the following approaches.
Approach 1: Accessing Patch Plan from Plans Region
To access the patch plan from the Plans region, follow these steps:
From the Enterprise menu, select Provisioning and Patching, then select Patches & Updates.
On the Patches & Updates page, in the Plans region, click the Patch Plan you want to view. Alternatively, select the Patch Plan, and in the context menu, click View. The Create Plan Wizard appears.
To filter the plans table, select All Plan Types or Patch depending on your preference. To search for a plan, enter a plan name or partial plan name in the search box, then click the search button.
Note:
If you do not see the Plans region, click Customize Page from the top-right corner, and then drag the Plans region to the page.
To view only the plans that you created, click the icon of a person in the Plans region.
Approach 2: Accessing a Patch Plan from the Patch Recommendations Region
To access the patch plan from the Patch Recommendations region, follow these steps:
From the Enterprise menu, select Provisioning and Patching, then select Patches & Updates.
On the Patches & Updates page, in the Patch Recommendations region, click All Recommendations.
Note:
If you do not see the Patch Recommendations region, click Customize Page from the top-right corner, and then drag the Patch Recommendations region to the page.On the Patch Recommendations page, in the table, a patch that is already part of a plan is shown with the plan icon in the In Plan column. Click the icon to display all plans with which the patch is associated, and then click a plan to open the Create Plan Wizard.
|
This section is mainly for Patch Designers who want to analyze the patch plans and deploy them to roll out the patches. |
To analyze the patch plan you created in Creating a Patch Plan and deploy it (or save it as a patch template), follow these steps:
Access the patch plan using one of the approaches described in Accessing the Patch Plan.
Cloud Control displays the Create Plan Wizard.
On the Plan Information page, do the following:
In the Overview section, validate the Patch Plan name. You can choose to edit it if you want.
(Optional) Select a date and time when you want to deploy the Patch Plan, and enter a short description to describe the Patch Plan.
(Optional) Add administrators or roles who should have access to the Patch Plan by clicking Add.
In the Add Privileges to Administrators window, select an administrator or role, the permission you want to grant, and then, click Add Permission.
Note:
You can only add administrators or roles that you previously created in Cloud Control. You cannot create them from within a Patch Plan. For information on roles and privileges required for patch plan and patch templates, see Creating Administrators with the Required Roles.
To remove an administrator or role, select the administrator or role, and from the context menu, click Remove.
Click Next.
On the Patches page, do the following:
Review the patches added to the Patch Plan. Any recommended patches for your configuration are automatically added to the Patch Plan. In addition, any patches that you added manually are listed.
To associate additional targets to a patch that is already in your Patch Plan, follow the instructions outlined in Associating Additional Targets to a Patch in a Patch Plan.
To view details of a patch, select the patch, and from its context menu, click View. To temporarily remove the patch from analysis and deployment, click Suppress. This leaves the patch in the Patch Plan, but does not consider it for analysis and deployment.
Click Next.
On the Deployment Options page, do the following:
In the Where to Stage section, select one of the following options:
Yes, if you want the wizard to stage the patches from the Software Library to a temporary location accessible to the target host, before the patch is applied on the target. By default, the wizard stages the patches to a default location on the target host, but if you want to change the location, you can enter a location where the patch can be staged.
No, if you have already manually staged the patches to a temporary location accessible to the target host. This can even be a shared, NFS-mounted location. In this case, ensure that you download the patch you want to apply. Go to the location (parent directory) where you want to stage the patch, create a subdirectory with the same name as the patch ZIP file, extract the contents of the patch ZIP file in this subdirectory. Then, enter the absolute path to the parent directory where you have manually staged the patches.
For example, if downloaded patch 699099.zip, and if the stage location, which is the parent directory, is /u01/app/oracle/em/stagepatch, then in this parent directory, create a subdirectory titled 699099 and extract the contents in it. Then, enter /u01/app/oracle/em/stagepatch as the stage path.
For tips for entering a stage location, click the question mark icon against the Stage Location list.
In the How to Patch section, select one of the following:
For standalone databases targets and Oracle Grid Infrastructure targets that are part of Oracle Exadata, you have a choice between in-place patching and out-of-place patching, so select the one that suits your requirement:
In Place, if you want to directly patch the existing original Oracle home of the target without cloning the original Oracle home.
Out of Place, if you want to clone the existing Oracle home of the database and patch the cloned Oracle home instead of the original Oracle home.
For Oracle RAC database, Oracle Clusterware, Oracle Grid Infrastructure, Oracle WebLogic Server, Oracle Fusion Application, and Oracle SOA Infrastructure targets the default and the only patching mechanism offered is in-place patching.
If you select in-place patching, then select one of the following modes:
Rolling, if you want to patch one node at a time. This option is applicable only to Oracle RAC databases. It is the default option and it involves very little downtime.
Parallel, if you want to patch all nodes simultaneously. This option is applicable only to Oracle RAC databases. It involves downtime because your entire system is shut down for a specified period.
(Appears only for standalone database targets and Oracle Grid Infrastructure targets that are part of Oracle Exadata) In the What to Patch section, do the following:
If you have selected in-place patching, then review the details of the Oracle homes that will be patched. By default, all of the database instances are migrated.
If you have selected out-of-place patching, then click Create New Location against the Oracle home you want to clone, and enter the path to a location that is empty and has write permission. You can clone the Oracle home to any directory on the host where the target is being patched. After providing a location, if you want to change it, click Edit.
For standalone database targets, you have the option of migrating either all or only some of the database instances created from the specified Oracle home, so select the ones you want to migrate. However, for Oracle Grid Infrastructure targets that are part of Oracle Exadata, by default, all of the database instances are migrated.
Note:
After the cloned Oracle home is patched, and after the database instances are migrated to the cloned Oracle home, you can choose to retain the original Oracle home or delete it if there are no other targets running from that Oracle home.(Optional) In the Customization section, to customize the default deployment procedure used by the Patch Plan, click Create Like and Edit. To use a customized deployment procedure, select the customized procedure from the list.
Note:
After you save a customized deployment procedure, you will be taken to the deployment procedure Manager page. To use the customized deployment procedure, you must return to the Deployment Options page of the Create Plan Wizard.(Appears only for Oracle WebLogic and Oracle SOA Infrastructure targets) If you are patching an Oracle WebLogic Server target or Oracle SOA Infrastructure targets, you can set a timeout value after which the server is forcefully shut down if it was not shut down by default. By default, the shutdown time is 30 minutes, but if you want to change the value, you can enter a value in the Timeout for Shutdown (in minutes) field.
Oracle recommends that you set a timeout value, and ensure that it is based on monitoring of real time systems.
(Appears only for SOA Infrastructure targets) If the SOA Infrastructure patch you are applying involves SQL application functionality, then you must provide the absolute path to the SQL scripts in the Post-Install SQL Script Metadata field. For information about the SQL script location, refer to the readme document for the respective patch.
Note:
To patch SOA Infrastructure targets running on a Windows host, you must ensure that you use the environmental variable%FMW_ORACLE_HOME% as displayed in the following graphic to provide a relative path to the SQL files in the SOA patch. Providing an absolute path or using the environmental variable %ORACLE_HOME% will result in an error.
Note:
Ensure that the SQL scripts that you may need to provide as a part of patching SOA Infrastructure targets are JDBC-compliant, if not, the patch plan will fail during the analysis phase.To perform SOA Infrastructure patching on a Windows operating system, you must ensure that you shutdown all the servers running from the SOA instance home being patched. Stopping just the SOA servers running out of the SOA instance home will result in an error.
Roll back functionality is supported on the following targets: Management Agent, Oracle WebLogic Server, and Oracle SOA Infrastrcuture.
In the Rollback section, select Plan deployment rolls back the patches in the plan to rollback the patches listed in the plan rather than deploy them. For instructions on rolling back a patch, see Rolling Back Patches.

Note:
For Oracle WebLogic Server targets, patching and rollback happens at domain level. When Oracle WebLogic Server targets are selected for rollback, the domain along with the Administration Server and the Managed Servers are rolled back. You cannot select the instances you want to rollback, and deselect the ones you do not want to rollback from the domain.Note:
For SOA Infrastructure targets, patching and rollback happens at instance home level, which means, you can select the SOA Oracle home instances that you want to patch or from where you want to rollback the existing patches. If there are other servers running from the SOA home being rolled back, then all of these servers and their corresponding domains will also be rolled back along with the SQL metadata scripts that can be rolled back. Some of the SQL metadata scripts cannot be rolled back, in which case, Cloud Control will rollback the patch (bits in the Oracle Home) but the SQL remains unchanged.While patching a SOA setup, if the patch application fails on one of the Managed Servers, and succeeds on other Managed Servers, there will not be an automatic rollback operation to remove the patch from all Managed Servers where the patch was successfully applied. However, you will be notified about the failure, so you can manually rollback the patch.
Typically, you will rollback a patch for the following reasons:
- If you had forcefully applied an incoming patch that conflicted with a patch in the Oracle home, and now you want to uninstall that applied patch.
- If the applied patch does not meet your requirements satisfactorily; the patch might have fixed a bug, but at the same time, introduced other bugs in the process.
In the Credentials section, select the credentials.
For patching Oracle WebLogic Server targets and Oracle SOA Insfrastructure targets, you need the following sets of credentials:
- Oracle WebLogic Domain Administrator Credentials: These credentials are required to connect to the admin server of the domain which monitors all the Managed Servers present in that domain.
- Oracle WebLogic Server Home Credentials: These credentials are required to connect to all the Oracle homes present on different hosts.
You can also choose to override the existinf credentials by selecting Override Preferred WebLogic Domain Administrator Credentials and Override Preferred WebLogic Home Credentials. However, if you choose to override the preferred credentials, then you must validate the credentials. For Oracle WebLogic Server targets, you can validate only the Oracle WebLogic Server Home credentials, and not the administrator credentials.
Note:
The validation of credentials fails when the Management Agent is down, or when the credentials are incorrect.Click Next.
On the Validation page, click Analyze to check for conflicts. For information about what checks are performed in the validation screen, see Introduction to Create Plan Wizard.
Upon validation, if there are conflicts between the two patches, then you might be recommended to request for replacement patches. In this case, click Request Replacement Patches.
If there is a Merge Patch already available, you can directly opt to replace the conflicting patches with the Merge Patch. In this case, click Replace Conflicting Patches.
Click Next.
On the Review & Deploy page, review the details and do one of the following:
If you are patching standalone databases in out-of-place patching mode [that is, if you have selected Out of Place in Step (4 b)], then click Prepare. This essentially clones the source Oracle home and patches it. While this happens, the source Oracle home and their database instances are up and running.
After the prepare operation ends successfully, click Deploy. This essentially switches the database instances from the source Oracle home to the cloned and patched Oracle home. The prepare and deploy operation enable you to minimize the downtime.
If you are patching any other target in any other mode, click Deploy.
Note:
To save a successfully analyzed or deployed patch plan as a patch template, see Saving Successfully Analyzed or Deployed Patch Plan As a Patch Template.If you had patched an Oracle Grid Infrastructure target, which was part of Oracle Exadata, in out-of-place patching mode, and if you now want to switch back to the original home for some reason, then you can use the Switchback option available in the Create Plan Wizard. The advantage of using this option is, you do not actually roll back the patches from the cloned and patched Oracle home; you only switch back to the old, original Oracle home that exists without the patches.
Note:
The Swtichback option is available only for Oracle Grid Infrastructure targets, which are part of Oracle Exadata, and only when they are patched in out-of-place patching mode.
You can switch back only if you have successfully analyzed and deployed a patch plan.
To switch back to the original Oracle home after a patch plan is deployed, follow these steps:
From the Enterprise menu, select Provisioning and Patching, then select Patches & Updates.
On the Patches & Updates page, in the Plans region, click the successfully analyzed and deployed patch plan you used for patching Oracle Grid Infrastructure targets. Alternatively, select the patch plan, and in the context menu, click View. The Create Plan Wizard appears
In the Create Plan Wizard, on the Review & Deploy page, click Switchback.
|
This section is mainly for Patch Designers who want to save the successfully analyzed or deployed patch plans as patch templates so that operators can consume them to create fresh patch plans with the approved patches and predefined deployment options. |
To save a patch plan as a patch template, follow Step (1) to Step (5) as outlined in Analyzing, Preparing, and Deploying Patch Plans, and then for Step (6), on the Review & Deploy page, click Save as Template. In the Create New Plan Template dialog, enter a unique name for the patch template, and click Create Template.
 |
Oracle recommends you to follow this as a best practice if you have to roll out in a mass scale over a period of time involving more administrators. If you have a large data center, then as a Patch Designer, create a patch plan and apply the patches on a few databases, test if the patches are being applied successfully, then save the plan as a template. Later, have your Patch Operators create patch plans out of these templates so that they can roll out the same set of patches to the rest of the databases in the data center. |
Once a successfully analyzed or deployed patch plan is saved as a patch template, you can create patch plans out of the template, associate targets you want to patch, and deploy the newly created patch plan.
This is purely an optional step. You do not have to save your patch plans as patch templates to roll out patches. You can roll out patches directly from a patch plan as described in Analyzing, Preparing, and Deploying Patch Plans.
 |
This section is mainly for Patch Operators who want to create patch plans from patch templates for rolling out the patches. |
To create patch plans out of the patch templates, use one of the following approaches:
From the Enterprise menu, select Provisioning and Patching, then select Patches & Updates.
On the Patches & Updates page, in the Plans region, select the patch template you want to use to create a patch plan out of it.
From the context menu, select Create Plan.
In the Create Plan from Template dialog, enter a unique name for the patch plan, select the targets on which you want to patch, and click Create Plan.
Return to the Patches & Updates page, and in the Plans region, click the patch plan you want to use. Alternatively, select the patch plan, and in the context menu, click View. The Create Plan Wizard appears.
In the Create Plan Wizard, go to the Validation page, and click Re-Analyze to analyze the patch plan with the newly associated targets.
After successfully analyzing the patch plan, on the Validation page, click Next.
On the Review & Deploy page, click Deploy.
From the Enterprise menu, select Provisioning and Patching, then select Patches & Updates.
On the Patches & Updates page, in the Plans region, do one of the following:
Select a patch template. From the context menu, select View. The Edit Template Wizard appears.
Click the name of a patch template. The Edit Template Wizard appears.
In the Edit Template Wizard, click Create Plan.
In the Create Plan from Template dialog, enter a unique name for the patch plan, select the targets on which you want to patch, and click Create Plan.
Return to the Patches & Updates page, and in the Plans region, click the patch plan you want to use. Alternatively, select the patch plan, and in the context menu, click View. The Create Plan Wizard appears.
In the Create Plan Wizard, go to the Validation page, and click Re-Analyze to analyze the patch plan with the newly associated targets.
After successfully analyzing the patch plan, on the Validation page, click Next.
On the Review & Deploy page, click Deploy.
Using patch plans, you can patch the Oracle RAC database targets and the Oracle Grid Infrastructure targets (Oracle Clusterware) running on an Exadata Database Machine.
Exadata Patching can be performed in two modes: In Place Patching, and Out-of-place Patching, though Oracle recommends you to use the Out-of-place patching mechanism as the downtime involved is much lesser. For more information about Exadata Out Of Place Patching, see Exadata Out-Of-Place Patching Of Oracle Grid Infrastructure and Oracle RAC Targets.
For information about the supported Exadata releases, see Supported Targets, Releases, and Deployment Procedures.
However, note that patch plans do not patch the Exadata Database Machine's compute node entities such as the operating system and firmware, and also its storage cells. They patch only the associated Oracle RAC database targets and the Oracle Grid Infrastructure (Oracle Clusterware) targets running on the machine.
Note:
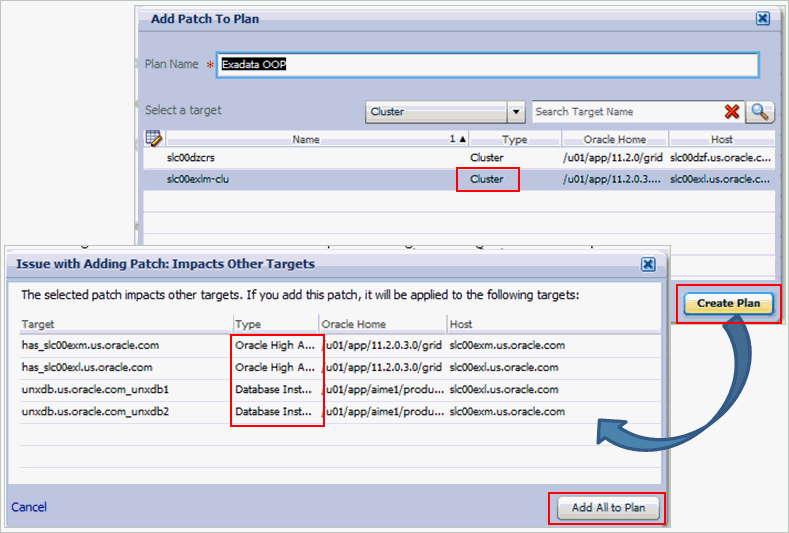
Oracle Exadata Database Machine recommended bundle patches that apply to Oracle RAC and the Oracle Grid Infrastructure targets (Oracle Clusterware) are tested and certified with Cloud Control.Therefore, when you create a patch plan with an Exadata Database Machine recommended bundle patch, make sure you add the cluster or the Oracle RAC database target running on the Exadata Database machine. The patch plan automatically recognizes their association with the Exadata Database machine, and prompts you to add all the impacted targets running on that machine. For example, if you select the cluster target, it prompts you to add all the Oracle RAC database targets and the Oracle Grid Infrastructure targets that are part of that cluster running on the Exadata Databae Machine.
To patch an Exadata Database machine, follow these steps:
Identify the Exadata Database Machine recommended bundle patch you need to apply, as described in Identifying Patches to Be Applied.
Create a patch plan as described in Creating a Patch Plan.
Add the cluster or the Oracle RAC database target running on the Exadata Database machine, and analyze and deploy the patch plan as described in Analyzing, Preparing, and Deploying Patch Plans.
The following illustrate how you can add an Exadata Database Machine recommended bundle patch to a new patch plan, select a cluster target, and all the other associated Oracle RAC database targets and Oracle Grid Infrastructure targets.
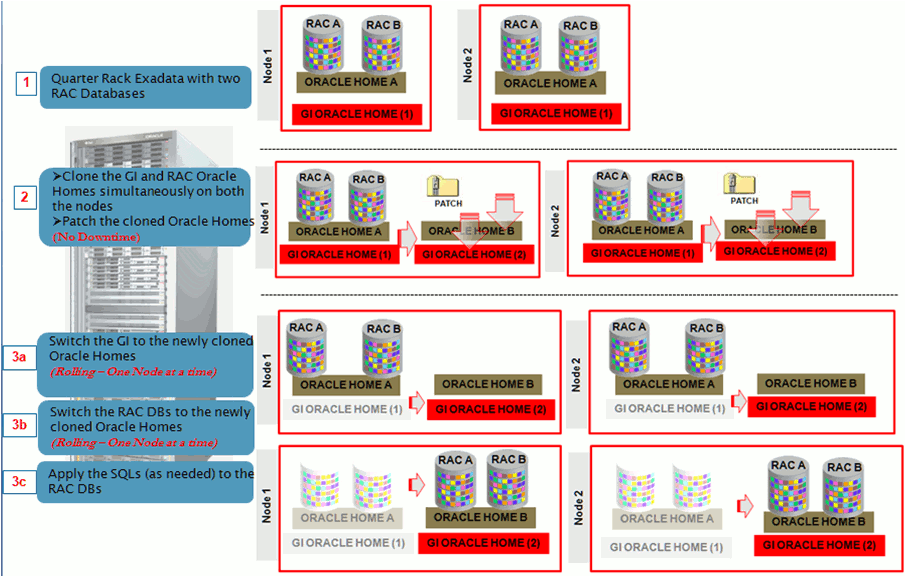
Exadata Out-of-place patching mechanism allows you patch the Oracle Grid Infrastructure and Oracle RAC targets by making a copy of their existing Oracle homes, and patching the cloned Oracle homes. Once the cloned homes are patched, you can migrate the instances to run from the cloned home, which means there will be minimal downtime while switching over the instances, but not a significant downtime.
Figure 24-13 illustrates how Oracle Grid Infrastructure and Oracle RAC targets running on an Exdata Database Machine get patched in Out-of-place patching mode:
The migration of these instances can be performed in the following modes:
Full Migration: If you choose the migrate all the database instances running in your data center in one session, then it is termed as Full Migration.
Partial Migration: If you choose to migrate only some of the instances depending on the downtime you can afford in your data center in one session, then it is termed as Partial Migration. However, you must ensure that you migrate the remaining instances in the following sessions. This approach is particularly useful when you have multiple instances runnning out of an Oracle home.
Note:
for steps on how to perform Full Migration or Partial Migration of Oracle Grid Insfrastructure Targets and Oracle RAC Targets running on Exadata Database Machine, see Analyzing, Preparing, and Deploying Patch Plans.Switch Back is an option available exclusively for Oracle Grid Infrsatructure targets and Oracle RAC targets running on Exadata machine, that enables you to switch the instances from the newly cloned Oracle homes back to the original Oracle homes in case of any problems.
For more information on how to perform a Switch Back, see Switching Back to the Original Oracle Home After Deploying a Patch Plan.
This section describes the following:
While analyzing or deploying patch plans, you might see errors if the following are true:
If the OMS or the Management Agent is down
If the Software Library is not properly configured
If there is no connectivity to My Oracle Support (in online mode)
If there is no Management Repository
If there are no collections
If there are host or Oracle home security issues
If there are inherent OPatch or SQL errors
If the patch plan consists of non-homogenous patches, for example, a combination of one-off patches and patch sets
(For Oracle WebLogic Targets only) If there are inherent problems with the SmartUpdate tool.
(For Oracle WebLogic Targets only) If there is problem discovering Oracle WebLogic targets reporting to the OMS.
You will see these errors in the following places:
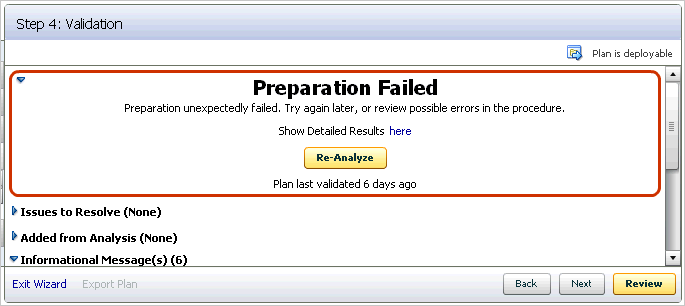
In the header section of the Validation page or the Review page in the Create Plan Wizard (Figure 24-14)
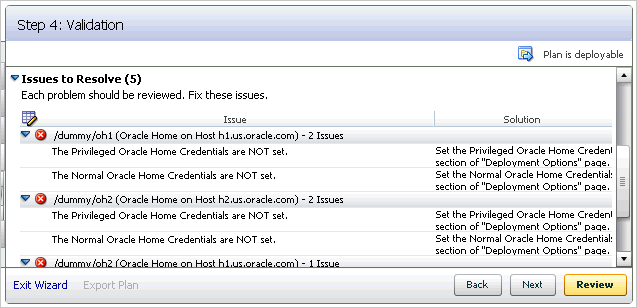
In the Issues to Resolve section of the Validation page (Figure 24-15)
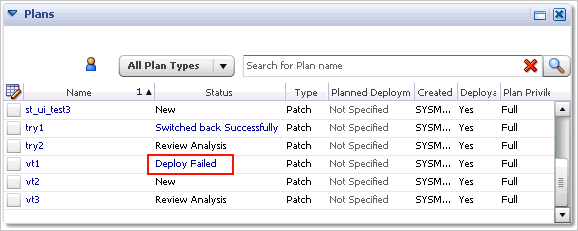
In the Plans region of the Patches & Updates page (Figure 24-16).
Table 24-6 lists the different phases that the patch plan goes through, the different states the phases can have, and how you can diagnose and resolve the errors.
Note:
Also refer to the troubleshooting tips described in Troubleshooting Patching Issues .Table 24-6 Diagnosing Patching Issues
| Phase | State | Diagnosis and Resolution |
|---|---|---|
|
Analysis |
Analysis In Progress |
N/A |
|
Analysis Error |
Review the following log file:
|
|
|
Issues Remain |
In the Create Plan Wizard, on the Validation page, review the issues listed in the Issues to Resolve section. In the Issues to Resolve section, if an error message states that you must click Show Detailed Results here, then click it. On the Procedure Activity Status page, in the Status Detail table, review the status of each of the steps. Click the status to view the log details. |
|
|
Conflicts Detected |
In the Create Plan Wizard, on the Validation page, review the issues listed in the Issues to Resolve section. In the Issues to Resolve section, if an error message states that you must click Show Detailed Results here, then click it. On the Procedure Activity Status page, in the Status Detail table, review the status of each of the steps. Click the status to view the log details. |
|
|
Ready for Deployment |
N/A |
|
|
Preparation |
Preparation In Progress |
N/A |
|
Preparation Error |
Review the following log file:
|
|
|
Preparation Failed |
On the Validation page, click Show Detailed Results here. On the Procedure Activity Status page, in the Status Detail table, review the status of each of the steps. Click the status to view the log details. |
|
|
Preparation Successful |
N/A |
|
|
Deploy |
Deployment In Progress |
N/A |
|
Deployment Error |
Review the following log file:
|
|
|
Deployment Failed |
On the Validation page, click Show Detailed Results here. On the Procedure Activity Status page, in the Status Detail table, review the status of each of the steps. Click the status to view the log details. |
|
|
Deployment Successful |
N/A |
If you want to roll back the patches, follow the rollback instructions outlined in the ReadMe that is packaged with the patch you applied.
Roll back functionality is supported on the following targets: Management Agent, Oracle WebLogic Server, and Oracle SOA Infrastrcuture. For more information about the steps to rollback, see Rolling Back Patches. For all other targets, Cloud Control does not support automatic rollback of patches, and therefore, you must roll back the patches manually.
This section covers the additional tasks you can perform with patch plans. In particular, it covers the following:
Converting Nondeployable Patch Plan to Deployable Patch Plan
Patching Primary and Standby Databases Configured with Oracle Data Guard
To view or modify a patch template, follow these steps:
From the Enterprise menu, select Provisioning and Patching, then select Patches & Updates.
On the Patches & Updates page, in the Plans region, do one of the following:
Select a patch template. From the context menu, select View. The Edit Template Wizard appears.
Click the name of a patch template. The Edit Template Wizard appears.
Note:
An administrator who created the patch template and the super administrator of Cloud Control can modify a patch template.
You can modify only the description and the deployment date in the patch template.
If you have already analyzed and deploy a patch plan, and if you want to save that patch plan as a patch template, then use one of the following approaches:
Approach 1
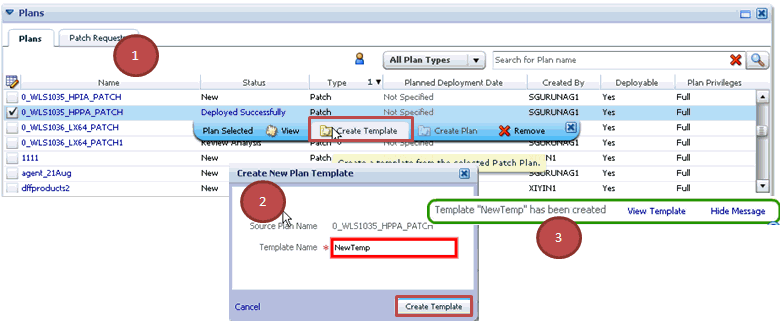
From the Enterprise menu, select Provisioning and Patching, then select Patches & Updates.
On the Patches & Updates page, in the Plans region select a successfully analyzed deployable Patch Plan. The context menu appears.
Note:
You can create a patch template only from one Patch Plan at a time.From the context menu, select Create Template. The Create New Plan Template dialog appears.
Enter a unique name for the template, then click Create Template.
Note:
When you select a plan, the Create Template option is not visible if you:Select a nondeployable Patch Plan or a deployable Patch Plan that has either not been analyzed or resulted in errors after being analyzed.
Do not have the privileges to view the Patch Plan that you selected.
Do not have the privileges to create a template.
Approach 2
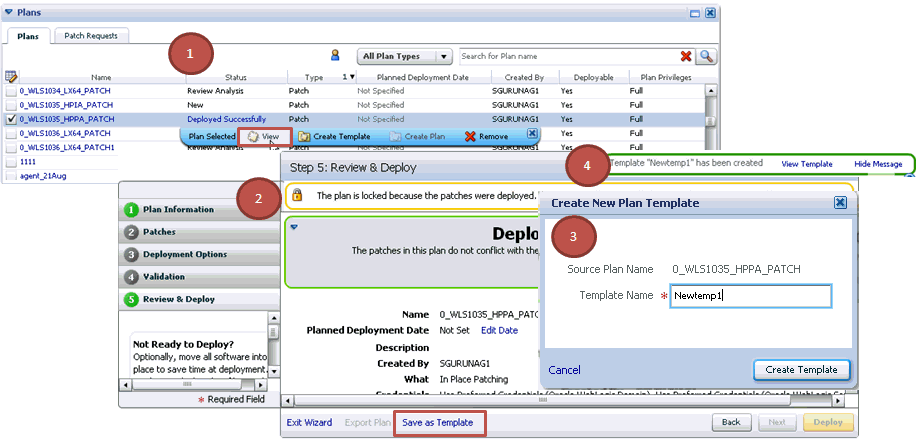
From the Enterprise menu, select Provisioning and Patching, then select Patches & Updates.
On the Patches & Updates page, in the Plans region do one of the following:
Select a successfully analyzed deployable Patch Plan. From the context menu, select View. The Create Plan Wizard appears.
Click the name of a successfully analyzed deployable Patch Plan. The Create Plan Wizard appears.
In the Create Plan Wizard, in the Review & Deploy page, click Save as Template.
Enter a unique name for the template, then click Create Template.
Note:
You must create patch templates only with unique names.To create a compliance standard from a patch template, follow these steps:
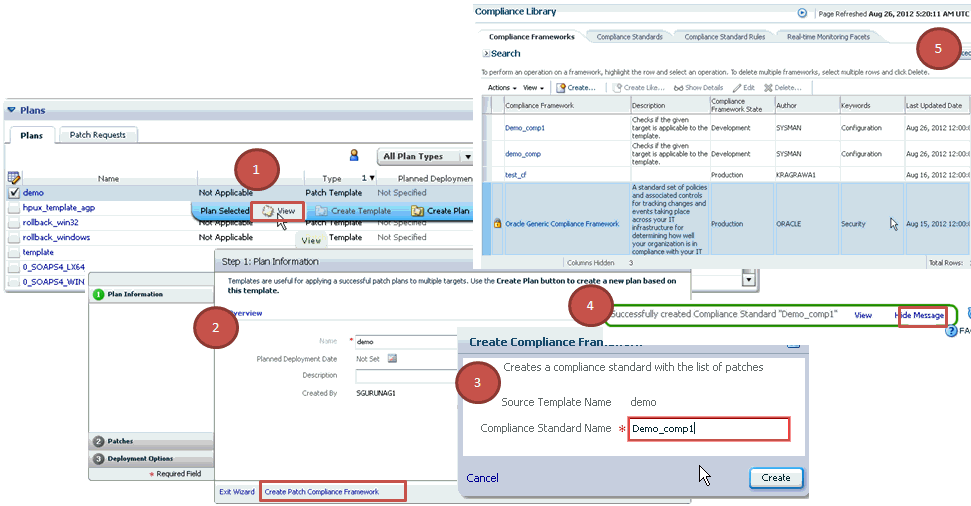
On the Patches & Updates page, in the Plans region select a patch plan template. The context menu appears.
From the context menu, select View. The Edit Template Wizard appears.
On the Plan Information page, click Create Patch Compliance Framework.
In the Create Compliance Framework dialog, enter a unique name for the compliance standard, and click Create.
A confirmation message appears when the compliance is successfully created. Click View to access the Compliance Library Page.
To download a patch from a patch template, follow these steps:
From the Enterprise menu, select Provisioning and Patching, then select Patches & Updates.
On the Patches & Updates page, in the Plans region, select a patch template.
From the context menu, select View. The Edit Template Wizard appears.
In the Edit Template Wizard, on the Patches page, click a patch number. The patch details page appears.
On the patch details page, click Download.
To delete a patch plan, follow these steps:
From the Enterprise menu, select Provisioning and Patching, then select Patches & Updates.
On the Patches & Updates page, in the Plans region, click the Patch Plan you want to delete. From the context menu, click Remove.
Note:
If you do not see the Plans region, click Customize Page from the top-right corner, and then drag the Plans region to the page.To delete a patch template, follow these steps:
From the Enterprise menu, select Provisioning and Patching, then select Patches & Updates.
On the Patches & Updates page, in the Plans region select one or more patch templates. The context menu appears.
From the context menu, select Remove.
Note:
n administrator who created the patch template and the super administrator of Cloud Control can modify a patch template.To make a nondeployable Patch Plan deployable, divide the Patch Plan into smaller deployable plans that contain only homogenous patches and targets.
Note:
For more information, see Patch Plan Becomes Nondeployable and Fails.To associate additional targets to a patch in a patch plan, use one of the following approaches:
Approach 1
From the Enterprise menu, select Provisioning and Patching, then select Patches & Updates.
On the Patches & Updates page, in the Plans region, select a Patch Plan to which the patch belongs. From the context menu that appears, select View.
Note:
If you do not see the Plans region, click Customize Page from the top-right corner, and then drag the Plans region to the page.In the Create Plan Wizard, on the Patches page, Click Add Patch. The Edit Search window appears.
In the Edit Search window, search the patch to which you want to associate additional targets.
Select the patch that you want to add, then click Add to This Plan. The Add Patch To Plan window appears.
In Add Patch To Plan window, search and select the additional targets that you want to associate with the patch, and then, click Add Patch to Plan.
Note:
Ensure that you select only homogeneous targets.For Oracle WebLogic Server, using a single patch plan, you can patch only one domain. However, if it is a shared domain, then the admin servers and Managed Servers running on different domains, which are shared with the domain being patched, are automatically added into the same plan.
Approach 2
From the Enterprise menu, select Provisioning and Patching, then select Patches & Updates.
On the Patches & Updates page, in the Patch Recommendations region, click the graph.
Note:
If you do not see the Patch Recommendations region, click Customize Page from the top-right corner, and then drag the Patch Recommendations region to the page.On the Patch Recommendations page, select a patch.
From the context menu, select Add to Plan, then Add to Existing, and select the plan you want to add the patch to.
The patch you selected and the target it is associated with get added to the existing plan.
Approach 3
From the Enterprise menu, select Provisioning and Patching, then select Patches & Updates.
On the Patches & Updates page, in the Search region, search a patch you want to add to the patch plan.
Note:
If you do not see the Search region, click Customize Page from the top-right corner, and then drag the Search region to the page.On the Patch Search page, click the patch to view its details.
On the patch details page, click Add to Plan, then Add to Existing, and select the plan you want to add the patch to.
The patch you selected and the target it is associated with get added to the existing plan.
If the patches in the patch plan conflict among themselves or with patches in the Oracle home, then you can do one of the following to resolve the conflict:
Request for a merge patch of the conflicting patches. To do so, click Request Patch on the Validation page.
Roll back the conflicting patches in the Oracle home and forcefully apply the incoming patches. To do so, on the Deployment Options page, in the Advanced Patching Options section, from the Conflict Resolution list, select Forcefully apply incoming patches.
Skip the conflicting patches. To do so, on the Deployment Options page, in the Advanced Patching Options section, from the Conflict Resolution list, select Skip conflicting patches.
If you want to analyze the results of the patching operations you have done over a period of time, then run the EM Deployable Patch Plan Execution Summary. The report shows the number of deployable and nondeployable plans you have had in the past, and provides a breakdown of the deployable plans indicating how many succeeded and failed, how many were analyzed and deployed, and so on.
To run the EM Deployable Patch Plan Execution Summary report, follow these steps:
From the Enterprise menu, select Reports, then select Information Publisher Reports.
On the Information Publisher Reports page, in the table, expand Deployment and Configuration, then expand Patching Automation Reports, and then select EM Deployable Patch Plan Execution Summary.
When you submit a patch plan, the patch plan automatically selects an appropriate patching deployment procedure based on the targets you have added to the plan, and runs it internally to patch the targets. For information about the patching deployment procedures offered by Cloud Control, see Supported Targets, Releases, and Deployment Procedures. These deployment procedures are default procedures created considering the best practices in the industry to ensure that they meet all your patching requirements. However, although the default procedures are self-sufficient and can meet most of your requirements, there might be occasions when you might want to customize the procedures to include additional custom steps, disable unwanted steps, run some additional scripts before or after shutting down the instances or applying the patch, and so on to suit your requirements.
Cloud Control allows you to customize these deployment procedures - you cannot directly modify a default procedure, but you can create a copy of the default procedure and modify that to suit your requirements. Unlike other deployment procedures, you can create a copy of a default patching deployment procedure directly from the patch plan. Once you have customized a deployment procedure, you can choose to use that to patch your targets.
Note:
This section describes how you can customize only the patching deployment procedures. For information about customizing deployment procedures in general, see Chapter 33. The chapter explains in detail what customization means, the different ways of customizing a deployment procedure, and so on. Read the chapter if you want to learn about customizing deployment procedures.To customize a default patching deployment procedure:
Go to the Deployment Options page.
In the Customization section, click Create Like and Edit.
Edit the deployment procedure and save it with a unique, custom name. For information about editing a deployment procedure, see Customizing a Deployment Procedure.
Note:
After you save a customized deployment procedure, you will be taken to the deployment procedure Manager page. To use the customized deployment procedure, you must return to the Deployment Options page of the Create Plan Wizard.To use a customized deployment procedure:
Go to the Deployment Options page.
In the Customization section, select the customized deployment procedure that you want to use from the list of deployment procedures.
To further customize a customized deployment procedure:
Go to the Deployment Options page.
In the Customization section, select the customized deployment procedure you want to update, then click Customize.
This section covers the following:
To patch the primary and standby databases that are configured with Oracle Data Guard, you can use patch plans, which inherently use the default database patching deployment procedures suitable for the targets selected in the patch plan.
The databases that act as primary or standby can be either a standalone database (single-instance) or an Oracle Real Application Cluster (Oracle RAC) database running with or without a broker.
However, the following are the limitations with patching of primary and standby databases:
There is no support for orchestrated patching between a primary database and its standby database. Although the default database patching deployment procedures used by the patch plans automatically identify the primary and the standby databases, they do not recognize the association between them. As a result, you must manually identify the primary database and its associated standby database, and patch them separately in such a way that the standby database switches over to production mode while the primary database is being patched.
There is no support automatically stopping and starting log shipping. You must manually stop and start the log shipping either directly or via a broker. The deployment procedures do not handle this by default. However, if you want, you can customize the deployment procedure to include additional steps that will handle this issue.
There is no support for Oracle Data Guard in logical standby configuration.
To patch the primary and the standby database, follow these steps:
Customize the database patching deployment procedure as described in Customizing Patching deployment procedure to include additional steps to handle stopping and starting of log shipping with or without a broker.
Identify the primary and standby database.
Patch the standby database using the customized deployment procedure in a patch plan.
Patch the primary database using the customized deployment procedure in a patch plan.
To automate the stopping and starting of log shipping, you must customize the patching deployment procedure to include two steps—one to stop the log shipping on the primary database and another to start the log shipping once the patching operation ends.
Note:
You must be a Patch Designer to customize a deployment procedure.To do so, follow these steps:
From the Enterprise menu, select Provisioning and Patching, then select Procedure Library.
On the deployment procedure Manager page, in the Procedure Library table, select one of the following patching deployment procedure based on the target type you want to patch, and click Create Like.
Patch Oracle Database or Clone and Patch Oracle Database, for Oracle Database
Patch Oracle RAC Rolling, for the Oracle RAC Databases
On the Create Like Procedure page, click the Procedure Steps tab.
In the Procedure Steps tab, in the table, select Pre-Shutdown Custom Host Command Step and Post-Apply SQL Custom Host Command Step, and click Enable.
Select Pre-Shutdown Custom Host Command Step, and click Edit Step.
In the Edit Step Wizard, do the following:
On the Edit page, click Next.
On the Enter Command page, in the Script text box, copy the following lines, and then click Next.
# Script for Stopping Log Shipping on Primary Database, Insert before Shutdown Database step
echo ' Executing Stop Log Shipping command on Primary Database'
PRIMDB_LIST=${target.primaryDBSIDs}
DGMGRL_CMD=${target.oraHome}/bin/dgmgrl
STATE='LOG-TRANSPORT-OFF'
if [ -z $PRIMDB_LIST ]
then
 echo " Selected Databases are not Primary Databases found.  Step will be skipped"
 exit 0
fi
PRIMDB_SPCSEP_LIST=`echo $PRIMDB_LIST | tr ',' ' '`
for EACH_PRIMDB in $PRIMDB_SPCSEP_LIST
do
        echo Running $DGMGRL_CMD on $EACH_PRIMDB
        export ORACLE_HOME=${target.oraHome}
        export ORACLE_SID=$EACH_PRIMDB
        $DGMGRL_CMD -silent / "edit database $EACH_PRIMDB SET STATE=$STATE"
$DGMGRL_CMD  -silent / "show database $EACH_PRIMDB"
done
exit 0
Figure 24-17 shows how the Script textbooks will look after you copy the preceding lines.
On the Review page, click Finish.
In the Procedure Steps tab, in the table, select Post-Apply SQL Custom Host Command Step, and click Edit Step.
In the Edit Step Wizard, do the following:
On the Edit page, click Next.
On the Enter Command page, in the Script text box, copy the following lines, and then click Next.
# Script for Starting Log Shipping on Primary Database, Insert after Apply Post SQL step
echo ' Executing Start Log Shipping command on Primary Database'
PRIMDB_LIST=${target.primaryDBSIDs}
DGMGRL_CMD=${target.oraHome}/bin/dgmgrl
STATE=' ONLINE '
if [ -z $PRIMDB_LIST ]
then
  echo " Selected Databases are not Primary Databases found.  Step will be skipped "
  exit 0
fi
PRIMDB_SPCSEP_LIST=`echo $PRIMDB_LIST | tr ',' ' '`
for EACH_PRIMDB in $PRIMDB_SPCSEP_LIST
do
        echo Running $DGMGRL_CMD on $EACH_PRIMDB
        export ORACLE_HOME=${target.oraHome}
        export ORACLE_SID=$EACH_PRIMDB
        $DGMGRL_CMD -silent / "edit database $EACH_PRIMDB SET STATE=$STATE"
        $DGMGRL_CMD -silent / "show database $EACH_PRIMDB"
done
exit 0
Figure 24-17 shows how the Script text box will look after you copy the preceding lines.
On the Review page, click Finish.
Save the customized deployment procedure with a unique name. For example, Clone and Patch Oracle Database in Physical Standby Configuration.
While creating a patch plan as described in Analyzing, Preparing, and Deploying Patch Plans for patching the primary and the standby databases, in the Create Plan Wizard, on the Deployment Options page (Chapter 24), in the Customization section, select the customized procedure from the list.
Note:
You can customize the deployment procedure even further if you want. For more information on customizing deployment procedures, refer to Chapter 33.Roll back functionality is supported on the following targets: Management Agent, Oracle WebLogic Server, and Oracle SOA Infrastrcuture. To rollback patches, you must create a new patch plan, select the relevant patches to rollback, and then select the rollback check box. To do so, perform the following steps:
In Cloud Control, from the Enterprise menu, select Provisioning and Patching, and then click Patches and Updates.
On the Patches and Updates page, in the Patch Search region, enter the patch number that you want to rollback.
In the Add Patch to Plan dialog box, enter a unique name for the plan, and select all the targets from where you want to rollback the patches.
Click Create Plan.
In the Create Plan Wizard, select Deployment Options.
On the Deployment options page, in the Rollback section, select Specify if you want to rollback the patches in this plan, and click Next.
On the Validation page, click Analyze to validate the plan. After a successful analysis, click Next.
On the Review and Deploy page, review the details you have provided for the patch plan, and then click Deploy to rollback the selected patch from the corresponding targets mentioned in the plan.
|
Copyright © 2012, Oracle and/or its affiliates. All rights reserved. Legal Notices |
|