| Oracle® Enterprise Manager Lifecycle Management Administrator's Guide 12c Release 2 (12.1.0.2) Part Number E27046-08 |
|
|
PDF · Mobi · ePub |
| Oracle® Enterprise Manager Lifecycle Management Administrator's Guide 12c Release 2 (12.1.0.2) Part Number E27046-08 |
|
|
PDF · Mobi · ePub |
This chapter describes the infrastructure requirements you must meet before you start using the lifecycle management features. This chapter is essentially for administrators or designers who create the infrastructure. The requirements described in this chapter have to be performed just once.
This chapter covers the following:
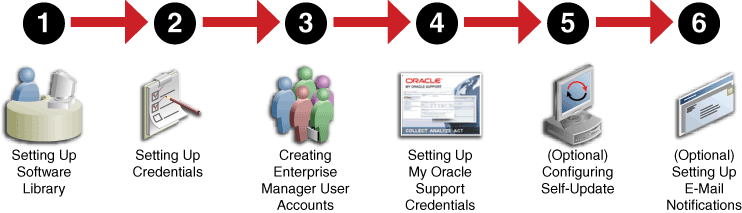
This chapter helps you get started by providing an overview of all the steps involved in setting up your infrastructure. Consider this section to be a documentation map to understand the sequence of actions you must perform to successfully set up your infrastructure for carrying out all the lifecycle management tasks, including Patching and Provisioning.
Figure 2-1 is a pictorial representation of the sequence of steps you must perform in order to setup your infrastructure.
Click the reference links provided against the steps in the Table 2-1 for more information on each of the seactions.
Table 2-1 Getting Started with Setting Up Your Infrastructure
| Step | Description | Reference Links |
|---|---|---|
|
Step 1 |
Setting Up Software Library |
|
|
Step 2 |
Setting Up Credentials |
|
|
Step 3 |
Creating Enterprise Manager User Accounts |
|
|
Step 4 |
Setting Up My Oracle Support Credentials |
|
|
Step 5 |
Additional /Value Add setup (optional) Configuring Self-Update |
|
|
Step 6 |
Additional /Value Add setup (optional) Setting Up E-Mail Notifications |
Note:
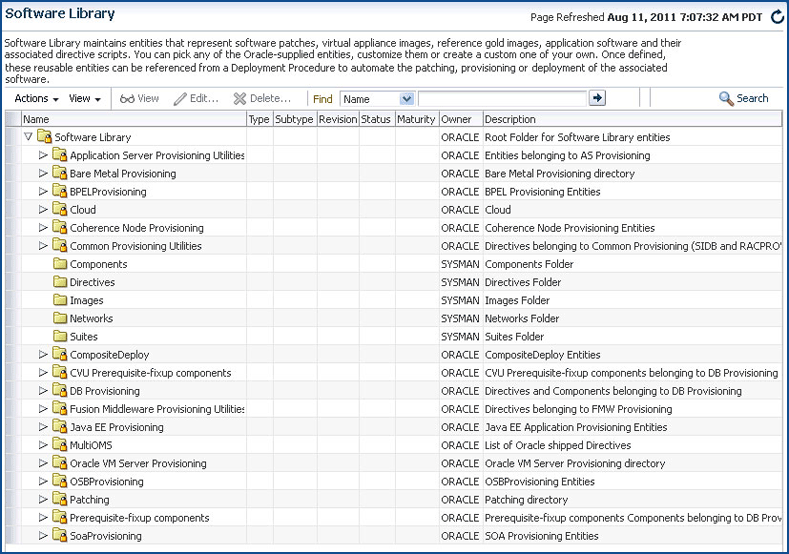
Ensure that the OMS is patched appropriately to the required level. For information about the patches that need to be applied on the Enterprise Manager Cloud Control Management Server (OMS) for using the Provisioning and Patching features, see My Oracle Support note 427577.1.Oracle Software Library (Software Library) is one of the core features offered by Oracle Enterprise Manager Cloud Control (Cloud Control). Technically, it is a storage location that stores certified software entities such as software patches, virtual appliance images, reference gold images, application software and their associated directive scripts. In addition to storing them, it also enables you to maintain versions, maturity levels, and states of these software entities.
To access the Software Library console page, in Cloud Control, from the Enterprise menu, select Provisioning and Patching and then, click Software Library. On the Software Library home page, as shown in Figure 2-2, there are two types of folders: Oracle-owned folders (marked by a lock symbol) and User-owned folders.
To start using the Software Library to upload entities or to access entities, the Software Library Storage Locations must be configured. System Administrators are responsible for configuring the Software Library storage locations, following which the Software Library becomes usable.
Cloud Control offers the following types of storage locations:
Upload File Locations: These locations are configured for storing files uploaded by Software Library as part of creating or updating an entity. The Upload File Locations support two storage options:
OMS Shared File System
OMS Agent File System
Referenced File Locations: These are locations that allow you to leverage the organization's existing IT infrastructure (like file servers, web servers, or storage systems) for sourcing software binaries and scripts. Such locations allow entities to refer to files without having to upload them explicitly to a Software Library storage. Referenced File Locations support three storage options:
HTTP Locations
NFS Locations
Management Agent Locations
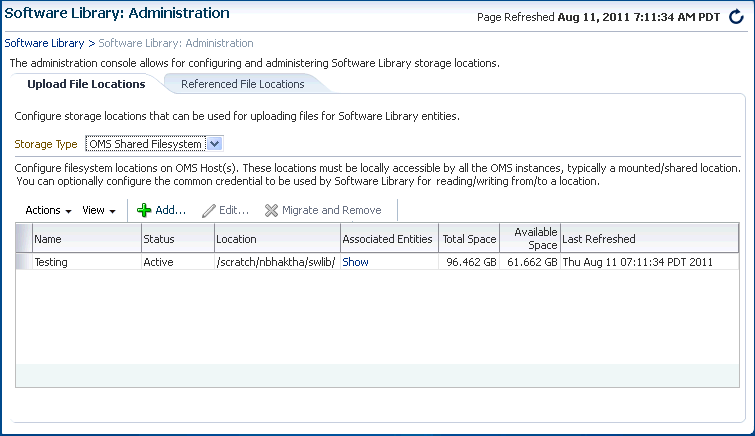
You can configure the storage locations from the Administrator console. To do so, in Cloud Control, from Setup menu, select Provisioning and Patching, then select Software Library. The Software Library Administration Page as shown in Figure 2-3 appears:
See Also:
For information on configuring Software Library, see Oracle Enterprise Manager Cloud Control Administrator's GuideCredentials are identity information stored in Cloud Control, and are used to access targets that are monitored, and managed by Cloud Control. Cloud Control allows you to save your operating system username/password with a unique name as Named Credentials for normal user (Oracle). Alternately, if you have root privileges, then the root account details can be saved with a unique name as Named Credentials for the privileged users.
Primarily, the two types of credentials available in Cloud Control are:
Named Credentials: A Named Credential specifies a users' authentication information on a system. Named credentials can be a username/password pair like the operating system login credentials, or Oracle home owner credentials primarily used for performing operations such as running jobs, patching and other system management tasks.
Privileged Credentials: Privileged Credentials specifies root users' authentication information on a system. Privileged credentials are the root account details used to perform privileged actions like executing root scripts. Privileged credentials are intended for privileged or power users. In Enterprise Manager 11g, each provisioning user required sudo privileges that had to be explicitly granted. However, in Enterprise Manager 12c, you must set up privileged credentials to perform typical root user actions with sudo privileges.
Cloud Control allows you the flexibility of saving the Named Credentials and the Privileged Credentials for future use as Preferred Credentials.
The advantages of saving the credentials are:
You do not have to expose the credential details to all the users.
It saves your time and effort as you do not have to specify the user name and password every time for each Oracle home or host machine, you can instead select a named profile that will use the saved credentials.
Important:
If you do not have the host credentials, for example the Oracle user account details, or theroot credentials to the host machine, then you can use Sudo or PowerBroker utilities provided by the Privilege Delegation framework to switch users, and complete the task. For more information about Configuring Privilege Delegation, see Configuring Privilege Delegation Settings.To perform any of the provisioning and patching tasks in Cloud Control, you need to set up Named Credentials for normal operating system user account (Oracle) and Named credentials for privileged user accounts (root). If you do not have access to either Oracle account or root account, then you can use SUDO or PowerBroker access to switch users to perform the tasks, this is called Privilege Delegation. Privilege Delegation is a framework that allows you to use either SUDO or PowerBroker to perform an activity with the privileges of another user (locked accounts).
The following table describes the steps to be performed for setting up credentials:
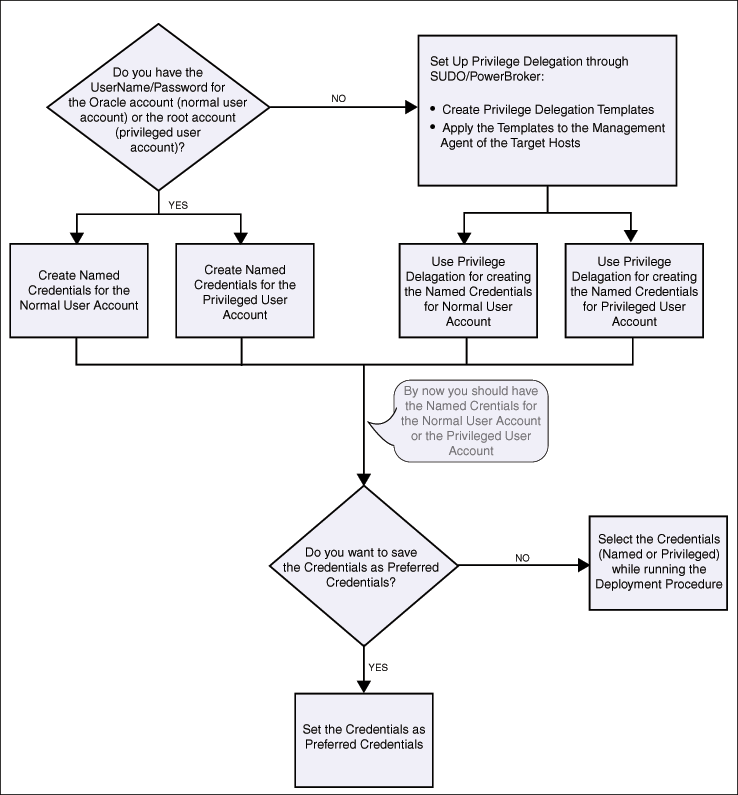
Table 2-2 Setting Up Enterprise Manager Credentials
| Use Case | Steps to be performed |
|---|---|
|
If you do not have direct access or the required credentials for the normal operating system user account (Oracle) OR If you do not have direct access or the required credentials for the privileged account (root). |
Do the following:
|
|
If you have direct access or the required credentials for the normal operating system user account (Oracle) OR If you have direct access or the required credentials for the privileged account (root). |
Do the following:
|
To create a named credentials, follow these steps:
In Cloud Control, from the Setup menu, select Security, then select Named Credentials.
On the Named Credentials page, click Create.
On the Create Credentials page, in the General Properties section, provide the following details:
Enter a unique Credential Name, and provide a description.
Select Host as the Authentication Target Type, and Host Credentials as the Credential type
Select Global to use the same credentials for all the targets.
On the Create Credentials page, in the Credential Properties section, enter the UserName and Password required to access the host machine, and from the Run Privilege drop down list, do one of the following:
Select None, if you are using operating system host credentials (like Oracle) or the Oracle Home Owner credentials.
When you do not have access to the operating system host credentials or the root credentials of the host machine, then select Sudo or PowerBroker to sudo (or pbrun)to the host machine using the credentials of another operating system user. To use the credentials of other users, in the Run As field, you need to enter operating system host credentials (like Oracle) or Oracle Home owner credentials of the host user.
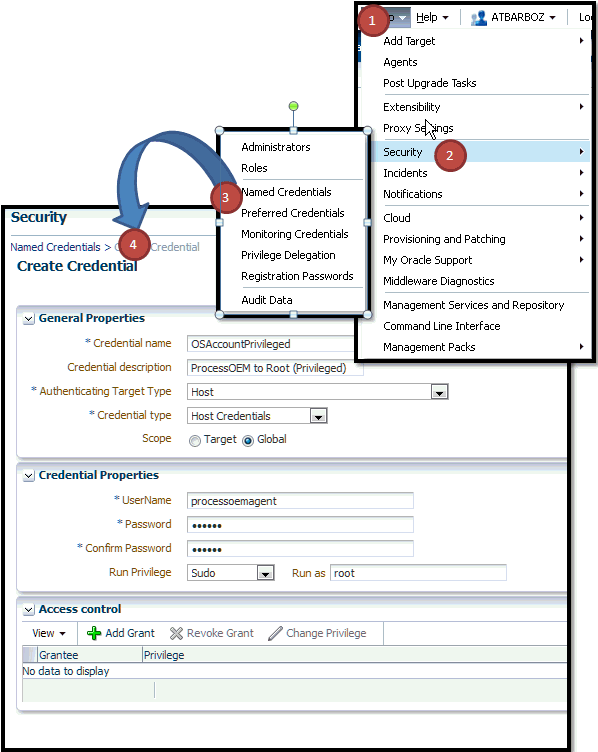
On the Create Credentials page, in the Access Control section, click Add Grant to grant privileges on the named profile to the selected Administrators or roles. By default the selected Administrator is granted View privilege.
Note:
To enable Administrators (or users) to access, and leverage an OMS Agent Filesystem Software Library Location, the owner of the Named Credential must ensure that an explicit View privilege is granted to all the Administrators accesssing the OMS Agent location. To do so, you can either click Add Grant and add the names of the administrators while creating the Named Credential as mentioned in this section, or edit an existing Named Credential to grant privileges to other Administrators (or users) by following these steps:In Cloud Control, from the Setup menu, select Security, then select Named Credentials.
On the Named Credentials page, click Manage Access.
On the Manage Access page, click Add Grant to add a user, or Change Privilege to edit the privileges of an existing user.
Click Save.
For example, if you have a Cloud Plug-in installed, and are using the Cloud features in Enterprise Manager, then ensure that the CLOUD_ENGINE_USER is also granted View privileges on credentials associated with Software Library. Since the CLOUD_ENGINE_USER is a hidden user account, the owner of the named credential will not be able to grant him View privileges from the Enterprise Manager UI. To handle this situation, (especially on a Windows host where OMS Agent Filesystem is the recommended approach for setting up Software Library) you can run the following EMCLI commands:
emcli login -username=<username -password =<>
emcli grant_privs -name=CLOUD_ENGINE_USER -privileges="GET_CREDENTIAL;CRED_ANME=<>:CRDED_OWNER=<>
To change the privilege, select the administrator, and click Change Privilege. In the Select Privilege dialog box, change the privilege to Edit or Full, and then click OK.
After entering all the details, click Test and Save. If the host credentials are correct, then the test is successful and the credentials get saved.
To create a privileged credentials, follow these steps:
Create the Named credentials using the steps mentioned in Setting Up Named Credentials.
On the Named Credentials page, select the credential, and then click Edit.
On the Edit Credential Properties page, in the Credential Properties section, edit the existing UserName and Password required to access the host machine, and from the Run Privilege drop down list, do one of the following:
Select None, if you are using operating system host credentials (like Oracle) or the Oracle Home Owner credentials.
When you do not have access to the operating system host credentials or the root credentials of the host machine, then select Sudo or PowerBroker to sudo (or pbrun)to the host machine using the credentials of another operating system user. To use the credentials of other users, in the Run As field, you need to enter operating system host credentials (like Oracle) or Oracle Home owner credentials of the host user.
Cloud Control allows you to run Deployment Procedures using authentication utilities such as SUDO, PowerBroker, and so on. This support is offered using the Privilege Delegation mechanism available in Cloud Control. Privilege Delegation is a framework that allows you to use either SUDO or PowerBroker to perform an activity with the privileges of another user (locked accounts).
Note:
The certifiedSUDO versions are 1.6.7 to 1.6.9. Also, note that SUDO 1.7.2 and higher versions are also supported. The certified PBRUN versions are 4.0.8 and 5.x. Higher versions of these utilities may continue to work unless some fundamental changes have been introduced to their behavior.All the Deployment Procedures offered by Cloud Control require administrator privileges to run. While most steps within a Deployment Procedure can be run as a normal user, there are some steps that require special permissions and privileges, and unless you provide the administrator's credentials, you cannot proceed with the deployment.
Note:
To run the procedure on a Windows host which involves executing some Software Library entities (for example, directive scripts), you (the Windows user) must be granted the following privileges:Act as part of the operating system
Adjust memory quotas for a process
Logon as batch job
Replace a process level token
If not, the execution of the directive steps in the procedure may fail.
Under such circumstances, you can do one of the following. Although the former option is recommended, you are always free to use the latter option to suit your needs.
Customize the Deployment Procedure to disable the steps that require special privileges, run the other steps as a normal user, and have the administrator run the disabled steps later.
Use authentication utilities to run some steps within the Deployment Procedure with the privileges of another user. The authentication utilities supported by Cloud Control are SUDO and PowerBroker. This support is offered using the Privilege Delegation mechanism available in Cloud Control. For more information, see Creating Privilege Delegation Templates.
In particular, this section covers:
While SUDO and PowerBroker are third-party utilities supported in Cloud Control, Privilege Delegation is proprietary to Oracle. Privilege Delegation is a framework that allows you to use either SUDO or PowerBroker to perform an activity with the privileges of another user.
Privilege Delegation can use either SUDO or PowerBroker, but not both, and the settings are only for a single host. Therefore, if a host is set up with pbrun, then it will use only pbrun.
Privilege Delegation offers the following advantages:
You have the flexibility to use either SUDO or PowerBroker within the same framework.
Using the framework, you can now run PowerBroker in a password-less or password-protected mode.
You can create a template with these Privilege Delegation settings and reuse it for multiple hosts. This not only allows you to standardize Privilege Delegation setting across your enterprise, but also facilitates the process of configuring Privilege Delegation Settings. It simplifies the Privilege Delegation setting management as well.
You can use the Privilege Delegation settings not only for deployment procedures, but also for jobs in Cloud Control.
Privilege Delegation can read passwords from both STDIN and TTY.
Using Privilege Delegation you can ensure that the host user has enough privileges to become a root user, and run root scripts for completing any lifecycle management requirements for your enterprise.
Primarily, there are two approaches for delegating privileges:
Updating the SUDOERS File or PBRUN Config File
You can either use SUDO or Pluggable Authentication Module (PAM) (for example : pbrun (PowerBroker), suexec, and so on) as an authentication tool to perform activity over an Oracle Home, when the owner of the Oracle home is not known or locked.
This section covers both the approaches:
Using SUDO Authentication Utility
If you want to use SUDO authentication utility, then before editing a Deployment Procedure, update the /etc/sudoers file to allow a normal user to switch to another user who has the privileges to run the Deployment Procedure. Also, if you want to restrict the normal user to have SUDO access only to certain commands, then specify a list of those commands for which SUDO access is required.
Host level setup can be done manually using Privilege Delegation. If a user running a procedure requires SUDO access to Oracle user and Root user for running the some commands, then you must edit the Sudoers file to add privileges to these commands.
In Enterprise Manager Cloud Control 12c Release 1 (12.1.0.1) [with or without Bundle Patch 1], nmosudo was located in the agent instance directory. For example, /u01/oracle/agent/agent_inst/bin/nmosudo.
In Enterprise Manager Cloud Control 12c Release 2 (12.1.0.2), this location has changed. Now, nmosudo is present in the sbin directory, which is in the agent base directory. For example, /u01/oracle/agent/sbin/nmosudo.
Therefore, when you install or upgrade to Enterprise Manager Cloud Control 12c Release 2 (12.1.0.2), you must modify the PDP configuration files to update the new location of nmosudo.
For example, if you use SUDO as your PDP, the configuration file for sudo is typically /etc/sudoers. In this file, update the following entry with the new location to nmosudo.
sudouser ALL : oracle /eminstall/basedir/sbin/nmosudo *
#Sample sudoersfile should have following entry#

If you do not have access to oracle and root accounts, then add the following entries into the file:
johndoe ALL=(oracle) /u01/oracle/agent/sbin/nmosudo
johndoe ALL=(root) /u01/oracle/agent/sbin/nmosudo

If you have access to the oracle account, but not to the root account, then only add the following entry into the file:
johndoe ALL=(root) /u01/oracle/agent/sbin/nmosudo

Where,
johndoe refers to the user who has been given the SUDO access to Oracle and Root accounts for running the nmsudo command.
Note:
To preserve the environment variable details, update privilege delegation settings to include-E parameter. However, to use the -E option in the SUDO command, you must upgrade to the SUDO version 1.7.2 or higher. The following examples describes the usage of -E option:
sudo -E -u %RUNAS% %COMMAND%.
Using PBRUN (PowerBroker) Authentication Utility
If you want to use PBRUN authentication utility, then before editing a Deployment Procedure, update the /etc/pb.conf file to allow a normal user to switch to another user who has the privileges to run the Deployment Procedure.
For example, a typical PBRUN config file must look like this:
A typical pbrun config file from /etc/pb.conf file config

if(user=="johndoe")
if(command=="/usr/oracle/agent/agent12c/agent_inst/bin/nmosud" )
// /usr/oracle/agent/agent12c/ is the Agent Home
{
   switch (requestuser
   {
      case "root":
         runuser="root";
         break;
      case "oracle":
         runuser="oracle";
         break;
      default:
      reject;
     }
 accept;
}
Setting Privileges From Oracle Enterprise Manager Cloud Control
For setting privileges from Cloud Control, follow these steps:
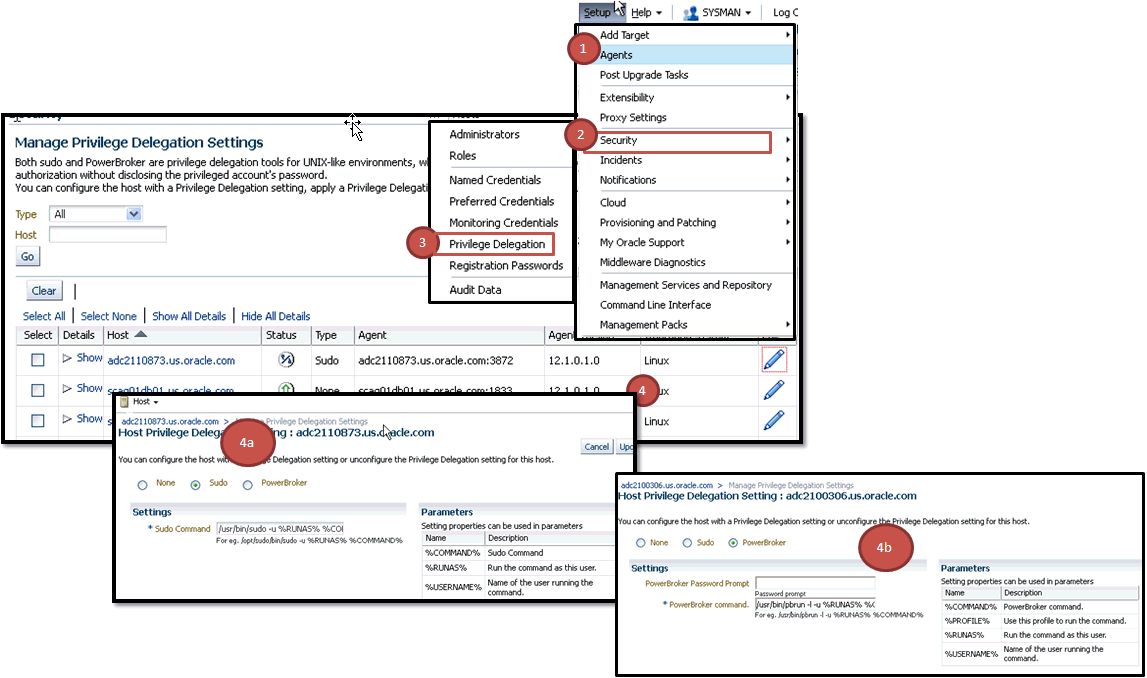
In Cloud Control, from the Setup menu, select Security, then select Privilege Delegation.
On the Manage Privilege Delegation Setting page, select the host name, and then click Edit.
On the Host Privilege Delegation Setting: <target name> page, select Sudo or PowerBroker, and specify the location where SUDO or PowerBroker is located (for PowerBroker, you can optionally provide the password prompt) to configure the host with a Privilege Delegation setting.
Click Update.
If you want to use Privilege Delegation authentication utility, then before editing a Deployment Procedure, create a Privilege Delegation template with the required settings for a host.
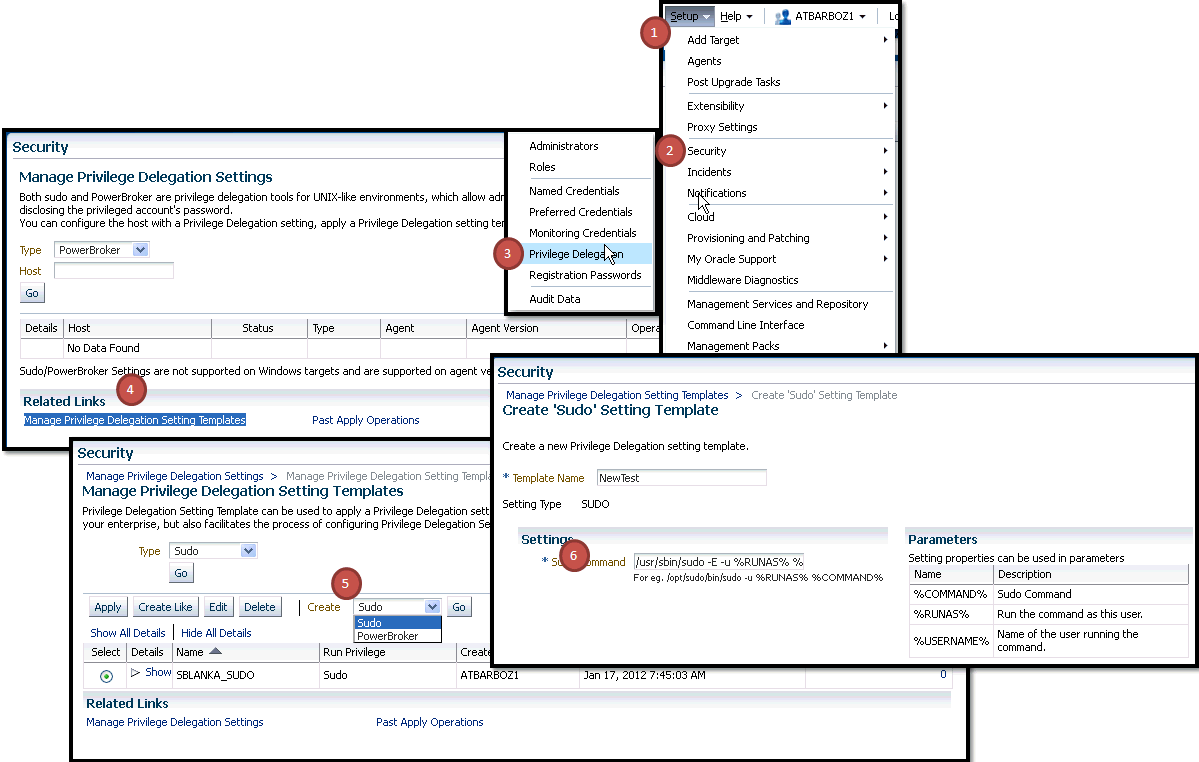
To do so, follow these steps:
In Cloud Control, from the Setup menu, select Security, then select Privilege Delegation.
On the Manage Privilege Delegation Settings page, from the Related Links section, click Manage Privilege Delegation Settings Template.
On the Manage Privilege Delegation Settings Templates page, from the Create list, select a privilege delegation type, either Sudo or PowerBroker, and click Go.
On the Create '<delegation type>' Setting Template page, provide a name for the template and specify the location where SUDO or PowerBroker is located (for PowerBroker, you can optionally provide the password prompt), and click Save.
For example, if you select SUDO, and if sudo is located in the /usr/sbin/directory, then in the Sudo Command field you need to enter /usr/sbin/sudo -E -u %RUNAS% %COMMAND%.
On the Manage Privilege Delegation Setting page, select the template you created and click Go.
On the Apply '<delegation type>' Setting: New page, click Add Targets to apply the privilege delegation template settings to selected hosts, and click Apply.
Note:
If you do not apply the privilege delegation template to a target, and if you configure a step in the deployment procedure to run in Privilege Delegation mode, then the deployment procedure for that target runs the step in normal mode instead.After creating a privilege delegation template and before applying it to a Deployment Procedure, Oracle recommends you to test the privilege delegation setting.
The following is an example that describes how you can register your credentials as preferred credentials, and also choose to run as another user, and then test the settings by creating a job that checks whether a command is being as normal user or as another user using privilege delegation mechanism.
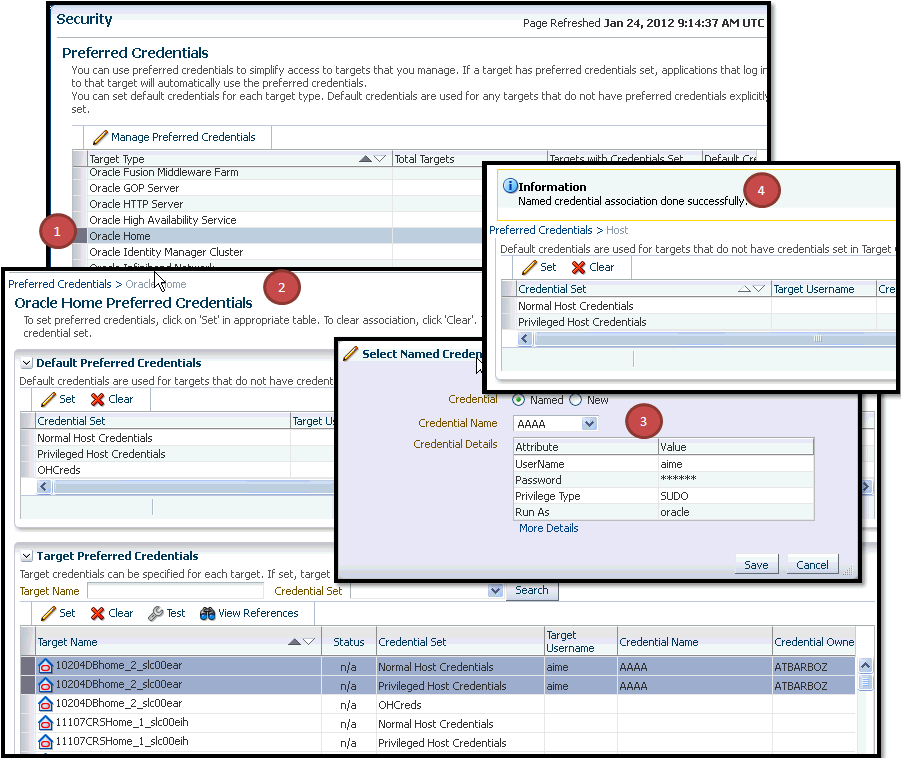
In Cloud Control, from the Setup menu, select Security, then select Privilege Delegation.
On the Manage Privilege Delegation Settings page, from the Related Links section, click Preferred Credentials.
On the Host Preferred Credentials page, in the Target Preferred Credentials section, select the host, and then click Set.
In the Select Named Credential dialog box, specify the normal user name, the normal password, and the Run as user name that you want to switch over to using the privilege delegation mechanism. Then click Test and Save.
After registering the credentials as preferred credentials, from the Enterprise menu, select Jobs, and then click Job Activity.
On the Job Activity page, from the Create Job list, select OS Command, and click Go.
On the Create OS Command Job page, in the General tab, specify a name for the job. Then, from the Target section, click Add to add the host on which you want to run the OS command.
In the Parameters tab, for Command, specify the command id.
Click Submit.
On the Job Activity page, click the job name you just created. Cloud Control displays the status of the job. Click the status column to view its results.
Ideally, Cloud Control should have switched over from normal user to another user, which you specified for Run as on the Host Preferred Credentials page, and then run the OS command.
Cloud Control allows you the flexibility of saving the Named and the Privileged Credentials for future use as Preferred Credentials.
This section includes:
To save the credentials as preferred credentials in Cloud Control, follow these steps:
In Cloud Control, from the Setup menu, select Security, then select Preferred Credentials.
On the Security page, in the Preferred Credentials section, from the table, select either Host or Oracle Home, and click Manage Preferred Credentials.
Note:
For setting up preferred credentials for virtual server targets, select Oracle VM Server as the target type and click the Set Credentials.If you select Host for provisioning tasks, then the Host Preferred Credentials page appears.
On the Host Preferred Credentials page, in the Target Preferred Credentials section, select the host target on which you want to provision, and click Set.

On the Security page, in the Preferred Credentials section, from the table, select either Host or Oracle Home, and click Manage Preferred Credentials
If you select Oracle Home for patching tasks, then the Oracle Home Preferred Credentials page appears.
On the Oracle Home Preferred Credentials page, in the Target Preferred Credentials section, select the Oracle home you want to patch. Ensure that you set both Normal and Privileged credentials for the targets selected, and click Set.
To register the My Oracle Support credentials as preferred credentials in Cloud Control, follow these steps:
In Cloud Control, from the Setup menu, select My Oracle Support, and then, click Set Credentials.
On the My Oracle Support page, provide the My Oracle Support credentials, and click Apply.
Oracle recommends you to register the My Oracle Support credentials as preferred credentials in Cloud Control so that you do not have to explicitly provide the credentials every time you access the My Oracle Support console, which is integrated within the Cloud Control console.
Note:
If you do not have access to My Oracle Support, then you can choose to patch your targets in the offline mode. To enable the offline mode, see Enabling Offline Mode.This section describes the following:
From the Cloud Control, you can create and manage new Enterprise Manager Administrator accounts. Each administrator account includes its own login credentials, as well as a set of roles and privileges that are assigned to the account.
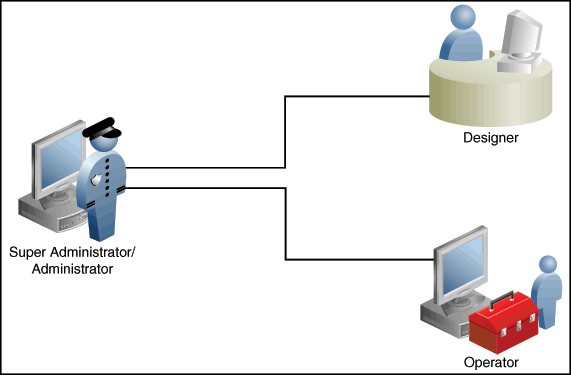
Based on the accesses, the users can be classified as follows:
Super Administrators are powerful Cloud Control administrators with full access privileges on all targets. They are responsible for creating and administering accounts within the Cloud Control environment. For example, Super Administrators create the Designer and Operator roles, and grant these roles to different users and groups within their enterprise.
Designers are lead administrators with increased privileges on Deployment Procedures and Software Library. Starting with Cloud Control, designers can create deployment procedure templates using the Lock down feature, and save these templates to enforce standardization and consistency. Operator privileges are granted on these templates so that administrators who login as Operators can launch these templates, and run the Deployment Procedure successfully. Doing this ensures that the procedures are less error prone, and more consistent.
For more information about saving deployment procedures using lock downs, see Saving and Launching the Deployment Procedure with Lock Down
Designers are responsible for performing all the design-time activities like:
Creating the provisioning profiles in the Software Library.
Creating components, directives, and images, and storing them in Oracle Software Library.
Customizing the default deployment procedures according to the needs of the organization.
Creating patch plans and patch templates.
The predefined Oracle role for a Designer is EM_ALL_DESIGNER, this role in turn includes fine grained roles where you can specifically set EM_PROVISIONING_DESIGNER for provisioning tasks, and EM_PATCH_DESIGNER for patching tasks. For more information about privilege grants to Designers, see Granting Roles and Privileges to Administrators.
Operators are administrators who have restricted privileges on a Deployment Procedure and Software Library. Normally, operators can view and submit a deployment procedure. The Designer user may also grant the Operator the necessary privileges on any targets or entities.
Operators use the infrastructure created by designers and perform run-time activities like:
Accessing the provisioning profiles present in the Software Library for provisioning procedures.
Launching software deployments to provision software on selected targets.
Patching software deployments using patch plans and patch templates.
The predefined Oracle role for an Operator is EM_ALL_OPERATOR, this role in turn includes fine grained roles where you can specifically set EM_PROVISIONING_OPERATOR for provisioning tasks, and EM_PATCH_OPERATOR for patching tasks. For more information about privilege grants to Operators, see Granting Roles and Privileges to Administrators.
Note:
Designers can choose to perform both design-time and run-time activities, but operators can perform only run-time activities.To create a Designer user account, follow these steps:
In Cloud Control, from the Setup menu, select Security, then select Administrators.
On the Administrators page, click Create.
In the Create Administrator wizard, do the following:
On the Properties page, specify the name Designer and provide a password. Leave the other fields blank, and click Next.
On the Roles page, select EM_ALL_DESIGNER, and click Next.
Note:
You can alternately restrict the Designer access to either Provisioning or Patching domains. For granting privileges explicitly for Provisioning, select theEM_PROVISION_DESIGNER role. Similarly, for granting designer privileges explicitly for Patching, select the EM_PATCH_DESIGNER role.On the Target Privileges page, select the targets privileges that must be granted to a Designer user account. For information about the target privileges available to an Administrator with Designer role, see Granting Roles and Privileges to Administrators on the Deployment Procedure
On the Resource Privileges page, select the privileges to be explicitly granted for each of the resource types.
On the Review page, review the information you have provided for this user account, and click Finish.
To create an Operator user account, follow these steps:
In Cloud Control, from the Setup menu, select Security, then select Administrators.
On the Administrators page, click Create.
In the Create Administrator wizard, do the following:
On the Properties page, specify the name Operator and provide a password. Leave the other fields blank and click Next.
On the Roles page, select EM_ALL_OPERATOR, and click Next.
Note:
You can alternately restrict the Operator access to either Provisioning or Patching domains. For granting privileges explicitly for Provisioning, select theEM_PROVISION_OPERATOR role. Similarly, for granting designer privileges explicitly for Patching, select the EM_PATCH_OPERATOR role.On the Target Privileges page, select the targets privileges that must be granted to an Operator user account. For information about the target privileges available to an Administrator with Operator role, see Granting Roles and Privileges to Administrators on the Deployment Procedure
On the Resource Privileges page, select the privileges to be explicitly granted for each of the resource types.
On the Review page, review the information you have provided for this user account, and click Finish.
For Cloud Control to connect to My Oracle Support for Agent Patching, patching other targets, MOS related tasks, and for Self-Update tasks, you must ensure that you set the proxy server settings and register the details. To do so, follow the instructions outlined in Setting Up Network Proxy and Realm Configuration Settings.
The Self Update feature enables you to obtain information about updates to Cloud Control components. The Self Update home page can be used to obtain information about new updates and provides a common workflow to review, download and apply the updates. The Self Update console automatically informs you whenever new updates that are applicable to your installation are made available by Oracle.
Software Library components and directives that you can use for provisioning and patching are called provisioning entities. A Provisioning bundle refers to a specific provisioning or patching area, such as database provisioning or FMW provisioning through which Cloud Control delivers updates to customers.
Note:
Ensure that the user hasVIEW_ANY_SELFUPDATE privilegesFor applying Oracle-supplied updates to provisioning entities, follow these steps:
In Cloud Control, from the Setup menu, select Extensibility, then select Self Update.
Schedule to download provisioning bundle. The Self-update framework downloads the bundle to a well-defined location. For more information about Self-Update, see Oracle Enterprise Manager Cloud Control Administrator's Guide.
From the Actions menu, select Subscribe to ensure that you receive notification whenever a provisioning bundle is available for download.
In the Updates Home page, select update of Type Provisioning Bundle and from the Actions menu, select Open.
Apply the provisioning bundle updates manually. Follow instructions as per selected provisioning bundle to apply the update manually.
In the Updates Home page, verify that the update is applied.
Cloud Control can send e-mail notification every time you run a Deployment Procedure. However, by default, Deployment Procedures do not have this feature enabled. To configure them to send e-mail notifications, you must customize the Deployment Procedure.
For information on how you can customize Deployment Procedures and set up e-mail notifications, see Chapter 33.
|
Copyright © 2012, Oracle and/or its affiliates. All rights reserved. Legal Notices |
|