| Oracle® Enterprise Manager Lifecycle Management Administrator's Guide 12c Release 2 (12.1.0.2) Part Number E27046-08 |
|
|
PDF · Mobi · ePub |
| Oracle® Enterprise Manager Lifecycle Management Administrator's Guide 12c Release 2 (12.1.0.2) Part Number E27046-08 |
|
|
PDF · Mobi · ePub |
This chapter explains how you can provision Coherence nodes or clusters across multiple targets in a farm using Oracle Enterprise Manager Cloud Control (Cloud Control). In particular, this chapter covers the following:
This section helps you get started with this chapter by providing an overview of the steps involved in provisioning Coherence nodes and clusters. The Coherence Deployment Procedure allows you to do the following:
Add one or more nodes to a new cluster and add this cluster as an Cloud Control monitored target.
Add a management node to an existing cluster and add this cluster as an Cloud Control monitored target.
Add one or more nodes to a cluster that is already being monitored by Cloud Control.
Update existing nodes by copying modified software components or configuration files and restart the nodes.
Create a new Coherence cluster.
Consider this section to be a documentation map to understand the sequence of actions you must perform to successfully deploy a Coherence node. Click the reference links provided against the steps to reach the relevant sections that provide more information.
Table 18-1 Getting Started with Deploying a Coherence Node
| Step | Description | Reference Links |
|---|---|---|
|
Step 1 |
Understanding the Deployment Procedure Understand the Deployment Procedure that is offered by Cloud Control for deploying a Coherence node. Know how the Deployment Procedure functions, what use cases it covers, and so on. |
To learn about the Deployment Procedure, see Deploying Coherence Nodes and Clusters. |
|
Step 2 |
Knowing About The Supported Releases Know what releases of Oracle Coherence are supported. |
To learn about the releases supported by the Deployment Procedure, see Supported Releases. |
|
Step 3 |
Meeting the Prerequisites Before you run any Deployment Procedure, you must meet the prerequisites, such as adding the Coherence node as a target, and setting up of Oracle Software Library. |
To learn about the prerequisites for deploying a Coherence node, see Prerequisites. |
|
Step 4 |
Running the Deployment Procedure Run the Deployment Procedure to successfully deploy a Coherence node. |
To deploy a Coherence node, follow the steps explained in Deployment Procedure. |
This section lists the releases of Oracle Coherence supported by this Deployment Procedure:
Oracle Coherence 3.3, 3.4, 3.5, 3.6, and 3.7.
This section describes how you can add one ore more nodes to an existing cluster or create a new cluster using the Coherence Node Provisioning procedure.
This section covers the following:
Before running the Deployment Procedure, meet the following prerequisites:
The host on which a Coherence node is being added or updated must be a monitored target in Cloud Control.
A zip file with the Coherence software, default configuration files and start scripts must be created. This zip file must be added as a software component to the Oracle Software Library. If the size of the zip file is more than 2 MB, it must be uploaded from a host monitored by the Management Agent. You can add specific configuration files as components to the Software Library which will override the default configuration files. These configuration files can be different depending on the type of node (storage, management, etc.). While adding a software component, it is recommended that you specify the Product Name as Coherence.
If you are provisioning a new node on a host on which the coherence.jar is not present, you must upload the coherence.zip file (containing Coherence software and default configuration files), and start scripts to the Oracle Software Library.
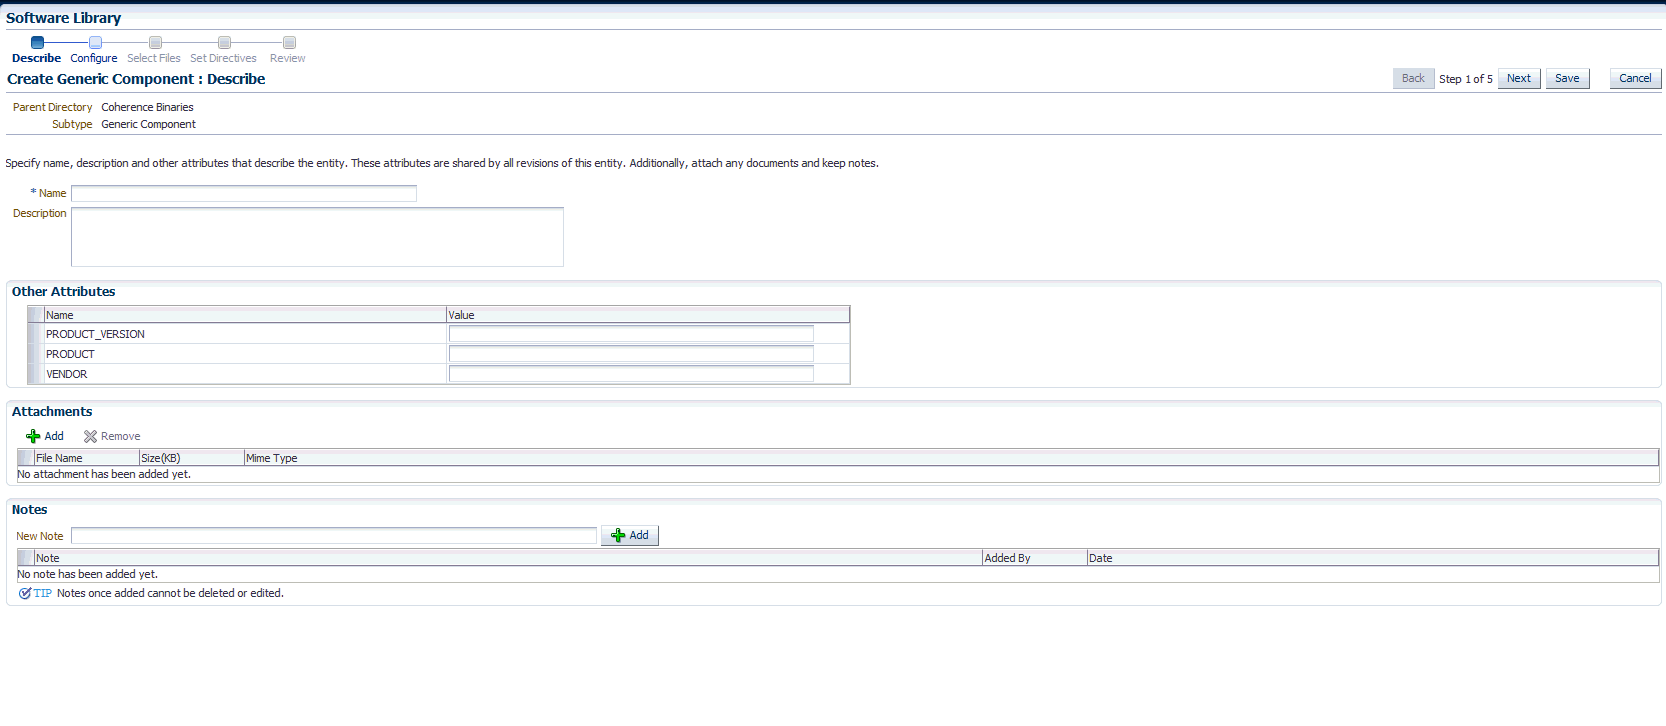
You can create one or more Coherence components and save it to the Software Library. This components are required while provisioning Coherence nodes and clusters. To create a Coherence component, follow these steps:
From the Enterprise menu, select Provisioning and Patching, then select Software Library.
Create a folder in which the components are to be stored. After the folder has been created, select the folder and click Create Entity and Component from the Actions menu.
A Create Component popup window appears. From the Select Subtype drop down list, select the Generic Component and click Continue.
In the Create Generic Component: Describe page, enter the Product as Coherence. This is helpful when you are searching for files during Coherence Provisioning. Click Next.
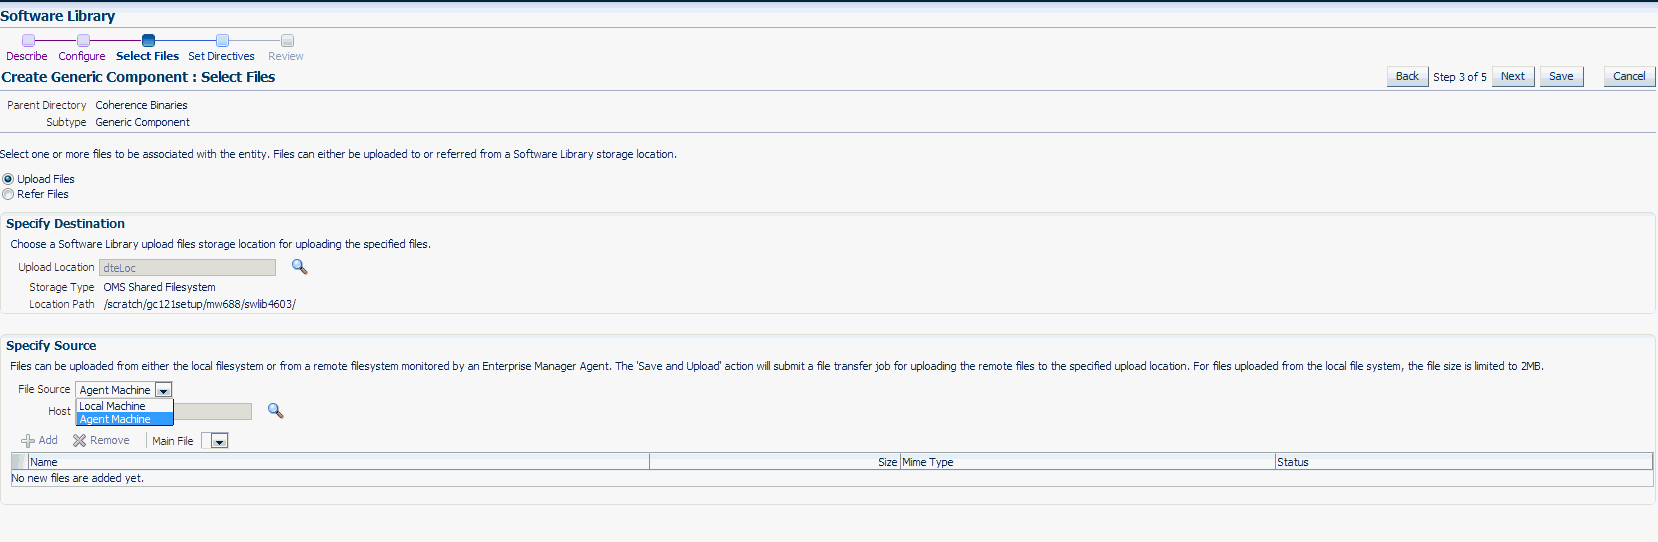
In the Create Generic Component: Select Files page, check the Upload Files option.
In the Specify Source section, select Agent Machine in the File Source drop down box and upload the following files:
$AGENT_ROOT/plugins/oracle.sysman.emas.agent.plugin_12.1.0.1.0/archives/coherence/bulkoperationsmbean_11.1.1.jar
$AGENT_ROOT/plugins/oracle.sysman.emas.agent.plugin_12.1.0.1.0/archives/coherence/coherenceEMIntg.jar
$AGENT_ROOT/plugins/oracle.sysman.emas.agent.plugin_12.1.0.1.0/scripts/coherence/default-start-script.pl
If you are uploading a large zip file such as Coherence.zip, you must save it on the Agent machine. Specify the path on the Agent to upload the file. This zip file must be downloaded from http://www.oracle.com/technetwork/middleware/coherence/downloads/index.htm
Click Save and Upload to submit a file transfer job to upload the remote files to the specified upload location.
To deploy a Coherence node or a cluster, follow these steps:
From the Enterprise menu, select Provisioning and Patching, then select Middleware Provisioning.
Select the Coherence Node Provisioning deployment procedure and click Launch.
Note:
You can also use the following methods to launch the deployment procedure:From the Enterprise menu, select Provisioning and Patching, then select Procedure Library. Select the Coherence deployment procedure from the list and click Launch.
Select the Coherence Node Provisioning option from the Coherence Home page menu.
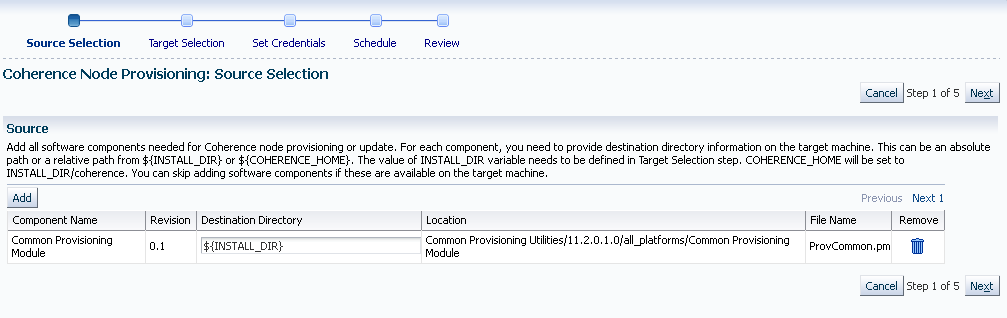
The Source Selection page which is the first page of the Coherence Node Provisioning wizard is displayed.
You can add all the software components needed to add or update a Coherence cluster. If the Coherence Home has already been created, you can click Next to go to the next page.
If the Coherence Home does not exist, click Add to add the Coherence binaries and the Start script from the Software Library. The Select Source popup is displayed. All software components with the product name Coherence that are present in the Software Library are displayed. Select required components and click Select.
For each component you have selected, specify the destination directory on the target machine. This can be an absolute path or a relative path from ${INSTALL_DIR} or ${COHERENCE_HOME}. The contents of the coherence.zip file will be extracted to this directory.
Note:
The value of the $INSTALL_DIR is defined in the Coherence Node Provisioning: Target Selection page and it is set as a level above the COHERENCE_HOME directory.
If the software components are available in the target machine, this step can be skipped.
Click Next. The Target Selection page is displayed. On this page, you can:
Add Nodes: You can add a new node or make a copy of an existing node. Click the Search icon in the Target Name field and select a Coherence cluster from the list. The following details are displayed:
Cluster Name: The name of the cluster.
Cluster Communication: This can be Multicast or Well Known Address (WKA).
License Mode: The mode in which the cluster has been deployed.
Click Add in the New Nodes section to add new nodes to an existing Coherence cluster monitored by Cloud Control. The Add Coherence Node page is displayed. Specify the details of the node and click Continue to add the node and return to the Coherence Node Provisioning: Select Target page. See Adding a Coherence Node for details.
Creating a Copy of an Existing Node: You can make a copy of an existing node. When you select a cluster to which a node is to be added, a list of nodes present in the cluster are displayed in the Existing Nodes section. Select a node from this list and click Create Like. The Add Coherence Node page is displayed. Specify the details of the node and click Continue to return to the Coherence Node Provisioning: Select Target page. A copy of the selected node is now listed in the New Nodes section and can be deployed.
Create Cluster: Click Create Cluster to a create a new Coherence cluster. Enter Cluster Name along with the following details:
Cluster Name: Enter a unique name for the cluster.
Cluster Communication: Select Multicast or Well Known Address (WKA). If you select Multicast, you are prompted for the Cluster Port and Cluster Address. If you select WKA, enter one or more sets of <hostname>:<port> entries separated by a comma and make sure that the WKA details have been specified in the Coherence Node Provisioning: Add Node page.
Note:
If you select WKA, you need to create an override file (tangosol-coherence-override-em.xml) for the WKA entries and specify the Dtangosol.coherence.override parameter in this file. This file is created from the default-start-script.pl which can be modified if required.License Mode: Specify the mode in which the cluster is to be deployed. This can be Development, Evaluation, or Production.
Click Add in the New Nodes section to add nodes to the new cluster being created. The Add Coherence Node page is displayed. Specify the details of the node and click Continue to add the node and return to the Coherence Node Provisioning: Select Target page.
To create a cluster, you must have the following components, coherenceEMIntg.jar, bulkoperationsmbean_11.1.1.jar, default-start-script.pl, and Coherence.zip.
Click Next to go to the next step in the wizard. In the Coherence Node Provisioning: Set Credentials page, you can set credentials for each host. You can apply the same credentials for multiple hosts by selecting multiple hosts from the list.
Select the host and specify the credentials which can be:
Preferred Credentials: This option is selected by default and the preferred credentials stored in the Management Repository are used. This option is available only if it has already been defined in Cloud Control.
Named Credentials: You can override the preferred credentials and select a common set of credentials that will be used for all the hosts and WebLogic domains.
New Credentials: You can override the preferred credentials and specify a separate set of credentials for each host.
Select the credentials and click Apply to apply the credentials to the selected hosts. For more information on setting up credentials, see the Enterprise Manager Security chapter in the Enterprise Manager Administration Guide.
Click Next. The Schedule page is displayed. On this page, you can specify the schedule for deploying the node. You can choose to deploy the node immediately or at a later date.
Note:
If you set the Grace Period as Indefinite, Cloud Control will keep trying to deploy the node for an indefinite period. If you specify a date / time in this field, the deployment process will be aborted after this period.Click Next. The Review page is displayed. You can review the details you have provided for deploying the node. If you are updating a node, you can view the node processes that will be stopped on this page. Click Finish to deploy or update the node.
After the new Management Node has been created, you must wait for the first collection before you add nodes to the cluster.
You can add a node to an existing cluster or create a new cluster by adding one or more new nodes. To add a node, follow these steps:
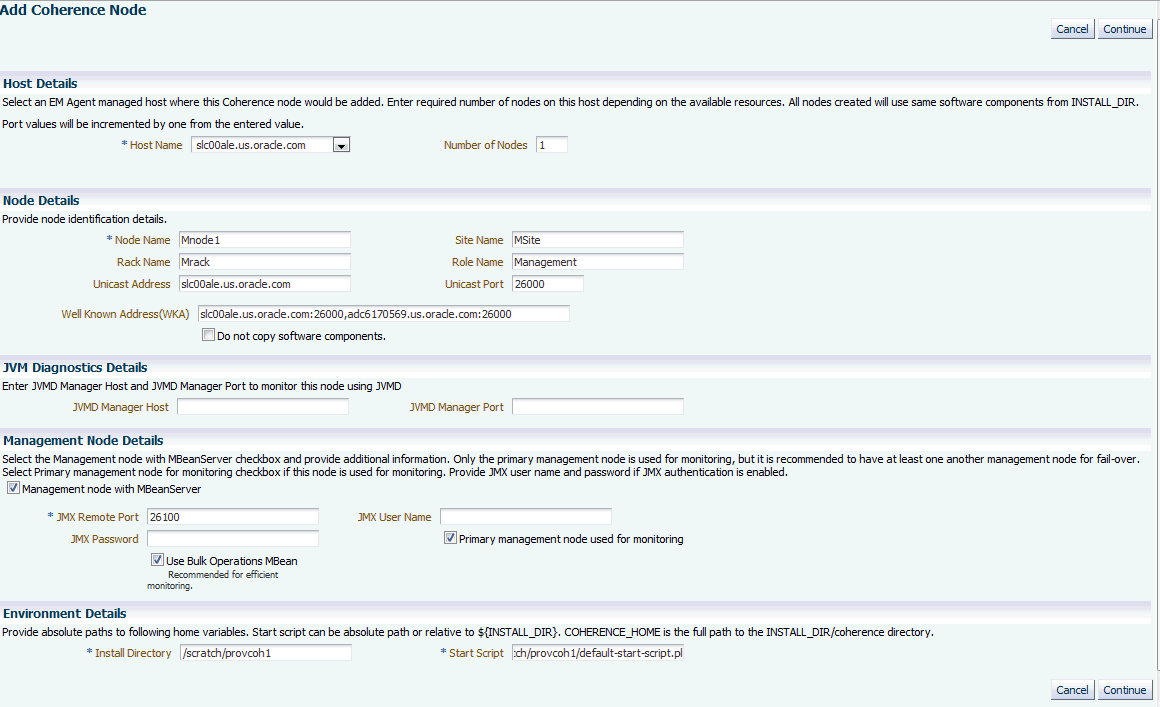
Click Add in the Coherence Node Provisioning: Target Selection page. The Add Coherence Node page is displayed. Enter the following details:
Table 18-2 Add Coherence Node Page
| Field Name | Description |
|---|---|
|
Host Details |
|
|
Host Name |
Select the host on which the node is to be added.You may have more than one node on the host depending on the machine configuration and the node configuration. Note: The Host Name you select here is used to set two start up parameters. Use the |
|
Number of Nodes |
Specify the number of nodes that need to be added. By default, this field has the value of 1 but you can add as many nodes as required depending on the machine and node configuration. If the value is more than 1, then all the nodes will have the following properties:
|
|
Node Details |
|
|
Node Name |
Enter a unique name for the node |
|
Site Name |
This is the location of the Coherence node. This is geographical physical site name which identifies the racks and machines on which the node is running. |
|
Rack Name |
The name of the rack in the site on which the machine is located. |
|
Role Name |
The role could be storage/data, application/process, proxy or management node. Note: The Node Name, Site Name, Rack Name, and Role Name cannot exceed 32 characters. |
|
Do not Copy Software Components |
If you are adding a node on a machine on which a Coherence Home is already present, you must check the Do not copy Software Components checkbox. If you are copying the files onto a new host, unchecked the Do not copy Software Components checkbox to ensure that the binaries selected in the Coherence Node Provisioning: Source Selection page. |
|
Well Known Address (WKA) |
If Cluster Communication has been set to WKA in the Coherence Node Provisioning: Target Selection page, enter the host and port number in the format host1:port1, host2:port2 and so on. |
|
JVM Diagnostics Details |
|
|
JVM Manager Host and Port |
If this node is to be monitored by JVM Diagnostics Manager, specify the address and port number of the JVM Diagnostics Console. |
|
Management Node Details |
|
|
Management Node with MBeanServer |
You can define multiple management nodes in the cluster but only one management node can be marked as the Primary Management Node. We recommend that you add at least two management nodes preferably running on different hosts / machines to support fail over. |
|
JMX Remote Port |
The port number of the EMIntegration Mbean server. |
|
JMX User Name |
The user name for the JMX server if authentication is enabled. |
|
JMX Password |
The password for the JMX server if authentication is enabled. Note: To enable the JMX authentication, you need to set |
|
Primary Management Node used for Monitoring |
Select this checkbox to mark the management node you are adding as the Primary Management Node used for Monitoring. This node is used to discover the Coherence cluster and any nodes added later will be added to the newly discovered cluster. If several nodes are being added to a cluster, only one management node can be marked as the primary one. If the primary management node fails, you can configure any of the other management nodes for monitoring. If no other management node is available, you can add a new primary management node to an existing cluster and this node can be used to monitoring. |
|
Use Bulk Operations MBean |
This checkbox is selected by default. When this option is selected, a new management node with BulkOperationsMBean will be started. |
|
Environment Details |
|
|
Install Directory |
Enter the absolute path to the folder under which the Coherence software components reside. The path specified here will be used as the Destination Directory specified on the Coherence Node Provisioning: Source Selection page. This value could be different for each node or the same for one or more nodes. |
|
Start Script |
This script is used to bring up the Coherence node. This script is operating system specific and sets the proper environment required for the node by specifying the relevant system parameters. See sample script for an example. |
The following table summarizes how the values specified during deployment will be used by the environment variables specified in the start script. The deployment procedure also sets the JAVA_HOME and AGENT_HOME variables by using the Agent installation details. You may override these by specifying appropriate values in your start script.
Table 18-3 Environment Variables
| UI Parameter | Environment Variable Set | Coherence System Parameter |
|---|---|---|
|
|
|
|
|
|
|
|
|
|
|
|
|
|
|
|
|
|
|
|
|
|
|
|
|
|
|
|
|
|
|
|
|
|
|
|
|
|
|
tangosol.coherence.mode |
|
|
|
|
|
|
|
|
|
|
jvm_console_host |
jamconhost |
|
JVM_CONSOLE_PORT |
jvm_console_port |
jamconport |
|
WKA_PORT |
wka_port |
|
After adding the node, click Continue to return to the Coherence Node Provisioning: Target Selection page.
Click Next to go to the next step in the wizard.
The default-start-script.pl and generate-wka-override.pl scripts are present in the $EMAS_PLUGIN_ROOT/scripts/coherence/directory.
This script is the default start script used to start a Coherence node. A sample script is shown below:
#!/usr/local/bin/perl

# Sample script to demonstrate starting of following Coherence nodes.
# When this script is passed in as a start script in Coherence Node Provisioning
  Deployment Procedure, while executing start node step, the deployment procedure
  sets all user entered options as environment variables. Based on the values of
  these environment variables, you can start different types of Coherence nodes
#
# - Management Node with Oracle Bulk Operation MBean is started when
# "bulk_mbean" and "jmx_remote_port" variables are set. For this option,
# oracle.sysman.integration.coherence.EMIntegrationServer Java class is executed
# that starts a MBeanServer in this node and registers Oracle Bulk Operation
# MBean. You need coherenceEMIntg.jar and bulkoperationsmbean_11.1.1.jar in the
# classpath.

#
# - Management Node is started when "jmx_remote_port" is set, but "bulk_mbean" is
  NOT set.
#
# - Managed node when "jmx_remote_port" is not set.
#
#
# Following variables are set from the deployment procedure. Use these values to
# define required system parameters to override Coherence default settings.

my $coherence_home=$ENV{'COHERENCE_HOME'};

my $start_script=$ENV{'START_SCRIPT'};
my $java_home=$ENV{'JAVA_HOME'};
my $agent_home=$ENV{'AGENT_HOME'};
my $wka_port=$ENV{'WKA_PORT'};
my $license_mode=$ENV{'LICENSE_MODE'};
my $jamhost=$ENV{'JAM_CONSOLE_HOST'};
my $jamport=$ENV{'JAM_CONSOLE_PORT'};

my $member=$ENV{'tangosol_coherence_member'};
my $site=$ENV{'tangosol_coherence_site'};
my $rack=$ENV{'tangosol_coherence_rack'};
my $machine=$ENV{'tangosol_coherence_machine'};

# tangosol.coherence.machine has a limitation of 32 chars
# As a workaround, use oracle.coherence.machine to set machine name
# This parameter is used to identify hosts for cluster management features
my $oracle_coherence_machine=$ENV{'oracle_coherence_machine'};
my $role=$ENV{'tangosol_coherence_role'};

my $jmxport=$ENV{'jmx_remote_port'};
my $cluster=$ENV{'tangosol_coherence_cluster'};
my $clusteraddr=$ENV{'tangosol_coherence_clusteraddress'};
my $clusterport=$ENV{'tangosol_coherence_clusterport'};
my $bulkmbean=$ENV{'bulk_mbean'};
my $jmx_auth=$ENV{'jmx_enable_auth'};

my $SYS_OPT="";
my $JVM_OPT="";

my $psep="";
my $dsep="";
if ( !&IsWindows() ) {
$psep=":";
$dsep="/";
}
else
{
$psep=";";
$dsep="\\";
}

print
"\n\n*************************************************************************\n"

print "Output from default-start-script\n";
print "Starting Node : $member\n";
print "Coherence Home : $coherence_home \n";
print "Start Script : $start_script \n";
print "Java Home : $java_home \n";
print "Agent Home : $agent_home \n";
print "WKA Port: $wka_port \n";
print "License Mode: $license_mode \n";

print "Site Name : $site \n";
print "Rack Name : $rack \n";
print "Machine Name : $machine \n";
print "Oracle Coherence Machine Name : $oracle_coherence_machine \n";
print "Role Name : $role \n";

print "Cluster Name : $cluster \n";
print "Cluster Addr : $clusteraddr \n";
print "Cluster Port : $clusterport \n";
print "JMX Port : $jmxport \n";
print "Bulk MBean : $bulkmbean \n";
print "JMX Auth Enabled : $jmx_auth \n";
#

# you may run a local script as part of this script and override those
# settings.
# Override JAVA_HOME variable by setting it locally
#
#. ./set-env.sh
#echo "After setting JAVA_HOME locally, JAVA_HOME: $JAVA_HOME"
# Options for Java Virtual Machine.
$JVM_OPT="-server -Xms512m -Xmx512m -Xincgc -verbose:gc";
#
# Set system parameters to Coherence node
$SYS_OPT="-Djava.net.preferIPv4Stack=true";
# This param allows the mbeans on this node to be registered to mbean servers
running on management nodes


$SYS_OPT="$SYS_OPT -Dtangosol.coherence.management.remote=true";
$SYS_OPT="$SYS_OPT -Dcom.sun.management.jmxremote.ssl=false";
$SYS_OPT="$SYS_OPT -Dtangosol.coherence.cluster=$cluster";
$SYS_OPT="$SYS_OPT -Dtangosol.coherence.member=$member";
$SYS_OPT="$SYS_OPT -Dtangosol.coherence.site=$site";
$SYS_OPT="$SYS_OPT -Dtangosol.coherence.rack=$rack";
$SYS_OPT="$SYS_OPT -Dtangosol.coherence.machine=$machine";
# set this if machine name > 32 chars, tangosol.coherence.machine has a limitaion
# of 32 chars
$SYS_OPT="$SYS_OPT -Doracle.coherence.machine=$oracle_coherence_machine";
$SYS_OPT="$SYS_OPT -Dtangosol.coherence.role=$role";

# Set coh home and start script so they will be part of input args

$SYS_OPT="$SYS_OPT -Doracle.coherence.home=$coherence_home";
$SYS_OPT="$SYS_OPT -Doracle.coherence.startscript=$start_script";

# set jmxremote.authenticate=true if $jmx_enable_auth is present.
# username/password needs to be set in $JDK_
HOME/jre/lib/management/jmxremote.password and

# $JDK_HOME/jre/lib/management/jmxremote.access files.
Uncomment the following block after adding these files.
#
if ($jmx_auth ne "") {
$SYS_OPT="$SYS_OPT -Dcom.sun.management.jmxremote.authenticate=$jmx_auth";
 else {
$SYS_OPT="$SYS_OPT -Dcom.sun.management.jmxremote.authenticate=false";
}

# Default is true, so make sure to set it to false if not using authentication
# $SYS_OPT="$SYS_OPT -Dcom.sun.management.jmxremote.authenticate=false";
# set jmxremote.port only for management nodes, if user passes in.
# It enables monitoring from remote systems through this port.
if ($jmxport ne "") {
$SYS_OPT="$SYS_OPT -Dcom.sun.management.jmxremote.port=$jmxport";
}
#
# Define clusteraddress and clusterport if we have valid values.
#
if($clusteraddr ne "") {
$SYS_OPT="$SYS_OPT -Dtangosol.coherence.clusteraddress=$clusteraddr";
}

if("$clusterport" ne "") {
$SYS_OPT="$SYS_OPT -Dtangosol.coherence.clusterport=$clusterport";
}

if("$license_mode" ne "") {
$SYS_OPT="$SYS_OPT -Dtangosol.coherence.mode=$license_mode";
}
#This is used to generate WKA override file. If you choose to use an existing
#override file, you can comment this out.
#Make sure you set "-Dtangosol.coherence.override" to the appropriate file name.
if("$wka_port" ne "") {
$wka_port = "\"".$wka_port."\"";
$wka_script = $agent_
home.$dsep."sysman".$dsep."admin".$dsep."scripts".$dsep."coherence".$dsep."genera
te-wka-override.pl";
print "executing $wka_script $wka_port\n";
if ( !&IsWindows() ) {
system("chmod 0700 $wka_script");
}
if(fork() == 0) {
exec("$wka_script $wka_port") or die "Could not execute
generate-wka-override.xml\n";
}
$SYS_OPT="$SYS_OPT -Dtangosol.coherence.override=em-coherence-override.xml";
}
my $startup_class="";
my $cmd="";
# Note that Coherence lib is under $COHERENCE_HOME/coherence. Add any application
# specific jars to this classpath, if needed.
my $CLASSPATH=$coherence_home.$dsep."lib".$dsep."coherence.jar".$psep.$coherence
_home.$dsep."lib".$dsep."reporter.jar";
print "CLASSPATH: $CLASSPATH\n";
if($jamhost ne "" && $jamport ne "") {
$CLASSPATH=$CLASSPATH.$psep.$agent
_home.$dsep."archives".$dsep."jlib".$dsep."jamagent.war";
my $jamjvmid="$cluster/$member";
print "Using Oracle JVMD - $jamjvmid\n";
$SYS_OPT="$SYS_OPT -Doracle.coherence.jamjvmid=$jamjvmid";
$SYS_OPT="jamconshost=$jamhost $SYS_OPT";
$SYS_OPT="jamconsport=$jamport $SYS_OPT";
$SYS_OPT=" oracle.ad4j.groupidprop=$jamjvmid $SYS_OPT";
}
if ($bulkmbean ne "" && $jmxport ne "") {
# Management node with Bulk Operation MBean.
# add Oracle supplied jars for Bulk Operation MBean
$CLASSPATH=$CLASSPATH.$psep.$agent
_home.$dsep."..".$dsep."..".$dsep."lib".$dsep."coherenceEMIntg.jar".$psep.$agent
_home.$dsep."..".$dsep."..".$dsep."dependencies".$dsep."bulkoperationsmbean
_11.1.1.jar";
# Start MBeanServer
$SYS_OPT="$SYS_OPT -Dtangosol.coherence.management=all";
print "Starting a management node with Bulk Operation MBean \n";
$startup_class="oracle.sysman.integration.coherence.EMIntegrationServer";
$cmd=$java_home.$dsep."bin".$dsep."java -cp $CLASSPATH $JVM_OPT $SYS_OPT $startup
_class";
} elsif ($jmxport ne "") {
# Management Node with out Bulk Operation MBean
# Start MBeanServer
$SYS_OPT="$SYS_OPT -Dtangosol.coherence.management=all";
print "Starting a management node ...\n";
$startup_class="com.tangosol.net.DefaultCacheServer";
$cmd=$java_home.$dsep."bin".$dsep."java -cp $CLASSPATH $JVM_OPT $SYS_OPT $startup
_class";
} else {
# A simple managed node. Do not start MBeanServer.
$SYS_OPT="$SYS_OPT -Dtangosol.coherence.management=none";
print "Starting a simple managed node ...\n";
$startup_class="com.tangosol.net.DefaultCacheServer";
$cmd=$java_home.$dsep."bin".$dsep."java -cp $CLASSPATH $JVM_OPT $SYS_OPT $startup
_class";
}
if ( !&IsWindows() ) {
if (fork() == 0) {
print "Executing start script from child process... $cmd \n";
exec("$cmd") or die "Could not execute $cmd\n";
}
} else {
print "Command used to start node = $cmd\n";
exec($cmd);
}
print "exiting default start script\n";
exit 0;
sub IsWindows {
$osname = $^O;
if ( $osname eq "Windows_NT"
|| $osname eq "MSWin32"
|| $osname eq "MSWin64" )
{
return 1;
}
else {
return 0;
}
}
If Cluster Communication has been set to WKA in the Coherence Node Provisioning: Target Selection page, this script is launched by the default-start-script.pl. The generate-wka-override.pl is used to generate the override file. If you have your own override file, you can comment out the part that uses the generate-wka-override.pl script in the default-start-script.pl.
#!/usr/local/bin/perl
#
# $Header: emas/sysman/admin/scripts/coherence/generate-wka-override.pl /main/1
# 2011/02/01 16:51:33 $
#
# generate-wka-override.pl
#
# Copyright (c) 2011, 2011, Oracle and/or its affiliates. All rights reserved.
#
# NAME
# generate-wka-override.pl - <one-line expansion of the name>
#
# DESCRIPTION
# <short description of component this file declares/defines>
# expects input args as:
# host1:port1,host2:port2,host3:port3
# writes the wka information to em-coherence-override.xml
# Sample xml file:
#<coherence xml-override="/tangosol-coherence-override-{mode}.xml">
# <cluster-config>
# <unicast-listener>
# <well-known-addresses>
# <socket-address id="1">
# <address>10.232.129.69</address>
# <port>8088</port>
# </socket-address>
# <socket-address id="2">
# <address>10.232.129.69</address>
# <port>8089</port>
# </socket-address>
# </well-known-addresses>
# <port>8088</port>
# </unicast-listener>
# </cluster-config>
#</coherence>
#
use Cwd;
use IPC::Open3;
my $host_port = $ARGV[0];
@host_port_array = split(',', $host_port);
$size = @host_port_array;

my $xmlfile="em-coherence-override.xml";
print "$xmlfile\n";
open(XMLFL,"> $xmlfile");
print XMLFL "<coherence
xml-override=\"/tangosol-coherence-override-{mode}.xml\">\n";
print XMLFL "<cluster-config>\n";
print XMLFL "<unicast-listener>\n";
print XMLFL "<well-known-addresses>\n";

my $id = 1;
for($i = 0; $i < $size; $i++) {
$single_host_port = $host_port_array[$i];
$single_host_port =~ s/^\s+|\s+$//g;
@single_host_port_array = split(':', $single_host_port);
$wka_host = $single_host_port_array[0];
$wka_port = $single_host_port_array[1];
$id = $id + $i;
print XMLFL "<socket-address id=\"$id\">\n";
print XMLFL "<address>$wka_host</address>\n";
print XMLFL "<port>$wka_port</port>\n";
print XMLFL "</socket-address>\n";
}
print XMLFL "</well-known-addresses>\n";
print XMLFL "</unicast-listener>\n";
print XMLFL "</cluster-config>\n";
print XMLFL "</coherence>";
close(XMLFL);
exit 0;
We recommend that you have at least two management nodes running on different machines in a Coherence cluster. If a monitoring failure occurs, the second management node can be used. Some of the common failure scenarios are listed below:
Error Condition: Loss of Management Node
Solution: If the primary management node fails, you need to change the monitoring configuration of the cluster to point to another management node in the cluster. If no other management node is present in the cluster, you can use the Coherence Node Provisioning deployment procedure, select an existing cluster and add a new management node. This process will update the monitoring configuration for the cluster.
Error Condition: Loss of Agent Monitoring the Cluster
Solution: If the Agent is not available, you need to use another Management Agent to point to the management node of Coherence cluster.
Error Condition: Loss of Host with EM Agent and Management Node
Solution: If the Host is not available, you need to switch to another management node that is running on a different machine.
|
Copyright © 2012, Oracle and/or its affiliates. All rights reserved. Legal Notices |
|