| Oracle® Enterprise Manager Lifecycle Management Administrator's Guide 12c Release 2 (12.1.0.2) Part Number E27046-08 |
|
|
PDF · Mobi · ePub |
| Oracle® Enterprise Manager Lifecycle Management Administrator's Guide 12c Release 2 (12.1.0.2) Part Number E27046-08 |
|
|
PDF · Mobi · ePub |
This chapter explains how you can deploy, undeploy, and redeploy Java EE Applications using Oracle Enterprise Manager Cloud Control (Cloud Control). In particular, this chapter covers the following:
This deployment procedure supports deployment of Java EE Applications packaged into .ear, .war, .jar or .rar files as per Java EE specifications. Administrators can now use Cloud Control to deploy, redeploy, and undeploy one or more Java EE applications and need not drill down into the WebLogic Server or the Fusion Middleware Administration Console to perform these tasks. The Java EE applications need to be pre-configured before you add them to the Cloud Control Software Library. You can deploy a pre-configured Java EE application to one or more WebLogic domains in Cloud Control.The Java EE Application Provisioning Wizard offers GUI-rich interactive screens that allow you to deploy / redeploy to, or undeploy a pre-configured Java EE application from one or more WebLogic Domains.
This section provides an overview of the steps involved in deploying, redeploying, and undeploying Java EE Applications. The Deploy / Undeploy Java EE Applications Deployment Procedure allows you perform the following operations:
Deploy
Undeploy
Redeploy
Consider this section to be a documentation map to understand the sequence of actions you must perform to successfully provision a Java EE Application. Click the reference links provided against the steps to reach the relevant sections that provide more information.
Table 17-1 Getting Started with Deploying, Undeploying, or Redeploying a Java EE Application
| Step | Description | Reference Links |
|---|---|---|
|
Step 1 |
Understanding the Deployment Procedure Understand the Deployment Procedures offered by Cloud Control to deploy, undeploy, or redeploy a Java EE Application. Know how the Deployment Procedures function, what use cases it covers, and so on. |
To learn about the Deployment Procedure, see Deploying, Undeploying, or Redeploying Java EE Applications. |
|
Step 2 |
Selecting the Use Case This chapter covers the use cases for deploying, undeploying, and redeploying Java EE Application. Select the use case that best matches your requirement. |
|
|
Step 3 |
Meeting the Prerequisites Before you run the Deployment Procedure, you must meet the prerequisites, such as configuring the Software Library and creating components to be provisioned as part of the Deploy / Undeploy Java EE Application deployment procedure. |
To learn about the prerequisites for deploying, undeploying or redeploying Java EE Application, see Prerequisites. |
|
Step 4 |
Running the Deployment Procedure Run the Deployment Procedure to successfully deploy, redeploy, or undeploy one or more Java EE applications. |
To run the Deploy / Undeploy Java EE Applications Deployment Procedure, follow the steps explained in Java EE Applications Deployment Procedure. |
Before running the Deploy / Undeploy Java EE Applications Deployment Procedure, ensure that the following prerequisites are met:
The Management Agent must be installed on the hosts on which the Java EE Application is to be deployed, redeployed, or undeployed.
The destination machine must contain sufficient space.
The plug-ins required for this deployment procedure must be deployed to the Management Agent on the destination machines.
Ensure that the Software Library is configured. The archives and other related files must be present in the Software Library. <Aravind: please add a link to the Software Library chapter>
Preferred credentials must be set on all OMS hosts.
You can create a Java EE Application component which contains the archive, deployment plan, predeploy, postdeploy, target execution scripts, and other files required for deploying the Java EE application. To create a Java EE Application component, follow these steps:
From the Enterprise menu, select Provisioning and Patching, then select Software Library.
Create a folder or select a folder from the Software Library, select Create Entity, then select Component.
From the Create Entity: Component window, select Java EE Application and click Continue.
In the Create Java EE Application: Describe page, enter the Name, Description, and click Next.
In the Create Entity: Select Files page, select one or more files to be associated with the Java EE Application. You can upload files from a storage location in the Software Library. For Software Library to become usable, at least one upload file location must be configured. In the Specify Destination section, click the Browse button in the Upload Location field. Select either of the following:
OMS Shared File System: An OMS Shared File System location is required to be shared (or mounted) across all the Oracle Management Server (OMS) hosts. This option is ideal for UNIX systems.
For single OMS environments, you can configure the Software Library either on the host where the OMS is running or in a shared location, so that it is accessible to all the OMS hosts. For multiple OMS environments, Oracle recommends that you configure the Software Library in a shared location so that the storage is accessible through NFS mount points to all Oracle Management Servers in the environment.
OMS Agent File System: An OMS Agent File System location is a location that is accessible to one of the OMS host's Agent. This option is ideal for OMS installed on Windows hosts. By selecting this option for uploading files, you can avoid sharing a location between all participating OMS hosts.
Credentials must be set before using an OMS Shared File System or OMS Agent File System. For an OMS Shared File System, normal host credentials must set before configuring a storage location. However, for OMS Agent File System location configuration, a credential (preferred or named) has to be specified.
In the Specify Source section, you can add the standard Java EE archive files such as .ear, .war, .jar, .rar and other optional files such pre and post-deploy scripts, target execution script, execution plan and additional files. You can either upload each file separately (Individual Files) or upload a zip file (Zip File) that contains the JavaEEAppComp.manifest file. You can upload the files from:
Local Filesystem: Click Browse and upload the files from your local system.
Agent Filesystem: You can upload the files from a remote filesystem monitored by the Management Agent. Click Browse and select a host machine from the list and click Select. Click Add. The Remote File Browser window is displayed. Click the Login As button and enter the credentials for the host machine. Specify the location in which the files are present, select one or more archive related files and click Add. The selected files are listed in the Current Selection section. Click OK to return to the Create Entity: Select Files page.
The files are listed in the table. Specify the type of the file by selecting the options in the Type field. Click Next.
Review and verify the information entered so far. Click Save and Upload to upload the files and create the Java EE Application component.
This section describes the Java EE Application deployment procedure. It covers the following:
Deploying a Java EE Application
Undeploying a Java EE Application
Redeploying a Java EE Application
Follow these steps to deploy a Java EE Application:
From the Enterprise menu, select Provisioning and Patching, then select Middleware Provisioning.
Select the Java EE Application procedure from the list and click Launch. You can also use the following method to launch the deployment procedure:
Click Middleware from the Targets menu.
Right click on a WebLogic Domain from the list and from the context sensitive menu, select Provisioning, then select Deploy / Undeploy Java EE Applications.
In the Deployment Procedure Manager page, select the Java EE Application Provisioning procedure and click Launch.
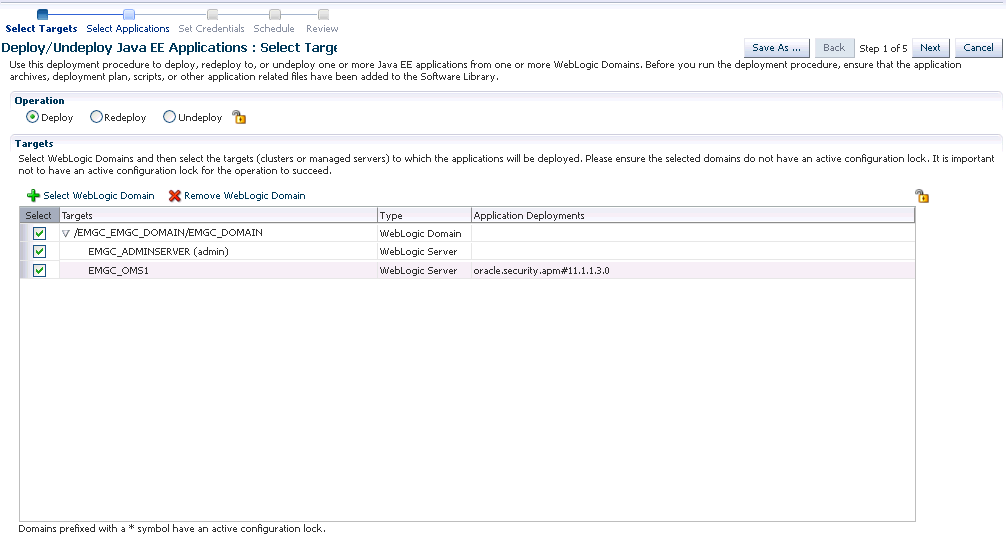
In the Deploy/Undeploy Java EE Applications: Select Targets page, choose the Deploy operation.
Select WebLogic Domains and select the targets on which the Java EE application is to be deployed. Click Add WebLogic Domains. Choose one or more WebLogic domains from the list and click Select.
Note:
You can customize the deployment procedure by locking certain features. You can lock an operation, a target, or an application. Before you proceed with the deployment, you must ensure that the selected domains do not have an active configuration lock. If the selected domains are locked, click the Lock icon to unlock the configuration lock.The selected WebLogic domains are listed in the Targets table. Select the targets (clusters or managed servers) for each domain and click Next.
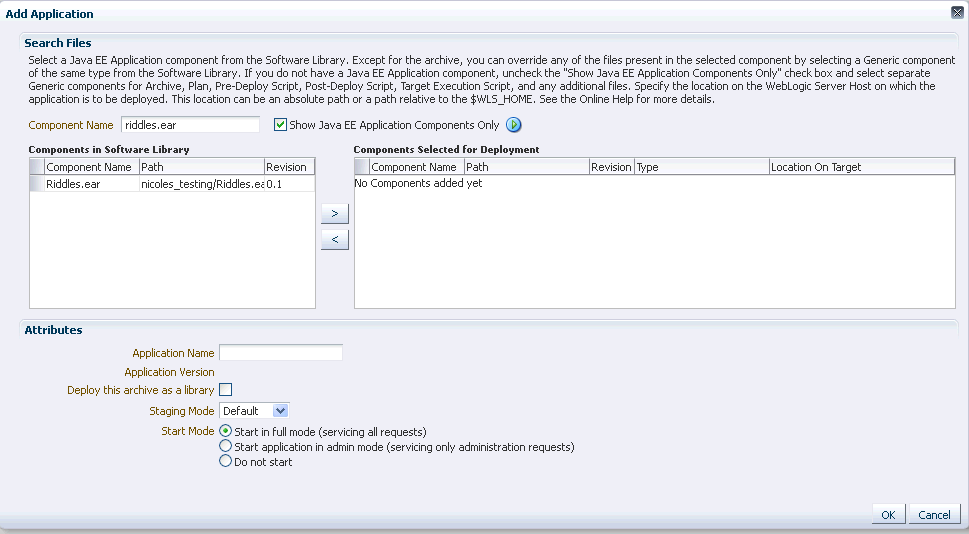
In the Deploy / Undeploy Java EE Applications: Select Applications page, add the archives and other related files that are to be deployed from the Software Library. Click Add to select one or more archives and other application related files or components from the Software Library. The Add Application popup is displayed. In the Component Name field, enter a file name or a wild card pattern to search for and retrieve components from the Software Library. Select the Show Java EE Application Components Only checkbox to list only the Java EE Application components in the Components in Software Library column. Select the archives and click the right arrow to move them to the Components Selected for Deployment section.
In the Type field, the type of each component is displayed. The Type can be:
Archive: This is the archive file which can be a .ear, .war, .jar, or .rar file.
Plan: This is an .xml file containing the deployment options for this application.
Pre Deploy Script: This is a script containing WLST commands. The Management Agent runs this script on the Administration Server of each WebLogic domain before the application is deployed. You can use this script to create data sources, JMS end points, and any other resources that might be needed by the application that is being deployed.
Post Deploy Script: This is a WLST script that is executed by the Management Agent on the Administration Server after the application is deployed. You can use this script to perform any post deployment configuration. For example, if you need to roll back and undo the changes made by the pre deploy script, you can select this option.
Note:
The archive, plan, predeploy, and postdeploy scripts can be moved only to the Administration Server.Additional File: You can add one or more files that will be required by the application that are not part of the application archive. These files can be of any type and can be moved only to the selected targets (managed servers and clusters).
Target Execution Script: These scripts can be used to set up the required environment or replace tokens in the additional files like property files. These scripts will be executed on selected targets.
In the Location On Target field, for each component, specify the location on the WebLogic Server Host on which the application is to be deployed. This can be an absolute path or relative to the $WLS_HOME for the selected targets.
After selecting the required files for deployment, enter a unique name for the application and specify the Staging Mode which can be:
Default: Each server in the WebLogic Domain maintains two attributes which are Staging Mode and StagingDirectoryName. The Staging Mode is the default staging mode for the server and StagingDirectoryName is the location on which the staged files are stored. Select this option to use the default staging mode for all the targets.
Stage: Select this option if the archive files should be moved to the destination machine.
No Stage: Select this option if the archive files should not be moved to the destination machine.
Select the Deploy this archive as library option if the application needs to be deployed as a shared library. You can select this option if one or more applications need the same set of files.
Select the Start Mode for deployment which can be:
Start in full mode (servicing all requests): Select this option to make the deployed application available to all users.
Start application in admin mode (servicing only administration requests): If you select this option, the deployed application is available only to the Administrator.
Do not start: The application is deployed but not started. You can select this option if any manual post-deployment configuration is required.
Click OK to add the archive and return to the Select Applications page. You can add more archives or click Next to proceed. If you have added more than one archive, select the Skip on Failure checkbox to skip any failed deployments and continue deploying the remaining applications.
Click the Lock icon to lock the fields you have configured.
Note:
The Designer can lock the fields after configuring them. This ensures that the Operator can run the deployment procedure with minimal input.Click Next. Specify the credentials for each domain you have selected, the host on which the Administration Server is running, and the hosts to which the additional files or execution scripts are to be moved. You can choose:
Preferred Credentials: This option is selected by default and the preferred credentials stored in the Management Repository are used. This option is available only if it has already been defined in Cloud Control.
Named Credentials: A named credential specifies the authentication information for a user and can be a combination of username / password, public and private key pair, and can be used to perform provisioning, patching, run jobs, and other system management tasks.
New Credentials: You can override the preferred credentials and specify a separate set of credentials for each host and WebLogic domain being deployed.
For more information on setting up the credentials, see the Enterprise Manager Security chapter in the Enterprise Manager Administration Guide.
Click the Lock icon to lock the fields you have configured. These fields cannot be edited once they are locked.
In the Schedule Deployment page, you can schedule the date on which the Java EE Application deployment procedure should be executed.
Click Next. On the Review page, review the details you have provided for the Deployment Procedure. If you are satisfied with the details, then click Submit to run the Deployment Procedure according to the schedule set. If you want to modify the details, click the Edit link in the section to be modified or click Back repeatedly to reach the page where you want to make the changes.
After you submit the deployment procedure, you will return to the Procedure Activity page where you can view the status of the Deployment Procedure. After the Java EE Application has been deployed, you can search for the target and navigate to the Target Home page.
Follow these steps to redeploy a Java EE application:
From the Enterprise menu, select Provisioning and Patching, then select Middleware Provisioning.
Select the Java EE Application procedure from the list and click Launch. You can also use the following method to launch the deployment procedure:
Click Middleware from the Targets menu.
Right click on a WebLogic Domain from the list and from the context sensitive menu, select Provisioning, then select Deploy / Undeploy Java EE Applications.
In the Deployment Procedure Manager page, select the Java EE Application Provisioning procedure and click Launch.
In the Select Targets page, choose the Redeploy operation.
Note:
Click the Lock icon to lock an operation or the fields you are configuring in any of the pages in the wizard. Once the fields have been locked, the Operator needs to provide minimal input while running the deployment procedure.Click Add WebLogic Domains to add one or more WebLogic domains. In the list of targets displayed, choose a target and click Select.
The deployment targets are listed in the Targets table. Select the applications that need to be redeployed and click Next.
In the Select Applications page, a list of applications that can be redeployed are displayed. Select an application and click Edit to modify the archive details and other application related files. In the Application Details window, enter a file name or a wild card pattern to search for and retrieve files from the Software Library. Select the archives and click the right arrow to move them to the Components Selected for Deployment section.
In the Type field, the type of each component is displayed. The Type can be:
Archive: This is the archive file which can be a .ear, .war, .jar, or .rar file.
Plan: This is an .xml file containing the deployment options for this application.
Pre Deploy Script: This is a script containing WLST commands. The Management Agent runs this script on the Administration Server of each WebLogic domain before the application is deployed. You can use this script to create data sources, JMS end points, and any other resources that might be needed by the application that is being deployed.
Post Deploy Script: This is a WLST script that is executed by Management Agent on the Administration Server after the application is deployed. You can use this script to perform any post deployment configuration. For example, if you need to roll back and ndo the changes made by the pre deploy script, you can select this option.
Note:
The archive, plan, predeploy, and postdeploy scripts can be moved only to the Administration Server.Additional File: You can add one or more files that will be required by the application that are not part of the application archive. These files can be of any type and can be moved only to the selected targets (managed servers and clusters).
Target Execution Script: These scripts can be used to set up the required environment or replace tokens in the additional files like property files. These scripts will be executed on selected targets.
Review the default location on the target machine on which the component will reside. This can be an absolute path or relative to the $WLS_HOME for the selected targets.
After selecting the required files for deployment, enter a unique name for the application and specify the Staging Mode which can be:
Default: Each server in the WebLogic Domain maintains two attributes which are Staging Mode and StagingDirectoryName. The Staging Mode is the default staging mode for the server and StagingDirectoryName is the location on which the staged files are stored. Select this option to use the default staging mode for all the targets.
Stage: Select this option if the archive files should be moved to the destination machine.
No Stage: Select this option if the archive files should not be moved to the destination machine.
Select the Start Mode for deployment which can be:
Start in full mode (servicing all requests): Select this option to make the deployed application available to all users.
Start application in admin mode (servicing only administration requests): If you select this option, the deployed application is available only to the Administrator.
Do not start: The application is deployed but not started. You can select this option if any post-deployment configuration is required.
Specify the Retirement Policy for the application. You can select:
Allow the application to finish its current sessions and then retire: Select this option if all the current sessions should be completed before retirement.
Retire the previous version after retire timeout: Specify a timeout period after which the application will be automatically retired.
Click OK to add the archive and return to the Select Applications page. You can add more archives or click Next to proceed. If you have added more than one archive, select the Skip on Failure checkbox to skip any failed deployments and continue deploying the remaining applications.
Click the Lock icon to lock the fields you have configured. These fields cannot be edited once they are locked.
Click Next. Specify the credentials for each domain you have selected, the host on which the Administration Server is running, and the hosts to which the additional files or execution scripts are to be moved. You can choose:
Preferred Credentials: This option is selected by default and the preferred credentials stored in the Management Repository are used. This option is available only if it has already been defined in Cloud Control.
Named Credentials: A named credential specifies the authentication information for a user and can be a combination of username / password, public and private key pair, and can be used to perform provisioning, patching, run jobs, and other system management tasks.
New Credentials: You can override the preferred credentials and specify a separate set of credentials for each host and WebLogic domain being deployed.
For more information on setting up the credentials, see the Enterprise Manager Security chapter in the Enterprise Manager Administration Guide.
Click the Lock icon to lock the fields you have configured. These fields cannot be edited once they are locked.
In the Schedule Deployment page, you can schedule the date on which the Java EE Application deployment procedure should be executed.
Click Next. On the Review page, review the details you have provided for the Deployment Procedure. If you are satisfied with the details, then click Submit to run the Deployment Procedure according to the schedule set. If you want to modify the details, click the Edit link in the section to be modified or click Back repeatedly to reach the page where you want to make the changes.
After you submit the deployment procedure, you will return to the Procedure Activity page where you can view the status of the Deployment Procedure. After the Java EE Application has been deployed, you can search for the target and navigate to the Target Home page.
Follow these steps to undeploy a Java EE Application:
From the Enterprise menu, select Provisioning and Patching, then select Middleware Provisioning.
Select the Java EE Application procedure from the list and click Launch. You can also use the following method to launch the deployment procedure:
Click Middleware from the Targets menu.
Right click on a WebLogic Domain from the list and from the context sensitive menu, select Provisioning, then select Deploy / Undeploy Java EE Applications.
In the Deployment Procedure Manager page, select the Java EE Application Provisioning procedure and click Launch.
In the Select Targets page, choose the Undeploy operation.
Click Add WLS Domains to add one or more WebLogic domains. In the list of targets displayed, choose a target and click Select.
The deployment targets are listed in the Targets table. When an application is undeployed from the WebLogic domain, select the applications that need to be undeployed and click Next.
Click Next. Specify the credentials for each domain you have selected, the host on which the Administration Server is running, and the hosts to which the additional files or execution scripts are to be moved. You can choose:
Preferred Credentials: This option is selected by default and the preferred credentials stored in the Management Repository are used. This option is available only if it has already been defined in Cloud Control.
Named Credentials: A named credential specifies the authentication information for a user and can be a combination of username / password, public and private key pair, and can be used to perform provisioning, patching, run jobs, and other system management tasks.
New Credentials: You can override the preferred credentials and specify a separate set of credentials for each host and WebLogic domain being deployed.
For more information on setting up the credentials, see the Enterprise Manager Security chapter in the Enterprise Manager Administration Guide
Specify the deployment schedule and click Next.
Review the details and click Undeploy. You will return to the Procedure Activity page where you can check the status.
|
Copyright © 2012, Oracle and/or its affiliates. All rights reserved. Legal Notices |
|