| Oracle® Enterprise Manager Lifecycle Management Administrator's Guide 12c Release 2 (12.1.0.2) Part Number E27046-08 |
|
|
PDF · Mobi · ePub |
| Oracle® Enterprise Manager Lifecycle Management Administrator's Guide 12c Release 2 (12.1.0.2) Part Number E27046-08 |
|
|
PDF · Mobi · ePub |
This chapter explains how you can automate common provisioning operations for Middleware Homes and WebLogic Domains using Oracle Enterprise Manager Cloud Control. It covers the following:
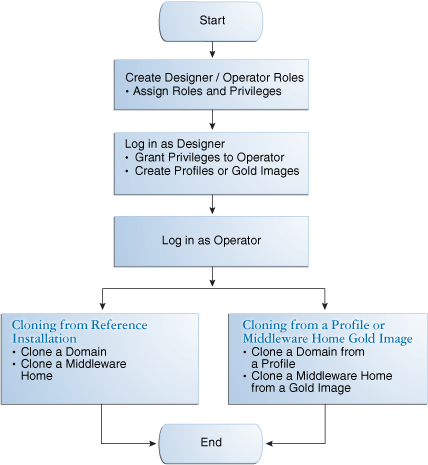
This chapter helps you get started by providing an overview of the steps involved in provisioning WebLogic Domains and Middleware Homes. Consider this section to be a documentation map to understand the sequence of actions you must perform to successfully provision a WebLogic domain. Click the reference links provided against the steps to reach the relevant sections that provide more information.
Table 15-1 Getting Started with Provisioning a WebLogic Domain or a Middleware Home
| Step | Description | Reference Links |
|---|---|---|
|
Step 1 |
Understanding the Deployment Procedure Understand the Deployment Procedures offered by Cloud Control for provisioning WebLogic Domains and Middleware Homes. Know how the Deployment Procedure functions, what use cases it covers, and so on. |
To learn about the Deployment Procedures, see Middleware Provisioning Deployment Procedures. |
|
Step 2 |
Knowing About the Supported Releases Know what releases can be provisioned by the Deployment Procedure. |
To learn about the releases supported by the Deployment Procedure, see Supported Releases. |
|
Step 3 |
Selecting the Use Case This chapter covers the use cases for provisioning a WebLogic Domain and a Middleware Home. Select the use case that best matches your requirement. |
|
|
Step 4 |
Meeting the Prerequisites Before you create a component in the Software Library or any Deployment Procedure, you must meet the prerequisites, such as space requirements and user privileges. When you run the Deployment Procedure, these prerequisites are verified. |
|
|
Step 5 |
Running the Deployment Procedure Run the Deployment Procedure to successfully provision a Middleware Home or a WebLogic Domain. |
|
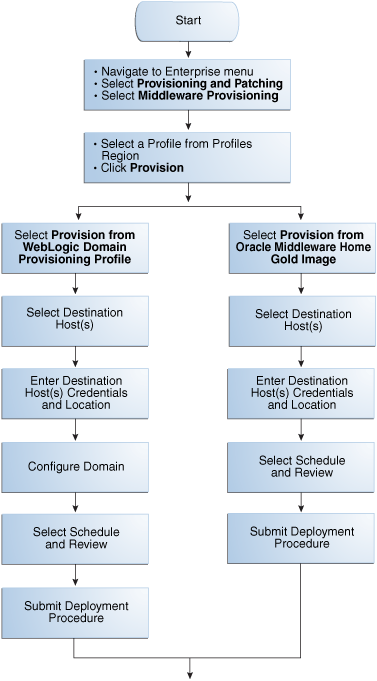
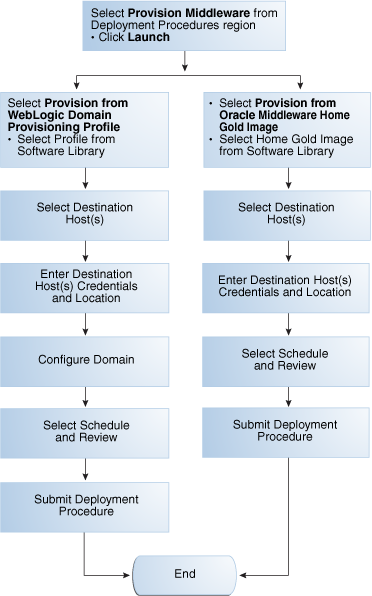
Using the Middleware Provisioning deployment procedures, you can clone a WebLogic Domain and /or a Middleware Home. This section covers the following:
Cloning from a Profile or a Middleware Home Gold Image
Before you run these deployment procedures, you must have created the profile or the gold image in the Software Library. See Creating Software Library Components for details.
The following figure shows the sequence of operations involved in cloning a WebLogic Domain or a Middleware Home.
Cloning from a Reference Installation: See Figure 15-4.
Cloning from a Profile or a Software Library component.
To clone from a provisioning profile, see Figure 15-10.
To clone from a Software Library component, see Figure 15-11.
Cloud Control supports Oracle WebLogic Server versions 10.3.1.0, 10.3.2.0, 10.3.3.0, 10.3.4.0, 10.3.5.0, 10.3.6.0, and 12.1.1.
This section describes the prerequisites required by Designer and Operator users before the Middleware Provisioning deployment procedures can be executed. It contains the following sections:
Designers are lead administrators with increased privileges on Deployment Procedures and Software Library. For more details, see Overview of User Accounts.
Following are the prerequisites required for designers to create components in the library, cusotmize the deployment procedure, and create and save deployment procedures for future usage by operators.
Ensure that you meet the infrastructure requirements described in Chapter 2.
Discover and monitor the destination hosts in Cloud Control. For this purpose, you need the latest version of Oracle Management Agent (Management Agent) on the destination hosts. For more information refer to the Oracle Enterprise Manager Cloud Control Basic Installation Guide. Ensure that the agents are installed in the same location on all hosts.
Set up the Oracle Software Library (Software Library). Create a folder to store the Software Library components and add components to the folder. Ensure that the WebLogic Domain Provisioning Profile and the Middleware Home Gold Image components have been added to the folder. For information about creating them, see Creating Software Library Components.
Store the operating system credentials of the destination hosts as preferred credentials in Oracle Management Repository (Management Repository) or use Named Credentials.
If you are using SUDO, PowerBroker, see Configuring Privilege Delegation Settings for information on setting up these authentication utilities.
You must have Write permissions on the following locations:
Oracle base directory for Grid Infrastructure where diagnostic data files related to Grid Infrastructure can be stored.
Grid Infrastructure software directory where Grid Infrastructure software can be provisioned.
You must have Operator target privileges on the destination host machines.
Operators are administrators who have restricted privileges on a Deployment Procedure and Software Library. Normally, operators can view and submit a deployment procedure. The Designer user may also grant the Operator the necessary privileges on any targets or entities. For more details, see Overview of User Accounts.
Following are the prerequisites for operators who will run the deployment procedures:
You must have permissions to view credentials (set and locked by the designer), view targets, submit jobs, and launch deployment procedures.
You must have Operator target privileges in the destination host machines.
If you are cloning a WebLogic domain using an existing installation, you must have Write access to the directory location of the Middleware Home or the WebLogic domain on the destination host machine.
If you are using an external JDK, ensure that the JDK software has been installed on the destination host before you launch the deployment procedure.
Middleware Home Requirements:
Existing Middleware Home: The Middleware Home on the destination machine must be identical in content and product stack as the Middleware Home on the source machine.
Create New Middleware Home: Ensure that there is sufficient disk space on the destination machine. The space required is approximately 2 times the size of the source Middleware Home.
Shared Middleware Home: This option is applicable when you are provisioning on multiple hosts. You must specify an absolute shared mount directory that is accessible by all destination hosts.
Following are the additional prerequisites required when you run the deployment procedures on Windows:
The Operating System user must be part of the Administrators Group.
If the source Middleware Home is being cloned, ensure that the Node Manager service has been stopped.
Ensure that directory paths and locations you specify are in the Windows standard format.
If you are using a profile or a gold image to provision your WebLogic Domain or Middleware Home, you must create the necessary components in the Software Library. This section describes the procedures to create these components. It covers the following:
A WebLogic Domain Provisioning Profile consists of the Middleware Home, binaries and the domain configuration. You can create a profile, save it in the Software Library, and then use the saved profile as the source for creating new WebLogic domains. This will ensure that future WebLogic installations follow a standard, consistent configuration.
Prerequisites
The Management Agent must be running on the Administration Server.
You must have the host credentials for the Administration Server running on the source machine.
The WebLogic domain for which the profile is being created must be a monitored target in Cloud Control.
The disk space required to create a profile is calculated as follows:
Disk Space = Middleware Home Size + WebLogic Domain Size + Space for Temporary Scripts
To create an Oracle Middleware Profile, follow these steps:
From the Enterprise menu, select Provisioning and Patching, then select Software Library.
From the Actions menu, click Create Folder to create a folder in which the profile you are creating is to be stored. We recommend that you do not use an out-of-box folder to store the profile.
Select the folder that you have created, and from the Actions menu, select Create Entity, and then Component.
A Create Component popup window appears. From the Select Subtype drop-down list, select the WebLogic Domain Provisioning Profile component and click Continue.
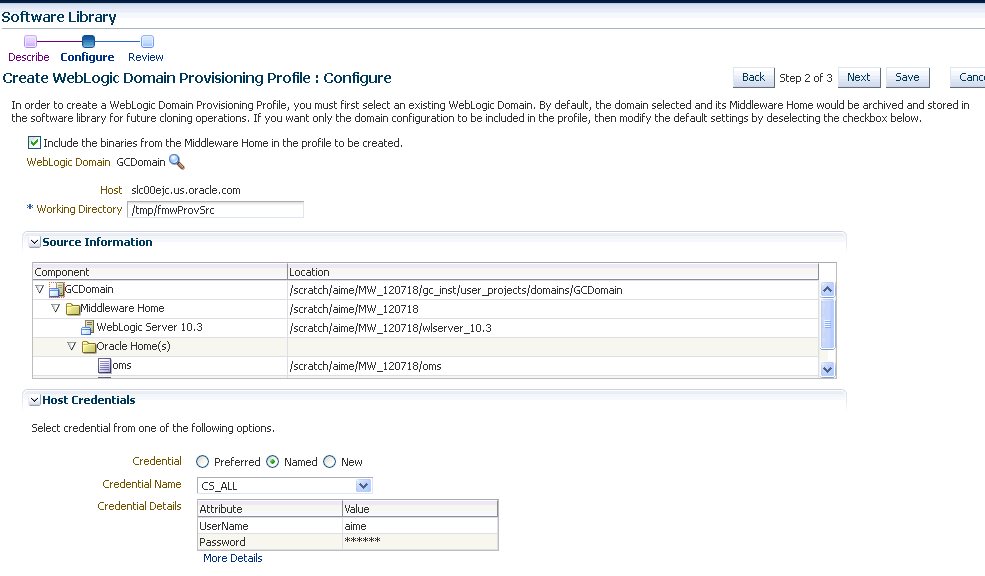
In the Create WebLogic Domain Provisioning Profile: Describe page, the Parent Directory under which the profile will be created and the Subtype are displayed. Enter a name (only alphanumeric characters and underscores are allowed) and description for the profile and enter the values for the Product Version, Product, and Vendor attributes. For example, enter the Product Version as 10.3.3, Product as WebLogic Domain, and Vendor as Oracle.
Click Next. The Create WebLogic Domain Provisioning Profile: Configure page appears.
Click the Search icon next to the WebLogic Domain field and select a WebLogic Domain from which the profile is to be created. The profile will include both the software in the Middleware Home as well as the configuration in the WebLogic Domain home.
Note:
To upload a profile without binaries, deselect the Include the binaries from the Middleware Home in the profile to be created checkbox. If you select a profile without binaries, during provisioning, you must select an existing Middleware Home that is the same version as the one selected in the source installation.In the Working Directory field, specify the directory on the host machine on which the files required for creating the profile are temporarily stored. If this directory is not present, it will be created. When the profile has been created, the contents of this directory will be deleted.
In the Host Credentials section, enter the host credentials of the machine on which the Administration Server of the source WebLogic Domain is installed. Select one of the following options:
Preferred Credentials: The preferred credentials stored in the Management Repository are used. The Preferred Credentials option will be available only if it has already been defined in Cloud Control. For more information on setting up Preferred Credentials, see Managing Preferred Credentials.
Named Credentials: The credentials stored in the Management Repository is used. To use the Named Credentials stored in the Management Repository, you must have already registered each of the preferred credential types with a unique name. Select the desired Named credential from the list available in Credential Name. For more information on registering a name for the preferred credentials, see Managing Named Credentials.
New Credentials: You can override the preferred credentials by specifying a new credential with a unique name and password.
Click Next. In the Review page, you can review the information and click Save and Upload.
The Job Name is displayed at the top of the page. Navigate to the Job Activity page and check the job status. Once it has been completed, navigate to the Software Library page and confirm if all the components of the profile (WebLogic Domain, MWHome, and Profile) have a Ready Status. You can also verify if the profile has been successfully created by navigating to the Middleware Provisioning page. From the Enterprise menu, select Provisioning and Patching, then select Middleware Provisioning and check if the profile is displayed there. You can now use this profile as the source for future WebLogic Domain installations.
You can create an Oracle Middleware Home Gold Image and save it in the Software Library. You can then use this gold image as the source for future Middleware Home installations.
Prerequisites
The Management Agent must be running on the Administration Server.
You must have the host credentials for the Administration Server running on the source machine.
The disk space required to create a gold image is calculated as follows:
Disk Space = Middleware Home Size + Space for Temporary Scripts
From the Enterprise menu, select Provisioning and Patching, then select Software Library.
From the Actions menu, click Create Folder to create a folder in which the gold image you are creating is to be stored. We recommend that you do not use an out-of-box folder to store the gold image.
Select the folder you have created and from the Actions menu, select Create Entity, then select Component.
A Create Component popup window appears. From the Select Subtype drop-down list, select the Oracle Middleware Home Gold Image component and click Continue.
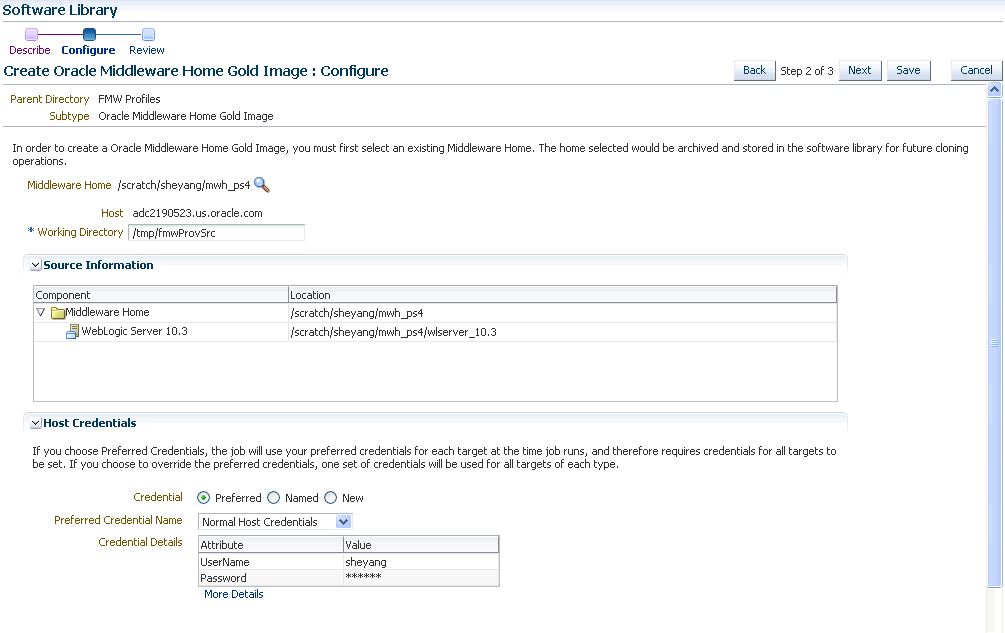
In the Describe page, the Parent Directory under which the gold image will be created and the Subtype are displayed. Enter a name and description for the profile and enter the values for the Product Version, Product, and Vendor attributes. For example, enter the Product Version as 10.3.3, Product as Middleware Home, and Vendor as Oracle.
Click Next. Create Oracle Middleware Home Gold Image: Configure page appears. Click the Search icon next to the Middleware Home field and select an existing Middleware Home from which the gold image is to be created.
In the Working Directory field, specify the directory on the destination Host on which the files required for creating the gold image are temporarily stored. If this directory is not present, it will be created. When the gold image has been created, the contents of this directory will be deleted.
In the Host Credentials section, enter the host credentials of the machine on which the Middleware Home is located. Select one of the following options:
Preferred Credentials: The preferred credentials stored in the Management Repository are used. The Preferred Credentials option will be available only if it has already been defined in Cloud Control.
Named Credentials: The credentials stored in the Management Repository is used. To use the Named Credentials stored in the Management Repository, you must have already registered each of the preferred credential types with a unique name. Select the desired Named credential from the list available in Credential Name.
New Credentials: You can override the preferred credentials by specifying a new credential with a unique name and password. These credentials can be different for each host or the same for all the hosts.
Click Next.- In the Review page, you can review the information and click Save and Upload.
The Job Name is displayed at the top of the page. Navigate to the Job Activity page and check the job status. Once it has been completed, navigate to the Software Library page and confirm if all the components of the gold image have a Ready Status. You can also verify if the gold image has been successfully created by navigating to the Middleware Provisioning page. From the Enterprise menu, select Provisioning and Patching, then select Middleware Provisioning and check if the gold image is displayed there. You can now use this gold image for future cloning operations.
This section describes the procedures to clone a WebLogic Domain or a Middleware Home from an existing installation. It contains the following sections:
Figure 15-4 shows the sequence of operations involved in cloning a WebLogic Domain or a Middleware Home from an existing instalaltion.
This section describes the procedures used to clone a WebLog ic Domain from an existing installation. It covers the following:
Before running the Deployment Procedure, meet the following prerequisites:
The destination host machines on which the Middleware domains are to be cloned must be discovered targets in Cloud Control.
The Operating System Host user must have Read permissions on:
Middleware directory on the host machine on which the Administration Server is running.
Administration Server host domain directory.
Agent home directory.
The user must have Write permissions on:
Working Directory on the source host machine which Administration Server is running.
Working Directory on all destination hosts.
Middleware Home directory on all destination hosts.
Domain location on all destination hosts
The ports on the Administration Server, Managed Server, and Node Manager on the destination host must be free.
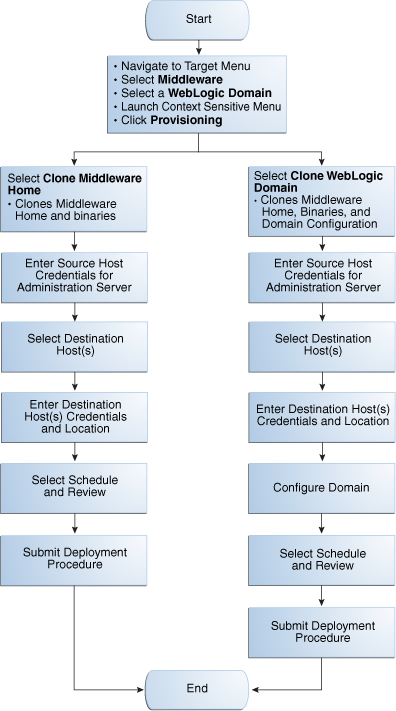
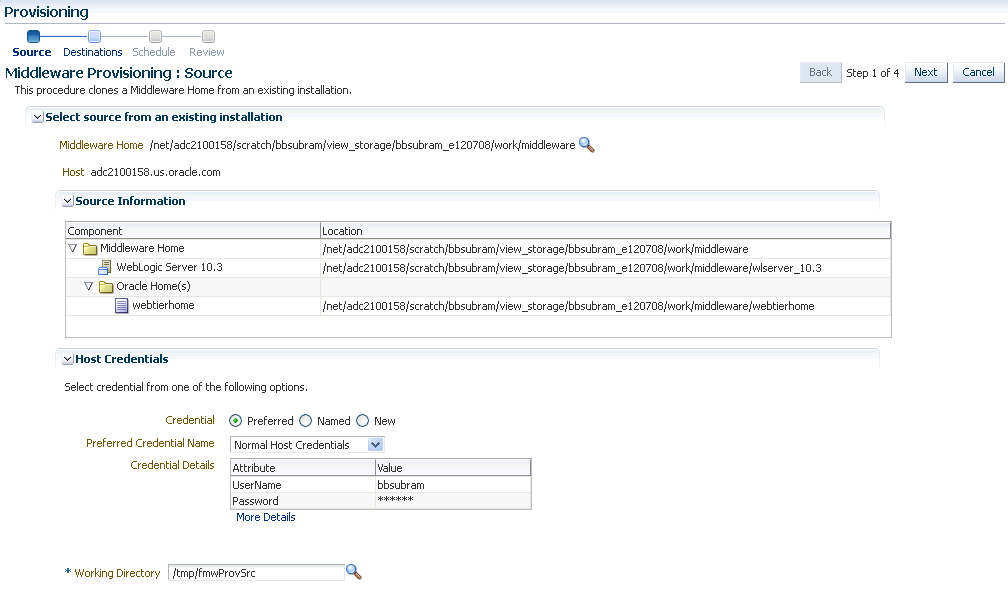
The Clone WebLogic Domain option launches a wizard that enables you to clone a WebLogic Domain from an existing reference domain that is already discovered with Cloud Control. It allows you to clone the Middleware Home and its binaries, and the domain configuration.
To clone a WebLogic Domain from an existing installation, follow these steps:
From the Targets menu, select Middleware.
A list of Middleware targets is displayed. Find the WebLogic Domain that you want to use as the source for the cloning operation. Right click on that WebLogic Domain to access the context sensitive menu and select the Provisioning menu option. From the menu, select Provisioning and Clone WebLogic Domain.
You can select:
Clone Middleware Home: Select this option if you want to clone only the software in the Middleware Home.
Clone WebLogic Domain: Select this option to clone a WebLogic Domain from an existing reference domain that is already discovered with Cloud Control. It allows you to clone the Middleware Home and its binaries, and the domain configuration.
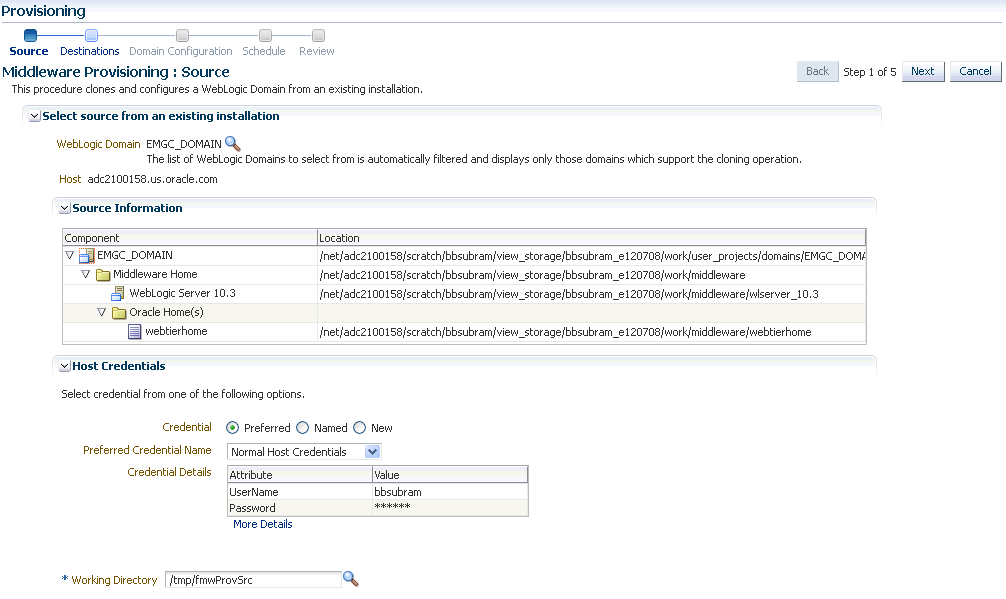
In the Select Source page, depending on your selection, the WebLogic Domain or the Middleware Home to be cloned is displayed.
In the Source Information section, the location of the WebLogic Domain, Middleware Home, WebLogic Server or the location of the Middleware Home is displayed.
In the Working Directory field, specify the directory on the destination Host on which the cloning related files are temporarily stored. The directory must have sufficient space to store the cloning related files. If this directory is not present, it will be created. When the cloning operation has been completed, the contents of this directory will be deleted.
Note:
The Working Directory must not be created under the Middleware Home or the WebLogic Domain Home directory.In the Host Credentials section, enter the host credentials of the machine on which the Administration Server is running. Select one of the following options:
Preferred Credentials: The preferred credentials stored in the Management Repository are used. The Preferred Credentials option will be available only if it has already been defined in Cloud Control.
Named Credentials: The credentials of a named profile stored in the Management Repository is used. To use the Named Credentials stored in the Management Repository, you must have already registered each of the preferred credential types with a unique name. Select the desired Named credential from the list available in Credential Name. If you have created all necessary named credentials, you can use them now. If they have not been created, you can create them using this deployment procedure.
New Credentials: You can override the preferred credentials by specifying a new credential with a unique name and password.
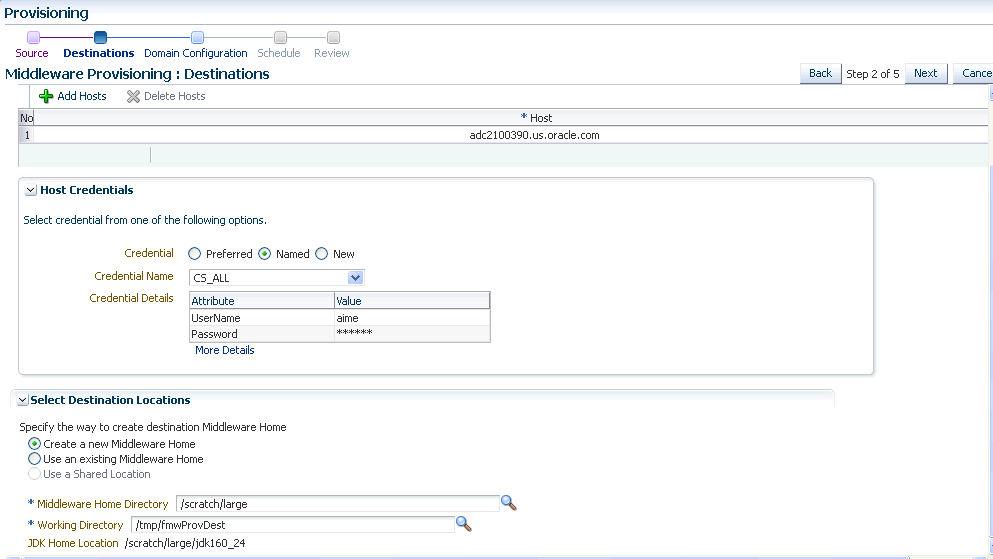
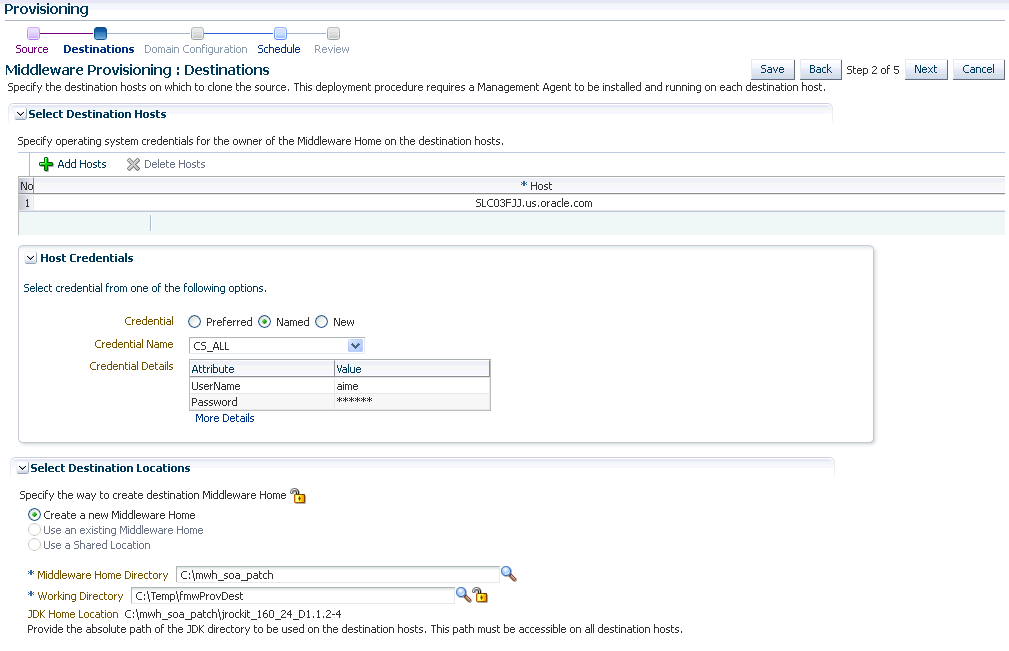
Click Next. In the Middleware Provisioning: Destinations page, specify the destination hosts on which the Middleware Home or WebLogic Domain is to be cloned.
In the Select Destinations section, click Add Hosts. Select a host from the list and specify the operating system credentials for the owner of the Middleware Home on the destination host. The Host Credentials can be Preferred, Named, or New credentials.
In the Select Destination Locations section, specify the location of the Middleware Home on the Host machine. You can select one of the following:
Create a New Middleware Home: Select this option to create a new Middleware Home on the destination host.
Use an Existing Middleware Home: Select this option to use the existing Middleware Home present on the destination host.
Use a Shared Location: If you have added more than one host, select this option to use a shared location for all the destination hosts. Specify an absolute path that is accessible by all targets here. If you select this option, the JDK Home Location associated with the Middleware Home and the Oracle Inventory location must also be shared.
In the Middleware Home Directory field, enter the full path to the directory in which the Middleware Home is to be created.
In the JDK Home Location field, enter the absolute path to the JDK directory to be used on the destination Host. You need to specify this path if a similar configuration is detected on the source machine.
In the Working Directory field, specify the directory on the destination Host on which the cloning related files are temporarily stored. This directory must have sufficient space to create the cloning related files. If this directory is not present, it will be created. When the cloning operation has been completed, the directory and its contents will be deleted.
Note:
The Working Directory must not be created under the Middleware Home or the WebLogic Domain Home directory.
If the source and destination machines are the same, the Working Directory for the source and destination must be different.
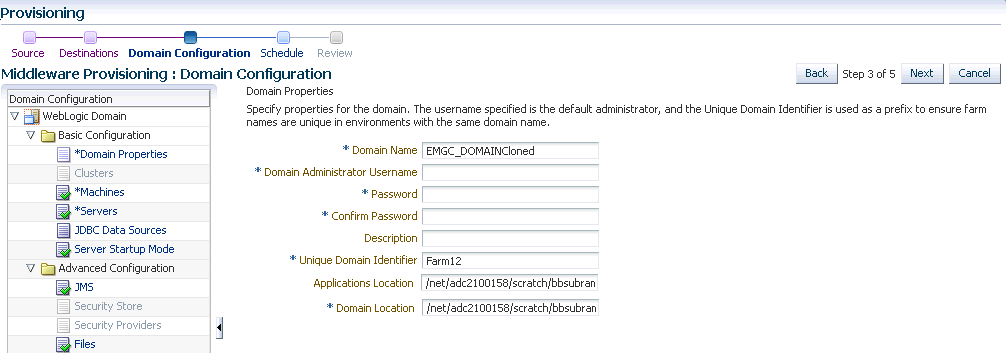
Click Next. If you selected the Cloning a WebLogic Domain option, the Middleware Provisioning: Domain Configuration page appears. This page contains a set of links to several pages where you can enter the properties that are most likely to be reconfigured like domain name, listen addresses for the administration server and managed servers, Node Manager/Machine configuration, and JDBC data sources. By default, the source domain configuration settings are used as default values for the destination domain. For example, if the source domain has one cluster containing 4 managed servers, the destination domain will also have one cluster with 4 servers but these default values can be changed. For more information on configuring the domain, see Oracle® Fusion Middleware Creating Domains Using the Configuration Wizard guide.
In the Domain Properties page, enter or modify the following details:
Domain Name: The name of the domain is displayed but can be modified. The generated components for the domain are stored under the specified Domain directory. For example, if you enter mydomain, your domain files are stored (by default) in MW_HOME\user_projects\domains\mydomain. The domain name must not start with a number. The domain name is also listed on the Windows Start menu. For example, if your domain name is mydomain, and the Domain directory is user_projects, you can access commands for the domain by selecting Oracle WebLogic > user_projects > mydomain from the Windows Start menu.
Domain Administrator Username: The default Administrator account for the domain. This account is used to boot and connect to the domain's Administration Server. The username must not contain commas, tabs, or any of these characters: < > # | & ? ( ) { }
Password: The password for the Administrator account. The password must be at least eight characters, and must contain at least one numeric character or at least one of the following characters:
! " # $ % & ' ( ) * + , - . / : ; < = > ? @ [ \ ] ^ _ ` { | } ~
Unique Domain Identifier: A farm is a collection of components managed by Cloud Control. It can contain an Oracle WebLogic Server domain, one Administration Server, one or more Managed Servers, and the Oracle Middleware components that are installed, configured, and running in the domain. The Unique Domain Identifier is used as a prefix to ensure that the farm names are unique in environments with the same domain name. It is used to name the farm target as a prefix in conjunction with the WebLogic domain name. For example, if the Unique Domain Identifier is farm and the domain name is base_domain then the farm name would be farm_base_domain.
Applications Location: The directory in which the applications will be deployed on the destination host. By default, this directory is created under the parent directory of the Middleware Home. For example: If the Middleware Home is located at /user/mwh, the application directory is created as /user/applications.
Domain Location: The location in which your domain directory will be stored. By default, this directory is created under the parent directory of the Middleware Home, but can be changed. For example: If the Middleware Home is located at /user/mwh, the application directory is created as /user/domains. The domain location can be anywhere on the destination host machine or network. On Windows, you must include the drive letter in this path.
In the Clusters page, you can modify the name of the cluster, enter the cluster address that identifies the Managed Servers in the cluster, and the messaging mode (multicast or unicast). If you selected Multicast as the Messaging Mode, enter the address and port number that will be dedicated for multicast communications on the cluster.
Note:
The destination domain can have the same number of clusters as the source domain. If the source domain has no clusters, you cannot add a cluster in the destination domain.In the Machines page, enter the configuration information for the machines in the domain. A Machine is a logical representation of the system that hosts one or more WebLogic Server instances. The Administration Server and Node Manager use the Machine definition to start remote servers. The machine configurations present in the source domain are listed here. You can modify the configuration details defined for each machine or click Add Rows to add one or more machine configurations. Enter the following details:
Machine Name: Enter a valid machine name or modify an existing name. The machine name is used to identify the machine within the WebLogic domain; it does not have to match the network name for the machine. The name must be unique among all component names within the domain.
Node Manager Listen Address: Enter the listen address used by Node Manager to listen for connection requests. By default, the IP addresses defined for the local system and localhost are shown in the drop-down list. The default value is the same as specified in the source domain.
Note:
If multiple machines are running on the same host, the Node Manager Home location must be different for each host.Node Manager Listen Port: Enter a valid value for the listen port used by Node Manager to listen for connection requests. The valid Node Manager listen port range is from 1 to 65535. The default value is 5556. The port number must be available on the destination machine.
Node Manager Home: Enter the directory in which the Node Manager is to be installed. For existing machine configurations, the Node Manager is installed under the parent directory of the Middleware Home directory by default, but this can be modified.
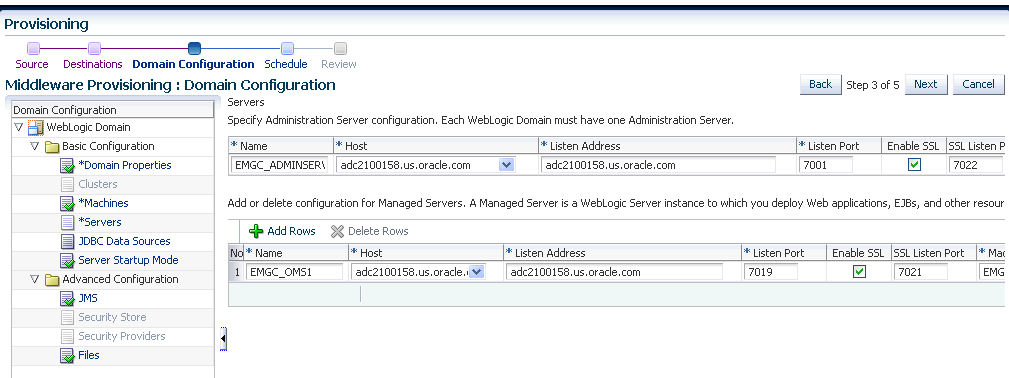
In the Servers page, enter the configuration information for the Adminstration Server and one or Managed servers.
Administration Server: Enter the following details for the Administration Server:
Name: Valid names are a string of characters (alphabetic and numeric).
Host: Select the host on which the Administration Server is to be installed.
Note:
The host:port combination for the Administration Server must be unique among all the registered domains. For example, if an Administration Server running onmyhost.example.com:7001 has been discovered in Cloud Control, this host name and port number combination cannot be used for a new Administration Server even if the status of the old Administration Server is Down or it has been removed.Listen Address: Enter the listen address to be used to connect to the Aministration Server.
Listen Port: Enter a valid value for the listen port to be used for regular, nonsecure requests (through protocols such as HTTP and T3). The valid listen port range is from 1 to 65535. The port number you enter here must be available on the destination machine.
SSL Listen Port: If you check the Enable SSL checkbox, enter the number of the SSL Listen Port for secure requests. You must ensure that the port numbers you specify for the Listen Port and SSL Listen Port are available. If you are using the SSL configuration, you must ensure that the security/identity stores are present in the file system under the same path as on the source and are configured with certificates generated for the destination hosts
Machine: Select the machine configuration that is to be associated with the Administration Server.
Managed Servers: You can add or delete the configuration for the Managed Servers. A Managed Server is a WebLogic Server instance to which you deploy Web applications, EJBs, and other resources. Enter the following details:
Name: Valid server names are a string of characters (alphabetic and numeric). The name must be unique in the domain.
Host: The host on which the managed server is running.
Listen Address: Enter the listen address to be used to connect to the Managed Server instance.
Listen Port: Enter a valid value for the listen port to be used for regular, nonsecure requests (through protocols such as HTTP and T3). The valid listen port range is from 1 to 65535. The port number you enter here must be available on the destination machine.
Note:
If a domain was registered on the host with a port number whose status is down, you need to select a different port or manually deregister the domain before launching the deployment procedure.Enable SSL: Select this check box to enable the SSL listen port. By default, SSL is disabled for all new servers.
SSL Listen Port: This field is enabled only if you selected the SSL enabled check box. Enter a valid value to be used for secure requests (through protocols such as HTTPS and T3S). The valid listen port range is from 1 to 65535. The port number you enter here must be available on the destination machine.
Machine: Select the machine configuration that is to be associated with the Managed Server.
Cluster: Select the cluster that is to be associated with the Managed Server.
In the JDBC Data Sources page, enter the configuration information for the data source. A JDBC data source contains a pool of database connections that are created when the data source instance is created—when it is deployed or targeted, or at server startup. Applications look up a data source on the JNDI tree, and then request a connection. When the applications no longer need the connections, they return the connections to the connection pool in the data source.
By default, the cloned domain is configured with the same JDBC data sources as the source domain but it can be changed here. In the Driver field, select the correct driver from the drop down list. Based on the driver you have selected, enter the URL in the correct format. Select the target from the drop down list and specify the database user name and password.
In the Server Startup Mode page, you can optionally start up the Managed Servers and / or the Administration Server.
In the JMS page, you can add new JMS persistent stores and JMS servers.A JMS file store is a disk-based file in which persistent messages can be saved. You can modify the JMS file stores configured in your domain. If these are not configured in the source domain, they cannot be configured in the destination domain.
In the Security Store and Security Providers pages, you can configure an external database as a data store for various security providers.
In the Files page, specify any external files that need to be cloned from the source domain. All the external files must reside in the same directory on the Administration Server host and will be cloned to the same directory on the destination host.
In the Schedule page, specify a Deployment Instance name. If you want to run the procedure immediately, then retain the default selection, that is, Immediately. If you want to run the procedure later, then select Later and provide time zone, start date, and start time details. You can set the notification preferences according to deployment procedure status. If you want to run only prerequisites, you can select Pause the procedure after the necessary prerequisite checks have been completed to pause the procedure execution after all prerequisite checks are performed. Click Next.
On the Review page, review the details you have provided for the Deployment Procedure. If you are satisfied with the details, then click Submit to run the Deployment Procedure according to the schedule set. If you want to modify the details, click the Edit link in the section to be modified or click Back repeatedly to reach the page where you want to make the changes.
In the Procedure Activity page, view the status of the execution of the job and steps in the deployment procedure. Click the Status link for each step to view the details of the execution of each step. You can click Debug to set the logging level to Debug and click Stop to stop the procedure execution.
This section covers the procedures involved in cloning a Middleware Home from an existing installation. It covers the following:
Before running this deployment procedure, you must meet the following prerequisites:
The hosts on which the Middleware domains are to be cloned must be discovered targets in Cloud Control.
The user must have Read permissions on the Middleware Home directory on the host machine on which the Administration Server is running.
The user must have Write permissions on:
Working Directory on the host machine which Administration Server is running.
Working Directory on all destination hosts.
Middleware directory on all destination hosts.
This procedure launches a wizard that enables you to clone an Oracle Middleware Home that is already discovered or registered with Cloud Control. To clone an Oracle Middleware Home, follow these steps:
From the Targets menu, select Middleware.
A list of Middleware targets is displayed. Right click on WebLogic Domain target in the list and from the context sensitive menu, select Provisioning and then select Clone Middleware Home.
The Middleware Provisioning: Source page is displayed.
In the Source Information section, the Middleware Home to be cloned is displayed.
Follow Steps 6 to 9 as listed in Cloning a WebLogic Domain from an Existing Installation.
In the Schedule page, specify a Deployment Instance name. If you want to run the procedure immediately, then retain the default selection, that is, One Time (Immediately). If you want to run the procedure later, then select One Time (Later) and provide time zone, start date, and start time details. You can set the notification preferences according to deployment procedure status. If you want to run only prerequisites, you can select Pause the procedure to allow me to analyze results after performing prerequisite checks to pause the procedure execution after all prerequisite checks are performed. Click Next.
On the Review page, review the details you have provided for the Deployment Procedure. If you are satisfied with the details, then click Submit to run the Deployment Procedure according to the schedule set. If you want to modify the details, click the Edit link in the section to be modified or click Back repeatedly to reach the page where you want to make the changes.
In the Procedure Activity page, view the status of the execution of the job and steps in the deployment procedure. Click the Status link for each step to view the details of the execution of each step. You can click Debug to set the logging level to Debug and click Stop to stop the procedure execution.
This section describes the procedures to clone a WebLogic Domain from a provisioning profile present in the Software Library or a Middleware Home from a Middleware Home Gold Image. It contains the following sections:
Figure 15-10 and Figure 15-11 show the sequence of operations involved in cloning a WebLogic Domain or Middleware Home from a profile or from a Software Library component.
This section describes the procedures used to clone a WebLog ic Domain from a WebLogic Domain Provisioning Profile.
It covers the following:
Before running this deployment procedure, you must meet the following prerequisites:
The user must have Write permissions on:
The Working Directory on all destination hosts.
Middleware Home on all destination hosts.
The ports on the Administration Server, Managed Server, and Node Manager must be free.
A WebLogic Domain Provisioning Profile must be present in the Software Library. For details on creating this profile, see Creating a WebLogic Domain Provisioning Profile.
You can clone a WebLogic Domain from a profile present in the Software Library. To clone a WebLogic Domain from a profile, follow these steps:
From the Enterprise menu, select Provisioning and Patching, then select Middleware Provisioning.
Select a profile from the Profiles section, and click Provision. You can also select the Middleware Provisioning deployment procedure and click Launch.
In the Source Information section, the selected component and its location is displayed. Click Next.
In the Middleware Provisioning: Destinations page, specify the destination hosts on which the WebLogic Domain is to be cloned.
Click Add Hosts and select a host from the list. Specify the credentials for the destination host. The credentials can be:
Preferred Credentials: The preferred credentials stored in the Management Repository are used. The Preferred Credentials option will be available only if it has already been defined in Cloud Control.
Named Credentials: The credentials stored in the Management Repository is used. To use the Named Credentials stored in the Management Repository, you must have already registered each of the preferred credential types with a unique name. Select the desired Named credential from the list available in Credential Name. If you have created all necessary named credentials, you can use them now. If they have not been created, you can create them using this deployment procedure.
New Credentials: You can override the preferred credentials by specifying a new credential with a unique name and password. These credentials can be different for each host or the same for all the hosts.
In the Select Destination Locations section, specify the location of the Middleware Home on the Host machine. The Create a New Middleware Home option is selected by default.
In the Middleware Home Directory field, enter the full path to the directory in which the Middleware Home is to be created.
In the JDK Home Location field, enter the absolute path to the JDK directory to be used on the destination Host. This field can be edited only if the JDK Home in the source domain is in an external location. If the JDK Home in the source domain is internal and installed in the Middleware Home, this field cannot be edited.
Note:
If there are several destination hosts, the location of the Middleware Home, Working Directory, and JDK Home Location is the same across all the hosts.In the Working Directory field, specify the directory on the destination Host on which the cloning related files are temporarily stored. This directory must have sufficient space to store the files. If this directory is not present, it will be created. When the cloning operation has been completed, the directory and its contents will be deleted.
Click Next. Follow Steps 13 to 26 as listed in the Cloning a WebLogic Domain from an Existing Installation section.
Note:
The Node Manager Listen Address must be unique and must be a valid host name or IP address.This section describes the procedures used to clone a Middleware Home from an Oracle Middleware Home Gold Image. It covers the following:
Before running this deployment procedure, you must meet the following prerequisites:
The user must have Write permissions on:
The Working Directory on all destination hosts.
Middleware Home on all destination hosts.
An Oracle Middleware Home Gold Image must be present in the Software Library. For details on creating this gold image, see Creating an Oracle Middleware Home Gold Image.
You can clone a Middleware Home from a gold image present in the Software Library. This gold image must have been created earlier by pointing to an existing Middleware Home. To clone a Middleware Home from a gold image, follow these steps:
From the Enterprise menu, select Provisioning and Patching, then select Middleware Provisioning.
From the Middleware Provisioning Deployment Procedures section, select the Provision Middleware procedure from the list and click Launch.
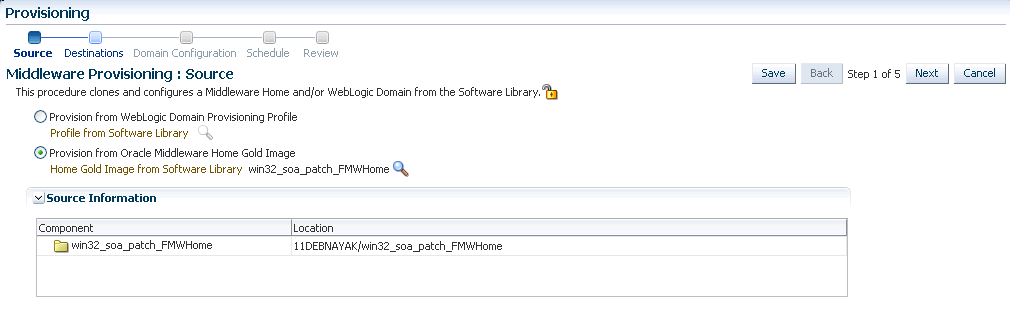
In the Middleware Provisioning: Source page, select the Provision from Oracle Middleware Home Gold Image option. Click the Search icon next to the Home Gold Image from Software Library field and select a gold image from the list.
In the Source Information section, the selected component and its location is displayed. Click Next.
In the Middleware Provisioning: Destinations page, specify the destination hosts on which the Middleware Home is to be cloned.
Click Add Hosts and select a host from the list. Specify the credentials for the destination host. The credentials can be:
Preferred Credentials: The preferred credentials stored in the Management Repository are used. The Preferred Credentials option will be available only if it has already been defined in Cloud Control.
Named Credentials: The credentials of a named profile stored in the Management Repository is used. To use the Named Credentials stored in the Management Repository, you must have already registered each of the preferred credential types with a unique name. Select the desired Named credential from the list available in Credential Name. If you have created all necessary named credentials, you can use them now. If they have not been created, you can create them using this deployment procedure.
New Credentials: You can override the preferred credentials by specifying a new credential with a unique name and password. These credentials can be different for each host or the same for all the hosts.
In the Select Destination Locations section, specify the location of the Middleware Home on the Host machine. The Create a New Middleware Home option is selected by default.
In the Middleware Home Directory field, enter the full path to the directory in which the Middleware Home is to be created.
In the JDK Home Location field, enter the absolute path to the JDK directory to be used on the destination Host. This field can be edited only if the JDK Home in the source domain is in an external location. If the JDK Home in the source domain is internal and installed in the Middleware Home, this field cannot be edited.
Note:
If there are several destination hosts, the location of the Middleware Home, Working Directory, and JDK Home Location is the same across all the hosts.In the Working Directory field, specify the directory on the destination Host on which the cloning related files are temporarily stored. This directory must have sufficient space to store the files. If this directory is not present, it will be created. When the cloning operation has been completed, the directory and its contents will be deleted. Click Next.
In the Schedule page, specify a Deployment Instance name. If you want to run the procedure immediately, then retain the default selection, that is, One Time (Immediately). If you want to run the procedure later, then select One Time (Later) and provide time zone, start date, and start time details. You can set the notification preferences according to deployment procedure status. If you want to run only prerequisites, you can select Pause the procedure after the necessary prerequisite checks have been completed to pause the procedure execution after all prerequisite checks are performed. Click Next.
On the Review page, review the details you have provided for the Deployment Procedure. If you are satisfied with the details, then click Submit to run the Deployment Procedure according to the schedule set. If you want to modify the details, click the Edit link in the section to be modified or click Back repeatedly to reach the page where you want to make the changes.
In the Procedure Activity page, view the status of the execution of the job and steps in the deployment procedure. Click the Status link for each step to view the details of the execution of each step. You can click Debug to set the logging level to Debug and click Stop to stop the procedure execution.
This section describes the manual configuration steps that need to be performed after cloning or scaling out a WebLogic Domain.
After the deployment procedure has been successfully completed, you must set the STARTSCRIPTENABLED=TRUE in the nodemanager.properties file.
If this property is not set, you may not be able to start the Administration Server from the Console. This is required for WebLogic domains on which additional Oracle Fusion Middleware components (e.g. SOA Suite) have been deployed.
This section describes the procedure to customize the deployment procedure for specific requirements. An example is shown below:
From the Enterprise menu, select Provisioning and Patching, then select Software Library.
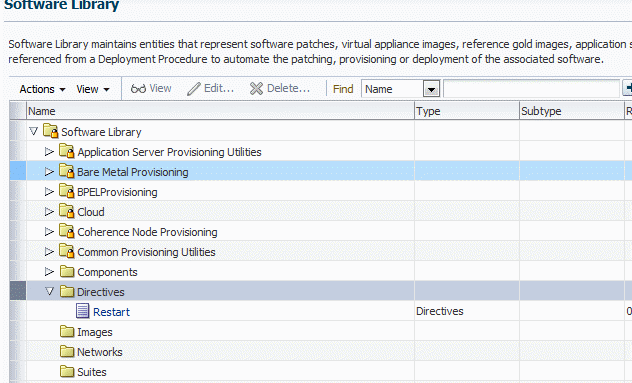
Select the Directives folder.
From the Actions menu, select Create Entity, then select Directives.
In the Create Directives: Describe page, enter a name for the directive step and click Next. The Create Directives: Configure page appears.
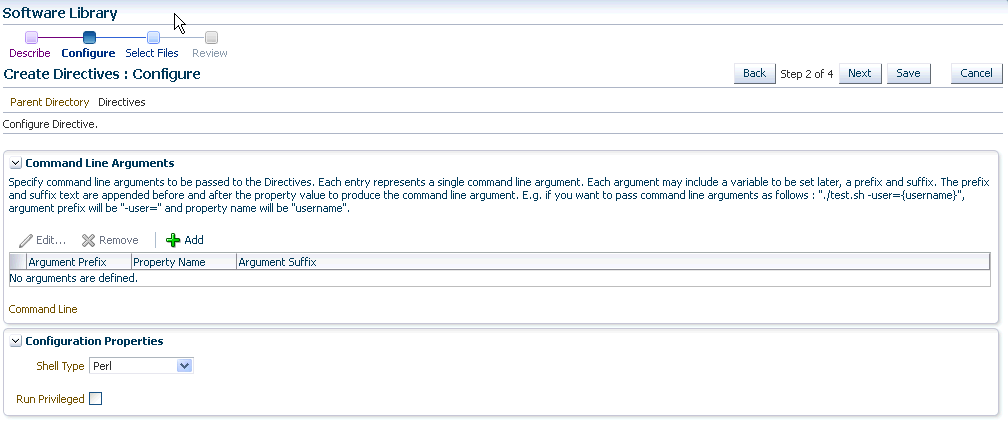
Click Add to add one or more command line arguments. Each argument may include a variable to be set later, a prefix and suffix.
Select a script type and click Next to continue.The Create Directives: Select Files page appears:
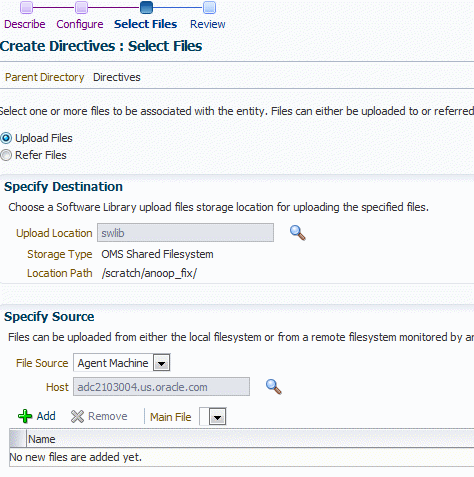
Specify a Destination, which is typically a location the Software Library and specify the Source file that is to be uploaded, either from Local Machine or from a remote file system monitored by an Enterprise Manager Agent.
Click Add. If you are adding from a local machine, in the Add File window, click Browse and select a file less than 25 MB in size, enter a name and click OK.
If you are adding from a remote location, click Add. In the Remote File Browser, specify the login credentials, select the files, click Add and OK when finished.
Click Save. You will return to the Software Library page where you can see that a new step has been added.
From the Enterprise menu, select Provisioning and Patching, then select Procedure Library.
In the selection list, you can select how the deployment procedure is to be customized. Select Create Like, then select the deployment procedure that is to be used and click Go.
Enter a name for the deployment procedure. Click the Procedure Variables tab and click Add Row to add one ore more procedure variables.
Click the Procedure Steps tab. You can edit the deployment procedure by selecting an action (such as Enable, Disable, Delete, and so on) to be performed. For example, to insert a custom step, select the step before it is to be inserted, and click Insert.
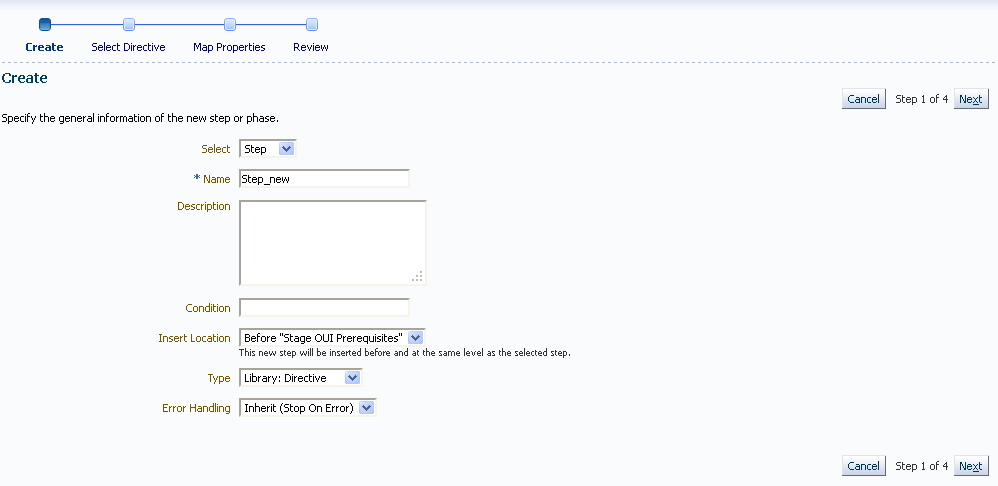
Specify the general information about the new step. Enter a name for the step and the Insert location.
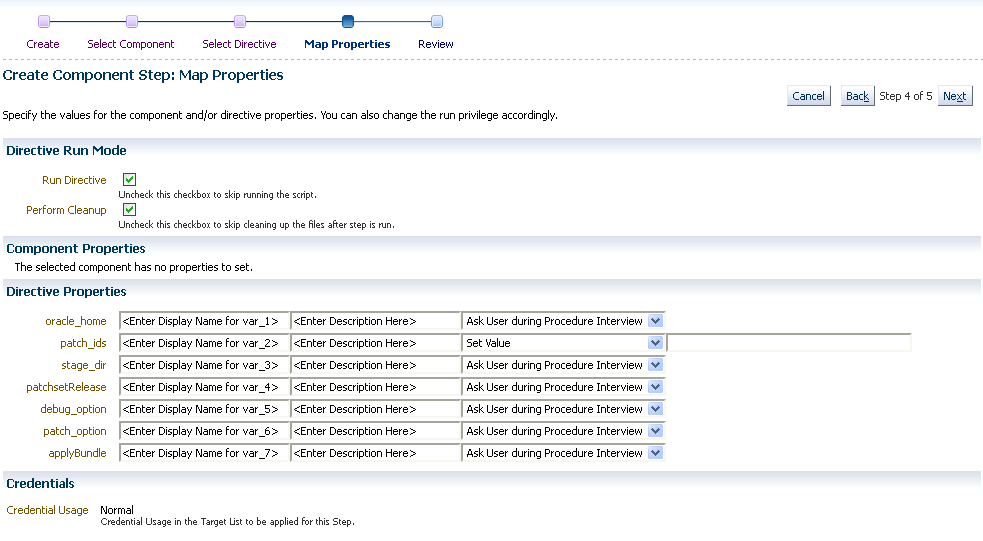
Search for the new step created earlier, select it, and click Next. The Create Component Step: Map Properties page appears.
You can decide the way you want to map the argument in your script. You can select:
Set Value (set value for the variable now)
Choose Variable (bind it to existing data in the deployment procedure)
Ask User during Procedure Interview (user enters value when the deployment procedure is launched)
For example, you can choose to set the value for var_1 at run-time and value of var_2 now, you can specify the directive properties as required.
Click Next. Review the information and click Finish. You will return to the Procedure Steps page where you can see the deployment procedure has now been added. Click Save and Close to return to the Procedure Library page.
From the Enterprise menu, select Provisioning and Patching, then select Middleware Provisioning.
Select the newly created deployment procedure and click Launch.
Follow the same steps as the Middleware Provisioning. If a custom variable needs to be set at run time, specify the appropriate value and click Next.
Submit the deployment procedure with the newly created step.
Follow these steps to create an operating system component:
From the Enterprise menu, select Provisioning and Patching, then select Software Library.
From the Software Library Home, from the Actions menu, select Create Folder.
In the Create Folder popup, specify a Name and Description for the folder and select the folder location.
From the Actions menu, select Create Entity and then Bare Metal Provisioning Components.
In the Create Entity: Bare Metal Provisioning Components dialog box, select Oracle Virtual Server Component and click Continue.
On the Describe page, enter the Name, Description, and Other Attributes that describe the entity.
Note: The component name must be unique to the parent folder that it resides in. Sometime even when you enter a unique name, it may report a conflict, this is because there could be an entity with the same name in the folder that is not visible to you, as you do not have view privilege on it.
Click +Add to attach files that describe the entity better like readme, collateral, licensing, and so on. Ensure that the file size is less than 2 MB.
In the Notes field, include information related to the entity like changes being made to the entity or modification history that you want to track.
In the Basic Operating System page, select a Time Zone and specify the Root Password and the OVM Agent Password.
In the Operating System Users List, add the users for the operating system by specifying the User Name, Password, Primary Group, and Additional Groups. Specify if you want to Enable Sudo Access for the user.
Click Next.
In the Advanced Configuration page, specify the Dom0 Configuration, Boot Configurations, and Additional OS Details as explained in the tables.
Click Next.
In the Review page, verify the information and click Finish.
The oracle virtual server component will be saved in the Software Library with the status Ready.
| Element | Description |
|---|---|
|
Dom0 Memory |
|
|
Advanced Configuration and Power Interface |
Table 15-3 Additional OS Details
| Element | Description |
|---|---|
|
Mount Point Settings |
Specify entries for the /etc/fstab file. You can specify mount points on the newly provisioned Linux machine. By default, mount point settings from the reference Linux machine are inherited. |
|
NIS Settings |
Specify entries for the /etc/yp.conf file. You can specify NIS settings for the newly provisioned Linux machine. By default, NIS settings from the reference Linux machine are inherited. |
|
NTP Settings |
Specify entries for the /etc/ntp.conf file. You can specify NTP settings for the newly provisioned Linux machine. By default, NTP settings from the reference Linux machine are inherited. |
|
Kernel Parameter Settings |
Specify scripts for Kernel Parameters. |
|
Initab Settings |
Specify settings for/etc/inittab file. All processes are started as part init operation in boot process. Init operation decides the processes that will start on booting of a machine or when runlevel changes. |
|
Firewall Settings |
Specify firewall settings for the Linux target. Firewall settings are disabled by default and can be configured. Make sure that the port used by Management Agent is open for its communication with the Management Service. By default, Management Agent uses port 3872 or a port number in the range 1830-1849, unless configured to use some other port. |
Table 15-4 Boot Configuration and Configuration Scripts
| Element | Description |
|---|---|
|
Post Install Script |
Specify any set of commands that need to be executed on the newly provisioned machine. These commands will be appended to the post section of the kickstart file. |
|
First Boot Script |
Specify any set of commands that need to be executed on the newly provisioned machine when it starts up for the first time. |
|
Copyright © 2012, Oracle and/or its affiliates. All rights reserved. Legal Notices |
|