| Oracle® Database 2 Day DBA 11g Release 1 (11.1) Part Number B28301-03 |
|
|
View PDF |
| Oracle® Database 2 Day DBA 11g Release 1 (11.1) Part Number B28301-03 |
|
|
View PDF |
This section provides background information about managing memory for the Oracle instance, and includes instructions about how to adjust the memory allocation for the Oracle instance. It contains the following topics:
See Also:
Memory management involves maintaining optimal sizes for the Oracle instance memory structures as demands on the database change. The memory that must be managed is the System Global Area (SGA) memory and the instance Program Global Area (instance PGA) memory. The instance PGA memory is the collection of memory allocations for all individual PGAs.
Beginning with Release 11g, Oracle Database can manage the SGA memory and instance PGA memory completely automatically. You designate only the total memory size to be used by the instance, and Oracle Database dynamically exchanges memory between the SGA and the instance PGA as needed to meet processing demands. This capability is referred to as automatic memory management. In this memory management mode, the database also dynamically tunes the sizes of the individual SGA components and the sizes of the individual PGAs.
If you want to exercise more direct control over the sizes of the SGA and instance PGA, you can use the Memory Advisors page of Database Control to disable automatic memory management and enable automatic shared memory management. When you do this, you also implicitly enable automatic PGA memory management. With automatic shared memory management, you set target and maximum sizes for the SGA. The database then tunes the total size of the SGA to your designated target, and dynamically tunes the sizes of all SGA components. With automatic PGA memory management, you set a target size for the instance PGA. The database then tunes the size of the instance PGA to your target, and dynamically tunes the sizes of individual PGAs.
If you want complete control of individual SGA component sizes, you can use the Memory Advisors page of Database Control to disable both automatic memory management and automatic shared memory management. This effectively enables manual shared memory management. In this mode, you set the sizes of several individual SGA components, thereby determining the overall SGA size. You then manually tune these individual SGA components on an ongoing basis. This mode is intended for experienced DBAs only. Note that in this mode, automatic PGA memory management remains enabled.
Note:
Although it is possible to disable automatic PGA memory management, it is not recommended, and cannot be done using the Memory Advisors page of Database Control.Table 5-3 summarizes the various memory management modes that you can set using the Memory Advisors page of Database Control.
Table 5-3 Oracle Database Memory Management Modes
| Memory Management Mode | You Set | Oracle Database Automatically Tunes |
|---|---|---|
|
Automatic memory management |
|
|
|
Automatic shared memory management and automatic PGA memory management (Automatic memory management disabled) |
|
|
|
Manual shared memory management and automatic PGA memory management (Automatic memory management and automatic shared memory management disabled) |
|
|
Note:
Automatic Memory Management is not available on all platforms. See Oracle Database Administrator's Guide for more information about supported platforms.If you choose the basic installation option when you install the database, automatic memory management is enabled. If you choose advanced installation, DBCA enables you to select from the three memory management modes. Oracle recommends that you enable automatic memory management.
Whichever memory management mode you choose, you may have occasion to adjust memory settings as demands on the database or on its host computer change. Reasons why you adjust memory settings include the following:
You receive a memory-related alert or error message.
You receive a memory-related recommendation from Automatic Database Diagnostic Monitor (ADDM).
You want to change the amount of memory allocated to accommodate future growth in memory demand.
You can use a memory advisor to help you adjust memory sizes. See "Modifying Memory Settings – Automatic Shared Memory Management" for an example of using a memory advisor.
See Also:
"Modifying Memory Settings – Automatic PGA Memory Management"
"Memory" for information about setting memory parameters during installation
If you did not enable automatic memory management when you installed and configured your database, Oracle recommends that you do so after installation, unless you are an experienced DBA with specific reasons to manually tune memory sizes. With automatic memory management, the Oracle instance dynamically tunes all memory components to optimize performance as the workload changes.
To enable automatic memory management:
Go to the Database Home page, logging in as user SYS.
See "Accessing the Database Home Page".
Note:
You must log in as userSYS to change the maximum memory size, which is a static initialization parameter.At the top of the page, click Server to view the Server subpage.
In the Database Configuration section, click Memory Advisors.
The Memory Advisors page appears with the SGA subtab displayed by default.
If the Maximum SGA Size field already contains a positive number that is greater than or equal to the desired total amount of memory to allocate to the database, skip to Step 13.
In the Maximum SGA Size (MB) field, enter the maximum permissible size for database memory.
Use the sum of the current sizes of the SGA and instance PGA as a guideline, and optionally add some room for growth.
Click Apply.
A confirmation page appears, indicating that you must restart the database.
Click Yes.
The Restart Database: Specify Host and Target Database Credentials page appears.
Enter host credentials and database credentials.
Supply host credentials for any operating system user that has execute permission on SQL*Plus. Supply database credentials for a database user with the SYSDBA privilege (such as the user SYS).
Click OK.
The Restart Database: Confirmation page appears.
Click Yes to proceed with database restart.
Wait a few minutes, and then click Refresh.
The Database Home page appears.
Return to the Memory Advisors page.
Next to Automatic Memory Management Disabled, click Enable.
The Enable Automatic Memory Management page appears.
In the field titled Total Memory Size for Automatic Memory Management, enter the desired amount of memory to allocate to the database, and then click OK.
A confirmation message appears.
See Also:
Modifying memory settings for automatic memory management involves using the Memory Advisors page of Database Control to change the total memory size setting. The procedure for changing this setting differs depending on whether or not your desired new setting exceeds the current setting for maximum memory size. If the new setting exceeds the maximum memory size setting, you must first increase the maximum memory size accordingly.
To modify total memory size (new value does not exceed maximum memory size):
Go to the Database Home page.
At the top of the page, click Server to view the Server subpage.
In the Database Configuration section, click Memory Advisors.
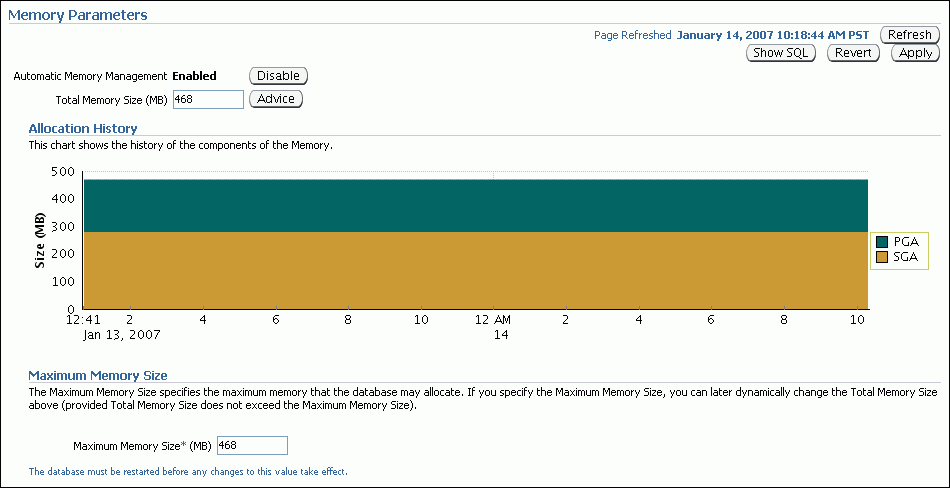
The Memory Parameters page appears.

Do one of the following:
In the Total Memory Size field, enter a new value that is less than or equal to the value in the current Maximum Memory Size field.
To use the Memory Advisor to help you choose a new size, click Advice.
The Memory Size Advice page appears.
Click a point on the curve to change the total memory size. The new size is displayed below the graph. Continue clicking the curve until the desired value is displayed, and then click OK.
On the Memory Advisors page, click Apply.
A confirmation message appears.
To modify total memory size (new value exceeds maximum memory size):
Go to the Database Home page, logging in as user SYS.
See "Accessing the Database Home Page".
Note:
You must log in as userSYS to change the maximum memory size, which is a static initialization parameter.At the top of the page, click Server to view the Server subpage.
In the Database Configuration section, click Memory Advisors.
The Memory Advisors page appears.
In the Maximum Memory Size (MB) field, enter a new value for the maximum total memory to allocate to the database.
This value must be greater than or equal to the desired new value for total memory size.
Click Apply.
A confirmation page appears, indicating that you must restart the database.
Click Yes.
The Restart Database page appears.
Enter host credentials and database credentials.
Supply host credentials for any user that has execute permission on SQL*Plus. Supply database credentials for a database user with the SYSDBA privilege (such as user SYS).
Click OK.
The Restart Database: Confirmation page appears.
Click Yes to proceed with database restart.
Wait a few minutes, and then click Refresh.
The Database Home page appears.
Return to the Memory Advisors page.
Do one of the following:
In the Total Memory Size field, enter a new value that is less than or equal to the value in the current Maximum Memory Size field.
To use the Memory Advisor to help you choose a new size, click Advice.
The Memory Size Advice page appears.
Click a point on the curve to change the total memory size. The new size is displayed below the graph. Continue clicking the curve until the desired value is displayed, and then click OK.
On the Memory Advisors page, click Apply.
A confirmation message appears.
See Also:
Oracle Database Performance Tuning Guide for more information about memory parameters and their tuning
Modifying memory settings for automatic shared memory management involves using the Memory Advisors page of Database Control to change the total SGA size. This section assumes that automatic memory management is disabled, that automatic shared memory management is enabled, and that the desired new value for the total SGA size does not exceed the current value for maximum SGA size.
Note:
If you want a new total SGA size that exceeds the current value for maximum SGA size, you must first log in as userSYS, change the maximum SGA size, and restart the database. A similar procedure is described in "To modify total memory size (new value exceeds maximum memory size):".To modify the total SGA memory size:
Go to the Database Home page.
At the top of the page, click Server to view the Server subpage.
In the Database Configuration section, click Memory Advisors.
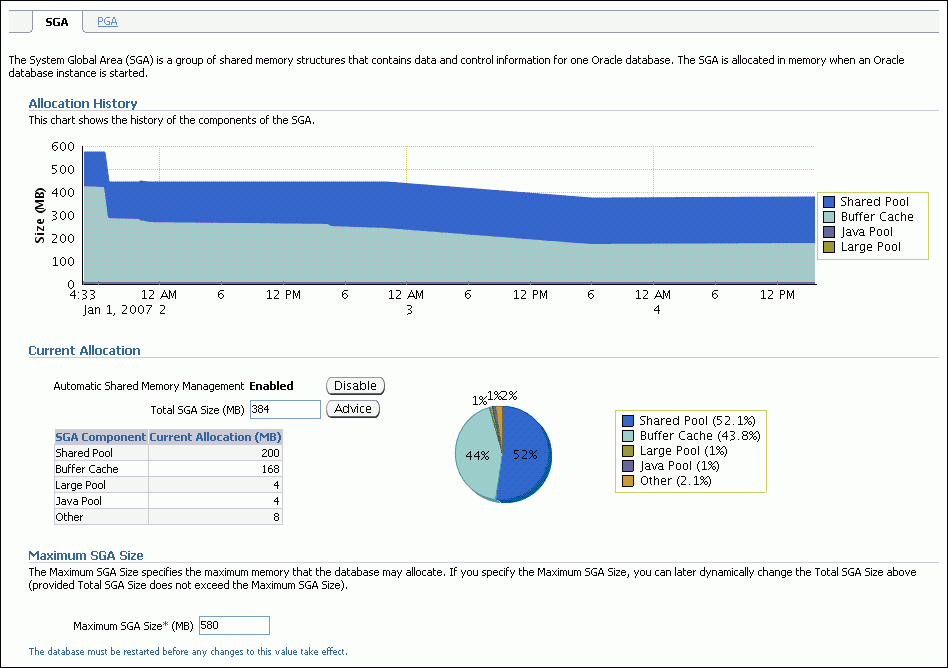
The Memory Advisors page appears, with the SGA subpage shown.

In the Current Allocation section, do one of the following:
In the Total SGA Size (MB) field, enter a new total size for the SGA.
To use the SGA Advisor to help you choose a new SGA size, click Advice.
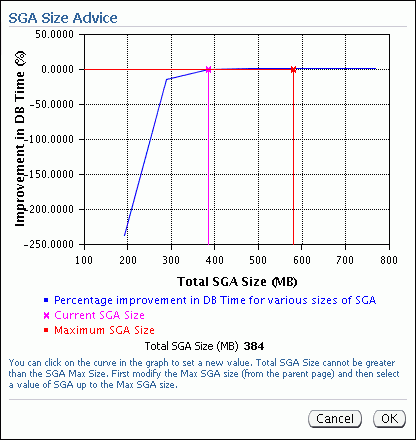
The SGA Size Advice window opens.

Click a point on the curve to change the total SGA size. The new SGA size is displayed below the graph. Continue clicking the curve until the desired value is displayed, and then click OK.
This example graph shows that at the current time, increasing the total SGA size is not expected to provide any gain in performance.
On the Memory Advisors page, click Apply.
A confirmation message appears.
See Also:
Oracle Database Performance Tuning Guide for more information about memory parameters and their tuning
Modifying memory settings for automatic PGA memory management involves using the Memory Advisors page of Database Control to modify the instance PGA size. This section assumes that automatic memory management is disabled, and that automatic PGA memory management is enabled.
Note:
When you disable automatic memory management, automatic PGA memory management is enabled by default.To modify the instance PGA size:
Go to the Database Home page.
At the top of the page, click Server to view the Server subpage.
In the Database Configuration section, click Memory Advisors.
The Memory Advisors page appears, with the SGA subpage shown.
Click PGA to view the PGA subpage.

Do one of the following:
In the Aggregate PGA Target field, enter a new size for the instance PGA.
To use the PGA Advisor to help you choose a new instance PGA size, click Advice.
The PGA Aggregate Target Advice window appears. Click a point on the curve to change the instance PGA size, and then click OK.
See Oracle Database Performance Tuning Guide for information about sizing the instance PGA.
Click Apply.
A confirmation message appears.
See Also:
Oracle Database Performance Tuning Guide for more information about memory parameters and their tuning