
Seafile is an advanced Open Source collaborative cloud storage application written in Python with file sharing and syncing support, team collaboration and privacy protection using client side encryption. It’s build as a multi-platform file syncing with clients that runs on all major platforms (Linux, Raspberry Pi, Windows, Mac, iPhone and Android) and can be easily integrated with local services such as LDAP and WebDAV or can be deployed using advanced network services and databases like MySQL, SQLite, PostgreSQL, Memcached, Nginx or Apache Web Server.

Install Seafile in Linux
This tutorial will guide you on a step by step Seafile Server installation on RHEL/CentOS/Scientific Linux 7.x/6.x deployed with MySQL database, with start-up init scripts for running the server on default Seafile port (8000/TCP) and default HTTP transaction port (80/TCP), create necessary Firewall rules to open required ports.
Requirements
- Minimal CentOS 6.5 installation with static IP address.
- MySQL/MariaDB database
- Python 2.6.5+ or 2.7
- Python-setuptools
- Python-simplejson
- Python-imaging
- Python-mysqldb
This installation procedure tested on CentOS 6.4 64-bit system, but can also be used on other Linux distributions with the specification that init start-up scripts differ from one distribution to another.
Step 1: Install Python Modules
1. First do a system Update, then install all required Python modules using the following commands.
# yum upgrade
# yum install python-imaging MySQL-python python-simplejson python-setuptools
2. If you use a Debian or Ubuntu server install all Python modules with the next commands.
$ sudo apt-get update
$ sudo apt-get install python2.7 python-setuptools python-simplejson python-imaging python-mysqldb
Step 2: Install Seafile Server
3. After all Python modules are installed create a new system user with a strong password that will be used to host Seafile server configuration and all data on its home directory, then switch to newly user account created.
# adduser seafile
# passwd seafile
# su - seafile
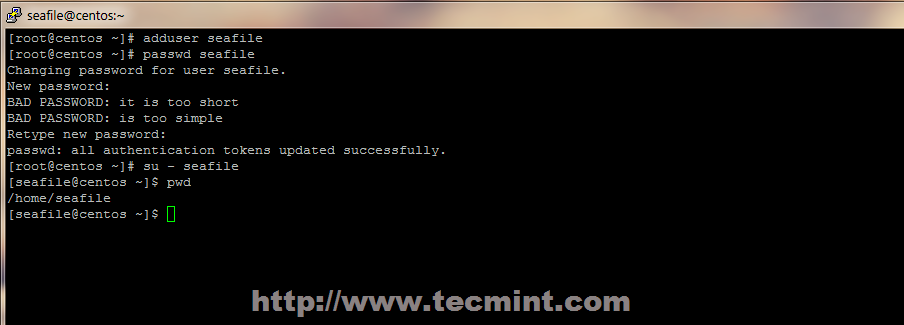
Create Seafile User
4. Then login to MySQL database and create three databases, one for every Seafile Server components: ccnet server, seafile server and seahub with a single user for all databases.
$ mysql -u root -p

mysql> create database `ccnet-db`;
mysql> create database `seafile-db`;
mysql> create database `seahub-db`;
mysql> create user 'seafile'@'localhost' identified by 'password';
mysql> GRANT ALL PRIVILEGES ON `ccnet-db`.* to `seafile`@`localhost`;
mysql> GRANT ALL PRIVILEGES ON `seafile-db`.* to `seafile`@`localhost`;
mysql> GRANT ALL PRIVILEGES ON `seahub-db`.* to `seafile`@`localhost`;
mysql> FLUSH PRIVILEGES;
mysql> exit;
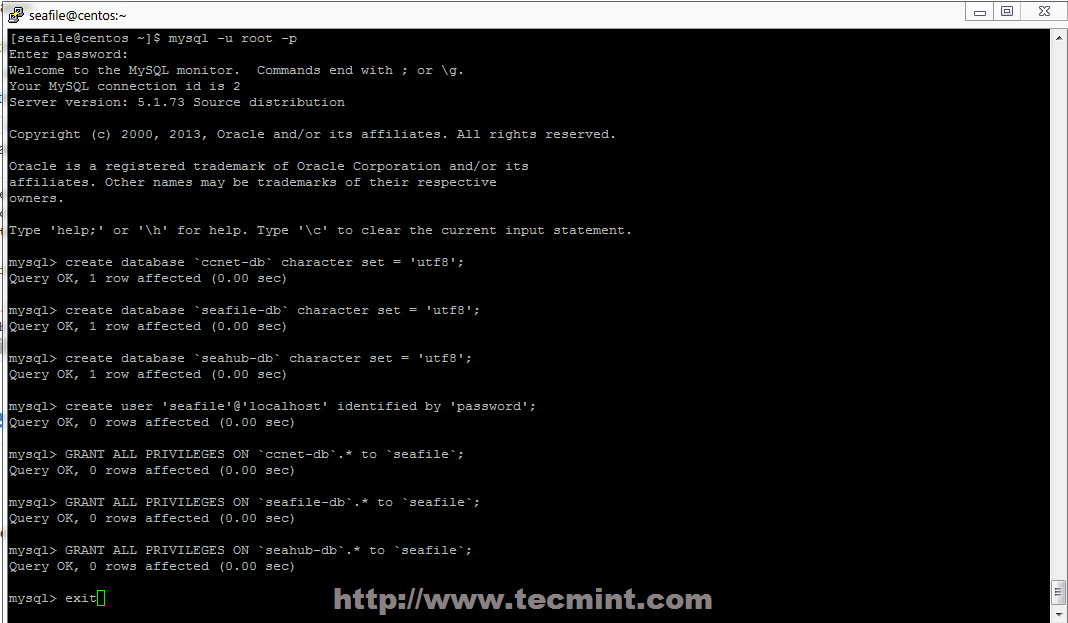
Create Seafile Database
5. Now it’s time to download and install Seafile Server. Go to Seafile official download page and grab the last .Tar Linux archive release for your server architecture using wget command, then extract it to your home Seafile user created earlier and enter Seafile extracted directory.
$ wget https://bitbucket.org/haiwen/seafile/downloads/seafile-server_3.0.4_x86-64.tar.gz
$ tar xfz seafile-server_3.0.4_x86-64.tar.gz
$ cd seafile-server_3.0.4/
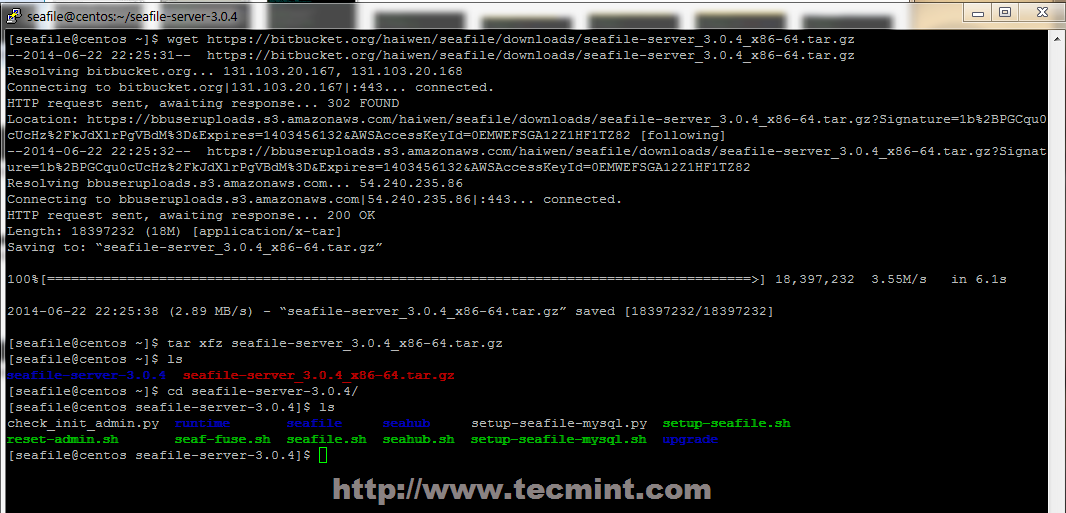
Download Seafile
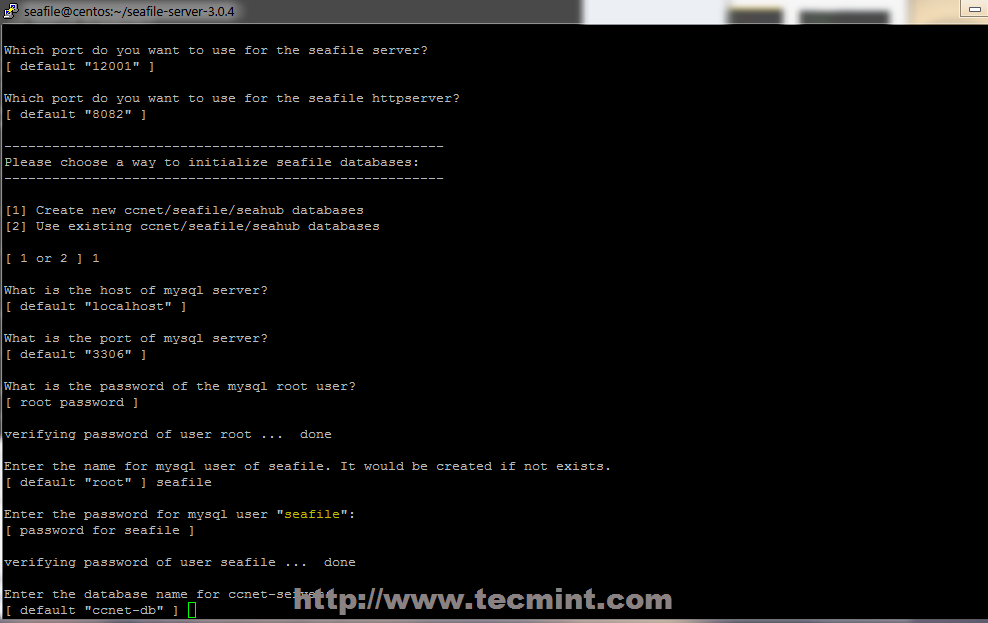
6. To install Seafile Server using MySQL database run setup-seafile-mysql.sh initialization script and answer all questions using the following configuration options, after the script verifies the existence of all Python required modules.
$ ./setup-seafile-mysql.sh
- What is the name of your server? = choose a descriptive name (no spaces allowed).
- What is the IP or domain of the server? = enter your server IP address or your valid domain name.
- Which port do you want to use for ccnet server? = hit [Enter] – leave it default – 10001.
- Where do you want to put seafile data? = hit [Enter] – the default location will be your $HOME/seafile-datadirectory.
- Which port do you want to use for seafile server? = hit [Enter] – leave it default – 12001.
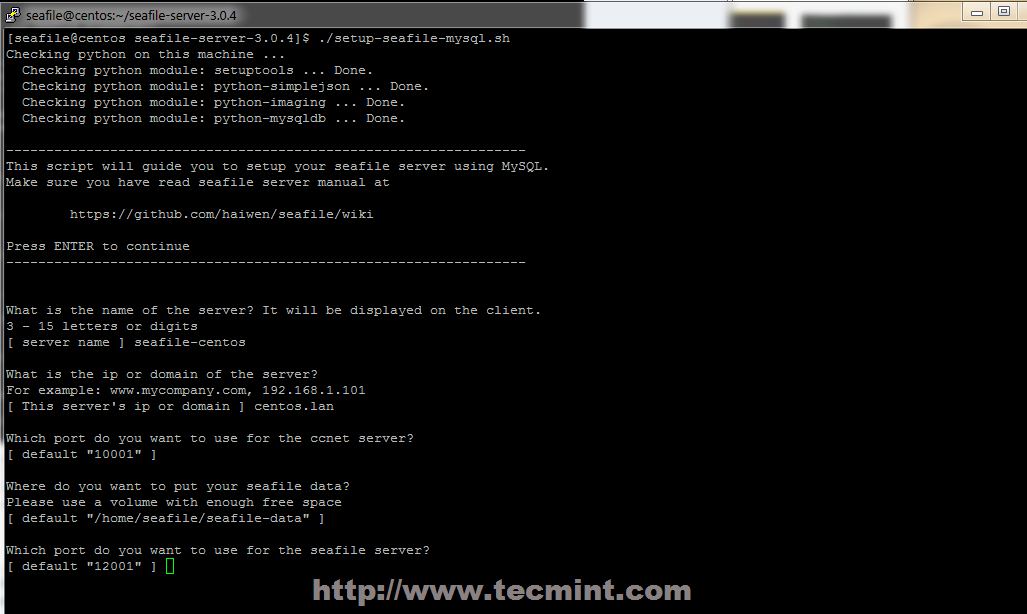
Run Seafile MySQL Script
- Which port do you want to use for seafile httpserver? = hit [Enter] – leave it default – 8082.
- Please choose a way to initialize seafile databases: = choose 1 and provide default MySQL credentials: localhost, 3306 and root password.
- Enter the name for MySQL user of seafile: = seafile ( if you created other username enter that username) and seafile MySQL user password.
- On ccnet-server, seafile-server and seahub databases just hit [Enter] key – default.
Configure Seafile for MySQL
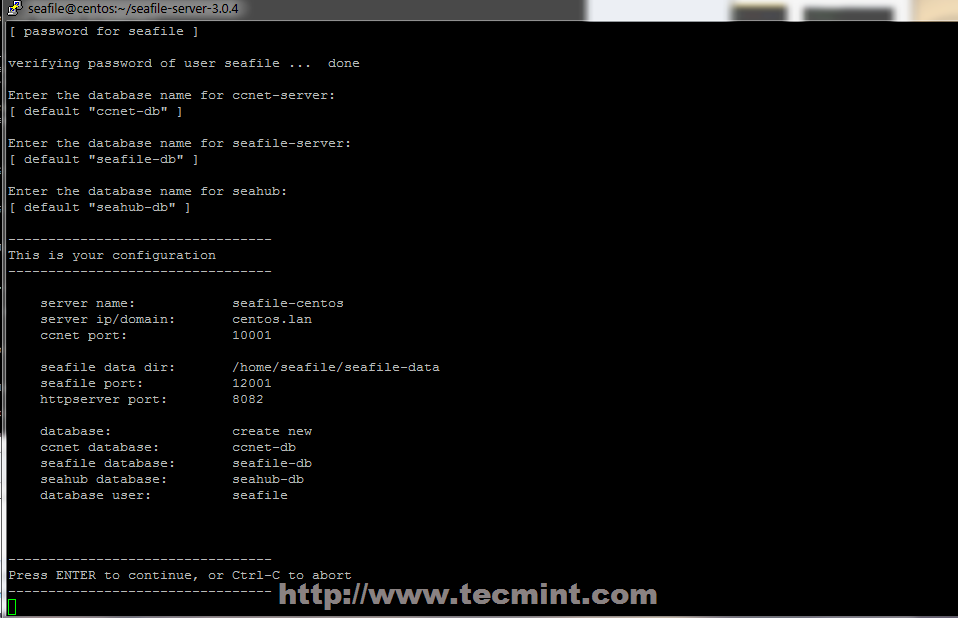
MySQL Seafile Configuration
After Seafile Server successfully installs, it will generate some useful information such as what ports needs to be open on your Firewall to allow external connection and what scripts to handle in order to start the server.
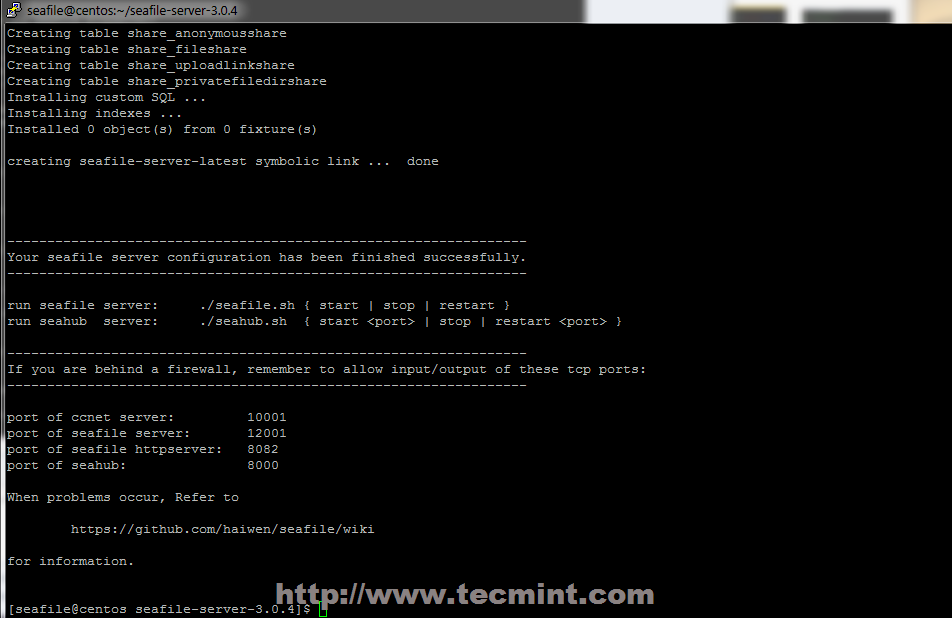
Seafile Installation Confirmation
Step 3: Open Firewall and Create Seafile init Script
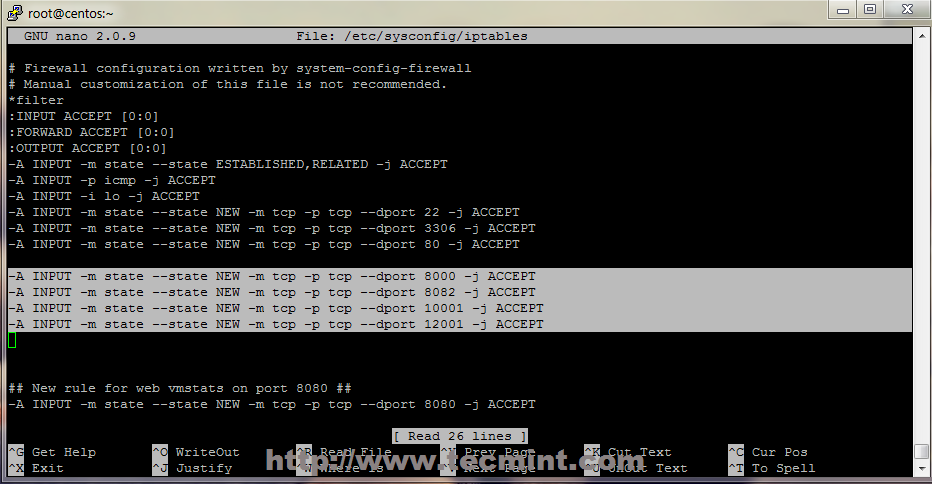
7. Before starting Seafile server from local script for a test, change back to root account and open iptablesfirewall file configuration located on /etc/sysconfig/ system path and add the following line rules before first REJECT line, then restart iptables to apply new rules.
$ su - root
# nano /etc/sysconfig/iptables
Append the following rules.
-A INPUT -m state --state NEW -m tcp -p tcp --dport 80 -j ACCEPT
-A INPUT -m state --state NEW -m tcp -p tcp --dport 8000 -j ACCEPT
-A INPUT -m state --state NEW -m tcp -p tcp --dport 8082 -j ACCEPT
-A INPUT -m state --state NEW -m tcp -p tcp --dport 10001 -j ACCEPT
-A INPUT -m state --state NEW -m tcp -p tcp --dport 12001 -j ACCEPT
Open Ports for Seafile
Restart iptables to apply rules using the following command.
# service iptables restart
NOTE: If you changed Seafile standard ports on installation process update your Firewall iptables rules accordingly.
8. Now it’s time to test Seafile Server. Switch to Seafile user and seafile-server directory and start the server using seafile.sh and seahub.sh scripts.
The first time you start seahub.sh script, create an administrative account for Seafile Server using your email address and choose a strong password for admin account, especially if you are deploying this configuration in a production environment.
# su - seafile
$ cd seafile-server-latest/
$ ./seafile.sh start
$ ./seahub.sh start
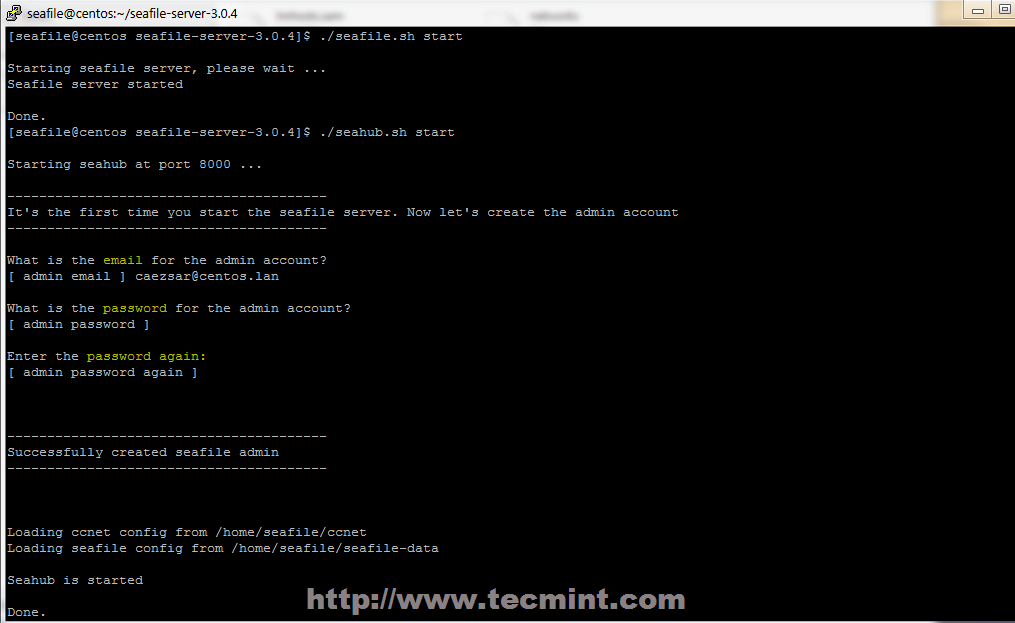
Start Seafile Server
9. After the server is successfully started, open a browser and navigate to your server IP address or domain name on port 8000 using HTTP protocol, then login using you admin account created on the above step.
http://system_IP:8000

OR

http://domain_name:8000
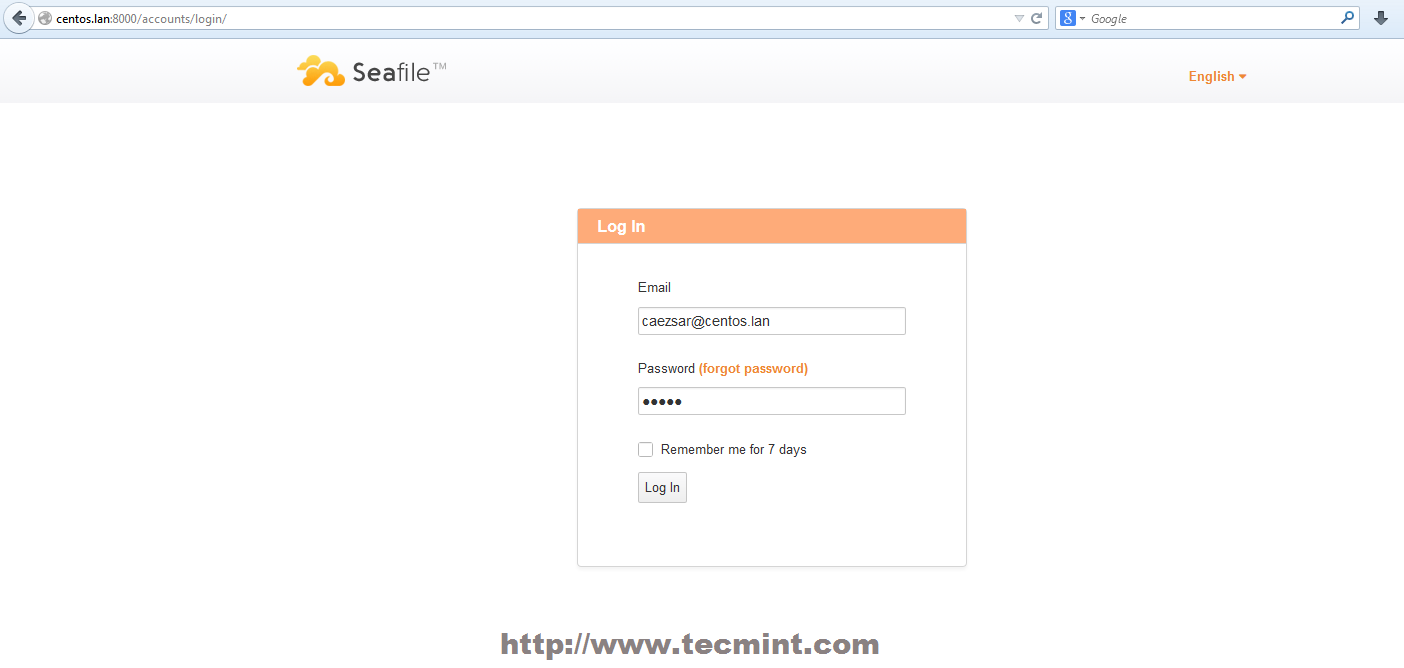
Seafile Login Screen
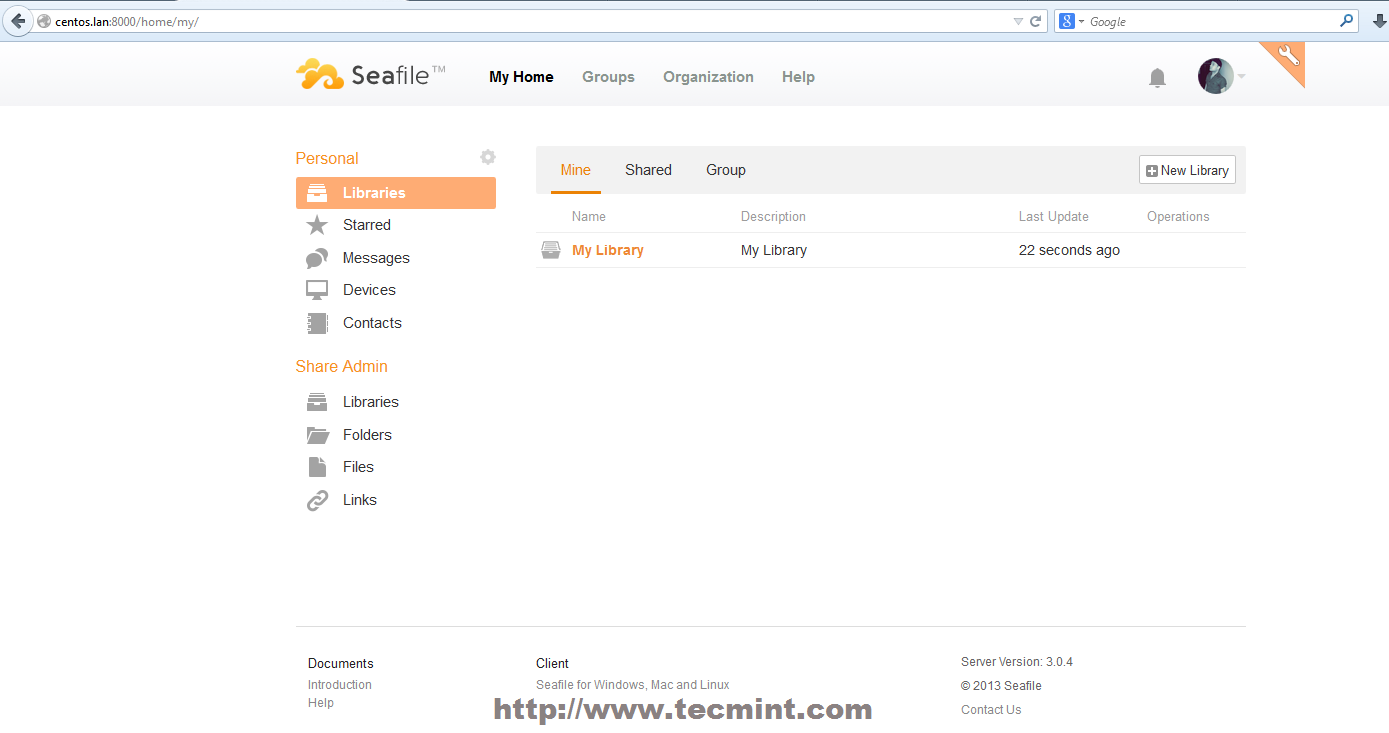
Seafile Dashboard
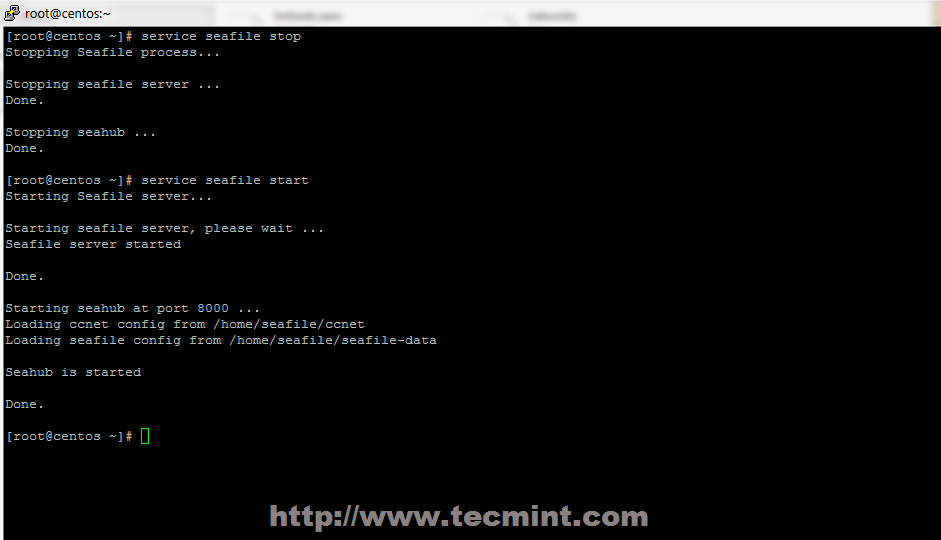
10. After first configuration tests, stop Seafile server and create an init script that will help you manage more easily the entire process, just like any other Linux system daemon processes.
$ ./seafile.sh stop
$ ./seahub.sh stop
$ su - root
# nano /etc/init.d/seafile
Add the following content on this init script – If Seafile is installed on other system user make sure to update user and paths accordingly on su – $USER -c lines.
#!/bin/sh
#chkconfig: 345 99 10
#description: Seafile auto start-stop script.

# source function library
. /etc/rc.d/init.d/functions

start() {
        echo "Starting Seafile server..."
su - seafile -c "seafile-server-latest/seafile.sh start"
su - seafile -c "seafile-server-latest/seahub.sh start"
}

stop() {
        echo "Stopping Seafile process..."
su - seafile -c "seafile-server-latest/seafile.sh stop"
su - seafile -c "seafile-server-latest/seahub.sh stop"
}

restart() {
        echo "Stopping Seafile process..."
su - seafile -c "seafile-server-latest/seafile.sh stop"
su - seafile -c "seafile-server-latest/seahub.sh stop"

         echo "Starting Seafile server..."
su - seafile -c "seafile-server-latest/seafile.sh start"
su - seafile -c "seafile-server-latest/seahub.sh start"
}

case "$1" in
    start)
       start
        ;;
    stop)
       stop
        ;;
    restart)
       restart
        ;;
        *)
      echo "Usage: $0 start stop restart"
        ;;
esac
11. After init file has been created, make sure it has execution permissions and manage the process using start, stop and restart switches. Now you can add Seafile service on system start-up using chkconfig command.
# chmod +x /etc/init.d/seafile
# service seafile start
# service seafile stop
# service seafile restart
# chkconfig seafile on | off
# chkconfig --list seafile
Start Seafile Service

Add Seafile Service on Startup
12. By default Seafile server uses 8000/TCP HTTP port for web transactions. If you want to access Seafile Server from browser on standard HTTP port use the following init script which starts the server on port 80 (be aware that starting a service on ports below 1024 requires root privileges).
# nano /etc/init.d/seafile
Add the following content on this init script to start Seafile on standard HTTP port. If Seafile is installed on other system user make sure to update user and paths accordingly on su – $USER -c and $HOME lines.
#!/bin/sh
#chkconfig: 345 99 10
#description: Seafile auto start-stop script.

# source function library
. /etc/rc.d/init.d/functions

start() {
                echo "Starting Seafile server..."
su - seafile -c "seafile-server-latest/seafile.sh start"
                ## Start on port default 80 http port ##
/home/seafile/seafile-server-latest/seahub.sh start 80
}

stop() {
                echo "Stopping Seafile process..."
su - seafile -c "seafile-server-latest/seafile.sh stop"
/home/seafile/seafile-server-latest/seahub.sh stop
}

restart() {
      echo "Stopping Seafile process..."
su - seafile -c "seafile-server-latest/seafile.sh stop"
/home/seafile/seafile-server-latest/seahub.sh stop
                 echo "Starting Seafile server..."
su - seafile -c "seafile-server-latest/seafile.sh start"
/home/seafile/seafile-server-latest/seahub.sh start 80
}

case "$1" in
    start)
       start
        ;;
    stop)
       stop
        ;;
     restart)
       restart
        ;;
                *)
        echo "Usage: $0 start stop restart"
        ;;
Esac
13. If you previously started Seafile on port 8000 make sure all processes are killed, start the server on port 80.
# chmod +x /etc/init.d/seafile
# service seafile start | stop | restart
Open a browser and direct it to the following address.
http://system_ip

OR

http://domain_name.tld
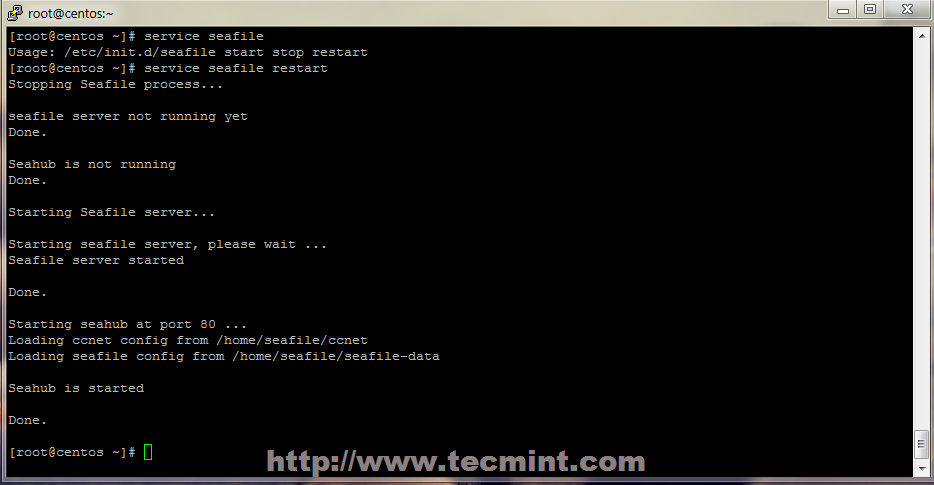
Start Seafile Service on Port 80
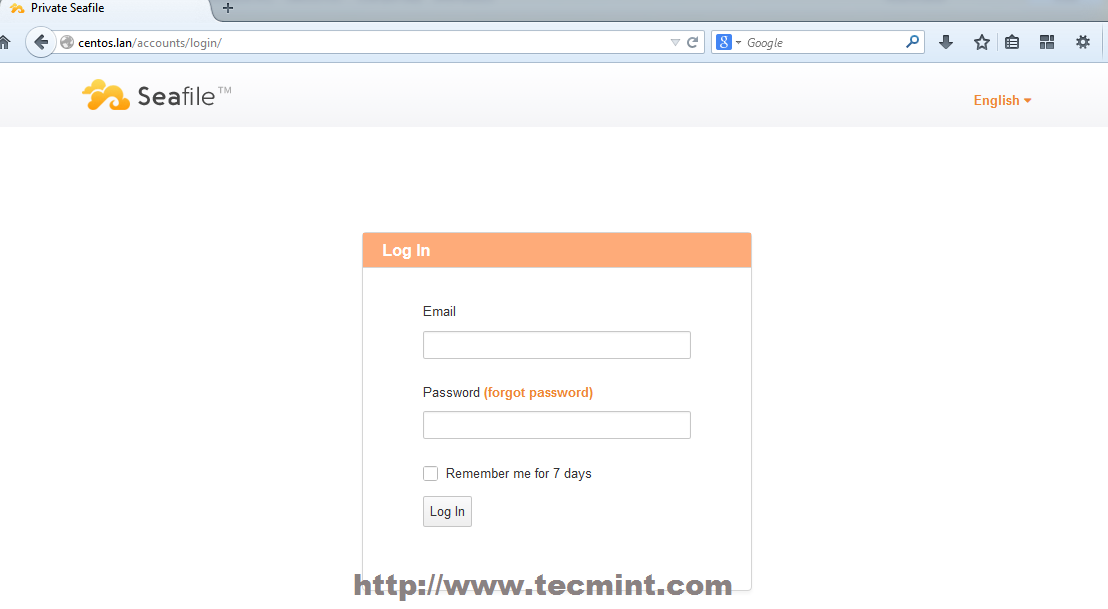
Seafile Login Panel
14. You can also verify on what ports Seafile is running using netstat command.
# netstat -tlpn
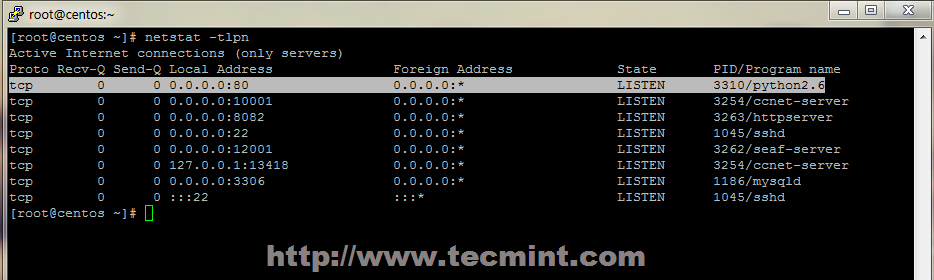
Verify Seafile Service
That’s it! Seafile can happily replace other cloud collaborative and file syncing platforms like public Dropbox, Owncloud, Pydio, OneDrive, etc on your Organization, being designed for better teamwork and full control over your storage with advanced security in user-space.