
Feb 6, 2019
In this tutorial, we will show you how to set up MyWebSQL on Ubuntu 18.04 server. MyWebSQL is a free and open-source web-based WYSIWYG client for managing the databases on your server. It provides a simple and intuitive interface with the look and feel of a desktop application. This PHP-based application offers a rich feature set and plenty of tools for database management. It can work with the most popular database types, such as MySQL, PostgreSQL, and SQLite databases. With its fast and attractive web interface, it is a very good alternative to the popular phpMyAdmin.
Here are some of the most important features:
- Multiple Syntax highlighted SQL editors
- WYSIWYG Table creator/editor
- Quick Inplace multi-record editing
- Desktop application look and feel
- Excellent support for all major browsers
- Zero configuration installation
- Multilingual Interface with themes support
- Supports MySQL, PostgreSQL and SQLite databases
- Import database script, export database, tables or results to multiple formats
The installation of MyWebSQL is very fast and easy. No additional configuration is required, and it works with all major web browsers right out of the box.
Requirements:
- For the purposes of this tutorial, we will be using an Ubuntu 18.04 VPS.
- You will also need a working LAMP or LEMP (Linux, Apache/Nginx, MySQL, PHP) stack. Our Ubuntu 18.04 VPS already comes pre-installed with a fully configured LAMP stack. However, if you do not have any web hosting stack installed on your VPS, we will also show you how to do this as a part of this tutorial.
- Full SSH root access or a user with sudo privileges is also required.
Step 1: Connect to your server
Before we begin, you need to connect to your server via SSH as the root user. To do this, use the following command:
ssh root@IP_ADDRESS -p PORT_NUMBER
and replace IP_ADDRESS and PORT_NUMBER with your actual server IP address and SSH port number.
Once logged in, make sure that your server is up-to-date by running the following commands:
sudo apt update
sudo apt upgrade
Step 2: Install LAMP
In this section, we will show you how to install the LAMP stack on your VPS. If you already have LAMP/LEMP installed you can skip this part and proceed with the next step of the tutorial.
First, let’s install the Apache web server. We can do this by running the following command:
apt install apache2
After the installation is completed, start Apache and enable it to start automatically after a reboot with:
systemctl start apache2
systemctl enable apache2
To check and verify whether Apache is currently running on your server, execute the following command:
systemctl status apache2
Output:
● apache2.service - The Apache HTTP Server
Loaded: loaded (/lib/systemd/system/apache2.service; enabled; vendor preset: enabled)
Drop-In: /lib/systemd/system/apache2.service.d
         └─apache2-systemd.conf
Active: active (running) since Sat 2019-01-26 02:20:44 CST; 1h 57min ago
Main PID: 14666 (apache2)
Tasks: 7 (limit: 2320)
CGroup: /system.slice/apache2.service
        ├─ 504 /usr/sbin/apache2 -k start
        ├─14666 /usr/sbin/apache2 -k start
        ├─14686 /usr/sbin/apache2 -k start
        ├─14687 /usr/sbin/apache2 -k start
        ├─14688 /usr/sbin/apache2 -k start
        ├─14689 /usr/sbin/apache2 -k start
        └─14690 /usr/sbin/apache2 -k start
Next, we need to install the MySQL web server. The following command will install the latest MySQL 5.7 server from the official Ubuntu repositories:
apt install mysql-server
Once the installation is complete, issue the following command to secure your installation:
mysql_secure_installation
You will be prompted to answer several questions:
Setup VALIDATE PASSWORD plugin? (Press y|Y for Yes, any other key for No) N
Change root password? (Press y|Y for Yes, any other key for No) N
Remove anonymous users? (Press y|Y for Yes, any other key for No) Y
Disallow root login remotely? (Press y|Y for Yes, any other key for No) Y
Remove test database and access to it? (Press y|Y for Yes, any other key for No) Y
Reload privilege tables now? (Press y|Y for Yes, any other key for No) Y
The last step of our LAMP stack setup is the PHP installation. Currently, the default PHP version available at the official Ubuntu repository is PHP 7.2.
To install PHP 7.2 on your server along with several PHP extensions, run the following command:
apt install -y php php-common php-mbstring php-gd php-intl php-xml php-mysql php-mcrypt
To verify if PHP is properly installed, you can run the following command:
php -v
Output:
PHP 7.2.10-0ubuntu0.18.04.1 (cli) (built: Sep 13 2018 13:45:02) ( NTS )
Copyright (c) 1997-2018 The PHP Group
Zend Engine v3.2.0, Copyright (c) 1998-2018 Zend Technologies
with Zend OPcache v7.2.10-0ubuntu0.18.04.1, Copyright (c) 1999-2018, by Zend Technologies
We now have a fully working LAMP stack running on our server. We are now ready to proceed to the next step of this tutorial and begin the MyWebSQL installation.
Step 3: Install the Required MyWebSQL Dependencies
Before we install MyWebSQL, we need to install some additional dependencies. They will be required in order to finish the installation and for MyWebSQL to work properly. You can install them with:
apt install wget zip php-pgsql php-mysql php-bcmath
The following extensions are not required, but they can provide some additional functionality:
apt install php-curl php-gmp
If you are using SQLite, the following package is also required:
apt-get install php-sqlite3
Step 4: Download and Install the MyWebSQL Package
At the moment of writing this article, the latest MyWebSQL version is MyWebSQL 3.7.
You can download the installation file with the following command:
wget https://newcontinuum.dl.sourceforge.net/project/mywebsql/stable/mywebsql-3.7.zip
To unpack the archive file to the default web server document root directory, run the following command:
unzip mywebsql-3.7.zip -d /var/www/html
Set the appropriate file permissions and ownership (www-data is the user of our Apache web server):
chown -R www-data:www-data /var/www/html/mywebsql/
chmod -R 775 /var/www/html/mywebsql/
After the archive is unpacked, MyWebSQL is already configured to use the best options for all parameters. You can now test and verify the installation by typing the following in your browser (using your own server IP address): http://YOUR-SERVER-IP-ADDRESS/mywebsql/install.php

Once you verify and make sure that the installation passed all of the requirements, you can remove or rename the install.php file from the mywebsql directory. To remove the file, run the following command:
rm /var/www/html/mywebsql/install.php
Step 5: Accessing MyWebSQL
You can now access MyWebSQL by typing the following in your browser: http://YOUR-SERVER-IP-ADDRESS/mywebsql
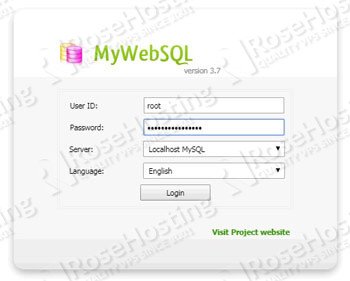
This will take you to the MyWebSQL login screen where you need to enter your database username and password, select your database server, select whether you use MySQL, PostgreSQL or SQLite, and choose your preferred language:
Once successfully logged in, you will be taken to the main MyWebSQL page from which you can start managing your databases.
![]() Of course, if you are one of our Ubuntu Hosting customers, you don’t have to install MyWebSQL on your Ubuntu 18.04 VPS – simply ask our admins, sit back, and relax. Our admins will install MyWebSQL on Ubuntu 18.04 for you immediately.
Of course, if you are one of our Ubuntu Hosting customers, you don’t have to install MyWebSQL on your Ubuntu 18.04 VPS – simply ask our admins, sit back, and relax. Our admins will install MyWebSQL on Ubuntu 18.04 for you immediately.
PS. If you liked this post about how to install MyWebSQL on Ubuntu 18.04 VPS, please share it with your friends on the social networks.