
By
Shashwat Chaudhary
April 04, 2017
- Disclaimer – TLDR; some stuff here can be used to carry out illegal activity, our intention is, however, to educate
In the previous tutorial, we set up our web application pentesting lab. However, it’s far from ready, and we need to make some changes to get it working as per our needs. Here’s the link to the previous post if you didn’t follow that-
Set up your web app pentesting lab
Contents
- Fixing the problems
- Changing credentials
- Adding recaptcha key
- Enabling disabled stuff
- Installing missing stuff
- Giving write privileges
Fixing problems
If you remember from previous post, we reached this point-
 |
| There’s some stuff in red color |
All the stuff in red needs fixing. If you are lucky, we have the same set of issues which need fixing. Otherwise, you’ll have to do some googling to find out how to fix problems which you are facing and I am not.
Changing mysql username and password
The default credentials are ‘root’ and ‘p@ssw0rd’ in the config.inc.php file. We change it to the correct mysql login credentials, ‘root’ and ”, in my case. You can change depending on your mysql credentials. This gets rid of our biggest worry – Unable to connect to database!
 |
| This is the biggest problem. Solving this means we can create our database, some modules may not work perfectly, but DVWA will run. Without fixing this, we won’t even be able to start. To fix this, open /opt/lamp/htdocs/DVWA-master/config/config.inc.php file in your favorite text editor. |
 |
| This password isn’t the password of our mysql database. In my case, password is nothing, i.e. two single quotes (i.e. ”). Update the value here. In case your mysql password is something else, use that. Change the username too is need be. |
Now we’ll fix the other remaining issues.
Fixing missing recaptcha key
Firstly, we need to solve the recaptcha key missing problem. Go to this
–
 |
| Go to the URL, you’ll see a form like this |
 |
| Fill form, values don’t matter much |
 |
| You obtain site key and secret key. Site key = Private key, secret key = private key |
| Open the config.ini.php file in your favourite text editor |
| Edit the recaptcha public key and private key fields. Here is what I did. |
 |
| Now we have a a recaptcha key. One red down, 3 to go. |
Fixing disabled allow_url_include
We simply have to locate the configuration file and edit the value of the parameter from Off to On.
 |
| The php configuration file is located at /opt/lampp/etc/php.ini Edit it with your favourite text editor, you’ll need root privileges (sudo) |
 |
| Locate the allow_url_include line by using search feature of your text editor |
 |
| Change Off to On |
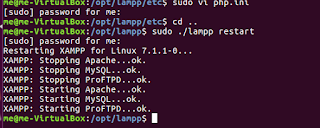 |
| Restart the lampp service |
 |
| Reload page, you’ll see that the issue is fixed |
Note: Any other function which is disabled can be enabled in a similar manner. All settings are in the php.ini file. You just need to search for the corresponding line and edit it.
Fixing missing modules
If a module is shown as missing , then we need to install it. In my case, everything is installed. Most likely, since you are also using XAMPP, everything would be installed. However, if that is not the case, then you have to figure out how to install the modules. If you aren’t using XAMPP and did everything manually, then apt-get would be the way to go. Otherwise look at XAMPP’s (or whichever bundle you are using) documentation.
Fixing File Ownership
We need to give www-data user write access to two directories. We’ll can use chgrp and chmod commands in unison to give only the privileges that are needed, or we could go the lazy way and use chmod 777 (full read, write and execute privileges to everyone). I’m feeling lazy and I’m just gonna go the chmod way. Run the command below-
chmod 777 <directory>
Replace directory with the correct directory.
| This is the last thing that needs to be done |
 |
| Everything is green finally! Also, notice the credentials, we’ll need it later. “admin // password” |
 |
| Database created. Populated with tables. |
 |
| Finally the damn vulnerable application is running. |
The username = “admin” and password is “password” (“admin // password” that we saw three pics ago).
 |
| Everything is running perfectly. This is the page you should see after successful login. |
I’ll leave you at the welcome page of DVWA. In the next tutorial, we’ll begin proper exploitation of the intentional vulnerabilities, moving from trivial stuff to the really hard stuff. The first two tutorials complete the installation and configuration parts.