
Ansible is an open source, powerful automation software for configuring, managing and deploying software applications on the nodes without any downtime just by using SSH. Today, most of the IT Automation tools runs as a agent in remote host, but ansible just need a SSH connection and Python (2.4 or later) to be installed on the remote nodes to perform it’s action.

Install Ansible in Linux
How Ansible Works?
There are many similar automation tools available like Puppet, Capistrano, Chef, Salt, Space Walk etc, but Ansible categorize into two types of server: controlling machines and nodes.
The controlling machine, where Ansible is installed and Nodes are managed by this controlling machine over SSH. The location of nodes are specified by controlling machine through its inventory.
The controlling machine (Ansible) deploys modules to nodes using SSH protocol and these modules are stored temporarily on remote nodes and communicate with the Ansible machine through a JSON connection over the standard output.
Playbooks are bunch of commands which can perform multiple tasks and each playbooks are in YAML file format.
What’s the Use of Ansible
Ansible can be used in IT infrastructure to manage and deploy software applications to remote nodes. For example, let’s say you need to deploy a single software or multiple software to 100’s of nodes by a single command, here ansible comes into picture, with the help of Ansible you can deploy as many as applications to many nodes with one single command, but you must have a little programming knowledge for understanding the ansible scripts.
We’ve compiled a series on Ansible, title ‘Preparation for the Deployment of your IT Infrastructure with Ansible IT Automation Tool‘, through parts 1-4 and covers the following topics.
In this article, we will show you how to install ‘Ansible’ on RHEL/CentOS 7/6, Fedora 21-19, Ubuntu 14.10-13.04 and Debian 7/6 systems and also we will go through some basics on how how to manage a server by installing packages, applying updates and much more from basic to pro.
Prerequisites
- Operating System: RHEL/CentOS/Fedora and Ubuntu/Debian/Linux Mint
- Jinja2: A modern, fast and easy to use stand-alone template engine for Python.
- PyYAML: A YAML parser and emitter for the Python programming language.
- parmiko: A native Python SSHv2 channel library.
- httplib2: A comprehensive HTTP client library.
- sshpass: A non-interactive ssh password authentication.
My Environment Setup
Controlling Machine – Ansible
Operating System :	Linux Mint 17.1 Rebecca
IP Address	 :	192.168.0.254
Host-name	 :	tecmint.instrcutor.com
User		 :	tecmint
Remote Nodes
Node 1: 192.168.0.112
Node 2: 192.168.0.113
Node 3: 192.168.0.114
Step 1: Installing Controlling Machine – Ansible
1. Before installing ‘Ansible‘ on the server, let’s first verify the details of the server like hostname and IP Address. Login into server as a root user and execute the below command to confirm system settings that we’re going to use for this setup.
# sudo ifconfig | grep inet
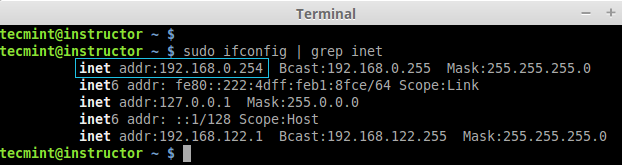
Verify System Details
2. Once you confirm your system settings, it’s time to install ‘Ansible’ software on the system.
On Ubuntu/Debian/Linux Mint
Here we are going to use official Ansible PPA repository on the system, just run the below commands to add the repository.
$ sudo apt-add-repository ppa:ansible/ansible -y
$ sudo apt-get update && sudo apt-get install ansible -y
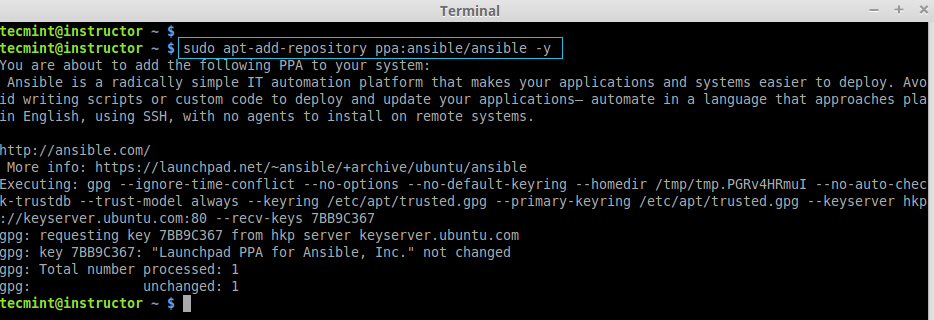
Add Ansible PPA
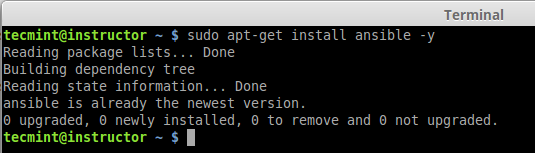
Install Ansible in Ubuntu
On RHEL/CentOS/Fedora
Unfortunately, there are no official Ansible repository for RedHat based clones, but we can install Ansible by enabling epel repository under RHEL/CentOS 6, 7 and currently supported fedora distributions.
Fedora users can directly install Ansible through default repository, but if you are using RHEL/CentOS 6, 7, you have to enable EPEL repo.
After configuring epel repository, you can install Ansible using following command.
$ sudo yum install ansible -y
After installed successfully, you can verify the version by executing below command.
# ansible --version
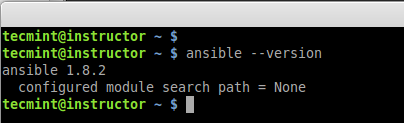
Verify Ansible Version
Step 2: Preparing SSH Keys to Remote Hosts
4. To perform any deployment or management from the localhost to remote host first we need to create and copy the ssh keys to the remote host. In every remote host there will be a user account tecmint (in your case may be different user).
First let we create a SSH key using below command and copy the key to remote hosts.
# ssh-keygen -t rsa -b 4096 -C "admin@tecmintlocal.com"

Create SSH Key
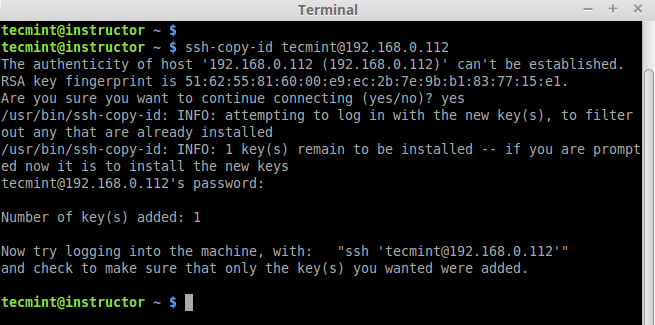
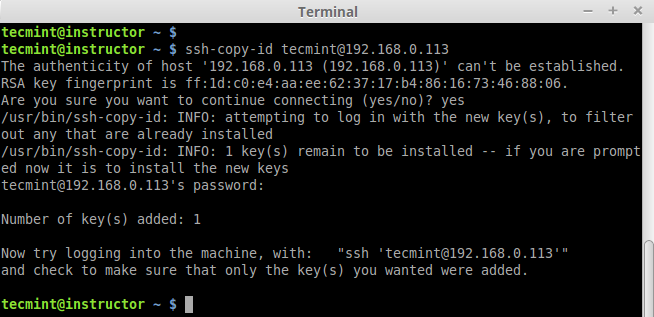
5. After creating SSH Key successfully, now copy the created key to all three remote server’s.
# ssh-copy-id tecmint@192.168.0.112
# ssh-copy-id tecmint@192.168.0.113
# ssh-copy-id tecmint@192.168.0.114
Copy SSH Key Remote Server
Copy SSH Key Second Remote Host
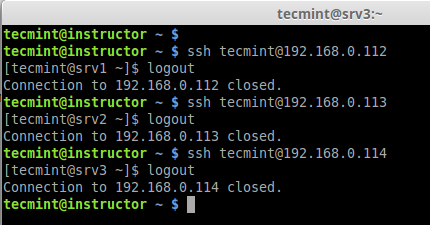
6. After copying all SSH Keys to remote host, now perform a ssh key authentication on all remote hosts to check whether authentication working or not.
$ ssh tecmint@192.168.0.112
$ ssh tecmint@192.168.0.113
$ ssh tecmint@192.168.0.114
SSH Key Authentication
Step 3: Creating Inventory File for Remote Hosts
Inventory file, This file hold the host information’s like which host we need to get connect from local to remote. Default inventory file will be under /etc/ansible/hosts.
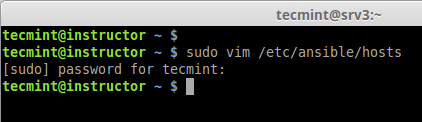
7. Now let’s add these three hosts to inventory file. Open and edit file using your favourite editor, Here I use vim.
# sudo vim /etc/ansible/hosts
Add the following three hosts IP address..
[web-servers]
192.168.0.112
192.168.0.113
192.168.0.114
Note: The ‘web-servers‘ in the brackets indicates as group names, it is used in classifying systems and deciding which systems you are going to controlling at what times and for what reason.
Create Ansible Inventory File
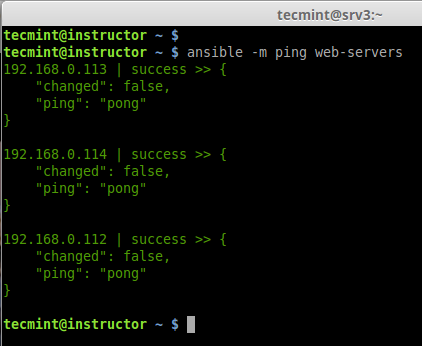
8. Now time to check our all 3 server by just doing a ping from my localhost. To perform the action we need to use the command ‘ansible‘ with options ‘-m‘ (module) and ‘-all‘ (group of servers).
# ansible -m ping web-servers

OR

# ansible -m ping -all
Ping Remote Hosts
In the above example, we’ve used ping module with Ansible command to ping all remote hosts at ones, the same way there are various modules can be used with Ansible, you can find available modules from ansible Official site here.
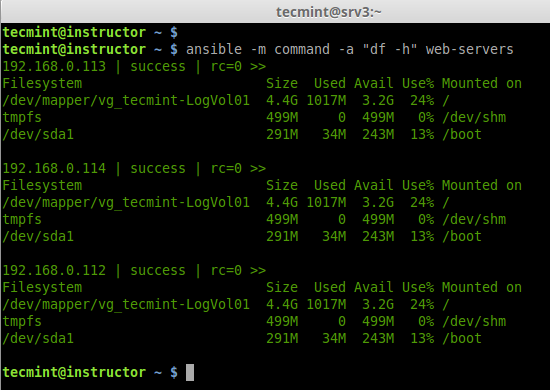
9. Now, here we are using another module called ‘command‘, which is used to execute list of commands (like, df, free, uptim, etc.) on all selected remote hosts at one go, for example watch out few examples shown below.
a. To check the partitions on all remote hosts
# ansible -m command -a "df -h" web-servers
Check Disk Space on all Hosts
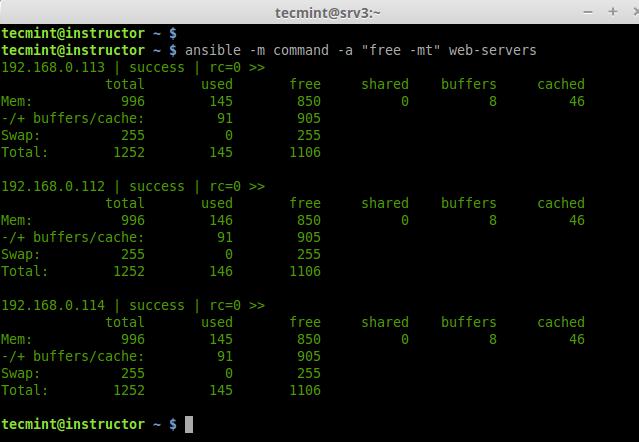
b. Check memory usage on all remote hosts.
# ansible -m command -a "free -mt" web-servers
Check Memory on all Hosts
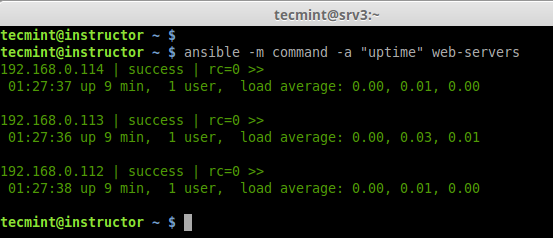
c. Checking Uptime for all 3 servers.
# ansible -m command -a "uptime" web-servers
Check uptime on all Hosts
d. Check for hostname and Architecture.
# ansible -m command -a "arch" web-servers
# ansible -m shell -a "hostname" web-servers
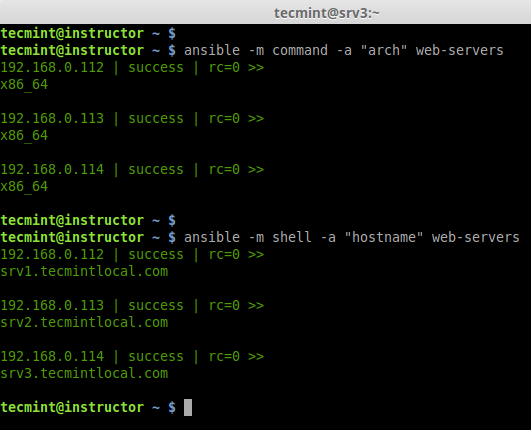
Check hostname on all Hosts
e. If we need the output to any file we can redirect as below.
# ansible -m command -a "df -h" web-servers > /tmp/df_outpur.txt
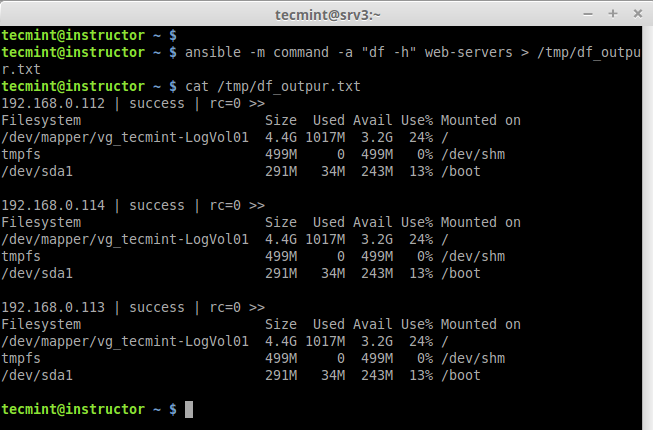
Redirect Output to File
Like this way, we can run many shell commands using ansible as what we have run the above steps.
Conclusion
Okay, We can see how to in next article.
Ansible is a Powerful IT automation tool which is must every sysadmins for deploying applications and managing server’s at one go. Among any other automation tool such as puppet, Capistrano, salt, Ansible is quit very interesting and very easy to setup for production environment. Capistrano oh no i feel headache please leave me alone :p this what i used to say.
Ansible use only SSH as there agent. We don’t have to install and run any agent in the remote servers. Hope this article will be interesting one for you too. In our next article, I will show you how to setup the directory structure for Ansible deployment and creating playbooks and working with it.
Till then keep on tracking us to get updated articles and don’t forget to tell us your opinions on the Ansible and also tell us do you use any other automation tool which is more powerful than Ansible….
Reference Links
http://www.ansible.com/get-started
http://docs.ansible.com/
In the previous article of this Ansible series, we explained that Ansible is an agent-less tool that allows you to quickly and efficiently manage multiple machines (also known as nodes – and perform deployments to them as well) from a single system.

Use Ansible Playbooks to Automate Complex Tasks on Linux – Part 2
After installing the software in the controller machine, creating the keys for passwordless login and copying them to the nodes, it’s time to learn how to optimize the process of managing such remote systems using Ansible.
Ansible Testing Environment
Throughout this article, as well as the next one, we will use the following test environment. All hosts are CentOS 7 boxes:
Controller machine (where Ansible is installed): 192.168.0.19
Node1: 192.168.0.29
Node2: 192.168.0.30
In addition, please note that both nodes have been added in the webservers section of the local /etc/ansible/hosts file:

Ansible Host File
That said, let’s get started with the topic at hand.
Introducing Ansible Playbooks
As described in the previous guide, you can use the ansible utility to run commands in remote nodes as follows:
# ansible -a "/bin/hostnamectl --static" webservers

Ansible: Run Commands on Remote Linux
In the example above, we ran hostnamectl --static on node1 and node2. It doesn’t take long for one to realize that this method of running tasks on remote computers works fine for short commands but can quickly become burdensome or messy for more complex tasks that require further well-structured configuration parameters or interactions with other services
For example, setting up and configuring WordPress on multiple hosts – which we will cover in the next article of this series). This is where Playbooks come into scene.
Simply put, Playbooks are plain text files written in the YAML format, and contain a list with items with one or more key/value pairs (also known as a “hash” or a “dictionary”).
Inside each Playbook you will find one or more group of hosts (each one of these groups is also called a play) where the desired tasks are to be performed.
An example from the official docs will help us to illustrate:
1. hosts: this is a list of machines (as per /etc/ansible/hosts) where the following tasks will be performed.
2. remote_user: remote account that will be used to perform the tasks.
3. vars: variables used to modify the behavior of the remote system(s).
4. tasks are executed in order, one at a time, against all machines that match hosts. Within a play, all hosts are going to get the same task directives.
If you need to execute a different set of associated tasks for a specific host, create another play in the current Playbook (in other words, the purpose of a play is to map a specific selection of hosts to well-defined tasks).
In that case, start a new play by adding the hosts directive at the bottom and starting over:
---
- hosts: webservers
  remote_user: root
  vars:
    variable1: value1
    variable2: value2
  remote_user: root
  tasks:
  - name: description for task1
    task1: parameter1=value_for_parameter1 parameter2=value_for_parameter2
  - name: description for task1
    task2: parameter1=value_for_parameter1 parameter2=value_for_parameter2
  handlers:
    - name: description for handler 1
      service: name=name_of_service state=service_status
- hosts: dbservers
  remote_user: root
  vars:
    variable1: value1
    variable2: value2
…
5. handlers are actions that are triggered at the end of the tasks section in each play, and are mostly used to restart services or trigger reboots in the remote systems.
# mkdir /etc/ansible/playbooks
And a file named apache.yml inside of there with the following contents:
---
- hosts: webservers
  vars:
    http_port: 80
    max_clients: 200
  remote_user: root
  tasks:
  - name: ensure apache is at the latest version
    yum: pkg=httpd state=latest
  - name: replace default index.html file
    copy: src=/static_files/index.html dest=/var/www/html/ mode=0644
    notify:
    - restart apache
  - name: ensure apache is running (and enable it at boot)
    service: name=httpd state=started enabled=yes
  handlers:
    - name: restart apache
      service: name=httpd state=restarted
Second, create a directory /static_files:
# mkdir /static_files
where you will store the custom index.html file:
<!DOCTYPE html>
 <html lang="en">
 <head>
 <meta charset="utf-8"/>
 </script>
 </head>
 <body>
 <h1>Apache was started in this host via Ansible</h1><br>
<h2>Brought to you by Tecmint.com</h2>
 </body>
 </html>
That said, now it’s time to use this playbook to perform the tasks mentioned earlier. You will note that Ansible will go through each task by host, one at a time, and will report on the status of such tasks:
# ansible-playbook /etc/ansible/playbooks/apache.yml
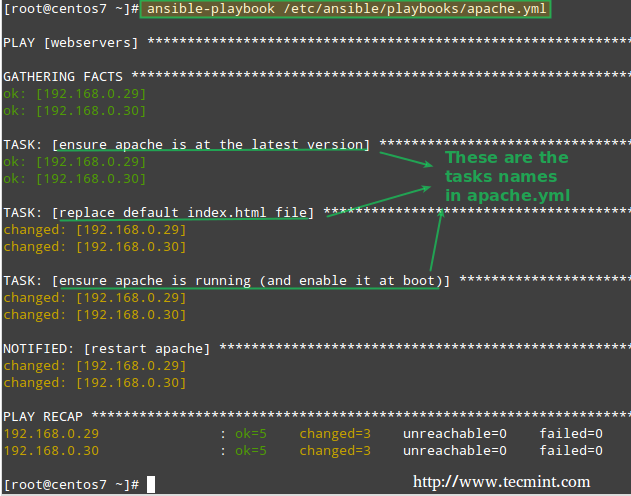
Ansible: Automate Tasks in Linux
Now let’s see what happens when we open a browser and point it to 192.168.0.29 and 192.168.0.30:
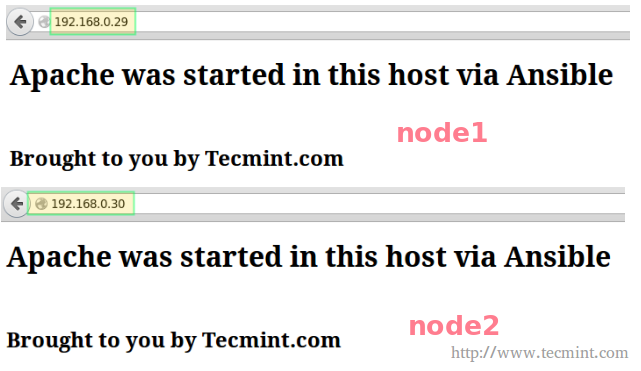
Ansible: Confirm Automated Tasks
Let’s go one step further and manually stop and disable Apache on node1 and node2:
# systemctl stop httpd
# systemctl disable httpd
# systemctl is-active httpd
# systemctl is-enabled httpd
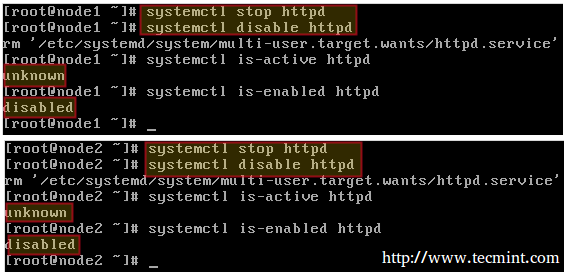
Stop and Disable Apache Service
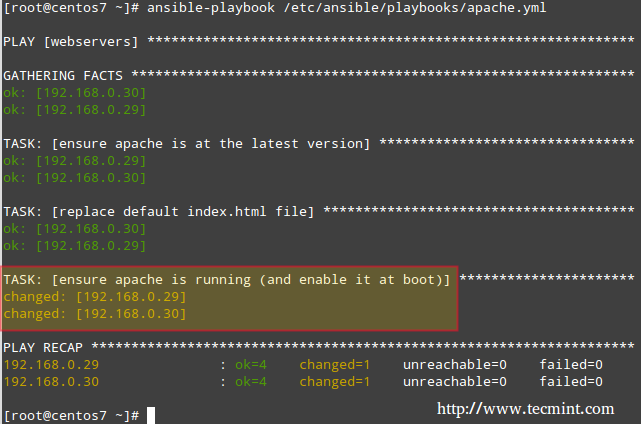
Then run again,
# ansible-playbook /etc/ansible/playbooks/apache.yml
This time, the task reports that the Apache web server was started and enabled on each host:
Ansible: Start Web Server
Please consider the above example as a glimpse of the power of Ansible. While these are relatively easy tasks when performed on a small number of servers, it can become very tedious and time-consuming if you need to do the same in several (perhaps hundreds) of machines.
Summary
In this article we have described how to run commands and execute complex tasks on several remote hosts simultaneously using Ansible. The official documentation and the GitHub repository provide a lot of examples and guides on how to use Ansible to achieve almost any imaginable task.
As you start learning how to automate tasks on remote Linux hosts using Ansible, we would like to hear your thoughts. Questions, comments, and suggestions are also always welcome, so feel free to contact us using the form below any time.
In the previous two articles of this Ansible series, we explained how to install and configure Ansible to run commands and perform complex tasks in several remote servers simultaneously.

Automate Multiple WordPress Installations using Ansible – Part 3
In the current tutorial we will explain how to set up WordPress in the same remote servers:
node1: 192.168.0.29
node2: 192.168.0.30
where we installed, enabled, and started Apache (you probably know by now why we chose to work with a web server as an initial example in the last tutorial).
I highly encourage you to read Part 1 and Part 2 before proceeding further in order to make sure you’re familiar with the concepts associated with Ansible.
How to Install and Configure ‘Ansible’ Automation Tool for IT Management – Part 1
How to Use Anisble Playbooks to Automate Complex Tasks on Multiple Remote Servers – Part 2
Step 1: Introducing Ansible Roles
As you start adding more and more tasks to plays, your Playbooks can become increasingly difficult to handle. For that reason, the recommended approach in those situations (actually, in all cases) is to use a directory structure that contains the directives for each group of tasks in distinct files.
This approach allows us to re-use these configuration files in separate projects further down the road. Each of these files define what is called in the Ansible ecosystem a role.
In our case, we will create two roles. One of them (called wp-dependencies) will be used to install the WordPress dependencies (PHP and MariaDB – no need to install Apache as it’s already installed).
The other role (named wp-install-config) will include all the necessary tasks associated with the installation and configuration of WordPress.
Step 2: Creating Ansible Roles
Ansible comes with an utility called ansible-galaxy that will help us to create the directory structure for our roles. We will do this in /etc/ansible/playbooks (which we created in Part 2) but in theory you can set it up in another directory if you want.
# cd /etc/ansible/playbooks
# ansible-galaxy init wp-dependencies
# ansible-galaxy init wp-install-config

Ansible: Create WordPress Roles
Next confirms the newly created roles.
# ls -R /etc/ansible/playbooks
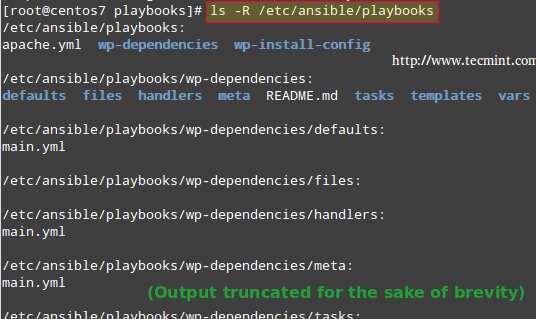
Ansible: Confirm WordPress Directory Structure
In the above image we can see that ansible-galaxy created two directories with the same name as our roles, and other subdirectories (defaults, files, handlers, meta, tasks, templates, and vars) and a README.md file inside each of them.
In addition, a YAML file named main.yml was created inside all of the directories listed earlier, with the exception of files and templates.
We will begin by editing the following configuration files as indicated:
1. /etc/ansible/playbooks/wp-dependencies/tasks/main.yml. Note that we are including httpd in case you have not followed along with the previous tutorials of this series.
---
# tasks file for wp-dependencies
- name: Update packages (this is equivalent to yum update -y)
  yum: name=* state=latest

- name: Install dependencies for WordPress
  yum: name={{ item }} state=present
  with_items:
        - httpd
        - mariadb-server
        - mariadb
        - php
        - php-mysql
        - MySQL-python

- name: Ensure MariaDB is running (and enable it at boot)
  service: name=mariadb state=started enabled=yes

- name: Copy ~/.my.cnf to nodes
  copy: src=/root/.my.cnf dest=/root/.my.cnf

- name: Create MariaDB database
  mysql_db: name={{ wp_mysql_db }} state=present

- name: Create MariaDB username and password
  mysql_user:
        login_user=root
        login_password=YourMariaDBRootPasswordHere
        name={{ wp_mysql_user }}
        password={{ wp_mysql_password }}
        priv=*.*:ALL
2. /etc/ansible/playbooks/wp-dependencies/defaults/main.yml
---
# defaults file for wp-dependencies
  wp_mysql_db: MyWP
  wp_mysql_user: wpUser
  wp_mysql_password: wpP4ss
3. /etc/ansible/playbooks/wp-install-config/tasks/main.yml:
---
# tasks file for wp-install-config
- name: Create directory to download WordPress
  command: mkdir -p /opt/source/wordpress

- name: Download WordPress
  get_url: url=https://www.wordpress.org/latest.tar.gz dest=/opt/source/wordpress/wordpress.tar.gz validate_certs=no

- name: Extract WordPress
  command: "tar xzf /opt/source/wordpress/wordpress.tar.gz -C /var/www/html --strip-components 1"

- name: Send config file
  copy: src=/root/wp-config-sample.php dest=/var/www/html/wp-config.php mode=0644
4. wp-config-sample.php (provided in this Pastebin) as follows and save it to your Ansible controller machine (as you can see in the last copy directive above, I downloaded it to the home directory of the superuser (/root/wp-config-sample.php).
Important: Please note that the value for variables DB_NAME, DB_USER, and DB_PASSWORD are the same as in /etc/ansible/playbooks/wp-dependencies/defaults/main.yml:
…
/** The name of the database for WordPress */
define('DB_NAME', 'MyWP');

/** MySQL database username */
define('DB_USER', 'wpUser');

/** MySQL database password */
define('DB_PASSWORD', 'wpP4ss');
…
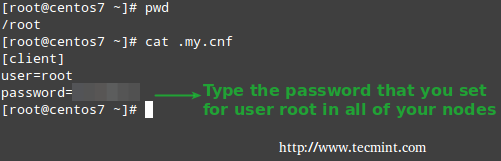
5. For new database server installations where the root password is empty, such as in this case, unfortunately we need to setup the password for user root individually in every machine through mysql_secure_installation.
As far as I know, there is no available workaround that will allow you to set up the root password via Ansible in the same step where you create the administrative database account for WordPress.
Make sure you use the same password in all hosts, then copy the credentials in /root/.my.cnf (the actual location may differ in your case, but in all instances it needs to match the value of the src parameter for the task Copy ~/.my.cnf to nodes in /etc/ansible/playbooks/wp-dependencies/tasks/main.yml).
In that file (see above) we’ve assumed that the password for root is YourMariaDBRootPassword.
Ansible Database Password
6. Next, our playbook (/etc/ansible/playbooks/playbook.yml) will look much more organized and simple when compared to the previous tutorial:
# cat playbook.yml
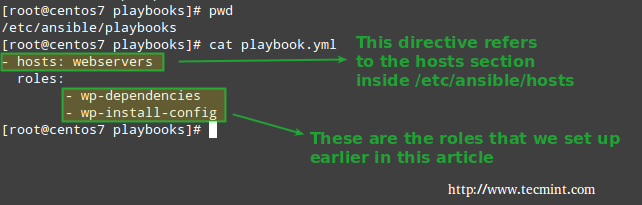
Ansible WordPress Playbooks
- hosts: webservers
  roles:
        - wp-dependencies
        - wp-install-config
Finally, it’s time to run these tasks by invoking our playbook:
# ansible-playbook playbook.yml
Now let’s check if we can access the WordPress Admin page using the IP addresses of node1 192.168.0.29 and node2 192.168.0.30:
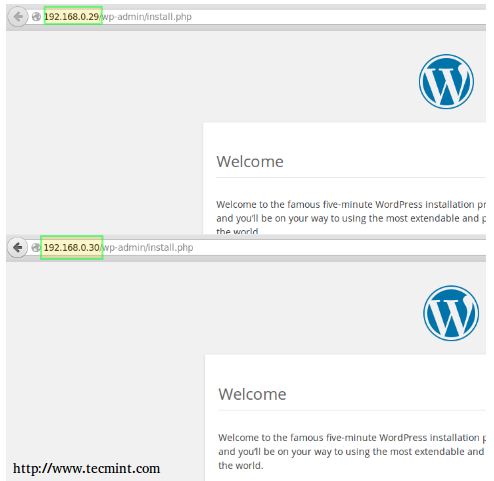
Ansible WordPress Installation
You can view the last two steps in the following screencast:
As you can see, you can set up multiple WordPress installations with little to no effort using Ansible. Then you can use the respective Admin user interface to configure each site separately.
Final considerations
If you are using another distribution to deploy WordPress, the packages name may vary, but it comes down to installing the Apache web server, the MariaDB database server, and the Python MySQL module. If that is the case, use your distribution’s software management system to search for the exact package name that you need to install.
Summary
In this series we have explained how to use Ansible to run commands and execute complex tasks in several Linux machines simultaneously.
One of such examples is setting up WordPress, as we have discussed in this guide. Whether you are a system administrator or a blogger, I hope you have found the concepts and examples in this tutorial useful.
Best of luck and do not hesitate to drop us a line if you need help or have any comments or suggestions!