
In this 3-article series, we will discuss about Docker, is an open-source lightweight virtualization tool which runs at top of Operating System level, allowing users to create, run and deploy applications, encapsulated into small containers.
Install Docker and Learn Basic Container Manipulation – Part 1
This type of Linux containers are proven to be fast, portable and secure. The processes that run in a Docker container are always isolated from the main host, preventing outside tampering.
This tutorial provides a starting point on how to install Docker, create and run Docker containers on CentOS/RHEL 7/6, but barley scratches the surface of Docker.
Step 1: Install and Configure Docker
1. Docker binaries are incorporated into RHEL/CentOS 7 extras repositories, the installation process being pretty simple. Install Docker package by issuing the following command with root privileges:
Install Docker on RHEL and CentOS 7
# yum install docker
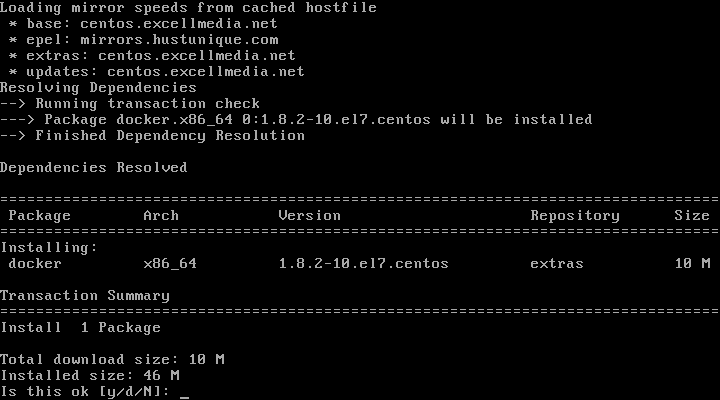
Install Docker on CentOS and RHEL 7
Install Docker on RHEL and CentOS 6
To install Docker, the Epel repositories must be enabled on your system by issuing the following command:
# yum install epel-release
# yum install docker-io
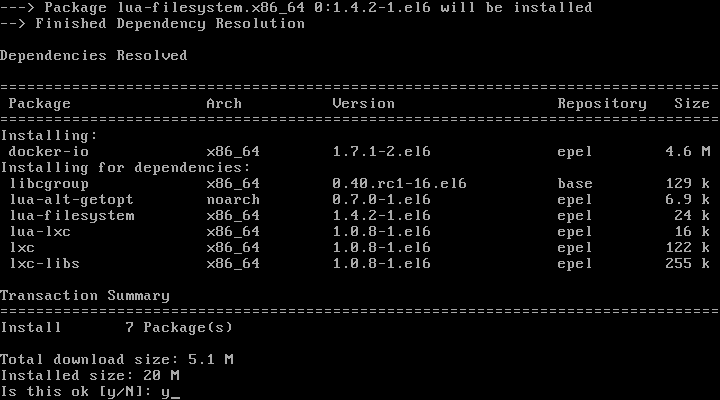
Install Docker on RHEL and CentOS 6
2. After, Docker package has been installed, start the daemon, check its status and enable it system wide using the below commands:
On RHEL/CentOS 7
# systemctl start docker
# systemctl status docker
# systemctl enable docker
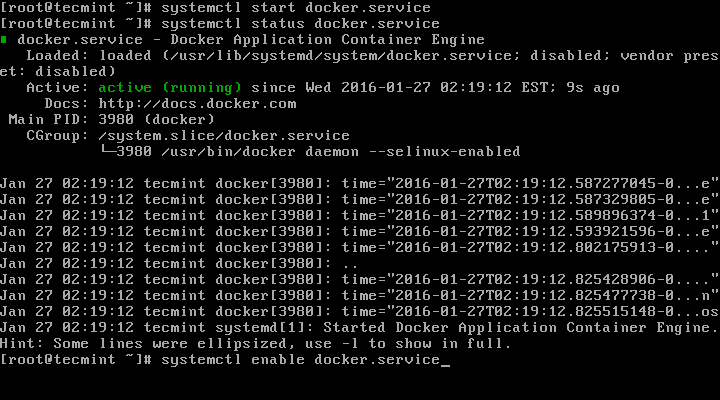
Enable Docker on RHEL and CentOS 7
On RHEL/CentOS 6
# service docker start
# service docker status
# chkconfig docker on
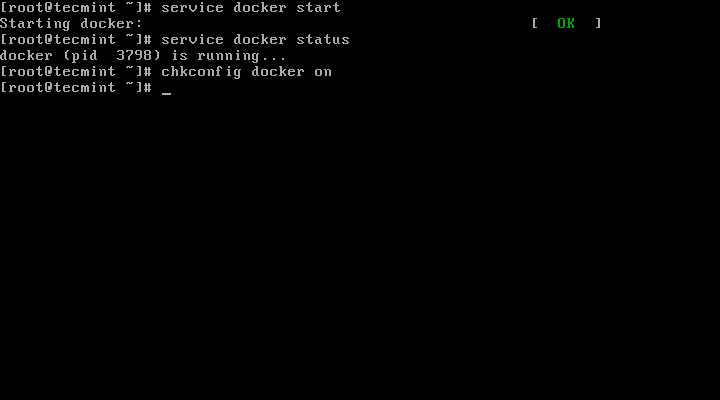
Enable Docker on RHEL and CentOS 6
3. Finally, run a container test image to verify if Docker works properly, by issuing the following command:
# docker run hello-world
If you can see the below message, then everything is in the right place.
"Hello from Docker. This message shows that your installation appears to be working correctly."
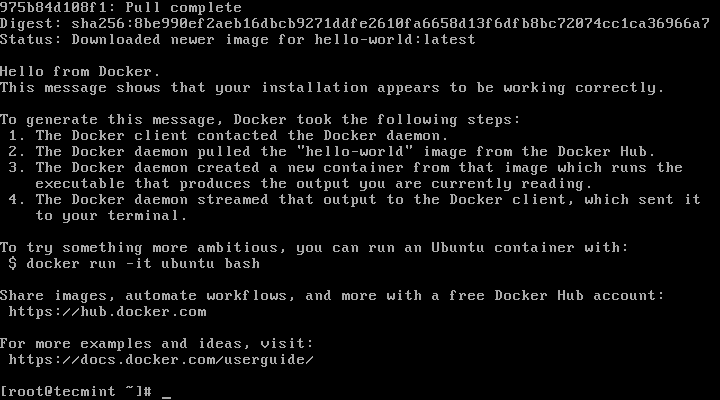
Docker Hello World
4. Now, you can run a few basic Docker commands to get some info about Docker:
For system-wide information on Docker
# docker info
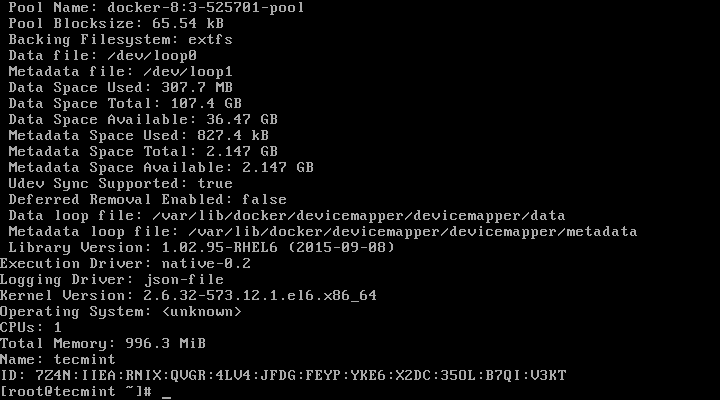
Check Docker Info
For Docker version
# docker version
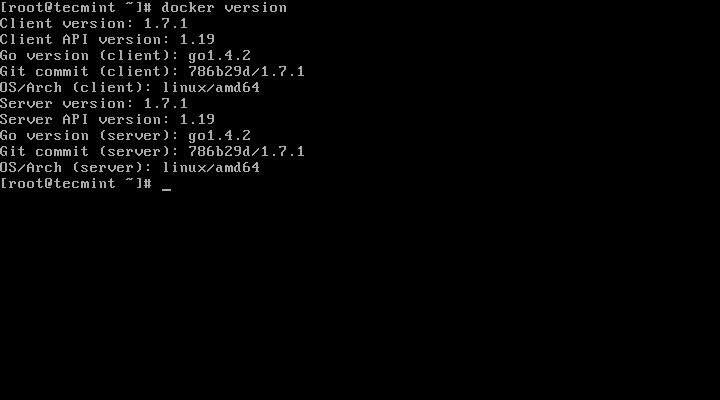
Check Docker Version
5. To get a list of all available Docker commands type docker on your console.
# docker
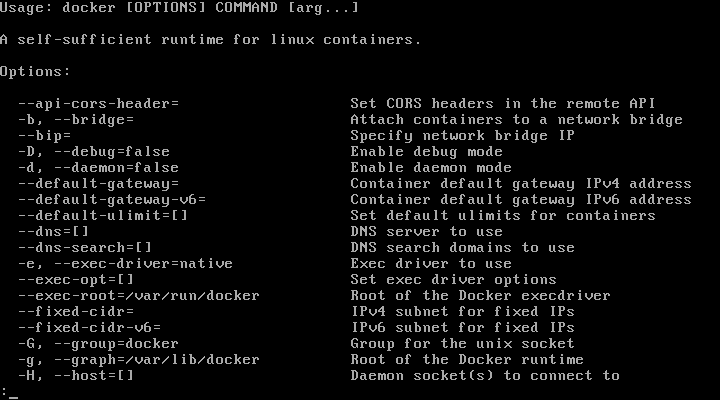
List Docker Commands
Step 2: Download a Docker Image
6. In order to start and run a Docker container, first an image must be downloaded from Docker Hub on your host. Docker Hub offers a great deal of free images from its repositories.
To search for a Docker image, Ubuntu for instance, issue the following command:
# docker search ubuntu
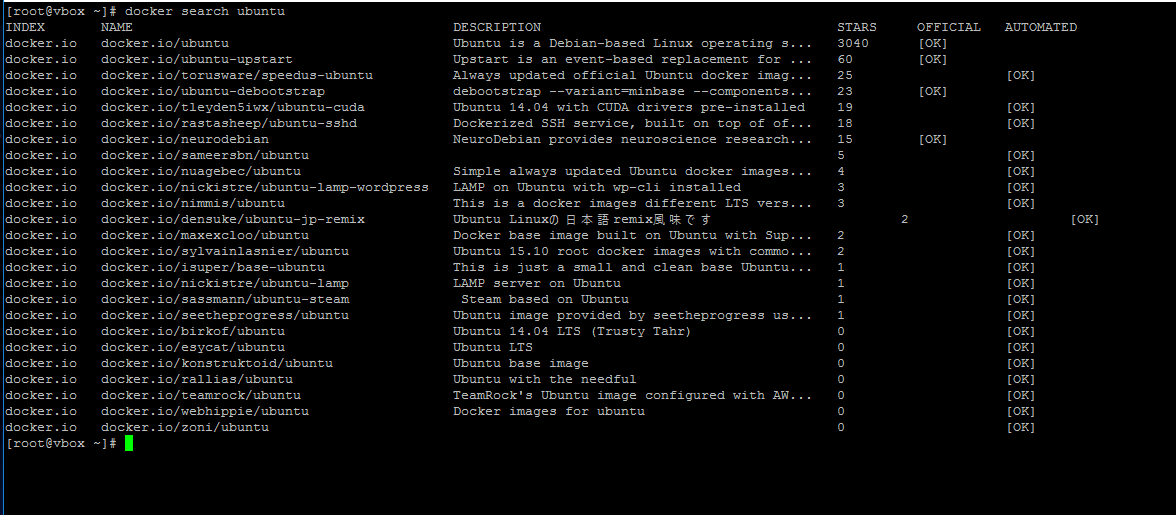
Search Docker Images
7. After you decided on what image you want to run based on your needs, download it locally by running the below command (in this case an Ubuntu image is downloaded and used):
# docker pull ubuntu

Download Docker Images
8. To list all the available Docker images on your host issue the following command:
# docker images
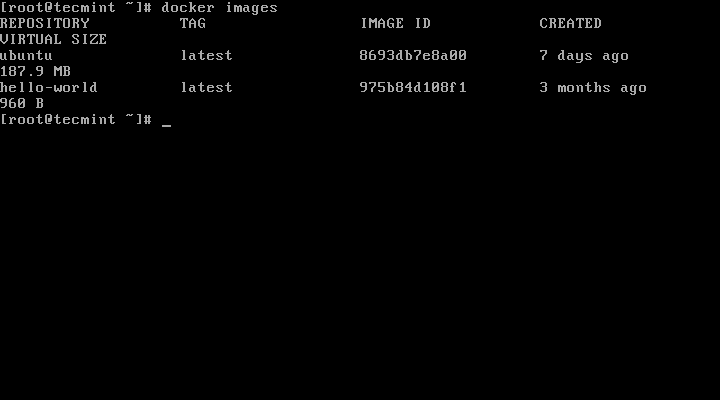
List Docker Images
9. If you don’t need a Docker image anymore and you want to remove it from the host issue the following command:
# docker rmi ubuntu
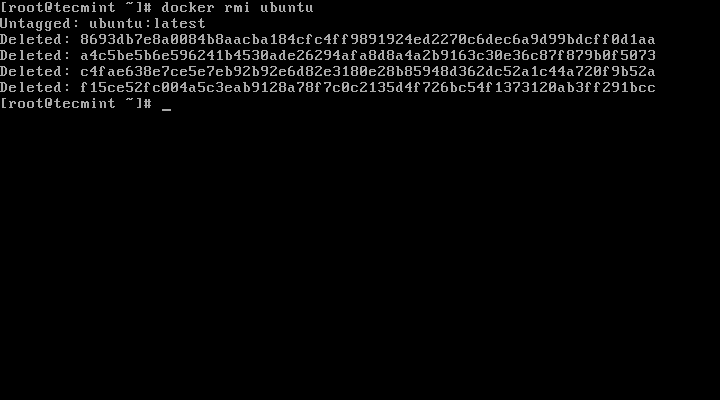
Remove Docker Image
Step 3: Run a Docker Container
When you execute a command against an image you basically obtain a container. After the command that is executing into container ends, the container stops (you get a non-running or exited container). If you run another command into the same image again a new container is created and so on.
All the containers created will remain on the host filesystem until you choose to delete them by using the docker rm command.
10. In order to create and run a container, you need to run a command into a downloaded image, in this case Ubuntu, so a basic command would be to display the distribution version file inside the container using cat command, as in the following example:
# docker run ubuntu cat /etc/issue
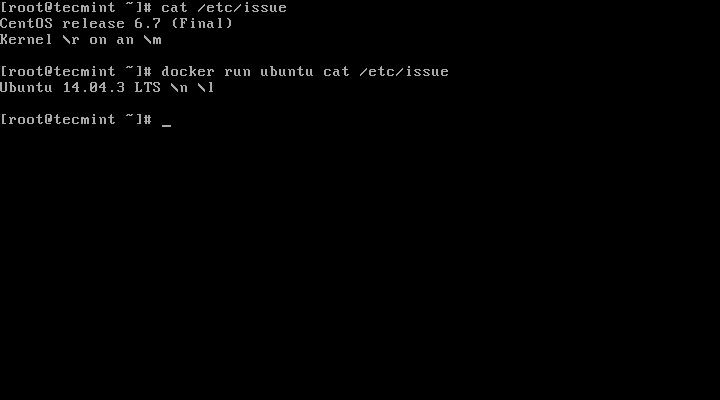
Run Docker Containers
The above command is divided as follows:
# docker run [local image] [command to run into container]
11. To run one of the containers again with the command that was executed to create it, first you must get the container ID (or the name automatically generated by Docker) by issuing the below command, which displays a list of the running and stopped (non-running) containers:
# docker ps -l
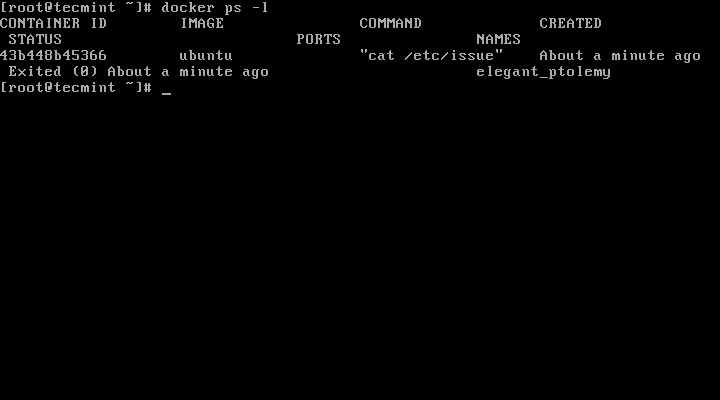
List Running Docker Containers
12. Once the container ID has been obtained, you can start the container again with the command that was used to create it, by issuing the following command:
# docker start c629b7d70666
Here, the string c629b7d70666 represents the container ID.
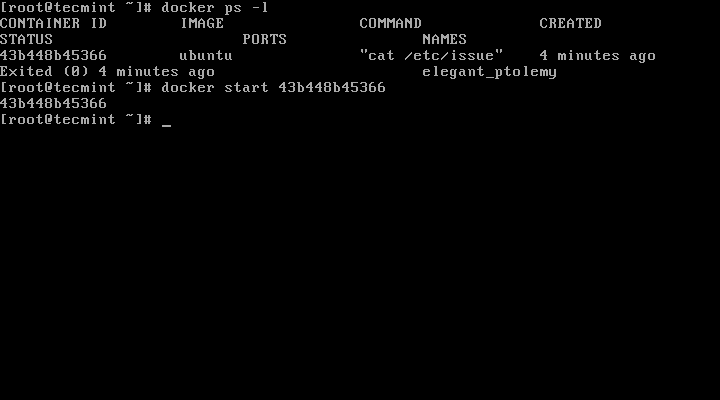
Start Docker Containers
13. In case the container is running state, you can get it’s ID by issuing docker ps command. To stop the running container issue docker stop command by specifying the container ID or auto-generated name.
# docker stop dreamy_mccarthy
# docker ps

Start Stop Docker Containers
14. A more elegant alternative so you don’t have to remember the container ID would be to allocate a unique name for every container you create by using the --name option on command line, as in the following example:
# docker run --name myname ubuntu cat /etc/debian_version
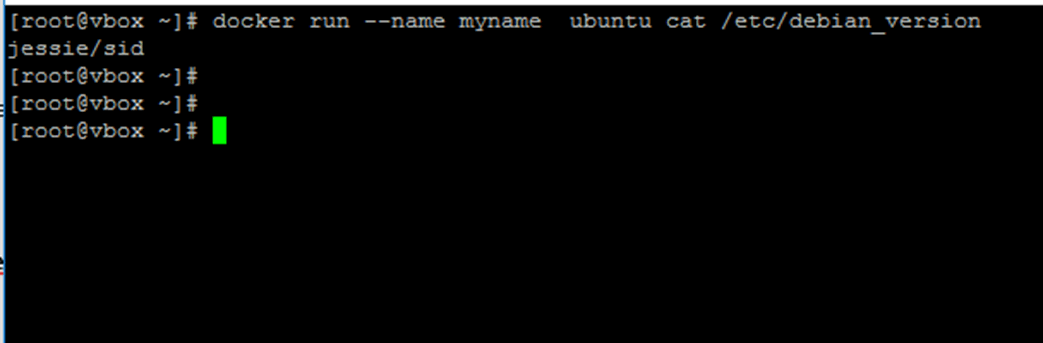
Add Name to Docker Container
15. Then, using the name that you allocated for the container, you can manipulate container (start, stop, remove, top, stats) further just by addressing its name, as in the below examples:
# docker start myname
# docker stats myname
# docker top myname
Be aware that some of the above commands might display no output if the process of command that was used to create the container finishes. When the process that runs inside the container finishes, the container stops.
Step 4: Run an Interactive Session into a Container
16. In order to interactively connect into a container shell session, and run commands as you do on any other Linux session, issue the following command:
# docker run -it ubuntu bash
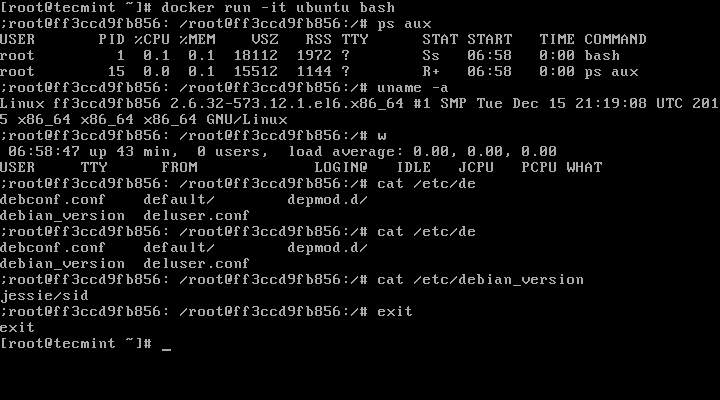
Start Docker Container Interactive Shell
The above command is divided as follows:
-iis used to start an interactive session.- -t allocates a tty and attaches stdin and stdout.
ubuntuis the image that we used to create the container.bash(or /bin/bash) is the command that we are running inside the Ubuntu container.
17. To quit and return to host from the running container session you must type exit command. The exitcommand terminates all the container processes and stops it.
# exit
18. If you’re interactively logged on container terminal prompt and you need to keep the container in running state but exit from the interactive session, you can quit the console and return to host terminal by pressing Ctrl+p and Ctrl+q keys.
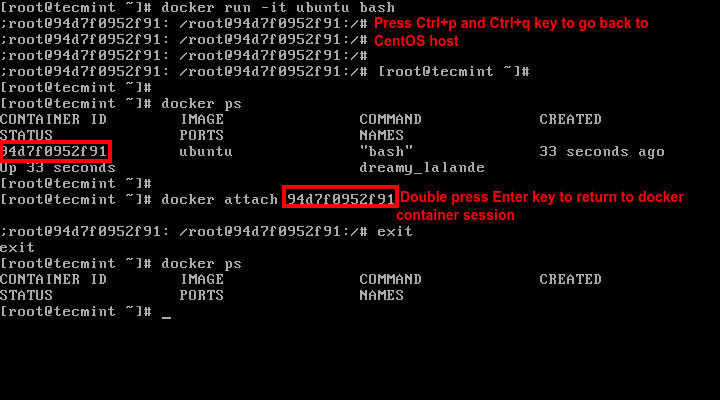
Keep Docker Shell Session Active
19. To reconnect to the running container you need the container ID or name. Issue docker ps command to get the ID or name and, then, run docker attach command by specifying container ID or name, as illustrated in the image above:
# docker attach <container id>
20. To stop a running container from the host session issue the following command:
# docker kill <container id>
That’s all for basic container manipulation. In the next tutorial we will discuss how to save, delete and run a web server into a Docker container.
Following the previous Docker article, this tutorial will discuss how to save a Docker container into a new image, remove a container and run a Nginx web server inside a container.
Install and Run Applications in Docker Containers – Part 2
Requirements
How To Run and Save a Docker Container
1. In this example we will run and save an Ubuntu based Docker container where Nginx server will be installed. But before committing any changes to container, first start the container with the below command which installs Nginx daemon into Ubuntu image:
# docker run ubuntu bash -c "apt-get -y install nginx"
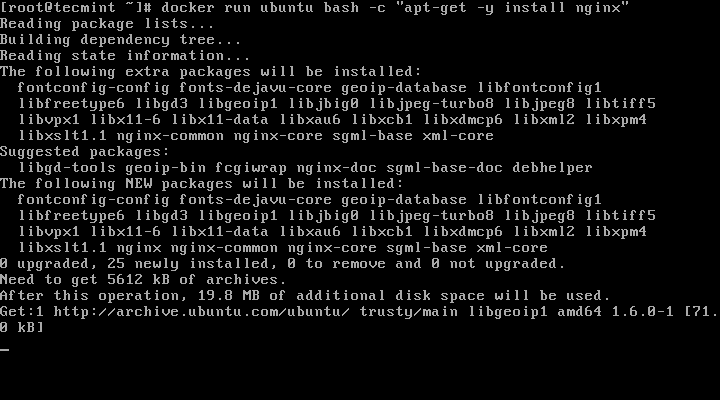
Install Nginx on Ubuntu Docker Container
2. Next, after Nginx package is installed, issue the command docker ps -l to get the ID or name of the running container.
# docker ps -l
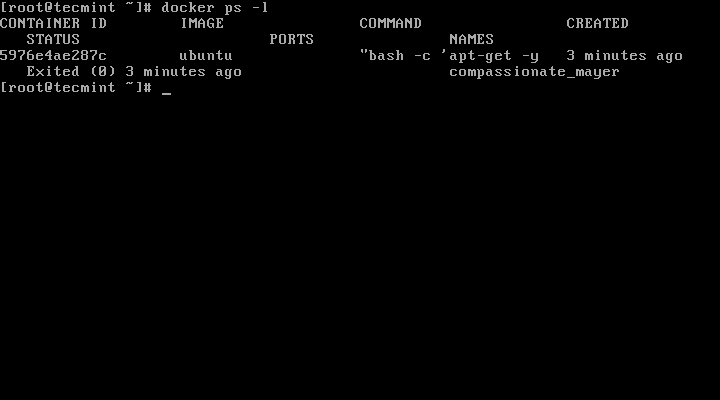
Find Docker Container ID Name
And apply changes by running the below command:
# docker commit 5976e4ae287c ubuntu-nginx
Here, 5976e4ae287c represents the container ID and ubuntu-nginx represents the name of the newly image that has been saved with committed changes.
In order to view if the new image has been successfully created just run docker images command and a listing of all saved images will be shown.
# docker images

Docker Container Changes
Chances are that the installation process inside the container finishes fast which leads to a non-running container (container is stopped). In this case the docker ps command won’t show any output because no container is running.
In order to be able to still get the container’s id run docker ps -a | head -3 to output the most recent containers and identify the container based on the command issued to create the container and the exited status.
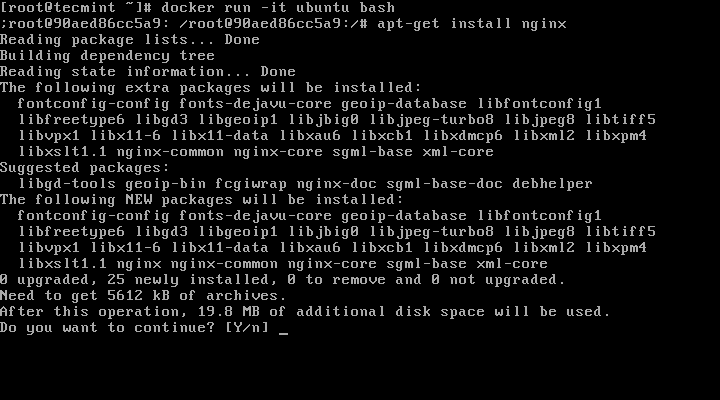
3. Alternatively, you can actively enter container session by running docker run -it ubuntu bashcommand and execute further apt-get install nginx command. While the command is running, detach from the container using Ctrl-p + Ctrl-q keys and the container will continue running even if the Nginx installation process finishes.
# docker run -it ubuntu bash
# apt-get install nginx
Install Nginx on Docker Container
Then, get the running container id with docker ps and commit changes. When finished, re-enter to container console using docker attach and type exit to stop container.
# docker ps
# docker attach 3378689f2069
# exit
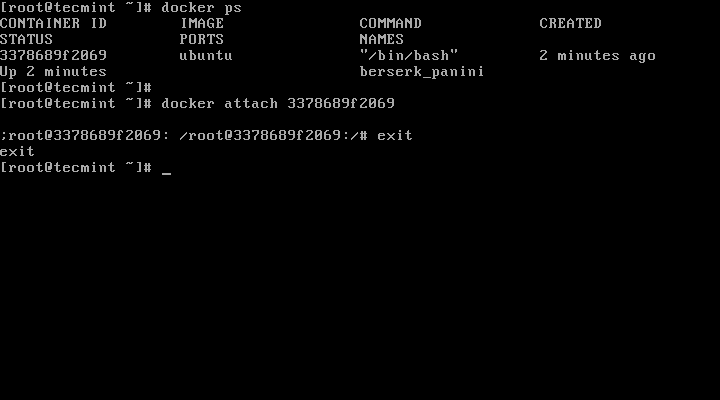
Attach Docker Container
4. To further test if the recently image has been committed properly (in this case Nginx service has been installed), execute the below command in order to generate a new container which will output if Nginx binary was successfully installed:
# docker run ubuntu-nginx whereis nginx
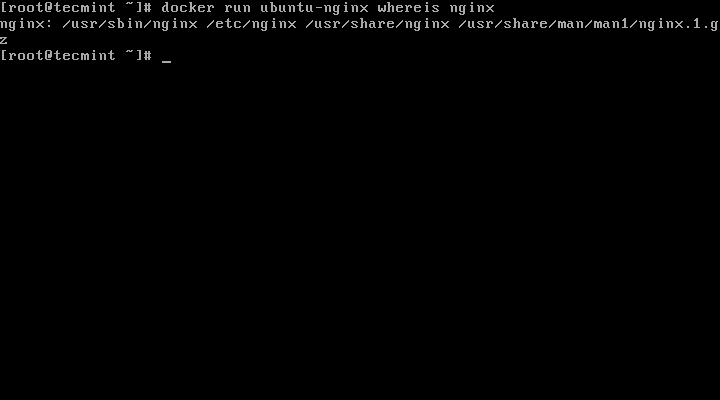
Generate New Docker Container
5. To remove a container use the rm command against a container ID or name, which can be obtained using docker ps -a command:
# docker ps -a
# sudo docker rm 36488523933a
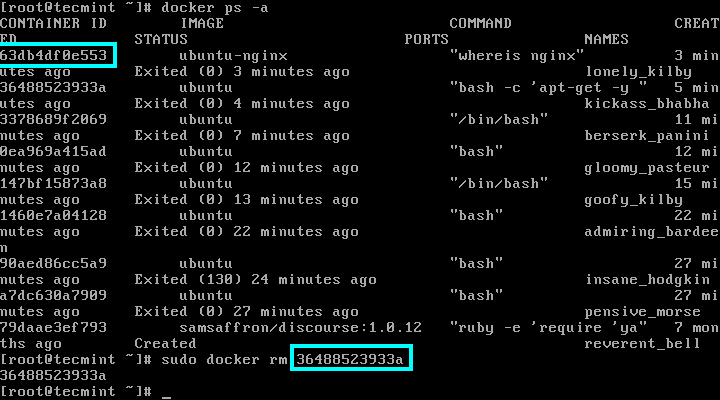
Remove Docker Container
How to Run Nginx inside Docker Container
6. In this part we will concentrate on how you can run and access a network service, such as a Nginx web server, inside Docker, using the ubuntu-nginx image created earlier where Nginx daemon was installed.
The first thing that you need to do is to create a new container, map host-container ports and enter container shell by issuing the below command:
# docker run -it -p 81:80 ubuntu-nginx /bin/bash
# nginx &
Here, the -p option exposes the host port to container port. While the host port can be arbitrary, with the condition that it should be available (no other host services should listen on it), the container port must be exactly the port that the inside daemon is listening to.
Once you’re connected to container session, start Nginx daemon in background and detach from container console by pressing Ctrl-p + Ctrl-q keys.
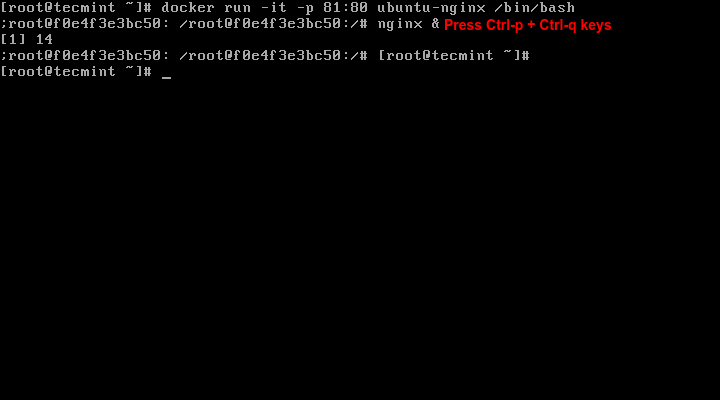
Run Nginx Inside Docker Container
7. Now, run docker ps to get the state of your running container. You can also view host network sockets by issuing the following command:
# docker ps
OR
# netstat -tlpn
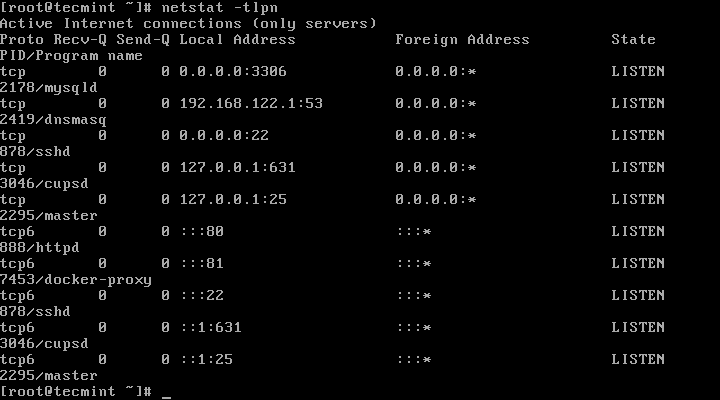
View Docker Container Running State
8. In order to visit the page served by the Nginx container, open a browser from a remote location in your LAN and type the IP address of your machine using the HTTP protocol.
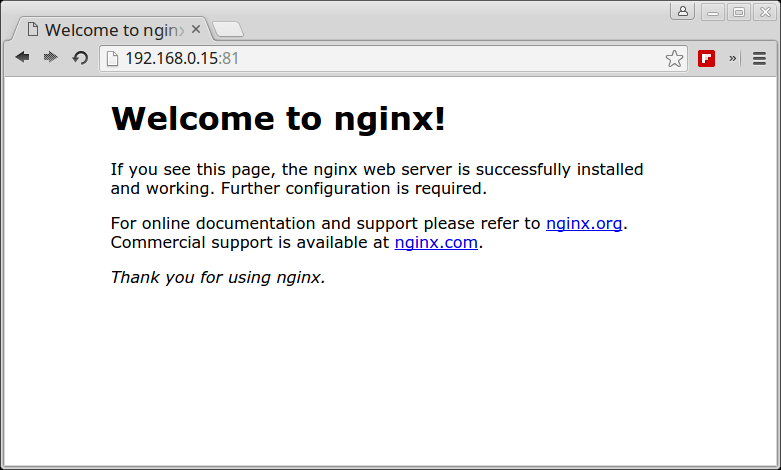
Verify Nginx Running under Docker Container
9. To stop the container run the following command followed by container ID or name:
# docker ps
# docker stop fervent_mccarthy
# docker ps
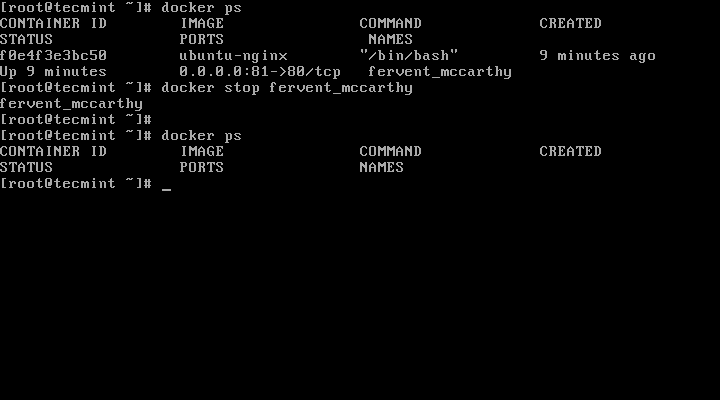
Stop Running Docker Container
As alternative to stop the running container, enter container shell command prompt and type exit to finish process:
# docker attach fervent_mccarthy
# exit
Be aware that using this kind of containers to run web servers or other kind of services are best suited only for development purposes or tests due to the fact that the services are only active while the container is running. Exiting the container disrupts all running services or any changes made.
This tutorial will concentrate on how to build a custom Docker image based on Ubuntu with Apache service installed. The whole the process will be automated using a Dockerfile.
Build Configure Docker Images with Dockerfile – Part 3
Docker images can be automatically build form text files, named Dockerfiles. A Docker file contains step-by-step ordered instructions or commands used to create and configure a Docker image.
Requirements
- Install Docker and Learn Docker Container Manipulation – Part 1
- Deploy and Run Applications under Docker Containers – Part 2
Basically, a Docker file contains various instructions in order to build and configure a specific container based on your requirements. The following instructions are the most used, some of them being mandatory:
FROM= Mandatory as first instruction in a Docker file. Instructs Docker to pull the base image from which you are building the new image. Use a tag to specify the exact image from which you are building:
Ex: FROM ubuntu:14.04
MAINTAINER= Author of the build imageRUN= This instruction can be used on multiple lines and runs any commands after Docker image has been created.CMD= Run any command when Docker image is started. Use only one CMD instruction in a Dockerfile.ENTRYPOINT= Same as CMD but used as the main command for the image.EXPOSE= Instructs the container to listen on network ports when running. The container ports are not reachable from the host by default.ENV= Set container environment variables.ADD= Copy resources (files, directories or files from URLs).
Step 1: Creating or Writing Dockerfile Repository
1. First, let’s create some kind of Dockerfile repositories in order to reuse files in future to create other images. Make an empty directory somewhere in /var partition where we will create the file with the instructions that will be used to build the newly Docker image.
# mkdir -p /var/docker/ubuntu/apache
# touch /var/docker/ubuntu/apache/Dockerfile

Create Dockerfile Repository
2. Next, start editing the file with the following instructions:
# vi /var/docker/ubuntu/apache/Dockerfile
Dokerfile excerpt:
FROM ubuntu
MAINTAINER  your_name  <user@domain.tld>
RUN apt-get -y install apache2
RUN echo “Hello Apache server on Ubuntu Docker” > /var/www/html/index.html
EXPOSE 80
CMD /usr/sbin/apache2ctl -D FOREGROUND

Dockerfile Repository
Now, let’s go through the file instructions:
The first line tells us that we are building from an Ubuntu image. If no tag is submitted, say 14:10 for example, the latest image from Docker Hub is used.
On the second line we’ve added the name and email of the image creator. Next two RUN lines will be executed in the container when building the image and will install Apache daemon and echo some text into default apache web page.
The EXPOSE line will instruct Docker container to listen on port 80, but the port will be not available to outside. The last line instructs the container to run Apache service in foreground after the container is started.
3. The last thing we need to do is to start creating the image by issuing the below command, which will locally create a new Docker image named ubuntu-apache based on the Dockerfile created earlier, as shown in this example:
# docker build -t ubuntu-apache /var/docker/ubuntu/apache/
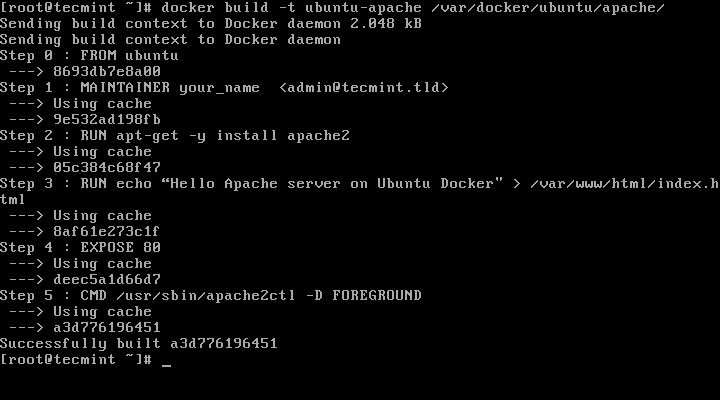
Create Docker Image
4. After the image has been created by Docker, you can list all available images and identify your image by issuing the following command:
# docker images
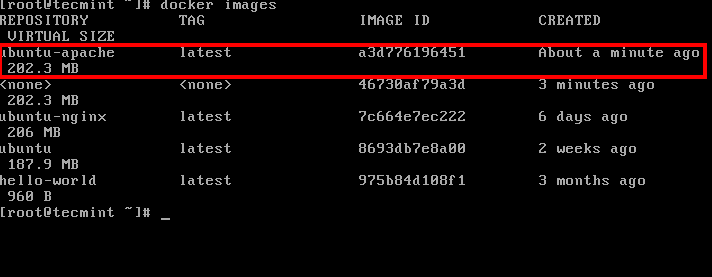
List All Docker Images
Step 2: Run the Container and Access Apache from LAN
5. In order to run the container continuously (in background) and access the container exposed services (ports) from the host or other remote machine in your LAN, run the below command on your host terminal prompt:
# docker run -d -p 81:80 ubuntu-apache

Run Docker Container Image
Here, the -d option runs the ubuntu-apache container in background (as a daemon) and the -p option maps the container port 80 to your localhost port 81. Outside LAN access to Apache service can be reached through port 81 only.
Netstat command will give you an idea about what ports the host is listening to.
After the container has been started, you can also run docker ps command to view the status of the running container.
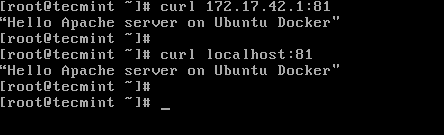
6. The webpage can be displayed on your host from command line using curl utility against your machine IP Address, localhost or docker net interface on port 81. Use ip command line to show network interface IP addresses.
# ip addr               [List nework interfaces]
# curl ip-address:81    [System Docker IP Address]
# curl localhost:81     [Localhost]
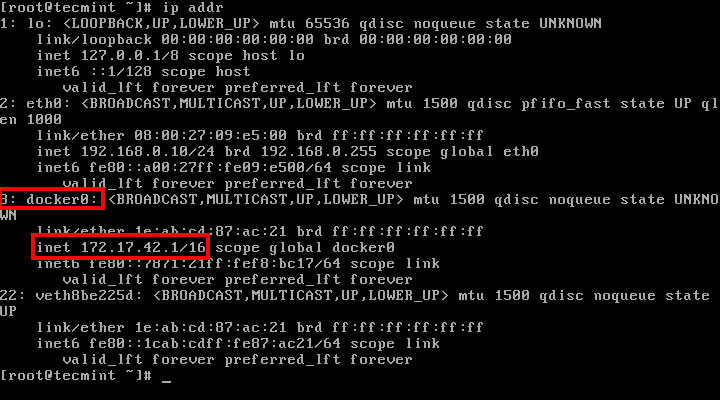
Check Docker Network Interface and IP Address
Check Docker Apache Webpage
7. To visit the container webpage from your network, open a browser at remote location and use HTTP protocol, the IP Address of the machine where the container is running, followed by port 81 as illustrated on below image.
http://ip-address:81
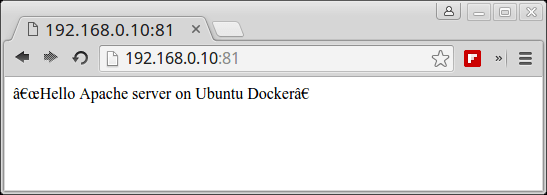
Check Docker Container Apache Page
8. To get an inside of what processes are running inside the container issue the following command:
# docker ps
# docker top <name or ID of the container>
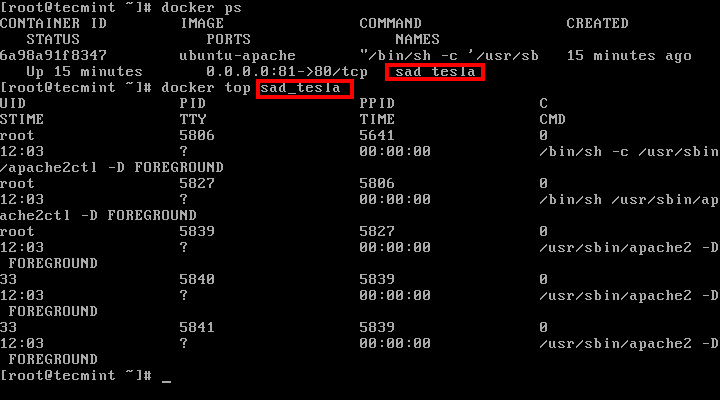
Check Running Docker Processes
9. To stop the container issue docker stop command followed by the container ID or name.
# docker stop <name or ID of the container>
# docker ps
10. In case you want to assign a descriptive name for the container use the --name option as shown in the below example:
# docker run --name my-www -d -p 81:80 ubuntu-apache
# docker ps
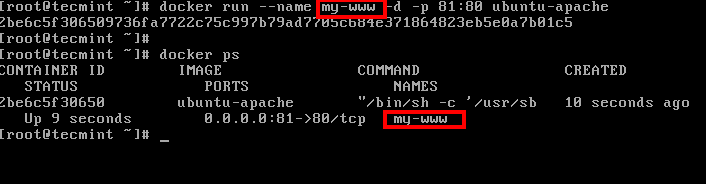
Give Docker Container Name
Now you can reference the container for manipulation (start, stop, top, stats etc) only by using the assigned name.
# docker stats my-www

Monitor Docker Container Utilization
Step 3: Create a System-wide Configuration File for Docker Container
11. On CentOS/RHEL 7 you can create a systemd configuration file and manage the container as you normally do for any other local service.
For instance, create a new systemd file named, let’s say, apache-docker.service using the following command:
# vi /etc/systemd/system/apache-docker.service
apache-docker.service file excerpt:
[Unit]
Description=apache container
Requires=docker.service
After=docker.service

[Service]
Restart=always
ExecStart=/usr/bin/docker start -a my-www
ExecStop=/usr/bin/docker stop -t 2 my-www

[Install]
WantedBy=local.target
12. After you finish editing the file, close it, reload the systemd daemon to reflect changes and start the container by issuing the following commands:
# systemctl daemon-reload
# systemctl start apache-docker.service
# systemctl status apache-docker.service
This was just a simple example on what you can do with a simple Dockerfile but you can pre-build some pretty sophisticated applications that you can fire-up in just a matter of seconds with minimal resources and effort.
ctop – Top-like Interface for Monitoring Docker Containers
ctop is a free open source, simple and cross-platform top-like command-line tool for monitoring container metrics in real-time. It allows you to get an overview of metrics concerning CPU, memory, network, I/O for multiple containers and also supports inspection of a specific container.
Docker Container Monitoring
At the time of writing this article, it ships with built-in support for Docker (default container connector) and runC; connectors for other container and cluster platforms will be added in future releases.
How to Install ctop in Linux Systems
Installing the latest release of ctop is as easy as running the following commands to download the binary for your Linux distribution and install it under /usr/local/bin/ctop and make it executable to run it.
$ sudo wget https://github.com/bcicen/ctop/releases/download/v0.7.1/ctop-0.7.1-linux-amd64  -O /usr/local/bin/ctop
$ sudo chmod +x /usr/local/bin/ctop
Alternatively, install ctop via Docker using following command.
$ docker run --rm -ti --name=ctop -v /var/run/docker.sock:/var/run/docker.sock quay.io/vektorlab/ctop:latest
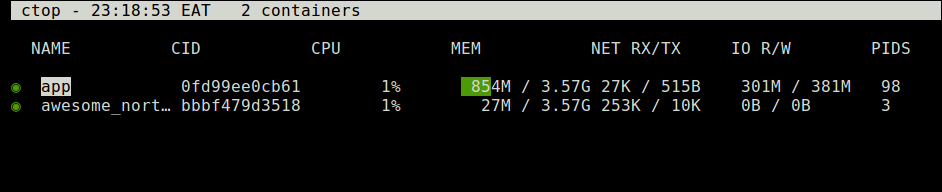
$ ctop
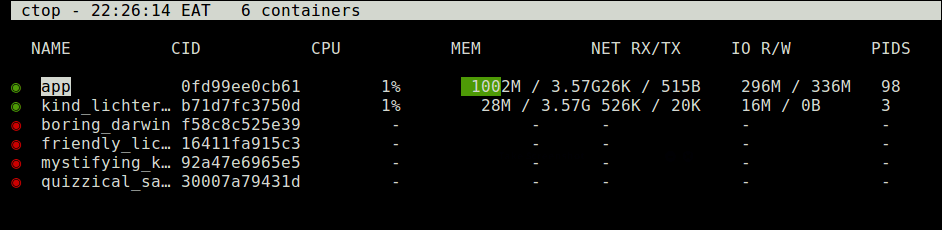
Monitor Docker Containers
You can use the Up and Down arrow keys to highlight a container and click Enter to select it. You will see a menu as shown in the following screenshot. Choose “single view” and click on it to inspect the selected container.
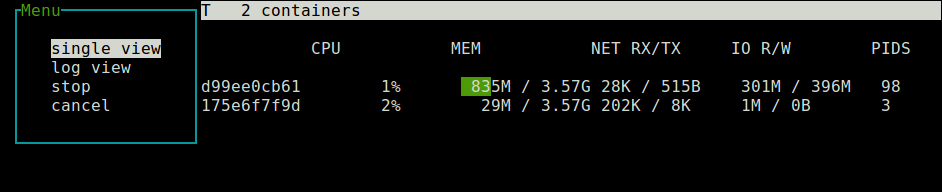
Monitor Single Docker Container
The following screenshot shows the single view mode for a specific container.
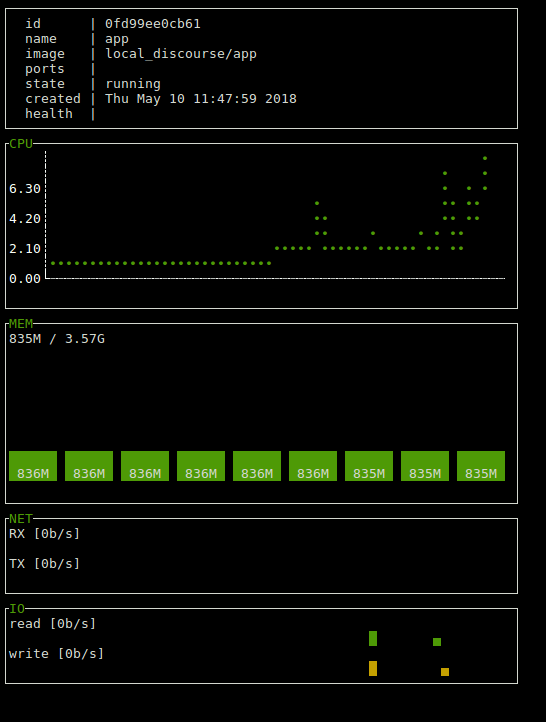
Inspect a Single Container
To display active containers only, use the -a flag.
$ ctop -a
Check Active Docker Container
To display CPU as % of system total, use the -scale-cpu option.
$ ctop -scale-cpu
You can also filter containers using the -f flag, for example.
$ ctop -f app
Additionally, you can select initial container sort field using the -s flag, and see the ctop help message as shown.
$ ctop -h
Note that connectors for other container and cluster systems are yet to be added to ctop. You can find more information from the Ctop Github repository.
ctop is a simple top-like tool for visualizing and monitoring container metrics in real-time. In this article, we’ve expalined how to install and use ctop in Linux. You can share your thoughts or ask any questions via the comment form below.