
In this series we are discussing RHEV3.5 administration topics. RHEV is the RedHat Enterprise Virtualization solution, which is based on oVirt project [open-source Virtualization project].
Red Hat Enterprise Virtualization is a complete virtualization management solution for virtualized servers and desktops.
This series will discuss (How to) administration topics including the RHCVA exam objectives.
In our first article, we are discussing RHEV environment and basic deployment. RHEV consists of two main components, like Hypervisor and Management system.
RHEV-H is the Hypervisor of RHEV platform, it is a bare-metal hypervisor which used to host virtual machines. It’s also based on KVM and RHEL.
RHEVM is the management system of the environment which controls the environment hypervisors. It’s also used to create, migrate, modify and control virtual machines hosted by hypervisrors and a lot of other many tasks will be discussed later.
RHEV3.5 Features
- Open source solution based on the Red Hat Enterprise Linux kernel with the Kernel-based Virtual Machine (KVM) hypervisor technology.
- Supported limit of up to 160 logical CPUs and 4TB per host and up to 160 vCPU and 4TB vRAM per virtual machine.
- OpenStack integration.
- Supported Daily missions like offline migration, High availability, Clustering, etc..
For more features and details read: RedHat Enterprise Virtualization Guide
Prerequisites
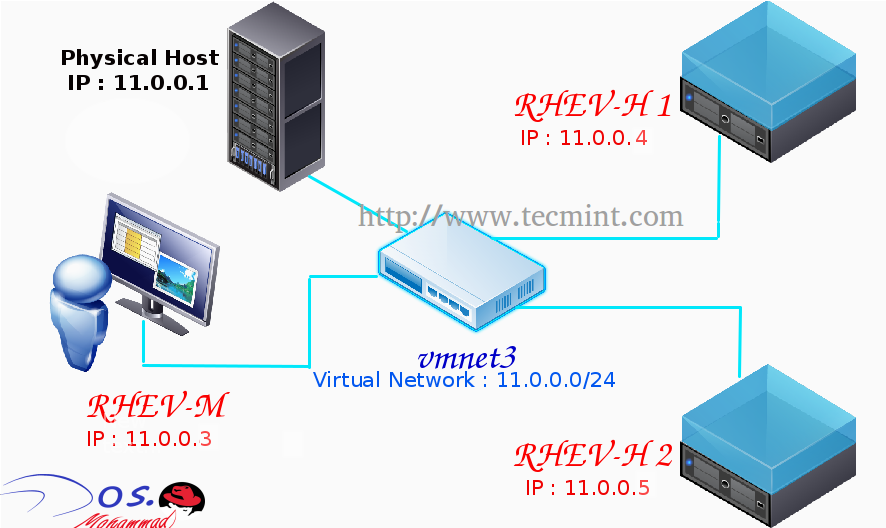
During our series, we will work on two nodes ‘hypervisors’ and ‘hosts’ with one manager and one iscsi storage node. In the future we will add one IPA and DNS server to our environment.
For deployment scenarios we have two:
- Physical Deployment – Real environment, so you will need at least three or physical machines.
- Virtual deployment – Test labs/environment, so you will need one physical machine with high resources e.g. i3 or i5 processor with 8G or 12G ram. Additional to another virtualization software e.g. Vmware workstation.
In this series we are working on the second scenario:
Physical Host OS : Fedora 21 x86_64 with kernel 3.18.9-200
RHEV-M  machine OS : RHEL6.6 x86_64
RHEV-H  machines hypervisor : RHEV-H 6.6
Virtualization software : Vmware workstation 11
Virtual Network interface : vmnet3
Network : 11.0.0.0/24
Physical Host IP : 11.0.0.1
RHEV-M machine : 11.0.0.3
RedHat Enterprise Virtualization Diagram
In the future articles, we will add additional components like storage nodes and IPA server so make your environment scalable as possible.
For RHEV-M machine take care about this prerequisites:
- RHEL/CentOS6.6 x86_64 new minimal installation [Clean installation].
- Make sure your system is up-to-date.
- Static IP for your network configuration.
- Your host-name something like machine.domain.com.
- Update your local /etc/hosts file with host-name and IP [Make sure the host-name is resolvable].
- The minimum requirement is 4G for memory and 25GB for hard disk.
- Mozilla Firefox 37 is recommended browser to access WUI.
Installation of RedHat Enterprise Virtualization Manager 3.5
1. To get access for RHEV packages and updates, you should get a free 60-day trial subscription from the redhat official site using co-prorate mail from here:
Note: After 60-day your environment will work fine, but without availability to update your system if there is new updates.
2. Then register your machine to redhat channels. Steps explained here.
3. Lets install rhevm package and its dependencies using yum command.
[root@rhevm ~]# yum install rhevm
4. Now its time to configure rhevm by runing “engine-setup” command, which will check the status of rhevm and any available updates with asking a series of questions.
We could summarize the questions in main sections :
- Product Options
- Packages
- Network Configuration
- DataBase Configuration
- oVirt Engine Configuration
- PKI Configuration
- Apache Configuration
- System Configuration
- Configuration Preview
Hint: Suggested configuration defaults are provided in square brackets; if the suggested value is acceptable for a given step, press Enter to accept that value.
To run the command:
[root@rhevm ~]# engine-setup
Product Options
First thing you will be asked about is to install and configure the engine on the same host. For our tutorial, keep the default value (Yes). If you want WebSocket Proxy to be configured on your machine, keep the default value (yes).

Product Options
Packages
Script will check any updates are available for the packages linked to the Manager. No user input is required at this stage.

Package Updates
Network Configuration
Let script configures your iptables firewall automatically. For now we won’t use DNS, so make sure that your host-name is fully qualified name by updating /etc/hosts as we did previously.

Network Configuration
Database Configuration
The default database for RHEV3.5 is PostgreSQL. You have the option to configure it on the same machine or remotely. For our tutorial will use the local one and let script to configure it automatically.

Database Configuration
Ovirt Configuration
In this section you will provide the admin password and the application mode for you environment.

Ovirt Configuration
PKI Configuration
RHEVM uses certificates to communicate securely with its hosts. You provide the organization name for the certificate.

PKI Configuration
Apache Configuration
For RHEVM web user interface, manager needs Apache web-server to be installed and configured, lets make setup configure it automatically.

Apache Configuration
System configuration
RHEV environment has ISO library which you could store many OS ISO in. This ISO lib called also ISO domain, this domain is a network shared path, usually it shared by NFS. This domain/path will be on the same RHEVM machine so you could create it manually or let script configures it automatically.

System Configuration
Configuration Review
In this section you will review all previous configuration and confirm if everything is OK.
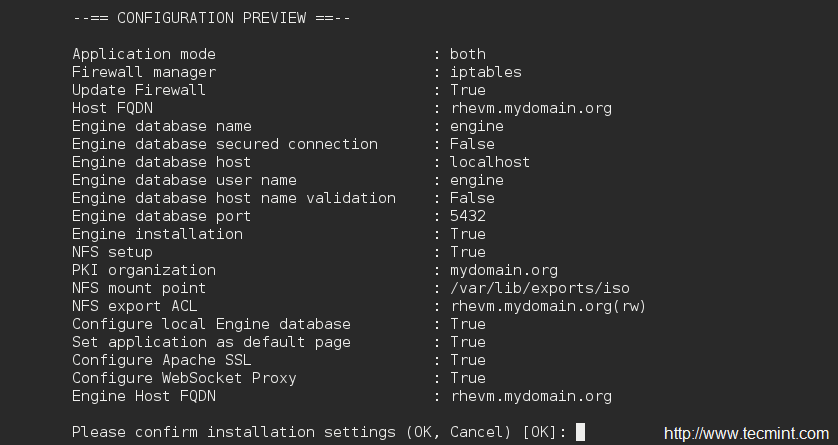
Configuration Review
Summery
This is the last stage which show additional information about how to access the admin panel and starting the services.
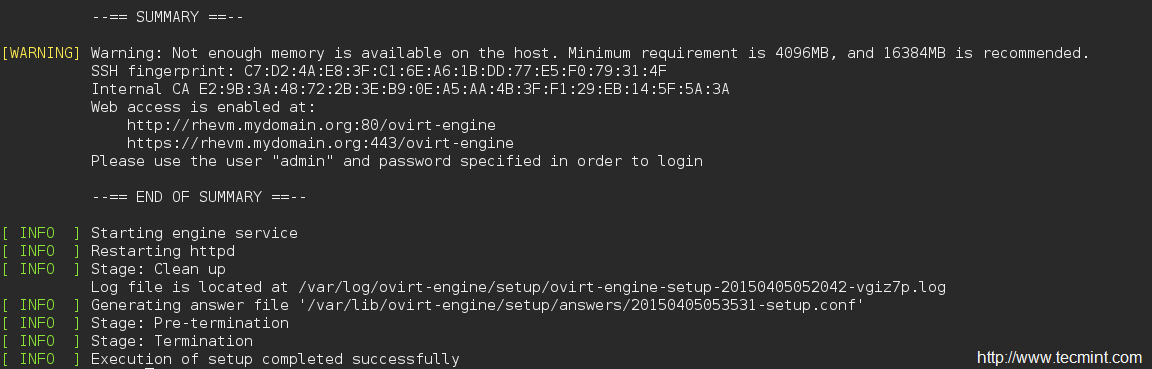
Summary
Hint: Warning may appears, if the memory used is low than the minimum requirement. For test-environment it’s not very important just keep on.
To access RHEVM web user interface:
http://$your-ip/ovirt-engine
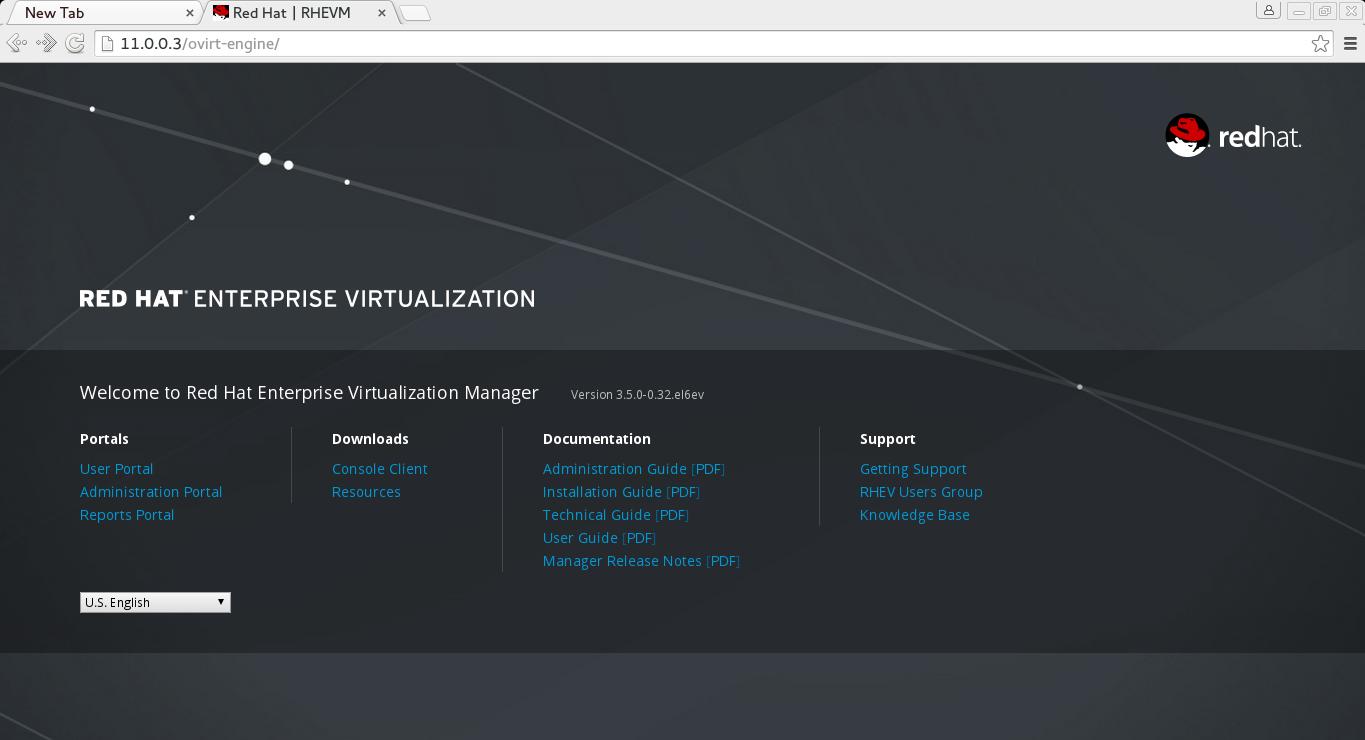
RedHat Enterprise Virtualization Manager
Then select Administrator Portal and provide your credentials Username:admin and the password you entered during the installation. Click Login.
RedHat Enterprise Virtualization Administrator Portal
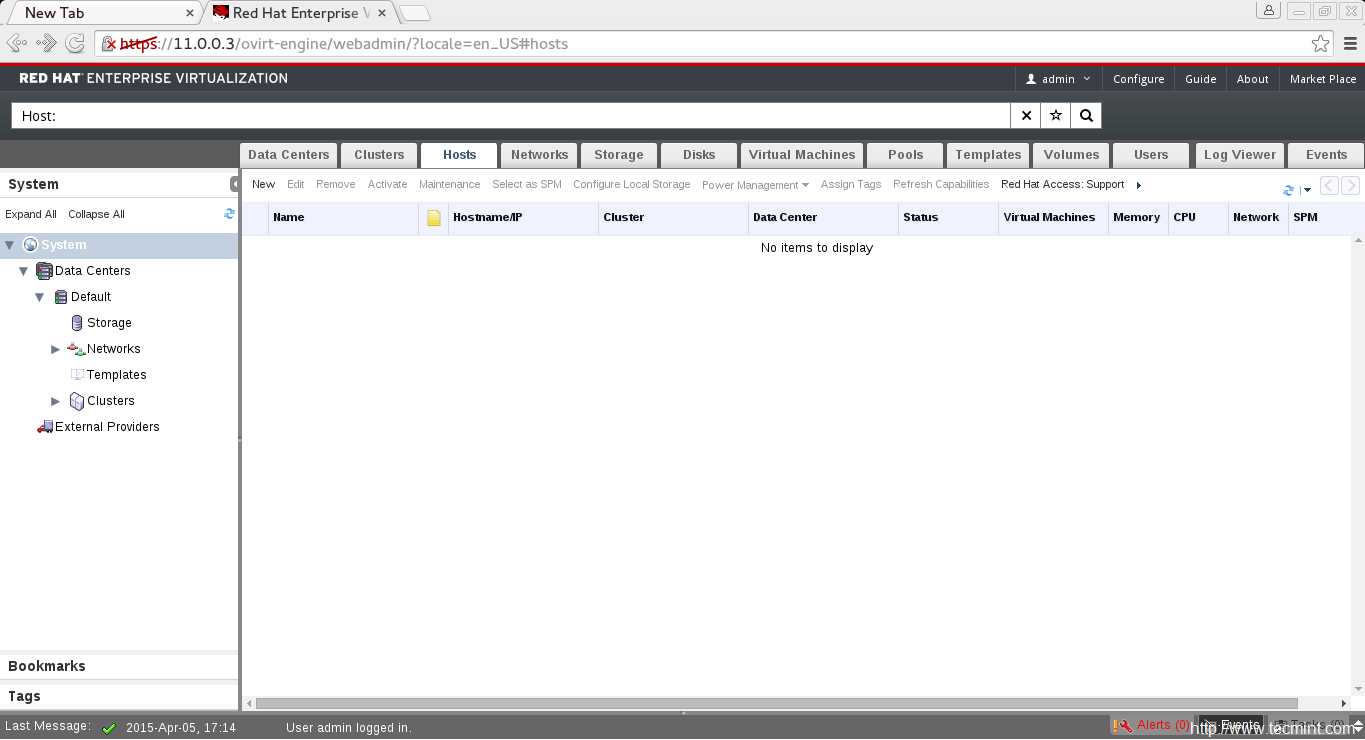
This is the administration portal which will be discussed later. You will notice that hosts tab is empty as we didn’t add any host/hypervisor to our environment yet.
Administrator Dashboard
Conclusion
This is first article in our RHEV3.5 administration series. We just introduce the solution, its features and its main components then we installed RHEV-M for our RHEV environment. In next article we will discuses RHEV-Hinstallation and adding them to RHEV environment under RHEVM management.
How to Deploy RedHat Enterprise Virtualization Hypervisor (RHEV-H) – Part 2
In this second part, we are discussing the deployment of RHEVH or the Hypervisor nodes of our environment with some tips and tricks for your virtual lab or virtual environment.
Deploy RedHat Enterprise Virtualization Hypervisor – Part 2
As we discussed before, in our scenario which including two hyprvisors with separate RHEVM machine. The reason to deploy the manager in separate machine is more reliable than deploying it on one of the environment hosts/nodes. If you try to deploy it (as a virtual machine/appliance) on one of environment nodes/hosts and for any reason this node becomes down, the RHEVM machine/appliance will become down due to the node failure, on other words, we wont RHEVM depends on environment nodes so we will deploy it over separate machine which doesn’t belong to DataCenter/Environment nodes.
Deploying RedHat Enterprise Virtualization Hypervisor
1. For our virtual environment, you should now have this network virtual interface “vmnet3” with this specification at VMware workstation 11.

Virtual Network Editor
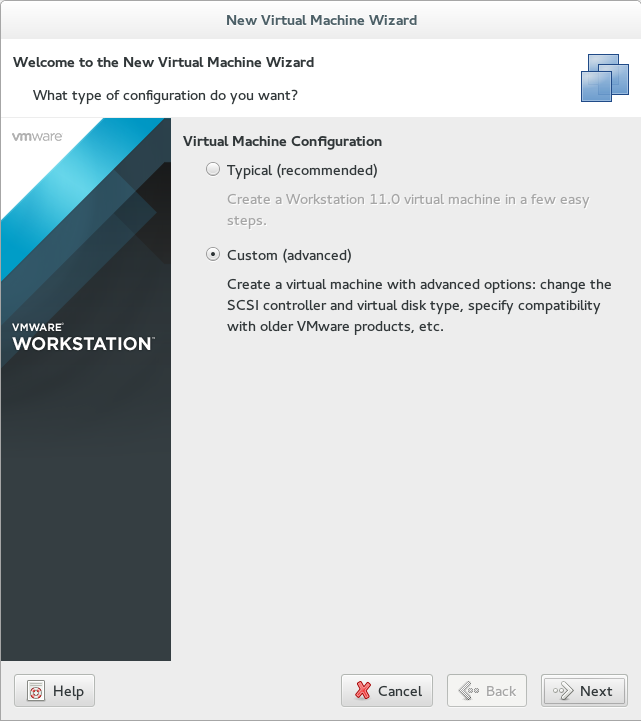
2. Lets deploy our nodes, you will need to create normal virtual machine with some customization as presented in screen-shots.
Create New Machine
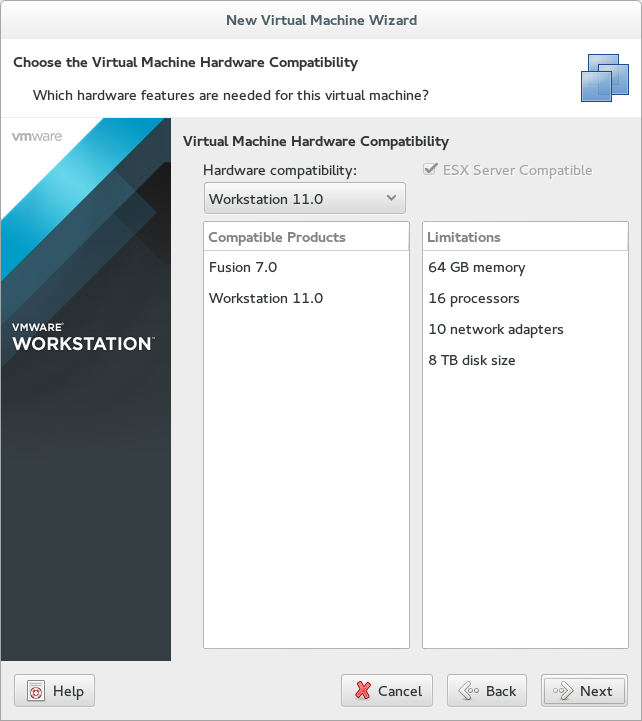
Select Hardware Compatibility
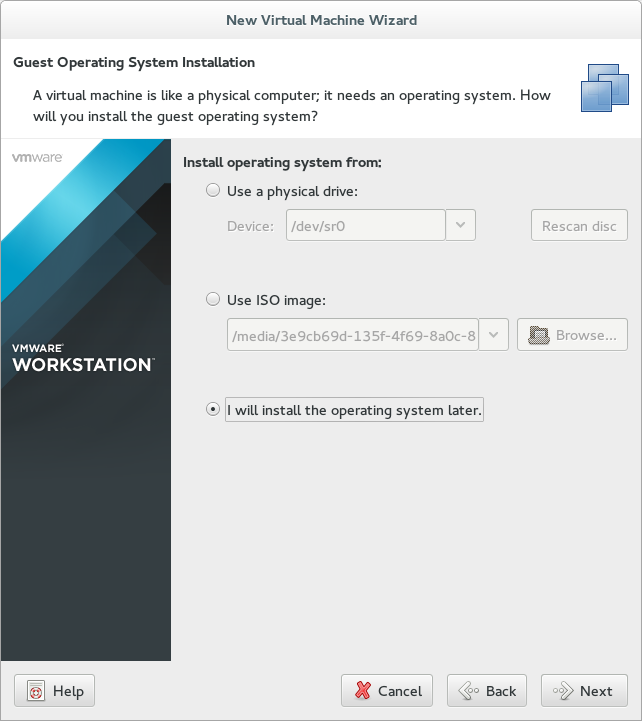
Select Install Source
3. Make sure about OS type in next step : Other, Other64-bit.

Select Guest OS Type
4. Select your suitable name and path for your virtual machine.

Set Name of OS
5. If you have more resources, increase the number of cores/processors on demand.

Processor Configuration
6. For memory, don’t choose less than 2G, we won’t to suffer later.
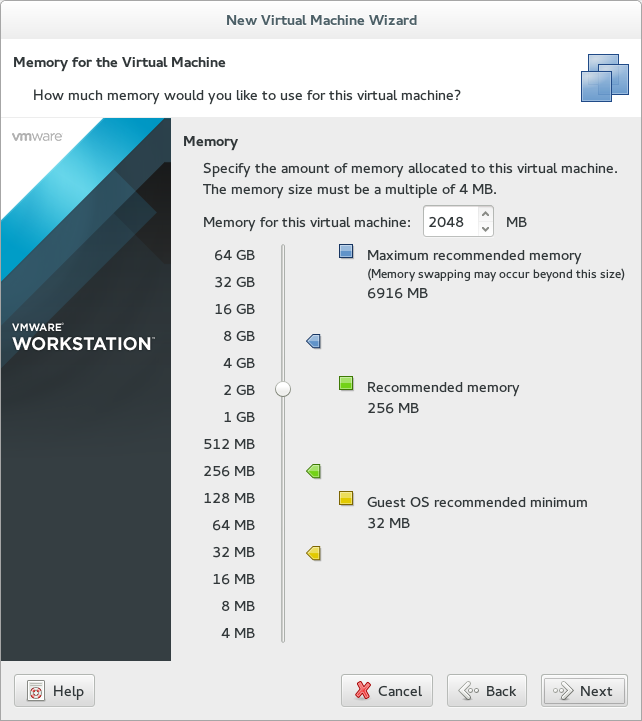
Select VM Memory
7. For now, select NAT connection, it isn’t make different as we will change it later.
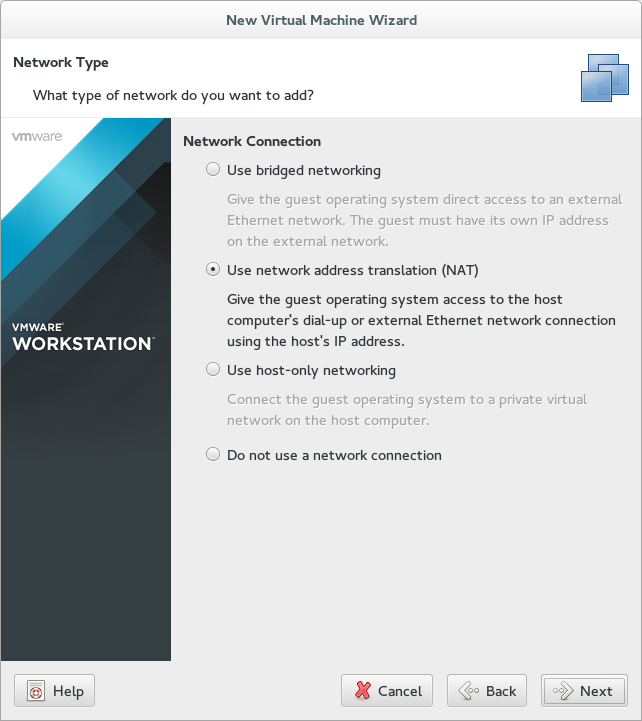
Select Network Type
8. It is very important point to select SAS controller.
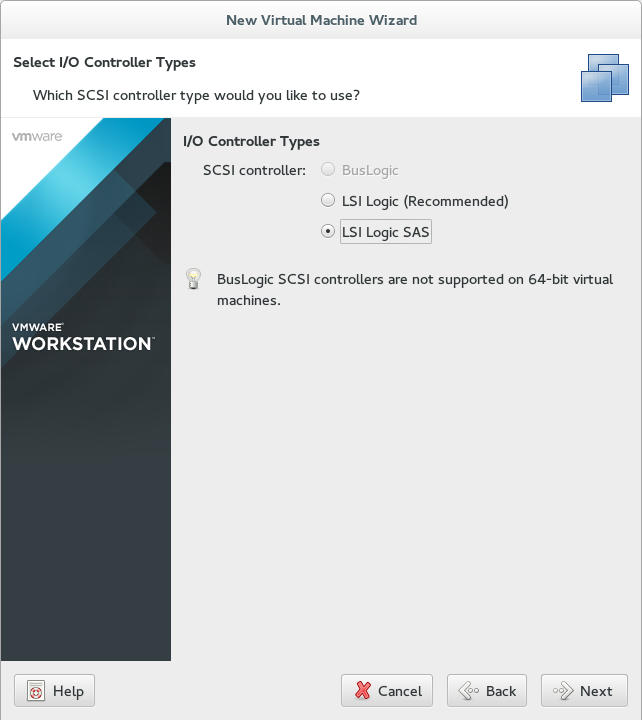
Select I/O Controller Types
9. Choose SCSI Disk Type.

Select Disk Type
10. We will work with shared storage later, so 20 G is more than suitable.

Select Storage Capacity
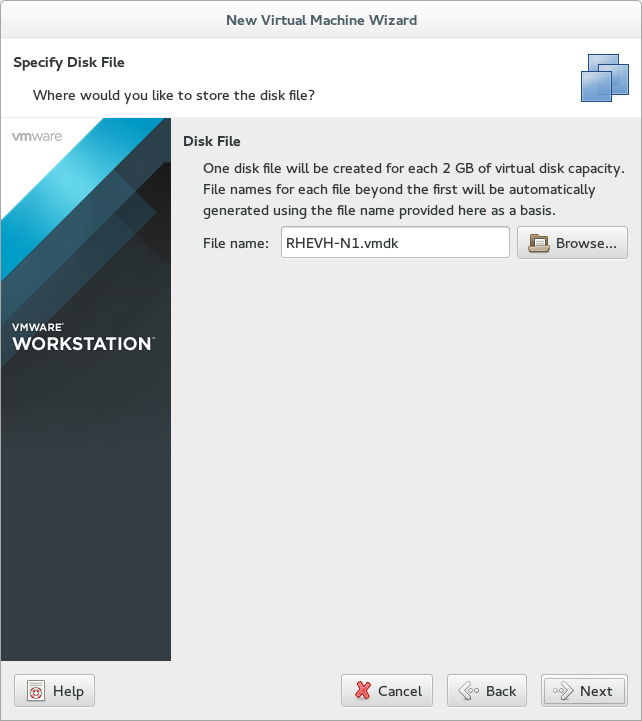
Select Storage Drive
11. Before finishing, lets make some additional modification…click Customize Hardware.

Customize Hardware
First modification will be for Processor as we will check the two options to enable virtualization features in our Processor.
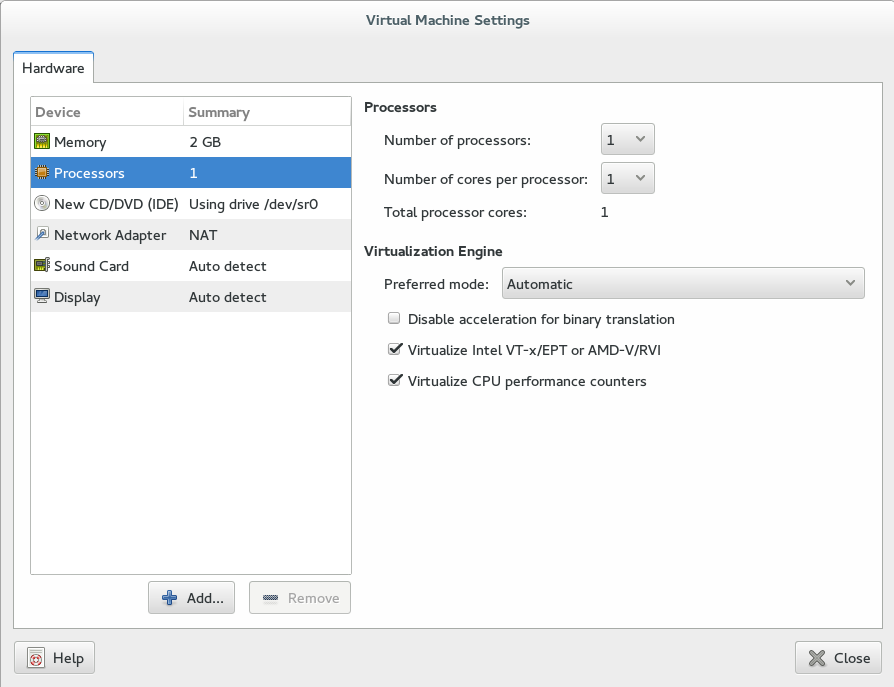
Enable Virtualization
Second modification will be for Network Configuration… change it to be Custom and insert the path of “vmnet3”.
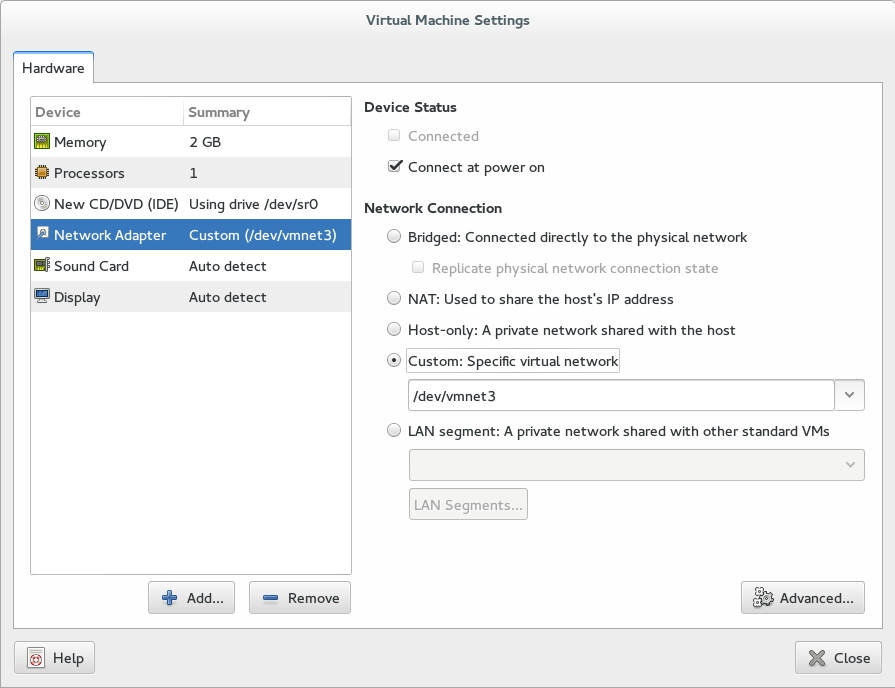
Network Configuration
Last modification will be our Hypervisor-ISO path, then close, review and finishing.
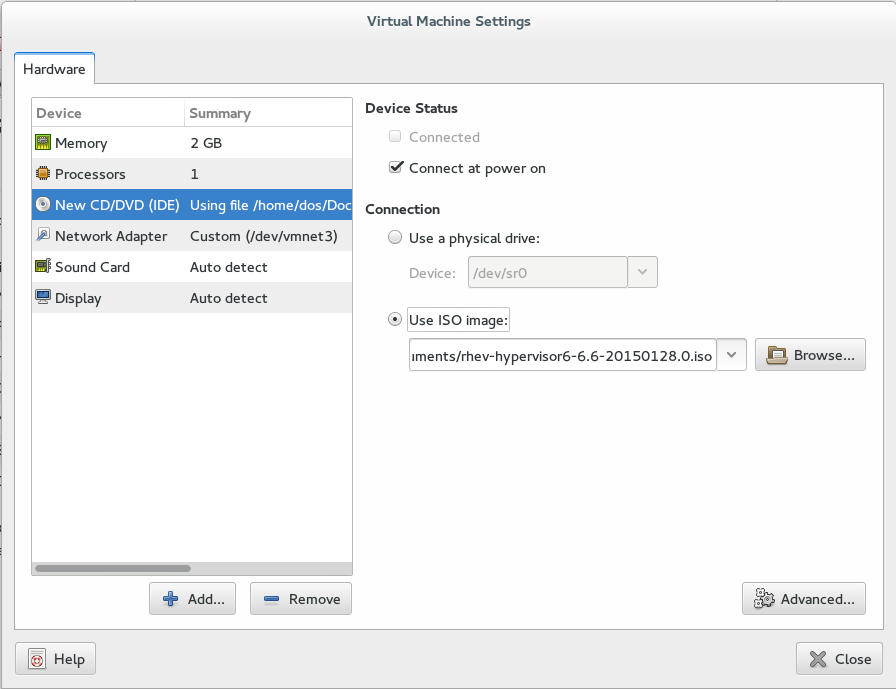
Select Hypervisor ISO Path
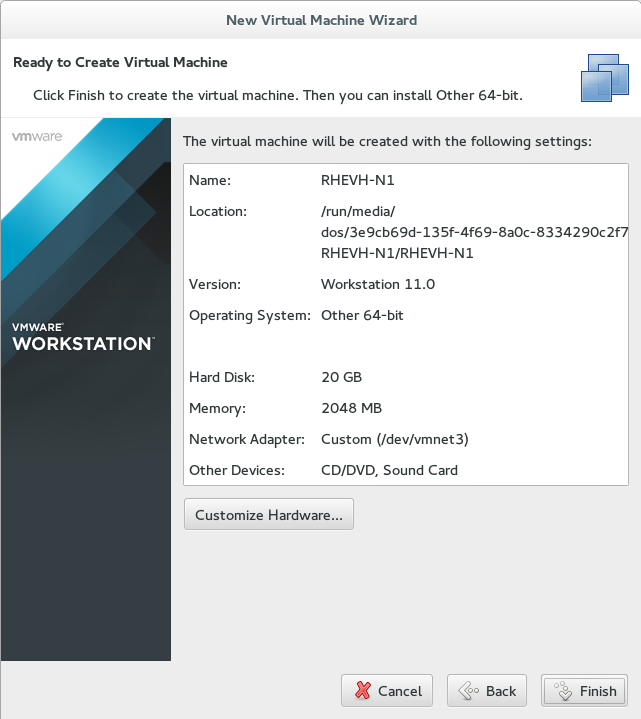
Virtual Machine Summary
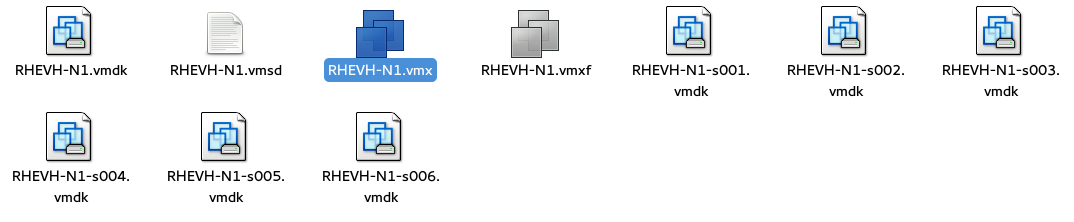
12. Before starting your virtual machine, we should make some manual modification in vm configuration file. Go to the path of you virtual machine, you will find file with “vmx” extension.
Virtual Machine Configuration
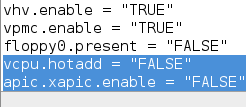
13. Open it with your preferred editor and add those two option at the end of file.
vcpu.hotadd = "FALSE"
apic.xapic.enable = "FALSE"
Configure VM
Then save and go back to our virtual machine as its time to start it.
Start VM
Press any button, DON’T continue with Automatic boot. This list will appear…

VM Boot Menu
Make sure you selected the 1st line the press “tab” to edit some options.
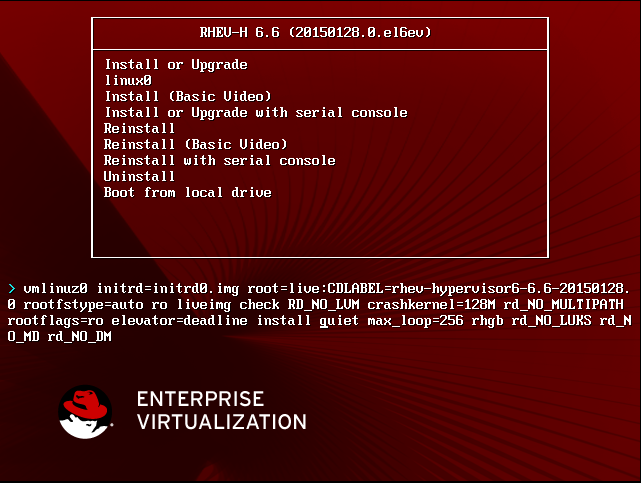
Change Boot Options
Remove “quiet” from booting options and Press enter to continue.
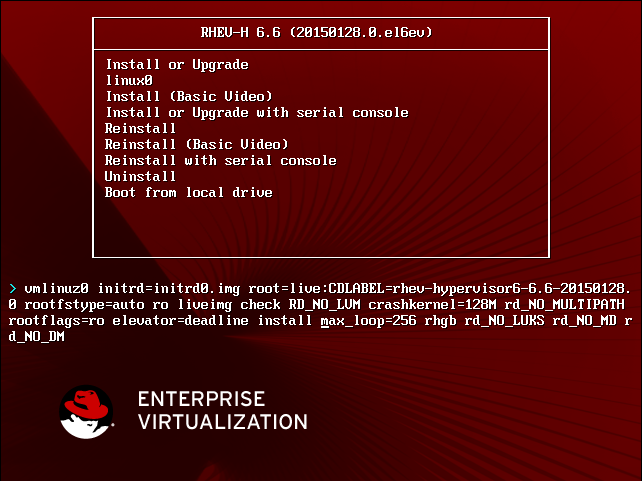
Remove Quiet Option
VM Booting
14. In the start console make sure about INFO which talking Virtualzation H/W was detected and enabled. Don’t continue with anything else..
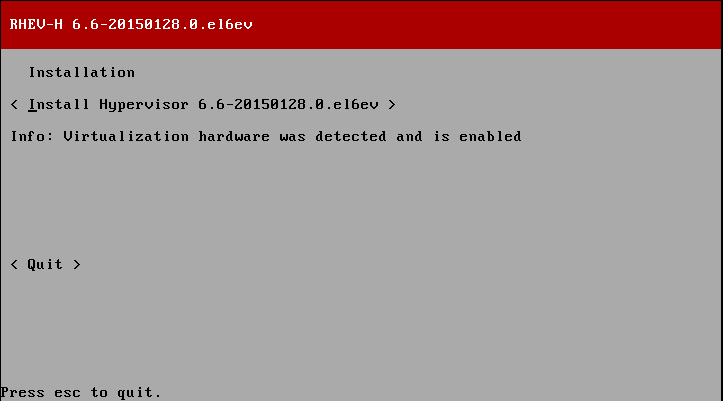
Install Hypervisor
15. Check you preferred language and continue with your local storage.
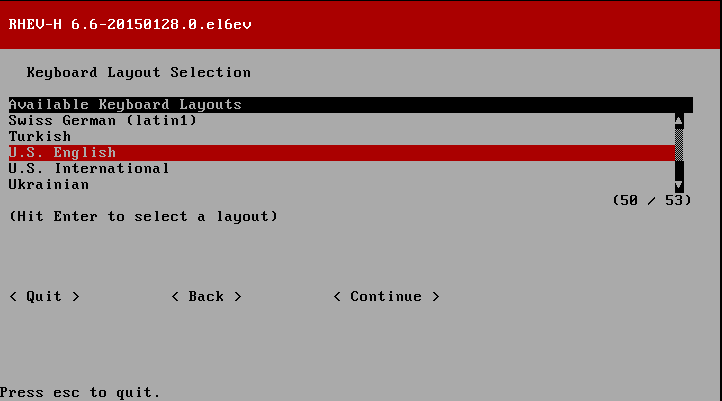
Select Language
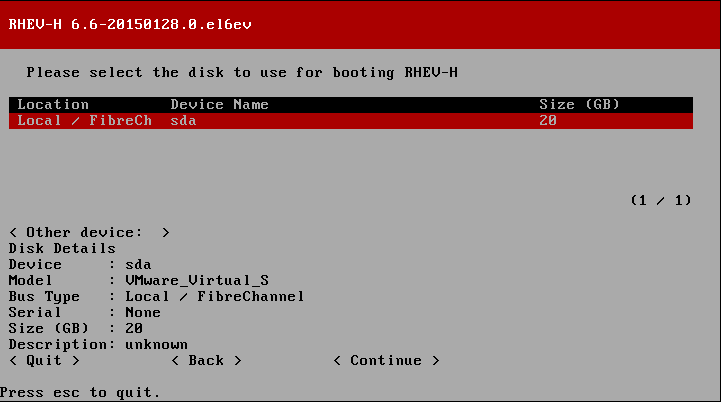
Select Disk Storage
Hint: Use arrows keys to change and space to select and deselect options.
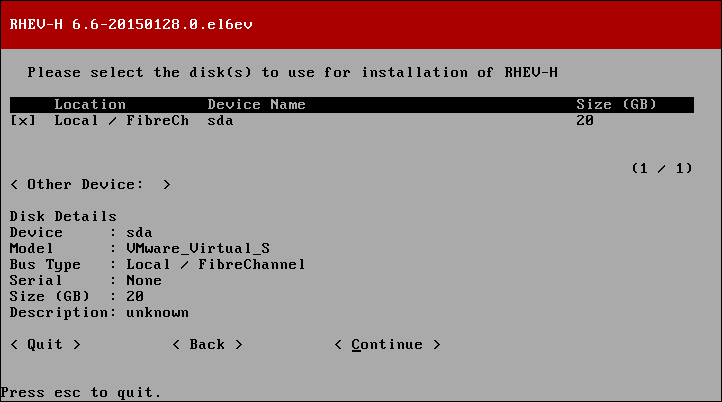
Selected Disk Storage
16. There is no need to change the default values of storage volumes and system portions, so keep it as defaults and make sure to review and confirm settings.
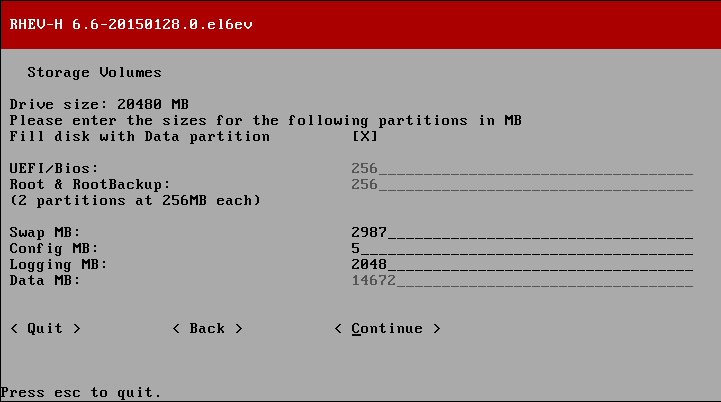
Storage Volumes
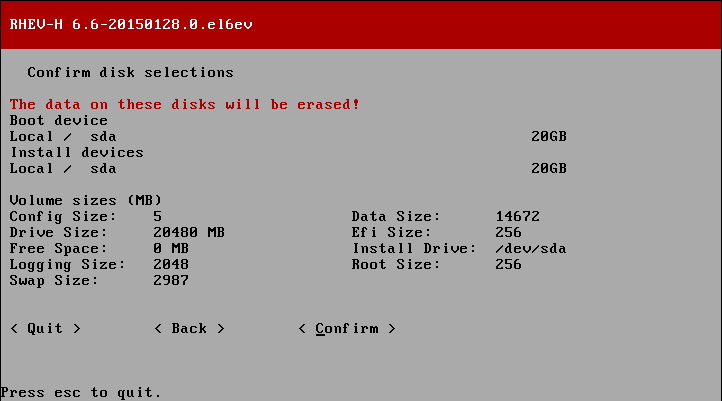
Confirm Disk Selection
17. For security reasons, root account isn’t available directly by-default as you should login with admin account, which have full privilege – then switch to root account. So take care about admin password as its equivalent to root password in importance.
Mainly, root account be needed for maintenance and troubleshoot proposals. Any configuration or customization done be admin account only.
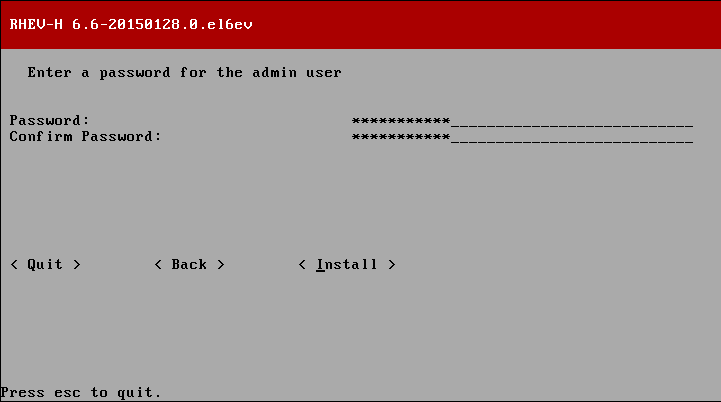
Enter Login Details
Wait minutes until installation finishes and then “Reboot” the system.
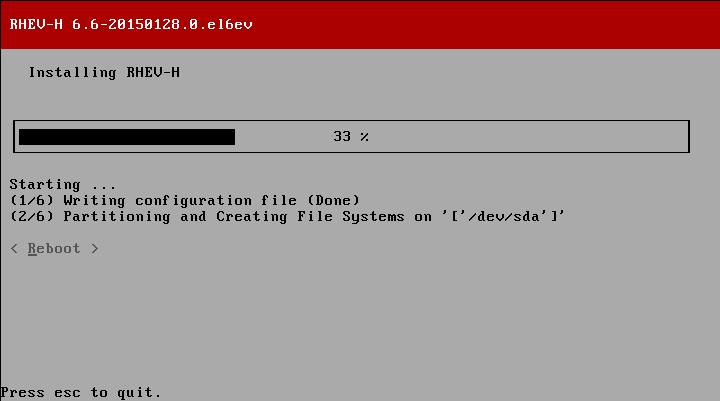
Hypervisor Installation
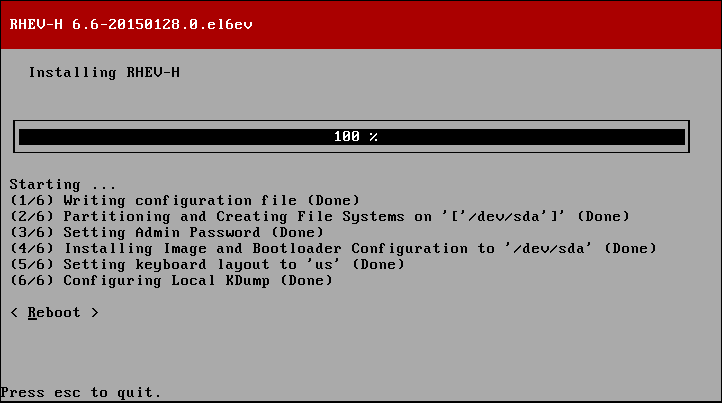
RHEV H Installation
18. After rebooting, provide admin credentials to login.
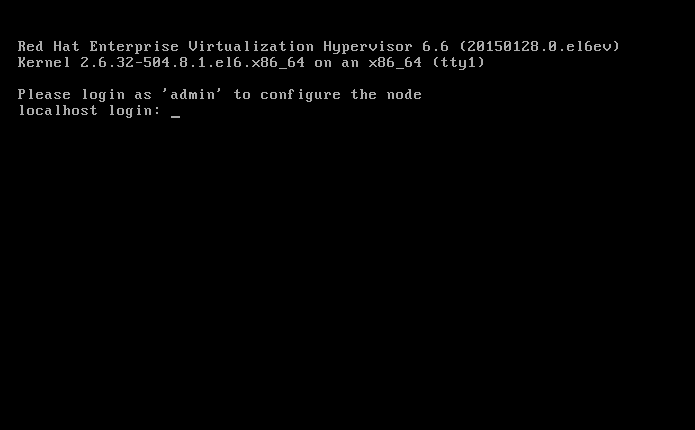
Root Login
This is the default console to manage the basic configuration of your hypervisor.
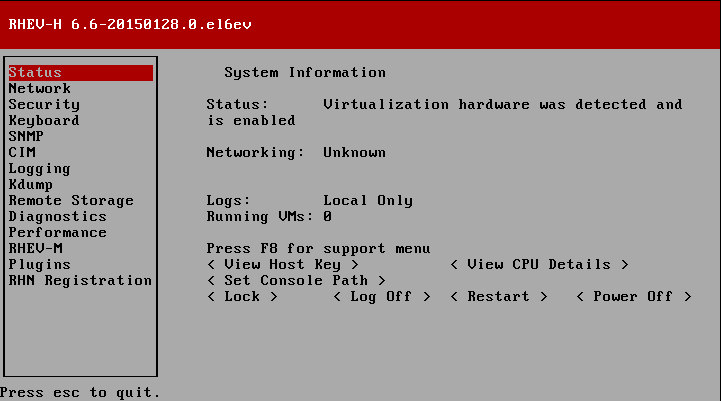
RHEV H Console
Hint: Review the status of your hypervisor and make sure it looks like the above.
19. Now, we will make three major, basic and important configuration.
- Network
- Security
- RHEV-M
Network:
Select Network tab [using arrows].
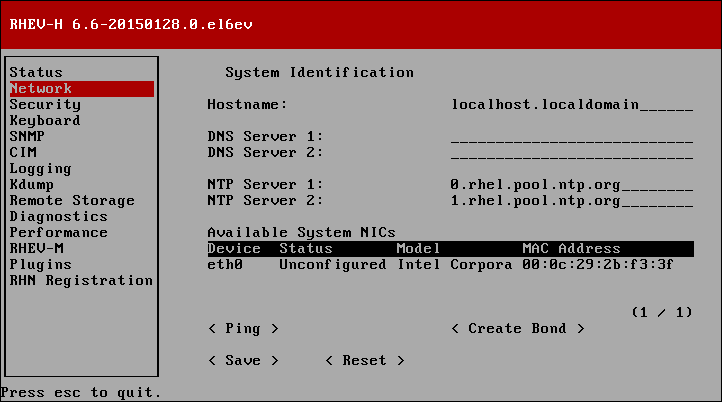
Network
Change you hypervisor hostname and add DNS IP address.
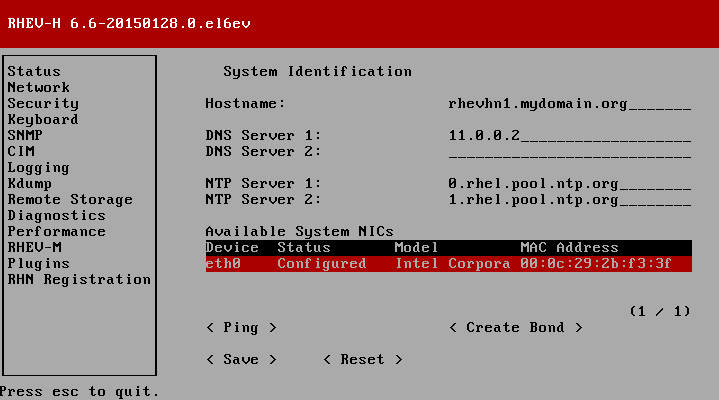
Set Hostname and DNS
Hint: For our VMware workstation environment, we will provide the gateway IP address.
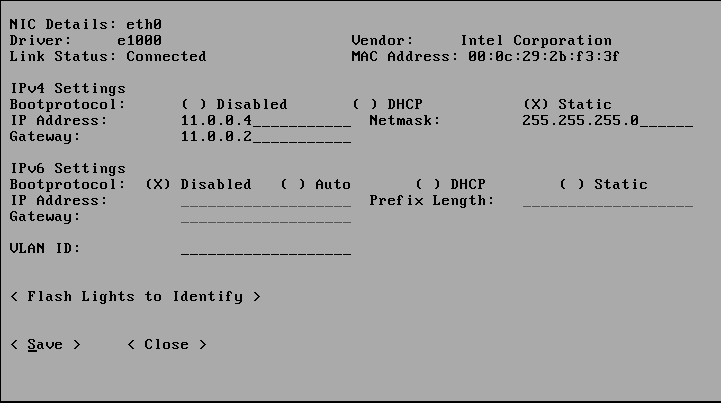
Next, configure Static IP for your NIC.
Configure IP Address
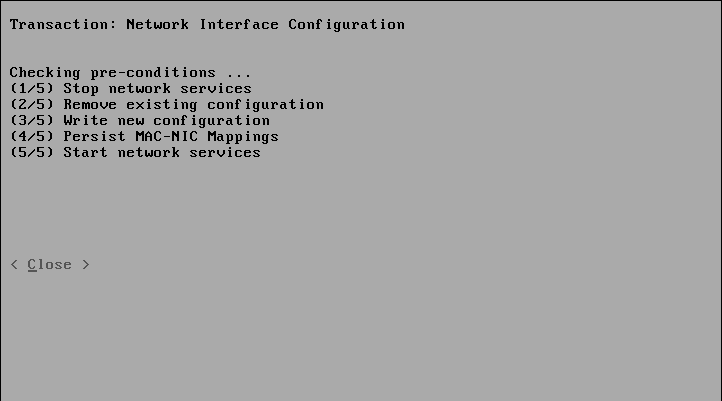
Then save and close ‘wait few minuets‘…
Network Interface Configuration
Test your connectivity with internet using ping.
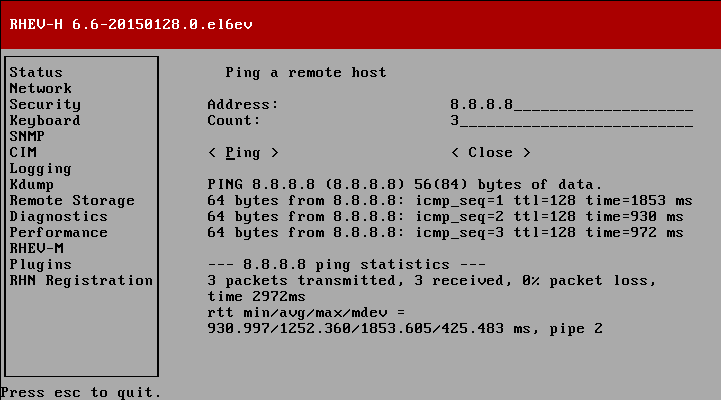
Test Network Connectivity
Important: Check the connectivity between hypervisors nodes and manager machines using ping.
Security
Select security tab. By default ssh is disabled enable it [by check it using ‘space‘] and then save and close.

Enable SSH
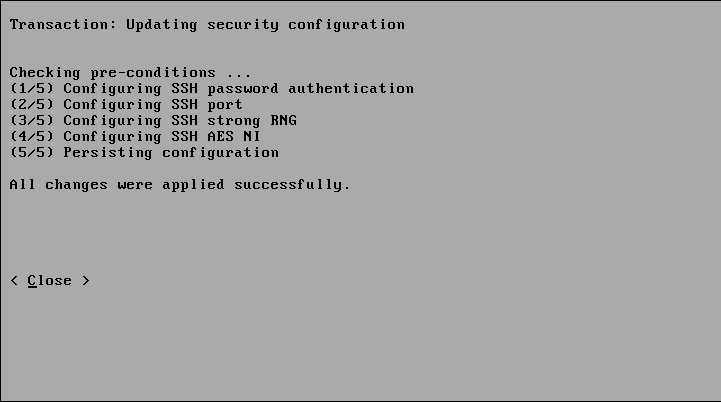
Security Configuration
RHEV-M
The last and important thing is establish connection between hypervisors and manager then registration them under the manager.
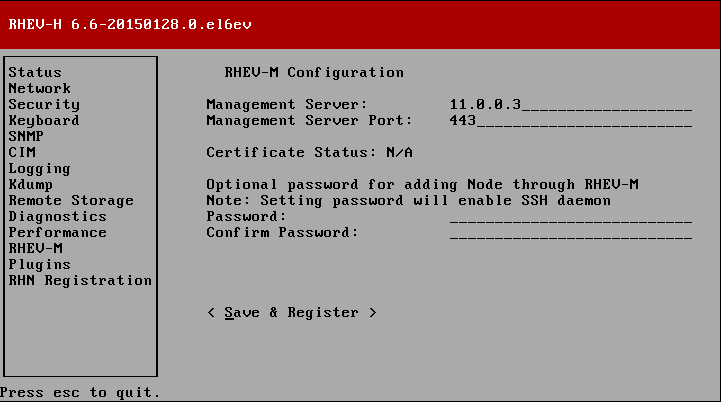
RHEV-M Configuration
Due to SSL connection you should compare SSL Finger print with Internal CA from RHEVM.
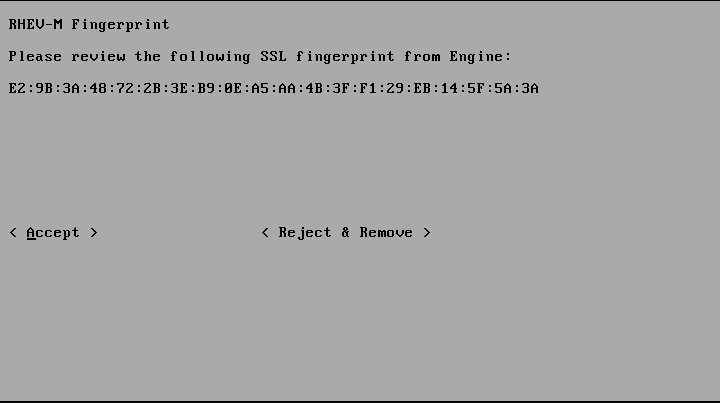
Check RHEV-M Fingerprint
Hint: If you reviewed it with Install RedHat Enterprise Virtualization – Part 1 article, we will find them identical.
Then accept and close the tab, next go to status tab and review everything.

Configuring RHEV-M
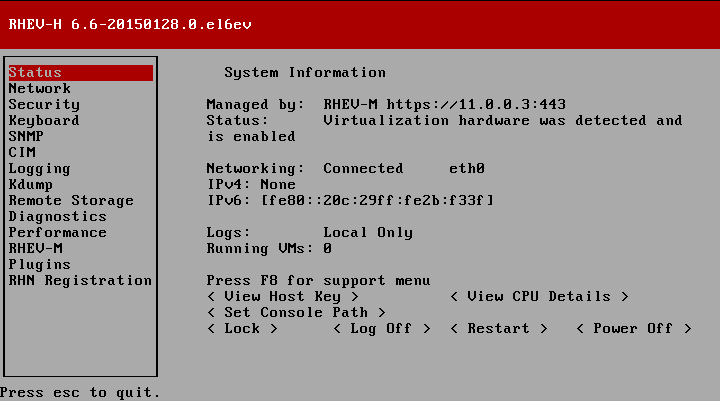
RHEV-H Summary
20. Final check, using RHEVM web interface. If you reviewed previous article, you will find there is no hosts under hosts tab.
RHEV Interface
You will find node is registered successfully and ready for admin approval to be included under data-center.
Conclusion
We’ve discussed how to deploy our environment hypervisors and connect them to manager, in our next upcoming article we will see how to deploy to general datacenter with clusters using shared storage. Last thing, If you working over real environment, skip VMware preparation section.
Reference Links:
- Red Hat Enterprise Virtualization Installation Guide
- Red Hat Enterprise Virtualization Administration Guide
How to Deploy Data-Centers with Cluster and Add ISCSI Storage in RHEV Environment
In this part, we are going to discuss how to deploy data-center with one cluster which contains our two hosts in the RHEV environment. Both of two hosts connected to shared storage, additional to previous preparation, we will add another CentOS6.6 virtual machine acts as storage node.
Create Data-Centers and Cluster in RHEV – Part 3
Data Center is a terminology describes the RHEV environment resources such as logical, network and storage resources.
Data Center consists of Clusters which include a set of node or nodes, which host virtual machines and its related snapshots, templates and pools. Storage domains are mandatory attached to Data Center to make it working effectively in enterprise environments. Multiple data centers in the same infrastructure could be managed separately by the same RHEVM portal.

Data Center Diagram
Red Hat Enterprise Virtualization uses a centralized storage system for virtual machine disk images, ISO files and snapshots.
Storage networking can be implemented using:
- Network File System (NFS)
- GlusterFS
- Internet Small Computer System Interface (iSCSI)
- Local storage attached directly to the virtualization hosts
- Fibre Channel Protocol (FCP)
Setting up storage is a prerequisite for a new data center because a data center cannot be initialized unless storage domains are attached and activated. For clustering features and enterprise deployment needs, its recommended to deploy shared-storage in your environment instead of host-based local storage.
In general, storage node will be accessible by Data Center hosts to create, store and snapshot virtual machines beside other important tasks.
Red Hat Enterprise Virtualization platform has three types of storage domains:
- Data Domain: used to hold the virtual hard disks and OVF files of all the virtual machines and templates in a data center. In addition, snapshots of the virtual machines are also stored in the data domain. You must attach a data domain to a data center before you can attach domains of other types to it.
- ISO Domain: used to store ISO files which are needed to install and boot operating systems and applications for the virtual machines.
- Export Domain: temporary storage repositories that are used to copy and move images between data centers in Red Hat Enterprise Virtualization environments.
In this part we are going to deploy Data Domain with following storage node specifications for our tutorial:
IP Address : 11.0.0.6
Hostname : storage.mydomain.org
Virtual Network : vmnet3
OS : CentOS6.6 x86_64 [Minimal Installation]
RAM : 512M
Number of Hard disks : 2 Disk  [1st: 10G for the entire system,  2nd : 50G to be shared by ISCSI]
Type of shared storage : ISCSI
Note: You could change the above specs as per your environment needs.
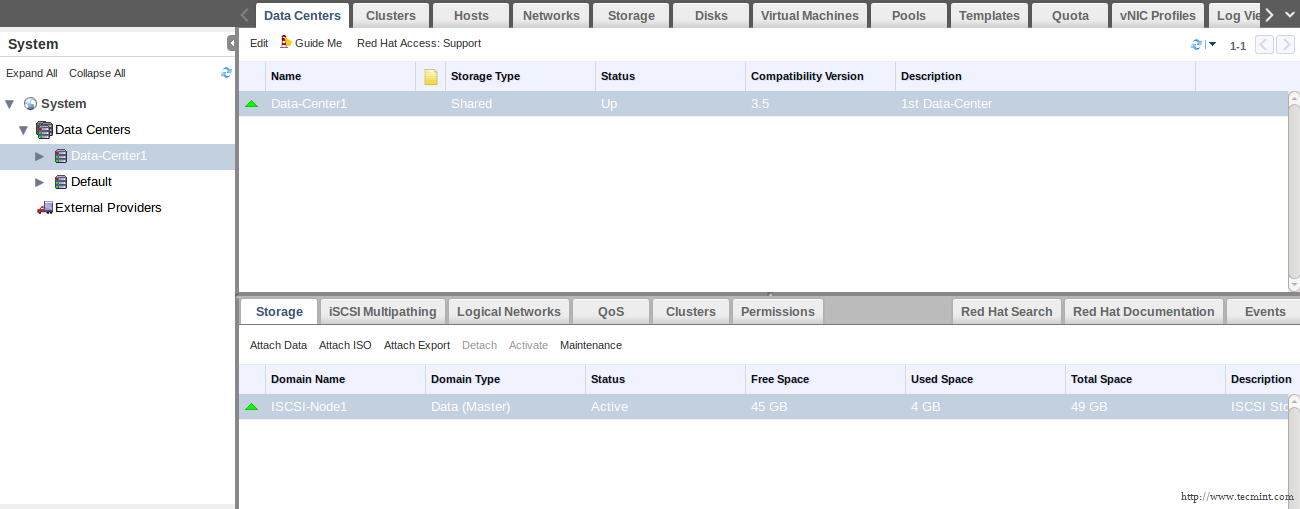
Step 1: Creating New Data Center with Cluster of Two Nodes
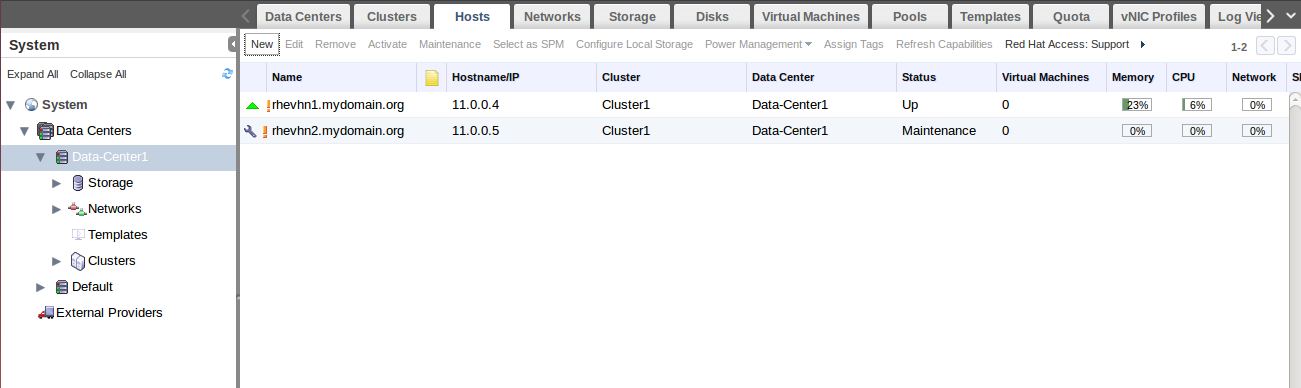
By default, RHEVM create default data-center contains one empty cluster with name Default in our RHEV environment. We will create new one and add the two (Pending Approval) Hosts under it.
Check the current data-centers, by selecting Data centers tab.

Data Centers
1. Click on New to add new Data center to your environment. Wizard window like this will appear, Fill it as shown:
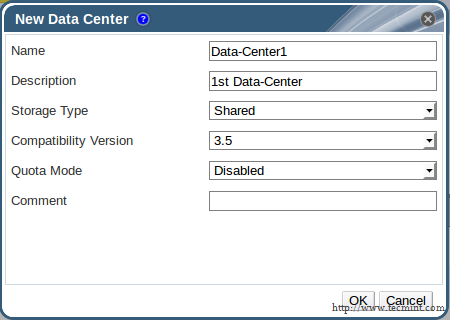
Create New Data Center
2. You will be asked to create new cluster as apart of “Data-Center1”. Click (Configure Cluster) and fill it as shown..
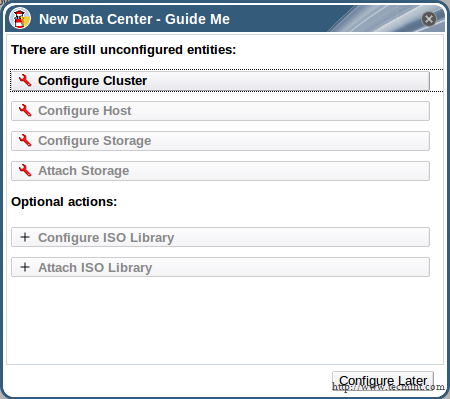
Configure Cluster
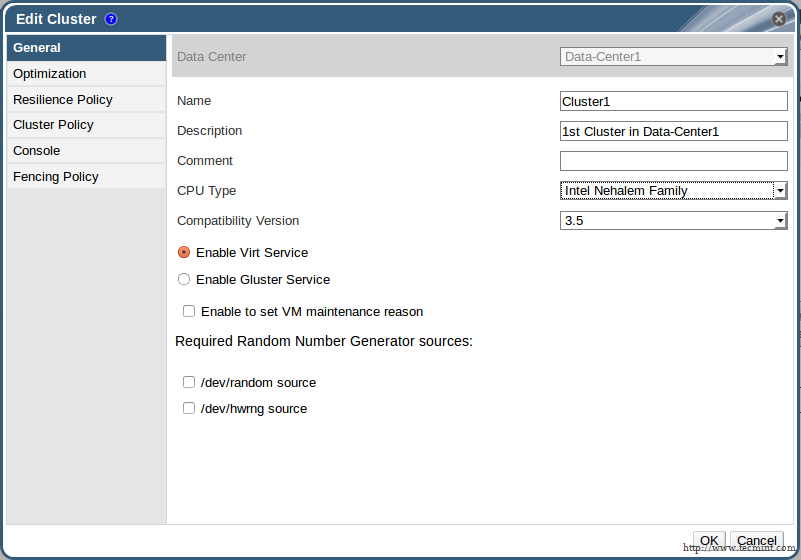
Configure Cluster for Data Center
Important: Make sure that CPU Type is correct one and ALL nodes have the same CPU Type. You can modify any setting as per your environment needs. Some settings will be discussed in details later..
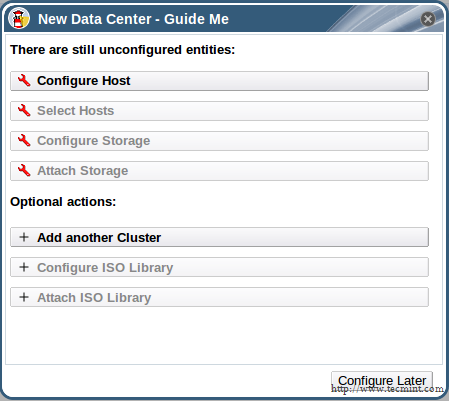
3. Click (Configure Later) to exit the wizard.
Configure Cluster Later
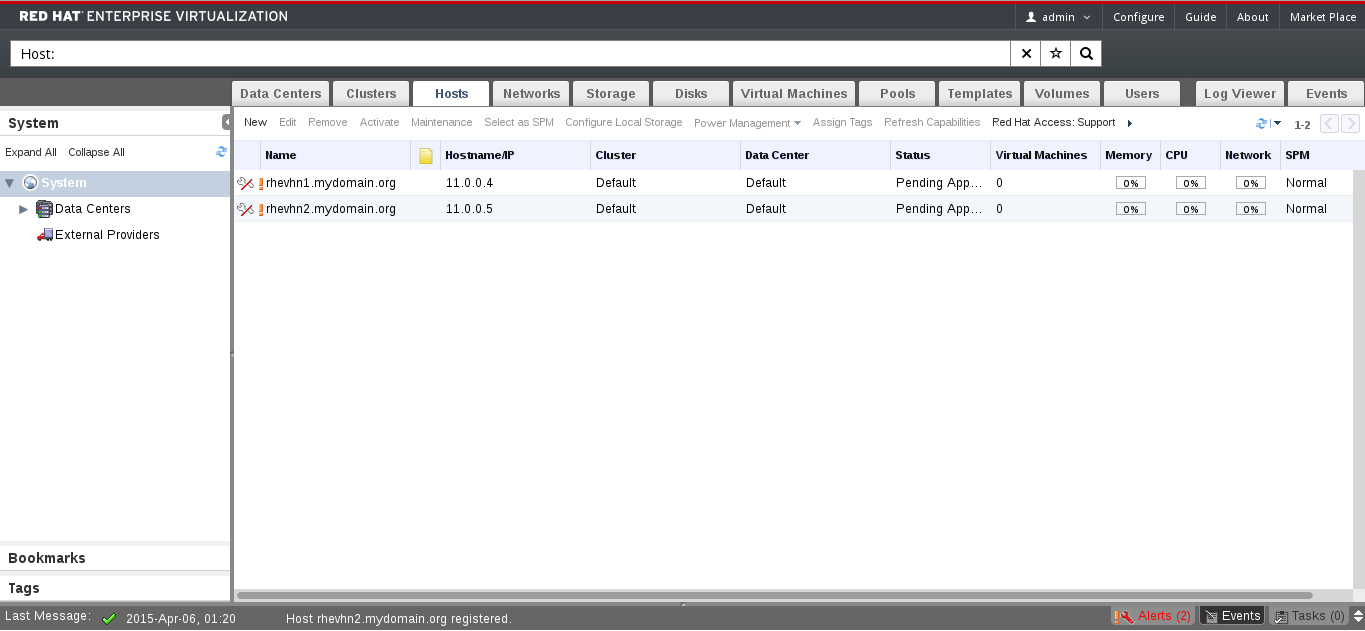
4. Switch to Hosts tab to approve and add (Pending Approval) node to our environment. Select your first node and click Approve.

Add Pending Node
5. Fill the appeared wizard with the new created “Data-Center1” and its first cluster as shown:
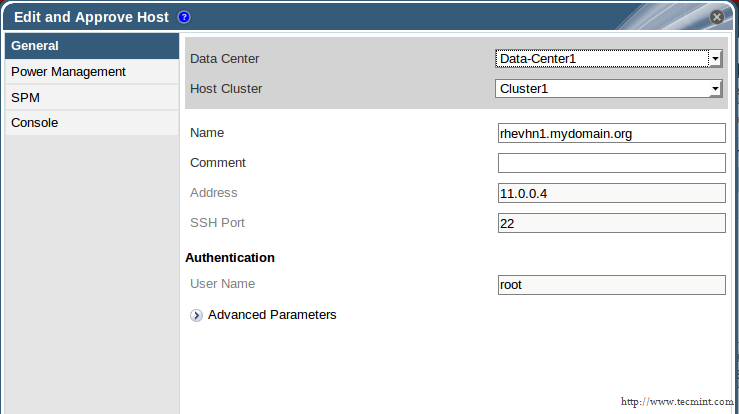
Configure Data Center and Cluster
Important: You may see warning about Power Management just skip it by clicking OK, repeat the same steps with the second node..
If everything goes well, status should be changed from “Pending Approval” to (Installing).

Installing Data Centers
Wait another few minutes, status should be changed from “Installing” to (Up).

Data Centers Up
Also you could check which cluster and data center are assigned to the two node..
Step 2: Prepare ISCSI Storage for RHEV Environment
Lets switch to storage node to configure ISCSI storage.
6. First you need to install some needed packages to configure ISCSI target.
[root@storage ~]# yum install scsi-target-utils
7. For this tutorial we use sdb as our backing device, so we should add the below section to the configurationfile targets.conf.
[root@storage ~]# vim /etc/tgt/targets.conf
Add the following lines to this file, save and close it.
<target iqn.2015-07.org.mydomain:server.target1>
    backing-store /dev/sdb
</target>
[root@storage ~]# service tgtd start
[root@storage ~]# chkconfig tgtd on
Important: Make sure that ports 860 and 3260 are opened in firewall or flush it (Not recommended).
Fore more details about ISCSI configuration and deployment, check tecmint’s iscsi series.
Step 3: Add ISCSI storage Node to RHEV Environment
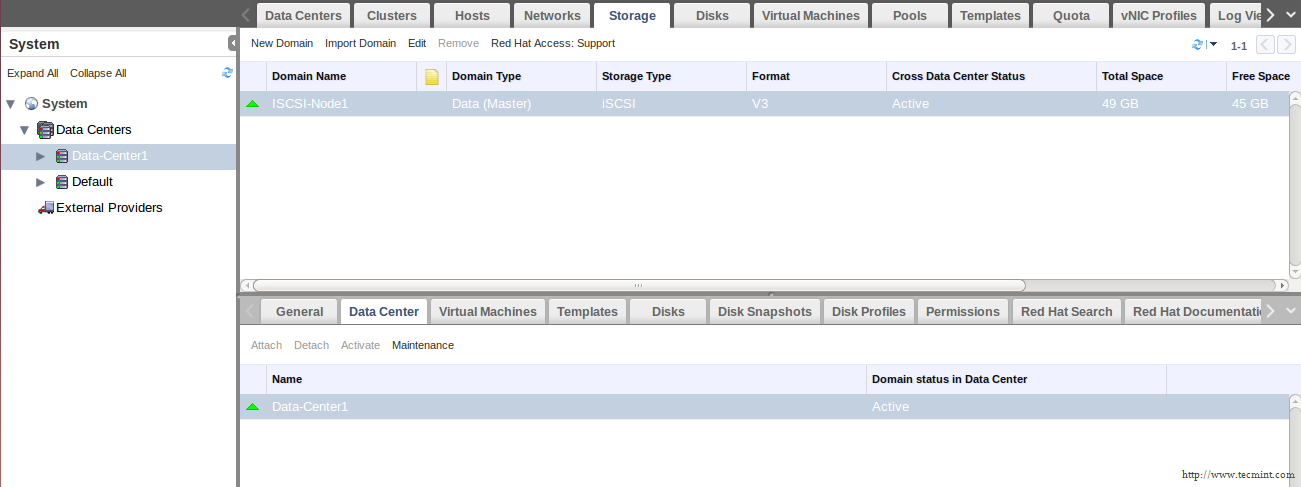
The Red Hat Enterprise Virtualization platform enables you to assign and manage storage using the Administration Portal’s Storage tab. The Storage results list displays all the storage domains, and the details pane shows general information about the domain.
9. Select Data-Center1 from Left tree, then select storage tab as shown.

Select Storage Tab
10. Click on New Domain to add new storage domain for our data-center1 then fill the wizard as shown.
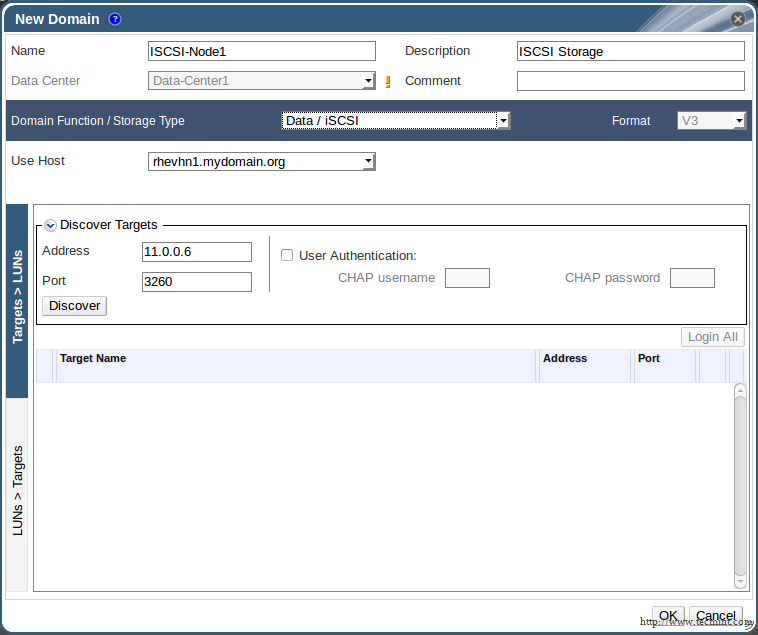
Add New Domain to Data Center
Important: Make sure you select Storage Type “iSCSI” in the type list.
11. Then click Discover, here you will find the target name of our storage node. Click the arrow button to go on.

Target Name
12. You will find our storage is discovered. Check it then Click OK as shown, then wait a while and check our new storage domain under Storage tab.
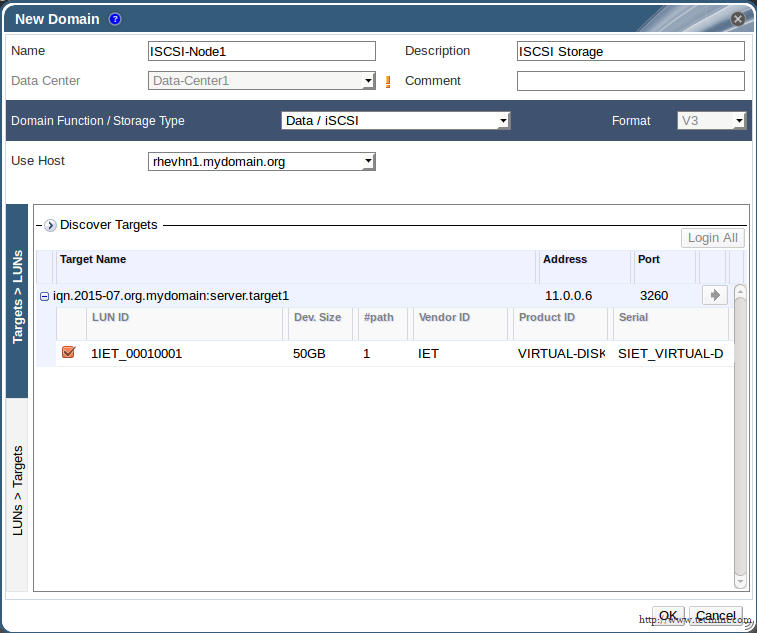
Discovered Storage
Storage Domain
13. Review and check size, Status and attaching Data Center.
Review All Settings
Conclusion
Now, our RHEV environment has active Data Center with one cluster which contains two active and ready nodes with active ISCSI shared storage. So, we are ready to deploy server and desktop virtual machines with visualization features such as HA, Snapshots , Pools, etc. that will be discussed in next articles…
References: RHEV Storage Administration Guide
Don’t Miss:
- Install RedHat Enterprise Virtualization (RHEV) 3.5 – Part 1
- Deploy RedHat Enterprise Virtualization Hypervisor (RHEV-H) – Part 2
How to Deploy Virtual Machines in RHEV Environment – Part 4
Our environment consist of one datacenter attached with ISCSI shared storage. This datacenter included one cluster with two hosts/nodes which will be used to host our virtual machine.
Deploy Virtual Machines in RHEV ISO Domain – Part 4
Basically in any environment, we could deploy physical/virtual machines by using popular methods such as From ISO/DVD, Network, Kickstart and so on. For our environment, there is no huge difference about previous fact, as we will use the same methods/installation types.
As a start we are discussing VM deployment using ISO file/image. RHEV entertainment is very organized one, so it has special domain used only for this target, store ISO files used to create virtual machines, this domain is storage one called ISO Domain.
Step 1: Deploy New ISO Domain
Actually, RHEVM creates ISO Domain during installation process. To check that, just navigate storage tab for the environment.
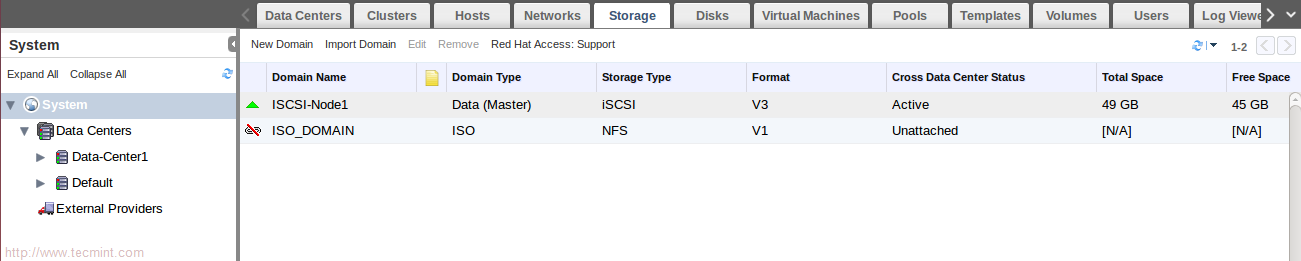
Confirm ISO Domains
We could use the exist one and attach it to our datacenter, but lets create new one for more practice.
Note: The exist one is used NFS shared storage on the rhevm machine IP:11.0.0.3. The new created one will use NFS shared storage on our storage node IP:11.0.0.6.
1. To Deploy NFS service on our storage node,
[root@storage ~]# yum install nfs-utils -y
[root@storage ~]# chkconfig nfs on
[root@storage ~]# service rpcbind start
[root@storage ~]# service nfs start
2. We should create new directory to be shared using NFS.
[root@storage ~]# mkdir /ISO_Domain
3. Share the directory by add this line to /etc/exports file and then apply changes.
/ISO_Domain 11.0.0.0/24(rw)
[root@storage ~]# exportfs -a
Important: Change the ownership of the directory to be with uid:36 and gid:36.
[root@storage ~]# chown 36:36 /ISO_Domain/
Note: The 36 is the uid for vdsm user “RHEVM agent” and the gid of kvm group.
It is mandatory to make the exported directory is accessible be RHEVM. So, your NFS should be ready to be attached as ISO Domain to our environment.
4. To create New ISO domain with NFS type… choose Data-Center1 From system tab, then click on New Domainfrom storage tab.

Create New ISO Domain
5. Then Fill the appeared window as shown:
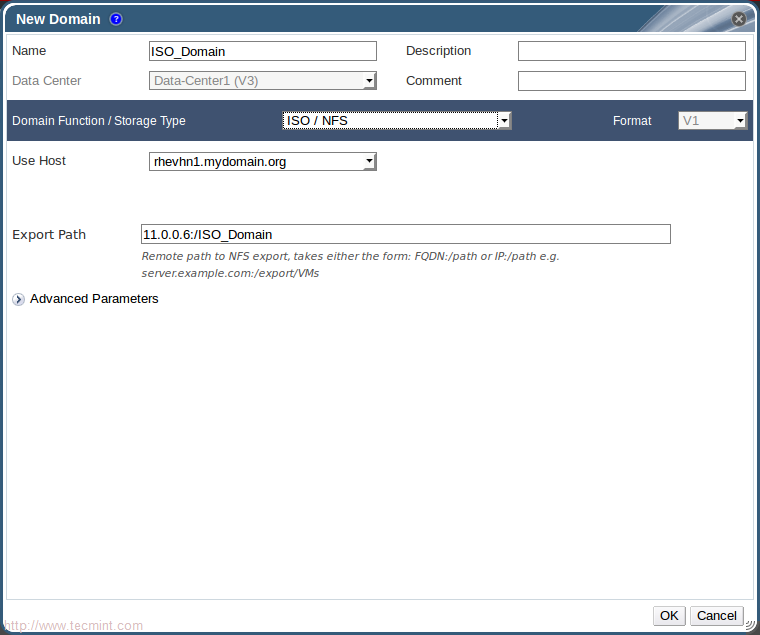
New Domain Details
Note: Make sure about the Domain function/Storage type is ISO / NFS.
Wait a moment and check again under storage tab.
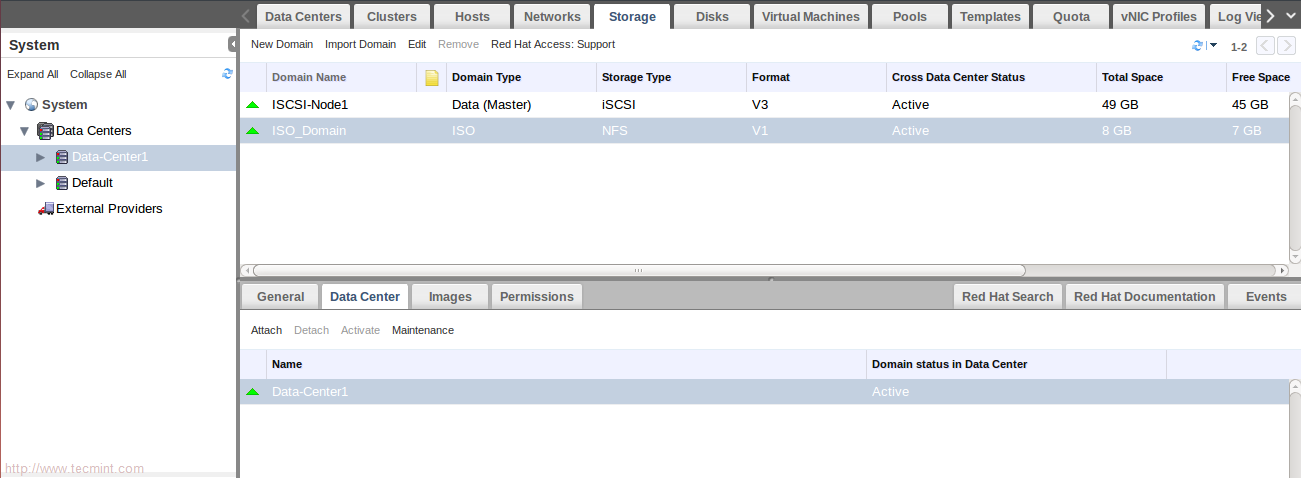
Confirm New ISO Domain
Now, our ISO Domain is successfully created and attached. So, lets upload some ISO’s to it for VM’s deploying.
6. Make sure you have ISO file on your RHEVM server. We will work with two ISO’s one for Linux {CentOS_6.6} and the other one for windows {Windows_7}.
Confirm ISO Files
7. RHEVM provides tool called (rhevm-iso-uploader). It used to upload ISO’s to ISO Domains beside useful tasks.
First, we will use it to list all available ISO Doamins.

Check ISO Domains
Hint: The upload operation supports multiple files (separated by spaces) and wildcards. Second, we will use it to upload ISO’s to our iso domain “ISO_Domain”.

Upload Files ISO Domain
Note: Uploading process takes some time as it depends on your network.
Hint: ISO domain could be on the RHEVM machine, its recommended in some cases, any way its totally depend on your environment and infrastructure needs.
8. Check the uploaded ISO’s from web interface.
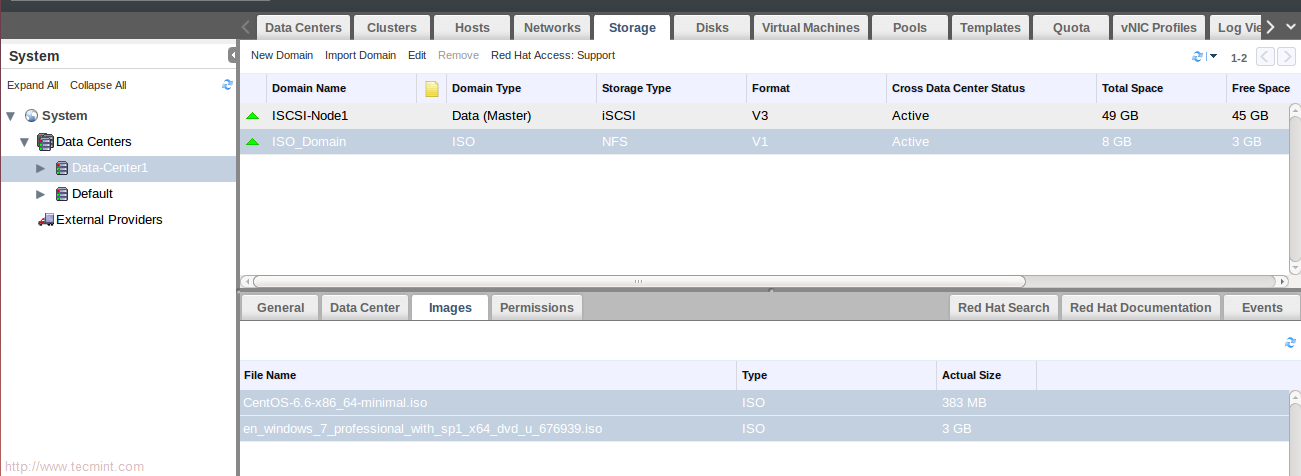
Check Uploaded ISO Files
Its time for second section “Virtual Machines Deployment”.
Step 2: Virtual Machines Deployment – Linux
11. Switch to Virtual Machines tab and click “New VM”.

Create New Virtual Machine
12. Then fill the appeared windows as shown:
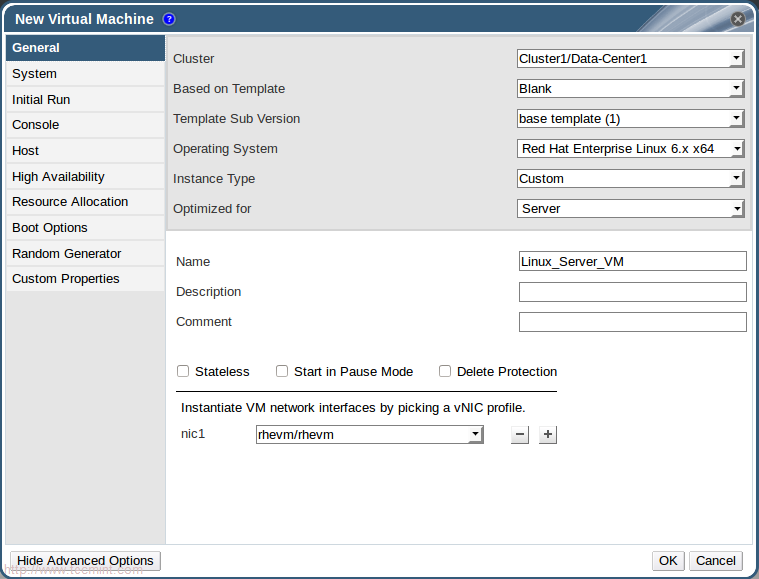
New VM Details
To modify some options like memory allocation and boot options, press “Show Advanced Options”.
13. Select “System” to modify Memory and vCPU’s.
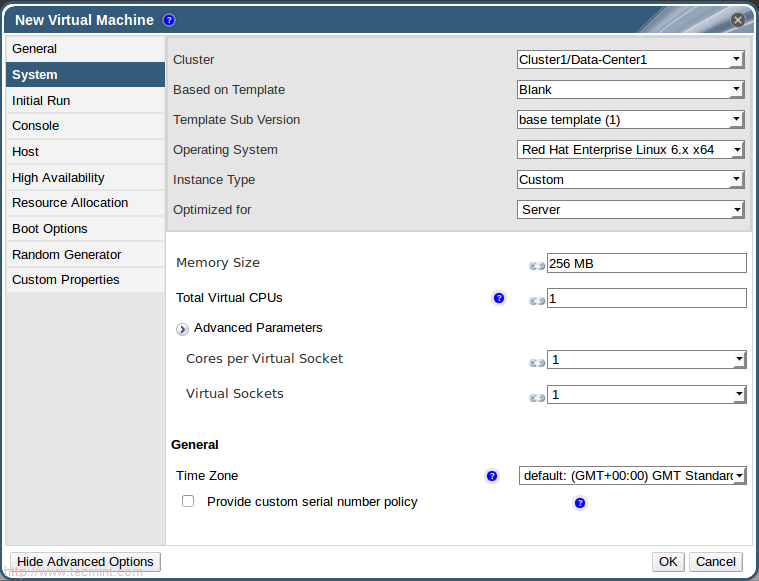
Configure Memory CPU
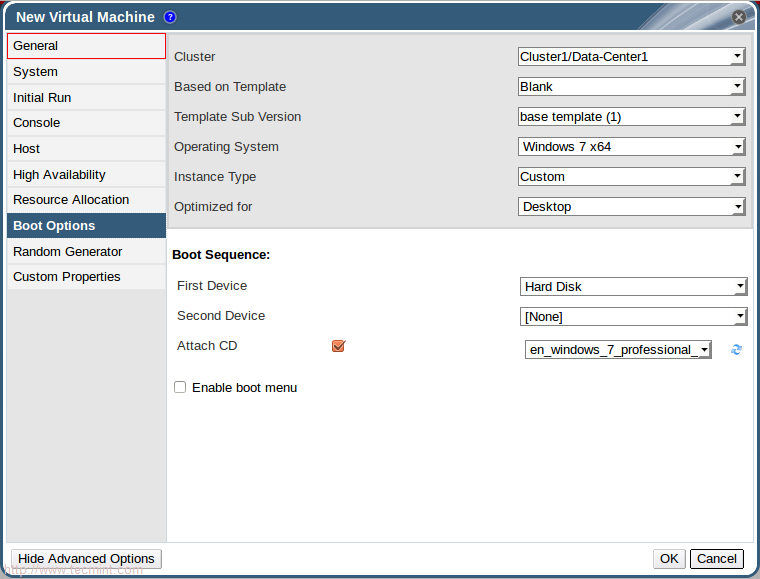
14. Select Boot Options to attach our ISO image to virtual machines, then press OK.
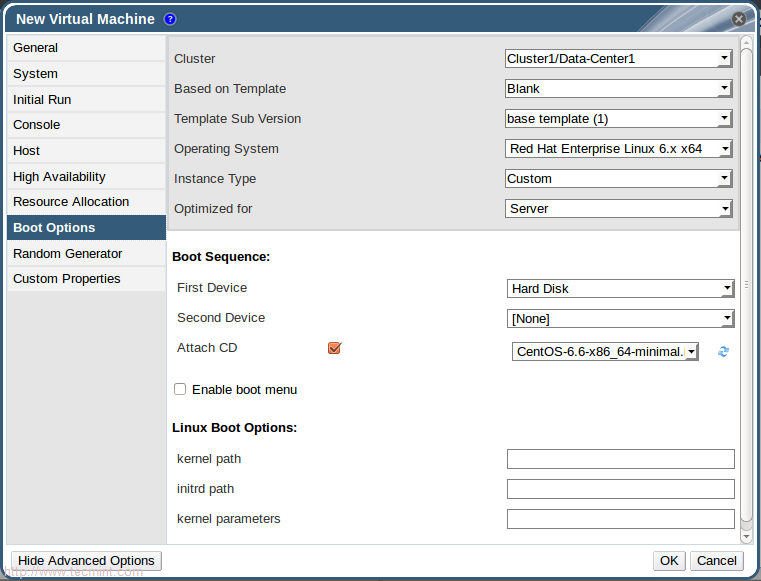
Select Boot Options
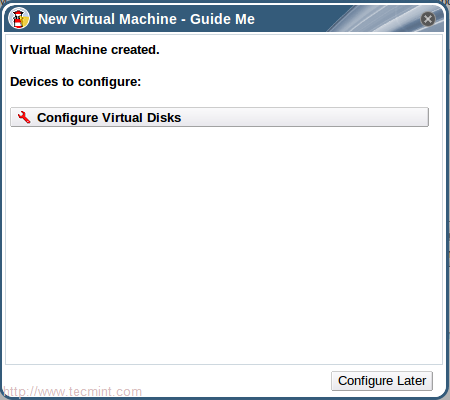
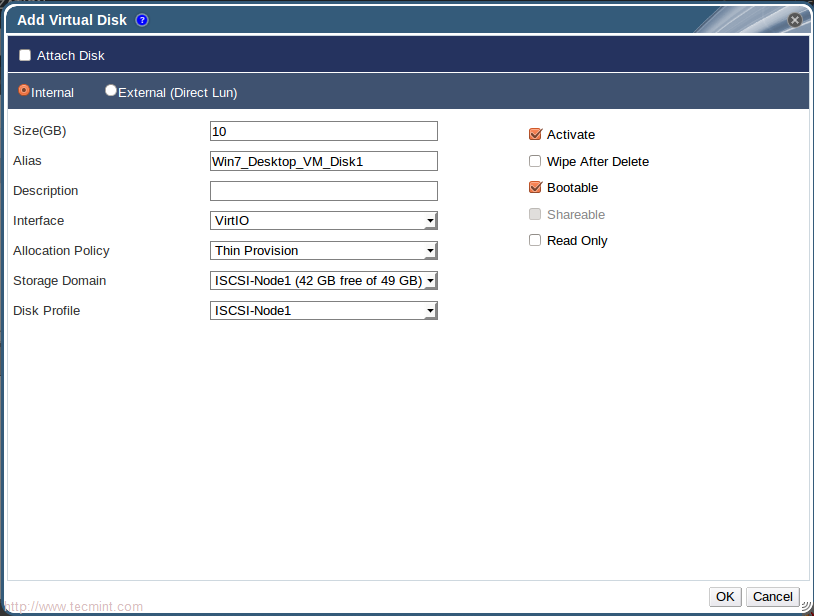
15. Before starting your virtual machine, you should create and attach virtual disk. So, press “Configure Virtual Disks“ in the automatically appeared window.
Configure Virtual Disks
16. Then Fill the next appeared window as shown and press OK.
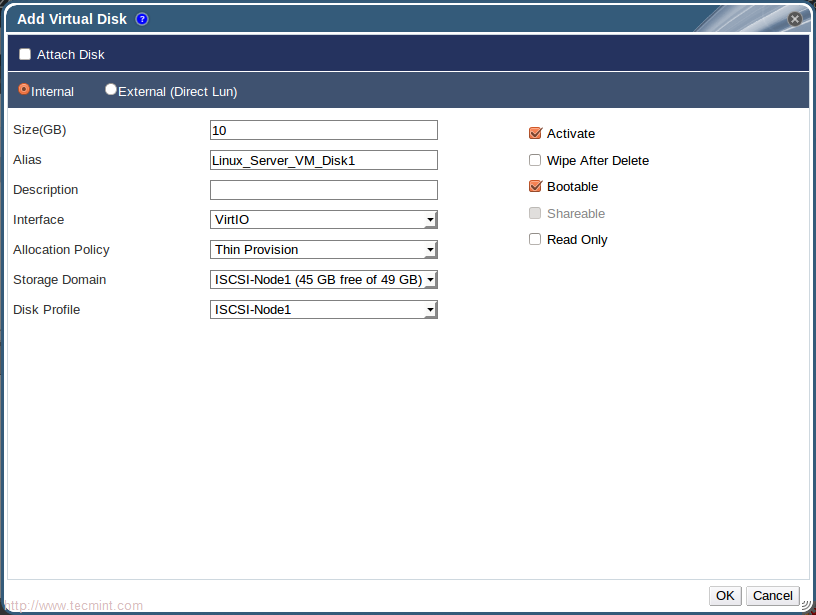
Add Virtual Disk Details
Hint: We discussed the difference between “Pre-allocated” and “Thin Provision” previously in this article from kvm series at Manage KVM Storage Volumes and Pools – Part 3.
17. Close the window asks about adding another virtual disk. Now, Lets check our virtual machine.
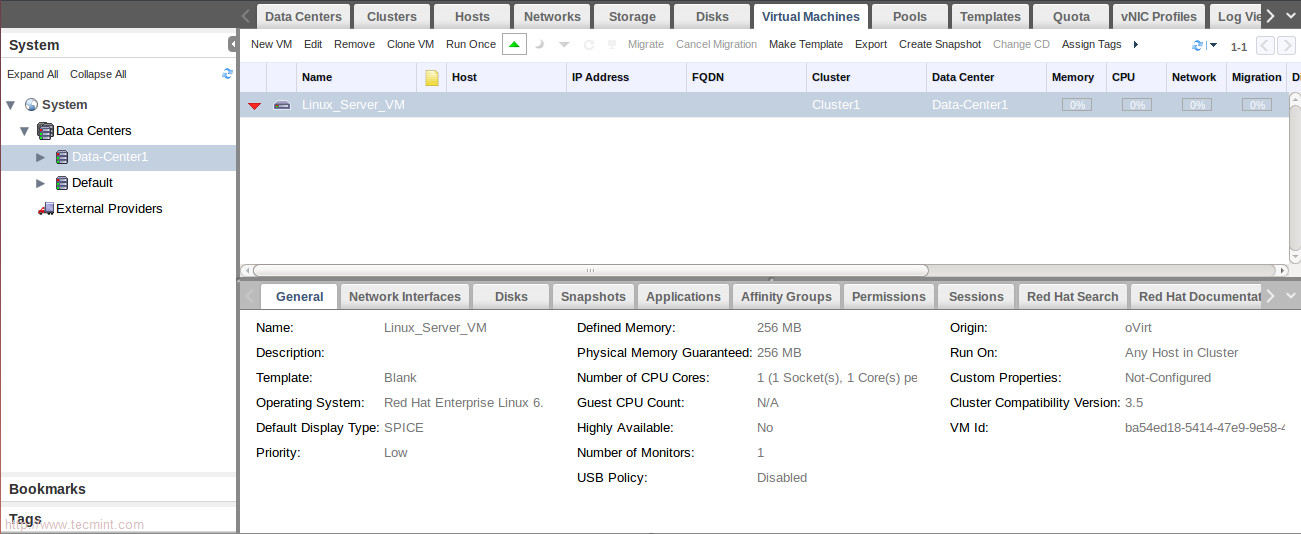
Check New Virtual Machine
Hint: You may need to install SPICE plug-in to make sure virtual machine console will work fine.
For Redhat based Distro’s
# yum install spice-xpi
For Debian based Distro’s
# apt-get install browser-plugin-spice
Then restart your Firefox browser.
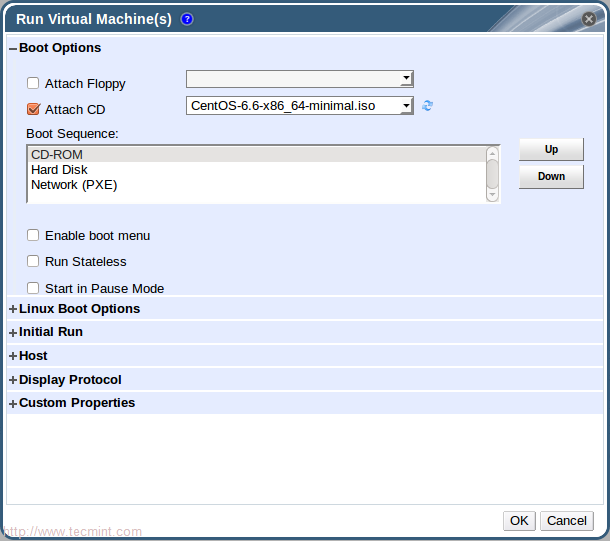
18. For first time, we will run virtual machine from “Run once”…just click on it and then change the order of boot options – make First one is CD-ROM.
Run Virtual Machines
Note: Run once is used for modify vm setting just for one time (Not Permanent) for testing or installation.
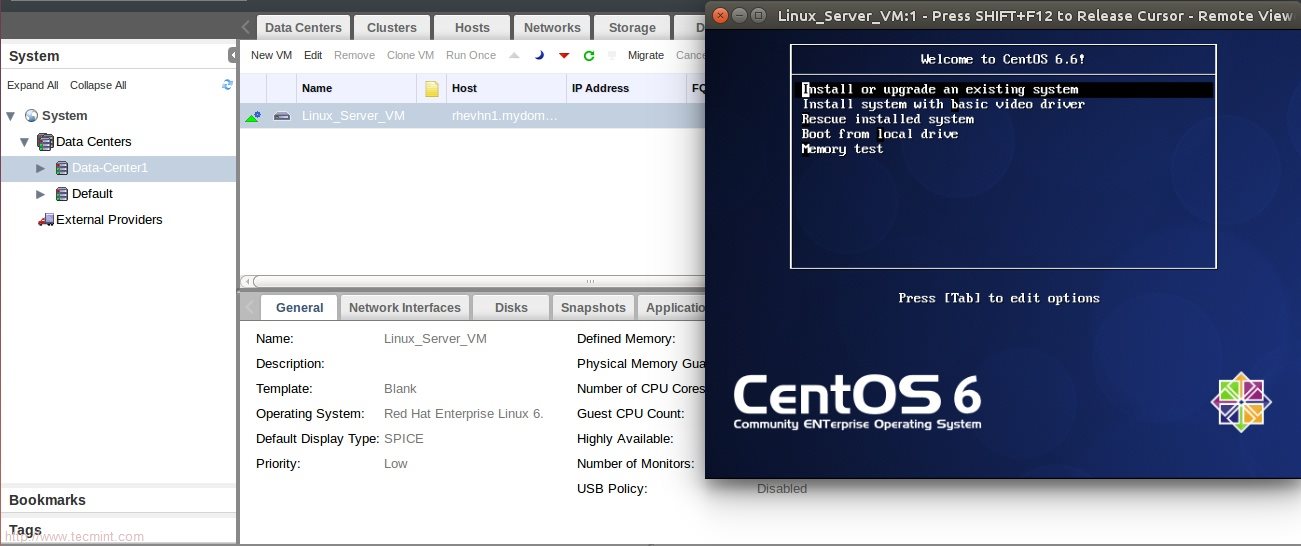
19. After Clicking (OK), you will notice the state of virtual machine is changed to starting then to up!!.
![]()
![]()
20. Click on icon open Virtual Machine’s Console.
Open Virtual Machine
Basically, we created a linux-server virtual machine successfully which hosted on node1 {RHEVHN1}.
Step 3: Virtual Machines Deployment – Windows
So, lets complete the journey with deploying another virtual machine acts as desktop machine, we will discuss the difference between server and desktop type later, this desktop virtual machine will be Windows7.
Generally, we will repeat almost previous steps with some additional ones. Follow steps as shown in next screens:
21. Click New VM and then fill the requested information.
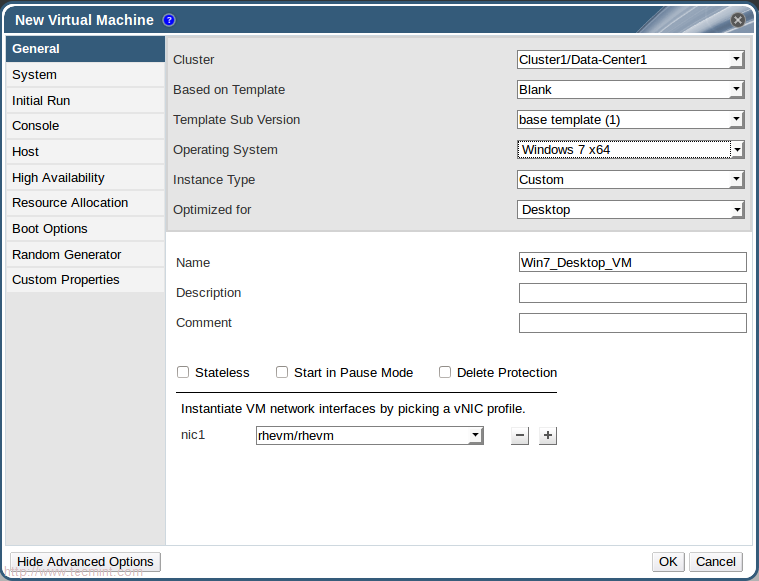
New Virtual Machine
Add Information about New VM
22. Create a new disk and confirm that the windows VM is created.
Add Windows Virtual Disk
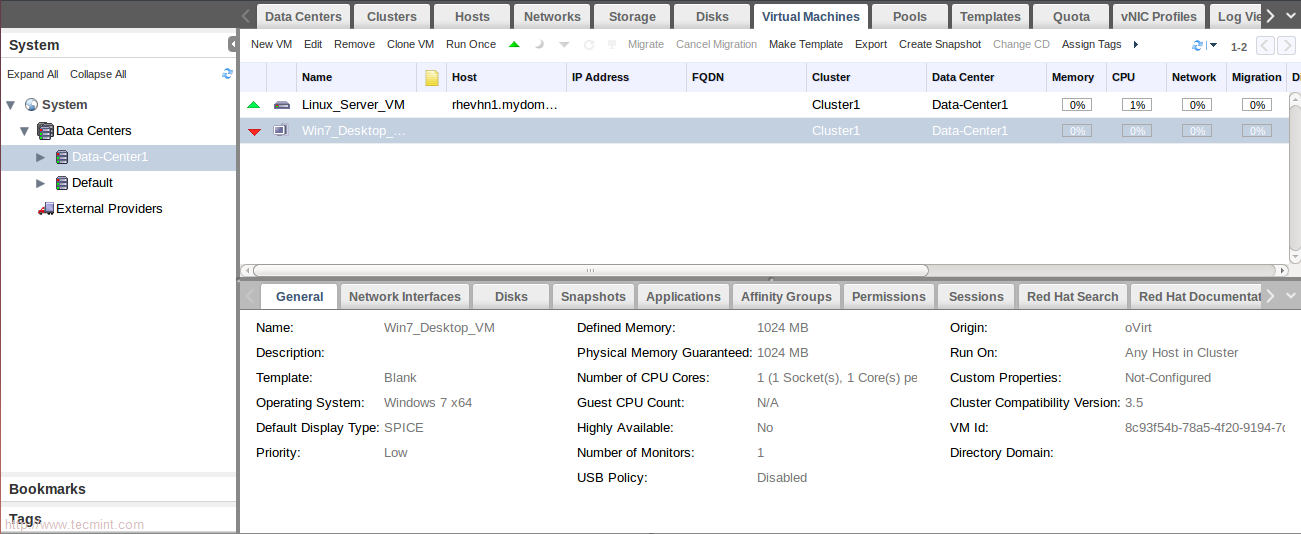
Confirm Windows VM
Before continue to next steps, windows virtual machines needs some special paravirtualization drivers and tools to be installed successfully…you can find them under:
/usr/share/virtio-win/
/usr/share/rhev-guest-tools-iso/
For this ISO used in this tutorial, we will need to upload those files to our ISO Domain and confirm from web interface.
/usr/share/rhev-guest-tools-iso/RHEV-toolsSetup_3.5_9.iso
/usr/share/virtio-win/virtio-win_amd64.vfd

Upload Windows ISO
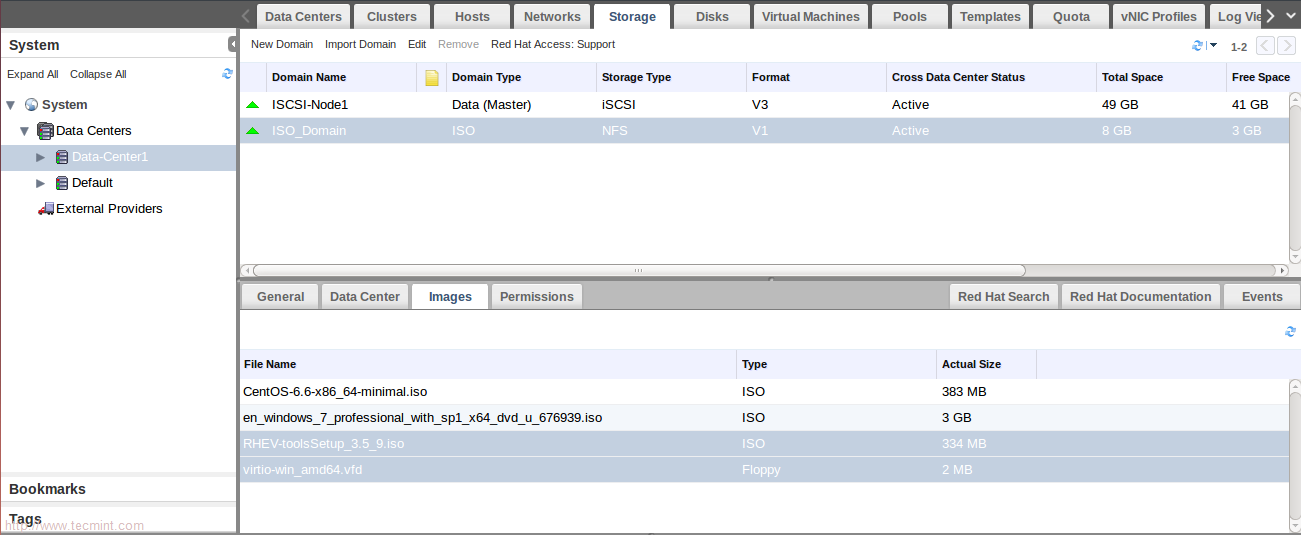
Confirm Windows ISO Files
23. Click Run once and Don’t forget to attach the virtual floppy disk to open VM console.
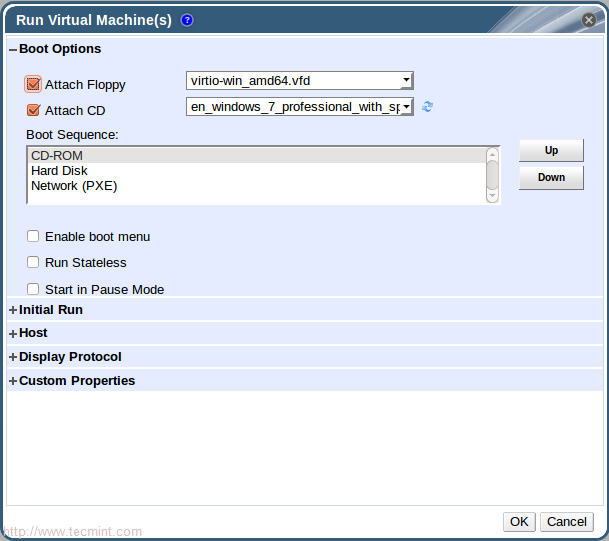
Run Windows Virtual Machine
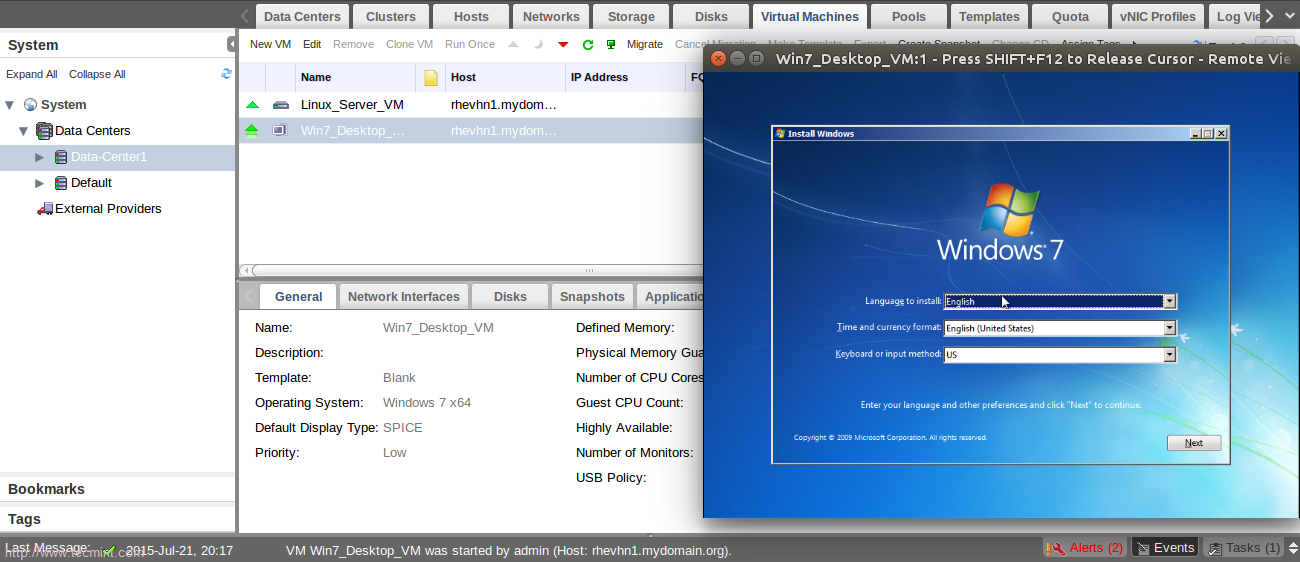
Open Windows VM Console
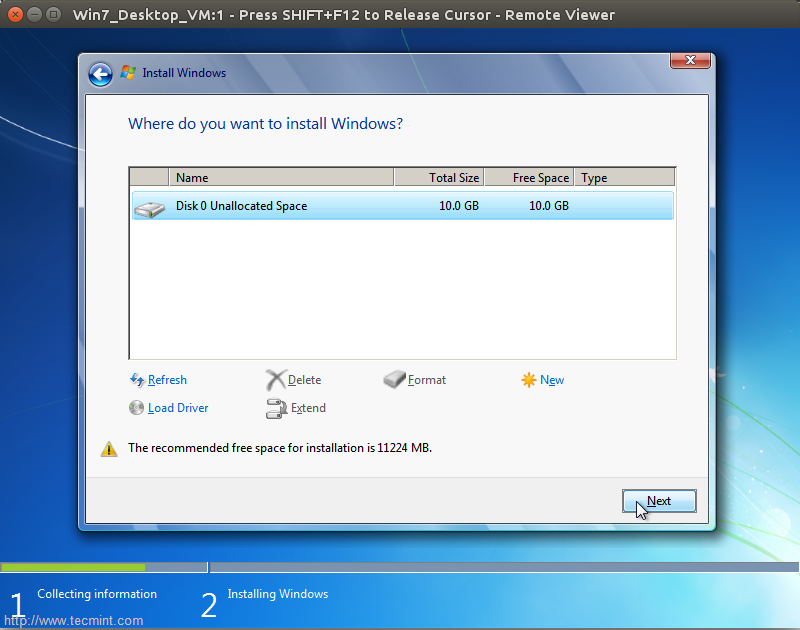
24. Follow windows instruction to complete the installation. At Disk partitioning stage, you will notice there is no appeared disks. Click on ”Load Driver” then ”Browse”.
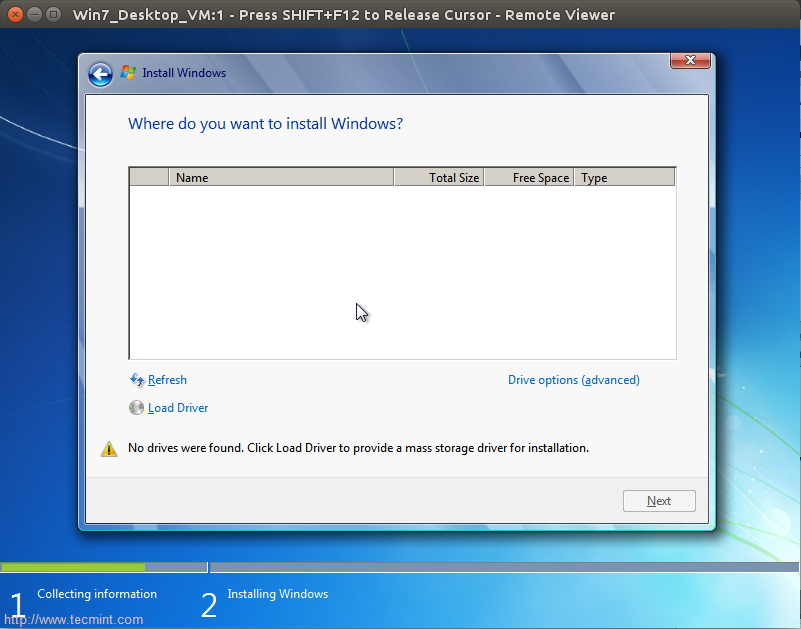
Windows Driver Errors
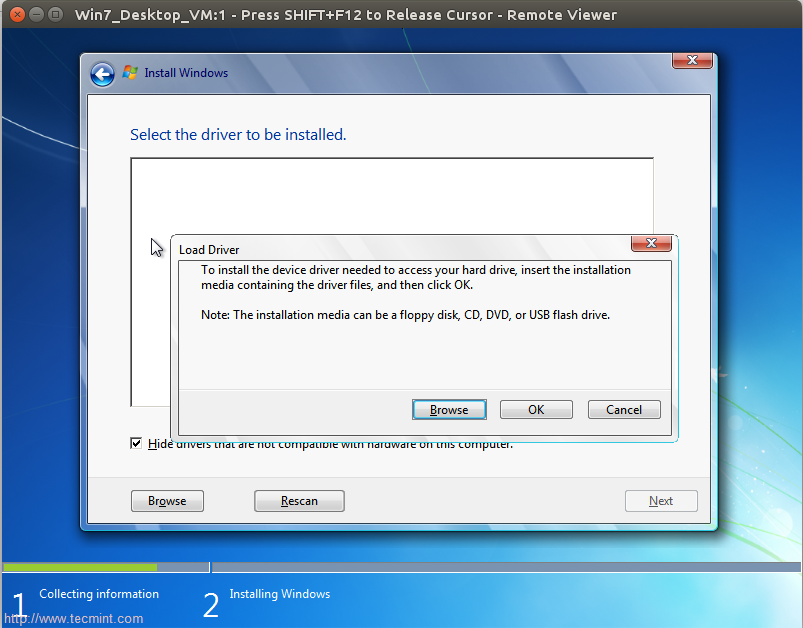
Load Windows Drivers
25. Then locate the path of drivers on the virtual floppy disk and select the two drivers related to Ethernet and SCSI controller.
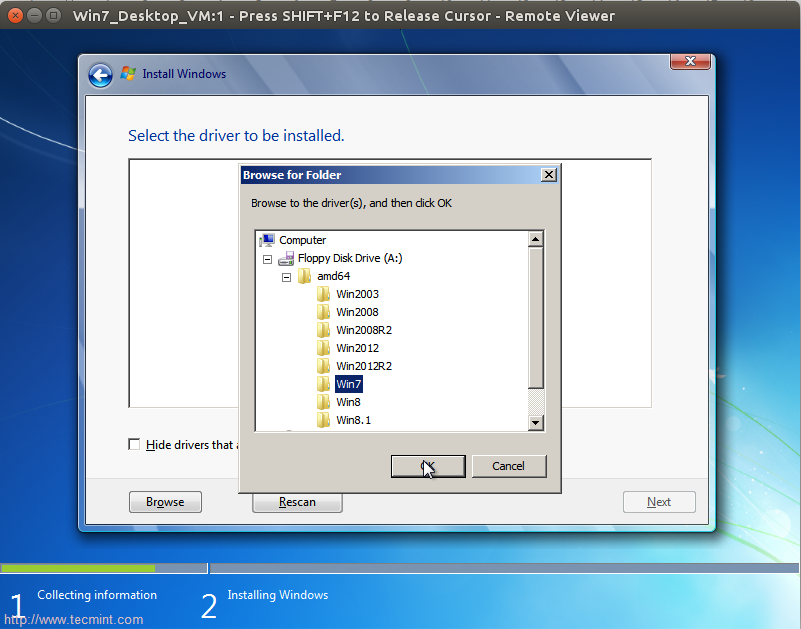
Browse Drivers
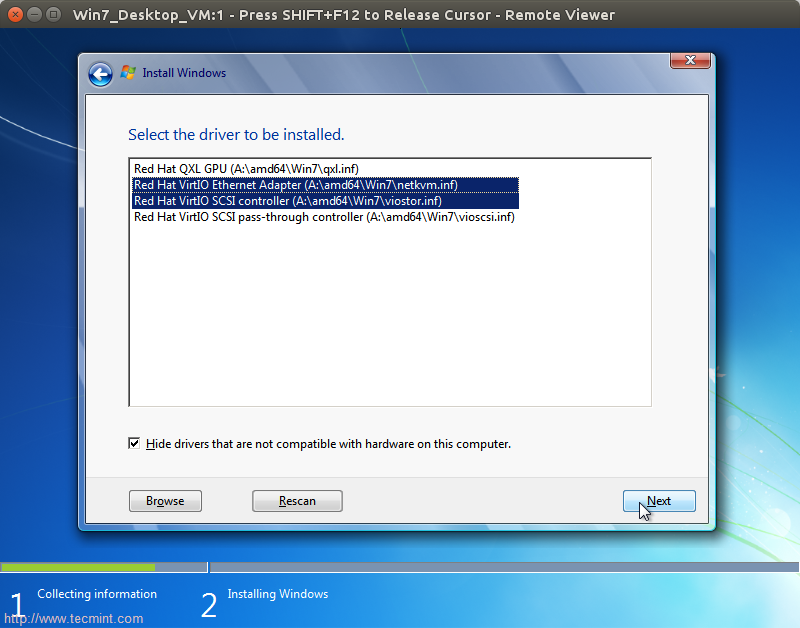
Install Drivers
26. Then Next and wait some time to load our 10G virtual disk is appeared.
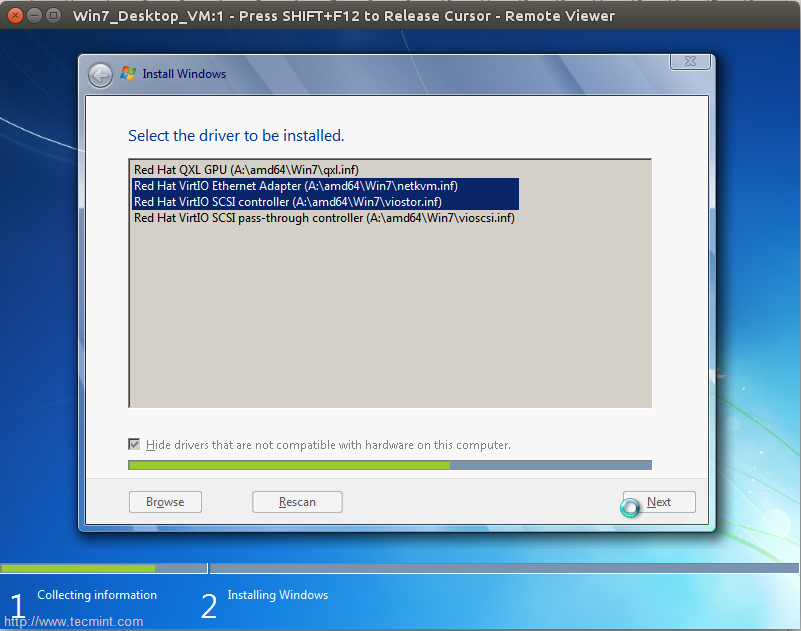
Installing Drivers
Loaded Disk Drive
Complete the installation process until it finished successfully. Once it finished successfully, go to RHEVM web interface and change the attached CD.
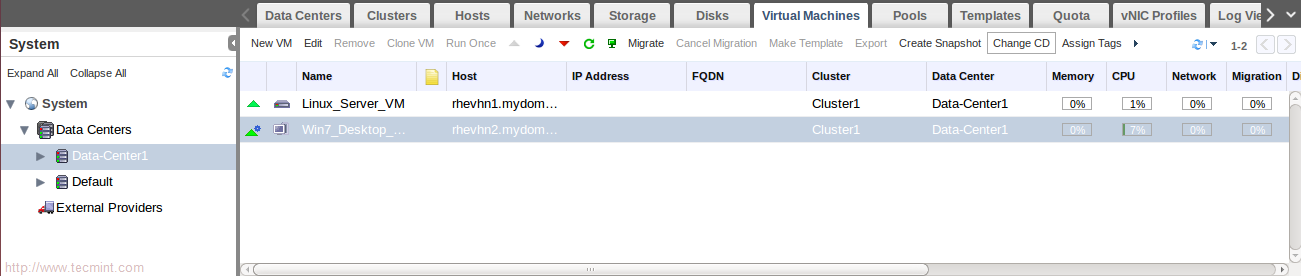
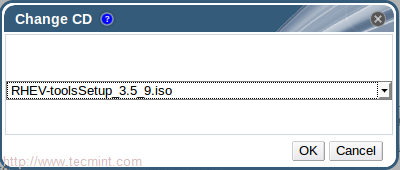
Change CD Drive
27. Now attach RHEV tools CD and then go back to windows virtual machine, you will find tools CD is attached. Install RHEV tools as shown..
RHEV Tools Setup
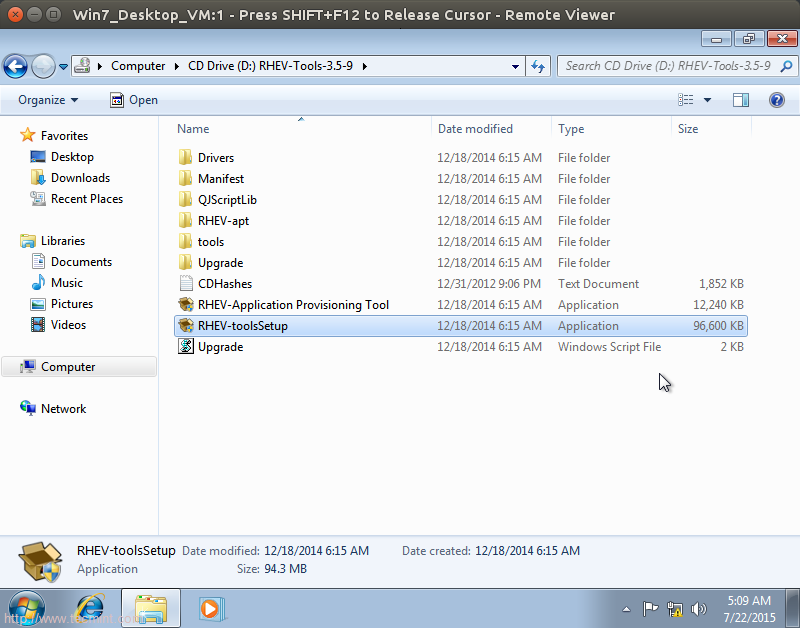
Install RHEV Tools on Windows
Follow the sequentially steps until it finished successfully then reboot the system.
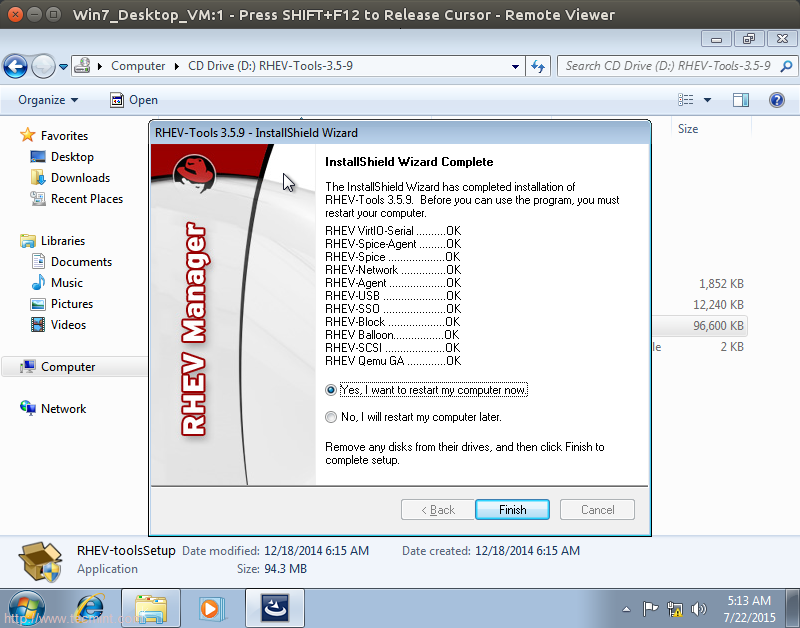
RHEV Tools Installation
and finally, your windows virtual machine is healthy up and running..:)
Conclusion
We discussed in this part, ISO Domain importance and deployment then how to use for storing ISO files which be used later to deploy virtual machines. Linux and windows virtual machines have been deployed and fine working. In next part, we will discuss Clustering importance and tasks with how to use clustering features in our environment.
RHEV Clustering and RHEL Hypervisors Installation – Part 5
In this part we are going to discuss some important points related to our RHEV series. In Part-2 of this series, we’ve discussed RHEV Hypervisor deployments and installations. In this part we will discuss another ways to install RHEV Hypervisor.
RHEV Series: RHEV Clustering and RHEL Hypervisors Installation – Part 5
The First way was done by using dedicated RHEVH which customized by RedHat itself without any modification or change from admin side. The other way, we will use a normal RHEL server [Minimal installation] that will act as a RHEV Hypervisor.
Step 1: Add RHEL Hypervisor to the Environment
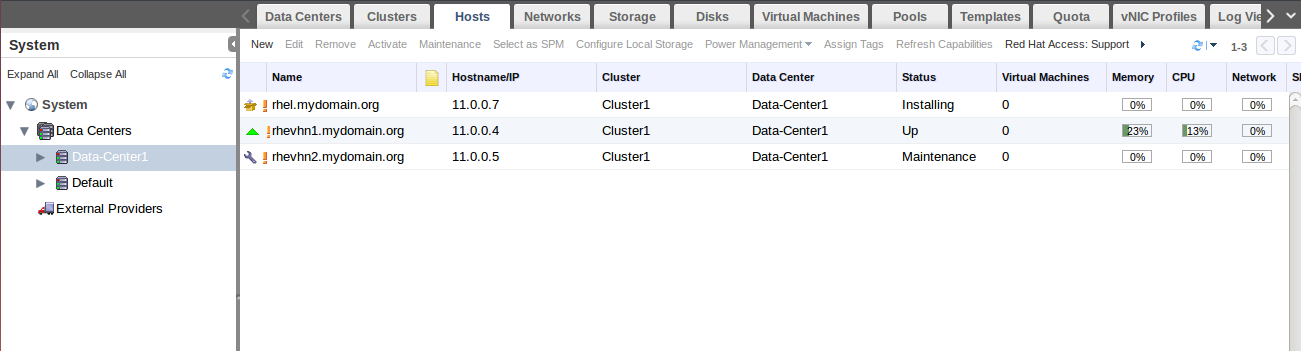
1. Install subscribed RHEL6 server [Minimal installation]. You may increase your virtual environment by adding additional subscribed RHEL6 server [Minimal installation] acts as hypervisor.
Virtual Machine Specification
OS: RHEL6.6 x86_64
Number of processors: 2
Number of cores : 1
Memory : 3G
Network : vmnet3
I/O Controller : LSI Logic SAS
Virtual Disk : SCSI
Disk Size : 20G
IP: 11.0.0.7
Hostname: rhel.mydomain.org
and make sure you checked the virtualization option in vm processor settings.
Hint : Make sure your system is subscribed to redhat channels and up-to-date, if you don’t know how to subscribe to redhat subscription channel, you may read the article Enable Red Hat Subscription Channel.
Tip : To save your resources you can shutdown one of the both currently up and running hypervisors.
2. To turn your server into hypervisor {use it as a hypervisor} you may need install the RHEVM agent on it.
# yum install vdsm
After packages installation complete, Go to RHEVM web interface to add it.
3. In against of RHEVH hypervisor, you can add RHEL hypervisor from one way from RHEM using the root credential of the RHEL hypervisor. So, from rhevm WUI switch to Hosts tab and click new.
Add RHEL Hypervisor
Then Provide your host information as shown.
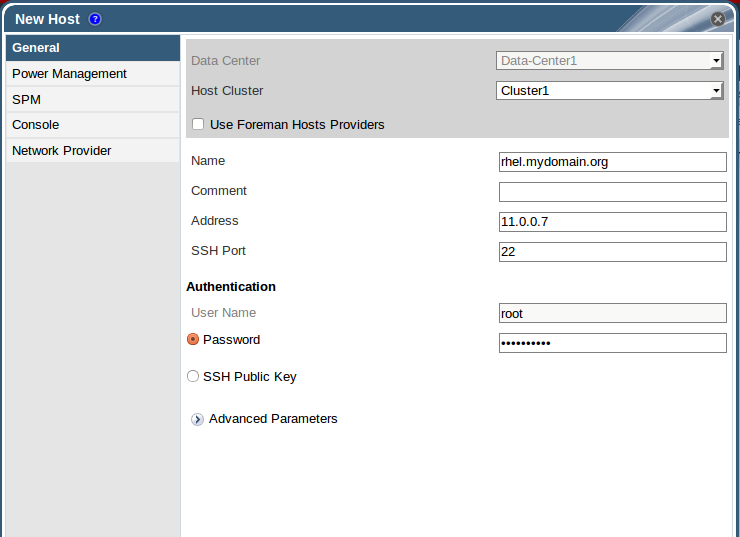
Add Host Information
Next, ignore Power mgmt warning and finish then wait for a few minutes and check the status of the newly added host.
New Host Status
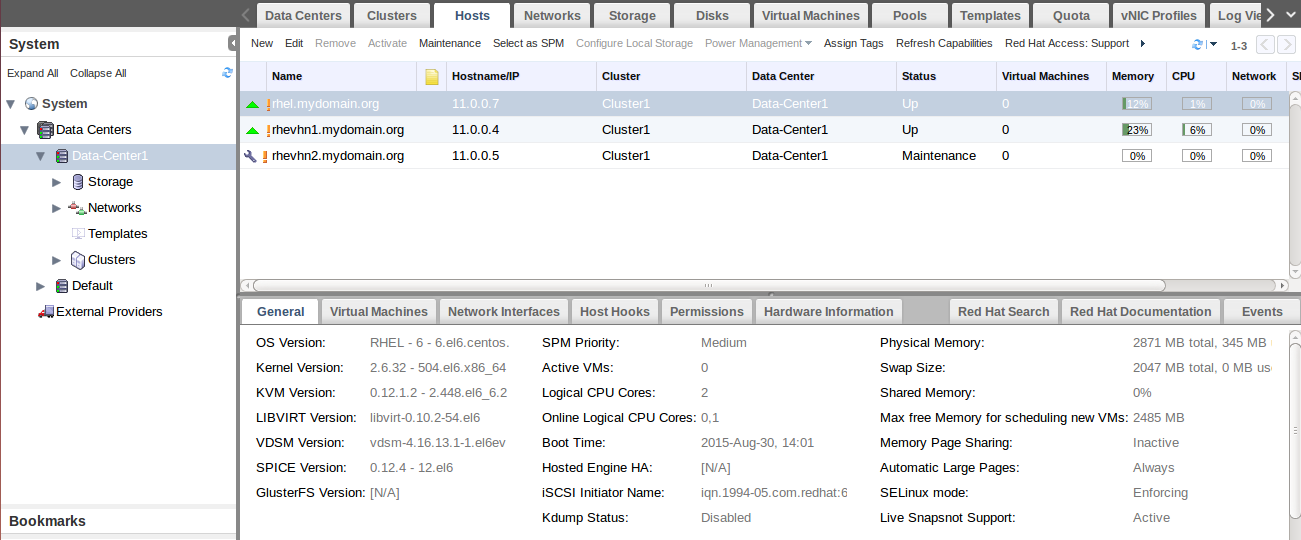
Confirm Host Information
For more details about adding RHEL based Host, check out RedHat official RHEV documentation.
Step 2: Managing RHEV Clustering
Clustering in RHEV describes a group of the same CPU type hosts are sharing the same storage [e.g. over network] and are using to do specific task [e.g. High Availability ]
Clustering in general has a lot of additional tasks you can check out the article that explains What is Clustering and Advantages/Disadvantages of it.
The main advantage of clustering in RHEV is to enable and manage virtual machines migration between hosts that belong to the same cluster.
So, How virtual machines migrate between hosts ?
RHEV has two strategies:
1. Live Migration
2. High Availability
1. Live Migration
Live Migration used in non-critical situation which mean everything is working fine in general but you have to do some load balancing tasks (e.g. you found there is host is loaded by virtual machine over another. So, you may Live migrate virtual machine from host to another to achieve load balancing).
Note : There is no interruption to services, application or users running inside VM during Live Migration. Live migration also called as resources re-allocation.
Live migration can be processed manually or automatic according to pre-defined policy:
- Manually: Force selecting the the destination host then migrate VM to it manually using WUI.
- Automatic : Using one of Cluster policies to manage Live migration according to RAM usage, CPU utilization, etc.
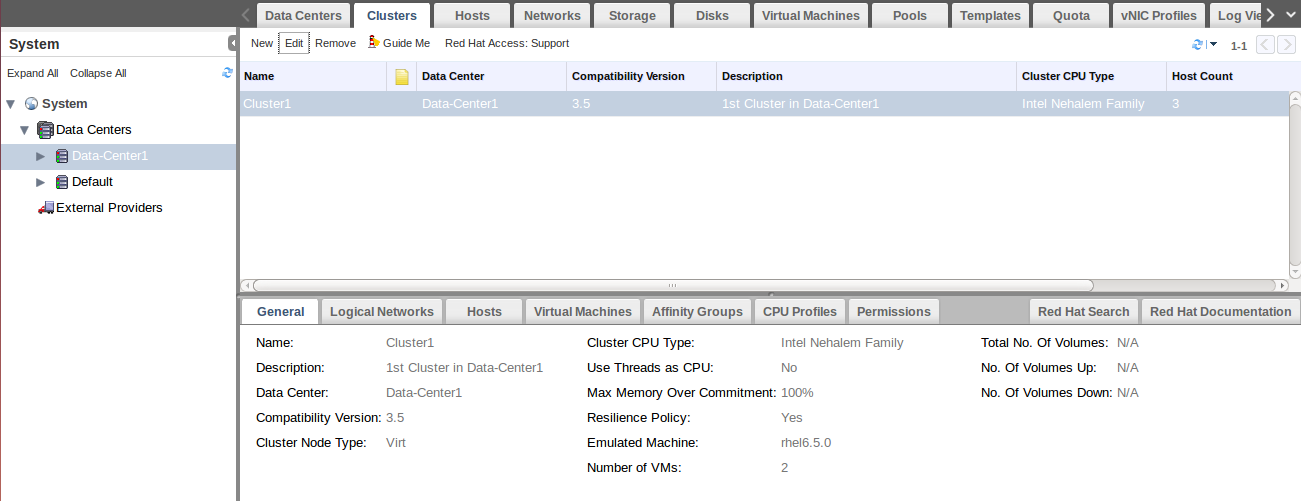
Switch to Clusters tab and select Cluster1 the click on edit.
Clustering Tab
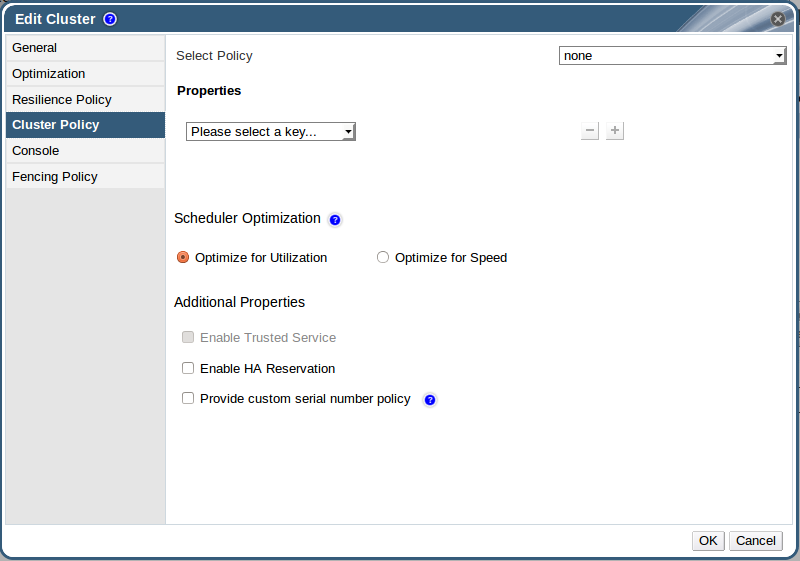
From window tabs, switch to Cluster Policy tab.
Cluster Policy
Select evenly_distributed policy. This policy allows you to configure Max threshold for CPU utilization on the host and the allowed time for the load before starting Live migration.
Hint
As shown I configured the max threshold to be 50% and duration to be 1 min.
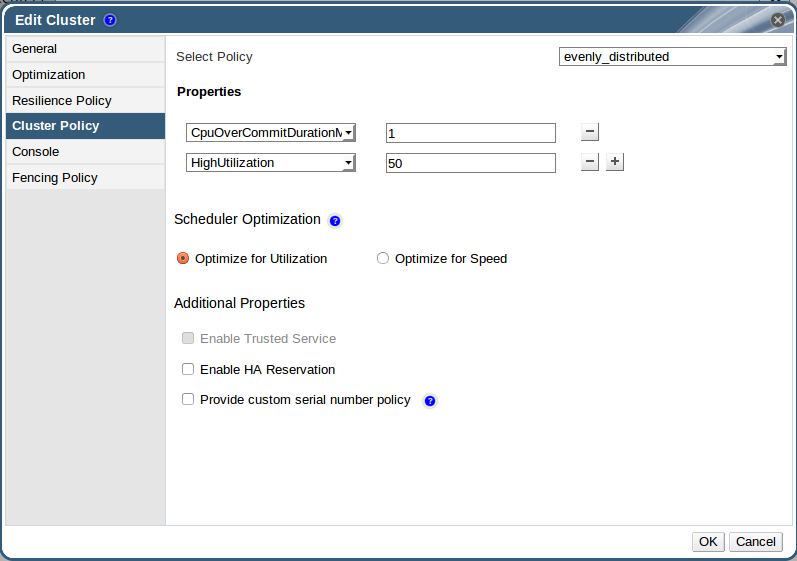
Configure Cluster Properties
Then OK and switch to VM’s tab.
Select Linux vm [Previously created] then click edit and check this points.
1. From Host tab : Check Manual and Automatic Live Migration is allowed for this VM.
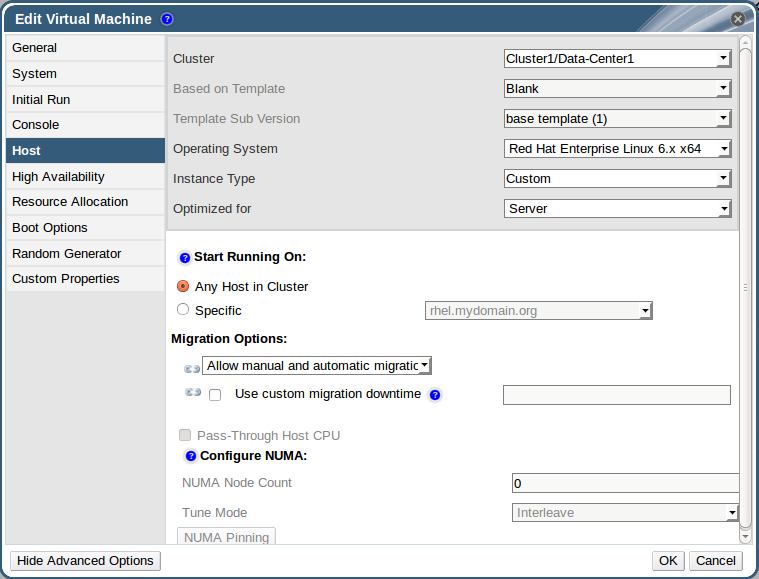
Cluster Migration Options
2. From HA tab : Check the Priority degree of your virtual-machine. In our case, its not very important as we are playing with only one vm. But it will be important to set priorities for your vms in large environment.
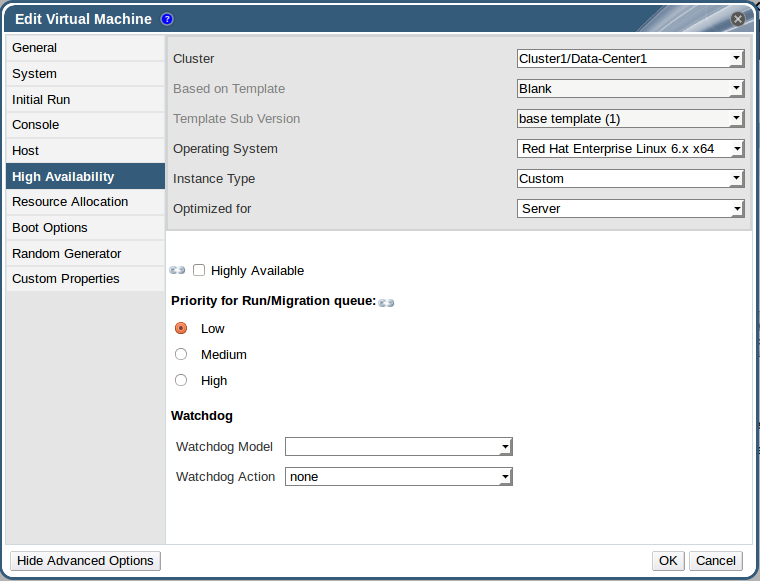
Cluster VM Priorities
Then start Linux VM.
First, we will use the Manually Live Migration. Linux VM in now running on rhel.mydomain.org.

Linux VM Status
Lets run the following command over vm console, before starting migration.
# ls -lRZ /
Then select Linux VM and click Migrate.
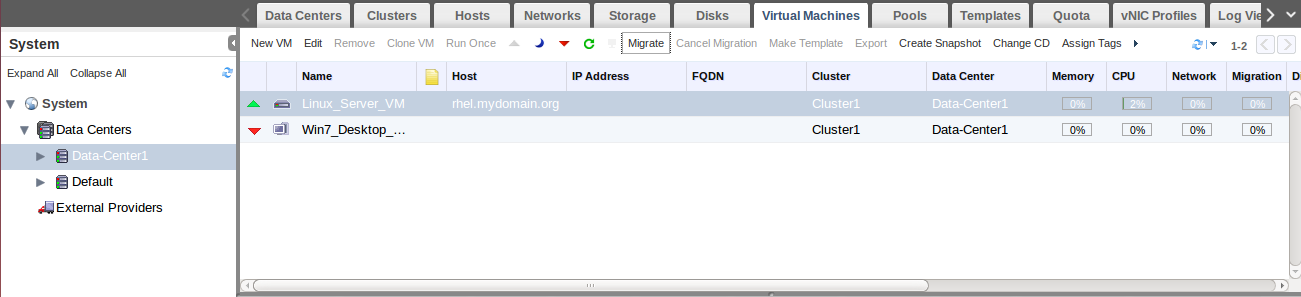
Linux VM Migrate
If you select automatically, system will check the most responsible host to be destination under the cluster policy. We will test this without any interference from administrator.
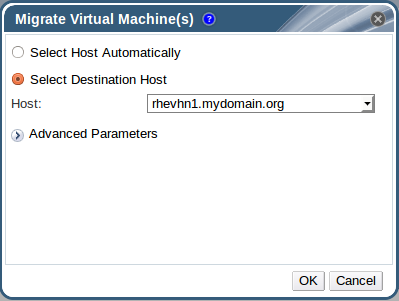
Migrate Virtual Machines
So, after selecting manually and choose the destination, Click OK and go to console and monitor the running command. You can also check the vm status.

Monitor VM Status
You may need to monitor Task events.
Monitor Task Events
After a few seconds, you will find a change in he vm Hostname.
Confirm VM Changes
Your VM is manually Live migrated successfully !!
Lets try automatic Live Migration, our target is to make CPU Load on the rhevhn1 Host is exceeded 50%. We will do that by increasing the load on the vm itself, so from console write this command:
# dd if=/dev/urandom of=/dev/null
and monitor the load on Host.
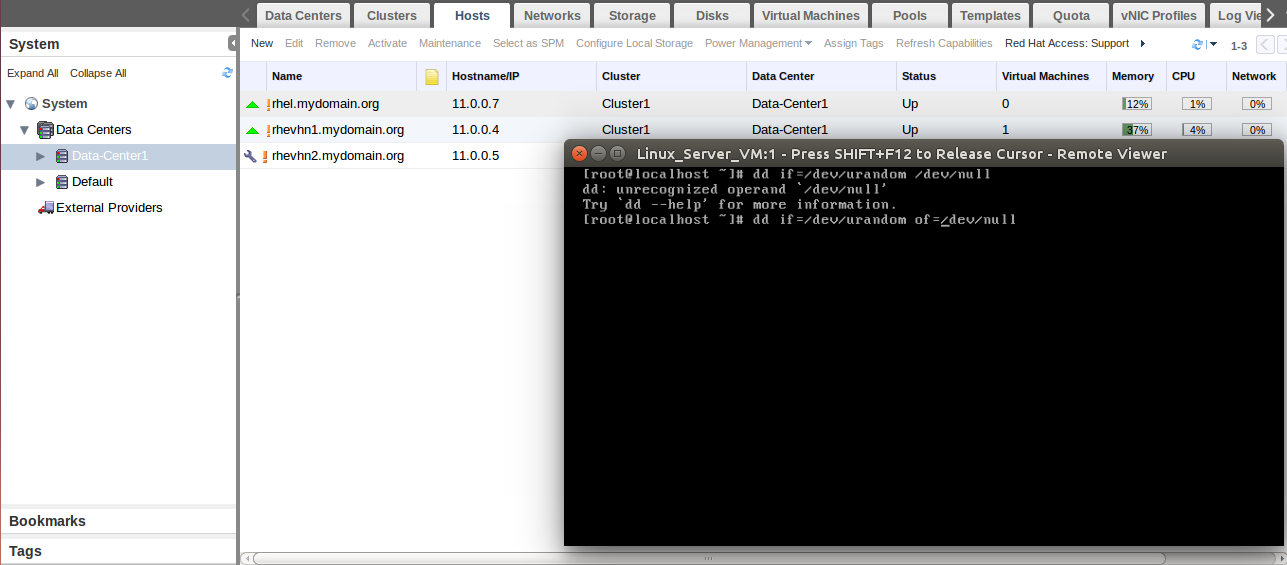
Monitor VM Load
After few minutes, the load on Host will exceeds 50%.
VM Load Alert
Just wait another few more minutes then live migration will start automatically as shown.
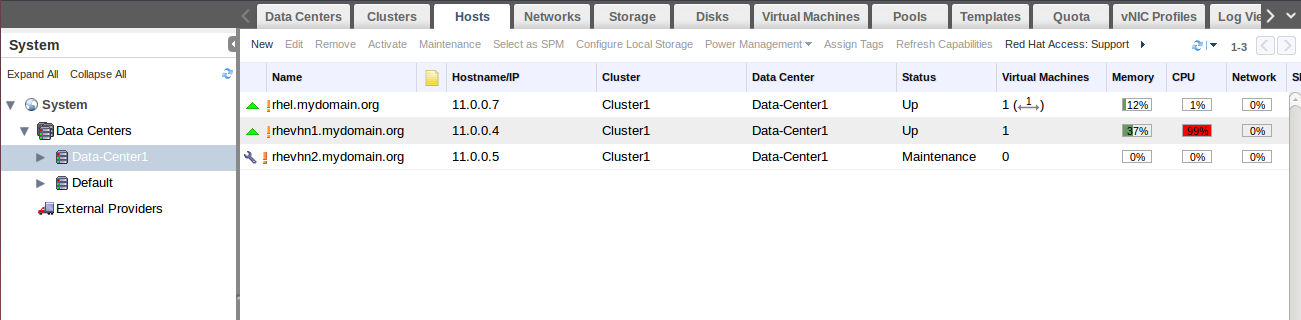
VM Live Migration
You can also check the tasks tab, and after little waiting, your virtual machine is automatically Live Migrated to rhel Host.
Monitor VM

VM RHEL Migration
Important: Make sure that one of your hosts have resources more than the other one. If the two hosts are identical in resources. VM won’t be migrated because there will be no difference !!
Hint: Putting Host into Maintenance Mode will automatically Live Migration Up and running VM’s to other hosts in the same cluster.
For further information about VM Migrations, read Migrating Virtual Machines Between Hosts.
Hint: Live Migration between different clusters isn’t officially supported expect one case you can check it here.
2. High Availability
In the against of Live Migration, HA is used to Cover Critical Situation not just load balancing tasks. The common section that your VM will also migrated to another host but with rebooting down time.
If you have Failure, Non-Operational or Non-responsive Host in your cluster, Live Migration Cannot help you. HA will power-off the virtual-machine and restart it on another up and running host in the same cluster.
To Enable HA in your environment, you must have at least one power management device [e.g. power switch] in your environment.
Unfortunately, we aren’t able to do that in our virtual environment. So for more about HA in RHEV please check out Improving Uptime with VM High Availability.
Remember: Live Migration and High Availability are working with hosts in the same cluster with same type of CPU and connected to shared Storage.
Conclusion:
We reached peak point in our series as we discussed one of the important features in RHEV Clustering as we described it and its importance. Also we discussed the second type [method] to deploy RHEV hypervisors which based on RHEL [at least 6.6 x86_64].
In next article, we will be able to make some operations on virtual-machines such as snapshots, sealing, cloning, exporting and pools.
How to Manage RedHat Enterprise Virtualization (RHEV) Virtual Machines Operations and Tasks – Part 6
In this part of our tutorial we are going to discuss the operations and tasks such as Taking Snaphots, Creating Pools, Making Templates and Cloning are the main operations which could be performed on RHEV virtual machines hosted by RHEV environment.
Before going further, I request you to read the rest of the articles from this RHEV series here:
RedHat Enterprise Virtualization (RHEV) Administration Series – Part 1-7
Manage RHEV VM Operations and Tasks – Part 6
Snapshots
Snapshot is used to save VM’s state at specific Point-Time. This is very useful and helpful during software testing process or revert something going wrong on your system as you could return back to the Point-Time which you took snapshot at.
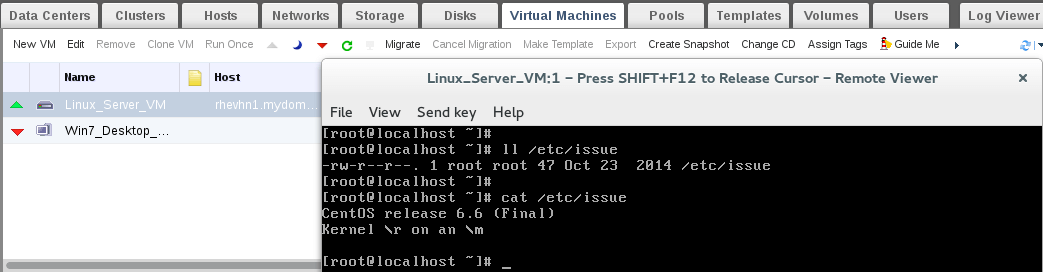
1. Start your linux-vm machine and verify the OS version and type before taking snapshot.
Img 01: Check Linux OS Version
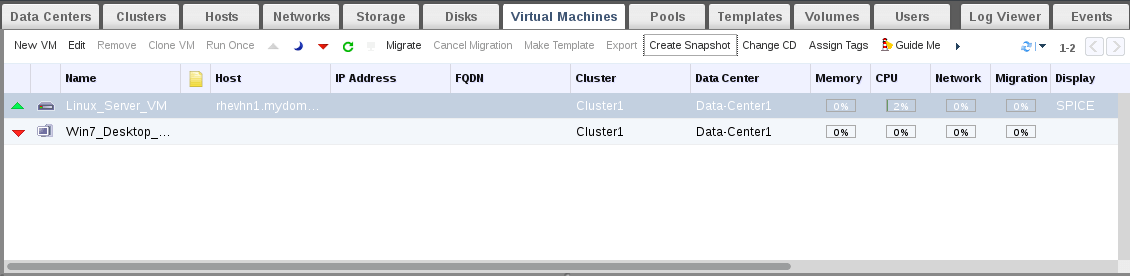
2. Click on “Create Snapshot”.
Img 02: Create RHEV Snapshot
3. Add the description and select disks and saving memory then OK.

Img 03: Add Snapshot Description
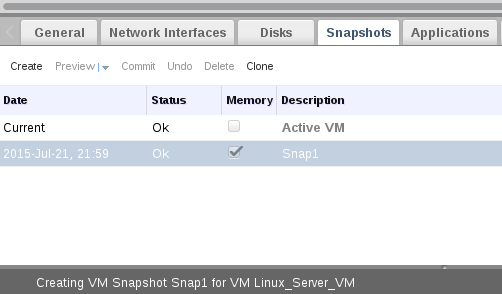
Check the status of snapshot and task status from tasks bar.

Img 04: Confirm Created Snapshot Status
After finishing, you will note that status of snapshot changed from Lock to OK, which meaning that your snapshot is ready and created successfully.
Img 05: Check Snapshot Status
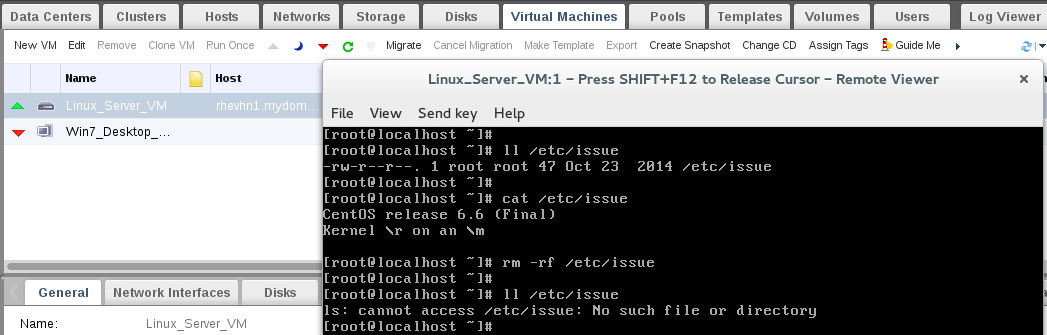
4. Lets go to the VM console and delete /etc/issue file.
Img 06: Delete Issue File
5. For reverting/restoring process, your virtual machine should be at down state. Make sure its powered off and then click “Preview” to check the snapshot and reverting on-fly to it.
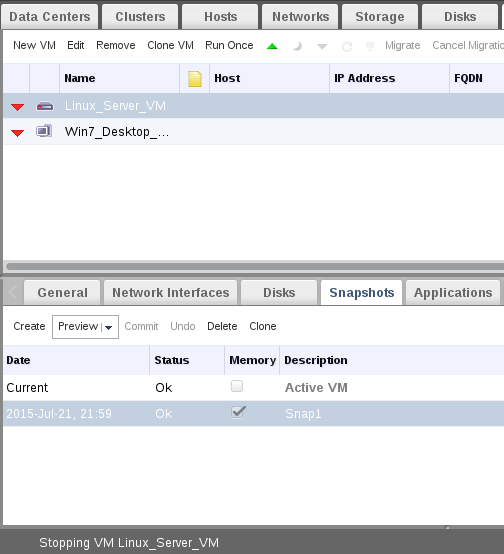
Img 07: Shut Down Snapshot
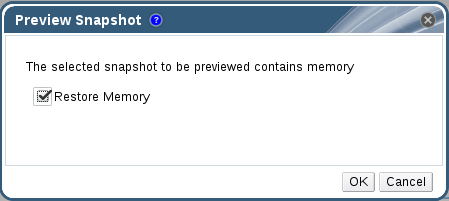
Now confirm Memory restoring.
Img 08: Restore Snapshot Memory
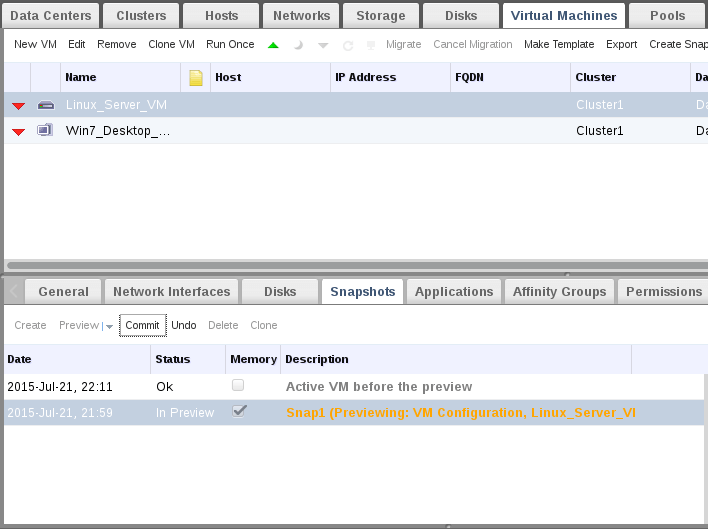
Wait for Previewing to be finished and after few minuets, you will noted that snapshot status is “In preview”.
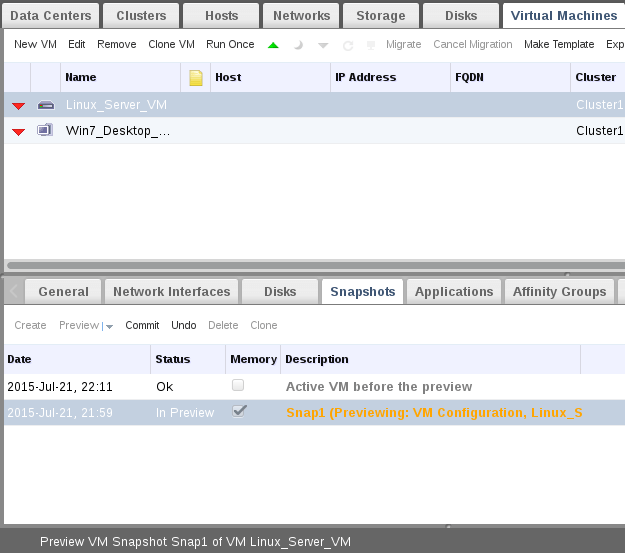
Img 09: Snapshot In Preview State
Now we have two ways:
6. First one to directly “Commit” the restored snapshot to the original virtual machine and finishing the total reverting process.
Second one to check the reverted changes before commit the restored snapshot to original vm. After checking we will go to the first way “Commit”.
For this article, we will start via second way. So, we will need to power up the virtual machine and then check the /etc/issue file. You will find it without any changes.
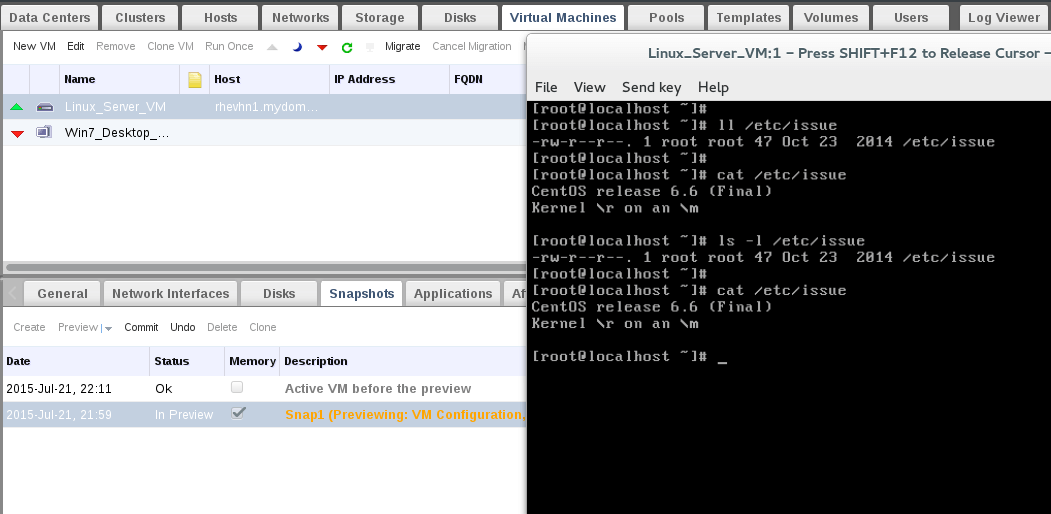
Img 10: Check Issue File
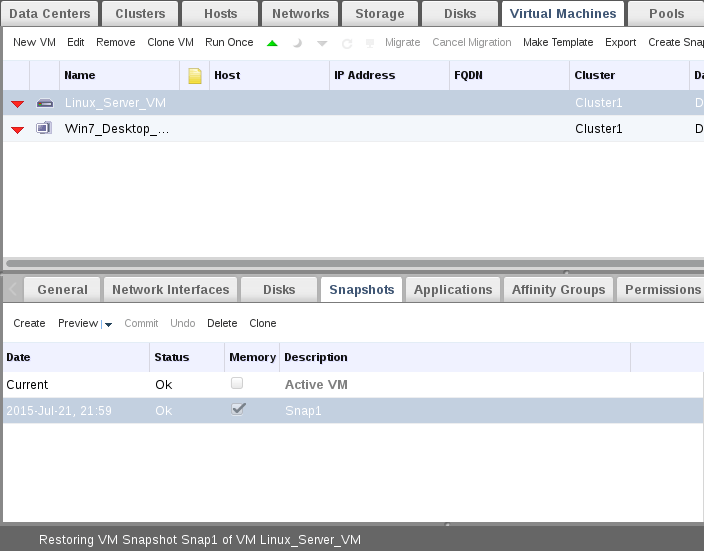
7. Your VM should be powered off for reverting process. After powering off, Commit your snapshot to vm.
Img 11: Commit VM Snapshot
Then watch restoring commit process, after finishing commit process, you will find snapshot status is “OK”.
Img 12: Confirm Commit Snapshot
Hints : 1. If you don’t want to confirm reverting to snapshot after preview stage, just click on “Undo” to skip snapshot. Its always recommended to take snapshot of power down VM instead of be running. You can create new VM from current snapshot, just select your preferred snapshot and click on “Clone”.
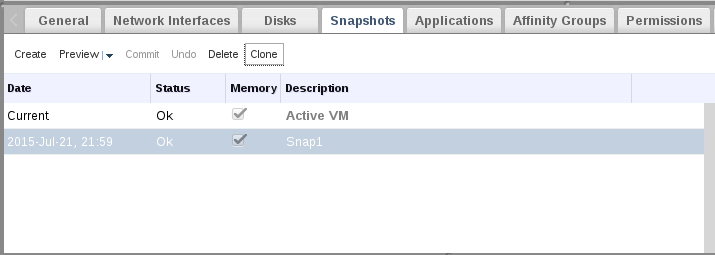
Img 13: Create VM Snapshot Clone
Templates:
Actually, template is a very normal virtual machine copy, but without any pre-configuration related to the original vm operating system. Templates are used to improve the speed and decrease time of vm operating system installation.
Creating templates has two main process:
- A. Sealing the original virtual machine.
- B. Taking copy [Create Template] of the sealed vm to be separated template.
A. Sealing Process:
To seal RHEL6 Virtual Machine you should make sure about this points :
8. Flagging system for pre-configuration for next booting by creating this empty hidden file.
# touch /.unconfigured
9. Remove any ssh host keys and set hostname to be localhost.localdomain in /etc/sysconfig/network file and also remove system udev rules.
# rm -rf /etc/ssh/ssh_host_*
# rm -rf /etc/udev/rules.d/70-*
10. Remove MAC address from Network interface configuration file eg. [/etc/sysconfig/network-scripts/ifcfg-eth0] and delete all system logs under /var/log/ and finally Power off your virtual machine.
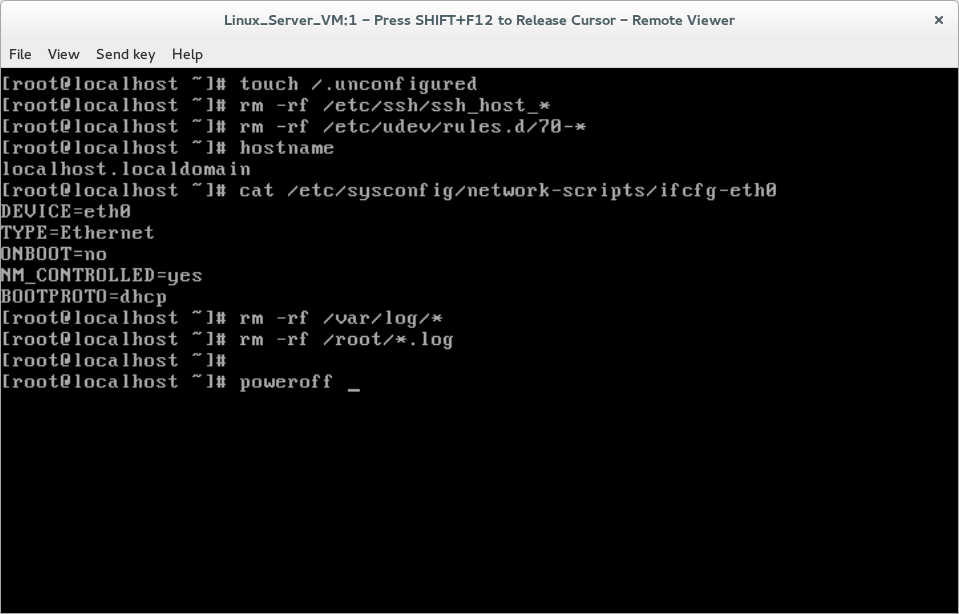
Img 14: Commands to Follow
B. Creating Templates
11. Select the sealed vm and click “Create Template”.

Img 15: Create New VM Template
12. Provide details and proprieties about your new template.
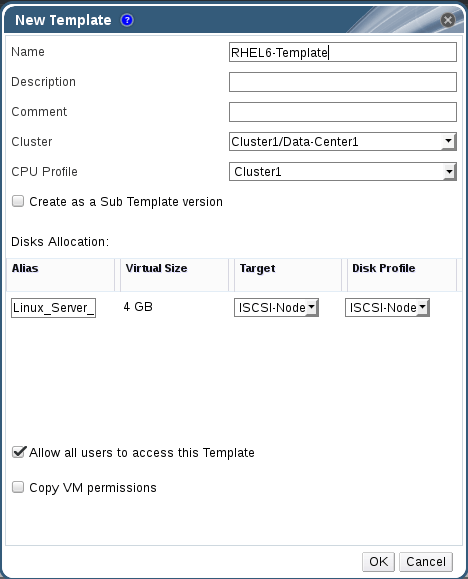
Img 16: Add Template Details
Now, you can check the process from tasks and also you could switch Templates tab to monitor the status of your new templates.
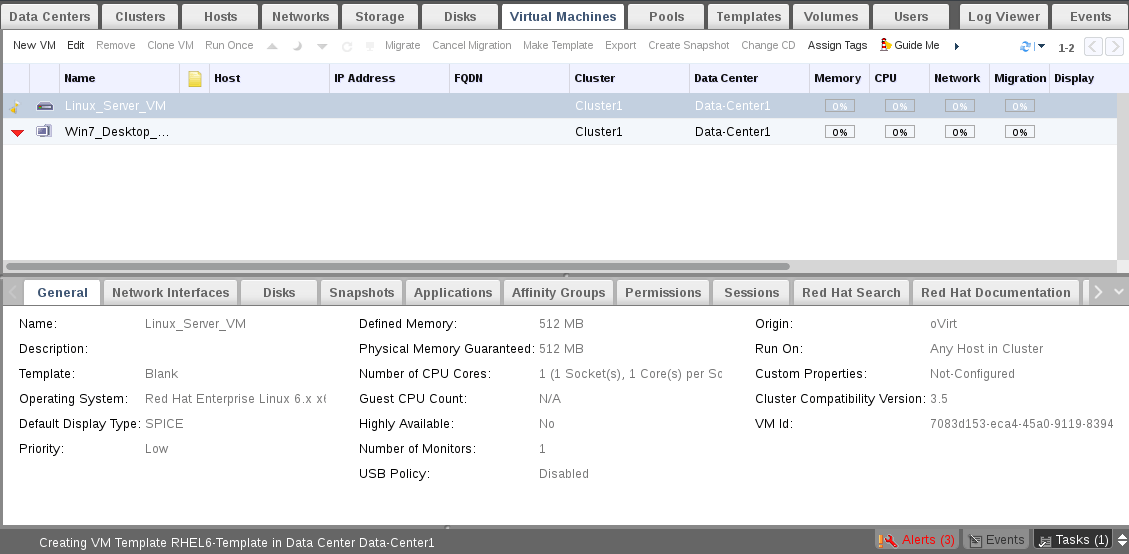
Img 16: Check Template Information

Img 17: Monitor Template Status
Wait a few minutes, then check template status again.
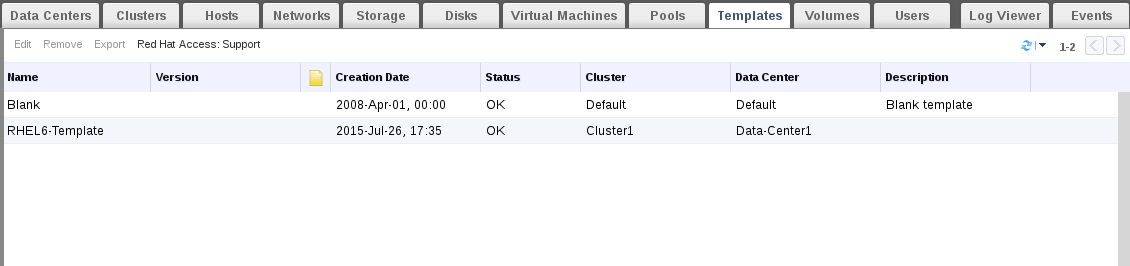
Img 18: Check VM Template Again
You will note that its converted from lock to OK. Now our new template is ready to be used. Actually we will use it in the next section.
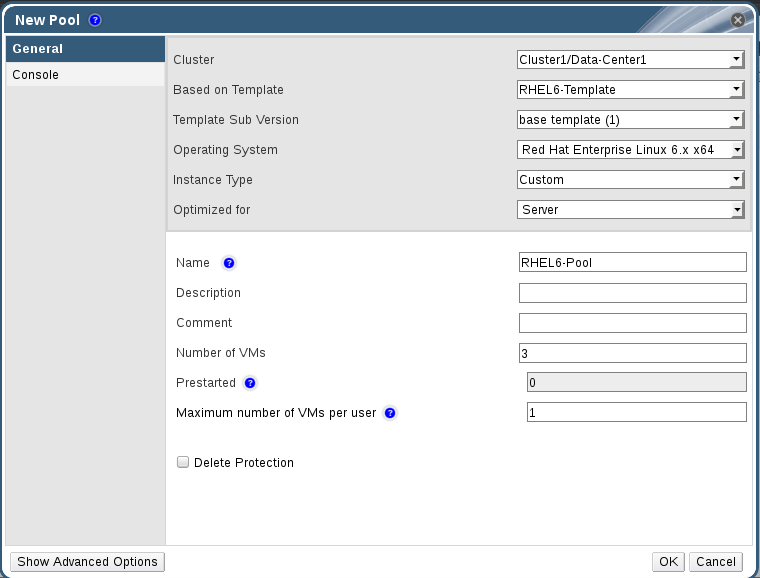
Creating Pools:
Pool is a group of identical virtual machines. Pooling is used to create a given number of identical virtual machines in one step. Those virtual machines could be based on pre-created template.
Creating New Pool
13. Switch to Pools tab and click New then fill the appeared wizard windows.
Img 19: Create New Pool
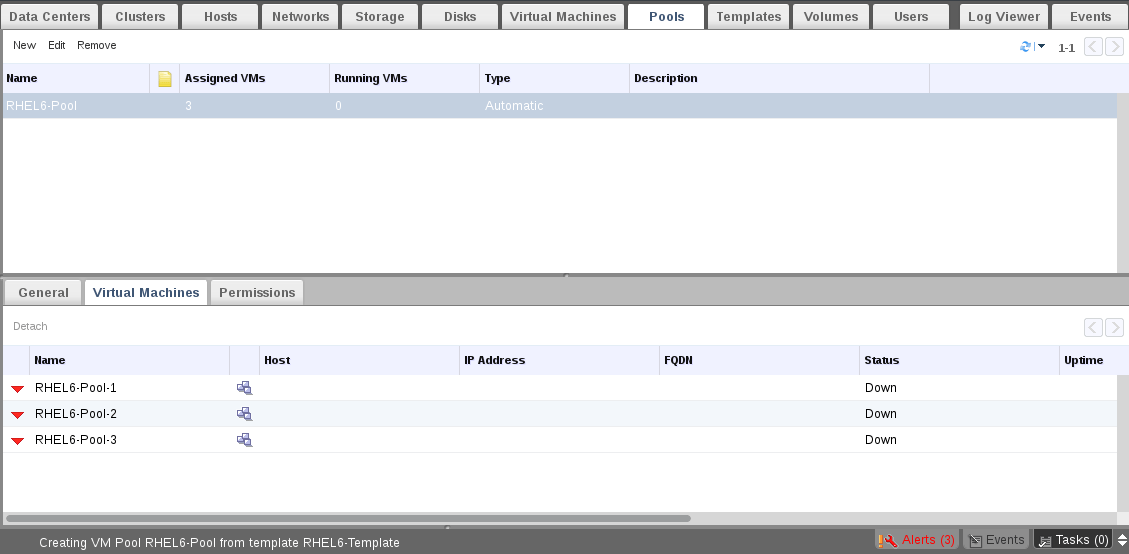
14. Now check the status of created Pool vms and wait few minutes, you will note the status of virtual machines changed from Lock to Down.
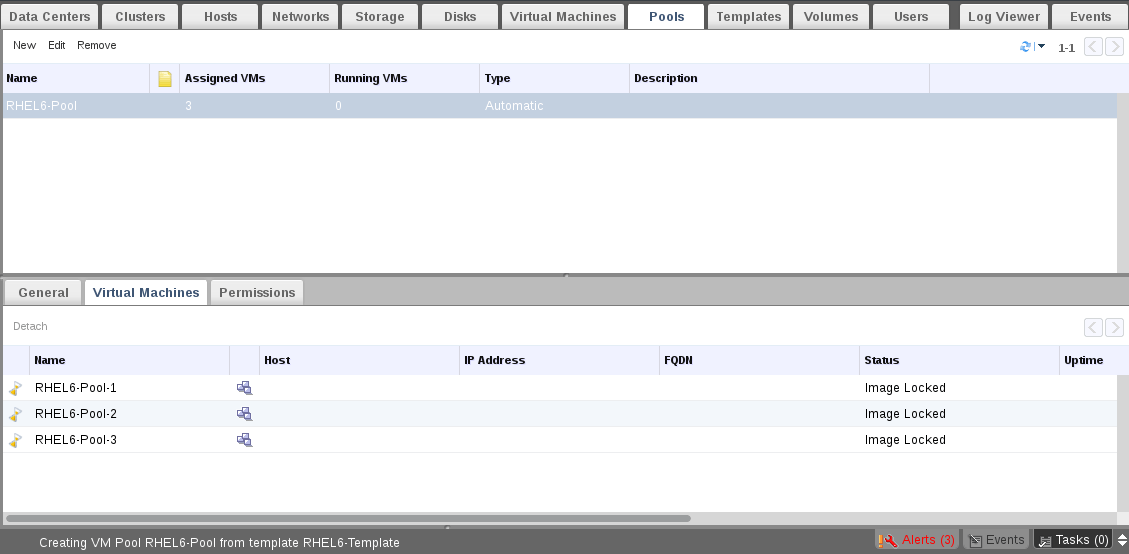
Img 20: VM Pool Status Locked
Img 21: VM Pool Status Down
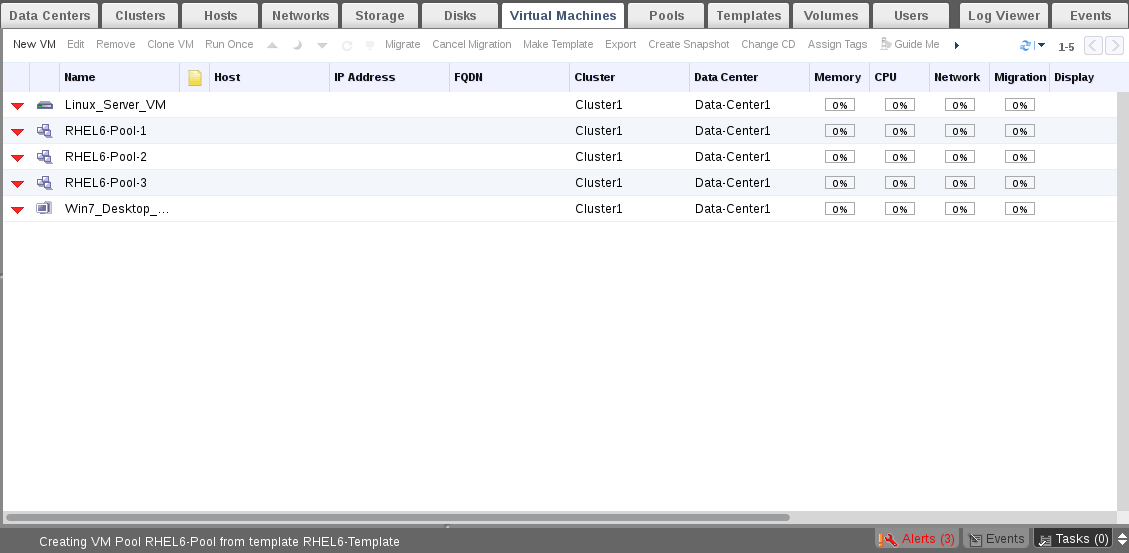
You could also check the status from Virtual Machines tab.
Img 22: Check Pool Status from VM
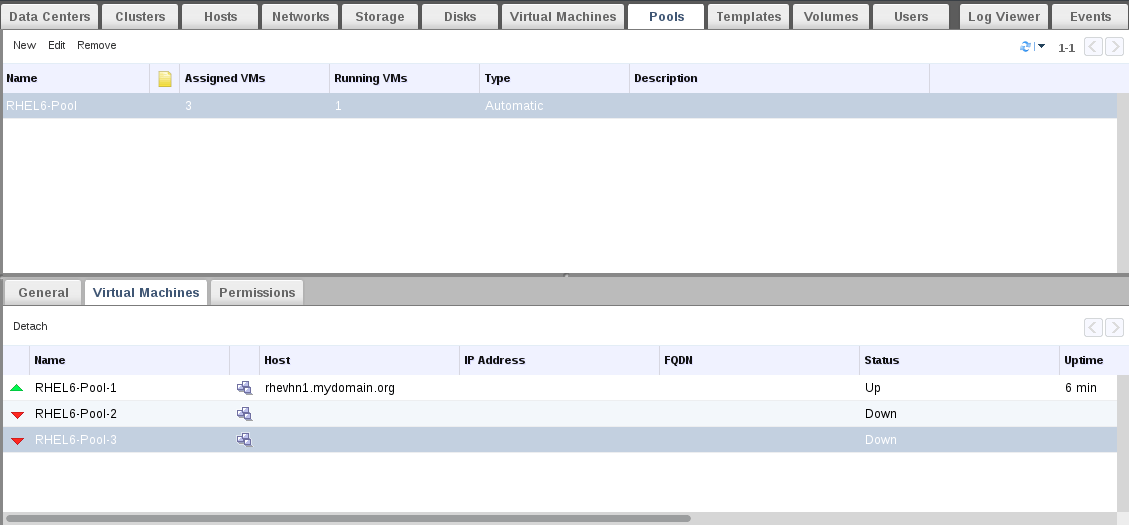
15. Lets try to run one of Pool virtual machines.

Img 22: Run Virtual Machine
That’s right, you will be asked for new root password and also you will be asked about basic authentication configuration. Once finished your new vm is now ready for use.

23: Select Basic Authentication
Monitor VMs also from pools tab.
Img 24: Monitor Virtual Machine
Notes:
- To delete Pool, You should detach all of VMs from the Pool.
- To detach VM from Pool, VM must be at down state.
- Compare VM installation time [Normal way VS. Template using].
Create VM Clones:
Cloning is normal Copy Process without any change to the Original Source. Cloning could done from Original VM or Snapshot.
To take Clone:
16. Select the Original source [VM or Snapshot] then click “Clone VM”.
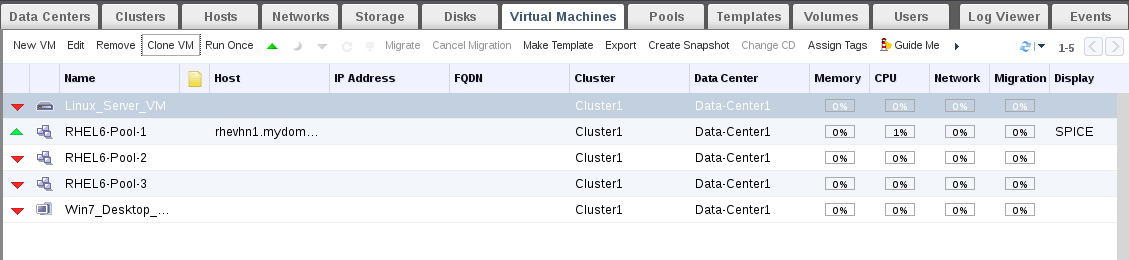
Img 25: Create VM Clone
Hint: If you will take clone from VM, VM must be at down state.
17. Provide name to your cloned VM and wait few minutes, you will find the cloning process is done and the new vm now is ready to be used.
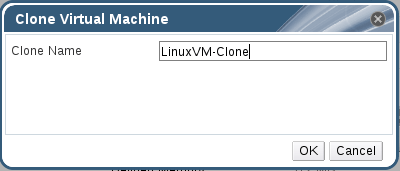
Img 26: Give VM Clone Name
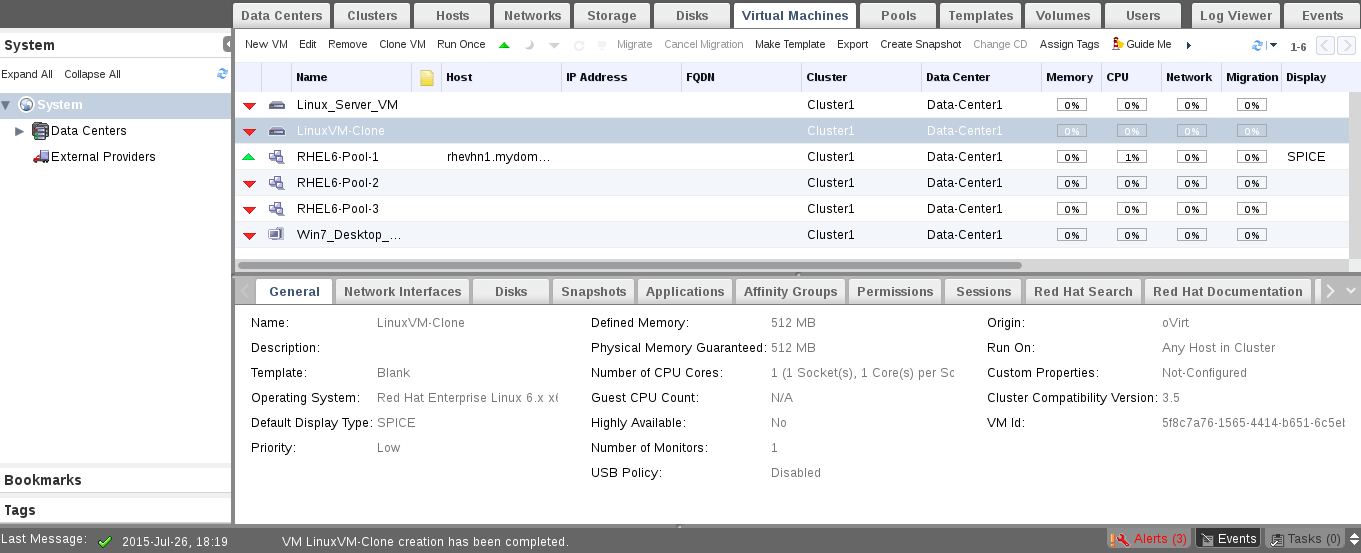
Img 27: VM Clone Details
Conclusion
As a RHEV administrator, there some main tasks to be done on environment virtual machines. Cloning, Creating Pools, Making Templates and Taking snapshots are basic and important tasks should be done by RHEV admin. This tasks also considered as the core tasks of any virtualization environment, So make sure you understood it well then do more and more,,, and more practical labs in your private environment.
Resources: RHEV Administration Guide