
For those of you in the hosting business, or if you’re hosting your own servers and exposing them to the Internet, securing your systems against attackers must be a high priority.
mod_security (an open source intrusion detection and prevention engine for web applications that integrates seamlessly with the web server) and mod_evasive are two very important tools that can be used to protect a web server against brute force or (D)DoS attacks.
Read Also : How to Install Linux Malware Detect with ClamAV as Antivirus Engine
mod_evasive, as its name suggests, provides evasive capabilities while under attack, acting as an umbrella that shields web servers from such threats.

Install Mod_Security and Mod_Evasive to Protect Apache
This assumes that you have a LAMP server installed on your system. If not, please check this article before proceeding further.
You will also need to setup iptables as the default firewall front-end instead of firewalld if you’re running RHEL/CentOS 7 or Fedora 21. We do this in order to use the same tool in both RHEL/CentOS 7/6 and Fedora 21.
Step 1: Installing Iptables Firewall on RHEL/CentOS 7 and Fedora 21
To begin, stop and disable firewalld:
# systemctl stop firewalld
# systemctl disable firewalld

Disable Firewalld Service
Then install the iptables-services package before enabling iptables:
# yum update && yum install iptables-services
# systemctl enable iptables
# systemctl start iptables
# systemctl status iptables

Install Iptables Firewall
Step 2: Installing Mod_Security and Mod_evasive
In addition to having a LAMP setup already in place, you will also have to enable the EPEL repository in RHEL/CentOS 7/6 in order to install both packages. Fedora users don’t need to enable any repo, because epel is a already part of Fedora project.
# yum update && yum install mod_security mod_evasive
When the installation is complete, you will find the configuration files for both tools in /etc/httpd/conf.d.
# ls -l /etc/httpd/conf.d

mod_security + mod_evasive Configurations
Now, in order to integrate these two modules with Apache and have it load them when it starts, make sure the following lines appear in the top level section of mod_evasive.conf and mod_security.conf, respectively:
LoadModule evasive20_module modules/mod_evasive24.so
LoadModule security2_module modules/mod_security2.so
Note that modules/mod_security2.so and modules/mod_evasive24.so are the relative paths, from the /etc/httpd directory to the source file of the module. You can verify this (and change it, if needed) by listing the contents of the /etc/httpd/modules directory:
# cd /etc/httpd/modules
# pwd
# ls -l | grep -Ei '(evasive|security)'
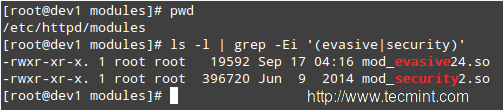
Verify mod_security + mod_evasive Modules
Then restart Apache and verify that it loads mod_evasive and mod_security:
# service httpd restart 		[On RHEL/CentOS 6 and Fedora 20-18]
# systemctl restart httpd 		[On RHEL/CentOS 7 and Fedora 21]
[Dump a list of loaded Static and Shared Modules]

# httpd -M | grep -Ei '(evasive|security)'
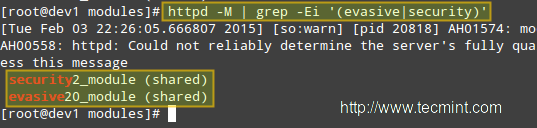
Check mod_security + mod_evasive Modules Loaded
Step 3: Installing A Core Rule Set and Configuring Mod_Security
In few words, a Core Rule Set (aka CRS) provides the web server with instructions on how to behave under certain conditions. The developer firm of mod_security provide a free CRS called OWASP (Open Web Application Security Project) ModSecurity CRS that can be downloaded and installed as follows.
1. Download the OWASP CRS to a directory created for that purpose.
# mkdir /etc/httpd/crs-tecmint
# cd /etc/httpd/crs-tecmint
# wget https://github.com/SpiderLabs/owasp-modsecurity-crs/tarball/master

Download mod_security Core Rules
2. Untar the CRS file and change the name of the directory for one of our convenience.
# tar xzf master
# mv SpiderLabs-owasp-modsecurity-crs-ebe8790 owasp-modsecurity-crs

Extract mod_security Core Rules
3. Now it’s time to configure mod_security. Copy the sample file with rules (owasp-modsecurity-crs/modsecurity_crs_10_setup.conf.example) into another file without the .example extension:
# cp modsecurity_crs_10_setup.conf.example modsecurity_crs_10_setup.conf
and tell Apache to use this file along with the module by inserting the following lines in the web server’s main configuration file /etc/httpd/conf/httpd.conf file. If you chose to unpack the tarball in another directory you will need to edit the paths following the Include directives:
<IfModule security2_module>
    Include crs-tecmint/owasp-modsecurity-crs/modsecurity_crs_10_setup.conf
    Include crs-tecmint/owasp-modsecurity-crs/base_rules/*.conf
</IfModule>
Finally, it is recommended that we create our own configuration file within the /etc/httpd/modsecurity.ddirectory where we will place our customized directives (we will name it tecmint.conf in the following example) instead of modifying the CRS files directly. Doing so will allow for easier upgrading the CRSs as new versions are released.
<IfModule mod_security2.c>
	SecRuleEngine On
	SecRequestBodyAccess On
	SecResponseBodyAccess On
	SecResponseBodyMimeType text/plain text/html text/xml application/octet-stream
	SecDataDir /tmp
</IfModule>
You can refer to the SpiderLabs’ ModSecurity GitHub repository for a complete explanatory guide of mod_security configuration directives.
Step 4: Configuring Mod_Evasive
mod_evasive is configured using directives in /etc/httpd/conf.d/mod_evasive.conf. Since there are no rules to update during a package upgrade, we don’t need a separate file to add customized directives, as opposed to mod_security.
The default mod_evasive.conf file has the following directives enabled (note that this file is heavily commented, so we have stripped out the comments to highlight the configuration directives below):
<IfModule mod_evasive24.c>
    DOSHashTableSize    3097
    DOSPageCount        2
    DOSSiteCount        50
    DOSPageInterval     1
    DOSSiteInterval     1
    DOSBlockingPeriod   10
</IfModule>
Explanation of the directives:
- DOSHashTableSize: This directive specifies the size of the hash table that is used to keep track of activity on a per-IP address basis. Increasing this number will provide a faster look up of the sites that the client has visited in the past, but may impact overall performance if it is set too high.
- DOSPageCount: Legitimate number of identical requests to a specific URI (for example, any file that is being served by Apache) that can be made by a visitor over the DOSPageInterval interval.
- DOSSiteCount: Similar to DOSPageCount, but refers to how many overall requests can be made to the entire site over the DOSSiteInterval interval.
- DOSBlockingPeriod: If a visitor exceeds the limits set by DOSSPageCount or DOSSiteCount, his source IP address will be blacklisted during the DOSBlockingPeriod amount of time. During DOSBlockingPeriod, any requests coming from that IP address will encounter a 403 Forbidden error.
Feel free to experiment with these values so that your web server will be able to handle the required amount and type of traffic.
Only a small caveat: if these values are not set properly, you run the risk of ending up blocking legitimate visitors.
You may also want to consider other useful directives:
DOSEmailNotify
If you have a mail server up and running, you can send out warning messages via Apache. Note that you will need to grant the apache user SELinux permission to send emails if SELinux is set to enforcing. You can do so by running
# setsebool -P httpd_can_sendmail 1
Next, add this directive in the mod_evasive.conf file with the rest of the other directives:
DOSEmailNotify you@yourdomain.com
If this value is set and your mail server is working properly, an email will be sent to the address specified whenever an IP address becomes blacklisted.
DOSSystemCommand
This needs a valid system command as argument,
DOSSystemCommand </command>
This directive specifies a command to be executed whenever an IP address becomes blacklisted. It is often used in conjunction with a shell script that adds a firewall rule to block further connections coming from that IP address.
Write a shell script that handles IP blacklisting at the firewall level
When an IP address becomes blacklisted, we need to block future connections coming from it. We will use the following shell script that performs this job. Create a directory named scripts-tecmint (or whatever name of your choice) in /usr/local/bin and a file called ban_ip.sh in that directory.
#!/bin/sh
# IP that will be blocked, as detected by mod_evasive
IP=$1
# Full path to iptables
IPTABLES="/sbin/iptables"
# mod_evasive lock directory
MOD_EVASIVE_LOGDIR=/var/log/mod_evasive
# Add the following firewall rule (block all traffic coming from $IP)
$IPTABLES -I INPUT -s $IP -j DROP
# Remove lock file for future checks
rm -f "$MOD_EVASIVE_LOGDIR"/dos-"$IP"
Our DOSSystemCommand directive should read as follows:
DOSSystemCommand "sudo /usr/local/bin/scripts-tecmint/ban_ip.sh %s"
In the line above, %s represents the offending IP as detected by mod_evasive.
Add the apache user to the sudoers file
Note that all of this just won’t work unless you to give permissions to user apache to run our script (and that script only!) without a terminal and password. As usual, you can just type visudo as root to access the /etc/sudoers file and then add the following 2 lines as shown in the image below:
apache ALL=NOPASSWD: /usr/local/bin/scripts-tecmint/ban_ip.sh
Defaults:apache !requiretty

Add Apache User to Sudoers
IMPORTANT: As a default security policy, you can only run sudo in a terminal. Since in this case we need to use sudo without a tty, we have to comment out the line that is highlighted in the following image:
#Defaults requiretty
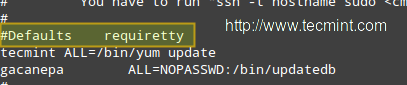
Disable tty for Sudo
Finally, restart the web server:
# service httpd restart 		[On RHEL/CentOS 6 and Fedora 20-18]
# systemctl restart httpd 		[On RHEL/CentOS 7 and Fedora 21]
Step 4: Simulating an DDoS Attacks on Apache
There are several tools that you can use to simulate an external attack on your server. You can just google for “tools for simulating ddos attacks” to find several of them.
Note that you, and only you, will be held responsible for the results of your simulation. Do not even think of launching a simulated attack to a server that you’re not hosting within your own network.
Should you want to do the same with a VPS that is hosted by someone else, you need to appropriately warn your hosting provider or ask permission for such a traffic flood to go through their networks. Tecmint.com is not, by any means, responsible for your acts!
In addition, launching a simulated DoS attack from only one host does not represent a real life attack. To simulate such, you would need to target your server from several clients at the same time.
Our test environment is composed of a CentOS 7 server [IP 192.168.0.17] and a Windows host from which we will launch the attack [IP 192.168.0.103]:

Confirm Host IPAddress
Please play the video below and follow the steps outlined in the indicated order to simulate a simple DoS attack:
Then the offending IP is blocked by iptables:

Blocked Attacker IP
Conclusion
With mod_security and mod_evasive enabled, the simulated attack causes the CPU and RAM to experiment a temporary usage peak for only a couple of seconds before the source IPs are blacklisted and blocked by the firewall. Without these tools, the simulation will surely knock down the server very fast and render it unusable during the duration of the attack.
We would love to hear if you’re planning on using (or have used in the past) these tools. We always look forward to hearing from you, so don’t hesitate to leave your comments and questions, if any, using the form below.
Reference Links
https://www.modsecurity.org/
http://www.zdziarski.com/blog/?page_id=442