
Gtkdialog (or gtkdialog) is an open source nifty utility for creating and building GTK+ Interfaces and Dialog Boxes with the help of Linux shell scripts and using GTK library, as well as using an xml-like syntax, which makes easy to create interfaces using gtkdialog. It is much similar to most famous tool called Zenity, but it comes with some useful customizable features that enables you to easily create many widgets like vbox, hbox, button, frame, text, menu, and a lot more.
Create Gtkdialog Boxes in Linux
Read Also : Create GTK+ Graphical Dialog Boxes using Zenity
Installation of Gtkdialog in Linux
You can download gtkdialog-0.8.3 (which is is the latest version) or you may also use wget command, unpack the downloaded file and run these following commands to compile from source.
$ sudo apt-get install build-essential [on Debian based systems]
# yum install gcc make gcc-c++ [on RedHat based systems]
$ wget https://gtkdialog.googlecode.com/files/gtkdialog-0.8.3.tar.gz
$ tar -xvf gtkdialog-0.8.3.tar.gz
$ cd gtkdialog-0.8.3/
$ ./configure
$ make
$ sudo make install
Now let’s start creating some boxes, create a new “myprogram” script in your home folder.
My First Program
$ cd
$ touch myprogram
Now open the “myprogram” file using any text editor you want, and add the following code to it.
#!/bin/bash

GTKDIALOG=gtkdialog
export MAIN_DIALOG='

<window title="My First Program" icon-name="gtk-about" resizable="true" width-request="300" height-request="310">

<vbox>
	<hbox space-fill="true" space-expand="true">
		<button>
			<label>Welcome to TecMint.com Home!</label>
			<action>echo "Welcome to TecMint.com Home!"</action>
		</button>
	</hbox>
</vbox>
</window>
'

case $1 in
	-d | --dump) echo "$MAIN_DIALOG" ;;
	*) $GTKDIALOG --program=MAIN_DIALOG --center ;;

esac
------------
Save the file, and set execute permission and run it as shown.
$ chmod 755 myprogram
$ ./myprogram
This is how your first program created and executed using gtkdialog.
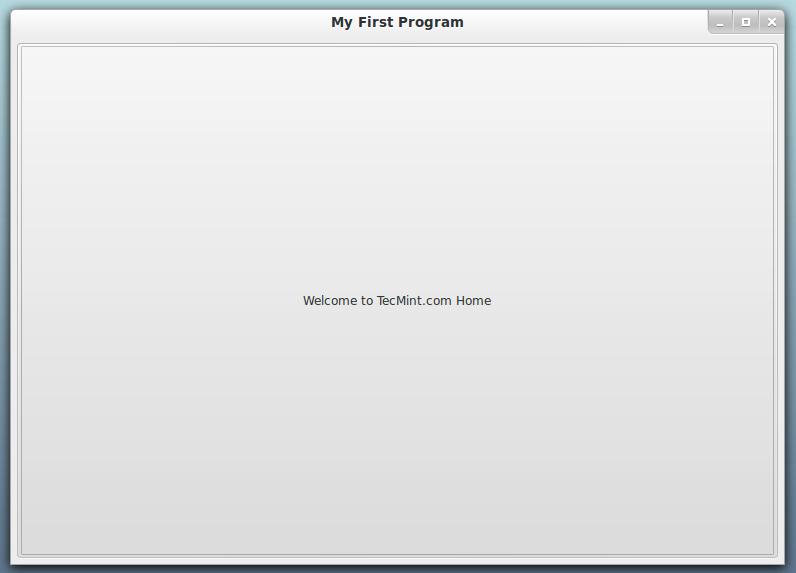
Gtkdialog Program
Now, we will explain the code in short.
- #!/bin/bash: The first line of any shell script, it is used to specify the bash shell path.
- GTKDIALOG = gtkdialog: Here we defined a variable to use it later when executing the shell script with gtkdialog, this line must be in all scripts that you create using gtkdialog.
- export MAIN_DIALOG=: Another variable we defined which will contain all syntax for our interface, you can replace MAIN_DIALOG with any name you want, but you have to replace it also in last 4 lines of the script.
- Window Title: I don’t think that this code need to be explained, we created a title, a default icon for the window, we choose if it was resizable or not, and we defined the width and height we want, of course all of those options are secondary, you can just use the <window> tag if you want.
- <vbox> : We use the vbox tag to create a vertical box, it is important to create a vbox tag in order to contain other tags such as hbox and button, etc.
- <hbox>: Here we created a horizontal box using the <hbox> tag, “space-fill” and “space-expand” are options to expand the hbox through the window.
- <button>: Create a new button.
- <label>: This is the default text for the button, we closed the label tag using </label>, of course it is very important to close all the tags that we use.
- <action>: This what happens when the button is clicked, you can run a shell command if you want or execute any other file if you want, there are many other actions and signals as well, don’t forget to close it using </action>.
- </button>: To close the button tag.
- </hbox>: To close the hbox tag.
- </window>: To close the window tag.
The last 4 lines must also be in all shell scripts that you create using gtkdialog, they execute the MAIN_DIALOG variable using gtkdialog command with the –center option to center the window, very useful in fact.
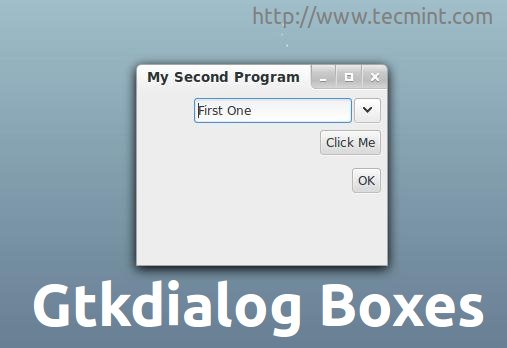
My Second Program
Similarly, create a another file and call it as ‘secondprogram‘ and add the following whole content to it.
#!/bin/bash

GTKDIALOG=gtkdialog
export MAIN_DIALOG='

<window title="My Second Program" icon-name="gtk-about" resizable="true" width-request="250" height-request="150">

<vbox>
	<hbox space-fill="true">
		<combobox>
			<variable>myitem</variable>
			<item>First One</item>
			<item>Second One</item>
			<item>Third One</item>
		</combobox>
	</hbox>
	<hbox>
		<button>
			<label>Click Me</label>
			<action>echo "You choosed $myitem"</action>
		</button>
	</hbox>
<hseparator width-request="240"></hseparator>

	<hbox>
		<button ok></button>
	</hbox>
</vbox>
</window>
'

case $1 in
	-d | --dump) echo "$MAIN_DIALOG" ;;
	*) $GTKDIALOG --program=MAIN_DIALOG --center ;;

esac
Save the file, set execute permission on it and run it as shown.
$ chmod 755 secondprogram
$ ./secondprogram
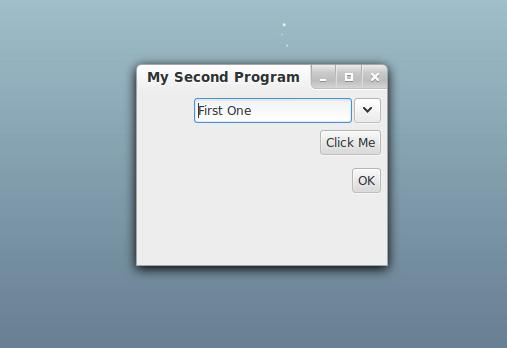
Gtkdialog Select Box
Now, we will explain the code in short.
- We create a combobox widget using <combobox>, the <variable> tag is the default name of the variable which the chosen item will be stored in, we used this variable to print the selected item later using echo.
- <hseparator> is a horizontal separator, you can set the default width for it using width-request option.
- <button ok></button> is an OK button that will close the window just when you click it, it is very useful so we don’t need to create a custom button to do that.
My Third Prgoram
Create another file called ‘thirdprogram‘ and add the whole bunch of code to it.
#!/bin/bash

GTKDIALOG=gtkdialog
export MAIN_DIALOG='

<window title="My Second Program" icon-name="gtk-about" resizable="true" width-request="250" height-request="150">

<notebook tab-label="First | Second|">
<vbox>
	<hbox space-fill="true">
		<combobox>
			<variable>myitem</variable>
			<item>First One</item>
			<item>Second One</item>
			<item>Third One</item>
		</combobox>
	</hbox>
	<hbox>
		<button>
			<label>Click Me</label>
			<action>echo "You choosed $myitem"</action>
		</button>
	</hbox>
<hseparator width-request="240"></hseparator>

	<hbox>
		<button ok></button>
	</hbox>
</vbox>

<vbox>

	<hbox space-fill="true">
		<text>
		<label>Spinbutton </label>
		</text>
	</hbox>

	<hbox space-fill="true" space-expand="true">
		<spinbutton range-min="0" range-max="100" range-value="4">
			<variable>myscale</variable>
			<action>echo $myscale</action>
		</spinbutton>
	</hbox>

	<hbox>
		<button ok></button>
	</hbox>

</vbox>
</notebook>
</window>
'

case $1 in
	-d | --dump) echo "$MAIN_DIALOG" ;;
	*) $GTKDIALOG --program=MAIN_DIALOG --center ;;

esac
Save the file, grant execute permission and fire it as shown.
$ chmod 755 thirdprogram
$ ./thirdprogram
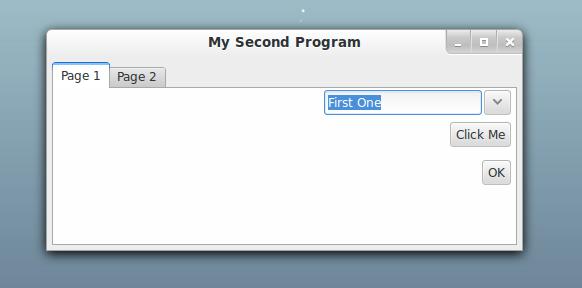
Select Name from Dropdown
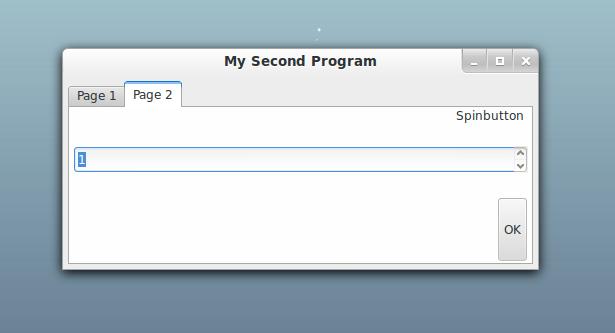
Select Number from Dropdown
Here, the explanation of code in more detailed fashion.
- We created two notebook tabs using <notebook>, the tab-label option is where you can create tabs, gtkdialog will create tabs depending on the labels you enter, every <vbox> is defined as a tab, so the first tab starts with the first <vbox>, the second tab starts with the second <vbox>.
- <text> is a text widget, we used the <label> tag to set the default text for it.
- <spinbutton> tag will create a new spin button, range-min option is the minimum value, and range-max is the maximum value for the spin button, range-value is the default value for the spin button.
- We gave a variable “myscale” to the <spinbutton>.
- We printed the selected value using echo and $myscale variable, the default signal for the action here is “value-changed” which helped us doing that.
This was just an example window, you can create more complicated interfaces using gtkdialog if you want, you can browse the official documentation in gtkdialog website to view all gtkdialog tags from the link below.
Have you used gtkdialog to create GUIs for your shell scripts before? Or have you used any such utility to create interfaces? What do you think about it?