
Network Interface Bonding is a mechanism used in Linux servers which consists of binding more physical network interfaces in order to provide more bandwidth than a single interface can provide or provide link redundancy in case of a cable failure. This type of link redundancy has multiple names in Linux, such as Bonding, Teaming or Link Aggregation Groups (LAG).
Read Also: How to Setup Network Bonding or Teaming in RHEL/CentOS
To use network bonding mechanism in Ubuntu or Debian based Linux systems, first you need to install the bonding kernel module and test if the bonding driver is loaded via modprobe command.
$ sudo modprobe bonding

Check Network Bonding in Ubuntu
On older releases of Debian or Ubuntu you should install ifenslave package by issuing the below command.
$ sudo apt-get install ifenslave
To create a bond interface composed of the first two physical NCs in your system, issue the below command. However this method of creating bond interface is ephemeral and does not survive system reboot.
$ sudo ip link add bond0 type bond mode 802.3ad
$ sudo ip link set eth0 master bond0
$ sudo ip link set eth1 master bond0
To create a permanent bond interface in mode 0 type, use the method to manually edit interfaces configuration file, as shown in the below excerpt.
$ sudo nano /etc/network/interfaces
# The primary network interface
auto bond0
iface bond0 inet static
	address 192.168.1.150
	netmask 255.255.255.0
	gateway 192.168.1.1
	dns-nameservers 192.168.1.1 8.8.8.8
	dns-search domain.local
		slaves eth0 eth1
		bond_mode 0
		bond-miimon 100
		bond_downdelay 200
		bound_updelay 200
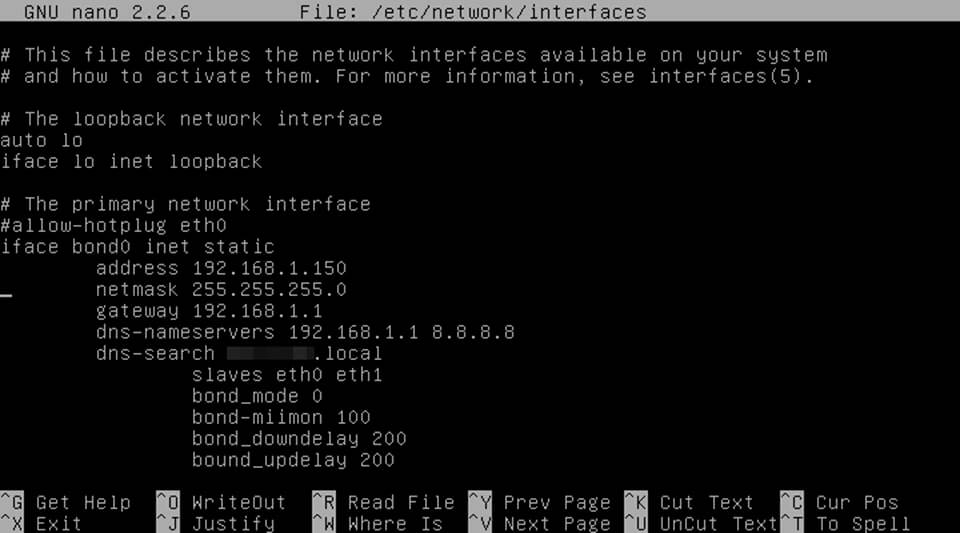
Configure Bonding in Ubuntu
In order to activate the bond interface, either restart network service, bring down the physical interface and rise the bond interface or reboot the machine in order for the kernel to pick-up the new bond interface.
$ sudo systemctl restart networking.service
or
$ sudo ifdown eth0 && ifdown eth1 && ifup bond0
The bond interface settings can be inspected by issuing the below commands.
$ ifconfig
or
$ ip a
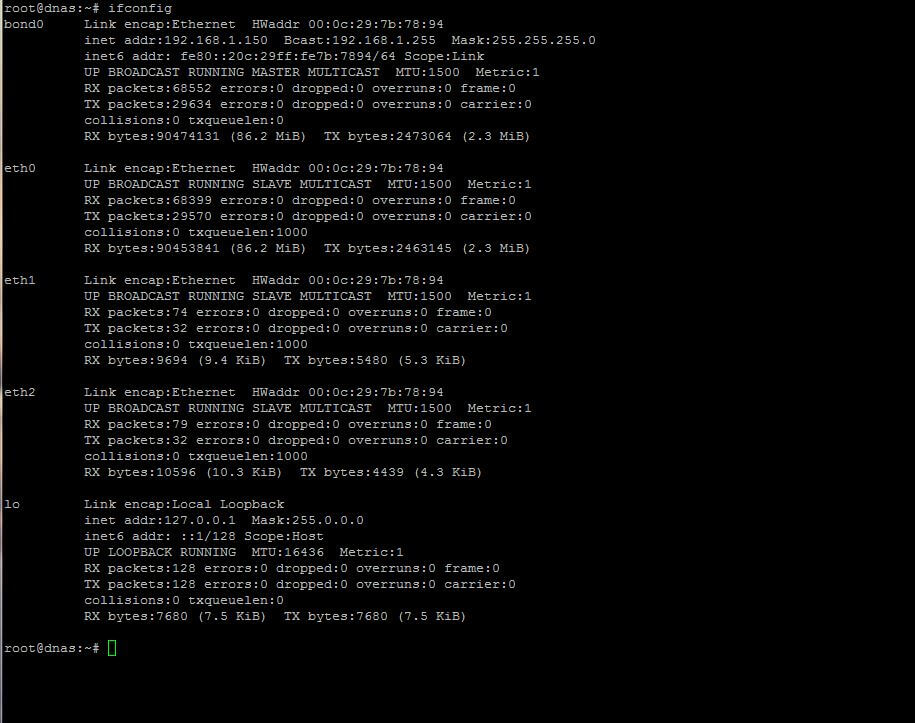
Verify Bond Interface in Ubuntu
Details about the bond interface can be obtained by displaying the content of the below kernel file using cat command as shown.
$ cat /proc/net/bonding/bond0
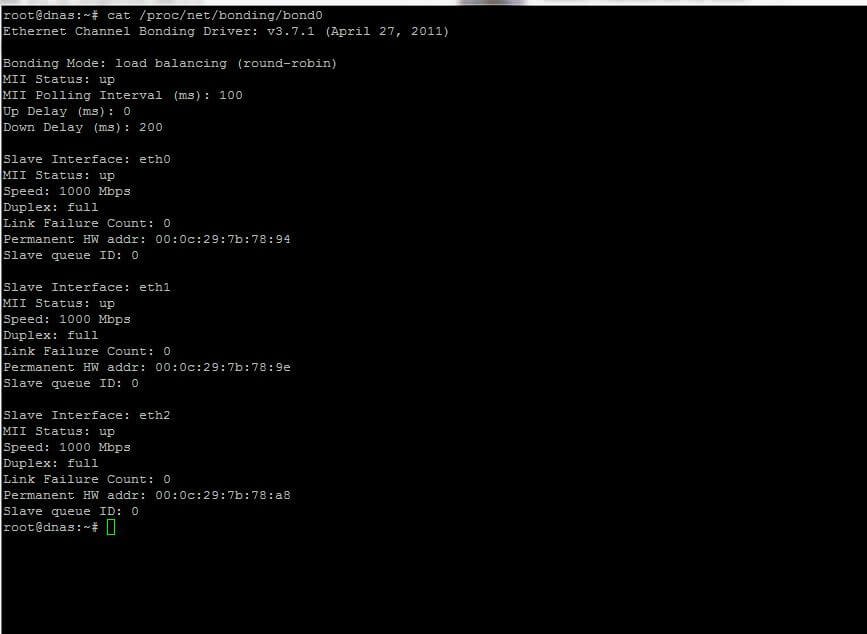
Check Bonding Information in Ubuntu
To investigate other bond interface messages or to debug the state of the bond physical NICS, issue the below commands.
$ tail -f /var/log/messages

Check Bond Interface Messages
Next use mii-tool tool to check Network Interface Controller (NIC) parameters as shown.
$ mii-tool

Check Bond Interface Link
The types of Network Bonding are listed below.
- mode=0 (balance-rr)
- mode=1 (active-backup)
- mode=2 (balance-xor)
- mode=3 (broadcast)
- mode=4 (802.3ad)
- mode=5 (balance-tlb)
- mode=6 (balance-alb)
The full documentations regarding NIC bonding can be found at Linux kernel doc pages.