
When a system administrator wants to increase the bandwidth available and provide redundancy and load balancing for data transfers, a kernel feature known as network bonding allows to get the job done in a cost-effective way.
Read more about how to increase or bandwidth throttling in Linux

Linux Inside: The Ideal Blog for Sysadmins & Geeks@tecmintHow to Limit the Network Bandwidth Used by Applications in a Linux with Tricklehttp://www.tecmint.com/manage-and-limit-downloadupload-bandwidth-with-trickle-in-linux/ …
Via @tecmint

In simple words, bonding means aggregating two or more physical network interfaces (called slaves) into a single, logical one (called master). If a specific NIC (Network Interface Card) experiences a problem, communications are not affected significantly as long as the other(s) remain active.
Read more about network bonding in Linux systems here:
- Network Teaming or NiC Bondin in RHEL/CentOS 6/5
- Network NIC Bonding or Teaming on Debian based Systems
- How to Configure Network Bonding or Teaming in Ubuntu
Enabling and Configuring Network Bonding or Teaming
By default, the bonding kernel module is not enabled. Thus, we will need to load it and ensure it is persistent across boots. When used with the --first-time option, modprobe will alert us if loading the module fails:
# modprobe --first-time bonding
The above command will load the bonding module for the current session. In order to ensure persistency, create a .conf file inside /etc/modules-load.d with a descriptive name, such as /etc/modules-load.d/bonding.conf:
# echo "# Load the bonding kernel module at boot" > /etc/modules-load.d/bonding.conf
# echo "bonding" >> /etc/modules-load.d/bonding.conf
Now reboot your server and once it restarts, make sure the bonding module is loaded automatically, as seen in Fig. 1:
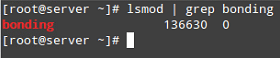
Check Network Bonding Module Loaded in Kernel
In this article we will use 3 interfaces (enp0s3, enp0s8, and enp0s9) to create a bond, named conveniently bond0.
To create bond0, we can either use nmtui, the text interface for controlling NetworkManager. When invoked without arguments from the command line, nmtui brings up a text interface that allows you to edit an existing connection, activate a connection, or set the system hostname.
Choose Edit connection –> Add –> Bond as illustrated in Fig. 2:
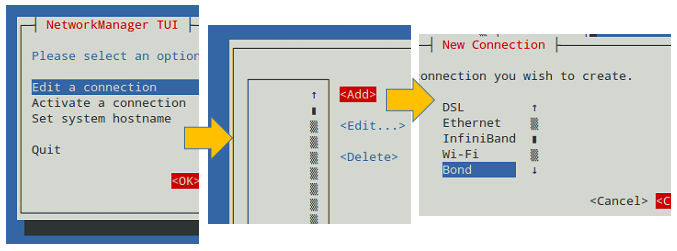
Create Network Bonding Channel
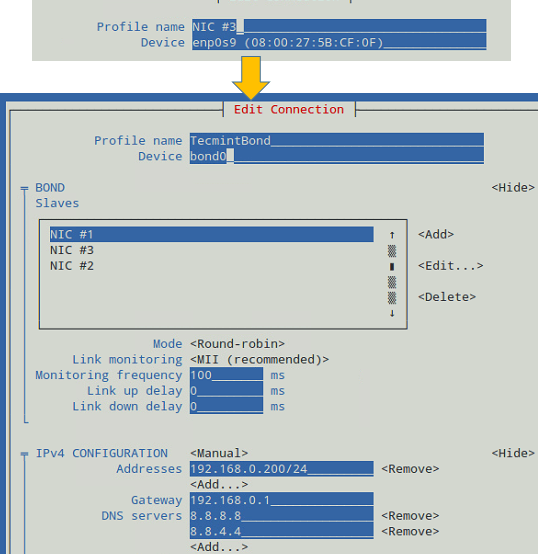
In the Edit Connection screen, add the slave interfaces (enp0s3, enp0s8, and enp0s9 in our case) and give them a descriptive (Profile) name (for example, NIC #1, NIC #2, and NIC #3, respectively).
In addition, you will need to set a name and device for the bond (TecmintBond and bond0 in Fig. 3, respectively) and an IP address for bond0, enter a gateway address, and the IPs of DNS servers.
Note that you do not need to enter the MAC address of each interface since nmtui will do that for you. You can leave all other settings as default. See Fig. 3 for more details.
Network Bonding Teaming Configuration
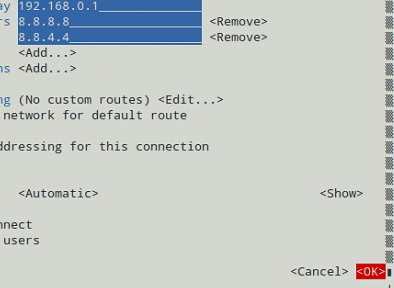
When you’re done, go to the bottom of the screen and choose OK (see Fig. 4):
Configuration of bond0
And you’re done. Now you can exit the text interface and return to the command line, where you will enable the newly created interface using ip command:
# ip link set dev bond0 up
After that, you can see that bond0 is UP and is assigned 192.168.0.200, as seen in Fig. 5:
# ip addr show bond0
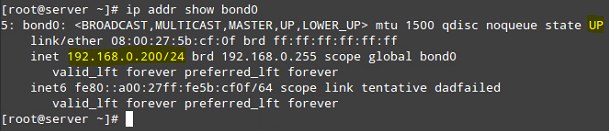
Check Network Bond Interface Status
Testing Network Bonding or Teaming in Linux
To verify that bond0 actually works, you can either ping its IP address from another machine, or what’s even better, watch the kernel interface table in real time (well, the refresh time in seconds is given by the -n option) to see how network traffic is distributed between the three network interfaces, as shown in Fig. 6.
The -d option is used to highlight changes when they occur:
# watch -d -n1 netstat -i
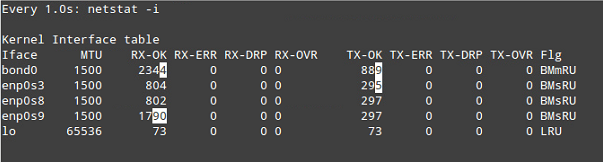
Check Kernel Interface Table
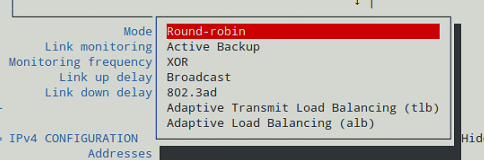
It is important to note that there are several bonding modes, each with its distinguishing characteristics. They are documented in section 4.5 of the Red Hat Enterprise Linux 7 Network Administration guide. Depending on your needs, you will choose one or the other.
In our current setup, we chose the Round-robin mode (see Fig. 3), which ensures packets are transmitted beginning with the first slave in sequential order, ending with the last slave, and starting with the first again.
The Round-robin alternative is also called mode 0, and provides load balancing and fault tolerance. To change the bonding mode, you can use nmtui as explained before (see also Fig. 7):
Changing Bonding Mode Using nmtui
If we change it to Active Backup, we will be prompted to choose a slave that will the only one active interface at a given time. If such card fails, one of the remaining slaves will take its place and becomes active.
Let’s choose enp0s3 to be the primary slave, bring bond0 down and up again, restart the network, and display the kernel interface table (see Fig. 8).
Note how data transfers (TX-OK and RX-OK) are now being made over enp0s3 only:
# ip link set dev bond0 down
# ip link set dev bond0 up
# systemctl restart network
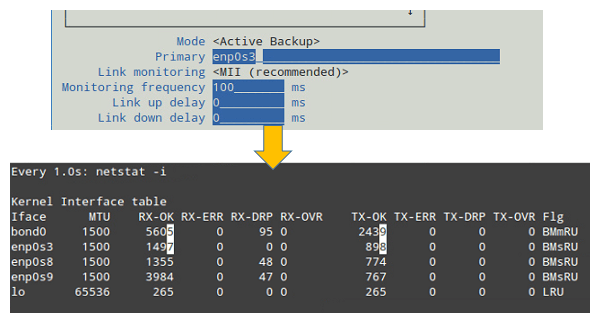
Bond Acting in Active Backup Mode
Alternatively, you can view the bond as the kernel sees it (see Fig. 9):
# cat /proc/net/bonding/bond0
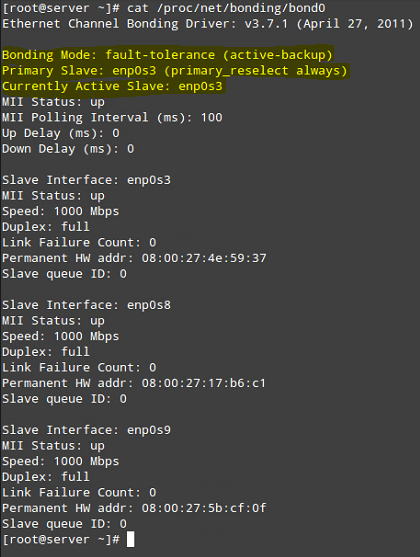
Check Network Bond as Kernel
Summary
In this chapter we have discussed how to set up and configure bonding in Red Hat Enterprise Linux 7 (also works on CentOS 7 and Fedora 22+) in order to increase bandwidth along with load balancing and redundancy for data transfers.
As you take the time to explore other bonding modes, you will come to master the concepts and practice related with this topic of the certification.