
Create an Active Directory Infrastructure with Samba4 on Ubuntu – Part 1
Samba is a free Open Source software which provides a standard interoperability between Windows OS and Linux/Unix Operating Systems.
Samba can operate as a standalone file and print server for Windows and Linux clients through the SMB/CIFSprotocol suite or can act as an Active Directory Domain Controller or joined into a Realm as a Domain Member. The highest AD DC domain and forest level that currently Samba4 can emulate is Windows 2008 R2.
The series will be titled Setting Up Samba4 Active Directory Domain Controller, which covers following topics for Ubuntu, CentOS, and Windows:
This tutorial will start by explaining all the steps you need to take care off in order to install and configure Samba4 as a Domain Controller on Ubuntu 16.04 and Ubuntu 14.04.
This configuration will provide a central management point for users, machines, volume shares, permissions and other resources in a mixed-up Windows – Linux infrastructure.
Requirements:
- Ubuntu 16.04 Server Installation.
- Ubuntu 14.04 Server Installation.
- A static IP Address configured for your AD DC server.
Step 1: Initial Configuration for Samba4
1. Before proceeding your Samba4 AD DC installation first let’s run a few pre-required steps. First make sure the system is up to date with the last security features, kernels and packages by issuing the below command:
$ sudo apt-get update
$ sudo apt-get upgrade
$ sudo apt-get dist-upgrade
2. Next, open machine /etc/fstab file and assure that your partitions file system has ACLs enabled as illustrated on the below screenshot.
Usually, common modern Linux file systems such as ext3, ext4, xfs or btrfs support and have ACLs enabled by default. If that’s not the case with your file system just open /etc/fstab file for editing and add acl string at the end of third column and reboot the machine in order to apply changes.
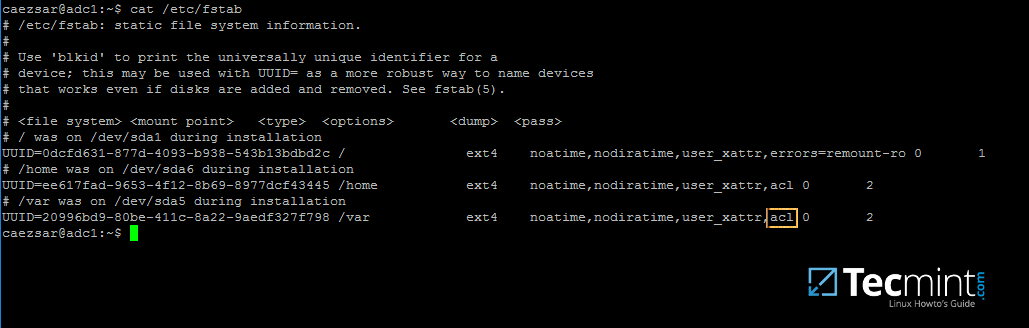
Enable ACL’s on Linux Filesystem
3. Finally setup your machine hostname with a descriptive name, such as adc1 used in this example, by editing /etc/hostname file or by issuing.
$ sudo hostnamectl set-hostname adc1
A reboot is necessary after you’ve changed your machine name in order to apply changes.
Step 2: Install Required Packages for Samba4 AD DC
4. In order to transform your server into an Active Directory Domain Controller, install Samba and all the required packages on your machine by issuing the below command with root privileges in a console.
$ sudo apt-get install samba krb5-user krb5-config winbind libpam-winbind libnss-winbind

Install Samba on Ubuntu
5. While the installation is running a series of questions will be asked by the installer in order to configure the domain controller.
On the first screen you will need to add a name for Kerberos default REALM in uppercase. Enter the name you will be using for your domain in uppercase and hit Enter to continue..

Configuring Kerberos Authentication
6. Next, enter the hostname of Kerberos server for your domain. Use the same name as for your domain, with lowercases this time and hit Enter to continue.
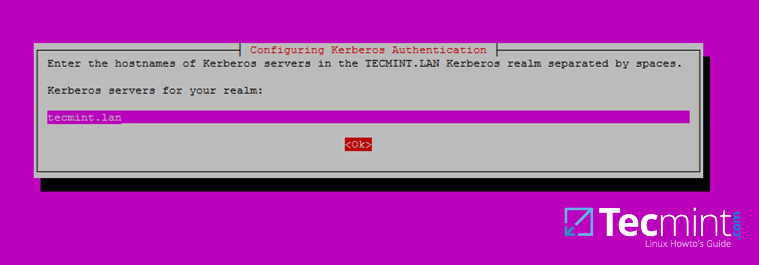
Set Hostname Kerberos Server
7. Finally, specify the hostname for the administrative server of your Kerberos realm. Use the same as your domain and hit Enter to finish the installation.
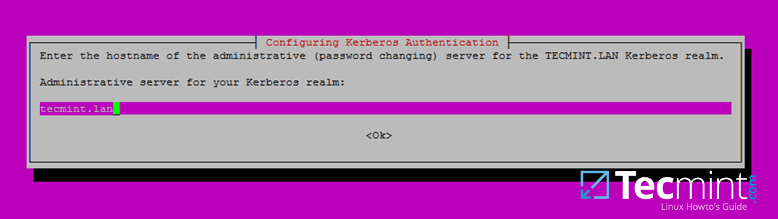
Set Hostname Administrative Server
Step 3: Provision Samba AD DC for Your Domain
8. Before starting to configure Samba for your domain, first run the below commands in order to stop and disable all samba daemons.
$ sudo systemctl stop samba-ad-dc.service smbd.service nmbd.service winbind.service
$ sudo systemctl disable samba-ad-dc.service smbd.service nmbd.service winbind.service
9. Next, rename or remove samba original configuration. This step is absolutely required before provisioning Samba AD because at the provision time Samba will create a new configuration file from scratch and will throw up some errors in case it finds an old smb.conf file.
$ sudo mv /etc/samba/smb.conf /etc/samba/smb.conf.initial
10. Now, start the domain provisioning interactively by issuing the below command with root privileges and accept the default options that Samba provides you.
Also, make sure you supply the IP address for a DNS forwarder at your premises (or external) and choose a strong password for Administrator account. If you choose a week password for Administrator account the domain provision will fail.
$ sudo samba-tool domain provision --use-rfc2307 --interactive

Samba Domain Provisioning
11. Finally, rename or remove Kerberos main configuration file from /etc directory and replace it using a symlink with Samba newly generated Kerberos file located in /var/lib/samba/private path by issuing the below commands:
$ sudo mv /etc/krb5.conf /etc/krb5.conf.initial
$ sudo ln –s /var/lib/samba/private/krb5.conf /etc/

Create Kerberos Configuration
12. Start and enable Samba Active Directory Domain Controller daemons.
$ sudo systemctl start samba-ad-dc.service
$ sudo systemctl status samba-ad-dc.service
$ sudo systemctl enable samba-ad-dc.service

Enable Samba Active Directory Domain Controller
13. Next, use netstat command in order to verify the list of all services required by an Active Directory to run properly.
$ sudo netstat –tulpn| egrep ‘smbd|samba’

Verify Samba Active Directory
Step 4: Final Samba Configurations
14. At this moment Samba should be fully operational at your premises. The highest domain level Samba is emulating should be Windows AD DC 2008 R2.
It can be verified with the help of samba-tool utility.
$ sudo samba-tool domain level show
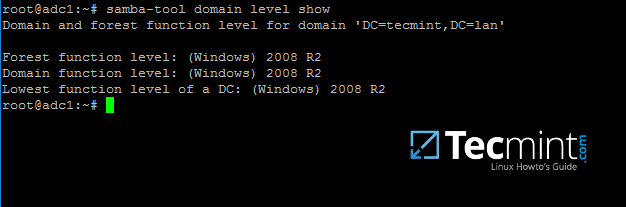
Verify Samba Domain Level
15. In order for DNS resolution to work locally, you need to open end edit network interface settings and point the DNS resolution by modifying dns-nameservers statement to the IP Address of your Domain Controller (use 127.0.0.1 for local DNS resolution) and dns-search statement to point to your realm.
$ sudo cat /etc/network/interfaces
$ sudo cat /etc/resolv.conf
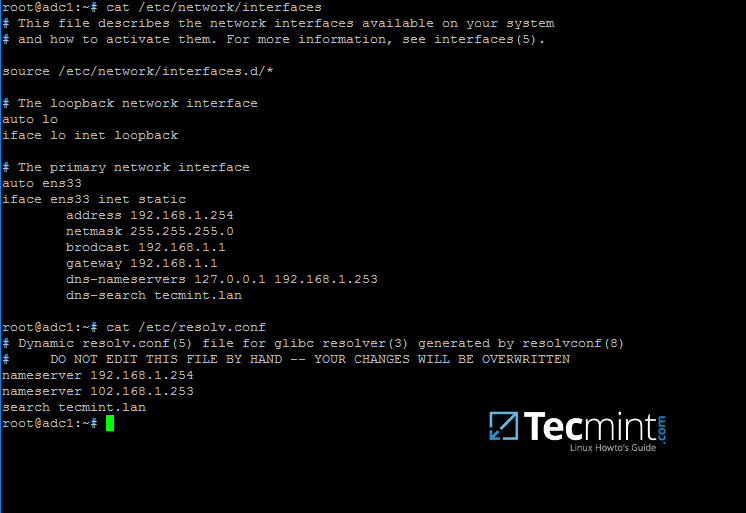
Configure DNS for Samba AD
When finished, reboot your server and take a look at your resolver file to make sure it points back to the right DNS name servers.
16. Finally, test the DNS resolver by issuing queries and pings against some AD DC crucial records, as in the below excerpt. Replace the domain name accordingly.
$ ping –c3 tecmint.lan       #Domain Name
$ ping –c3 adc1.tecmint.lan  #FQDN
$ ping –c3 adc1              #Host

Check Samba AD DNS Records
Run following few queries against Samba Active Directory Domain Controller..
$ host –t A tecmint.lan
$ host –t A adc1.tecmint.lan
$ host –t SRV _kerberos._udp.tecmint.lan  # UDP Kerberos SRV record
$ host -t SRV _ldap._tcp.tecmint.lan # TCP LDAP SRV record
17. Also, verify Kerberos authentication by requesting a ticket for the domain administrator account and list the cached ticket. Write the domain name portion with uppercase.
$ kinit administrator@TECMINT.LAN
$ klist

Check Kerberos Authentication on Domain
That’s all! Now you have a fully operational AD Domain Controller installed in your network and you can start integrate Windows or Linux machines into Samba AD.
On the next series we’ll cover other Samba AD topics, such as how to manage you’re the domain controller from Samba command line, how to integrate Windows 10 into the domain name and manage Samba AD remotely using RSAT and other important topics.
How to Manage Samba4 AD Infrastructure from Linux Command Line – Part 2
This tutorial will cover some basic daily commands you need to use in order to manage Samba4 AD Domain Controller infrastructure, such as adding, removing, disabling or listing users and groups.
We’ll also take a look on how to manage domain security policy and how to bind AD users to local PAM authentication in order for AD users to be able to perform local logins on Linux Domain Controller.
Requirements
- Create an AD Infrastructure with Samba4 on Ubuntu 16.04 – Part 1
- Manage Samba4 Active Directory Infrastructure from Windows10 via RSAT – Part 3
- Manage Samba4 AD Domain Controller DNS and Group Policy from Windows – Part 4
Step 1: Manage Samba AD DC from Command Line
1. Samba AD DC can be managed through samba-tool command line utility which offers a great interface for administrating your domain.
With the help of samba-tool interface you can directly manage domain users and groups, domain Group Policy, domain sites, DNS services, domain replication and other critical domain functions.
To review the entire functionality of samba-tool just type the command with root privileges without any option or parameter.
# samba-tool -h
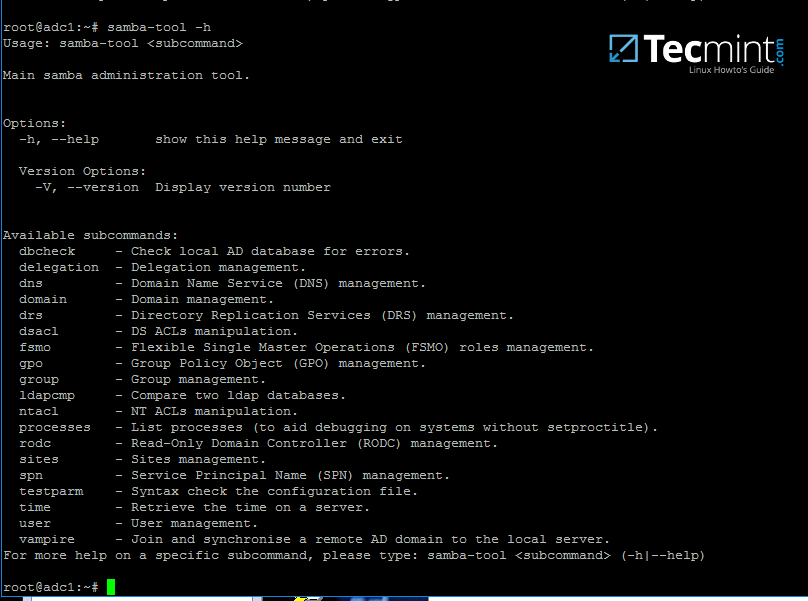
samba-tool – Manage Samba Administration Tool
2. Now, let’s start using samba-tool utility to administer Samba4 Active Directory and manage our users.
In order to create a user on AD use the following command:
# samba-tool user add your_domain_user
To add a user with several important fields required by AD, use the following syntax:
--------- review all options ---------
# samba-tool user add -h
# samba-tool user add your_domain_user --given-name=your_name --surname=your_username --mail-address=your_domain_user@tecmint.lan --login-shell=/bin/bash

Create User on Samba AD
3. A listing of all samba AD domain users can be obtained by issuing the following command:
# samba-tool user list

List Samba AD Users
4. To delete a samba AD domain user use the below syntax:
# samba-tool user delete your_domain_user
5. Reset a samba domain user password by executing the below command:
# samba-tool user setpassword your_domain_user
6. In order to disable or enable an samba AD User account use the below command:
# samba-tool user disable your_domain_user
# samba-tool user enable your_domain_user
7. Likewise, samba groups can be managed with the following command syntax:
--------- review all options ---------
# samba-tool group add –h
# samba-tool group add your_domain_group
8. Delete a samba domain group by issuing the below command:
# samba-tool group delete your_domain_group
9. To display all samba domain groups run the following command:
# samba-tool group list
10. To list all the samba domain members in a specific group use the command:
# samba-tool group listmembers "your_domain group"
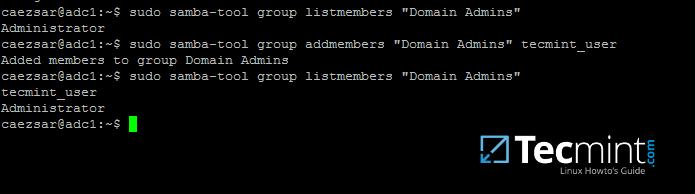
List Samba Domain Members of Group
11. Adding/Removing a member from a samba domain group can be done by issuing one of the following commands:
# samba-tool group addmembers your_domain_group your_domain_user
# samba-tool group remove members your_domain_group your_domain_user
12. As mentioned earlier, samba-tool command line interface can also be used to manage your samba domain policy and security.
To review your samba domain password settings use the below command:
# samba-tool domain passwordsettings show
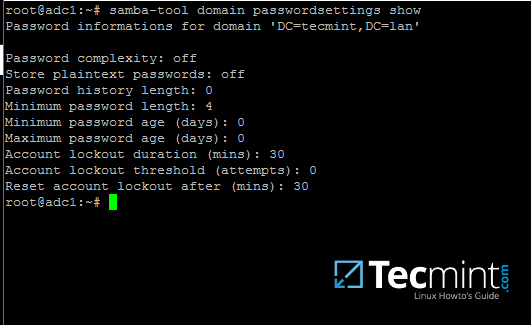
Check Samba Domain Password
13. In order to modify samba domain password policy, such as the password complexity level, password ageing, length, how many old password to remember and other security features required for a Domain Controller use the below screenshot as a guide.
---------- List all command options ----------
# samba-tool domain passwordsettings -h

Manage Samba Domain Password Settings
Never use the password policy rules as illustrated above on a production environment. The above settings are used just for demonstration purposes.
Step 2: Samba Local Authentication Using Active Directory Accounts
14. By default, AD users cannot perform local logins on the Linux system outside Samba AD DC environment.
In order to login on the system with an Active Directory account you need to make the following changes on your Linux system environment and modify Samba4 AD DC.
First, open samba main configuration file and add the below lines, if missing, as illustrated on the below screenshot.
$ sudo nano /etc/samba/smb.conf
Make sure the following statements appear on the configuration file:
winbind enum users = yes
winbind enum groups = yes
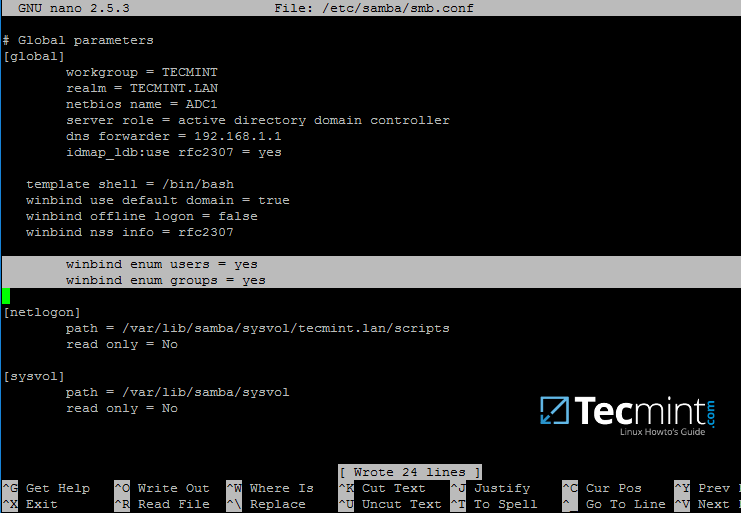
Samba Authentication Using Active Directory User Accounts
15. After you’ve made the changes, use testparm utility to make sure no errors are found on samba configuration file and restart samba daemons by issuing the below command.
$ testparm
$ sudo systemctl restart samba-ad-dc.service

Check Samba Configuration for Errors
16. Next, we need to modify local PAM configuration files in order for Samba4 Active Directory accounts to be able to authenticate and open a session on the local system and create a home directory for users at first login.
Use the pam-auth-update command to open PAM configuration prompt and make sure you enable all PAM profiles using [space] key as illustrated on the below screenshot.
When finished hit [Tab] key to move to Ok and apply changes.
$ sudo pam-auth-update
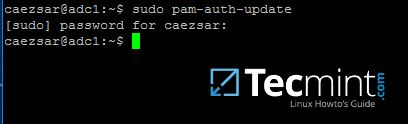
Configure PAM for Samba4 AD

Enable PAM Authentication Module for Samba4 AD Users
17. Now, open /etc/nsswitch.conf file with a text editor and add winbind statement at the end of the password and group lines as illustrated on the below screenshot.
$ sudo vi /etc/nsswitch.conf
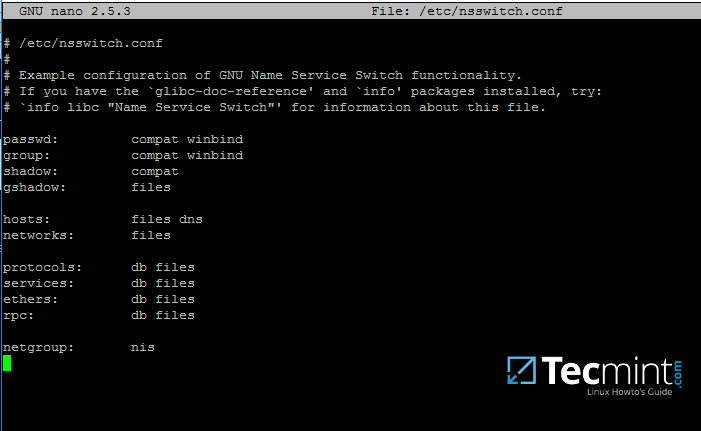
Add Windbind Service Switch for Samba
18. Finally, edit /etc/pam.d/common-password file, search for the below line as illustrated on the below screenshot and remove the use_authtok statement.
This setting assures that Active Directory users can change their password from command line while authenticated in Linux. With this setting on, AD users authenticated locally on Linux cannot change their password from console.
password [success=1 default=ignore] pam_winbind.so try_first_pass
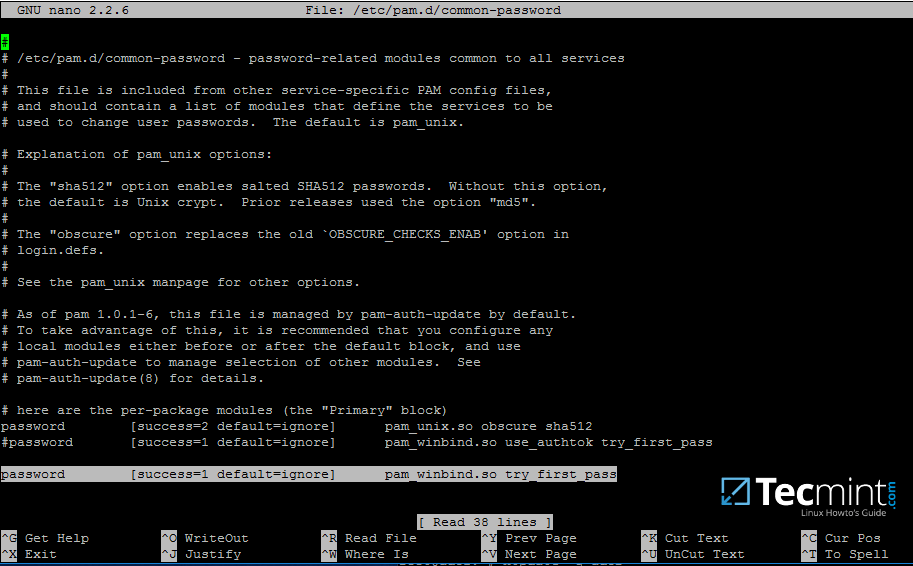
Allow Samba AD Users to Change Passwords
Remove use_authtok option each time PAM updates are installed and applied to PAM modules or each time you execute pam-auth-update command.
19. Samba4 binaries comes with a winbindd daemon built-in and enabled by default.
For this reason you’re no longer required to separately enable and run winbind daemon provided by winbindpackage from official Ubuntu repositories.
In case the old and deprecated winbind service is started on the system make sure you disable it and stop the service by issuing the below commands:
$ sudo systemctl disable winbind.service
$ sudo systemctl stop winbind.service
Although, we no longer need to run old winbind daemon, we still need to install Winbind package from repositories in order to install and use wbinfo tool.
Wbinfo utility can be used to query Active Directory users and groups from winbindd daemon point of view.
The following commands illustrates how to query AD users and groups using wbinfo.
$ wbinfo -g
$ wbinfo -u
$ wbinfo -i your_domain_user

Check Samba4 AD Information

Check Samba4 AD User Info
20. Apart from wbinfo utility you can also use getent command line utility to query Active Directory database from Name Service Switch libraries which are represented in /etc/nsswitch.conf file.
Pipe getent command through a grep filter in order to narrow the results regarding just your AD realm user or group database.
# getent passwd | grep TECMINT
# getent group | grep TECMINT

Get Samba4 AD Details
Step 3: Login in Linux with an Active Directory User
21. In order to authenticate on the system with a Samba4 AD user, just use the AD username parameter after su - command.
At the first login a message will be displayed on the console which notifies you that a home directory has been created on /home/$DOMAIN/ system path with the mane of your AD username.
Use id command to display extra information about the authenticated user.
# su - your_ad_user
$ id
$ exit

Check Samba4 AD User Authentication on Linux
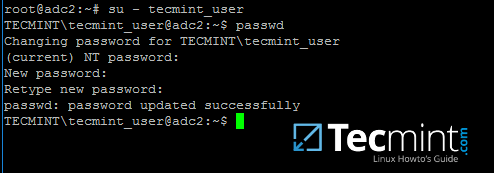
22. To change the password for an authenticated AD user type passwd command in console after you have successfully logged into the system.
$ su - your_ad_user
$ passwd
Change Samba4 AD User Password
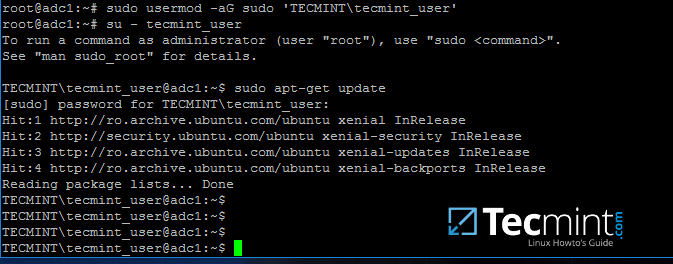
23. By default, Active Directory users are not granted with root privileges in order to perform administrative tasks on Linux.
To grant root powers to an AD user you must add the username to the local sudo group by issuing the below command.
Make sure you enclose the realm, slash and AD username with single ASCII quotes.
# usermod -aG sudo 'DOMAIN\your_domain_user'
To test if AD user has root privileges on the local system, login and run a command, such as apt-get update, with sudo permissions.
# su - tecmint_user
$ sudo apt-get update
Grant sudo Permission to Samba4 AD User
24. In case you want to add root privileges for all accounts of an Active Directory group, edit /etc/sudoers file using visudo command and add the below line after root privileges line, as illustrated on the below screenshot:
%DOMAIN\your_domain\ group ALL=(ALL:ALL) ALL
Pay attention to sudoers syntax so you don’t break things out.
Sudoers file doesn’t handles very well the use of ASCII quotation marks, so make sure you use % to denote that you’re referring to a group and use a backslash to escape the first slash after the domain name and another backslash to escape spaces if your group name contains spaces (most of AD built-in groups contain spaces by default). Also, write the realm with uppercases.

Give Sudo Access to All Samba4 AD Users
That’s all for now! Managing Samba4 AD infrastructure can be also achieved with several tools from Windows environment, such as ADUC, DNS Manager, GPM or other, which can be obtained by installing RSAT package from Microsoft download page.
To administer Samba4 AD DC through RSAT utilities, it’s absolutely necessary to join the Windows system into Samba4 Active Directory.
Manage Samba4 Active Directory Infrastructure from Windows10 via RSAT – Part 3
In this part of the Samba4 AD DC infrastructure series we will talk on how join a Windows 10 machine into a Samba4 realm and how to administer the domain from a Windows 10 workstation.
Once a Windows 10 system has been joined to Samba4 AD DC we can create, remove or disable domain users and groups, we can create new Organizational Units, we can create, edit and manage domain policy or we can manage Samba4 domain DNS service.
All of the above functions and other complex tasks concerning domain administration can be achieved via any modern Windows platform with the help of RSAT – Microsoft Remote Server Administration Tools.
Requirements
- Create an AD Infrastructure with Samba4 on Ubuntu 16.04 – Part 1
- Manage Samba4 AD Infrastructure from Linux Command Line – Part 2
- Manage Samba4 AD Domain Controller DNS and Group Policy from Windows – Part 4
Step 1: Configure Domain Time Synchronization
1. Before starting to administer Samba4 ADDC from Windows 10 with the help of RSAT tools, we need to know and take care of a crucial piece of service required for an Active Directory and this service refers to accurate time synchronization.
Time synchronization can be offered by NTP daemon in most of the Linux distributions. The default maximum time period discrepancy an AD can support is about 5 minutes.
If the divergence time period is greater than 5 minutes you should start experience various errors, most important concerning AD users, joined machines or share access.
To install Network Time Protocol daemon and NTP client utility in Ubuntu, execute the below command.
$ sudo apt-get install ntp ntpdate

Install NTP on Ubuntu
2. Next, open and edit NTP configuration file and replace the default NTP pool server list with a new list of NTP servers which are geographically located near your current physical equipment location.
The list of NTP servers can be obtained by visiting official NTP Pool Project webpage http://www.pool.ntp.org/en/.
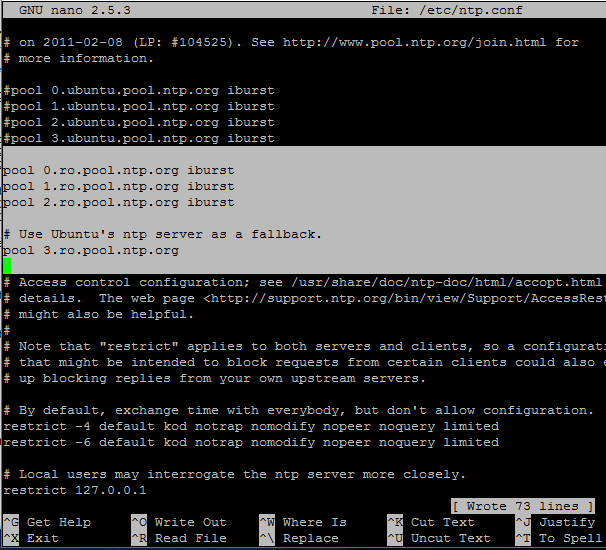
$ sudo nano /etc/ntp.conf
Comment the default server list by adding a # in front of each pool line and add the below pool lines with your proper NTP servers as illustrated on the below screenshot.
pool 0.ro.pool.ntp.org iburst
pool 1.ro.pool.ntp.org iburst
pool 2.ro.pool.ntp.org iburst

# Use Ubuntu's ntp server as a fallback.
pool 3.ro.pool.ntp.org
Configure NTP Server in Ubuntu
3. Now, don’t close the file yet. Move to the top at the file and add the below line after the driftfile statement. This setup allows the clients to query the server using AD signed NTP requests.
ntpsigndsocket /var/lib/samba/ntp_signd/

Sync AD with NTP
4. Finally, move to the bottom of the file and add the below line, as illustrated on the below screenshot, which will allow network clients only to query the time on the server.
restrict default kod nomodify notrap nopeer mssntp

Query Clients to NTP Server
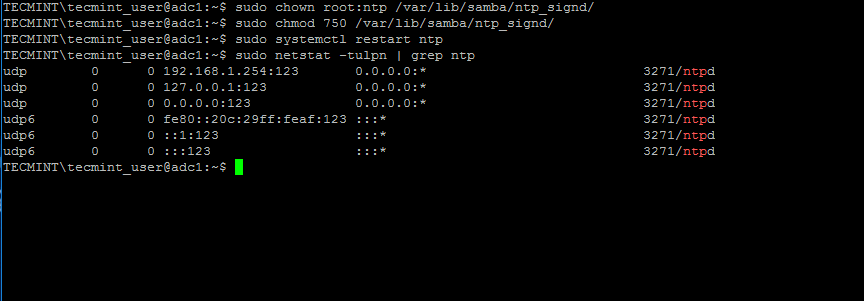
5. When finished, save and close the NTP configuration file and grant NTP service with the proper permissions in order to read the ntp_signed directory.
This is the system path where Samba NTP socket is located. Afterwards, restart NTP daemon to apply changes and verify if NTP has open sockets in your system network table using netstat command combined with grep filter.
$ sudo chown root:ntp /var/lib/samba/ntp_signd/
$ sudo chmod 750 /var/lib/samba/ntp_signd/
$ sudo systemctl restart ntp
$ sudo netstat –tulpn | grep ntp
Grant Permission to NTP
Use the ntpq command line utility to monitor NTP daemon along with the -p flag in order to print a summary of peers state.
$ ntpq -p
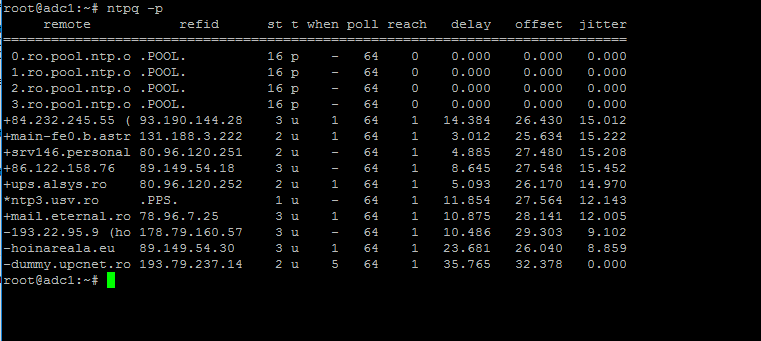
Monitor NTP Server Pool
Step 2: Troubleshoot NTP Time Issues
6. Sometimes the NTP daemon gets stuck in calculations while trying to synchronize time with an upstream ntp server peer, resulting the following error messages when manually trying to force time synchronization by running ntpdate utility on a client side:
# ntpdate -qu adc1
ntpdate[4472]: no server suitable for synchronization found

NTP Time Synchronization Error
when using ntpdate command with -d flag.
# ntpdate -d adc1.tecmint.lan
Server dropped: Leap not in sync

NTP Server Dropped Leap Not in Sync
7. To circumvent this issue, use the following trick to solve the problem: On the server, stop the NTP service and use the ntpdate client utility to manually force time synchronization with an external peer using the -b flag as shown below:
# systemctl stop ntp.service
# ntpdate -b 2.ro.pool.ntp.org  [your_ntp_peer]
# systemctl start ntp.service
# systemctl status ntp.service
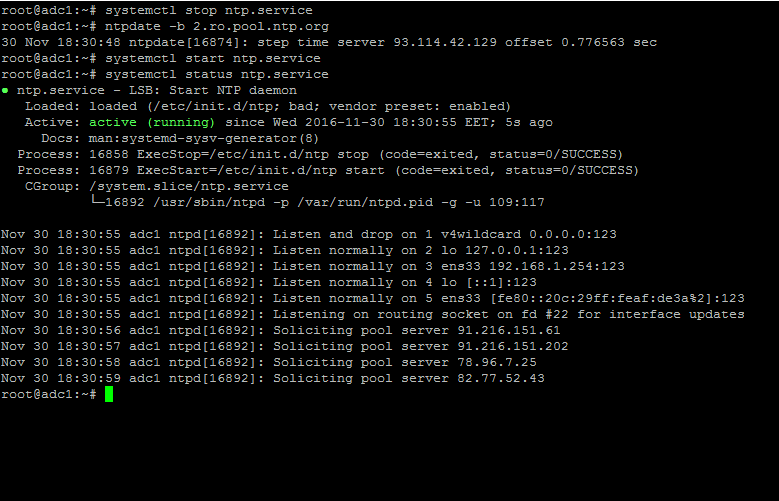
Force NTP Time Synchronization
8. After the time has been accurately synchronized, start the NTP daemon on the server and verify from the client side if the service is ready to serve time for local clients by issuing the following command:
# ntpdate -du adc1.tecmint.lan [your_adc_server]
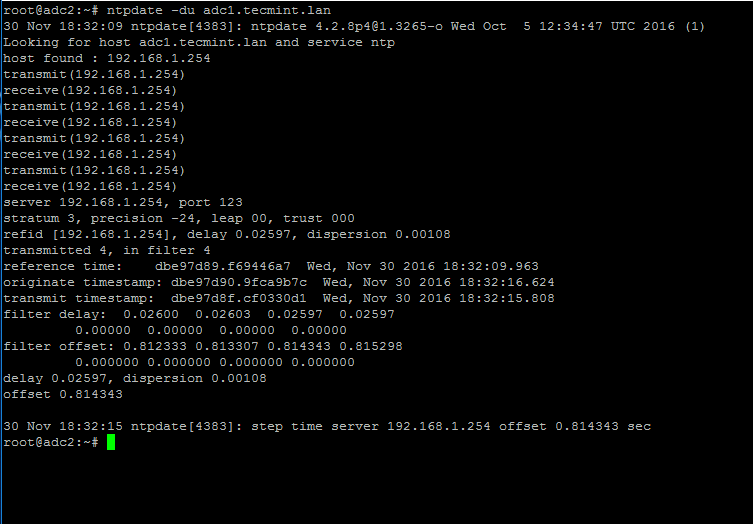
Verify NTP Time Synchronization
By now, NTP server should work as expected.
Step 3: Join Windows 10 into Realm
9. As we saw in our previous tutorial, Samba4 Active Directory can be managed from command line using samba-tool utility interface which can be accessed directly from server’s VTY console or remotely connected through SSH.
Other, more intuitively and flexible alternative, would be to manage our Samba4 AD Domain Controller via Microsoft Remote Server Administration Tools (RSAT) from a Windows workstation integrated into the domain. These tools are available in almost all modern Windows systems.
The process of joining Windows 10 or older versions of Microsoft OS into Samba4 AD DC is very simple. First, make sure that your Windows 10 workstation has the correct Samba4 DNS IP address configured in order to query the proper realm resolver.
Open Control panel -> Network and Internet -> Network and Sharing Center -> Ethernet card -> Properties -> IPv4 -> Properties -> Use the following DNS server addresses and manually place Samba4 AD IP Address to the network interface as illustrated in the below screenshots.

join Windows to Samba4 AD

Add DNS and Samba4 AD IP Address
Here, 192.168.1.254 is the IP Address of Samba4 AD Domain Controller responsible for DNS resolution. Replace the IP Address accordingly.
10. Next, apply the network settings by hitting on OK button, open a Command Prompt and issue a ping against the generic domain name and Samba4 host FQDN in order to test if the realm is reachable through DNS resolution.
ping tecmint.lan
ping adc1.tecmint.lan

Check Network Connectivity Between Windows and Samba4 AD
11. If the resolver correctly responds to Windows client DNS queries, then, you need to assure that the time is accurately synchronized with the realm.
Open Control Panel -> Clock, Language and Region -> Set Time and Date -> Internet Time tab -> Change Settings and write your domain name on Synchronize with and Internet time server field.
Hit on Update Now button to force time synchronization with the realm and hit OK to close the window.
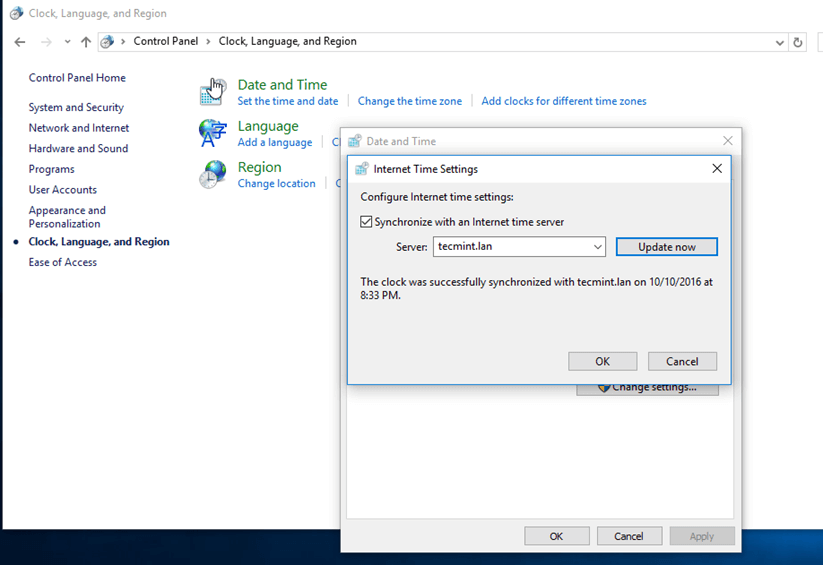
Synchronize Time with Internet Server
12. Finally, join the domain by opening System Properties -> Change -> Member of Domain, write your domain name, hit OK, enter your domain administrative account credentials and hit OK again.
A new pop-up window should open informing you’re a member of the domain. Hit OK to close the pop-up window and reboot the machine in order to apply domain changes.
The below screenshot will illustrate these steps.

Join Windows Domain to Samba4 AD

Enter Domain Administration Login
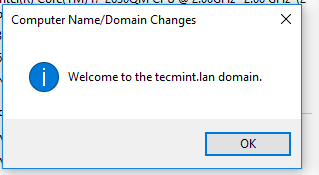
Domain Joined to Samba4 AD Confirmation

Restart Windows Server for Changes
13. After restart, hit on Other user and logon to Windows with a Samba4 domain account with administrative privileges and you should be ready to move to the next step.
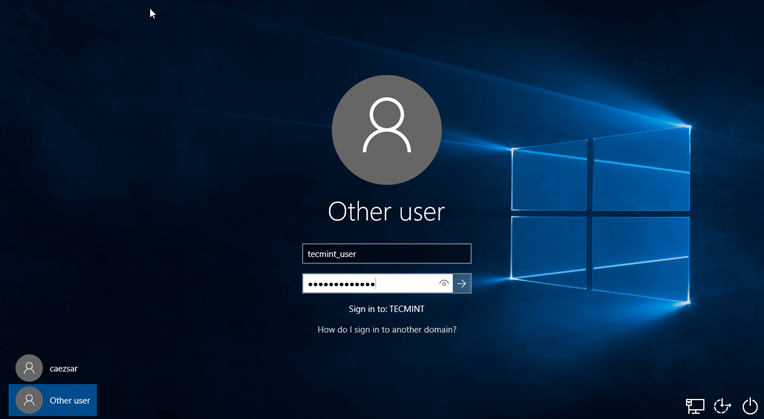
Login to Windows Using Samba4 AD Account
Step 4: Administer Samba4 AD DC with RSAT
14. Microsoft Remote Server Administration Tools (RSAT), which will be further used to administer Samba4 Active Directory, can be downloaded from the following links, depending on your Windows version:
- Windows 10: https://www.microsoft.com/en-us/download/details.aspx?id=45520
- Windows 8.1: http://www.microsoft.com/en-us/download/details.aspx?id=39296
- Windows 8: http://www.microsoft.com/en-us/download/details.aspx?id=28972
- Windows 7: http://www.microsoft.com/en-us/download/details.aspx?id=7887
Once the update standalone installer package for Windows 10 has been downloaded on your system, run the installer, wait for the installation to finish and restart the machine to apply all updates.
After reboot, open Control Panel -> Programs (Uninstall a Program) -> Turn Windows features on or off and check all Remote Server Administration Tools.
Click OK to start the installation and after the installation process finishes, restart the system.
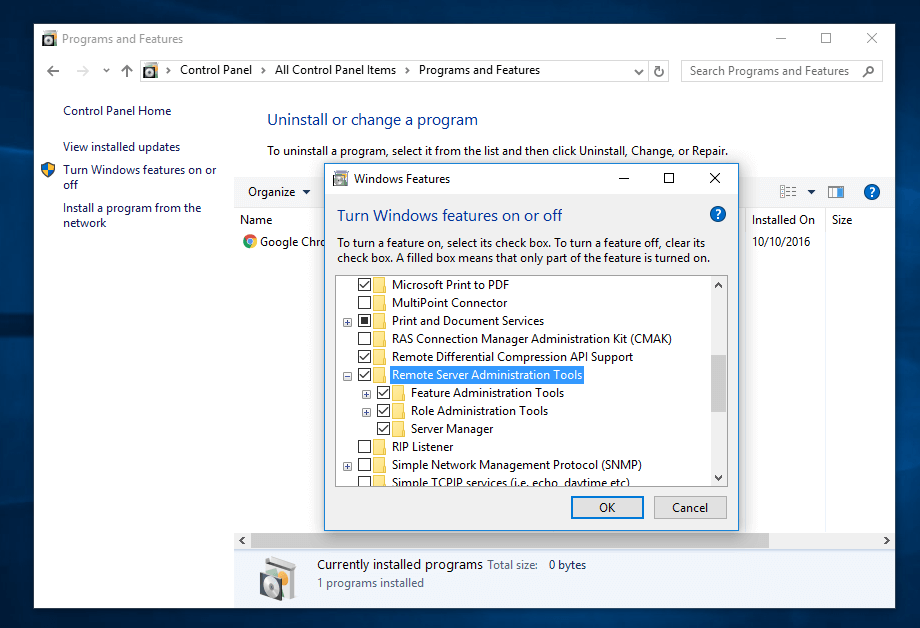
Administer Samba4 AD from Windows
15. To access RSAT tools go to Control Panel -> System and Security -> Administrative Tools.
The tools can also be found in the Administrative tools menu from start menu. Alternatively, you can open Windows MMC and add Snap-ins using the File -> Add/Remove Snap-in menu.

Access Remote Server Administration Tools
The most used tools, such as AD UC, DNS and Group Policy Management can be launched directly from Desktop by creating shortcuts using Send to feature from menu.
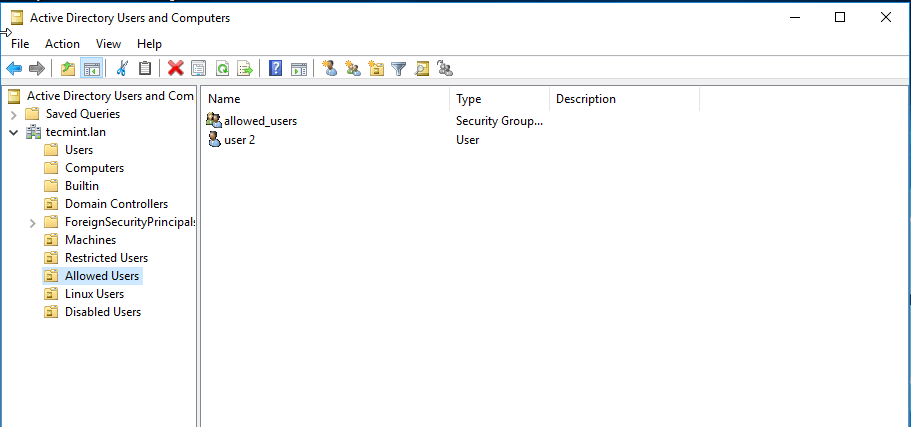
16. You can verify RSAT functionality by opening AD UC and list domain Computers (newly joined windows machine should appear in the list), create a new Organizational Unit or a new user or group.
Verify if the users or groups had been properly created by issuing wbinfo command from Samba4 server side.

Active Directory Users and Computers
Create Organizational Units and New Users
Confirm Samba4 AD Users
That’s it! On the next part of this topic we will cover other important aspects of a Samba4 Active Directorywhich can be administered via RSAT, such as, how to manage DNS server, add DNS records and create a reverse DNS lookup zone, how to manage and apply domain policy and how to create an interactive logon banner for your domain users.
Manage Samba4 AD Domain Controller DNS and Group Policy from Windows – Part 4
Continuing the previous tutorial on how to administer Samba4 from Windows 10 via RSAT, in this part we’ll see how to remotely manage our Samba AD Domain controller DNS server from Microsoft DNS Manager, how to create DNS records, how to create a Reverse Lookup Zone and how to create a domain policy via Group Policy Management tool.
Requirements
- Create an AD Infrastructure with Samba4 on Ubuntu 16.04 – Part 1
- Manage Samba4 AD Infrastructure from Linux Command Line – Part 2
- Manage Samba4 Active Directory Infrastructure from Windows10 via RSAT – Part 3
Step 1: Manage Samba DNS Server
Samba4 AD DC uses an internal DNS resolver module which is created during the initial domain provision (if BIND9 DLZ module is not specifically used).
Samba4 internal DNS module supports the basic features needed for an AD Domain Controller. The domain DNS server can be managed in two ways, directly from command line through samba-tool interface or remotely from a Microsoft workstation which is part of the domain via RSAT DNS Manager.
Here, we’ll cover the second method because it’s more intuitive and not so prone to errors.
1. To administer the DNS service for your domain controller via RSAT, go to your Windows machine, open Control Panel -> System and Security -> Administrative Tools and run DNS Manager utility.
Once the tool opens, it will ask you on what DNS running server you want to connect. Choose The following computer, type your domain name in the field (or IP Address or FQDN can be used as well), check the box that says ‘Connect to the specified computer now’ and hit OK to open your Samba DNS service.

Connect Samba4 DNS on Windows
2. In order to add a DNS record (as an example we will add an A record that will point to our LAN gateway), navigate to domain Forward Lookup Zone, right click on the right plane and choose New Host (A or AAA).
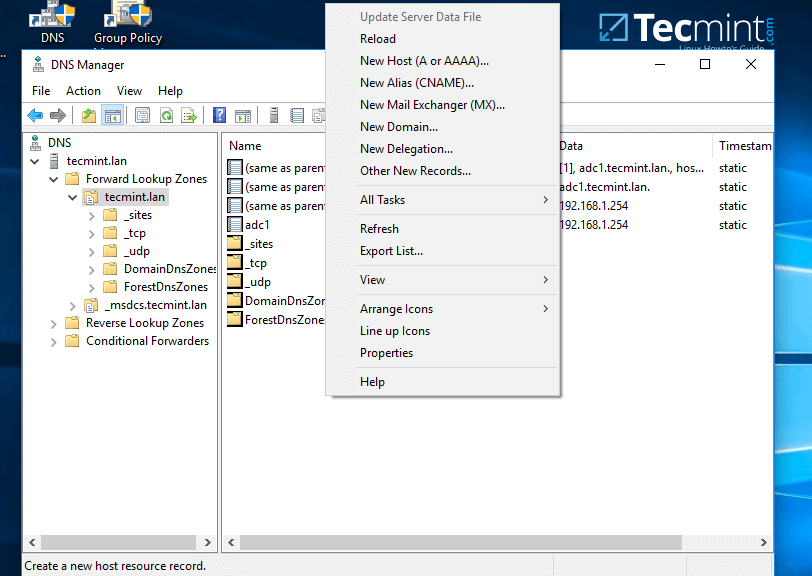
Add DNS A Record on Windows
3. On the New host opened window, type the name and the IP Address of your DNS resource. The FQDN will be automatically written for you by DNS utility. When finished, hit the Add Host button and a pop-up window will inform you that your DNS A record has been successfully created.
Make sure you add DNS A records only for those resources in your network configured with static IP Addresses. Don’t add DNS A records for hosts which are configured to acquire network configurations from a DHCP server or their IP Addresses change often.

Configure Samba Host on Windows
To update a DNS record just double click on it and write your modifications. To delete the record right click on the record and choose delete from the menu.
In the same way you can add other types of DNS records for your domain, such as CNAME (also known as DNS alias record) MX records (very useful for mail servers) or other type of records (SPF, TXT, SRV etc).
Step 2: Create a Reverse Lookup Zone
By default, Samba4 Ad DC doesn’t automatically add a reverse lookup zone and PTR records for your domain because these types of records are not crucial for a domain controller to function correctly.
Instead, a DNS reverse zone and its PTR records are crucial for the functionality of some important network services, such as an e-mail service because these type of records can be used to verify the identity of clients requesting a service.
Practically, PTR records are just the opposite of standard DNS records. The clients know the IP address of a resource and queries the DNS server to find out their registered DNS name.
4. In order to a create a reverse lookup zone for Samba AD DC, open DNS Manager, right click on Reverse Lookup Zone from the left plane and choose New Zone from the menu.

Create Reverse Lookup DNS Zone
5. Next, hit Next button and choose Primary zone from Zone Type Wizard.

Select DNS Zone Type
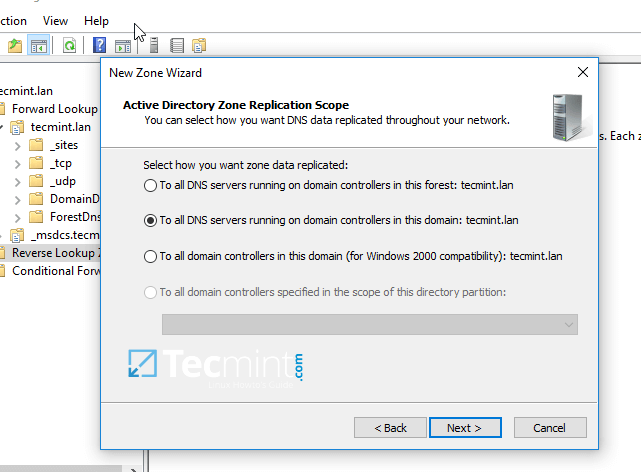
6. Next, choose To all DNS servers running on domain controllers in this domain from the AD Zone Replication Scope, chose IPv4 Reverse Lookup Zone and hit Next to continue.
Select DNS for Samba Domain Controller

Add Reverse Lookup Zone Name
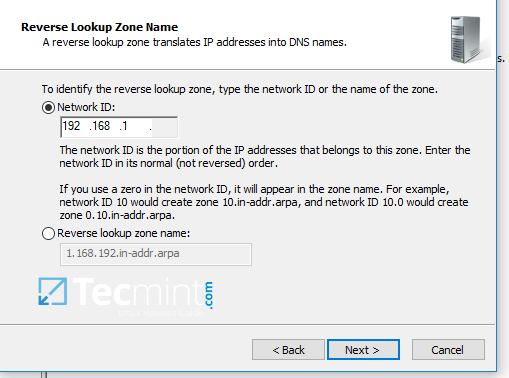
7. Next, type the IP network address for your LAN in Network ID filed and hit Next to continue.
All PTR records added in this zone for your resources will point back only to 192.168.1.0/24 network portion. If you want to create a PTR record for a server that does not reside in this network segment (for example mail server which is located in 10.0.0.0/24 network), then you’ll need to create a new reverse lookup zone for that network segment as well.
Add IP Address of Reverse Lookup DNS Zone
8. On the next screen choose to Allow only secure dynamic updates, hit next to continue and, finally hit on finishto complete zone creation.

Enable Secure Dynamic Updates
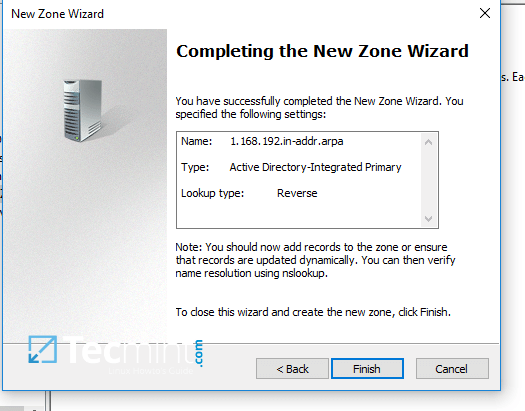
New DNS Zone Summary
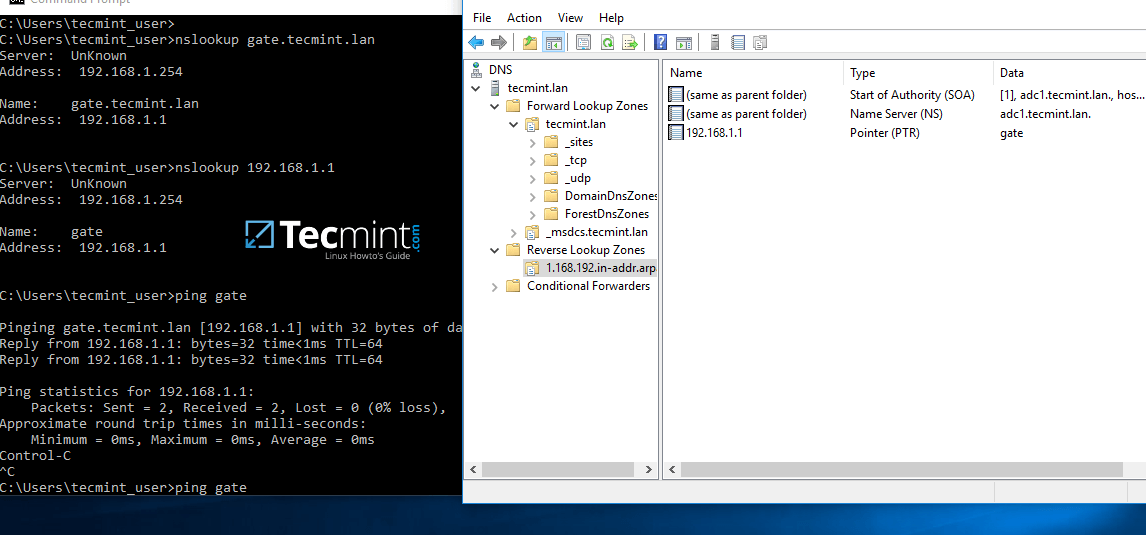
9. At this point you have a valid DNS reverse lookup zone configured for your domain. In order to add a PTRrecord in this zone, right click on the right plane and choose to create a PTR record for a network resource.
In this case we’ve created a pointer for our gateway. In order to test if the record was properly added and works as expected from client’s point of view, open a Command Prompt and issue a nslookup query against the name of the resource and another query for its IP Address.
Both queries should return the correct answer for your DNS resource.
nslookup gate.tecmint.lan
nslookup 192.168.1.1
ping gate
Add DNS PTR Record and Query PTR
Step 3: Domain Group Policy Management
10. An important aspect of a domain controller is its ability to control system resources and security from a single central point. This type of task can be easily achieved in a domain controller with the help of Domain Group Policy.
Unfortunately, the only way to edit or manage group policy in a samba domain controller is through RSAT GPMconsole provided by Microsoft.
In the below example we’ll see how simple can be to manipulate group policy for our samba domain in order to create an interactive logon banner for our domain users.
In order to access group policy console, go to Control Panel -> System and Security -> Administrative Tools and open Group Policy Management console.
Expand the fields for your domain and right click on Default Domain Policy. Choose Edit from the menu and a new windows should appear.

Manage Samba Domain Group Policy
11. On Group Policy Management Editor window go to Computer Configuration -> Policies -> Windows Settings-> Security settings -> Local Policies -> Security Options and a new options list should appear in the right plane.
In the right plane search and edit with your custom settings following two entries presented on the below screenshot.
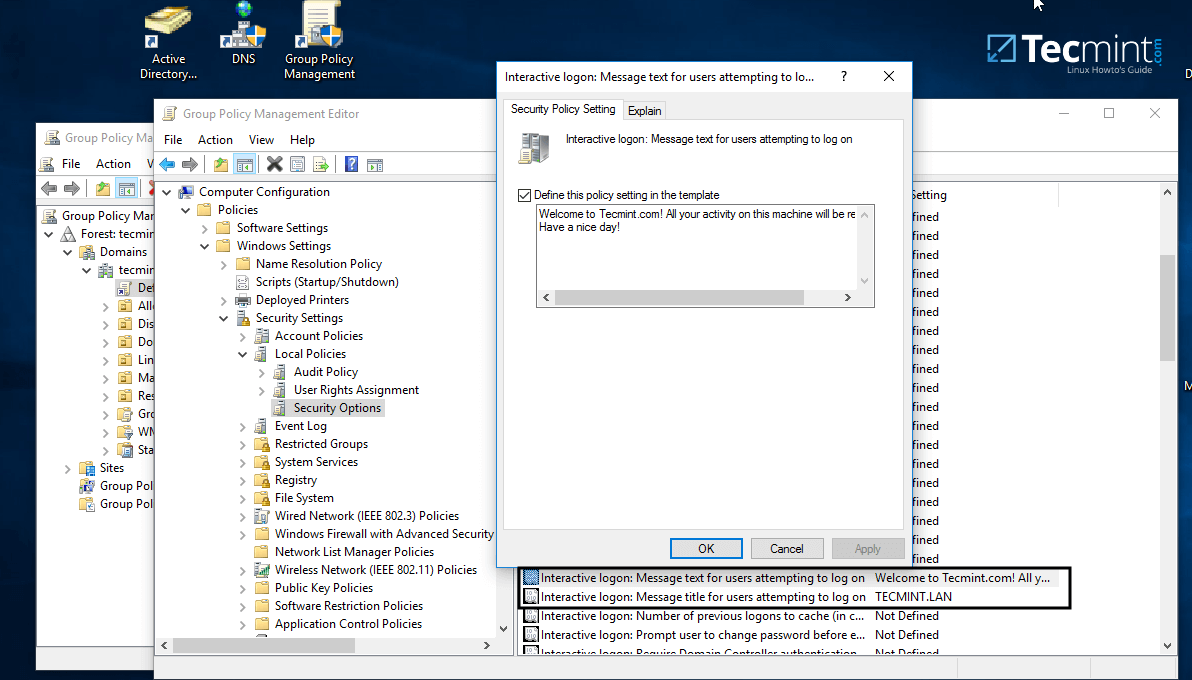
Configure Samba Domain Group Policy
12. After finishing editing the two entries, close all windows, open an elevated Command prompt and force group policy to apply on your machine by issuing the below command:
gpupdate /force
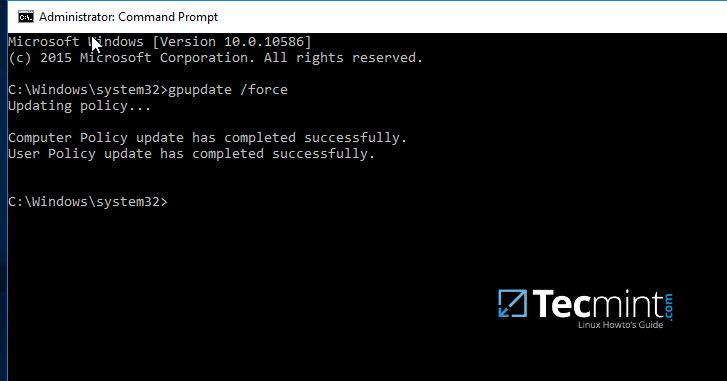
Update Samba Domain Group Policy
13. Finally, reboot your computer and you’ll see the logon banner in action when you’ll try to perform logon.

Samba4 AD Domain Controller Logon Banner
That’s all! Group Policy is a very complex and sensitive subject and should be treated with maximum care by system admins. Also, be aware that group policy settings won’t apply in any way to Linux systems integrated into the realm.
Join an Additional Ubuntu DC to Samba4 AD DC for FailOver Replication – Part 5
This tutorial will show you how to add a second Samba4 domain controller, provisioned on Ubuntu 16.04 server, to the existing Samba AD DC forest in order to provide a degree of load balancing/failover for some crucial AD DC services, especially for services such as DNS and AD DC LDAP schema with SAM database.
Requirements
This article is a Part-5 of Samba4 AD DC series as follows:
Step 1: Initial Configuration for Samba4 Setup
1. Before you start to actually perform domain joining for the second DC, you need to take care of few initial settings. First, make sure the hostname of the system which will be integrated into Samba4 AD DC contains a descriptive name.
Assuming that the hostname of the first provisioned realm is called adc1, you can name the second DC with adc2 in order to provide a consistent naming scheme across your Domain Controllers.
To change the system hostname you can issue the below command.
# hostnamectl set-hostname adc2
else you can manually edit /etc/hostname file and add a new line with the desired name.
# nano /etc/hostname
Here add the hostname.
adc2
2. Next, open local system resolution file and add an entry with the IP address witch points to the short name and FQDN of the main domain controller, as illustrated in the below screenshot.
Through this tutorial, the primary DC name is adc1.tecmint.lan and it resolves to 192.168.1.254 IP address.
# nano /etc/hosts
Add the following line:
IP_of_main_DC FQDN_of_main_DC short_name_of_main_DC

Set Hostname for Samba4 AD DC
3. On the next step, open /etc/network/interfaces and assign a static IP address for your system as illustrated in the below screenshot.
Pay attention to dns-nameservers and dns-search variables. These values should be configured to point back to the IP address of the primary Samba4 AD DC and realm in order for DNS resolution to work correctly.
Restart the network daemon in order to reflect changes. Verify /etc/resolv.conf file to assure that both DNS values from your network interface are updated to this file.
# nano /etc/network/interfaces
Edit and replace with your custom IP settings:
auto ens33
iface ens33 inet static
        address 192.168.1.253
        netmask 255.255.255.0
        brodcast 192.168.1.1
        gateway 192.168.1.1
        dns-nameservers 192.168.1.254
        dns-search tecmint.lan
Restart network service and confirm changes.
# systemctl restart networking.service
# cat /etc/resolv.conf

Configure DNS for Samba4 AD
The dns-search value will automatically append the domain name when you query a host by its short name (will form the FQDN).
4. In order to test if DNS resolution is working as expected, issue a series of ping commands against your domain short name, FQDN and realm as shown in the below screenshot.
In all these cases Samba4 AD DC DNS server should reply with the IP address of your main DC.

Verify DNS Resolution for Samba4 AD
5. The final additional step that you need to take care off is time synchronization with your main Domain Controller. This can be accomplished by installing NTP client utility on your system by issuing the below command:
# apt-get install ntpdate
6. Assuming that you want to manually force time synchronization with samba4 AD DC, run ntpdate command against the primary DC by issuing the following command.
# ntpdate adc1

Time Synchronize with Samba4 AD
Step 2: Install Samba4 with Required Dependencies
7. In order to enroll Ubuntu 16.04 system into your domain, first install Samba4, Kerberos client and a few other important packages for later use from Ubuntu official repositories by issuing the below command:
# apt-get install samba krb5-user krb5-config winbind libpam-winbind libnss-winbind
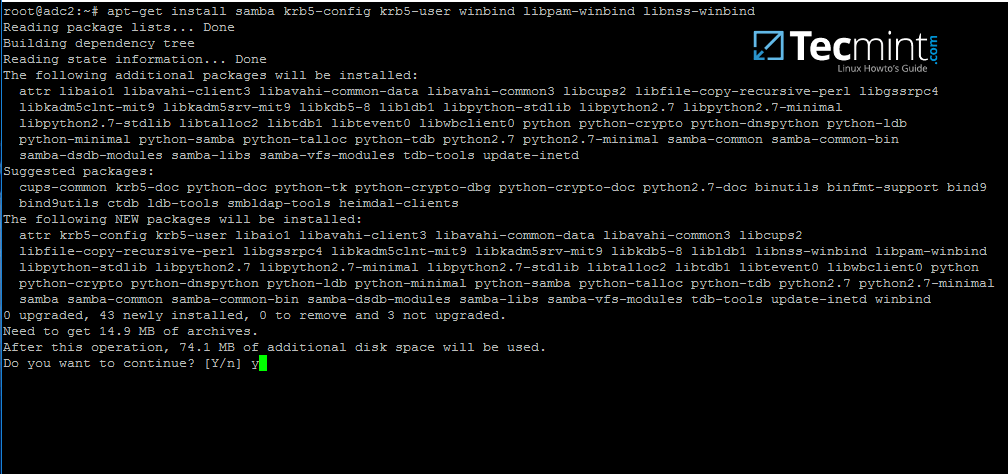
Install Samba4 in Ubuntu
8. During the installation you will need to provide Kerberos realm name. Write your domain name with upper cases and press [Enter] key to finish the installation process.

Configure Kerberos Authentication for Samba4
9. After the packages installation finishes, verify the settings by requesting a Kerberos ticket for a domain administrator using kinit command. Use klist command to list granted Kerberos ticket.
# kinit domain-admin-user@YOUR_DOMAIN.TLD
# klist
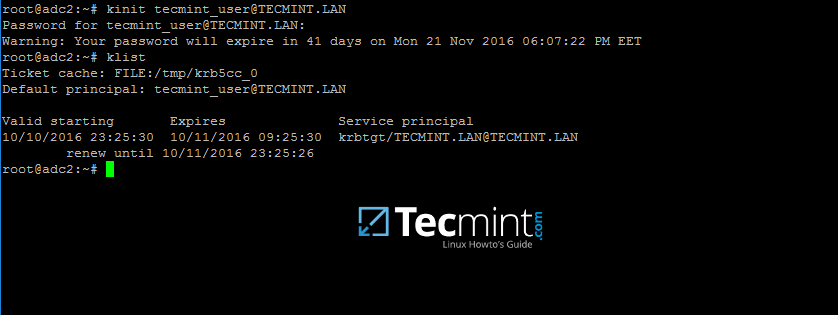
Verify Kerberos on Samba4 Domain
Step 3: Join to Samba4 AD DC as a Domain Controller
10. Before integrating your machine into Samba4 DC, first make sure all Samba4 daemons running on your system are stopped and, also, rename the default Samba configuration file in order to start clean. While provisioning the domain controller, samba will create a new configuration file from scratch.
# systemctl stop samba-ad-dc smbd nmbd winbind
# mv /etc/samba/smb.conf /etc/samba/smb.conf.initial
11. In order to start the domain joining process, first start only samba-ad-dc daemon, after which you will run samba-tool command to join the realm using an account with administrative privileges on your domain.
# samba-tool domain join your_domain DC -U "your_domain_admin"
Domain integration excerpt:
# samba-tool domain join tecmint.lan DC -U"tecmint_user"
Sample Output
Finding a writeable DC for domain 'tecmint.lan'
Found DC adc1.tecmint.lan
Password for [WORKGROUP\tecmint_user]:
workgroup is TECMINT
realm is tecmint.lan
checking sAMAccountName
Deleted CN=ADC2,CN=Computers,DC=tecmint,DC=lan
Adding CN=ADC2,OU=Domain Controllers,DC=tecmint,DC=lan
Adding CN=ADC2,CN=Servers,CN=Default-First-Site-Name,CN=Sites,CN=Configuration,DC=tecmint,DC=lan
Adding CN=NTDS Settings,CN=ADC2,CN=Servers,CN=Default-First-Site-Name,CN=Sites,CN=Configuration,DC=tecmint,DC=lan
Adding SPNs to CN=ADC2,OU=Domain Controllers,DC=tecmint,DC=lan
Setting account password for ADC2$
Enabling account
Calling bare provision
Looking up IPv4 addresses
Looking up IPv6 addresses
No IPv6 address will be assigned
Setting up share.ldb
Setting up secrets.ldb
Setting up the registry
Setting up the privileges database
Setting up idmap db
Setting up SAM db
Setting up sam.ldb partitions and settings
Setting up sam.ldb rootDSE
Pre-loading the Samba 4 and AD schema
A Kerberos configuration suitable for Samba 4 has been generated at /var/lib/samba/private/krb5.conf
Provision OK for domain DN DC=tecmint,DC=lan
Starting replication
Schema-DN[CN=Schema,CN=Configuration,DC=tecmint,DC=lan] objects[402/1550] linked_values[0/0]
Schema-DN[CN=Schema,CN=Configuration,DC=tecmint,DC=lan] objects[804/1550] linked_values[0/0]
Schema-DN[CN=Schema,CN=Configuration,DC=tecmint,DC=lan] objects[1206/1550] linked_values[0/0]
Schema-DN[CN=Schema,CN=Configuration,DC=tecmint,DC=lan] objects[1550/1550] linked_values[0/0]
Analyze and apply schema objects
Partition[CN=Configuration,DC=tecmint,DC=lan] objects[402/1614] linked_values[0/0]
Partition[CN=Configuration,DC=tecmint,DC=lan] objects[804/1614] linked_values[0/0]
Partition[CN=Configuration,DC=tecmint,DC=lan] objects[1206/1614] linked_values[0/0]
Partition[CN=Configuration,DC=tecmint,DC=lan] objects[1608/1614] linked_values[0/0]
Partition[CN=Configuration,DC=tecmint,DC=lan] objects[1614/1614] linked_values[28/0]
Replicating critical objects from the base DN of the domain
Partition[DC=tecmint,DC=lan] objects[97/97] linked_values[24/0]
Partition[DC=tecmint,DC=lan] objects[380/283] linked_values[27/0]
Done with always replicated NC (base, config, schema)
Replicating DC=DomainDnsZones,DC=tecmint,DC=lan
Partition[DC=DomainDnsZones,DC=tecmint,DC=lan] objects[45/45] linked_values[0/0]
Replicating DC=ForestDnsZones,DC=tecmint,DC=lan
Partition[DC=ForestDnsZones,DC=tecmint,DC=lan] objects[18/18] linked_values[0/0]
Committing SAM database
Sending DsReplicaUpdateRefs for all the replicated partitions
Setting isSynchronized and dsServiceName
Setting up secrets database
Joined domain TECMINT (SID S-1-5-21-715537322-3397311598-55032968) as a DC

Join Domain to Samba4 AD DC
12. After the Ubuntu with samba4 software has been integrated into the domain, open samba main configuration file and add the following lines:
# nano /etc/samba/smb.conf
Add following excerpt to smb.conf file.
dns forwarder = 192.168.1.1
idmap_ldb:use rfc2307 = yes

   template shell = /bin/bash
   winbind use default domain = true
   winbind offline logon = false
   winbind nss info = rfc2307
        winbind enum users = yes
        winbind enum groups = yes
Replace dns forwarder IP address with your own DNS forwarder IP. Samba will forward all DNS resolution queries that are outside your domain authoritative zone to this IP address.
13. Finally, restart samba daemon to reflect changes and check active directory replication by executing the following commands.
# systemctl restart samba-ad-dc
# samba-tool drs showrepl
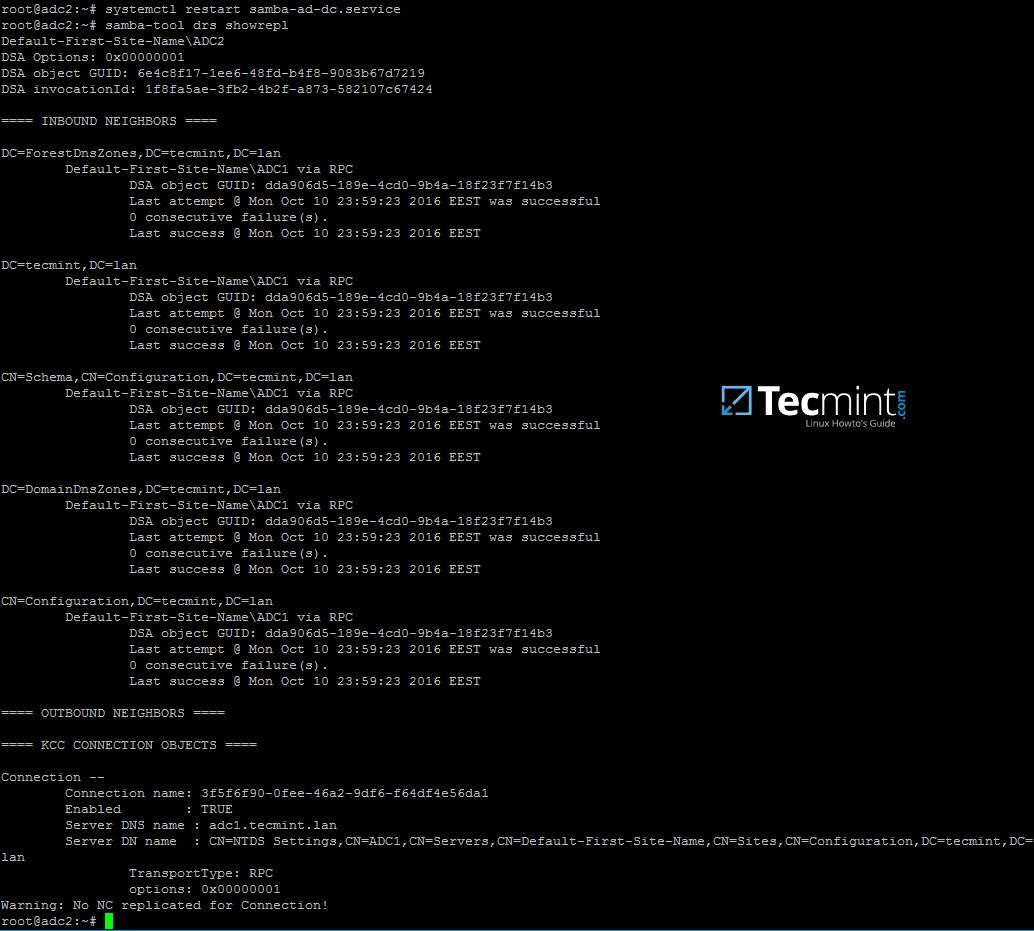
Configure Samba4 DNS
14. Additionally, rename initial Kerberos configuration file from /etc path and replace it with the new krb5.confconfiguration file generated by samba while provisioning the domain.
The file is located in /var/lib/samba/private directory. Use Linux symlink to link this file to /etc directory.
# mv /etc/krb5.conf /etc/krb5.conf.initial
# ln -s /var/lib/samba/private/krb5.conf /etc/
# cat /etc/krb5.conf

Configure Kerberos
15. Also, verify Kerberos authentication with samba krb5.conf file. Request a ticket for an administrator user and list the cached ticket by issuing the below commands.
# kinit administrator
# klist
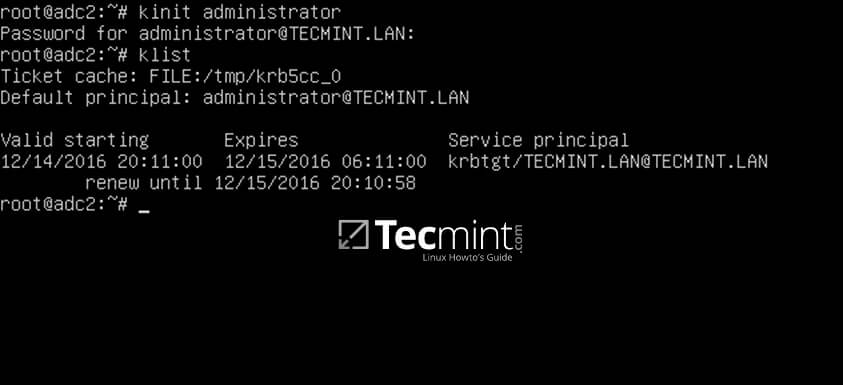
Verify Kerberos Authentication with Samba
Step 4: Additional Domain Services Validations
16. The first test you need to perform is Samba4 DC DNS resolution. To validate your domain DNS resolution, query the domain name using host command against a few crucial AD DNS records as presented on the below screenshot.
The DNS server should replay by now with a pair of two IP addresses for each query.
# host your_domain.tld
# host -t SRV _kerberos._udp.your_domain.tld  # UDP Kerberos SRV record
# host -t SRV _ldap._tcp.your_domain.tld  # TCP LDAP SRV record

Verify Samba4 DC DNS
17. These DNS records should also be visible from an enrolled Windows machine with RSAT tools installed. Open DNS Manager and expand to your domain tcp records as shown in the below image.

Verify DNS Records on Windows RSAT Tool
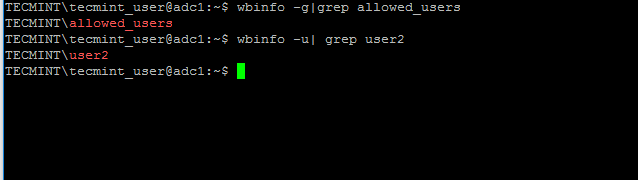
18. The next test should indicate if domain LDAP replication works as expected. Using samba-tool, create an account on the second domain controller and verify if the account is automatically replicated on the first Samba4 AD DC.
On adc2:
# samba-tool user add test_user
On adc1:
# samba-tool user list | grep test_user

Create User Account on Samba4 AD

Verify Replication on Samba4 AD
19. You can also create an account from a Microsoft AD UC console and verify if the account appears on both domain controllers.
By default, the account should be automatically created on both samba domain controllers. Query the account name from adc1 using wbinfo command.

Create Account from Microsoft AD UC

Verify Account Replication On Samba4 AD
20. As a fact, open AD UC console from Windows, expand to Domain Controllers and you should see both enrolled DC machines.

Verify Samba4 Domain Controllers
Step 5: Enable Samba4 AD DC Service
21. In order to enable samba4 AD DC services system-wide, first disable some old and unused Samba daemons and enable only samba-ad-dc service by running the below commands:
# systemctl disable smbd nmbd winbind
# systemctl enable samba-ad-dc

Enable Samba4 AD DC Services
22. If you remotely administer Samba4 domain controller from a Microsoft client or you have other Linux or Windows clients integrated into your domain, make sure you mention the IP address of the adc2 machine to their network interface DNS server IP settings in order to gain a level of redundancy.
The below screenshots illustrates the configurations required for a Windows or a Debian/Ubuntu client.

Configure Client to Administer Samba4 DC

Configure Linux Client to Administer Samba4 DC
Assuming that the first DC with 192.168.1.254 goes offline, reverse the order of the DNS server IP addresses in the configuration file so it won’t try to query first an unavailable DNS server.
Finally, in case you want to perform local authentication on a Linux system with a Samba4 Active Directory account or grant root privileges for AD LDAP accounts in Linux, read the steps 2 and 3 from the tutorial Manage Samba4 AD Infrastructure from Linux Command Line.
Setup SysVol Replication Across Two Samba4 AD DC with Rsync – Part 6
This topic will cover SysVol replication across two Samba4 Active Directory Domain Controllers performed with the help of a few powerful Linux tools, such as Rsync file synchronization utility, Cron scheduling daemon and SSH protocol.
Requirements:
Step 1: Accurate Time Synchronization Across DCs
1. Before starting to replicate the contents of the sysvol directory across both domain controllers you need to provide an accurate time for these machines.
If the delay is greater than 5 minutes on both directions and their clocks are not properly in sync, you should start experiencing various problems with AD accounts and domain replication.
To overcome the problem of time drifting between two or more domain controllers, you need to install and configure NTP server on your machine by executing the below command.
# apt-get install ntp
2. After NTP daemon has been installed, open the main configuration file, comment the default pools (add a # in front of each pool line) and add a new pool which will point back to the main Samba4 AD DC FQDN with NTPserver installed, as suggested on the below example.
# nano /etc/ntp.conf
Add following lines to ntp.conf file.
pool 0.ubuntu.pool.ntp.org iburst
#pool 1.ubuntu.pool.ntp.org iburst
#pool 2.ubuntu.pool.ntp.org iburst
#pool 3.ubuntu.pool.ntp.org iburst

pool adc1.tecmint.lan

# Use Ubuntu's ntp server as a fallback.
pool ntp.ubuntu.com
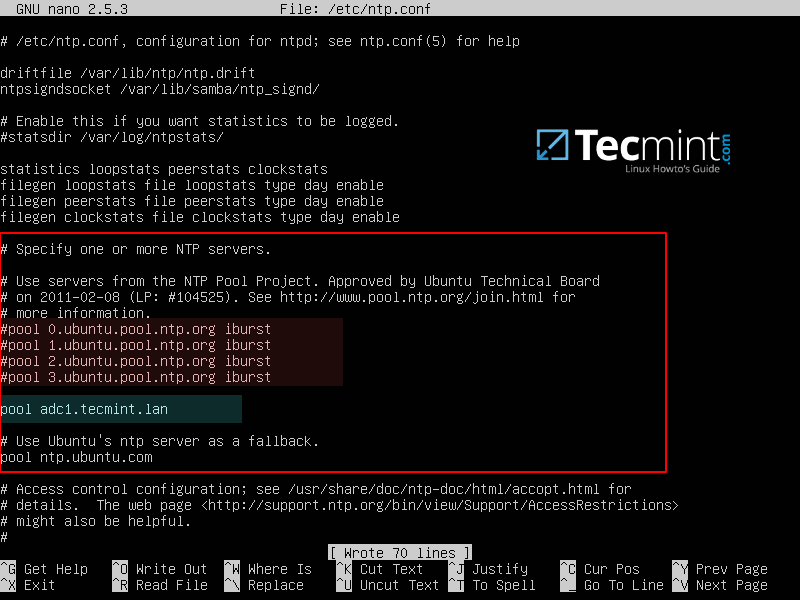
Configure NTP for Samba4
3. Don’t close the file yet, move to the bottom of the file and add the following lines in order for other clients to be able to query and sync the time with this NTP server, issuing signed NTP requests, in case the primary DC goes offline:
restrict source notrap nomodify noquery mssntp
ntpsigndsocket /var/lib/samba/ntp_signd/
4. Finally, save and close the configuration file and restart NTP daemon in order to apply the changes. Wait for a few seconds or minutes for the time to synchronize and issue ntpq command in order to print the current summary state of the adc1 peer in sync.
# systemctl restart ntp
# ntpq -p
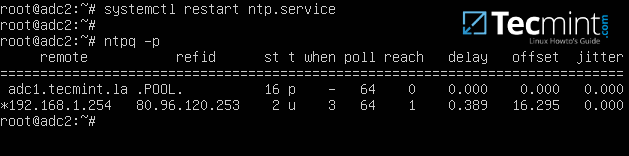
Synchronize NTP Time with Samba4 AD
Step 2: SysVol Replication with First DC via Rsync
By default, Samba4 AD DC doesn’t perform SysVol replication via DFS-R (Distributed File System Replication) or the FRS (File Replication Service).
This means that Group Policy objects are available only if the first domain controller is online. If the first DC becomes unavailable, the Group Policy settings and logon scripts will not apply further on Windows machines enrolled into the domain.
To overcome this obstacle and achieve a rudimentary form of SysVol replication we will schedule a Linux rsync command combined with a SSH encrypted tunnel with key-based SSH authentication in order to securely transfer GPO objects from the first domain controller to the second domain controller.
This method ensures GPO objects consistency across domain controllers, but has one huge drawback. It works only in one direction because rsync will transfer all changes from the source DC to the destination DC when synchronizing GPO directories.
Objects which no longer exist on the source will be deleted from the destination as well. In order to limit and avoid any conflicts, all GPO edits should be made only on the first DC.
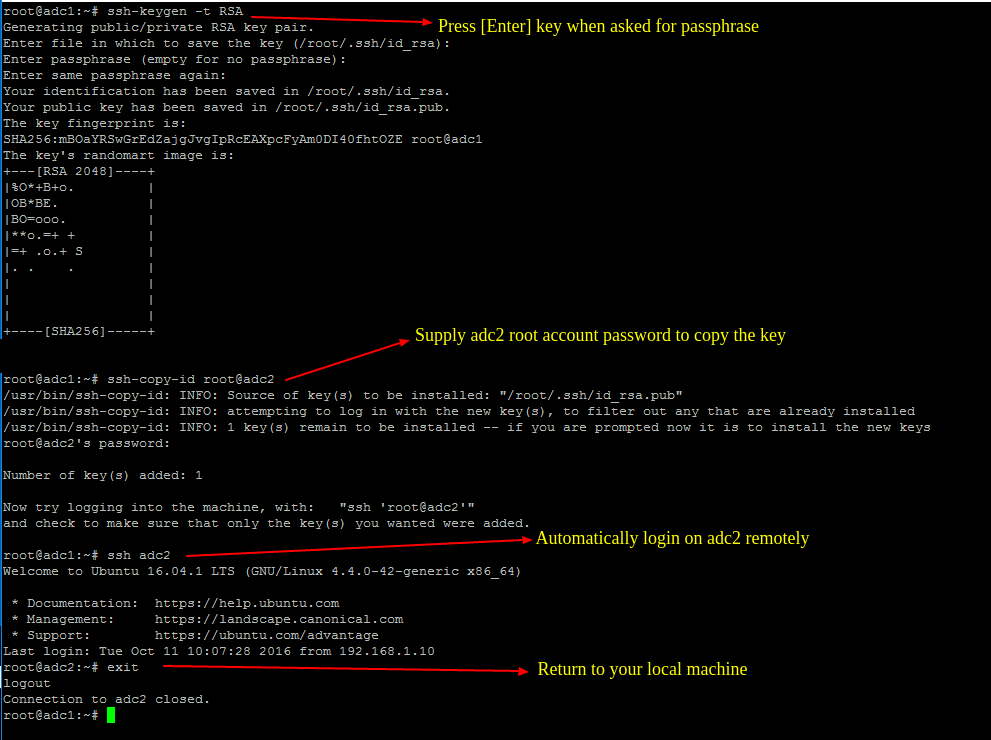
5. To start the process of SysVol replication, first generate a SSH key on the first Samba AD DC and transfer the key to the second DC by issuing the below commands.
Do not use a passphrase for this key in order for the scheduled transfer to run without user interference.
# ssh-keygen -t RSA
# ssh-copy-id root@adc2
# ssh adc2
# exit
Generate SSH Key on Samba4 DC
6. After you’ve assured that the root user from the first DC can automatically login on the second DC, run the following Rsync command with --dry-run parameter in order simulate SysVol replication. Replace adc2accordingly.
# rsync --dry-run -XAavz --chmod=775 --delete-after --progress --stats /var/lib/samba/sysvol/ root@adc2:/var/lib/samba/sysvol/
7. If the simulation process works as expected, run the rsync command again without the --dry-run option in order to actually replicate GPO objects across your domain controllers.
# rsync -XAavz --chmod=775 --delete-after --progress --stats /var/lib/samba/sysvol/ root@adc2:/var/lib/samba/sysvol/

Samba4 AD DC SysVol Replication
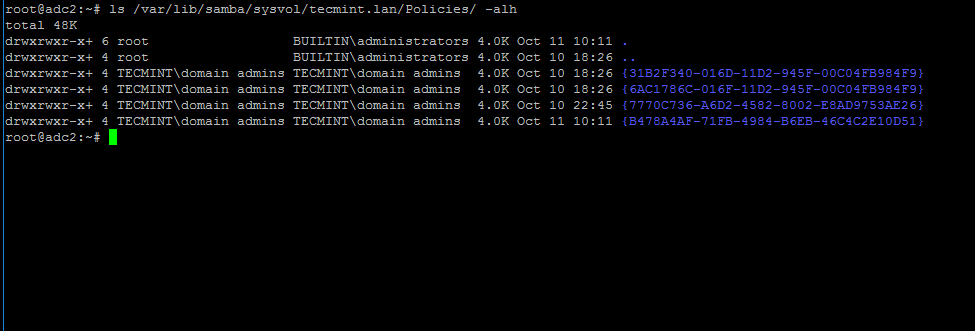
8. After SysVol replication process has finished, login to the destination domain controller and list the contents of one of the GPO objects directory by running the below command.
The same GPO objects from the first DC should be replicated here too.
# ls -alh /var/lib/samba/sysvol/your_domain/Policiers/
Verify Samba4 DC SysVol Replication
9. To automate the process of Group Policy replication (sysvol directory transport over network), schedule a root job to run the rsync command used earlier every 5 minutes by issuing the below command.
# crontab -e
Add rsync command to run every 5 minutes and direct the output of the command, including the errors, to the log file /var/log/sysvol-replication.log .In case something doesn’t work as expected you should consult this file in order to troubleshoot the problem.
*/5 * * * * rsync -XAavz --chmod=775 --delete-after --progress --stats /var/lib/samba/sysvol/ root@adc2:/var/lib/samba/sysvol/ > /var/log/sysvol-replication.log 2>&1
10. Assuming that in future there will be some related issues with SysVol ACL permissions, you can run the following commands in order to detect and repair these errors.
# samba-tool ntacl sysvolcheck
# samba-tool ntacl sysvolreset

Fix SysVol ACL Permissions
11. In case the first Samba4 AD DC with FSMO role as “PDC Emulator” becomes unavailable, you can force the Group Policy Management Console installed on a Microsoft Windows system to connect only to the second domain controller by choosing Change Domain Controller option and manually selecting the target machine as illustrated below.
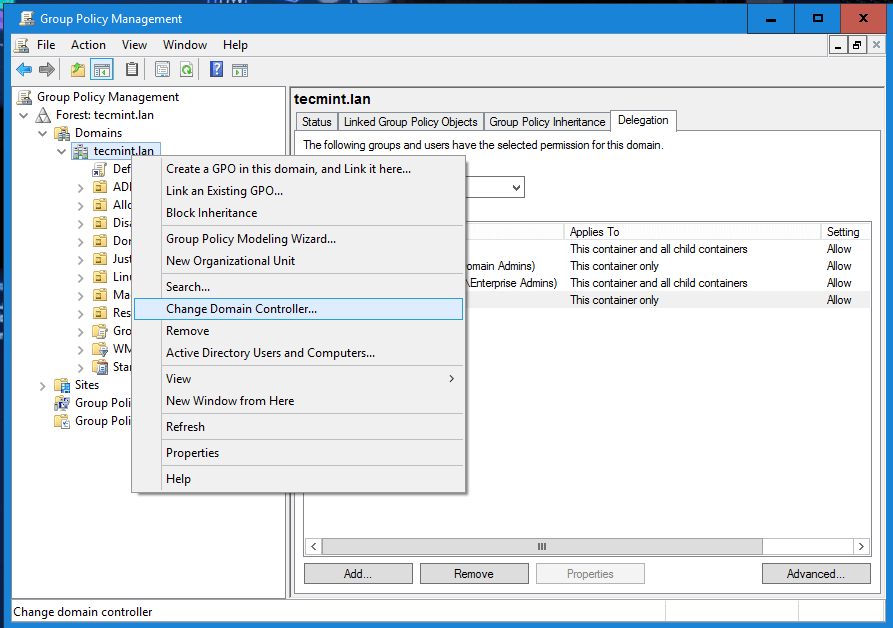
Change Samba4 Domain Controller
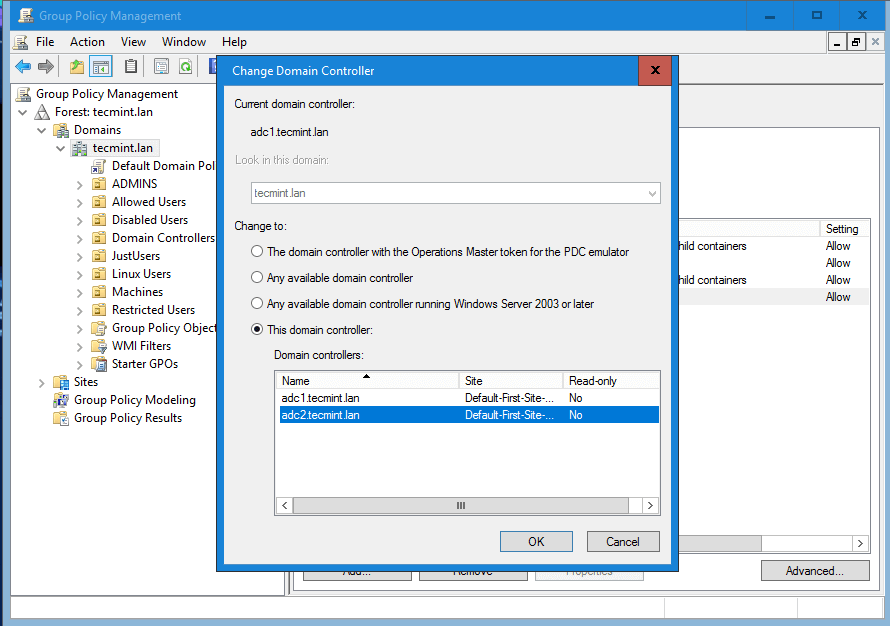
Select Samba4 Domain Controller
While connected to the second DC from Group Policy Management Console, you should avoid making any modification to your domain Group Policy. When the first DC will become available again, rsync command will destroy all changes made on this second domain controller.
Create a Shared Directory on Samba AD DC and Map to Windows/Linux Clients – Part 7
This tutorial will guide you on how to create a shared directory on Samba AD DC system, map this Shared Volume to Windows clients integrated into the domain via GPO and manage share permissions from Windows domain controller perspective.
It will also cover how to access and mount the file share from a Linux machine enrolled into domain using a Samba4 domain account.
Requirements:
Step 1: Create Samba File Share
1. The process of creating a share on Samba AD DC is a very simple task. First create a directory you want to share via SMB protocol and add the below permissions on the filesystem in order to allow a Windows AD DCadmin acount to modify the share permissions accordingly to what permissions Windows clients should see.
Assuming that the new file share on the AD DC would be the /nas directory, run the below commands to assign the correct permissions.
# mkdir /nas
# chmod -R 775 /nas
# chown -R root:"domain users" /nas
# ls -alh | grep nas
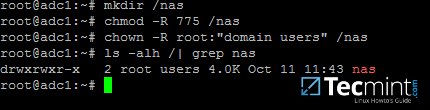
Create Samba Shared Directory
2. After you’ve created the directory that will be exported as a share from Samba4 AD DC, you need to add the following statements to samba configuration file in order to make the share available via SMB protocol.
# nano /etc/samba/smb.conf
Go to the bottom of the file and add the following lines:
[nas]
	path = /nas
	read only = no
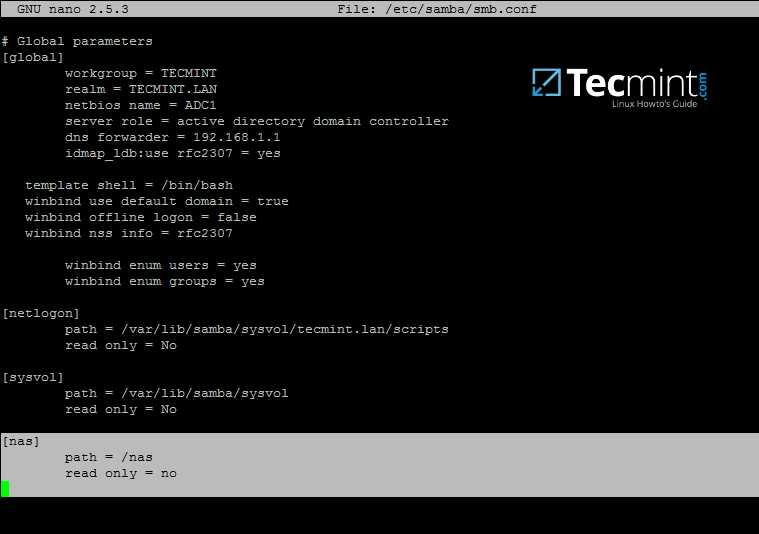
Configure Samba Shared Directory
3. The last thing you need to do is to restart Samba AD DC daemon in order to apply the changes by issuing the below command:
# systemctl restart samba-ad-dc.service
Step 2: Manage Samba Share Permissions
4. Since we’re accessing this shared volume from Windows, using domain accounts (users and groups) that are created on Samba AD DC (the share is not meant to be accessed by Linux system users).
The process of managing permissions can be done directly from Windows Explorer, in the same way permissions are managed for any folder in Windows Explorer.
First, log on to Windows machine with a Samba4 AD account with administrative privileges on the domain. In order to access the share from Windows and set the permissions, type the IP address or host name or FQDN of the Samba AD DC machine in Windows Explorer path field, preceded by two back slashes, and the share should be visible.
\adc1
Or
\192.168.1.254
Or
\adc1.tecmint.lan
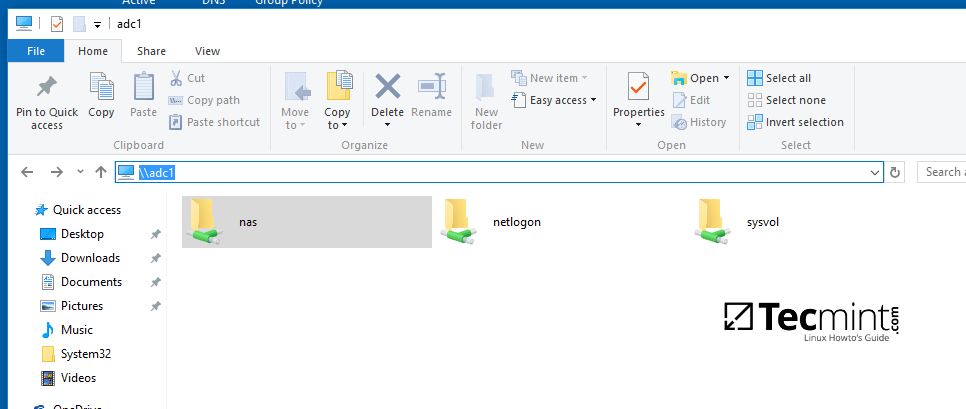
Access Samba Share Directory from Windows
5. To modify permissions just right click on the share and choose Properties. Navigate to Security tab and proceed with altering domain users and group permissions accordingly. Use Advanced button in order to fine tune permissions.
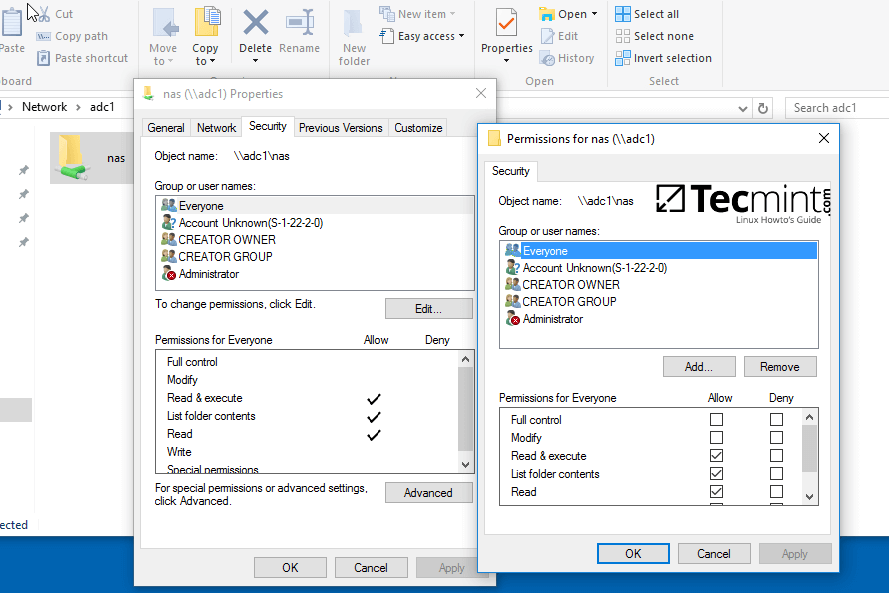
Configure Samba Share Directory Permissions
Use the below screenshot as an excerpt on how to tune permissions for specific Samba AD DC authenticated accounts.
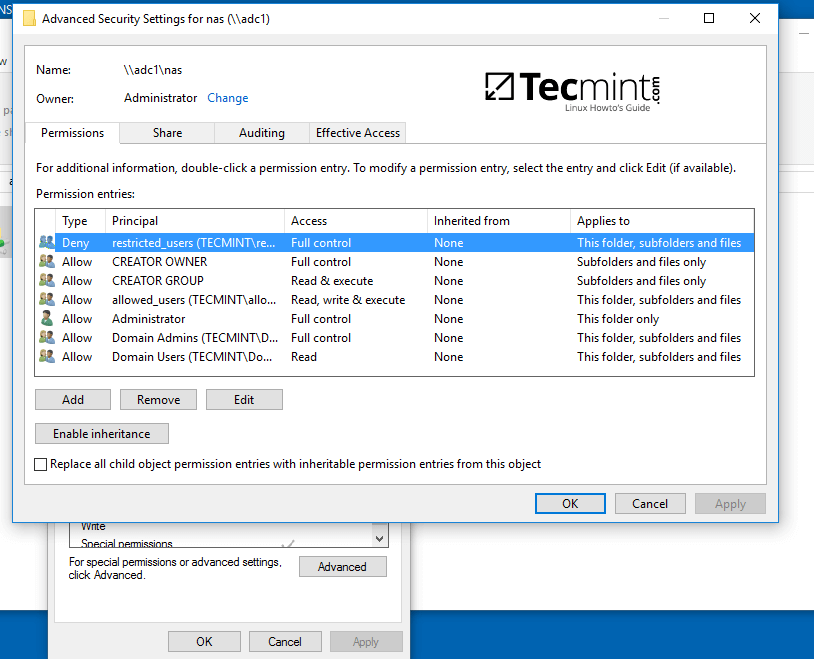
Manage Samba Share Directory User Permissions
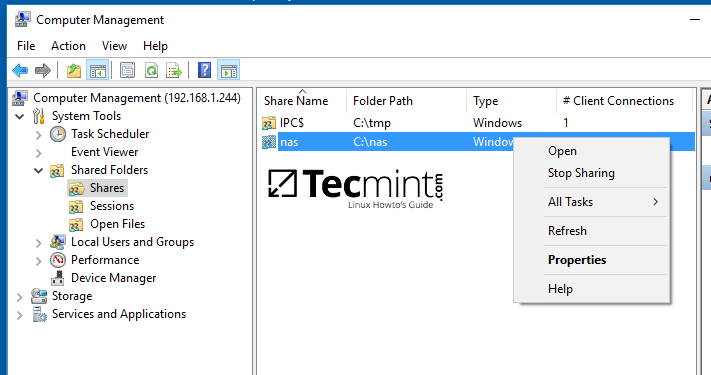
6. Other method you can use to manage the share permissions is from Computer Management -> Connect to another computer.
Navigate to Shares, right click on the share you want to modify permissions, choose Properties and move to Security tab. From here you can alter permissions in any way you want just as presented in the previous method using file share permissions.
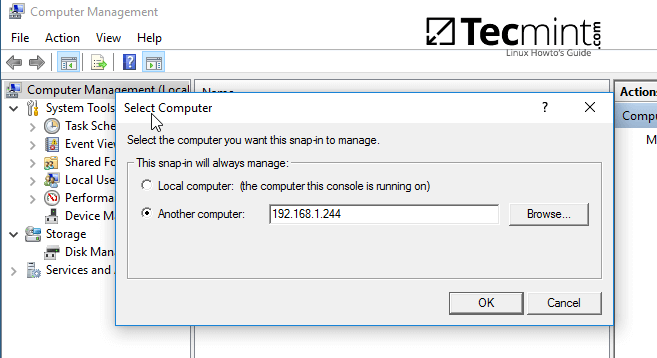
Connect to Samba Share Directory Machine
Manage Samba Share Directory Properties

Assign Samba Share Directory Permissions to Users
Step 3: Map the Samba File Share via GPO
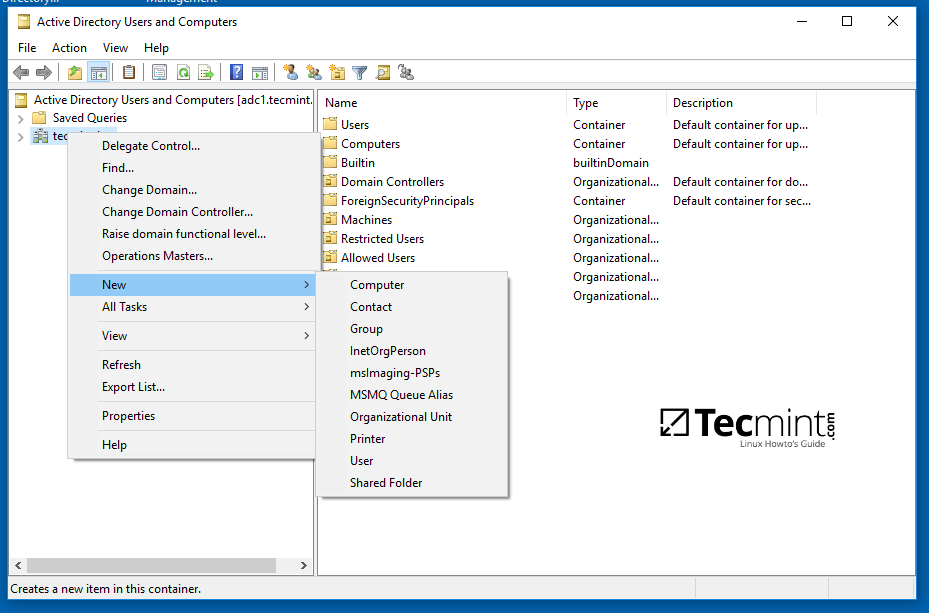
7. To automatically mount the exported samba file share via domain Group Policy, first on a machine with RSAT tools installed, open AD UC utility, right click on your domain name and, then, choose New -> Shared Folder.
Map Samba Share Folder
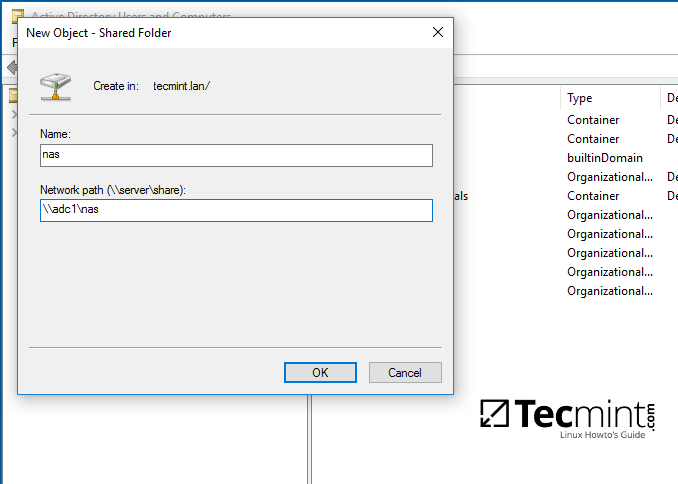
8. Add a name for the shared volume and enter the network path where your share is located as illustrated on the below image. Hit OK when you’ve finished and the share should now be visible on the right plane.
Set Samba Shared Folder Name Location
9. Next, open Group Policy Management console, expand to your domain Default Domain Policy script and open the file for editing.
On the GPM Editor navigate to User Configuration -> Preferences -> Windows Settings and right click on Drive Maps and choose New -> Mapped Drive.

Map Samba Share Folder in Windows
10. On the new window search and add the network location for the share by pressing the right button with three dots, check Reconnect checkbox, add a label for this share, choose the letter for this drive and hit OK button to save and apply configuration.

Configure Network Location for Samba Share Directory
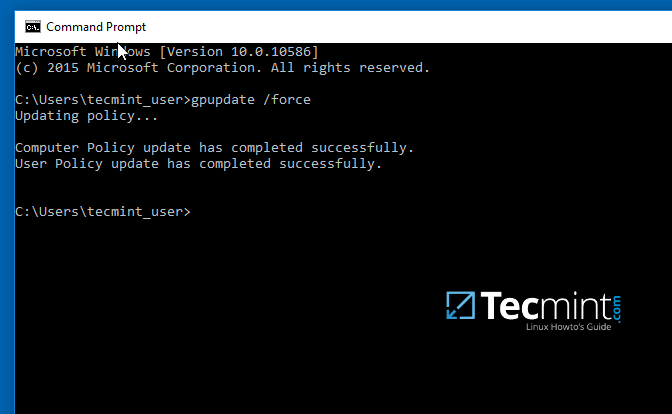
11. Finally, in order to force and apply GPO changes on your local machine without a system restart, open a Command Prompt and run the following command.
gpupdate /force
Apply GPO Changes
12. After the policy has been successfully applied on your machine, open Windows Explorer and the shared network volume should be visible and accessible, depending on what permissions you’ve granted for the share on previous steps.
The share will be visible for other clients on your network after they reboot or re-login onto their systems if the group policy will not forced from command line.

Samba Shared Network Volume on Windows
Step 4: Access the Samba Shared Volume from Linux Clients
13. Linux users from machines that are enrolled into Samba AD DC can also access or mount the share locally by authenticating into the system with a Samba account.
First, they need to assure that the following samba clients and utilities are installed on their systems by issuing the below command.
$ sudo apt-get install smbclient cifs-utils
14. In order to list the exported shares your domain provides for a specific domain controller machine use the below command:
$ smbclient –L your_domain_controller –U%
or
$ smbclient –L \adc1 –U%

List Samba Share Directory in Linux
15. To interactively connect to a samba share from command line with a domain account use the following command:
$ sudo smbclient //adc/share_name -U domain_user
On command line you can list the content of the share, download or upload files to the share or perform other tasks. Use ? to list all available smbclient commands.

Connect Samba Share Directory in Linux
16. To mount a samba share on a Linux machine use the below command.
$ sudo mount //adc/share_name /mnt -o username=domain_user
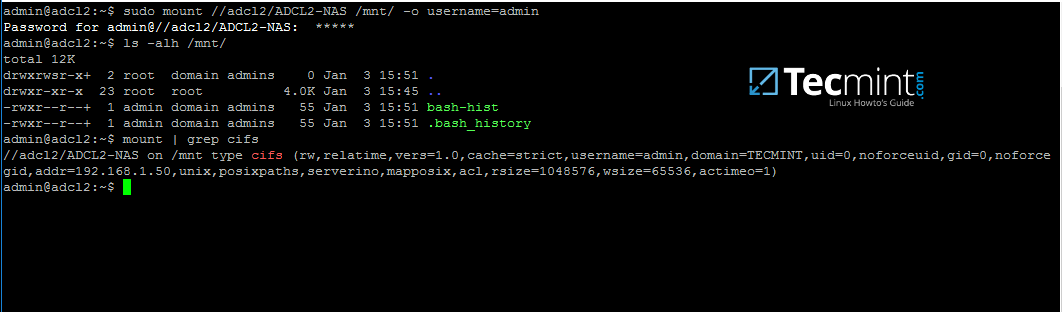
Mount Samba Share Directory in Linux
Replace the host, share name, mount point and domain user accordingly. Use mount command piped with grepto filter only by cifs expression.
As some final conclusions, shares configured on a Samba4 AD DC will work only with Windows access control lists (ACL), not POSIX ACLs.
Configure Samba as a Domain member with file shares in order to achieve other capabilities for a network share. Also, on an Additional Domain Controller configure Windbindd daemon – Step Two – before you start exporting network shares.
Integrate Ubuntu 16.04 to AD as a Domain Member with Samba and Winbind – Part 8
This tutorial describes how to join an Ubuntu machine into a Samba4 Active Directory domain in order to authenticate AD accounts with local ACL for files and directories or to create and map volume shares for domain controller users (act a as file server).
Requirements:
Step 1: Initial Configurations to Join Ubuntu to Samba4 AD
1. Before starting to join an Ubuntu host into an Active Directory DC you need to assure that some services are configured properly on local machine.
An important aspect of your machine represents the hostname. Setup a proper machine name before joining the domain with the help of hostnamectl command or by manually editing /etc/hostname file.
# hostnamectl set-hostname your_machine_short_name
# cat /etc/hostname
# hostnamectl
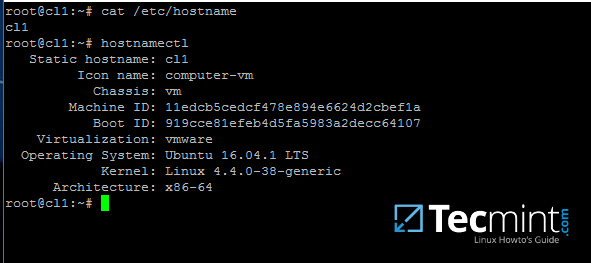
Set System Hostname
2. On the next step, open and manually edit your machine network settings with the proper IP configurations. The most important settings here are the DNS IP addresses which points back to your domain controller.
Edit /etc/network/interfaces file and add dns-nameservers statement with your proper AD IP addresses and domain name as illustrated on the below screenshot.
Also, make sure that the same DNS IP addresses and the domain name are added to /etc/resolv.conf file.
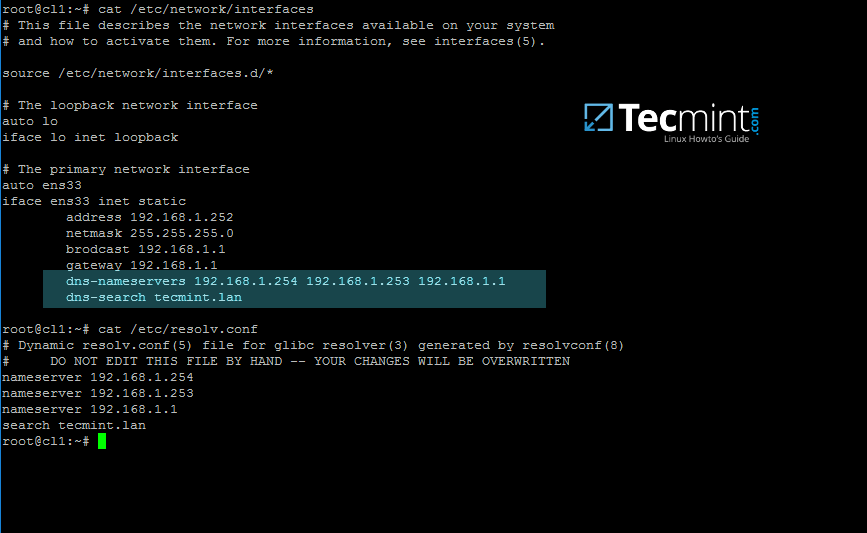
Configure Network Settings for AD
On the above screenshot, 192.168.1.254 and 192.168.1.253 are the IP addresses of the Samba4 AD DC and Tecmint.lan represents the name of the AD domain which will be queried by all machines integrated into realm.
3. Restart the network services or reboot the machine in order to apply the new network configurations. Issue a ping command against your domain name in order to test if DNS resolution is working as expected.
The AD DC should replay with its FQDN. In case you have configured a DHCP server in your network to automatically assign IP settings for your LAN hosts, make sure you add AD DC IP addresses to the DHCP server DNS configurations.
# systemctl restart networking.service
# ping -c2 your_domain_name
4. The last important configuration required is represented by time synchronization. Install ntpdate package, query and sync time with the AD DC by issuing the below commands.
$ sudo apt-get install ntpdate
$ sudo ntpdate -q your_domain_name
$ sudo ntpdate your_domain_name

Time Synchronization with AD
5. On the next step install the software required by Ubuntu machine to be fully integrated into the domain by running the below command.
$ sudo apt-get install samba krb5-config krb5-user winbind libpam-winbind libnss-winbind

Install Samba4 in Ubuntu Client
While the Kerberos packages are installing you should be asked to enter the name of your default realm. Use the name of your domain with uppercases and press Enter key to continue the installation.

Add AD Domain Name
6. After all packages finish installing, test Kerberos authentication against an AD administrative account and list the ticket by issuing the below commands.
# kinit ad_admin_user
# klist

Check Kerberos Authentication with AD
Step 2: Join Ubuntu to Samba4 AD DC
7. The first step in integrating the Ubuntu machine into the Samba4 Active Directory domain is to edit Samba configuration file.
Backup the default configuration file of Samba, provided by the package manager, in order to start with a clean configuration by running the following commands.
# mv /etc/samba/smb.conf /etc/samba/smb.conf.initial
# nano /etc/samba/smb.conf
On the new Samba configuration file add the below lines:
[global]
        workgroup = TECMINT
        realm = TECMINT.LAN
        netbios name = ubuntu
        security = ADS
        dns forwarder = 192.168.1.1

idmap config * : backend = tdb
idmap config *:range = 50000-1000000

   template homedir = /home/%D/%U
   template shell = /bin/bash
   winbind use default domain = true
   winbind offline logon = false
   winbind nss info = rfc2307
   winbind enum users = yes
   winbind enum groups = yes

  vfs objects = acl_xattr
  map acl inherit = Yes
  store dos attributes = Yes
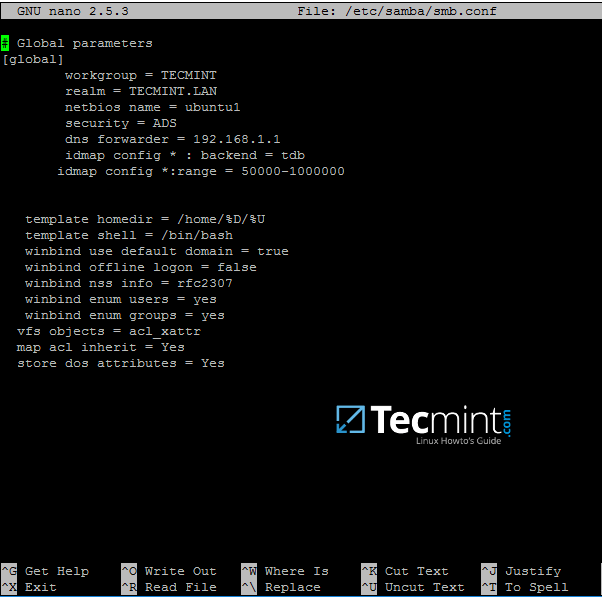
Configure Samba for AD
Replace workgroup, realm, netbios name and dns forwarder variables with your own custom settings.
The winbind use default domain parameter causes winbind service to treat any unqualified AD usernames as users of the AD. You should omit this parameter if you have local system accounts names which overlap AD accounts.
8. Now you should restart all samba daemons and stop and remove unnecessary services and enable samba services system-wide by issuing the below commands.
$ sudo systemctl restart smbd nmbd winbind
$ sudo systemctl stop samba-ad-dc
$ sudo systemctl enable smbd nmbd winbind
9. Join Ubuntu machine to Samba4 AD DC by issuing the following command. Use the name of an AD DC account with administrator privileges in order for the binding to realm to work as expected.
$ sudo net ads join -U ad_admin_user
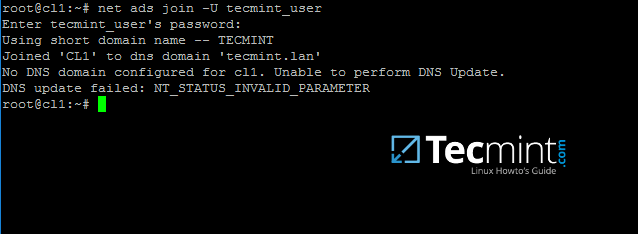
Join Ubuntu to Samba4 AD DC
10. From a Windows machine with RSAT tools installed you can open AD UC and navigate to Computerscontainer. Here, your Ubuntu joined machine should be listed.
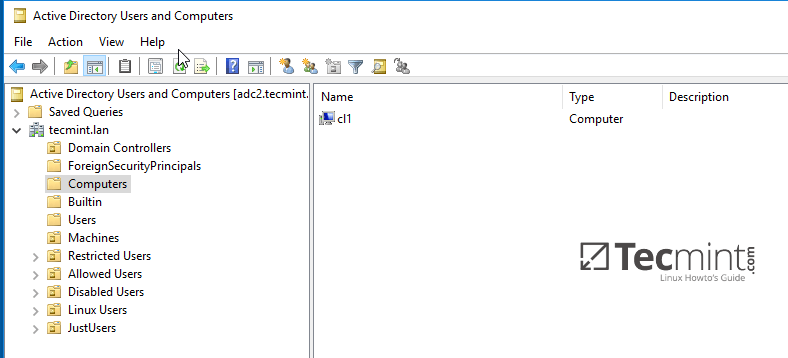
Confirm Ubuntu Client in Windows AD DC
Step 3: Configure AD Accounts Authentication
11. In order to perform authentication for AD accounts on the local machine, you need to modify some services and files on the local machine.
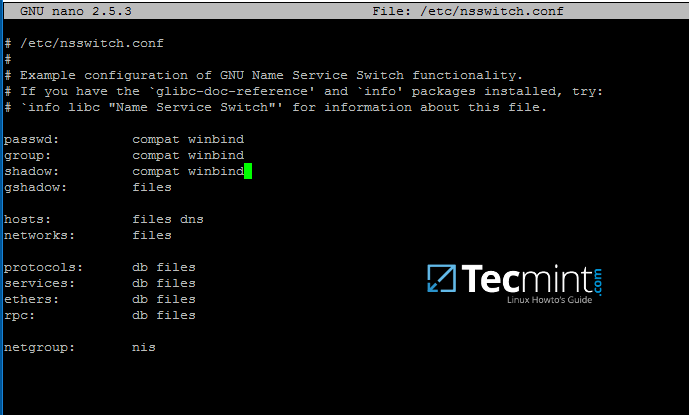
First, open and edit The Name Service Switch (NSS) configuration file.
$ sudo nano /etc/nsswitch.conf
Next append winbind value for passwd and group lines as illustrated on the below excerpt.
passwd:         compat winbind
group:          compat winbind
Configure AD Accounts Authentication
12. In order to test if the Ubuntu machine was successfully integrated to realm run wbinfo command to list domain accounts and groups.
$ wbinfo -u
$ wbinfo -g

List AD Domain Accounts and Groups
13. Also, check Winbind nsswitch module by issuing the getent command and pipe the results through a filter such as grep to narrow the output only for specific domain users or groups.
$ sudo getent passwd| grep your_domain_user
$ sudo getent group|grep 'domain admins'

Check AD Domain Users and Groups
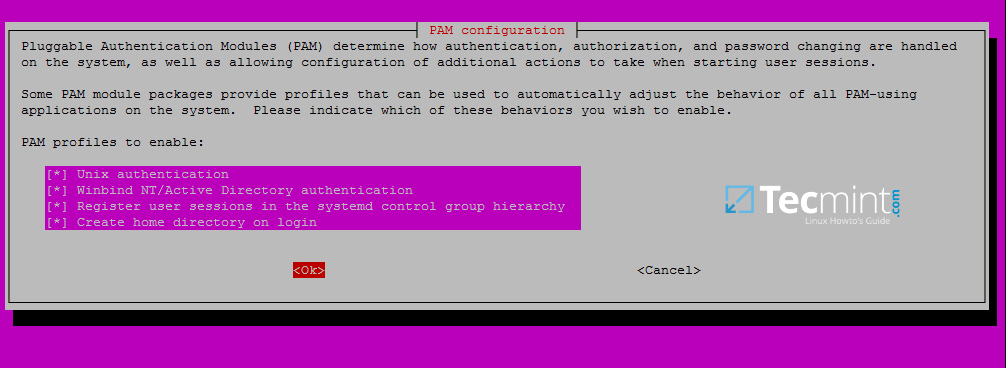
14. In order to authenticate on Ubuntu machine with domain accounts you need to run pam-auth-updatecommand with root privileges and add all the entries required for winbind service and to automatically create home directories for each domain account at the first login.
Check all entries by pressing [space] key and hit ok to apply configuration.
$ sudo pam-auth-update
Authenticate Ubuntu with Domain Accounts
15. On Debian systems you need to manually edit /etc/pam.d/common-account file and the following line in order to automatically create homes for authenticated domain users.
session required pam_mkhomedir.so skel=/etc/skel/ umask=0022
Authenticate Debian with Domain Accounts
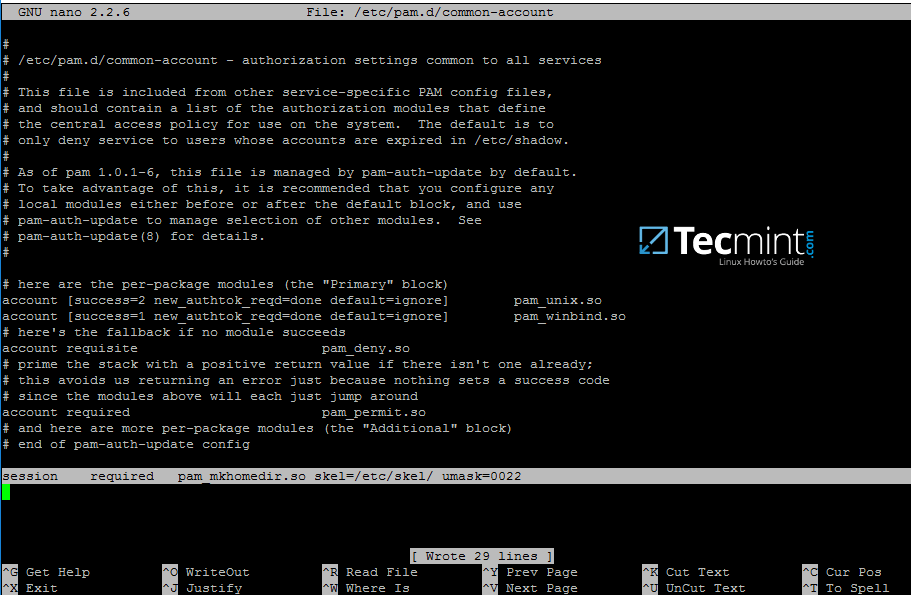
16. In order for Active Directory users to be able to change password from command line in Linux open /etc/pam.d/common-password file and remove the use_authtok statement from password line to finally look as on the below excerpt.
password [success=1 default=ignore] pam_winbind.so try_first_pass

Users Allowed to Change Password
17. To authenticate on Ubuntu host with a Samba4 AD account use the domain username parameter after su – command. Run id command to get extra info about the AD account.
$ su - your_ad_user

Find AD User Information
Use pwd command to see your domain user current directory and passwd command if you want to change password.
18. To use a domain account with root privileges on your Ubuntu machine, you need to add the AD username to the sudo system group by issuing the below command:
$ sudo usermod -aG sudo your_domain_user
Login to Ubuntu with the domain account and update your system by running apt-get update command to check if the domain user has root privileges.

Add Sudo User Root Group
19. To add root privileges for a domain group, open end edit /etc/sudoers file using visudo command and add the following line as illustrated on the below screenshot.
%YOUR_DOMAIN\your_domain\ group ALL=(ALL:ALL) ALL

Add Root Privileges to Domain Group
Use backslashes to escape spaces contained into your domain group name or to escape the first backslash. In the above example the domain group for TECMINT realm is named “domain admins”.
The preceding percent sign (%) symbol indicates that we are referring to a group, not a username.
20. In case you are running the graphical version of Ubuntu and you want to login on the system with a domain user, you need to modify LightDM display manager by editing /usr/share/lightdm/lightdm.conf.d/50-ubuntu.conf file, add the following lines and reboot the machine to reflect changes.
greeter-show-manual-login=true
greeter-hide-users=true
It should now be able to perform logins on Ubuntu Desktop with a domain account using either your_domain_username or your_domain_username@your_domain.tld or your_domain\your_domain_usernameformat.
Join CentOS 7 Desktop to Samba4 AD as a Domain Member – Part 9
This guide will describe how you can integrate CentOS 7 Desktop to Samba4 Active Directory Domain Controller with Authconfig-gtk in order to authenticate users across your network infrastructure from a single centralized account database held by Samba.
Requirements
Step 1: Configure CentOS Network for Samba4 AD DC
1. Before starting to join CentOS 7 Desktop to a Samba4 domain you need to assure that the network is properly setup to query domain via DNS service.
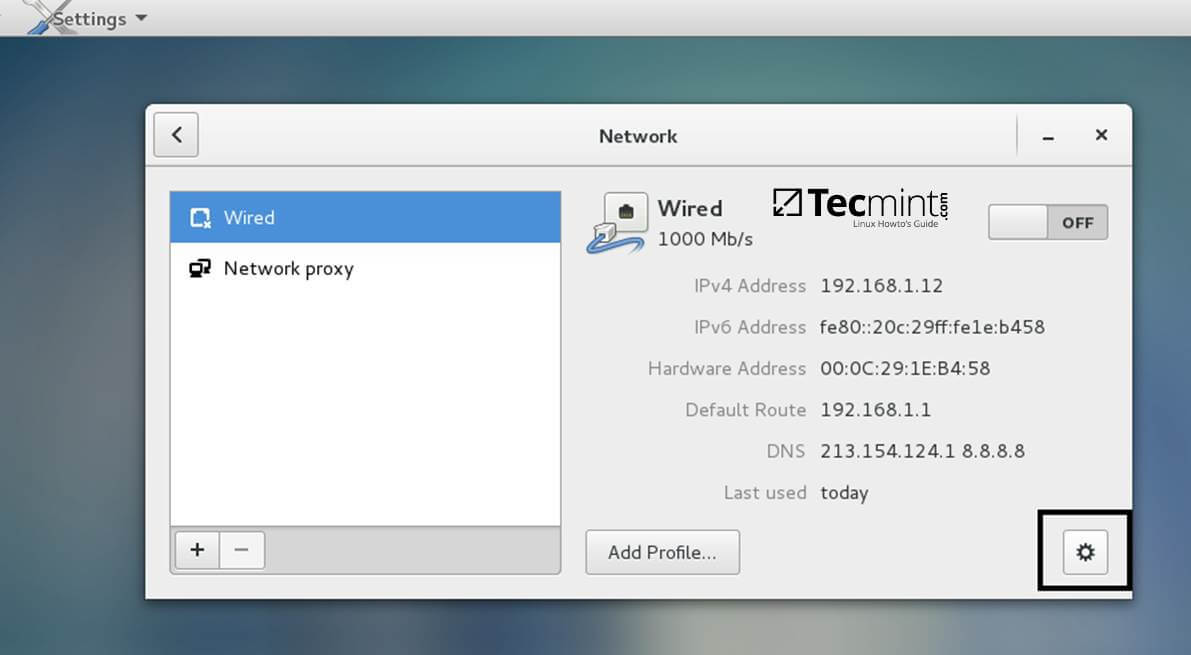
Open Network Settings and turn off the Wired network interface if enabled. Hit on the lower Settings button as illustrated in the below screenshots and manually edit your network settings, especially the DNS IPs that points to your Samba4 AD DC.
When you finish, Apply the configurations and turn on your Network Wired Card.
Network Settings

Configure Network
2. Next, open your network interface configuration file and add a line at the end of file with the name of your domain. This line assures that the domain counterpart is automatically appended by DNS resolution (FQDN) when you use only a short name for a domain DNS record.
$ sudo vi /etc/sysconfig/network-scripts/ifcfg-eno16777736
Add the following line:
SEARCH="your_domain_name"

Network Interface Configuration
3. Finally, restart the network services to reflect changes, verify if the resolver configuration file is correctly configured and issue a series of ping commands against your DCs short names and against your domain name in order to verify if DNS resolution is working.
$ sudo systemctl restart network
$ cat /etc/resolv.conf
$ ping -c1 adc1
$ ping -c1 adc2
$ ping tecmint.lan
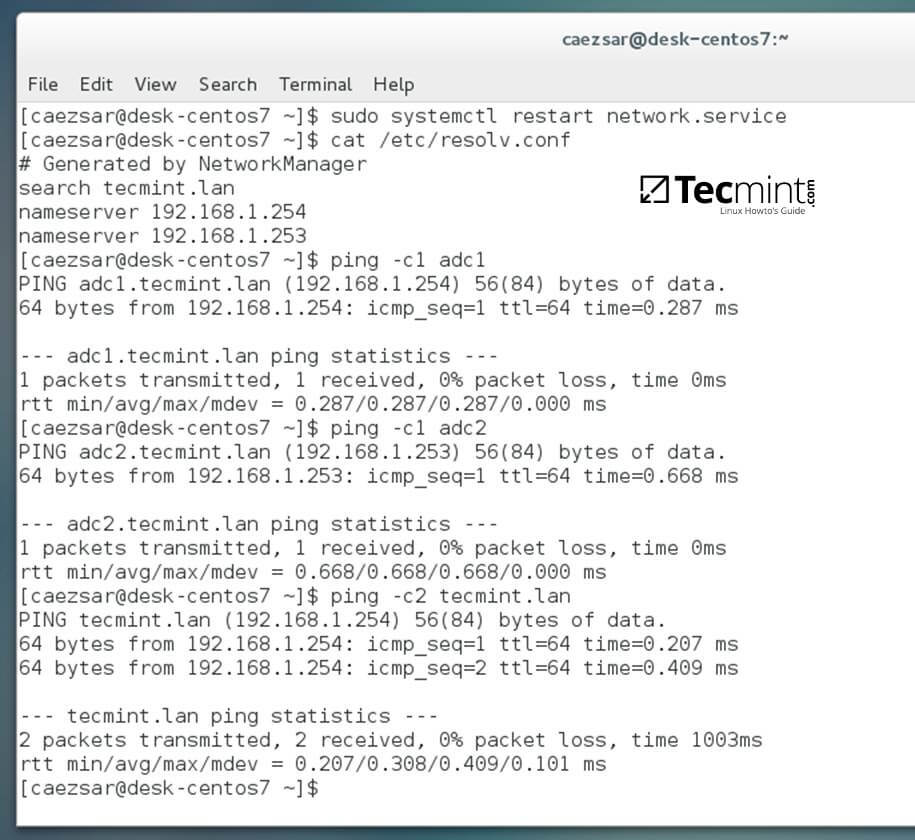
Verify Network Configuration
4. Also, configure your machine hostname and reboot the machine to properly apply the settings by issuing the following commands:
$ sudo hostnamectl set-hostname your_hostname
$ sudo init 6
Verify if hostname was correctly applied with the below commands:
$ cat /etc/hostname
$ hostname
5. The last setting will ensure that your system time is in sync with Samba4 AD DC by issuing the below commands:
$ sudo yum install ntpdate
$ sudo ntpdate -ud domain.tld
Step 2: Install Required Software to Join Samba4 AD DC
6. In order to integrate CentOS 7 to an Active Directory domain install the following packages from command line:
$ sudo yum install samba samba samba-winbind krb5-workstation
7. Finally, install the graphical interface software used for domain integration provided by CentOS repos: Authconfig-gtk.
$ sudo yum install authconfig-gtk
Step 3: Join CentOS 7 Desktop to Samba4 AD DC
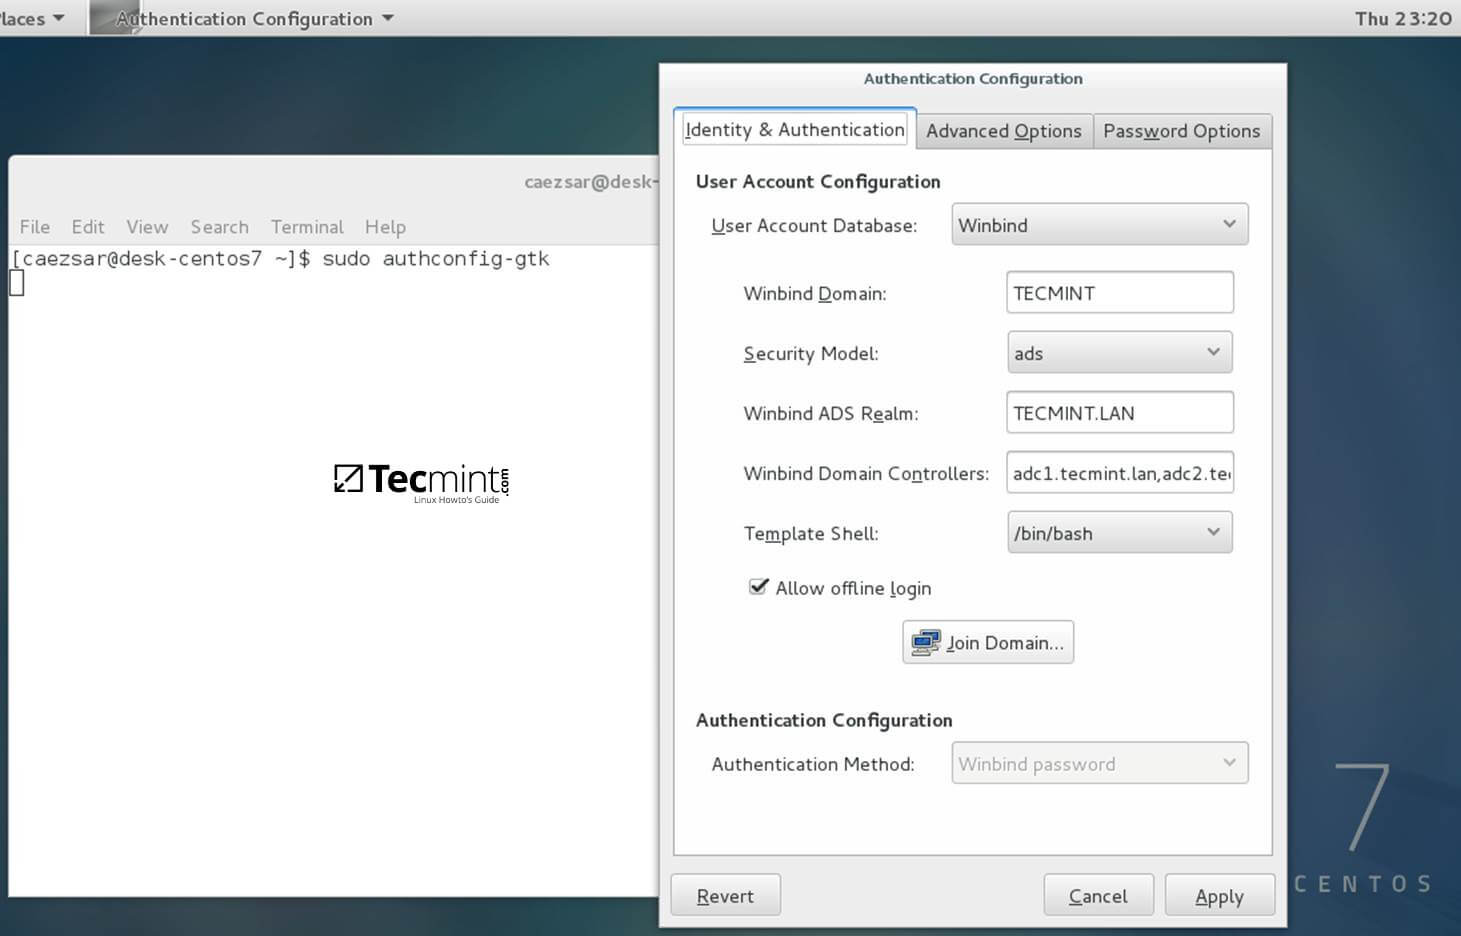
8. The process of joining CentOS to a domain controller is very straightforward. From command line open Authconfig-gtk program with root privileges and make the following changes as described below:
$ sudo authconfig-gtk
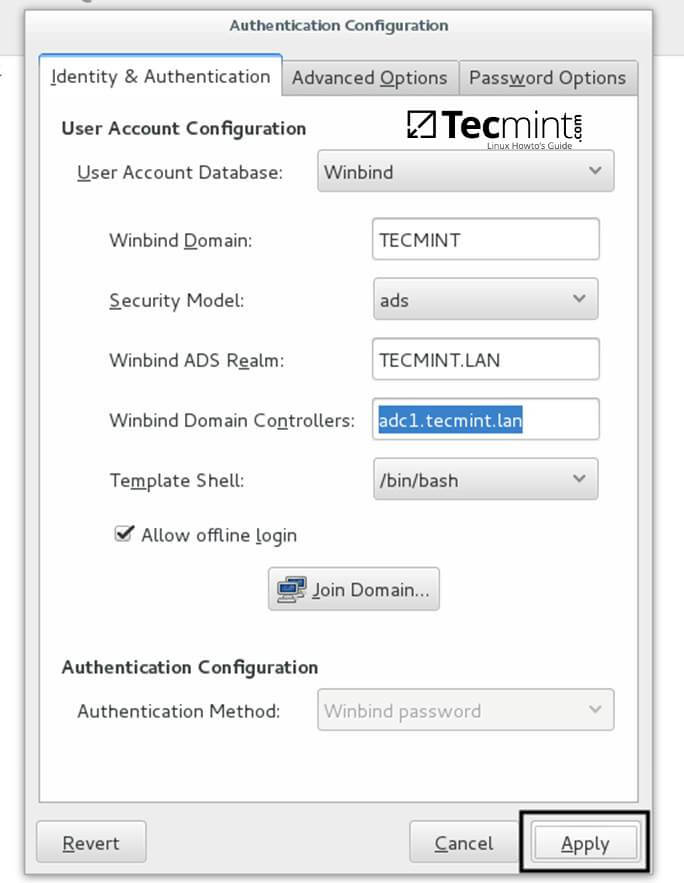
On Identity & Authentication tab.
- User Account Database = select Winbind
- Winbind Domain = YOUR_DOMAIN
- Security Model = ADS
- Winbind ADS Realm = YOUR_DOMAIN.TLD
- Domain Controllers = domain machines FQDN
- Template Shell = /bin/bash
- Allow offline login = checked
Authentication Configuration
On Advanced Options tab.
- Local Authentication Options = check Enable fingerprint reader support
- Other Authentication Options = check Create home directories on the first login

Authentication Advance Configuration
9. After you’ve added all required values, return to Identity & Authentication tab and hit on Join Domain button and the Save button from alert window to save settings.

Identity and Authentication

Save Authentication Configuration
10. After the configuration has been saved you will be asked to provide a domain administrator account in order to join the domain. Supply the credentials for a domain administrator user and hit OK button to finally join the domain.

Joining Winbind Domain
11. After your machine has been integrated into the realm, hit on Apply button to reflect changes, close all windows and reboot the machine.
Apply Authentication Configuration
12. In order to verify if the system has been joined to Samba4 AD DC open AD Users and Computers from a Windows machine with RSAT tools installed and navigate to your domain Computers container.
The name of your CentOS machine should be listed on the right plane.
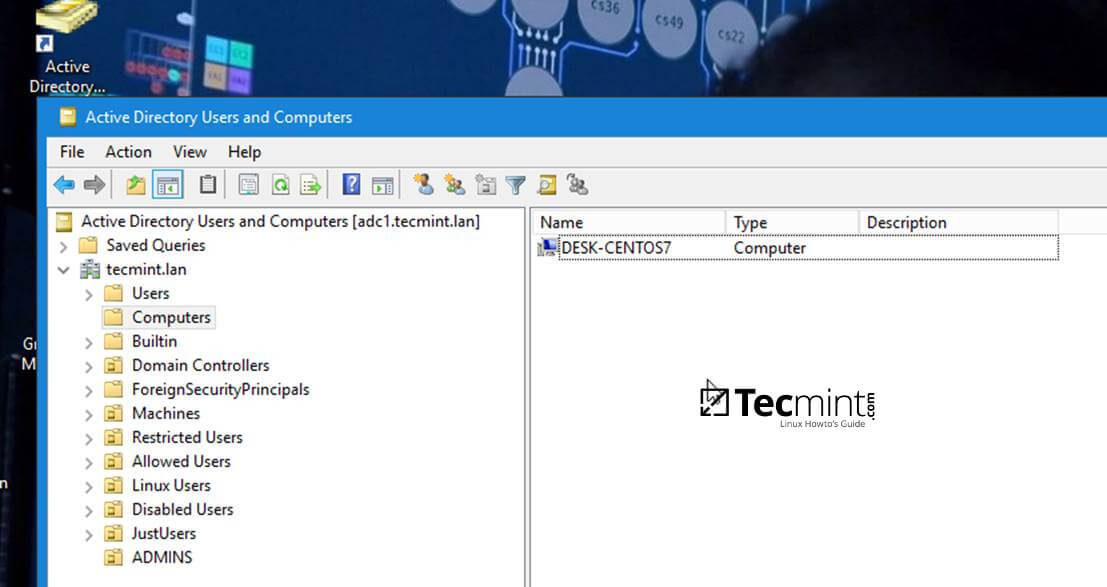
Active Directory Users and Computers
Step 4: Login to CentOS Desktop with a Samba4 AD DC Account
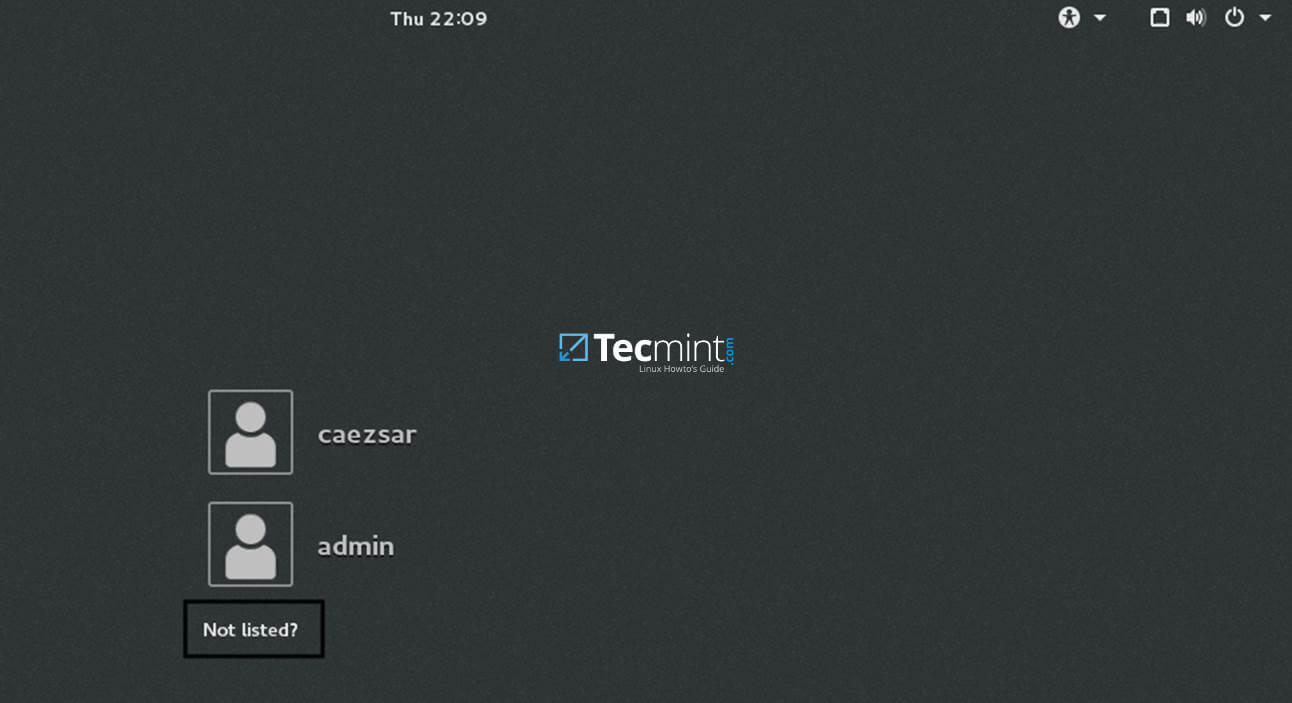
13. In order to login to CentOS Desktop hit on Not listed? link and add the username of a domain account preceded by the domain counterpart as illustrated below.
Domain\domain_account
or
Domain_user@domain.tld
Not listed Users

Enter Domain Username
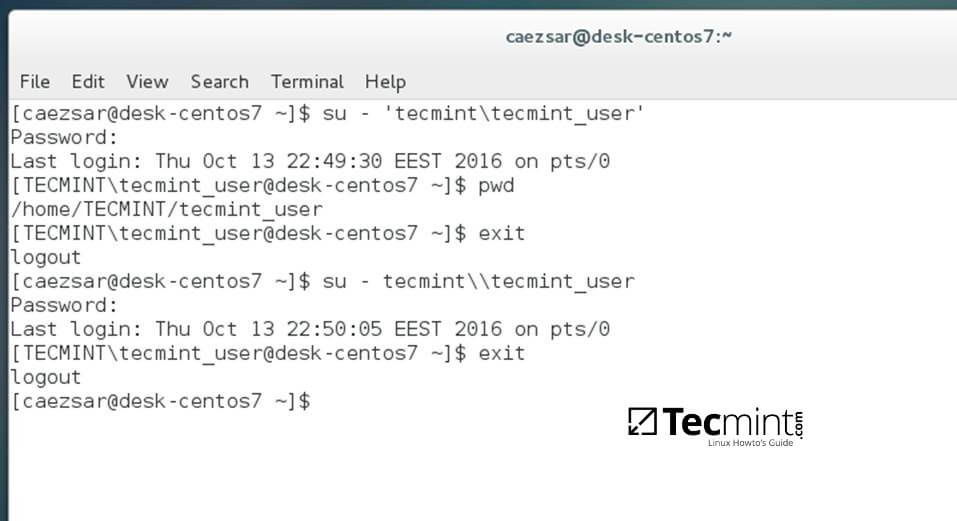
14. To authenticate with a domain account from command line in CentOS use one of the following syntaxes:
$ su - domain\domain_user
$ su - domain_user@domain.tld
Authenticate Domain Username

Authenticate Domain User Email
15. To add root privileges for a domain user or group, edit sudoers file using visudo command with root powers and add the following lines as illustrated on the below excerpt:
YOUR_DOMAIN\domain_username       		 ALL=(ALL:ALL) ALL  	#For domain users
%YOUR_DOMAIN\your_domain\  group      		 ALL=(ALL:ALL) ALL	#For domain groups

Assign Permission to User and Group
16. To display a summary about the domain controller use the following command:
$ sudo net ads info
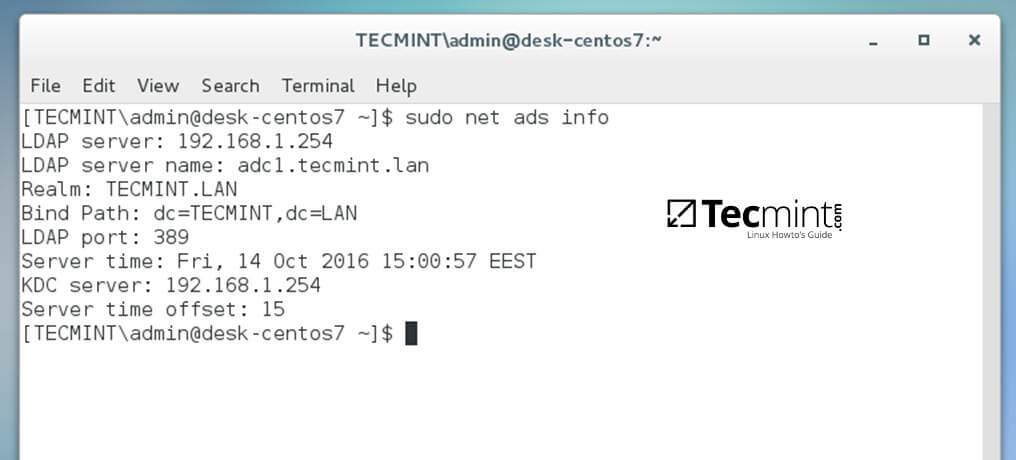
Check Domain Controller Info
17. In order to verify if the trust machine account created when CentOS was added to the Samba4 AD DC is functional and list domain accounts from command line install Winbind client by issuing the below command:
$ sudo yum install samba-winbind-clients
Then issue a series of checks against Samba4 AD DC by executing the following commands:
$ wbinfo -p #Ping domain
$ wbinfo -t #Check trust relationship
$ wbinfo -u #List domain users
$ wbinfo -g #List domain groups
$ wbinfo -n domain_account #Get the SID of a domain account

Get Samba4 AD DC Details
18. In case you want to leave the domain issue the following command against your domain name by using an domain account with administrator privileges:
$ sudo net ads leave your_domain -U domain_admin_username

Leave Domain from Samba4 AD
That’s all! Although this procedure is focused on joining CentOS 7 to a Samba4 AD DC, the same steps described in this documentation are also valid for integrating a CentOS 7 Desktop machine to a Microsoft Windows Server 2008 or 2012 domain.
How to Install iRedMail on CentOS 7 for Samba4 AD Integration – Part 10
This series of tutorials will guide you on how to integrate iRedMail installed on a CentOS 7 machine with a Samba4 Active Directory Domain Controller in order for domain accounts to send or receive mail via Thunderbird desktop client or via Roundcube web interface.
The CentOS 7 server where iRedMail will be installed will allow SMTP or mail routing services via ports 25 and 587 and will also serve as a mail delivery agent through Dovecot, providing POP3 and IMAP services, both secured with self-signed certificates issued on the installation process.
The recipient mailboxes will be stored on the same CentOS server along with the webmail user agent provided by Roundcube. Samba4 Active Directory will be used by iRedMail to query and authenticate recipient accounts against the realm, to create mail lists with the help of Active Directory groups and to control the mail accounts via Samba4 AD DC.
Requirements:
Step 1: Install iRedMail in CentOS 7
1. Before starting with iRedMail installation first make sure you have a fresh CentOS 7 operating system installed on your machine using the instructions provided by this guide:
2. Also, assure that the system is up-to-date with the latest security and packages updates by issuing the below command.
# yum update
3. The system will also need a FQDN hostname set by issuing the below command. Replace mail.tecmint.lan variable with your own custom FQDN.
# hostnamectl set-hostname mail.tecmint.lan
Verify system hostname with the below commands.
# hostname -s   # Short name
# hostname -f   # FQDN
# hostname -d   # Domain
# cat /etc/hostname  # Verify it with cat command
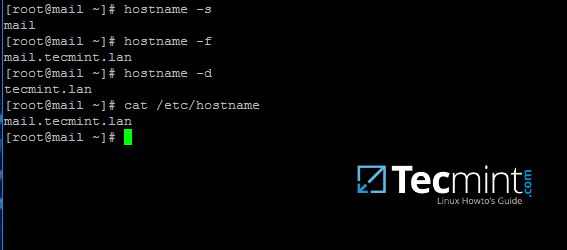
Verify CentOS 7 Hostname
4. Map the machine FQDN and short name against the machine loopback IP address by manually editing /etc/hosts file. Add the values as illustrated below and replace mail.tecmint.lan and mail values accordingly.
127.0.0.1 mail.tecmint.lan mail localhost localhost.localdomain
5. iRedMail technicians recommends that SELinux should be completely disabled. Disable SELinux by editing /etc/selinux/config file and set SELINUX parameter from permissive to disabled as illustrated below.
SELINUX=disabled
Reboot the machine to apply new SELinux policies or run setenforce with 0 parameter to force SELinux to instantly disable.
# reboot
OR
# setenforce 0
6. Next, install the following packages that will come in-handy later for system administration:
# yum install bzip2 net-tools bash-completion wget
7. In order to install iRedMail, first go to the download page http://www.iredmail.org/download.html and grab the latest archive version of the software by issuing the below command.
# wget https://bitbucket.org/zhb/iredmail/downloads/iRedMail-0.9.6.tar.bz2
8. After the download finishes, extract the compressed archive and enter the extracted iRedMail directory by issuing the following commands.
# tar xjf iRedMail-0.9.6.tar.bz2
# cd iRedMail-0.9.6/
# ls
9. Start the installation process by executing iRedMail shell script with the following command. From now on a series of questions will be asked by the installer.
# bash iRedMail.sh
10. On the first welcome prompt hit on Yes to proceed further with the installation.
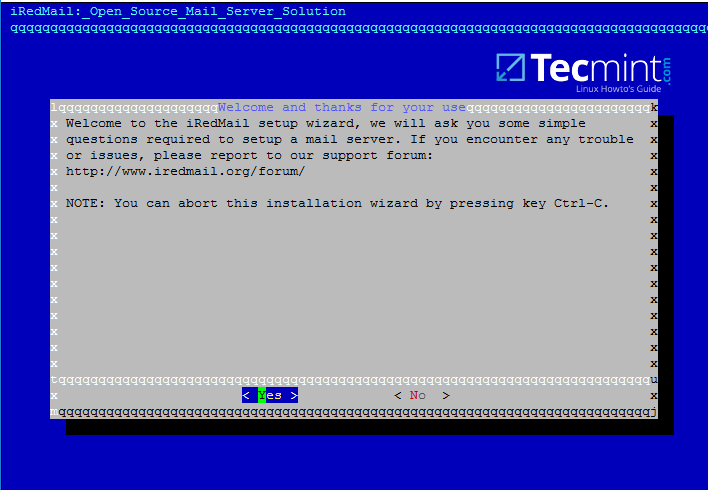
iRedMail Setup Wizard
11. Next, choose the location where all the mail will be stored. The default directory that iRedMail uses to store mailboxes is /var/vmail/ system path.
If this directory is located under a partition with enough storage to host mail for all your domain accounts then hit on Next to continue.
Otherwise change the default location with a different directory in case if you’ve configured a larger partition dedicated to mail storage.

iRedMail Mail Storage Path
12. On the next step choose the frontend web server through which you will interact with iRedMail. iRedMail administration panel will be completely disabled later, so we will use the frontend web server only to access accounts mail via Roundcube web panel.
If you don’t have thousands of mail accounts per hour accessing the webmail interface you should go with Apache web server do to its flexibility and easy management.

iRedMail Preferred Web Server
13. On this step choose OpenLDAP backend database for compatibility reasons with Samba4 domain controller and hit Next to continue, although we won’t use this OpenLDAP database later once we’ll integrate iRedMail to Samba domain controller.

iRedMail LDAP Backend
14. Next, specify your Samba4 domain name for LDAP suffix as illustrated on the image below and hit Next to continue.
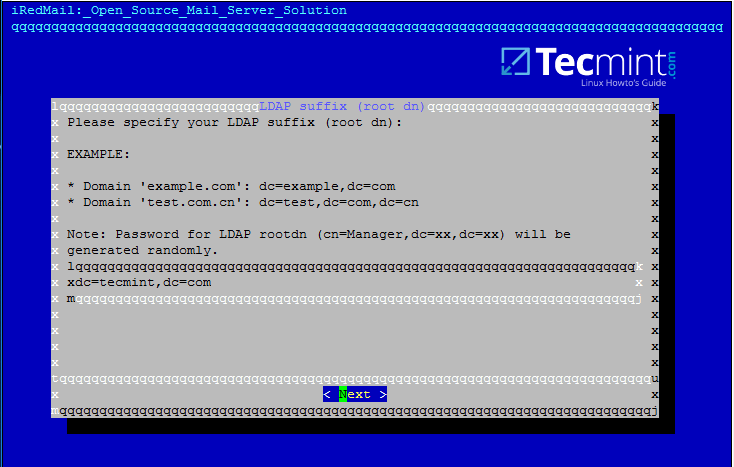
iRedMail LDAP Suffix
15. On the next prompt enter your domain name only and hit Next to move on. Replace tecmint.lan value accordingly.

iRedMail Mail Domain
16. Now, setup a password for postmaster@yourdomain.tld administrator and hit Next to continue.
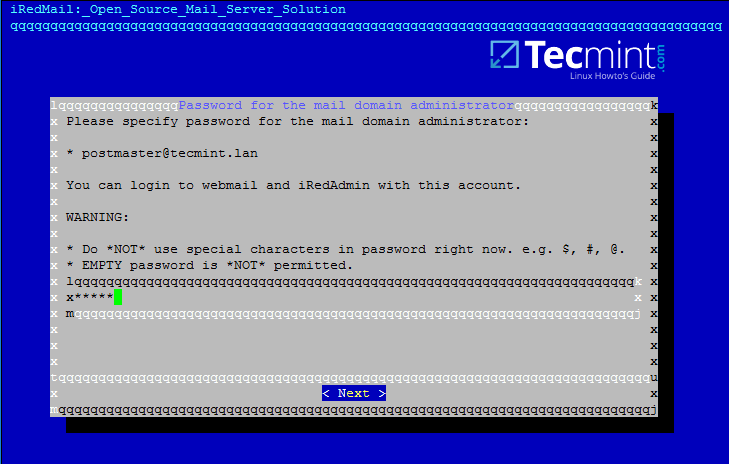
iRedMail Mail Domain Administrator
17. Next, choose from the list the optional components you want to integrate with your mail server. I strongly recommend to install Roundcube in order to provide a web interface for domain accounts to access mail, although Roundcube can be installed and configured on a different machine for this task in order to free mail server resources in case of high loads.
For local domains with restricted internet access and especially while we’re using domain integration the other components are not very useful, except Awstats in case you need mail analysis.
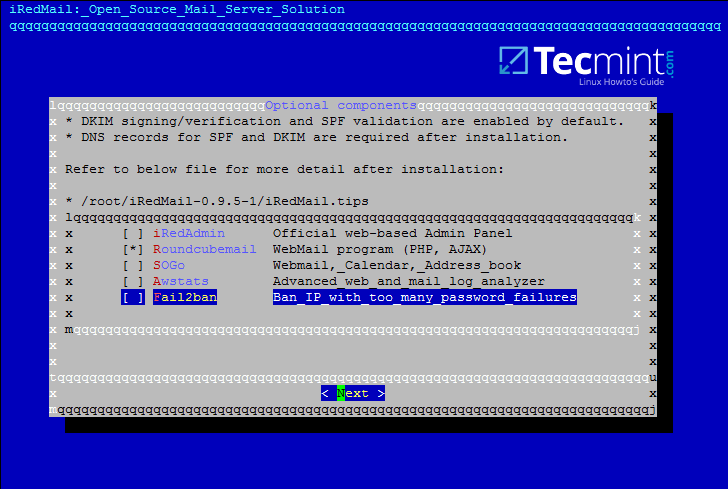
iRedMail Optional Components
18. On the next review screen type Y in order to apply configuration and start the installation process.
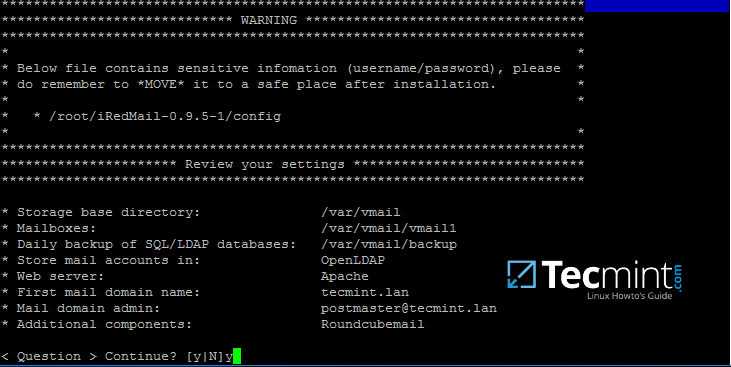
iRedMail Configuration Changes
19. Finally, accept iRedMail scripts to automatically configure your machine firewall and MySQL configuration file by typing yes for all questions.

iRedMail System Configuration
20. After the installation finishes the installer will provide some sensitive information, such as iRedAdmin credentials, web panel URL addresses and the file location with all parameters used at the installation process.

iRedMail Installation Summary
Read the displayed information above carefully and reboot the machine in order to enable all mail services by issuing the following command.
# init 6
21. After the system reboots, login with an account with root privileges or as root and list all network sockets and their associated programs your mail server listens on by issuing the following command.
From the socket list you will see that your mail server covers almost all services required by a mail server to properly function: SMTP/S, POP3/S, IMAP/S and antivirus along with spam protection.
# netstat -tulpn
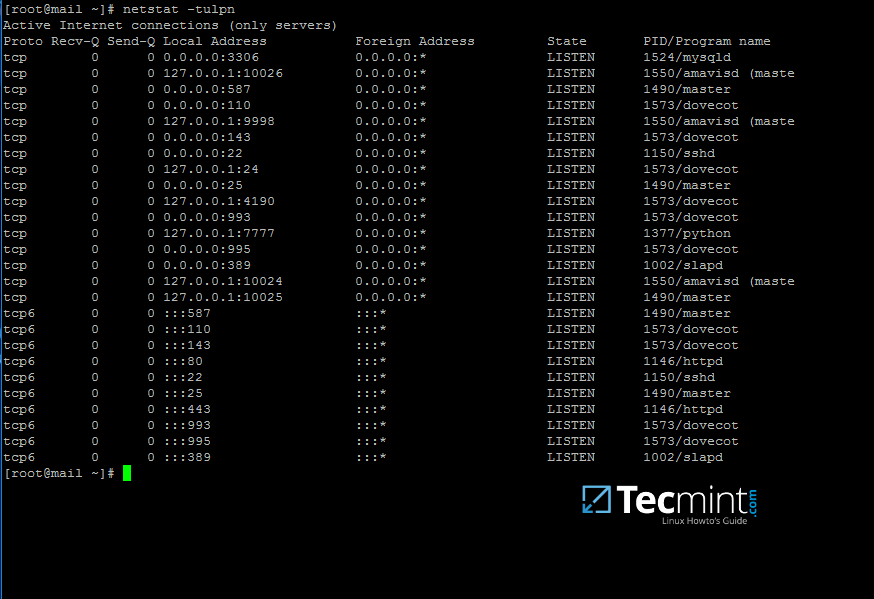
iRedMail Network Sockets
22. In order to view the location of all configuration files iRedMail has modified and the credentials used by iRedMail during the installation process for database administration, mail admin account and other accounts, display the contents of iRedMail.tips file.
The file is located in the directory where you’ve initially extracted the installation archive. Be aware that you should move and protect this file because it contains sensitive information about your mail server.
# less iRedMail-0.9.6/iRedMail.tips
23. The file mentioned above which contain details about your mail server will also be automatically mailed to the mail server administrator account, represented by the postmaster account.
The webmail can be accessed securely via HTTPS protocol by typing your machine IP address in a browser. Accept the error generated in browser by the iRedMail self-signed web certificate and log in with the password chosen for postmaster@your_domain.tld account during the initial installation. Read and store this e-mail to a safe mailbox.
https://192.168.1.254

iRedMail Account Login
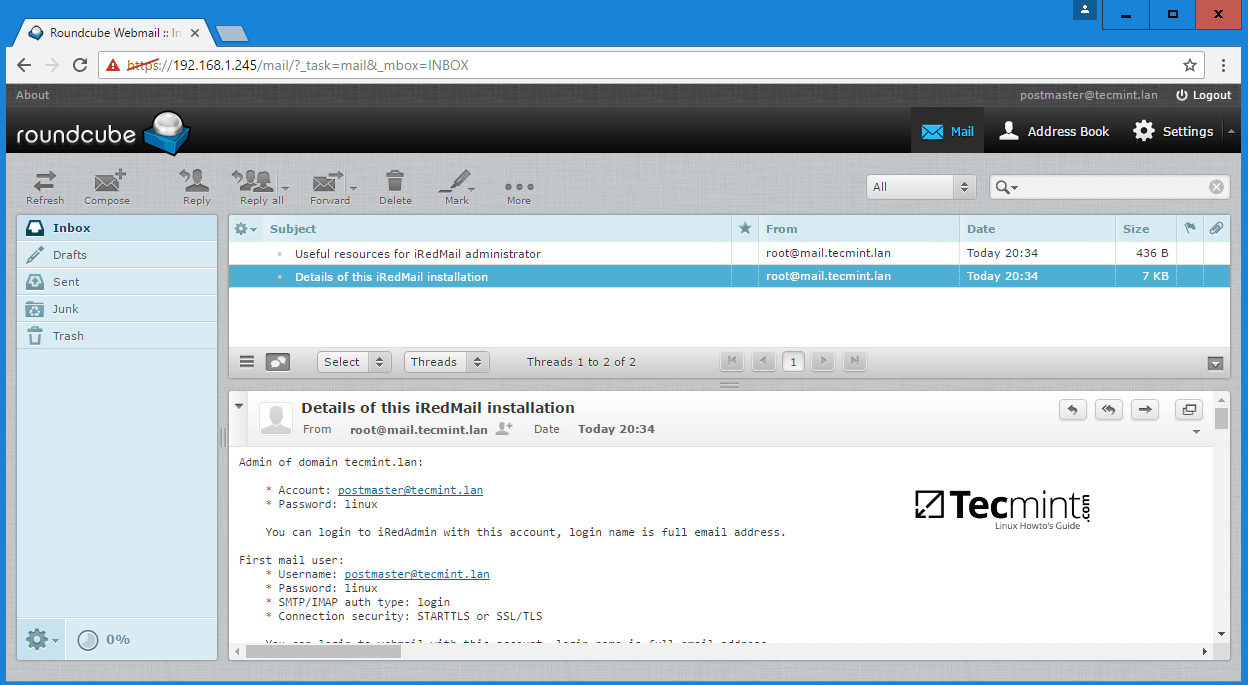
iRedMail Web Mail
That’s all! By now, you’ll have a full mail server configured on your premises which operates on its own, but not yet integrated with Samba4 Active Directory Domain Controller services.
On the next part we will see how to tamper iRedMail services (postfix, dovecot and roundcube configuration files) in order to query domain accounts, send, receive and read mail.
How to Configure and Integrate iRedMail Services to Samba4 AD DC – Part 11
In this tutorial will learn how to modify iRedMail main daemons which provide mail services, respectively, Postfix used for mail transfer and Dovecot which delivers mail to accounts mailboxes, in order to integrate them both in Samba4 Active Directory Domain Controller.
By integrating iRedMail to a Samba4 AD DC you will benefit from the following features: user authentication, management, and status via Samba AD DC, create mail lists with the help of AD groups and Global LDAP Address Book in Roundcube.
Requirements
Step 1: Prepare iRedMail System for Sama4 AD Integration
1. On the first step, you need to assign a static IP address for your machine in case you’re using a dynamic IP address provided by a DHCP server.
Run ifconfig command to list your machine network interfaces names and edit the proper network interface with your custom IP settings by issuing nmtui-edit command against the correct NIC.
Run nmtui-edit command with root privileges.
# ifconfig
# nmtui-edit eno16777736
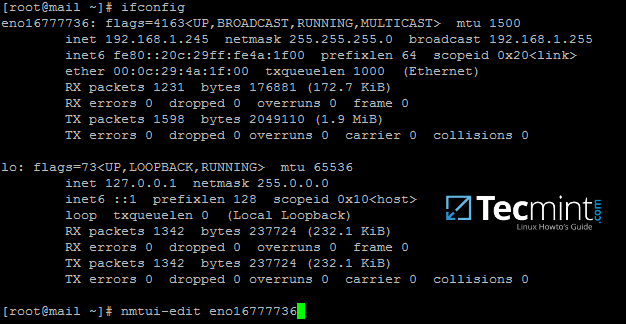
Find Network Interface Name
2. Once the network interface is opened for editing, add the proper static IP settings, make sure you add the DNS servers IP addresses of your Samba4 AD DC and the name of your domain in order to query the realm from your machine. Use the below screenshot as a guide.
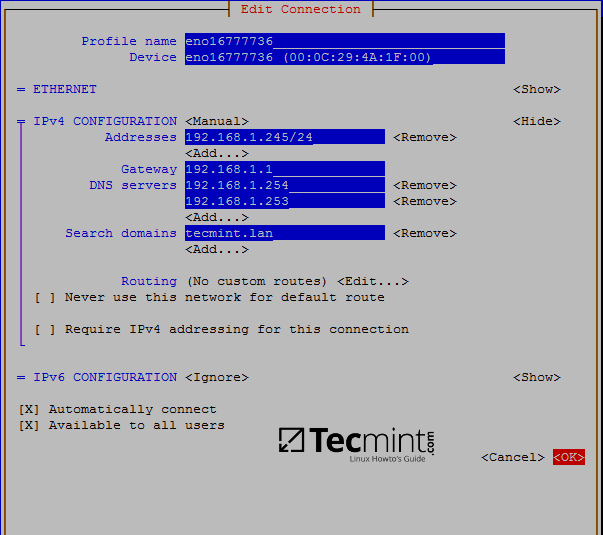
Configure Network Settings
3. After you finish configuring the network interface, restart the network daemon to apply changes and issue a series of ping commands against the domain name and samba4 domain controllers FQDNs.
# systemctl restart network.service
# cat /etc/resolv.conf     # verify DNS resolver configuration if the correct DNS servers IPs are queried for domain resolution
# ping -c2 tecmint.lan     # Ping domain name
# ping -c2 adc1            # Ping first AD DC
# ping -c2 adc2            # Ping second AD DC
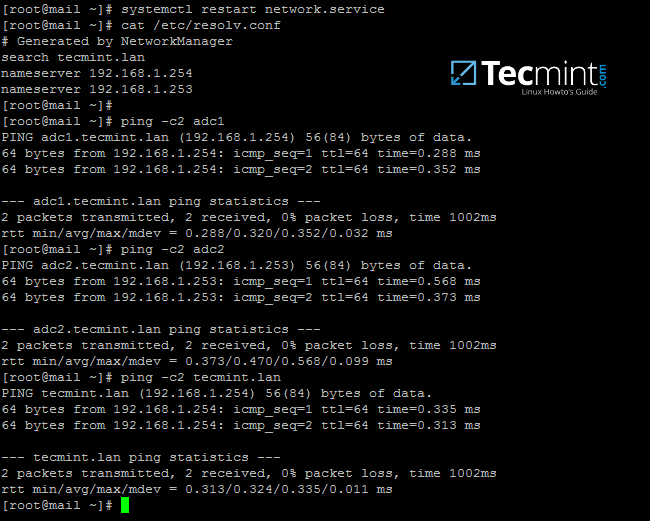
Verify Network DNS Configuration
4. Next, sync time with samba domain controller by installing the ntpdate package and query Samba4 machine NTP server by issuing the below commands:
# yum install ntpdate
# ntpdate -qu tecmint.lan      # querry domain NTP servers
# ntpdate tecmint.lan          # Sync time with the domain
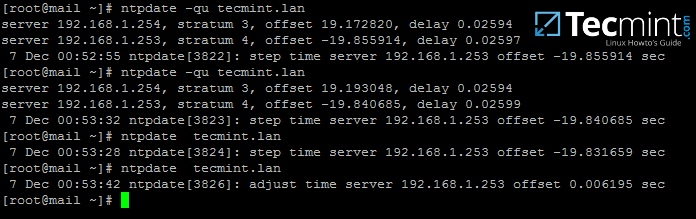
Sync Time with Samba NTP Server
5. You might want the local time to be automatically synchronized with samba AD time server. In order to achieve this setting, add a scheduled job to run every hour by issuing crontab -e command and append the following line:
0 */1 * * * /usr/sbin/ntpdate tecmint.lan > /var/log/ntpdate.lan 2>&1
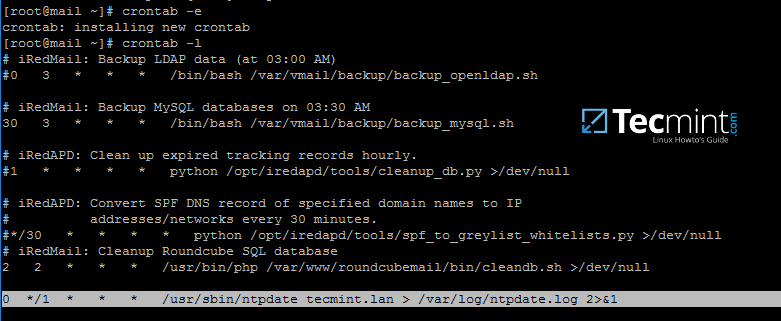
Auto Sync Time with Samba NTP
Step 2: Prepare Samba4 AD DC for iRedMail Integration
6. Now, move to a Windows machine with RSAT tools installed to manage Samba4 Active Directory as described in this tutorial here.
Open DNS Manager, go to your domain Forward Lookup Zones and add a new A record, an MX record and a PTR record to point to your iRedMail system IP address. Use the below screenshots as a guide.
Add A record (replace the name and the IP Address of iRedMail machine accordingly).
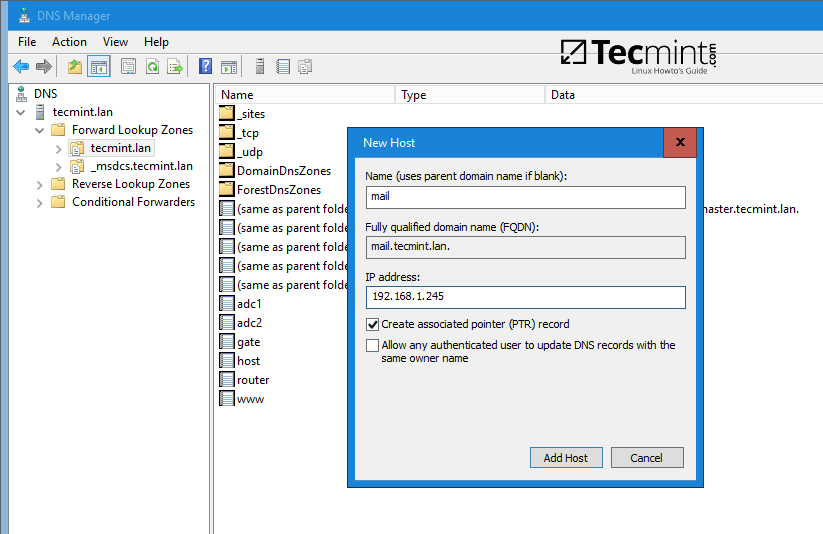
Create DNS A Record for iRedMail
Add MX record (leave child domain blank and add a 10 priority for this mail server).
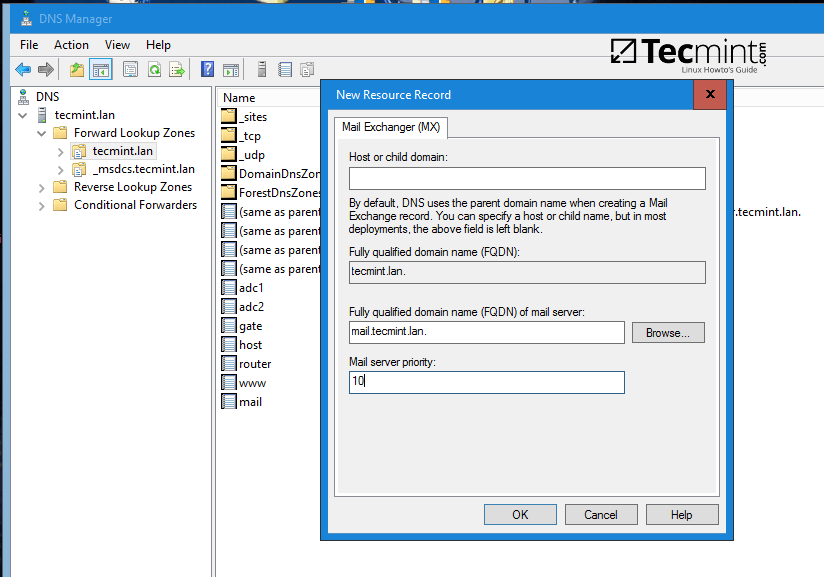
Create DNS MX Record for iRedMail
Add PTR record by expanding to Reverse Lookup Zones (replace IP address of iRedMail server accordingly). In case you haven’t configured a reverse zone for your domain controller so far, read the following tutorial:
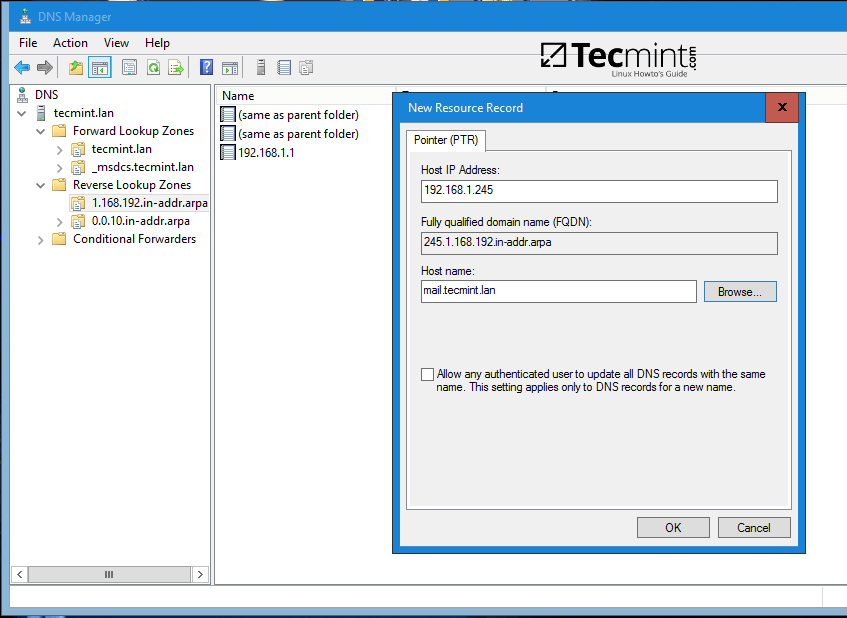
Create DNS PTR Record for iRedMail
7. After you’ve added the basic DNS records which make a mail server to function properly, move to the iRedMail machine, install bind-utils package and query the newly added mail records as suggested on the below excerpt.
Samba4 AD DC DNS server should respond with the DNS records added in the previous step.
# yum install bind-utils
# host tecmint.lan
# host mail.tecmint.lan
# host 192.168.1.245
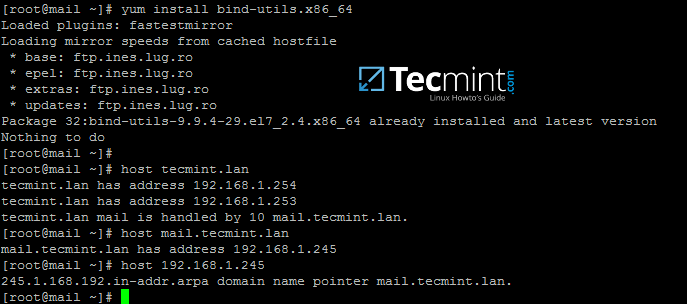
Install Bind and Query Mail Records
From a Windows machine, open a Command Prompt window and issue nslookup command against the above mail server records.
8. As a final pre-requirement, create a new user account with minimal privileges in Samba4 AD DC with the name vmail, choose a strong password for this user and make sure the password for this user never expires.
The vmail user account will be used by iRedMail services to query Samba4 AD DC LDAP database and pull the email accounts.
To create the vmail account, use ADUC graphical tool from a Windows machine joined to the realm with RSAT tools installed as illustrated on the below screenshots or use samba-tool command line directly from a domain controller as explained on the following topic.
In this guide, we’ll use the first method mentioned above.
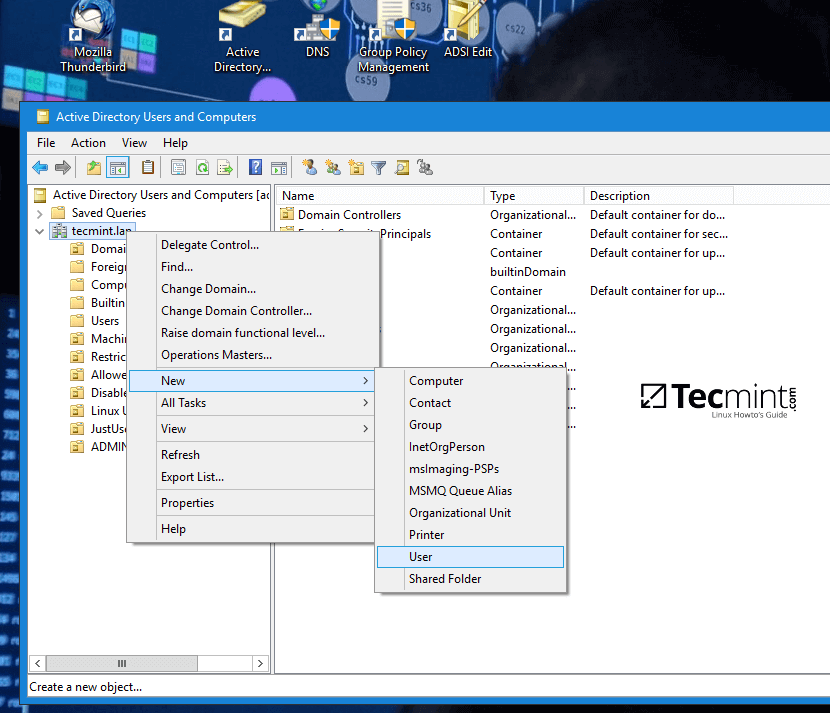
Active Directory Users and Computers
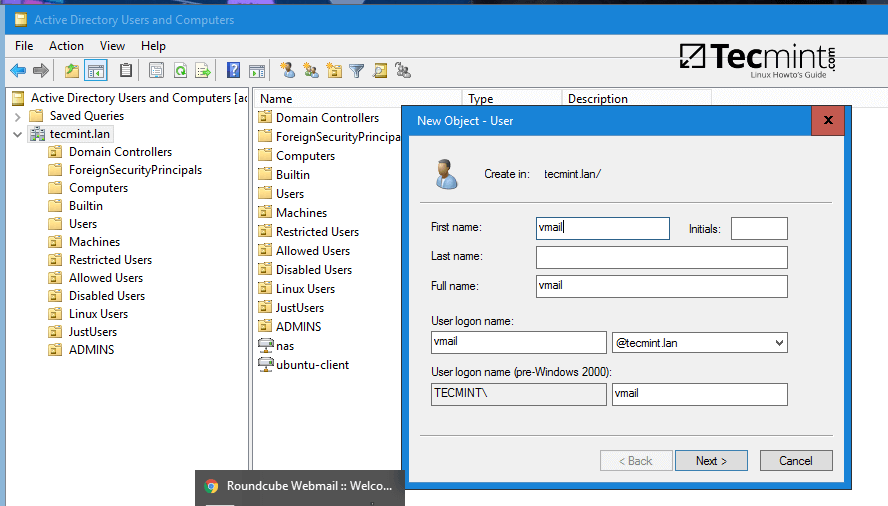
Create New User for iRedMail
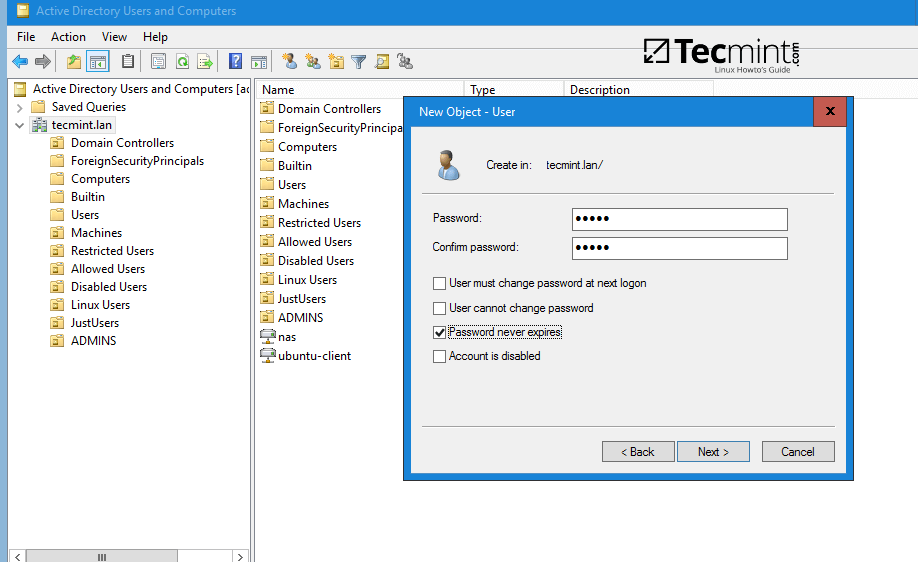
Set Strong Password for User
9. From iRedMail system, test the vmail user ability to query Samba4 AD DC LDAP database by issuing the below command. The returned result should be a total number of objects entries for your domain as illustrated on the below screenshots.
# ldapsearch -x -h tecmint.lan -D 'vmail@tecmint.lan' -W -b 'cn=users,dc=tecmint,dc=lan'
Note: Replace the domain name and the LDAP base dn in Samba4 AD (‘cn=users,dc=tecmint,dc=lan‘) accordingly.

Query Samba4 AD DC LDAP
Step 3: Integrate iRedMail Services to Samba4 AD DC
10. Now it’s time to tamper with iRedMail services (Postfix, Dovecot and Roundcube) in order to query Samba4 Domain Controller for mail accounts.
The first service to be modified will be the MTA agent, Postfix. Issue the following commands to disable a series of MTA settings, add your domain name to Postfix local domain and mailbox domains and use Dovecot agent to deliver received mails locally to user mailboxes.
# postconf -e virtual_alias_maps=' '
# postconf -e sender_bcc_maps=' '
# postconf -e recipient_bcc_maps= ' '
# postconf -e relay_domains=' '
# postconf -e relay_recipient_maps=' '
# postconf -e sender_dependent_relayhost_maps=' '
# postconf -e smtpd_sasl_local_domain='tecmint.lan'	#Replace with your own domain
# postconf -e virtual_mailbox_domains='tecmint.lan'	#Replace with your own domain
# postconf -e transport_maps='hash:/etc/postfix/transport'
# postconf -e smtpd_sender_login_maps='proxy:ldap:/etc/postfix/ad_sender_login_maps.cf'  # Check SMTP senders
# postconf -e virtual_mailbox_maps='proxy:ldap:/etc/postfix/ad_virtual_mailbox_maps.cf'  # Check local mail accounts
# postconf -e virtual_alias_maps='proxy:ldap:/etc/postfix/ad_virtual_group_maps.cf'  # Check local mail lists
# cp /etc/postfix/transport /etc/postfix/transport.backup	# Backup transport conf file
# echo "tecmint.lan dovecot" > /etc/postfix/transport		# Add your domain with dovecot transport
# cat /etc/postfix/transport					# Verify transport file
# postmap hash:/etc/postfix/transport
11. Next, create Postfix /etc/postfix/ad_sender_login_maps.cf configuration file with your favorite text editor and add the below configuration.
server_host     = tecmint.lan
server_port     = 389
version         = 3
bind            = yes
start_tls       = no
bind_dn         = vmail@tecmint.lan
bind_pw         = ad_vmail_account_password
search_base     = dc=tecmint,dc=lan
scope           = sub
query_filter    = (&(userPrincipalName=%s)(objectClass=person)(!(userAccountControl:1.2.840.113556.1.4.803:=2)))
result_attribute= userPrincipalName
debuglevel      = 0
12. Create /etc/postfix/ad_virtual_mailbox_maps.cf with the following configuration.
server_host     = tecmint.lan
server_port     = 389
version         = 3
bind            = yes
start_tls       = no
bind_dn         = vmail@tecmint.lan
bind_pw         = ad_vmail_account_password
search_base     = dc=tecmint,dc=lan
scope           = sub
query_filter    = (&(objectclass=person)(userPrincipalName=%s))
result_attribute= userPrincipalName
result_format   = %d/%u/Maildir/
debuglevel      = 0
13. Create /etc/postfix/ad_virtual_group_maps.cf with the below configuration.
server_host     = tecmint.lan
server_port     = 389
version         = 3
bind            = yes
start_tls       = no
bind_dn         = vmail@tecmint.lan
bind_pw         = ad_vmail_account_password
search_base     = dc=tecmint,dc=lan
scope           = sub
query_filter    = (&(objectClass=group)(mail=%s))
special_result_attribute = member
leaf_result_attribute = mail
result_attribute= userPrincipalName
debuglevel      = 0
On all three configuration files replace the values from server_host, bind_dn, bind_pw and search_base to reflect your own domain custom settings.
14. Next, open Postfix main configuration file and search and disable iRedAPD check_policy_service and smtpd_end_of_data_restrictions by adding a comment # in front of the following lines.
# nano /etc/postfix/main.cf
Comment the following lines:
#check_policy_service inet:127.0.0.1:7777
#smtpd_end_of_data_restrictions = check_policy_service inet:127.0.0.1:7777
15. Now, verify Postfix binding to Samba AD using an existing domain user and a domain group by issuing a series of queries as presented in the following examples.
The result should be similar as illustrated on the bellow screenshot.
# postmap -q tecmint_user@tecmint.lan ldap:/etc/postfix/ad_virtual_mailbox_maps.cf
# postmap -q tecmint_user@tecmint.lan ldap:/etc/postfix/ad_sender_login_maps.cf
# postmap -q linux_users@tecmint.lan ldap:/etc/postfix/ad_virtual_group_maps.cf

Verify Postfix Binding to Samba AD
Replace AD user and group accounts accordingly. Also, assure that the AD group you’re using has some AD users members assigned to it.
16. On the next step modify Dovecot configuration file in order to query Samba4 AD DC. Open file /etc/dovecot/dovecot-ldap.conf for editing and add the following lines.
hosts           = tecmint.lan:389
ldap_version    = 3
auth_bind       = yes
dn              = vmail@tecmint.lan
dnpass          = ad_vmail_password
base            = dc=tecmint,dc=lan
scope           = subtree
deref           = never
user_filter     = (&(userPrincipalName=%u)(objectClass=person)(!(userAccountControl:1.2.840.113556.1.4.803:=2)))
pass_filter     = (&(userPrincipalName=%u)(objectClass=person)(!(userAccountControl:1.2.840.113556.1.4.803:=2)))
pass_attrs      = userPassword=password
default_pass_scheme = CRYPT
user_attrs      = =home=/var/vmail/vmail1/%Ld/%Ln/Maildir/,=mail=maildir:/var/vmail/vmail1/%Ld/%Ln/Maildir/
The mailbox of a Samba4 AD account will be stored in /var/vmail/vmail1/your_domain.tld/your_domain_user/Maildir/ location on the Linux system.
17. Make sure pop3 and imap protocols are enabled in dovecot main configuration file. Verify if quota and acl mail plugins are also enabled by opening file /etc/dovecot/dovecot.conf and check if these values are present.

Enable Pop3 and Imap in Dovecot
18. Optionally, if you want to set a global hard quota to not exceed the maximum of 500 MB of storage for each domain user, add the following line in /etc/dovecot/dovecot.conf file.
quota_rule = *:storage=500M
19. Finally, in order to apply all changes made so far, restart and verify the status of Postfix and Dovecot daemons by issuing the below commands with root privileges.
# systemctl restart postfix dovecot
# systemctl status postfix dovecot
20. In order to test mail server configuration from the command line using IMAP protocol use telnet or netcat command as presented in the below example.
# nc localhost 143
a1 LOGIN ad_user@your_domain.tld ad_user_password
a2 LIST “” “*”
a3 LOGOUT
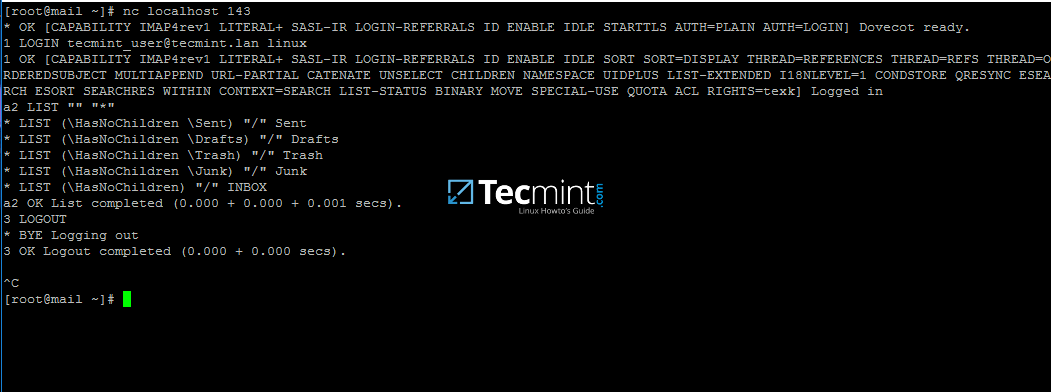
Test iRedMail Configuration
If you can perform an IMAP login from the command line with a Samba4 user account then iRedMail server seems ready to send and receive mail for Active Directory accounts.
On the next tutorial will discuss how to integrate Roundcube webmail with Samba4 AD DC and enable Global LDAP Address Book, customize Roudcube, access Roundcube web interface from a browser and disable some unneeded iRedMail services.
How to Integrate iRedMail Roundcube with Samba4 AD DC – Part 12
Roundcube, one of the most used webmail user agent in Linux, offers a modern web interface for end users to interact with all mail services in order to read, compose and send e-mails. Roundcube supports a variety of mail protocols, including the secured ones, such IMAPS, POP3S or submission.
In this topic we’ll discuss how to configure Roundcube in iRedMail with IMAPS and submission secured ports to retrieve and send emails for Samba4 AD accounts, how to access iRedMail Roundcube web interface from a browser and add a web address alias, how to enable Samba4 AD integration for Global LDAP Address Book and how to disable some unneeded iRedMail services.
Requirements
- How to Install iRedMail on CentOS 7 for Samba4 AD Integration
- Configure iRedMail on CentOS 7 for Samba4 AD Integration
Step 1: Declare E-mail Address for Domain Accounts in Samba4 AD DC
1. In order send and receive mail for Samba4 AD DC domain accounts, you need to edit each user account and explicitly set email filed with the proper e-mail address by opening ADUC tool from a Windows machine with RSAT tools installed and joined to Samba4 AD as illustrated in the below image.
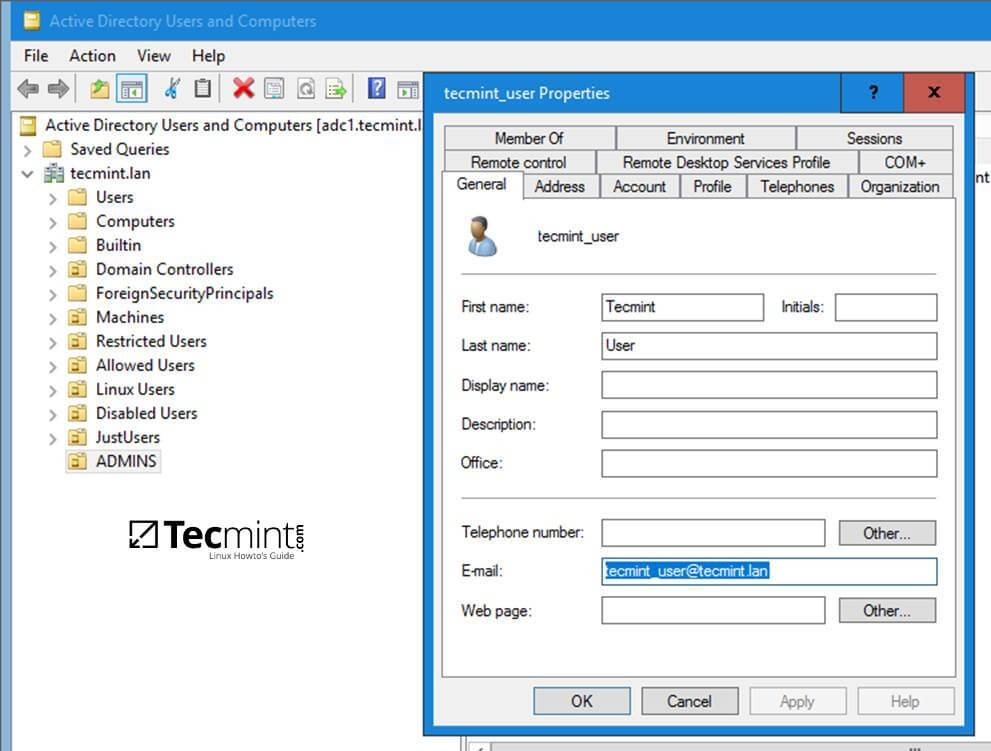
Add Email Account to Join Samba4 AD DC
2. Similarly, to use mail lists, you need to create groups in ADUC, add the corresponding e-mail address for each group and assign the proper user accounts as members of the group.
With this setup created as a mail list, all members mailboxes of a Samba4 AD group will receive mail destined for an AD group e-mail address. Use the below screenshots as a guide to declare e-mail filed for a Samba4 group account and add domain users as members of the group.
Make sure all accounts members added to a group have their e-mail address declared.
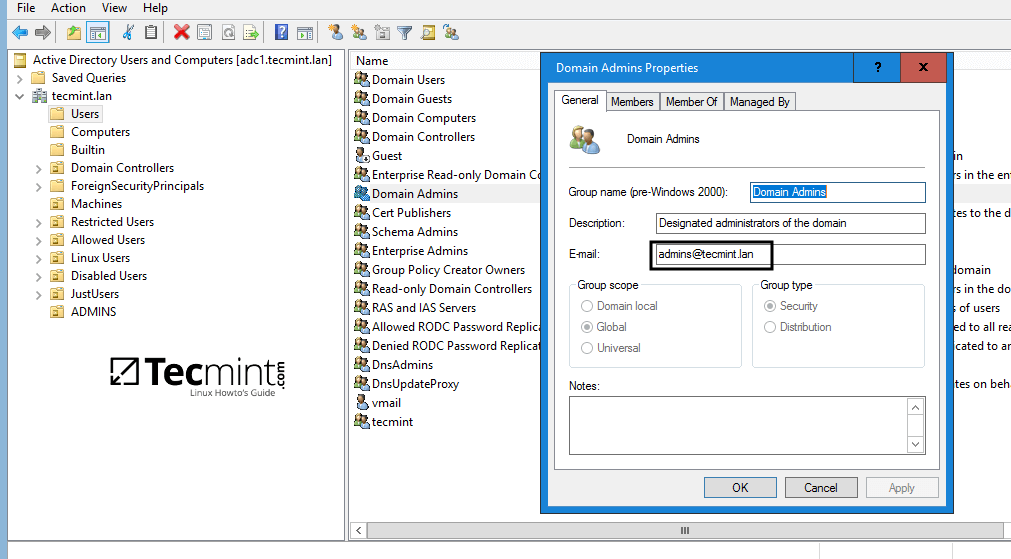
Create Group Admin for Samba4 AD DC
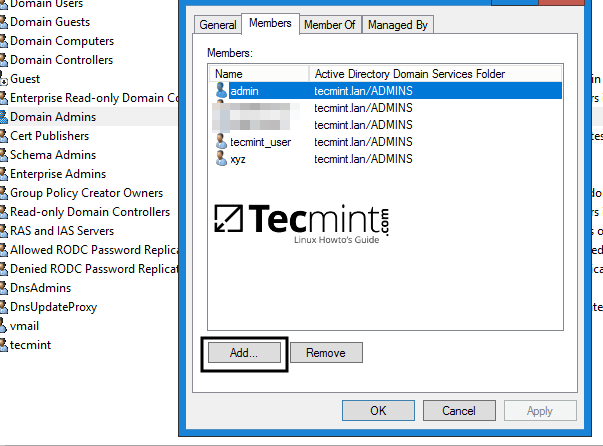
Add Users to Group
In this example, all mails sent to admins@tecmint.lan e-mail address declared for ‘Domain Admins’ group will be received by each member mailbox of this group.
3. An alternative method that you can use to declare the e-mail address for a Samba4 AD account is by creating a user or a group with samba-tool command line directly from one of the AD DC console and specify the e-mail address with the --mail-address flag.
Use one of the following command syntax to create a user with e-mail address specified:
# samba-tool user add --mail-address=user_email@domain.tld --surname=your_surname --given-name=your_given_name your_ad_user
Create a group with e-mail address specified:
# samba-tool group add --mail-address=group_email@domain.tld your_ad_group
To add members to a group:
# samba-tool group addmembers your_group user1,user2,userX
To list all available samba-tool command fields for a user or a group use the following syntax:
# samba-tool user add -h
# samba-tool group add -h
Step 3: Secure Roundcube Webmail
4. Before modifying Roundcube configuration file, first, use netstat command piped through egrep filter to list the sockets that Dovecot and Postfix listen to and assure that the properly secured ports (993 for IMAPS and 587 for submission) are active and enabled.
# netstat -tulpn| egrep 'dovecot|master'
5. To enforce mail reception and transfer between Roundcube and iRedMail services on secured IMAP and SMTP ports, open Roundcube configuration file located in /var/www/roundcubemail/config/config.inc.php and make sure you change the following lines, for localhost in this case, as shown in the below excerpt:
// For IMAPS
$config['default_host'] = 'ssl://127.0.0.1';
$config['default_port'] = 993;
$config['imap_auth_type'] = 'LOGIN';

// For SMTP
$config['smtp_server'] = 'tls://127.0.0.1';
$config['smtp_port'] = 587;
$config['smtp_user'] = '%u';
$config['smtp_pass'] = '%p';
$config['smtp_auth_type'] = 'LOGIN';
This setup is highly recommended in case Roudcube is installed on a remote host than the one that provides mail services (IMAP, POP3 or SMTP daemons).
6. Next, don’t close the configuration file, search and make the following small changes in order for Roundcube to be visited only via HTTPS protocol, to hide the version number and to automatically append the domain name for accounts who login in the web interface.
$config['force_https'] = true;
$config['useragent'] = 'Your Webmail'; // Hide version number
$config['username_domain'] = 'domain.tld'
7. Also, disable the following plugins: managesieve and password by adding a comment (//) in front of the line that starts with $config[‘plugins’].
Users will change their password from a Windows or Linux machine joined to Samba4 AD DC once they login and authenticate to the domain. A sysadmin will globally manage all sieve rules for domain accounts.
// $config['plugins'] = array('managesieve', 'password');
8. Finally, save and close the configuration file and visit Roundcube Webmail by opening a browser and navigate to iRedMail IP address or FQDN/mail location via HTTPS protocol.
The first time when you visit Roundcube an alert should appear on the browser due to the Self-Signed Certificate the web server uses. Accept the certificate and login with a Samba AD account credentials.
https://iredmail-FQDN/mail
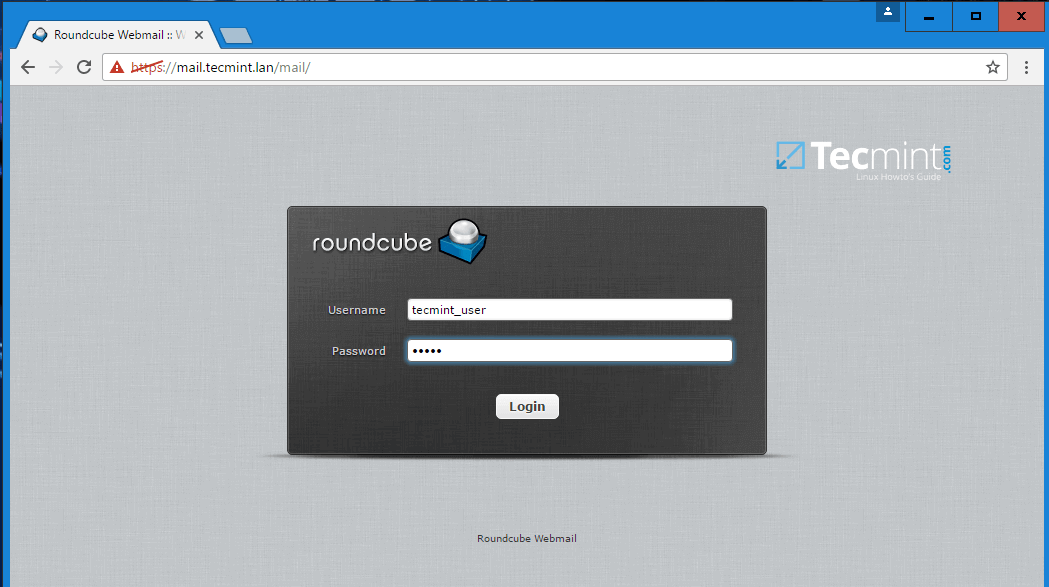
Roundcube Webmail Login
Step 3: Enable Samba AD Contacts in Roundcube
9. To configure Samba AD Global LDAP Address Book to appear Roundcube Contacts, open Roundcube configuration file again for editing and make the following changes:
Navigate to the bottom of the file and identify the section that begins with ‘# Global LDAP Address Book with AD’, delete all its content until the end of the file and replace it with the following code block:
# Global LDAP Address Book with AD.
#
$config['ldap_public']["global_ldap_abook"] = array(
    'name'          => 'tecmint.lan',
    'hosts'         => array("tecmint.lan"),
    'port'          => 389,
    'use_tls'       => false,
    'ldap_version'  => '3',
    'network_timeout' => 10,
    'user_specific' => false,

    'base_dn'       => "dc=tecmint,dc=lan",
    'bind_dn'       => "vmail@tecmint.lan",
    'bind_pass'     => "your_password",
    'writable'      => false,

    'search_fields' => array('mail', 'cn', 'sAMAccountName', 'displayname', 'sn', 'givenName'),

    'fieldmap' => array(
        'name'        => 'cn',
        'surname'     => 'sn',
        'firstname'   => 'givenName',
        'title'       => 'title',
        'email'       => 'mail:*',
        'phone:work'  => 'telephoneNumber',
        'phone:mobile' => 'mobile',

        'department'  => 'departmentNumber',
        'notes'       => 'description',

    ),
    'sort'          => 'cn',
    'scope'         => 'sub',
    'filter' => '(&(mail=*)(|(&(objectClass=user)(!(objectClass=computer)))(objectClass=group)))',
    'fuzzy_search'  => true,
    'vlv'           => false,
    'sizelimit'     => '0',
    'timelimit'     => '0',
    'referrals'     => false,
);
On this block of code replace name, hosts, base_dn, bind_dn and bind_pass values accordingly.
10. After you’ve made all the required changes, save and close the file, login to Roundcube webmail interface and go to Address Book menu.
Hit on your Global Address Book chosen name and a contact list of all domain accounts (users and groups) with their specified e-mail address should be visible.
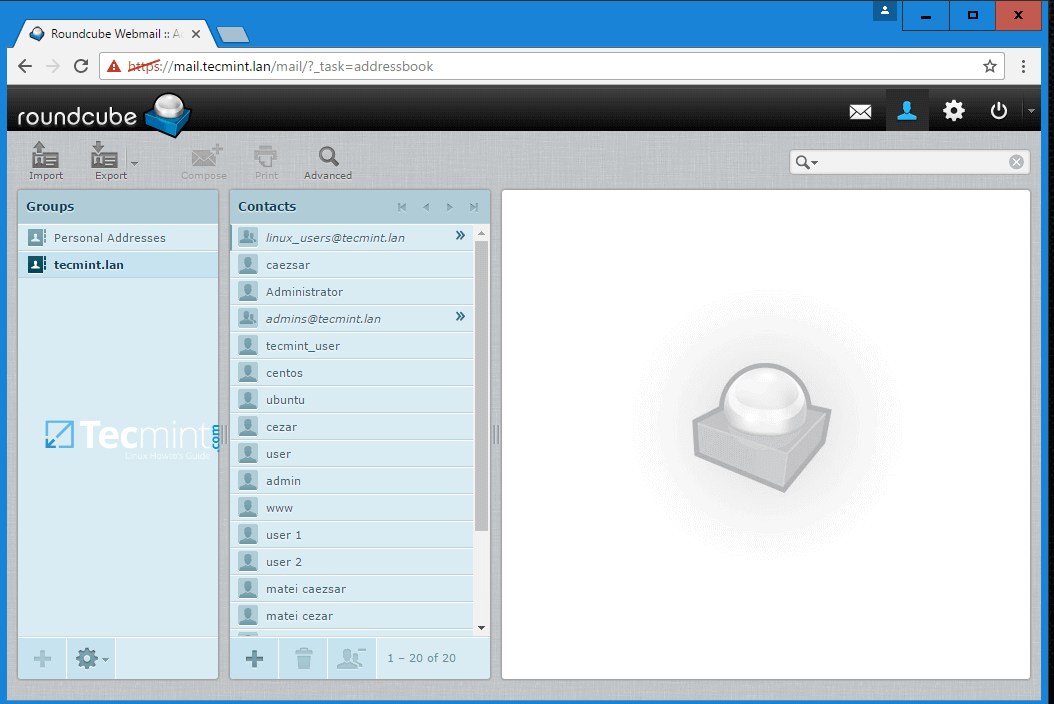
Roundcube User Contact List
Step 4: Add an Alias for Roundcube Webmail Interface
11. To visit Roundcube at a web address with the following form https://webmail.domain.tld instead of the old address provided by default by iRedMail you need to make the following changes.
From a joined Windows machine with RSAT tools installed, open DNS Manager and add a new CNAME record for iRedMail FQDN, named webmail, as illustrated in the following image.
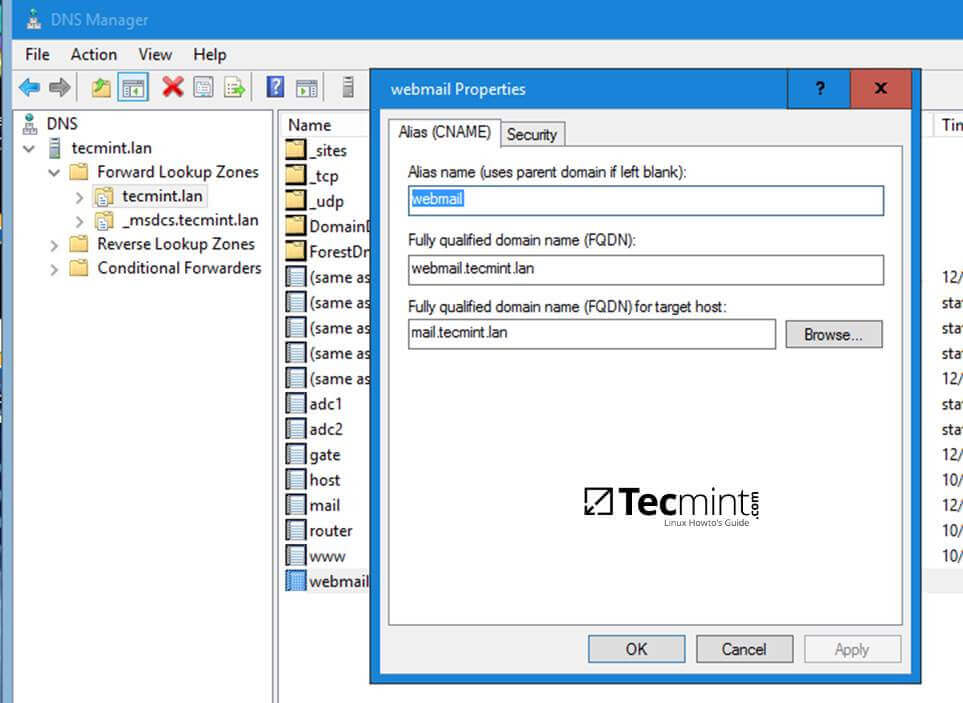
DNS Webmail Properties
12. Next, on iRedMail machine, open Apache web server SSL configuration file located in /etc/httpd/conf.d/ssl.conf and change DocumentRoot directive to point to /var/www/roundcubemail/ system path.
file /etc/httpd/conf.d/ssl.conf excerpt:
DocumentRoot “/var/www/roundcubemail/”
Restart Apache daemon to apply changes.
# systemctl restart httpd
13. Now, point the browser to the following address and Roundcube interface should appear. Accept the Self-Signed Cerificate error to continue to login page. Replace domain.tld from this example with your own domain name.
https://webmail.domain.tld
Step 5: Disable iRedMail Unused Services
14. Since iRedMail daemons are configured to query Samba4 AD DC LDAP server for account information and other resources, you can safely stop and disable some local services on iRedMail machine, such as LDAP database server and iredpad service by issuing the following commands.
# systemctl stop slapd iredpad
# systemctl disable slapd iredpad
15. Also, disable some scheduled tasks performed by iRedMail, such as LDAP database backup and iRedPad tracking records by adding a comment (#) in front of each line from crontab file as illustrated on the below screenshot.
# crontab -e
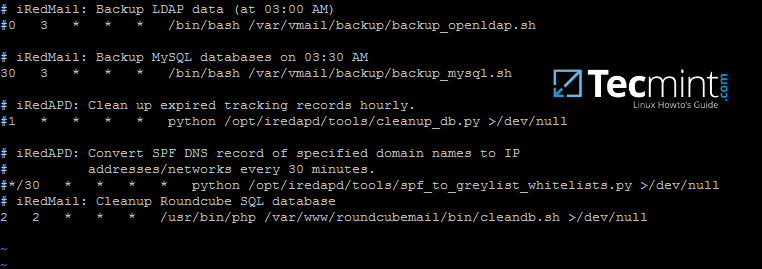
Disable iRedMail Tasks
Step 6: Use Mail Alias in Postfix
16. To redirect all locally generated mail (destined for postmaster and subsequently redirected to root account) to a specific Samba4 AD account, open Postfix aliases configuration file located in /etc/postfix/aliases and modify root line as follows:
root: your_AD_email_account@domain.tld
17. Apply the aliases configuration file so that Postfix can read it in its own format by executing newaliases command and test if the mail gets sent to the proper domain e-email account by issuing the following command.
# echo “Test mail” | mail -s “This is root’s email” root
18. After the mail has been sent, login to Roundcube webmail with the domain account you’ve setup for mail redirection and verify the previously sent mail should be received in your account Inbox.
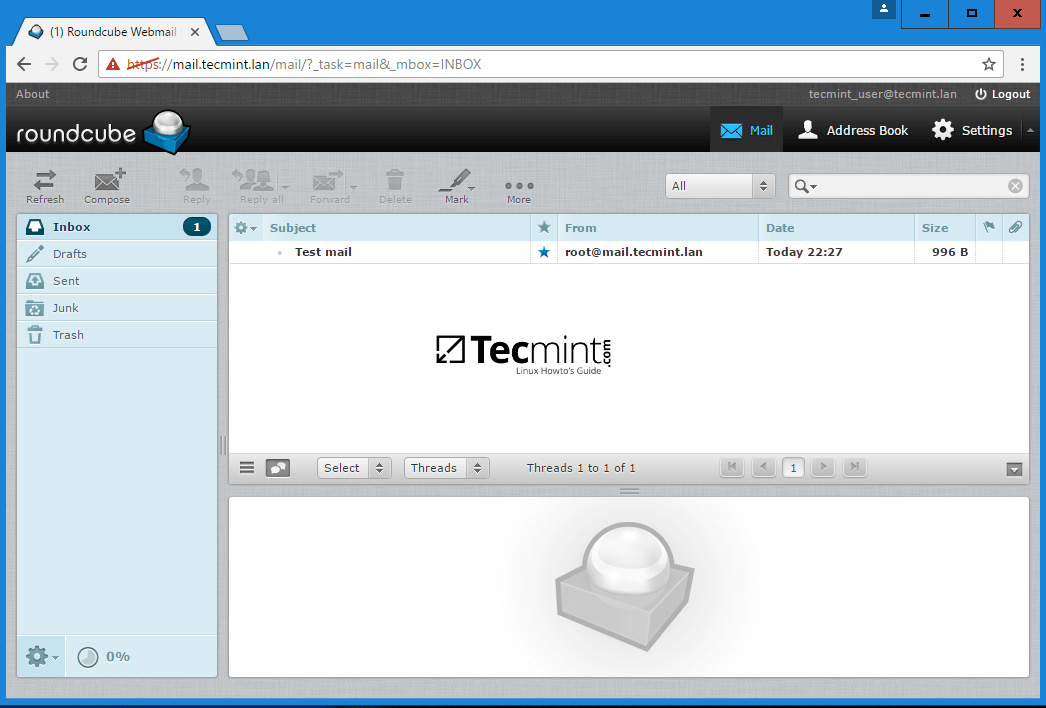
Verify User Mail
That’all! Now, you have a fully working mail server integrated with Samba4 Active Directory. Domain accounts can send and receive mail for their internal domain or for other external domains.
The configurations used in this tutorial can be successfully applied to integrate an iRedMail server to a Windows Server 2012 R2 or 2016 Active Directory.
How to Configure Thunderbird with iRedMail for Samba4 AD – Part 13
This tutorial will guide you on how to configure Mozilla Thunderbird client with an iRedMail server in order to send and receive mail via IMAPS and SMTP submission protocols, how to setup contacts database with Samba AD LDAP server and how to configure other related mail features, such as enabling Thunderbird contacts via LDAP database offline replica.
The process of installing and configuring Mozilla Thunderbird client described here is valid for Thunderbird clients installed on Windows or Linux operating systems.
Requirements
- How to Configure and Integrate iRedMail Services to Samba4 AD DC
- Integrate iRedMail Roundcube with Samba4 AD DC
Step 1: Configure Thunderbird for iRedMail Server
1. After installing Thunderbird mail client, hit on the launcher or shortcut to open the program and on the first screen check E-mail System Integration and click on Skip Integration button to continue.
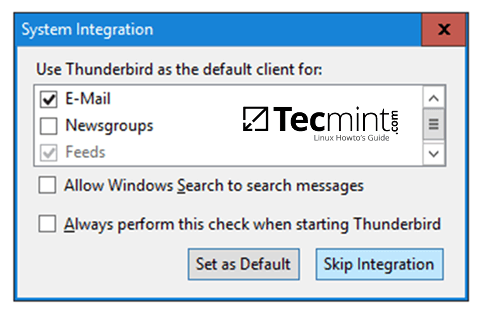
Thunderbird System Integration
2. On the welcome screen hit on Skip this and use my existing mail button and add your name, your Samba account e-mail address and password, check Remember password field and hit on Continue button to start your mail account setup.
After Thunderbird client tries to identify the correct IMAP settings provided by iRedMail server hit on Manualconfig button to manually setup Thunderbird.
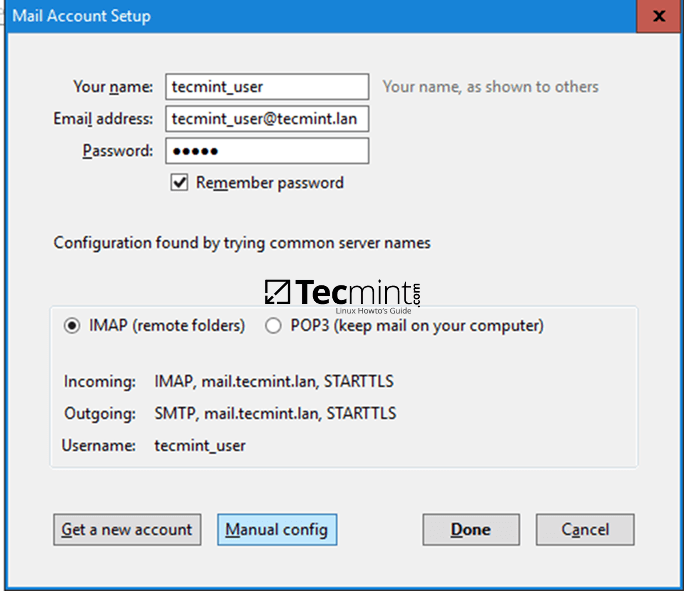
Thunderbird Mail Account Setup
3. After the Mail Account Setup window expands, manually edit IMAP and SMTP settings by adding your proper iRedMail server FQDN, add secured ports for both mail services (993 for IMAPS and 587 for submission), select the proper SSL communication channel for each port and authentication and hit Done to complete the setup. Use the below image as a guide.
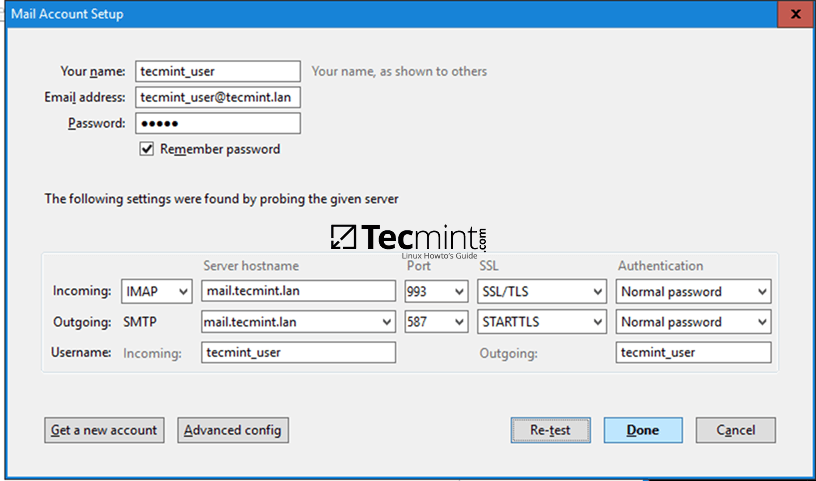
Thunderbird iRedMail Settings
4. A new Security Exception window should appear on your screen due to the Self-Signed Certificates your iRedMail server enforces. Check on Permanently store this exception and hit on Confirm Security Exceptionbutton to add this security exception and the Thunderbird client should be successfully configured.
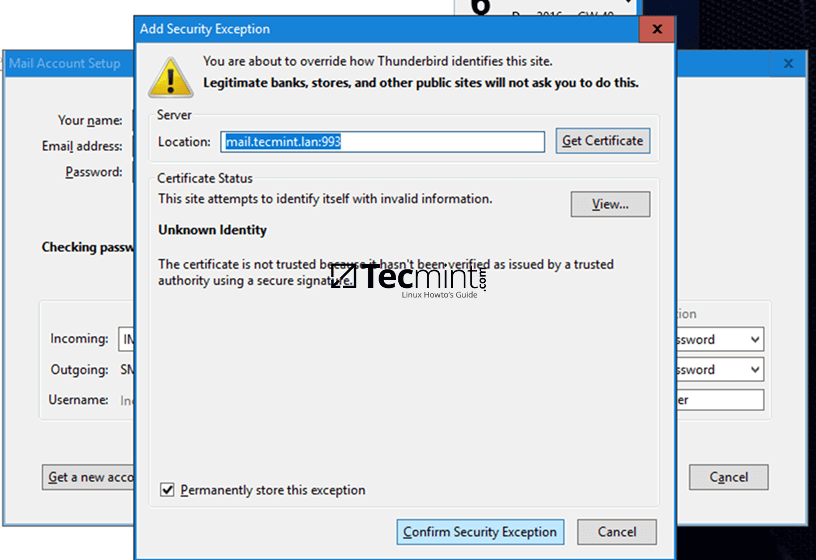
Thunderbird Security Exception
You will see all received mail for your domain account and you should be able to send or receive mail to and from your domain or other domain accounts.

Domain Mails Inbox
Step 2: Setup Thunderbird Contacts Database with Samba AD LDAP
5. In order for Thunderbird clients to query Samba AD LDAP database for contacts, hit on Settings menu by right clicking on your account from the left plane and navigate to Composition & Addressing → Addressing → Use a different LDAP server → Edit Directories button as illustrated on the below images.
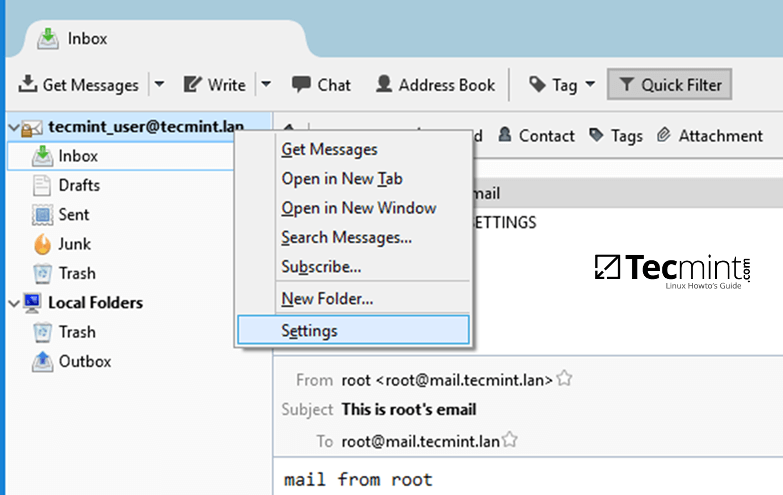
Thunderbird Samba AD LDAP Settings
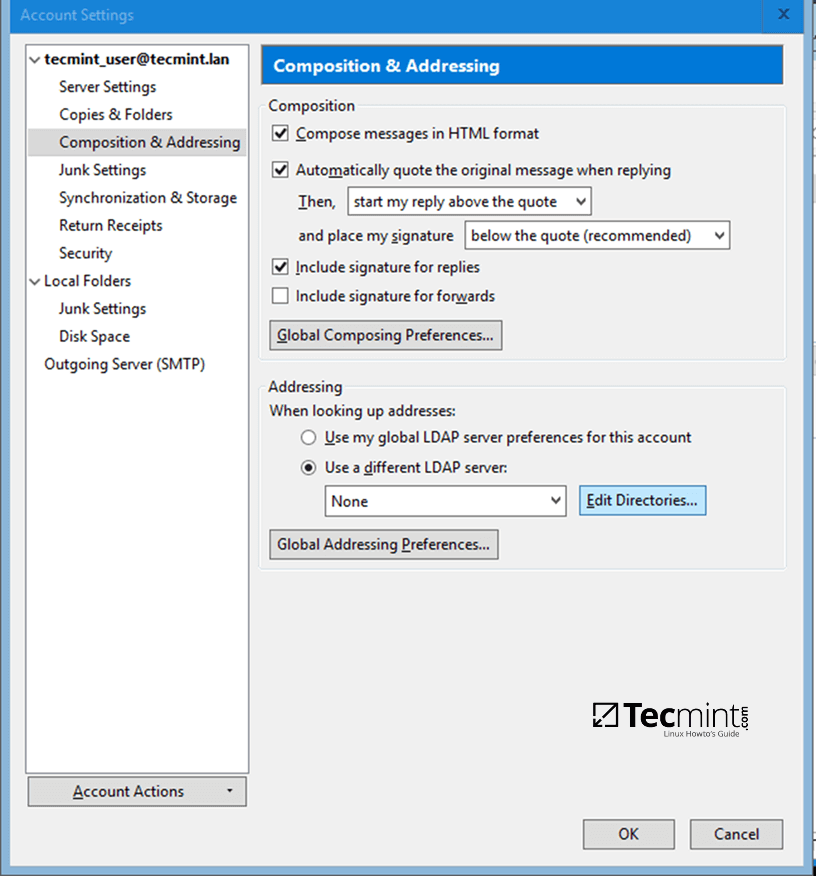
Thunderbird Composition & Addressing Settings
6. The LDAP Directory Servers windows should open by now. Hit on Add button and fill Directory Server Properties windows with the following content:
On General tab add descriptive name for this object, add the name of your domain or the FQDN of a Samba domain controller, the base DN of your domain in the form dc=your_domain,dc=tld, LDAP port number 389 and the vmail Bind DN account used to query the Samba AD LDAP database in the form vmail@your_domain.tld.
Use the below screenshot as a guide.
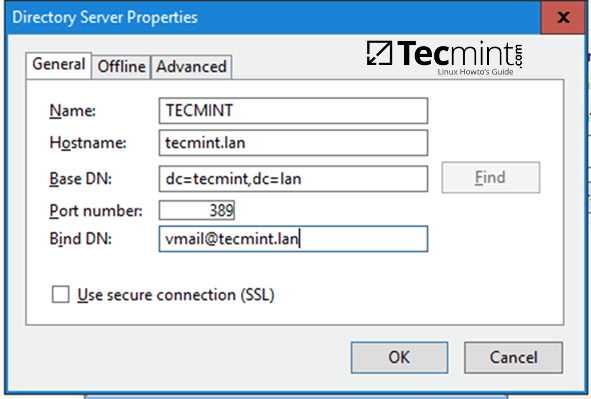
Directory Server Properties
7. On the next step, move to Advanced tab from Directory Server Properties, and add the following content in Search filter filed:
(&(mail=*)(|(&(objectClass=user)(!(objectClass=computer)))(objectClass=group)))
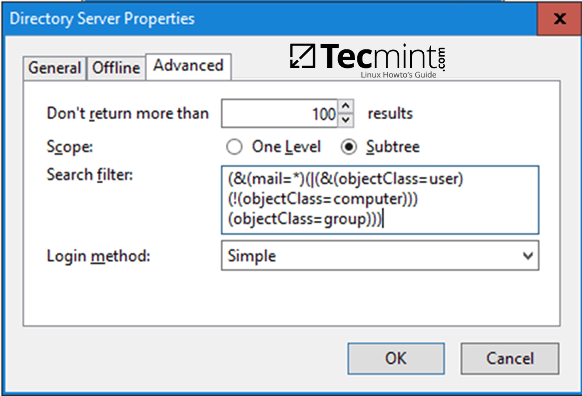
Add Search Filter
Leave the rest of the settings as default and hit on OK button to apply changes and again on OK button to close LDAP Directory Servers window and OK button again on Account Settings to close the window.

Select LDAP Directory Server
8. To test if Thunderbird client can query Samba AD LDAP database for contacts, hit on the upper Address Bookicon, select the name of the LDAP database created earlier.
Add the password for the Bind DN account configured to interrogate the AD LDAP server (vmail@your_domain.tld), check Use Password Manager to remember the password and hit OK button to reflect changes and close the window.
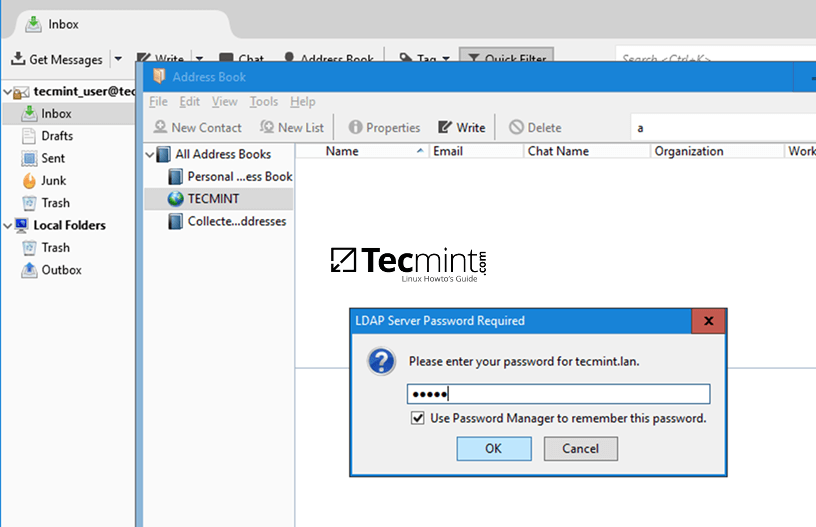
Thunderbird Samba AD LDAP Testing
9. Search for a Samba AD contact by using the upper search filed and suppling a domain account name. Be aware that Samba AD accounts with no e-mail address declared in their AD E-mail field will not be listed in Thunderbird Address Book searches.
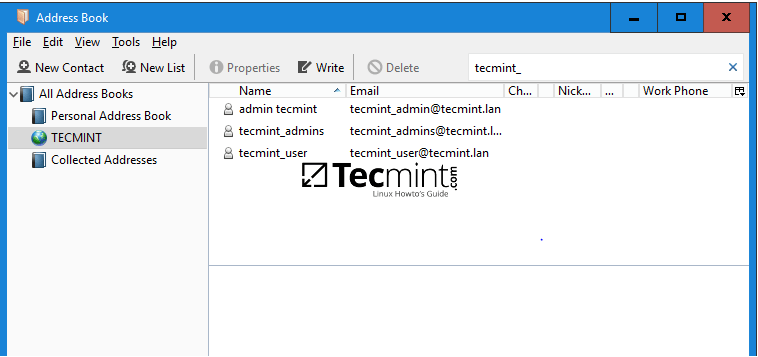
Search Samba AD Mail Contacts
10. To search for a contact while composing an e-mail, click on View → Contacts Sidebar or press F9 key to open Contacts panel.
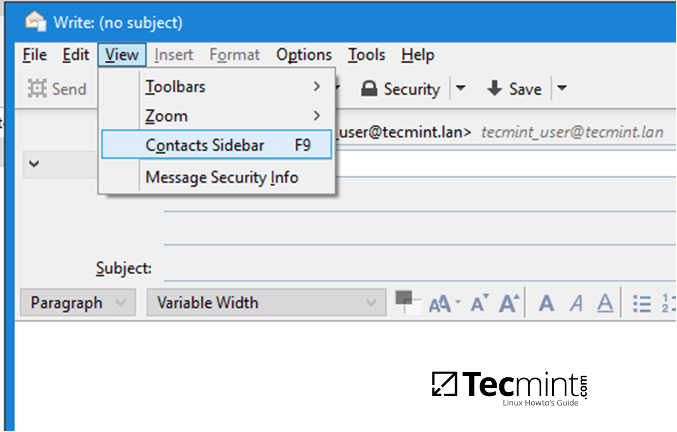
Search Mail Contacts in Thunderbird
11. Select the proper Address Book and you should be able to search and add an e-mail address for your recipient. When sending the first mail, a new security alert window should appear. Hit on Confirm Security Exception and the mail should be sent to your recipient e-mail address.
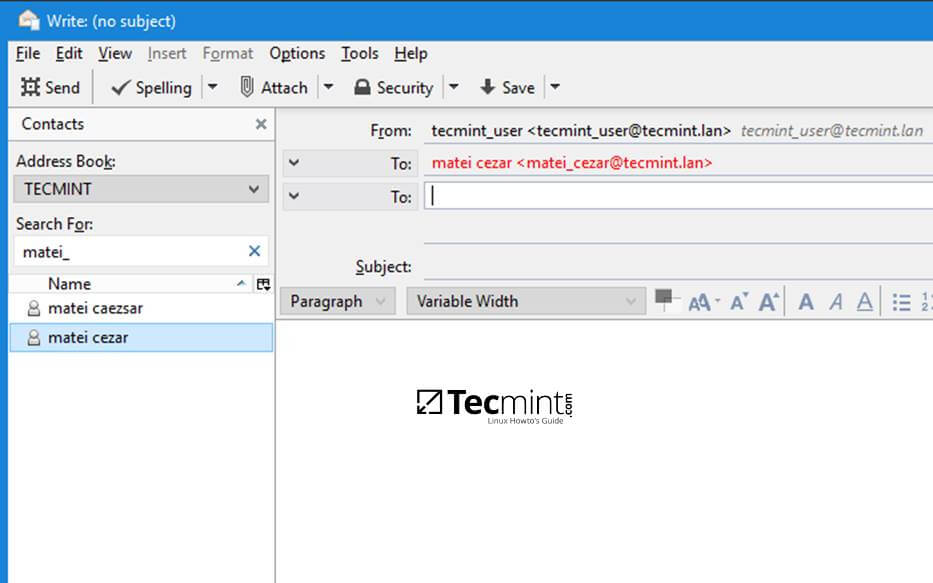
Send Mail in Thunderbird
12. In case you want to search contacts through Samba LDAP database only for a specific AD Organizational Unit, edit the Address Book for your Directory Server name from the left plane, hit on Properties and add the custom Samba AD OU as illustrated on the below example.
ou=your_specific_ou,dc=your_domain,dc=tld
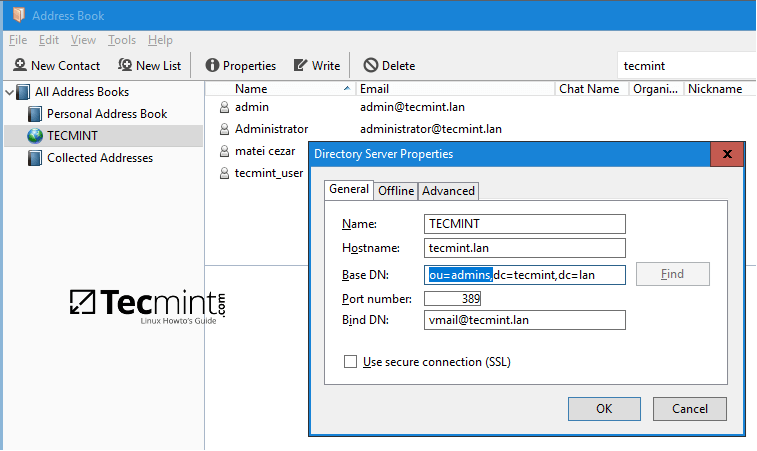
Search Contacts in Samba LDAP Database
Step 3: Setup LDAP Offline Replica
13. To configure Samba AD LDAP offline replica for Thunderbird hit on Address Book button, select your LDAP Address Book, open Directory Server Properties -> General tab and change the port number to 3268.
Then switch to Offline tab and hit on Download Now button to start replicate Samba AD LDAP database locally.
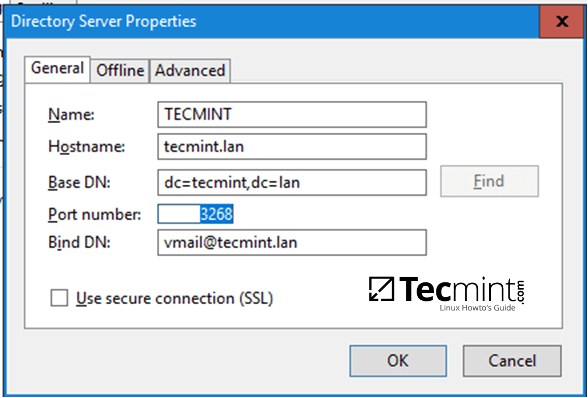
Setup LDAP Offline Replica in Thunderbird
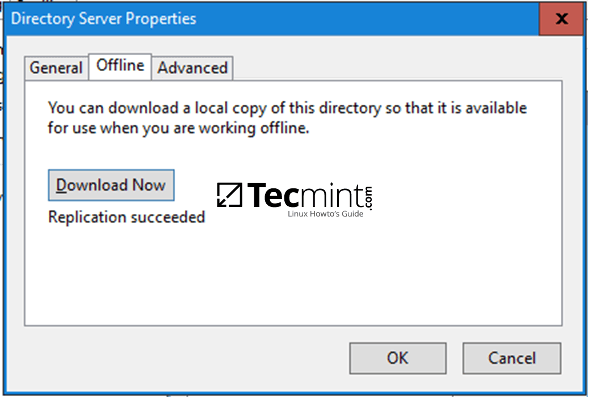
Download LDAP Database for Offline
When the process of synchronizing contacts finishes you will be informed with the message Replication succeeded. Hit OK and close all windows. In case Samba domain controller cannot be reached you can still search for LDAP contacts by working in offline mode.
Integrate CentOS 7 to Samba4 AD from Commandline – Part 14
This guide will show you how you can integrate a CentOS 7 Server with no Graphical User Interface to Samba4 Active Directory Domain Controller from command line using Authconfig software.
This type of setup provides a single centralized account database held by Samba and allows the AD users to authenticate to CentOS server across the network infrastructure.
Requirements
Step 1: Configure CentOS for Samba4 AD DC
1. Before starting to join CentOS 7 Server into a Samba4 DC you need to assure that the network interface is properly configured to query domain via DNS service.
Run ip address command to list your machine network interfaces and choose the specific NIC to edit by issuing nmtui-edit command against the interface name, such as ens33 in this example, as illustrated below.
# ip address
# nmtui-edit ens33
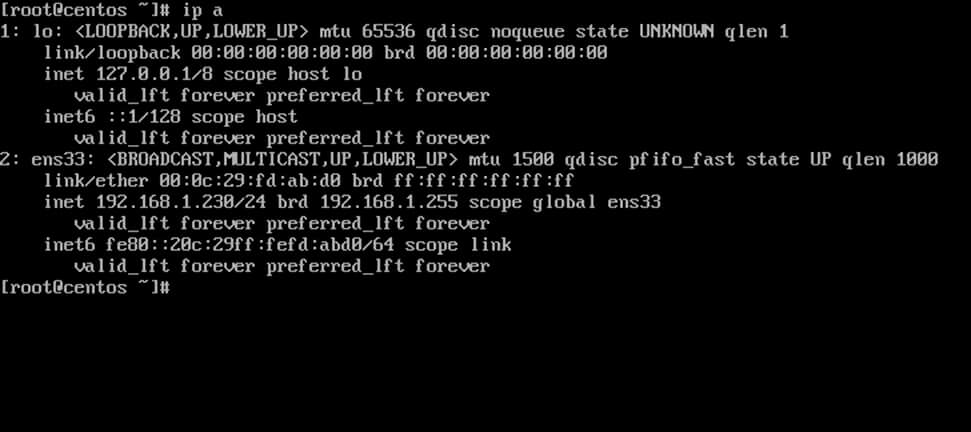
List Network Interfaces
2. Once the network interface is opened for editing, add the static IPv4 configurations best suited for your LAN and make sure you setup Samba AD Domain Controllers IP addresses for the DNS servers.
Also, append the name of your domain in search domains filed and navigate to OK button using [TAB] key to apply changes.
The search domains filed assures that the domain counterpart is automatically appended by DNS resolution (FQDN) when you use only a short name for a domain DNS record.
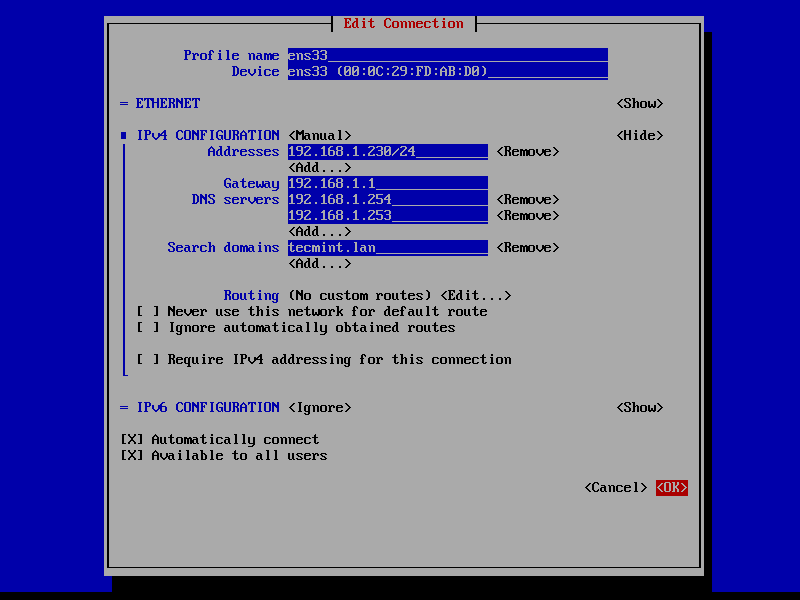
Configure Network Interface
3. Finally, restart the network daemon to apply changes and test if DNS resolution is properly configured by issuing series of ping commands against the domain name and domain controllers short names as shown below.
# systemctl restart network.service
# ping -c2 tecmint.lan
# ping -c2 adc1
# ping -c2 adc2
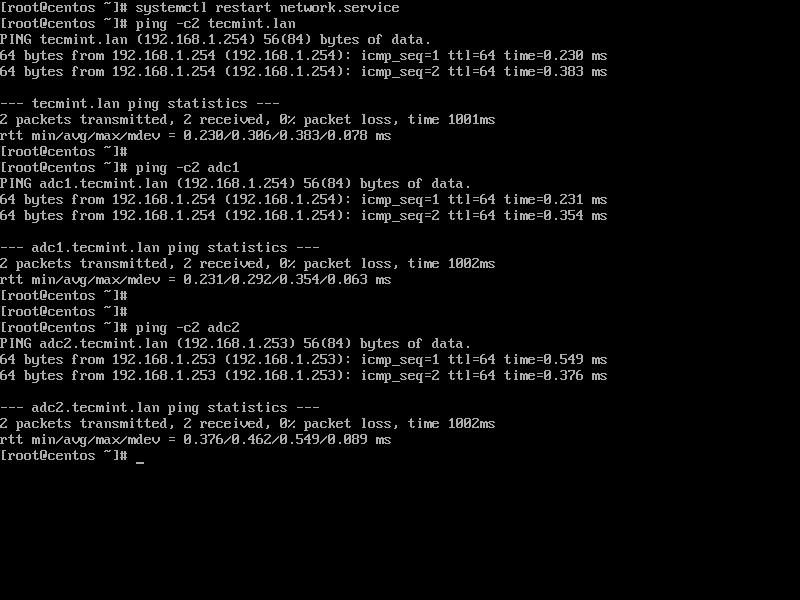
Verify DNS Resolution on Domain
4. Also, configure your machine hostname and reboot the machine to properly apply the settings by issuing the following commands.
# hostnamectl set-hostname your_hostname
# init 6
Verify if hostname was correctly applied with the below commands.
# cat /etc/hostname
# hostname
5. Finally, sync local time with Samba4 AD DC by issuing the below commands with root privileges.
# yum install ntpdate
# ntpdate domain.tld
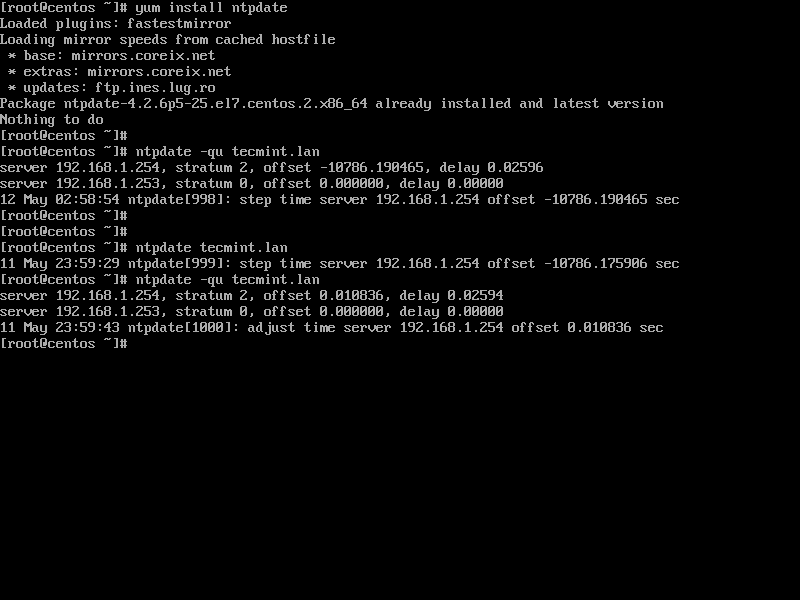
Sync Time with Samba4 AD DC
Step 2: Join CentOS 7 Server to Samba4 AD DC
6. To join CentOS 7 server to Samba4 Active Directory, first install the following packages on your machine from an account with root privileges.
# yum install authconfig samba-winbind samba-client samba-winbind-clients
7. In order to integrate CentOS 7 server to a domain controller run authconfig-tui graphical utility with root privileges and use the below configurations as described below.
# authconfig-tui
At the first prompt screen choose:
- On User Information:
- Use Winbind
- On Authentication tab select by pressing [Space] key:
- Use Shadow Password
- Use Winbind Authentication
- Local authorization is sufficient
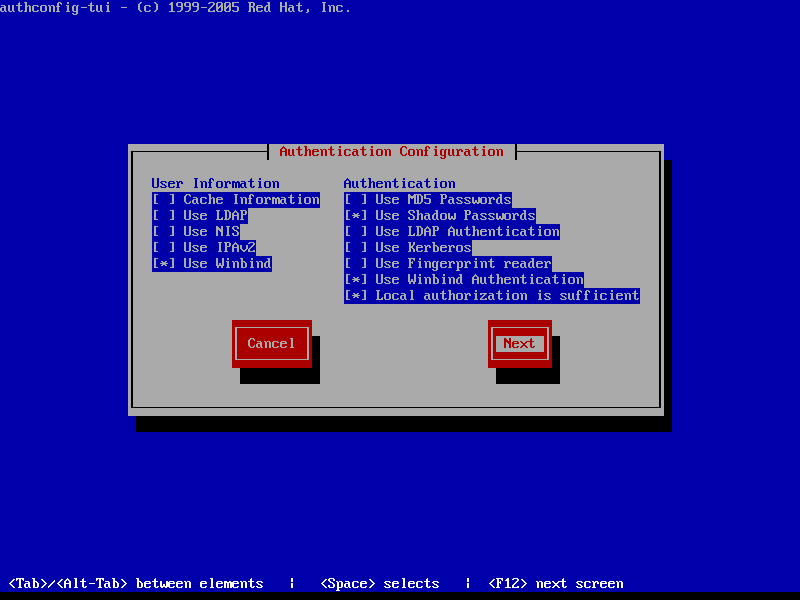
Authentication Configuration
8. Hit Next to continue to the Winbind Settings screen and configure as illustrated below:
- Security Model: ads
- Domain = YOUR_DOMAIN (use upper case)
- Domain Controllers = domain machines FQDN (comma separated if more than one)
- ADS Realm = YOUR_DOMAIN.TLD
- Template Shell = /bin/bash
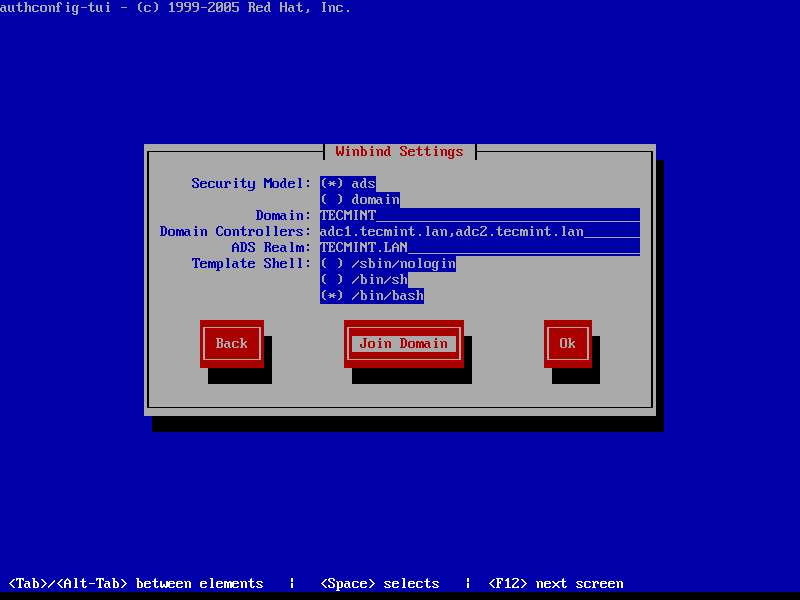
Winbind Settings
9. To perform domain joining navigate to Join Domain button using [tab] key and hit [Enter] key to join domain.
At the next screen prompt, add the credentials for a Samba4 AD account with elevated privileges to perform the machine account joining into AD and hit OK to apply settings and close the prompt.
Be aware that when you type the user password, the credentials won’t be shown in the password screen. On the remaining screen hit OK again to finish domain integration for CentOS 7 machine.

Join Domain to Samba4 AD DC
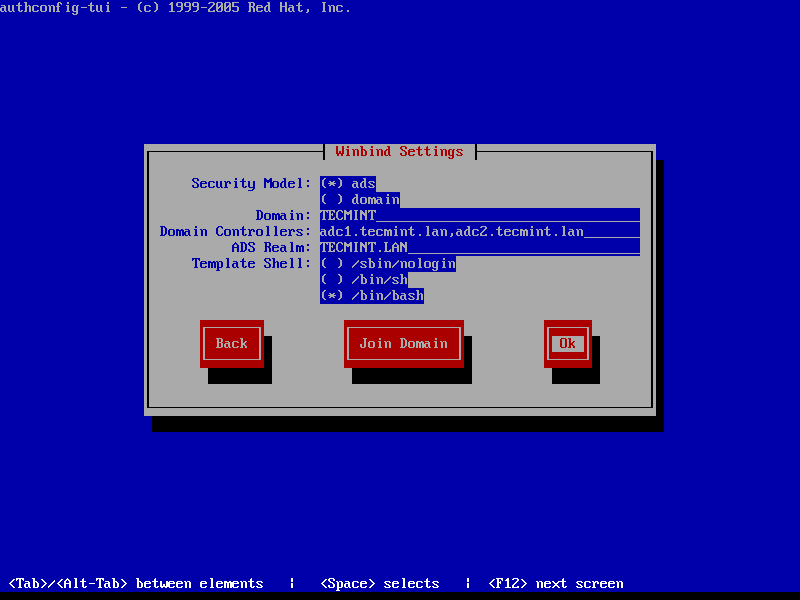
Confirm Winbind Settings
To force adding a machine into a specific Samba AD Organizational Unit, get your machine exact name using hostname command and create a new Computer object in that OU with the name of your machine.
The best way to add a new object into a Samba4 AD is by using ADUC tool from a Windows machine integrated into the domain with RSAT tools installed on it.
Important: An alternate method of joining a domain is by using authconfig command line which offers extensive control over the integration process.
However, this method is prone to errors do to its numerous parameters as illustrated on the below command excerpt. The command must be typed into a single long line.
# authconfig --enablewinbind --enablewinbindauth --smbsecurity ads --smbworkgroup=YOUR_DOMAIN --smbrealm YOUR_DOMAIN.TLD --smbservers=adc1.yourdomain.tld --krb5realm=YOUR_DOMAIN.TLD --enablewinbindoffline --enablewinbindkrb5 --winbindtemplateshell=/bin/bash--winbindjoin=domain_admin_user --update --enablelocauthorize --savebackup=/backups
10. After the machine has been joined to domain, verify if winbind service is up and running by issuing the below command.
# systemctl status winbind.service
11. Then, check if CentOS machine object has been successfully created in Samba4 AD. Use AD Users and Computers tool from a Windows machine with RSAT tools installed and navigate to your domain Computers container. A new AD computer account object with name of your CentOS 7 server should be listed in the right plane.
12. Finally, tweak the configuration by opening samba main configuration file (/etc/samba/smb.conf) with a text editor and append the below lines at the end of the [global] configuration block as illustrated below:
winbind use default domain = true
winbind offline logon = true
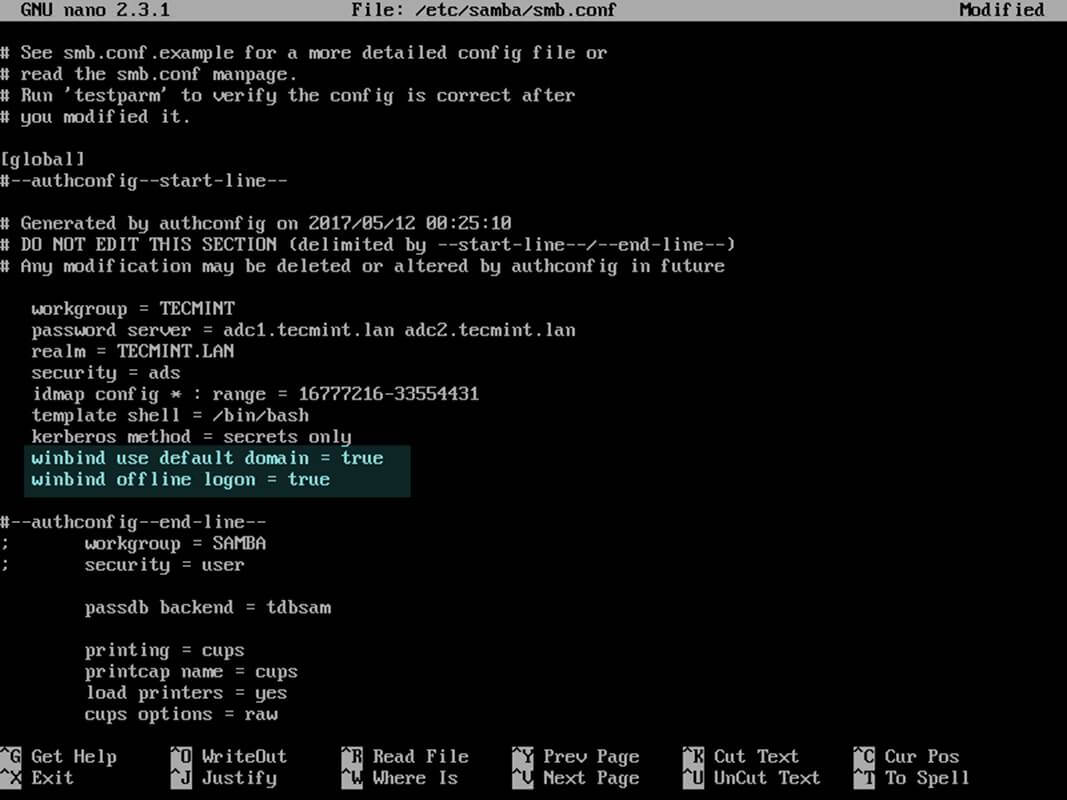
Configure Samba
13. In order to create local homes on the machine for AD accounts at their first logon run the below command.
# authconfig --enablemkhomedir --update
14. Finally, restart Samba daemon to reflect changes and verify domain joining by performing a logon on the server with an AD account. The home directory for the AD account should be automatically created.
# systemctl restart winbind
# su - domain_account

Verify Domain Joining
15. List the domain users or domain groups by issuing one of the following commands.
# wbinfo -u
# wbinfo -g
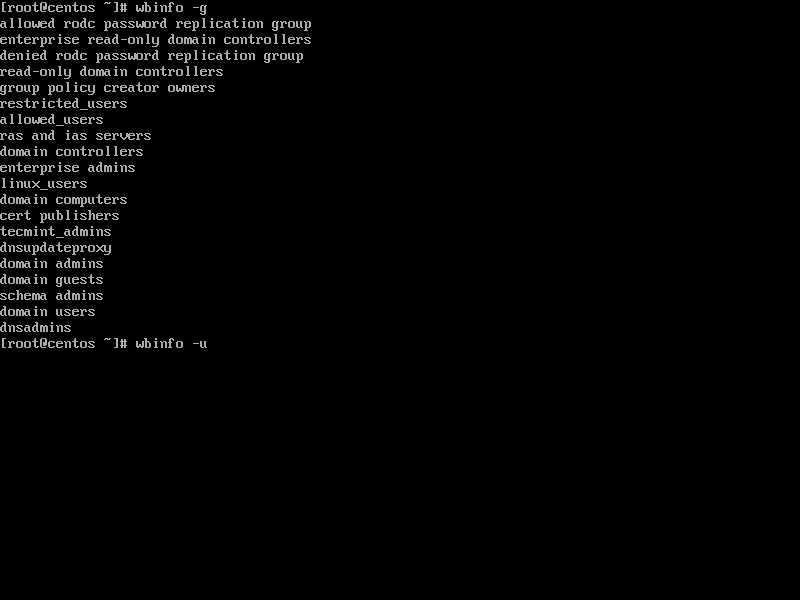
List Domain Users and Groups
16. To get info about a domain user run the below command.
# wbinfo -i domain_user
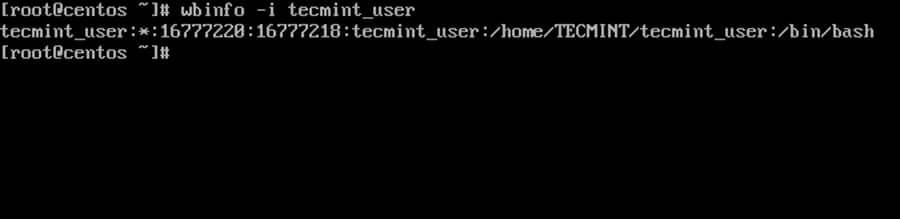
List Domain User Info
17. To display summary domain info issue the following command.
# net ads info
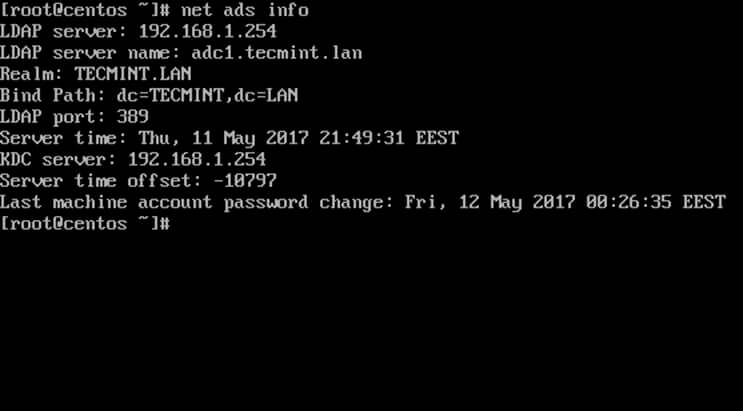
List Domain Summary
Step 3: Login to CentOS with a Samba4 AD DC Account
18. To authenticate with a domain user in CentOS, use one of the following command line syntaxes.
# su - ‘domain\domain_user’
# su - domain\domain_user
Or use the below syntax in case winbind use default domain = true parameter is set to samba configuration file.
# su - domain_user
# su - domain_user@domain.tld
19. In order to add root privileges for a domain user or group, edit sudoers file using visudo command and add the following lines as illustrated on the below screenshot.
YOUR_DOMAIN\domain_username       		 ALL=(ALL:ALL) ALL  	#For domain users
%YOUR_DOMAIN\your_domain\  group       	 ALL=(ALL:ALL) ALL	#For domain groups
Or use the below excerpt in case winbind use default domain = true parameter is set to samba configuration file.
domain_username 	        	 ALL=(ALL:ALL) ALL  	#For domain users
%your_domain\  group       		 ALL=(ALL:ALL) ALL	#For domain groups
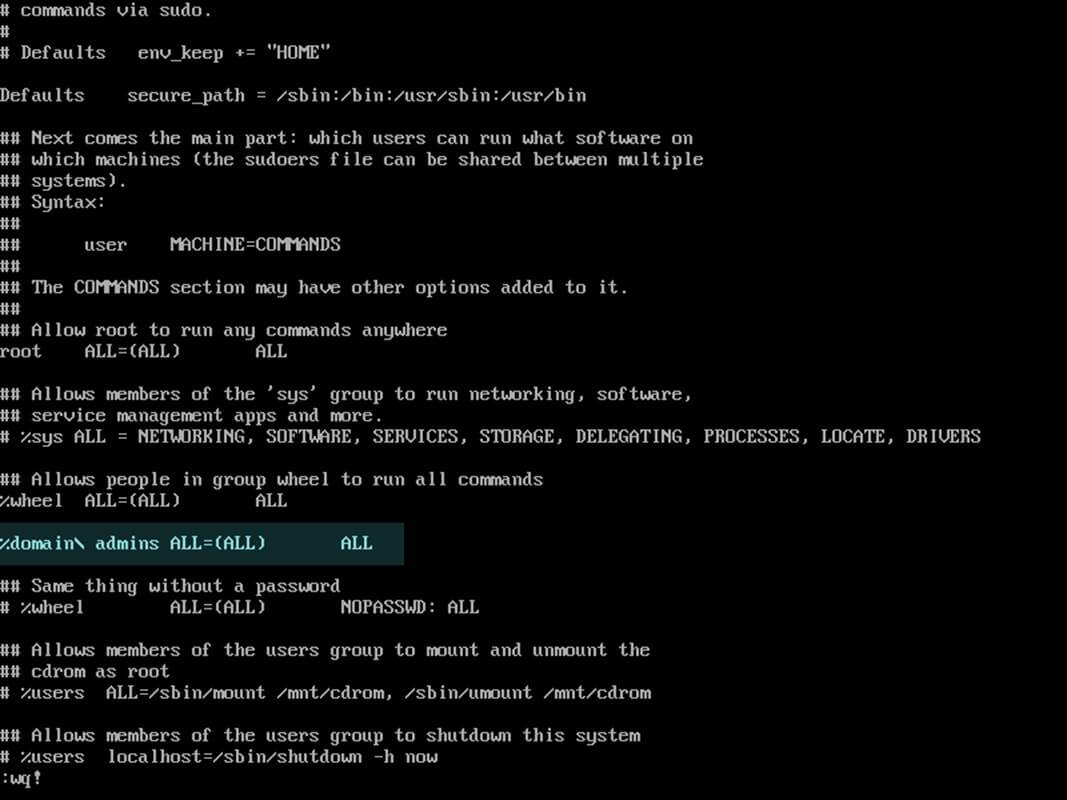
Grant Root Privileges on Domain Users
20. The following series of commands against a Samba4 AD DC can also be useful for troubleshooting purposes:
# wbinfo -p #Ping domain
# wbinfo -n domain_account #Get the SID of a domain account
# wbinfo -t  #Check trust relationship
21. To leave the domain run the following command against your domain name using a domain account with elevated privileges. After the machine account has been removed from the AD, reboot the machine to revert changes before the integration process.
# net ads leave -w DOMAIN -U domain_admin
# init 6
That’s all! Although this procedure is mainly focused on joining a CentOS 7 server to a Samba4 AD DC, the same steps described here are also valid for integrating a CentOS server into a Microsoft Windows Server 2012 Active Directory.
Integrate Ubuntu to Samba4 AD DC with SSSD and Realm – Part 15
This tutorial will guide you on how to join an Ubuntu Desktop machine into a Samba4 Active Directory domain with SSSD and Realmd services in order to authenticate users against an Active Directory.
Requirements:
Step 1: Initial Configurations
1. Before starting to join Ubuntu into an Active Directory make sure the hostname is properly configured. Use hostnamectl command to set the machine name or manually edit /etc/hostname file.
$ sudo hostnamectl set-hostname your_machine_short_hostname
$ cat /etc/hostname
$ hostnamectl
2. On the next step, edit machine network interface settings and add the proper IP configurations and the correct DNS IP server addresses to point to the Samba AD domain controller as illustrated in the below screenshot.
If you have configured a DHCP server at your premises to automatically assign IP settings for your LAN machines with the proper AD DNS IP addresses then you can skip this step and move forward.
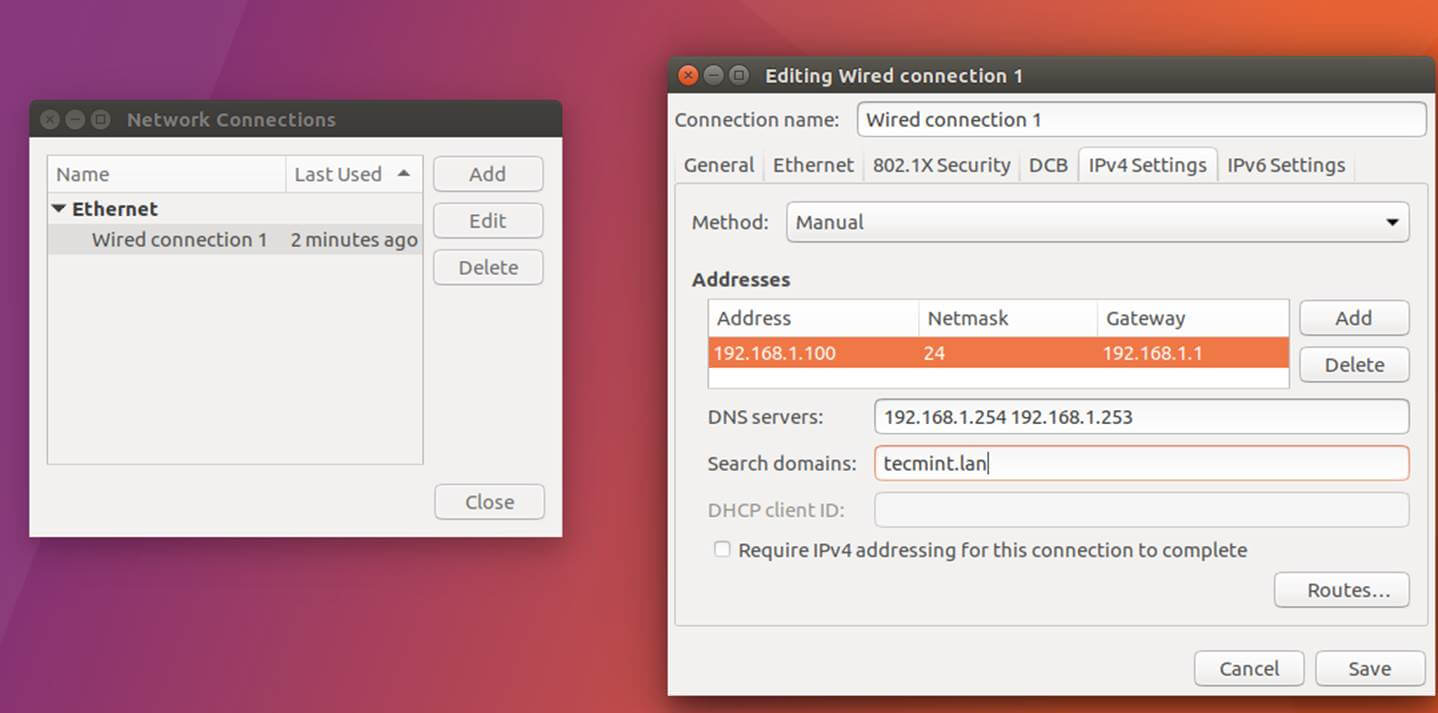
Configure Network Interface
On the above screenshot, 192.168.1.254 and 192.168.1.253 represents the IP addresses of the Samba4 Domain Controllers.
3. Restart the network services to apply the changes using the GUI or from command line and issue a series of ping command against your domain name in order to test if DNS resolution is working as expected. Also, use host command to test DNS resolution.
$ sudo systemctl restart networking.service
$ host your_domain.tld
$ ping -c2 your_domain_name
$ ping -c2 adc1
$ ping -c2 adc2
4. Finally, make sure that machine time is in sync with Samba4 AD. Install ntpdate package and sync time with the AD by issuing the below commands.
$ sudo apt-get install ntpdate
$ sudo ntpdate your_domain_name
Step 2: Install Required Packages
5. On this step install the necessary software and required dependencies in order to join Ubuntu into Samba4 AD DC: Realmd and SSSD services.
$ sudo apt install adcli realmd krb5-user samba-common-bin samba-libs samba-dsdb-modules sssd sssd-tools libnss-sss libpam-sss packagekit policykit-1
6. Enter the name of the default realm with uppercases and press Enter key to continue the installation.
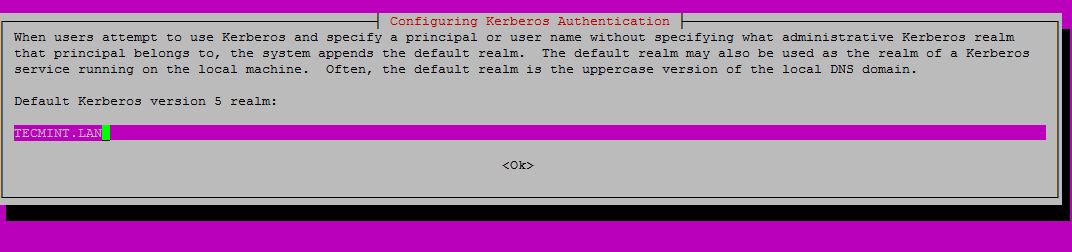
Set Realm Name
7. Next, create the SSSD configuration file with the following content.
$ sudo nano /etc/sssd/sssd.conf
Add following lines to sssd.conf file.
[nss]
filter_groups = root
filter_users = root
reconnection_retries = 3

[pam]
reconnection_retries = 3

[sssd]
domains = tecmint.lan
config_file_version = 2
services = nss, pam
default_domain_suffix = TECMINT.LAN


[domain/tecmint.lan]
ad_domain = tecmint.lan
krb5_realm = TECMINT.LAN
realmd_tags = manages-system joined-with-samba
cache_credentials = True
id_provider = ad
krb5_store_password_if_offline = True
default_shell = /bin/bash
ldap_id_mapping = True
use_fully_qualified_names = True
fallback_homedir = /home/%d/%u
access_provider = ad

auth_provider = ad
chpass_provider = ad
access_provider = ad
ldap_schema = ad
dyndns_update = true
dyndns_refresh_interval = 43200
dyndns_update_ptr = true
dyndns_ttl = 3600
Make sure you replace the domain name in following parameters accordingly:
domains = tecmint.lan
default_domain_suffix = TECMINT.LAN
[domain/tecmint.lan]
ad_domain = tecmint.lan
krb5_realm = TECMINT.LAN
8. Next, add the proper permissions for SSSD file by issuing the below command:
$ sudo chmod 700 /etc/sssd/sssd.conf
9. Now, open and edit Realmd configuration file and add the following lines.
$ sudo nano /etc/realmd.conf
Realmd.conf file excerpt:
[active-directory]
os-name = Linux Ubuntu
os-version = 17.04

[service]
automatic-install = yes

 [users]
default-home = /home/%d/%u
default-shell = /bin/bash

[tecmint.lan]
user-principal = yes
fully-qualified-names = no
10. The last file you need to modify belongs to Samba daemon. Open /etc/samba/smb.conf file for editing and add the following block of code at the beginning of the file, after the [global] section as illustrated on the image below.
 workgroup = TECMINT
   client signing = yes
   client use spnego = yes
   kerberos method = secrets and keytab
   realm = TECMINT.LAN
   security = ads
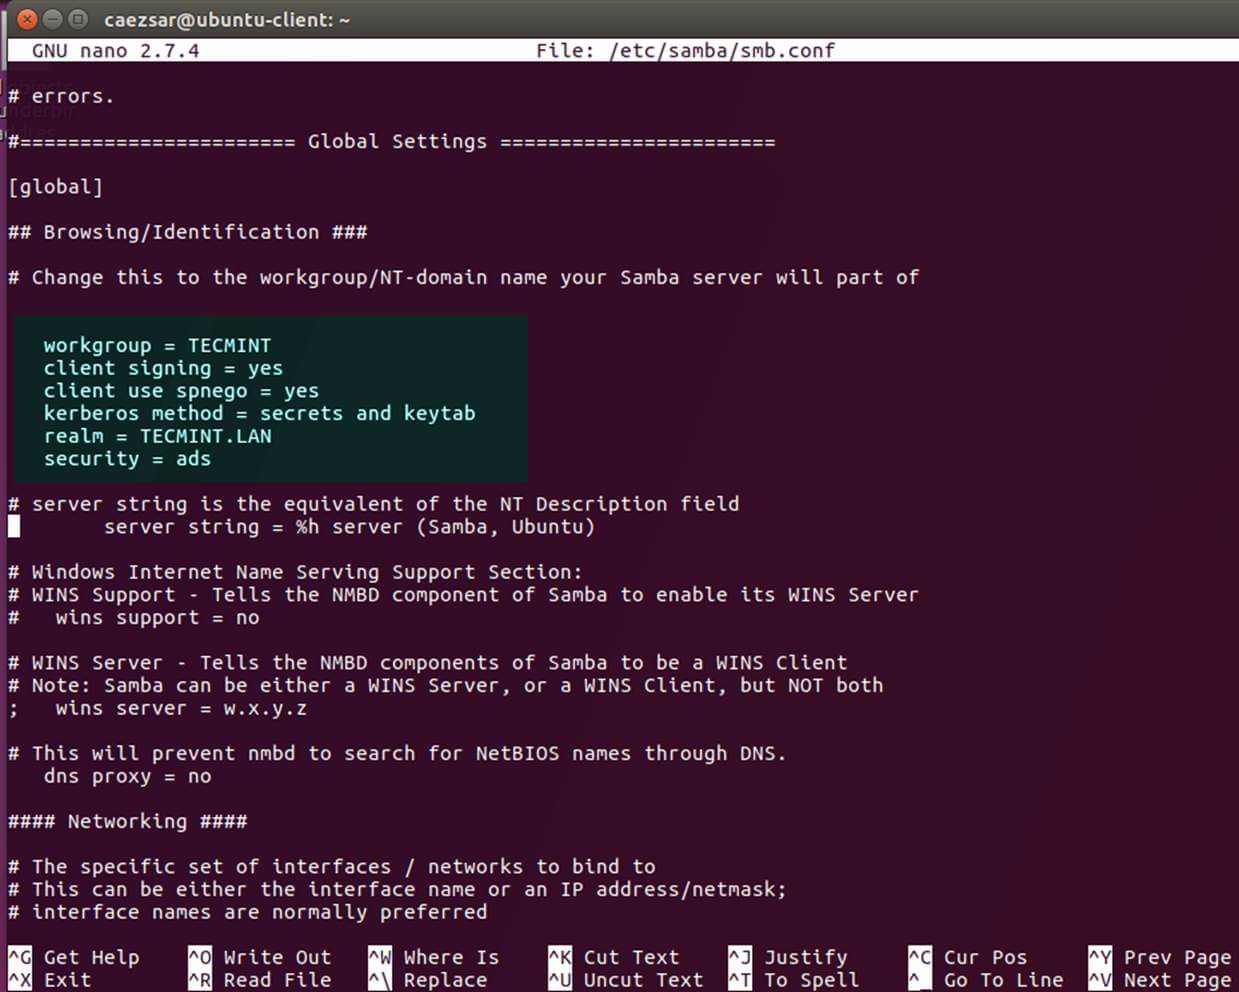
Configure Samba Server
Make sure you replace the domain name value, especially the realm value to match your domain name and run testparm command in order to check if the configuration file contains no errors.
$ sudo testparm
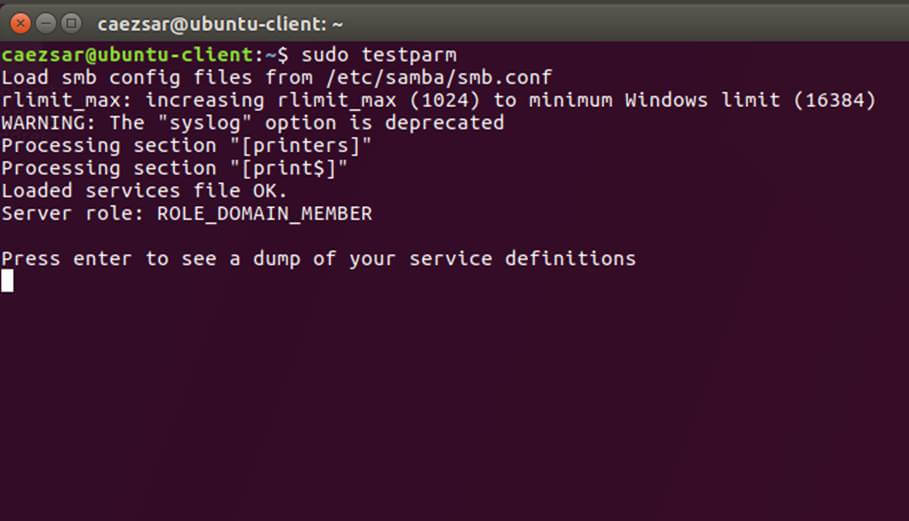
Test Samba Configuration
11. After you’ve made all the required changes, test Kerberos authentication using an AD administrative account and list the ticket by issuing the below commands.
$ sudo kinit ad_admin_user@DOMAIN.TLD
$ sudo klist
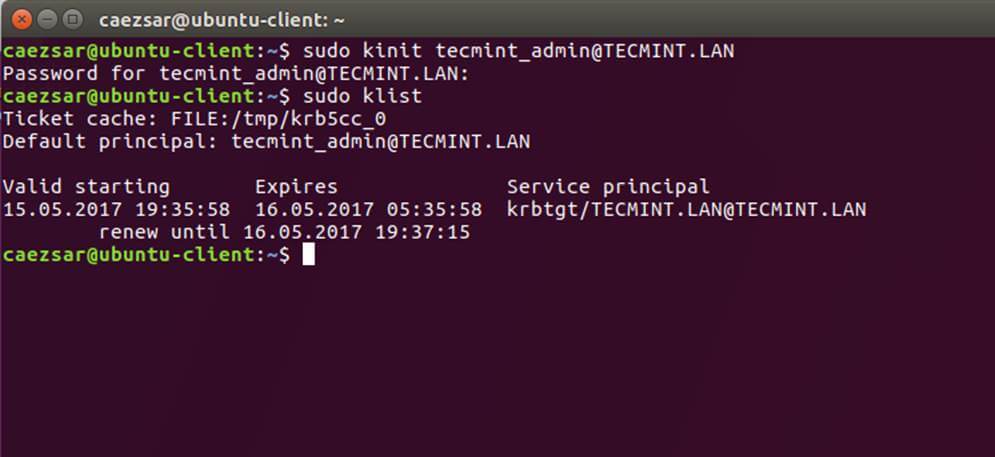
Check Kerberos Authentication
Step 3: Join Ubuntu to Samba4 Realm
12. To join Ubuntu machine to Samba4 Active Directory issue following series of commands as illustrated below. Use the name of an AD DC account with administrator privileges in order for the binding to realm to work as expected and replace the domain name value accordingly.
$ sudo realm discover -v DOMAIN.TLD
$ sudo realm list
$ sudo realm join TECMINT.LAN -U ad_admin_user -v
$ sudo net ads join -k
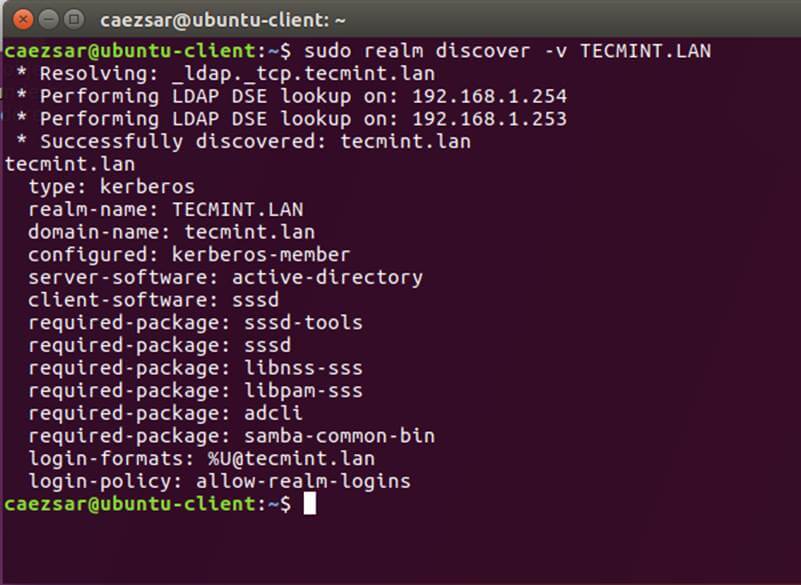
Join Ubuntu to Samba4 Realm
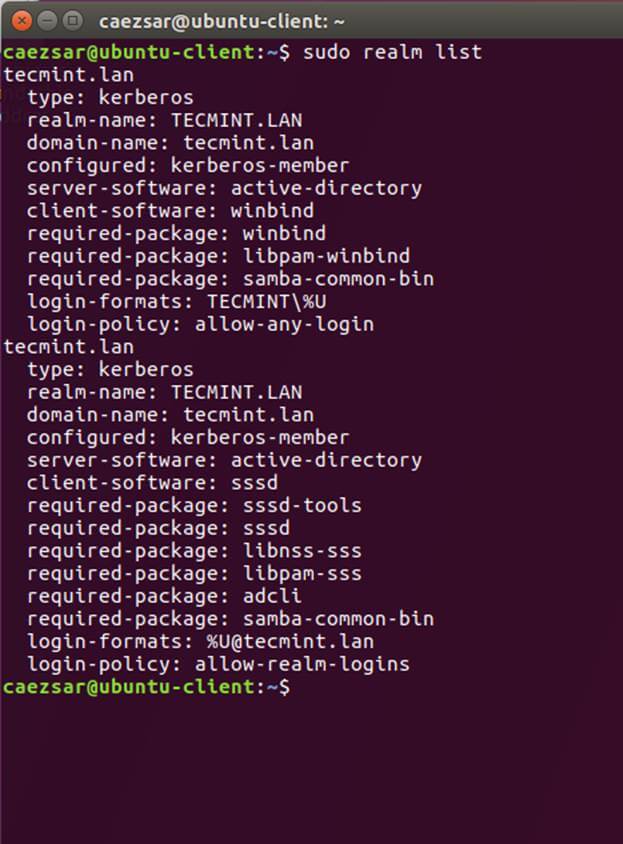
List Realm Domain Info
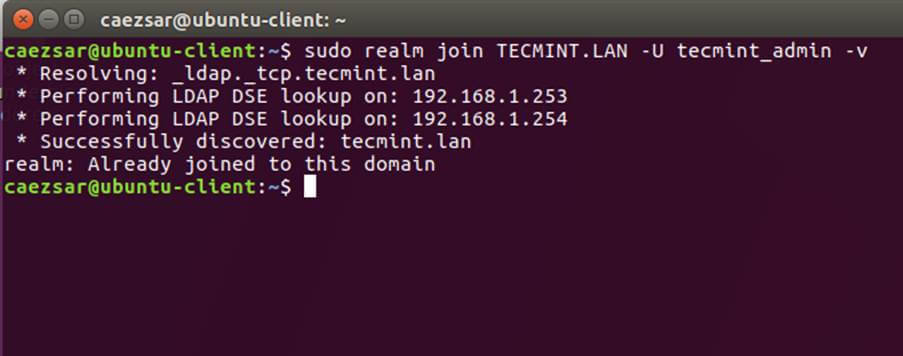
Add User to Realm Domain
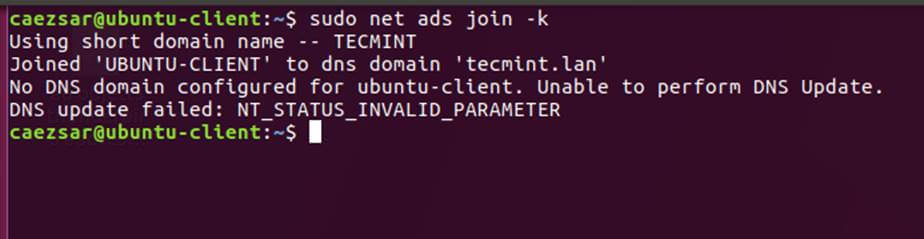
Add Domain to Realm
13. After the domain binding took place, run the below command to assure that all domain accounts are permitted to authenticate on the machine.
$ sudo realm permit --all
Subsequently, you can allow or deny access for a domain user account or a group using realm command as presented on the below examples.
$ sudo realm deny -a
$ realm permit --groups ‘domain.tld\Linux Admins’
$ realm permit user@domain.lan
$ realm permit DOMAIN\User2
14. From a Windows machine with RSAT tools installed you can open AD UC and navigate to Computerscontainer and check if an object account with the name of your machine has been created.
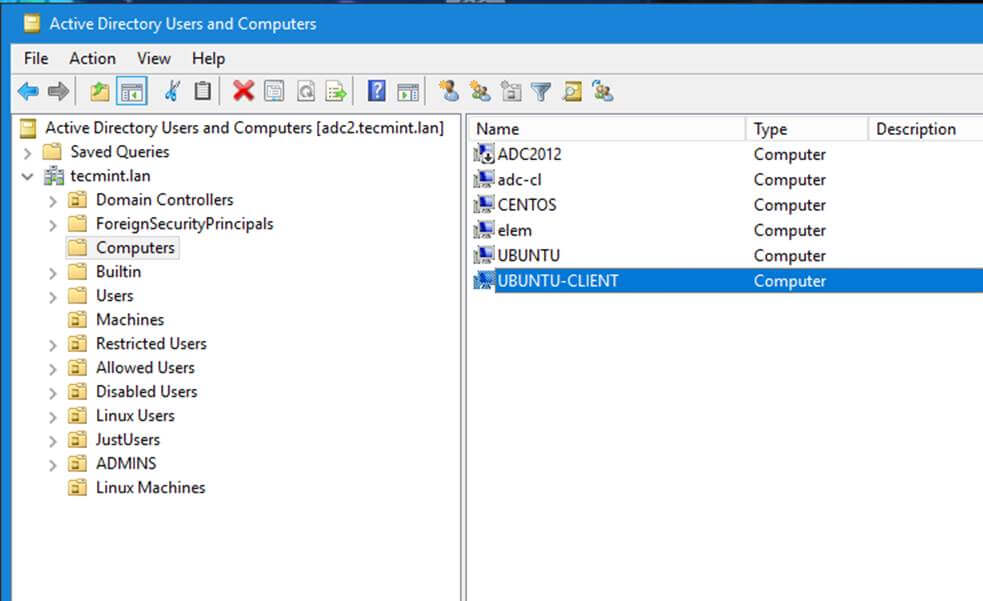
Confirm Domain Added to AD DC
Step 4: Configure AD Accounts Authentication
15. In order to authenticate on Ubuntu machine with domain accounts you need to run pam-auth-updatecommand with root privileges and enable all PAM profiles including the option to automatically create home directories for each domain account at the first login.
Check all entries by pressing [space] key and hit ok to apply configuration.
$ sudo pam-auth-update
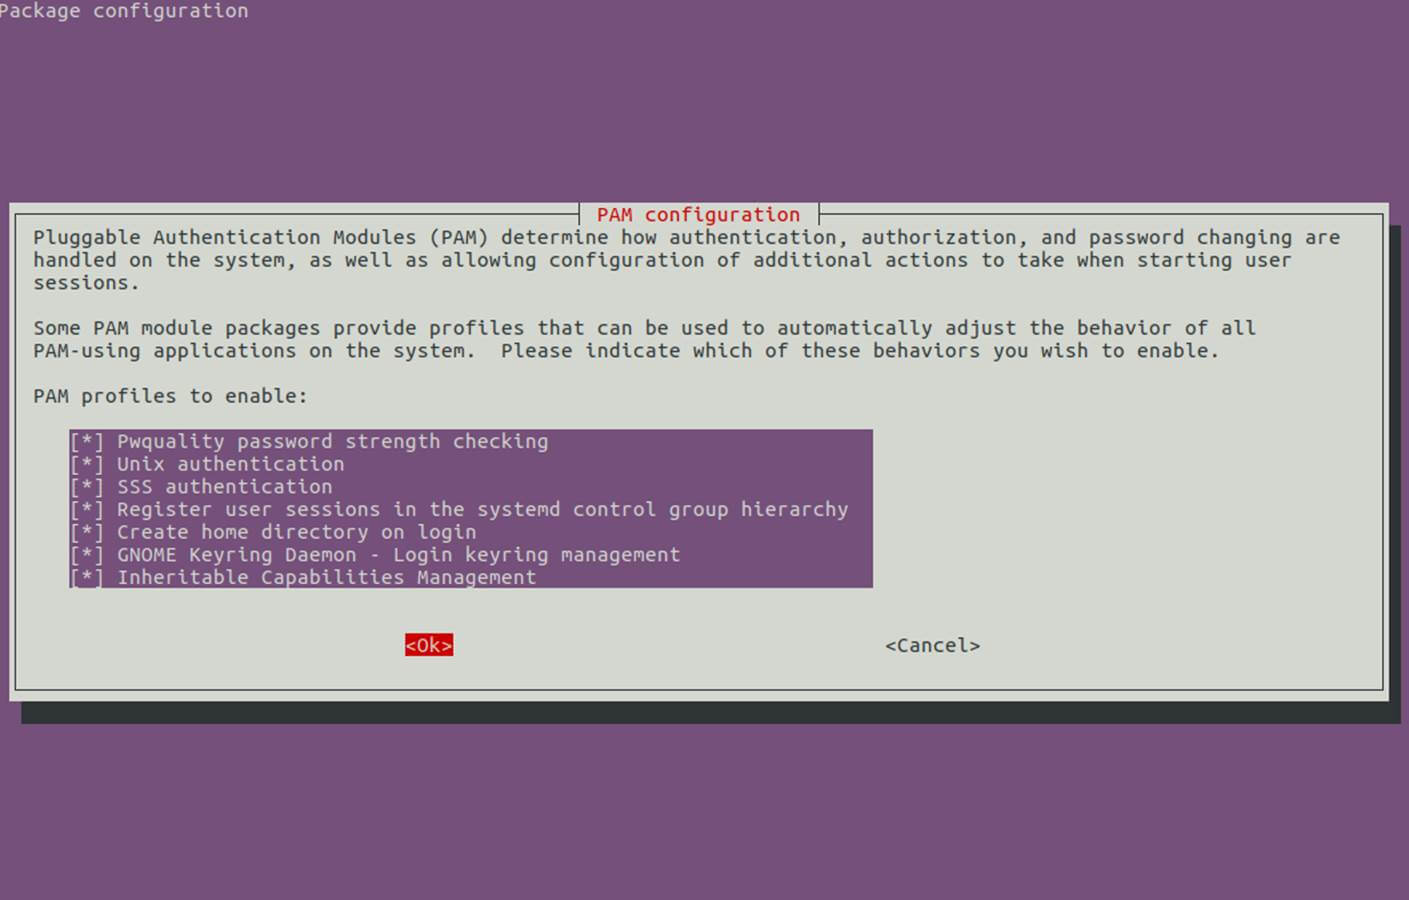
PAM Configuration
16. On systems manually edit /etc/pam.d/common-account file and the following line in order to automatically create homes for authenticated domain users.
session required pam_mkhomedir.so skel=/etc/skel/ umask=0022
17. If Active Directory users can’t change their password from command line in Linux, open /etc/pam.d/common-password file and remove the use_authtok statement from password line to finally look as on the below excerpt.
password [success=1 default=ignore] pam_winbind.so try_first_pass
18. Finally, restart and enable Realmd and SSSD service to apply changes by issuing the below commands:
$ sudo systemctl restart realmd sssd
$ sudo systemctl enable realmd sssd
19. In order to test if the Ubuntu machine was successfully integrated to realm run install winbind package and run wbinfo command to list domain accounts and groups as illustrated below.
$ sudo apt-get install winbind
$ wbinfo -u
$ wbinfo -g

List Domain Accounts
20. Also, check Winbind nsswitch module by issuing the getent command against a specific domain user or group.
$ sudo getent passwd your_domain_user
$ sudo getent group ‘domain admins’
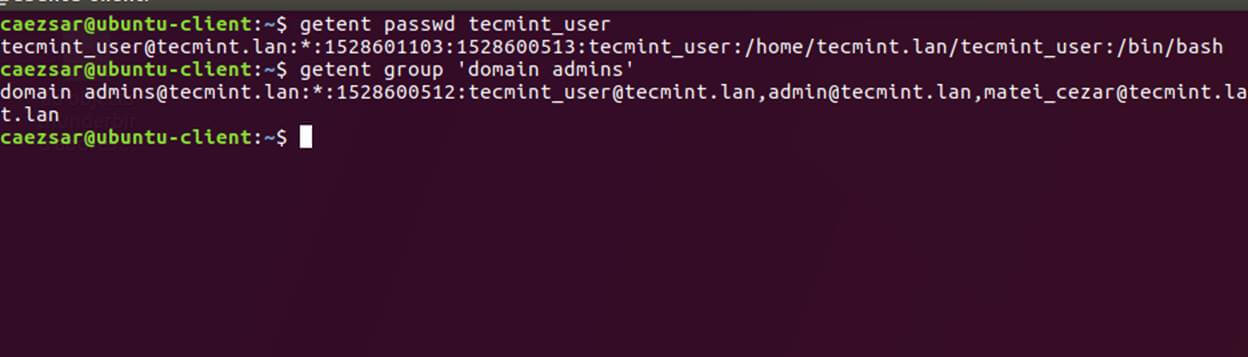
Check Winbind Nsswitch
21. You can also use Linux id command to get info about an AD account as illustrated on the below command.
$ id tecmint_user
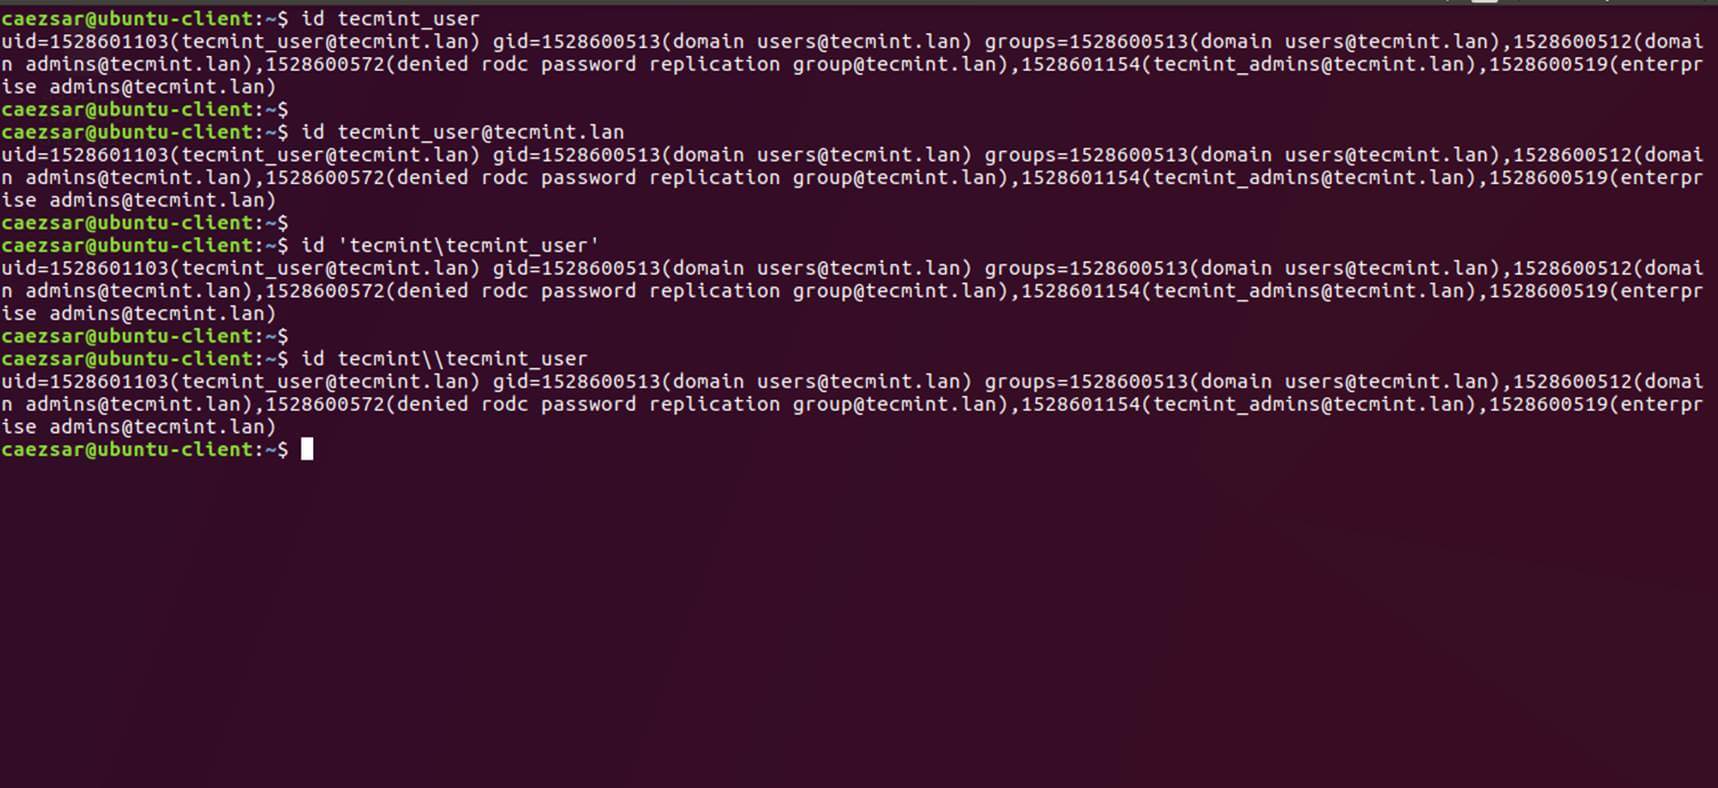
Check AD User Info
22. To authenticate on Ubuntu host with a Samba4 AD account use the domain username parameter after su – command. Run id command to get extra info about the AD account.
$ su - your_ad_user
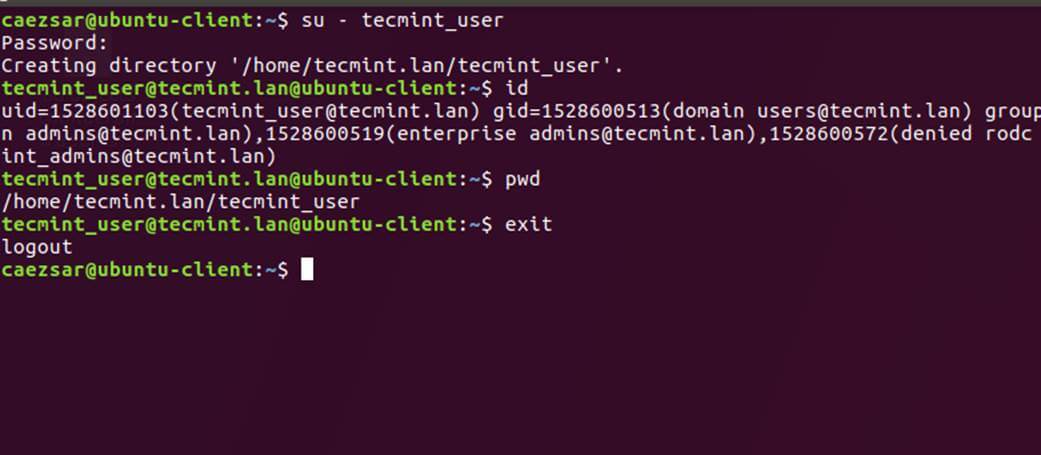
AD User Authentication
Use pwd command to see your domain user current working directory and passwd command if you want to change password.
23. To use a domain account with root privileges on your Ubuntu machine, you need to add the AD username to the sudo system group by issuing the below command:
$ sudo usermod -aG sudo your_domain_user@domain.tld
Login to Ubuntu with the domain account and update your system by running apt update command to check root privileges.
24. To add root privileges for a domain group, open end edit /etc/sudoers file using visudo command and add the following line as illustrated.
%domain\ admins@tecmint.lan ALL=(ALL:ALL) ALL
25. To use domain account authentication for Ubuntu Desktop modify LightDM display manager by editing /usr/share/lightdm/lightdm.conf.d/50-ubuntu.conf file, append the following two lines and restart lightdm service or reboot the machine apply changes.
greeter-show-manual-login=true
greeter-hide-users=true
Log in to Ubuntu Desktop with a domain account using either your_domain_username or your_domain_username@your_domain.tld syntax.
26. To use short name format for Samba AD accounts, edit /etc/sssd/sssd.conf file, add the following line in [sssd] block as illustrated below.
full_name_format = %1$s
and restart SSSD daemon to apply changes.
$ sudo systemctl restart sssd
You will notice that the bash prompt will change to the short name of the AD user without appending the domain name counterpart.
27. In case you cannot login due to enumerate=true argument set in sssd.conf you must clear sssd cached database by issuing the below command:
$ rm /var/lib/sss/db/cache_tecmint.lan.ldb
That’s all! Although this guide is mainly focused on integration with a Samba4 Active Directory, the same steps can be applied in order to integrate Ubuntu with Realmd and SSSD services into a Microsoft Windows Server Active Directory.
Integrate VMware ESXI to Samba4 AD Domain Controller – Part 16
This guide will describe how to integrate a VMware ESXI host into a Samba4 Active Directory Domain Controllerin order to authenticate in VMware vSphere Hypervisors across network infrastructure with accounts provided by a single centralized database.
Requirements
Step 1: Configure VMware ESXI Network for Samba4 AD DC
1. Preliminary steps before joining a VMware ESXI to a Samba4 require that the hypervisor has the proper Samba4 AD IP addresses configured in order to query the domain via DNS service.
To accomplish this step from VMware ESXI direct console, reboot the hypervisor, press F2 to open the direct console (also called DCUI) and authenticate with the root credentials assigned for the host.
Then, using the keyboard arrows navigate to Configure Management Network -> DNS Configuration and add the IP addresses of your Samba4 Domain Controllers in Primary and Alternate DNS Server fields.
Also, configure the hostname for the hypervisor with a descriptive name and press [Enter] to apply changes. Use the below screenshots as a guide.

VMware ESXI Console
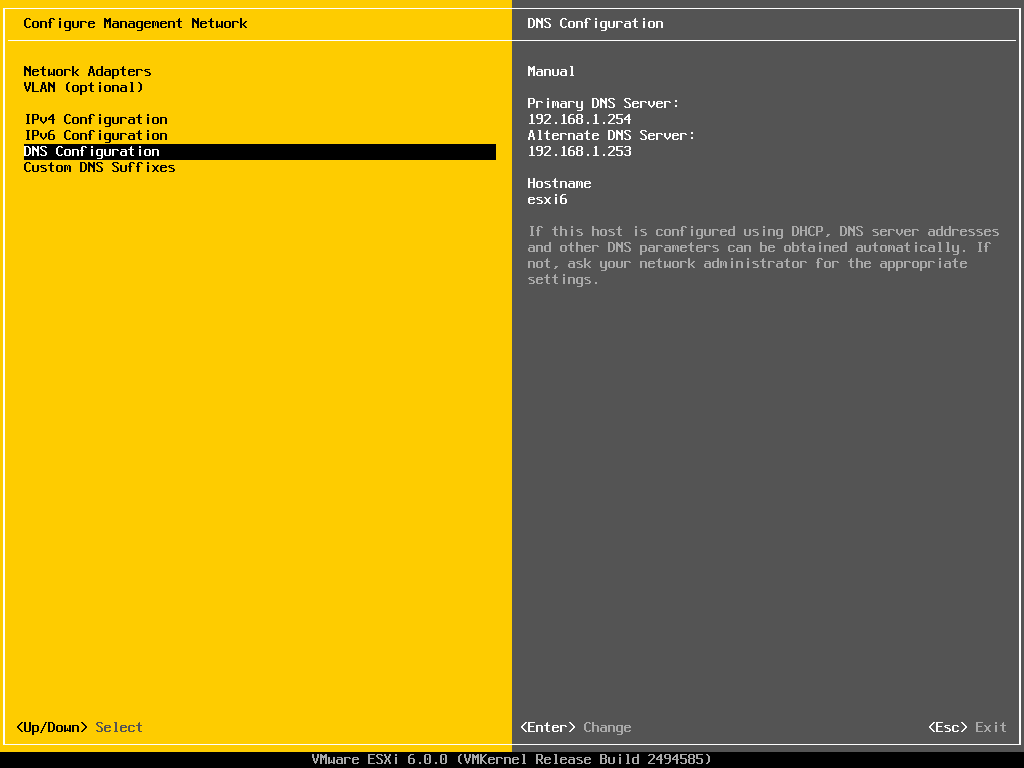
VMware ESXI DNS Configuration
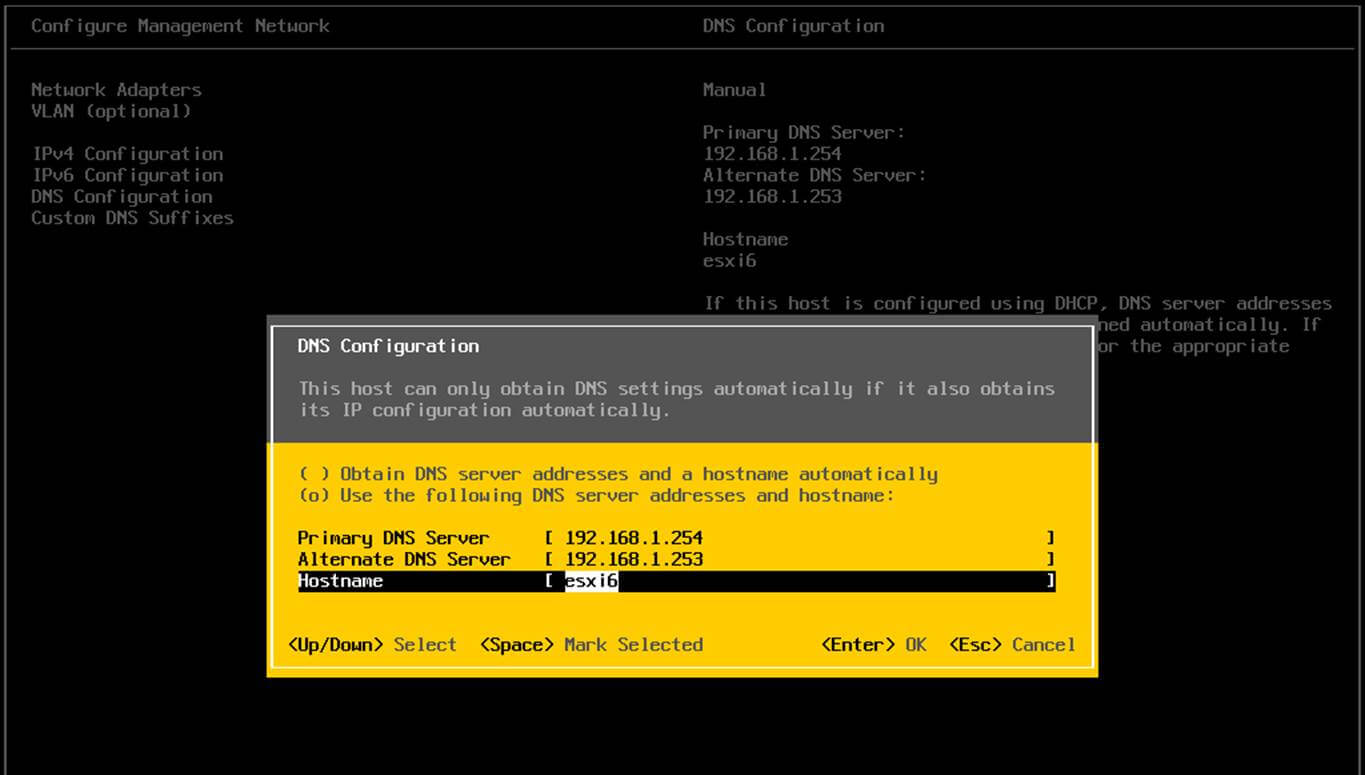
VMware ESXI Set Hostname
2. Next, go to Custom DNS Suffixes, add the name of your domain and press [Enter] key to write changes and return to main menu.
Then, go to Restart Management Network and press [Enter] key restart the network service in order to apply all changes made so far.
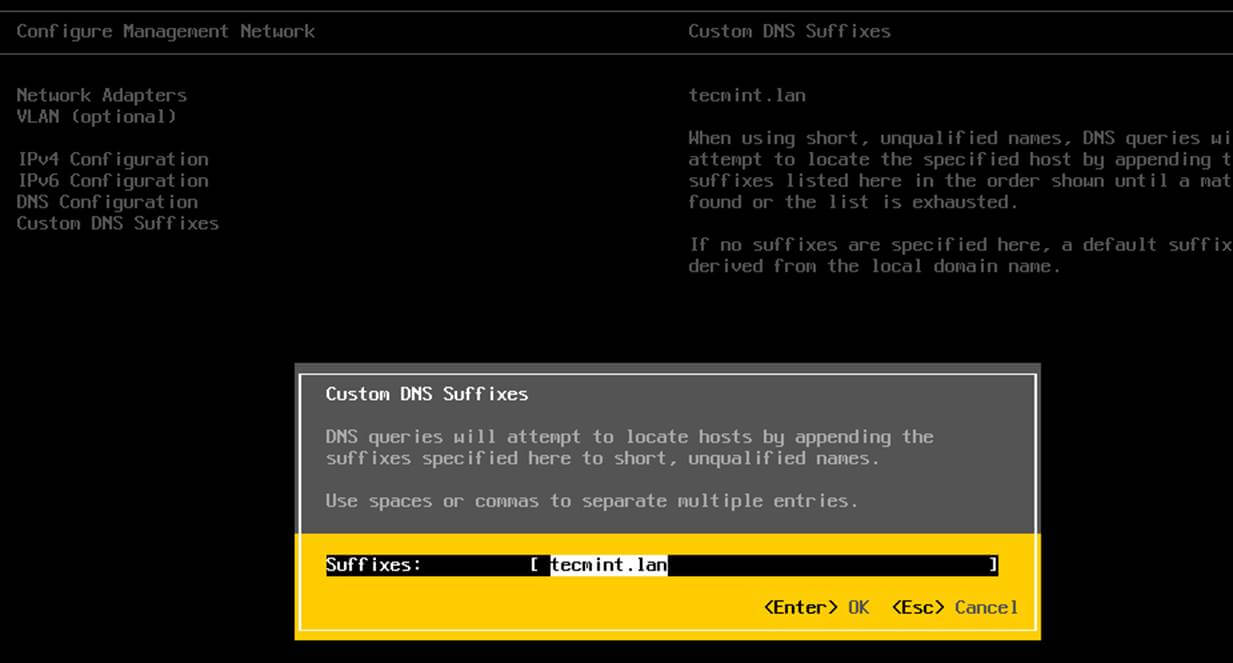
VMware ESXI Custom DNS Suffix
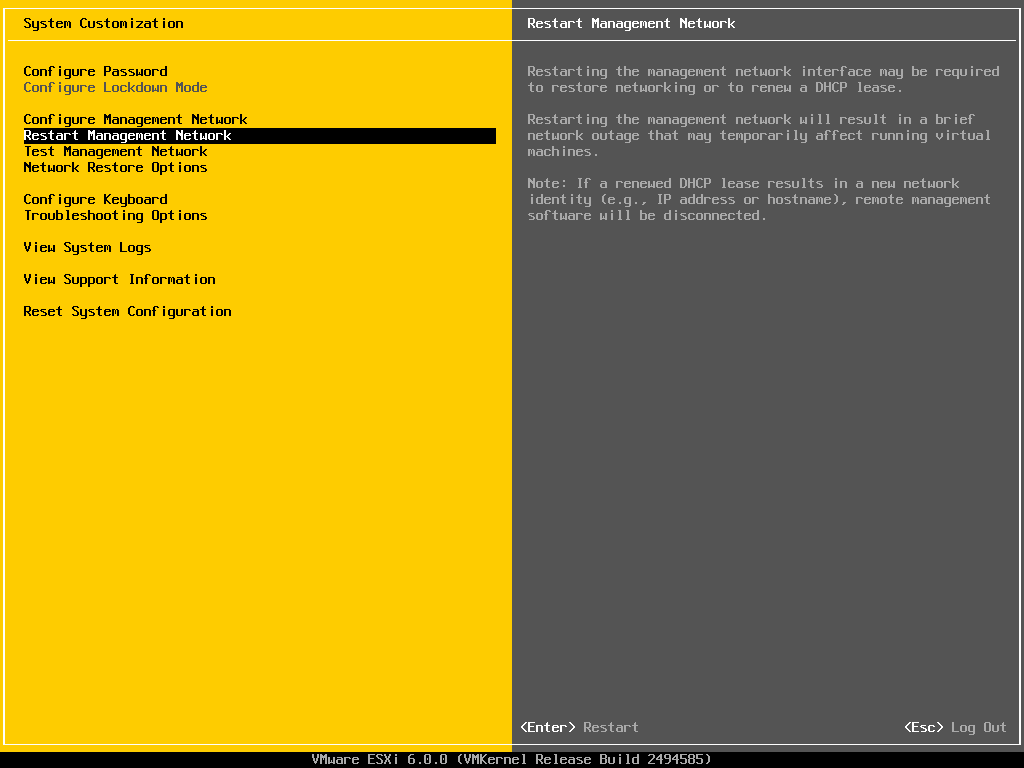
VMware ESXI Network Management
3. Finally, make sure that gateway and Samba DNS IPs are reachable from the hypervisor and test if the DNS resolution works as expected by selecting Test Management Network from the menu.
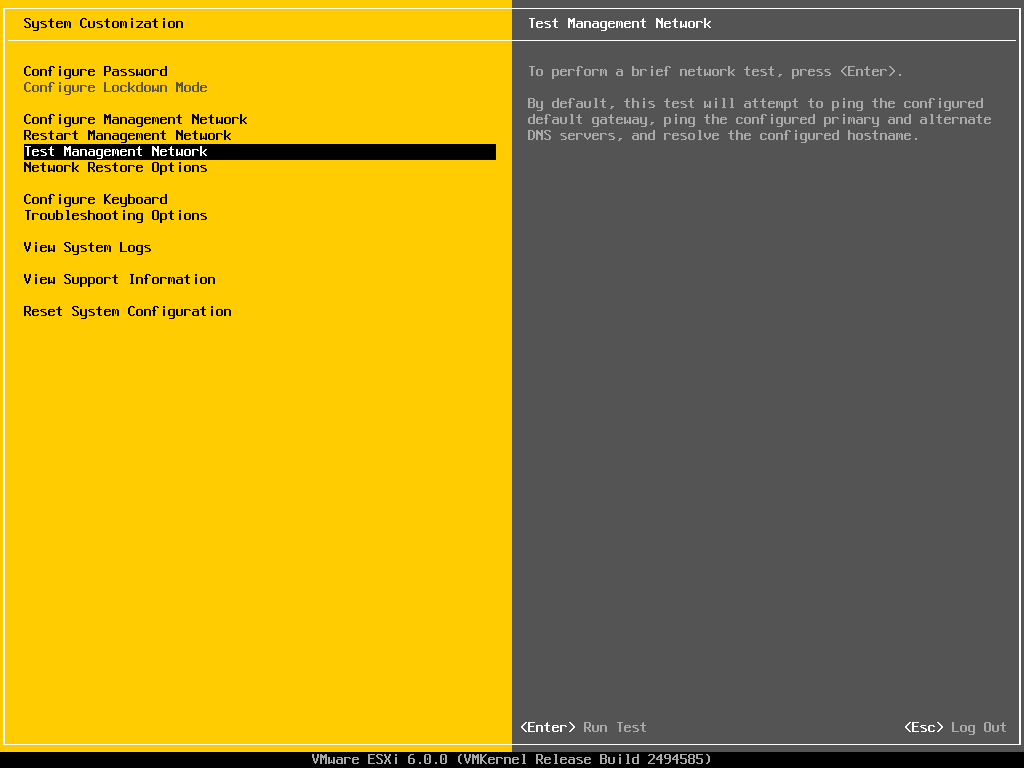
VMware ESXI Test Management Network
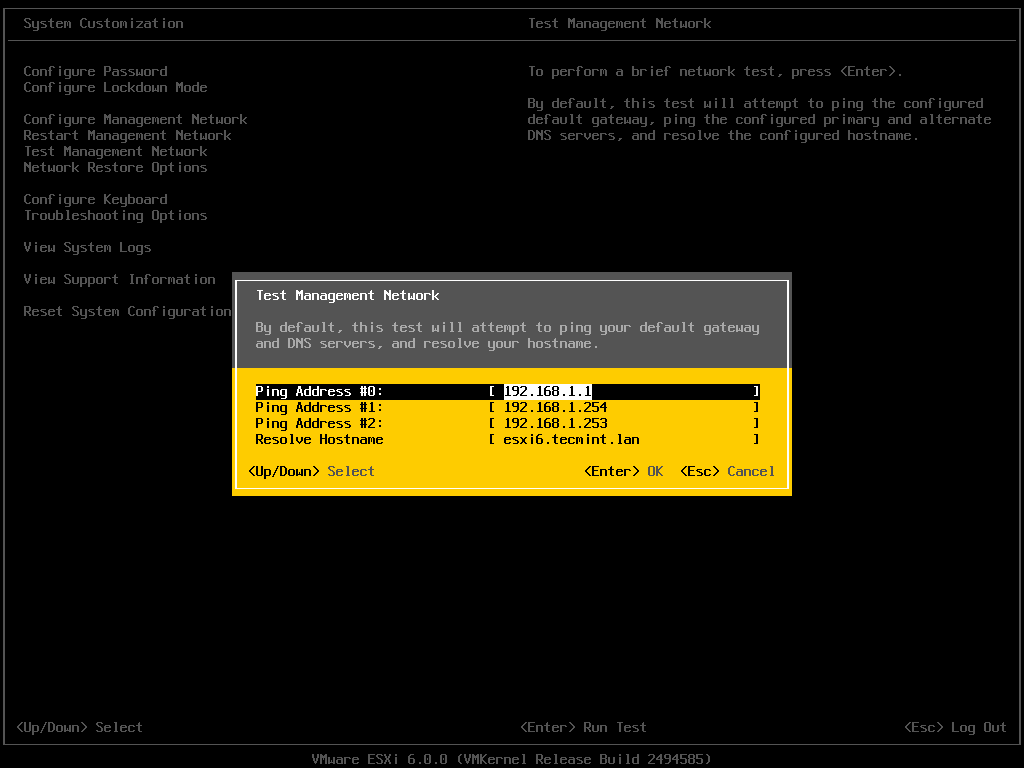
Test Samba DNS IP
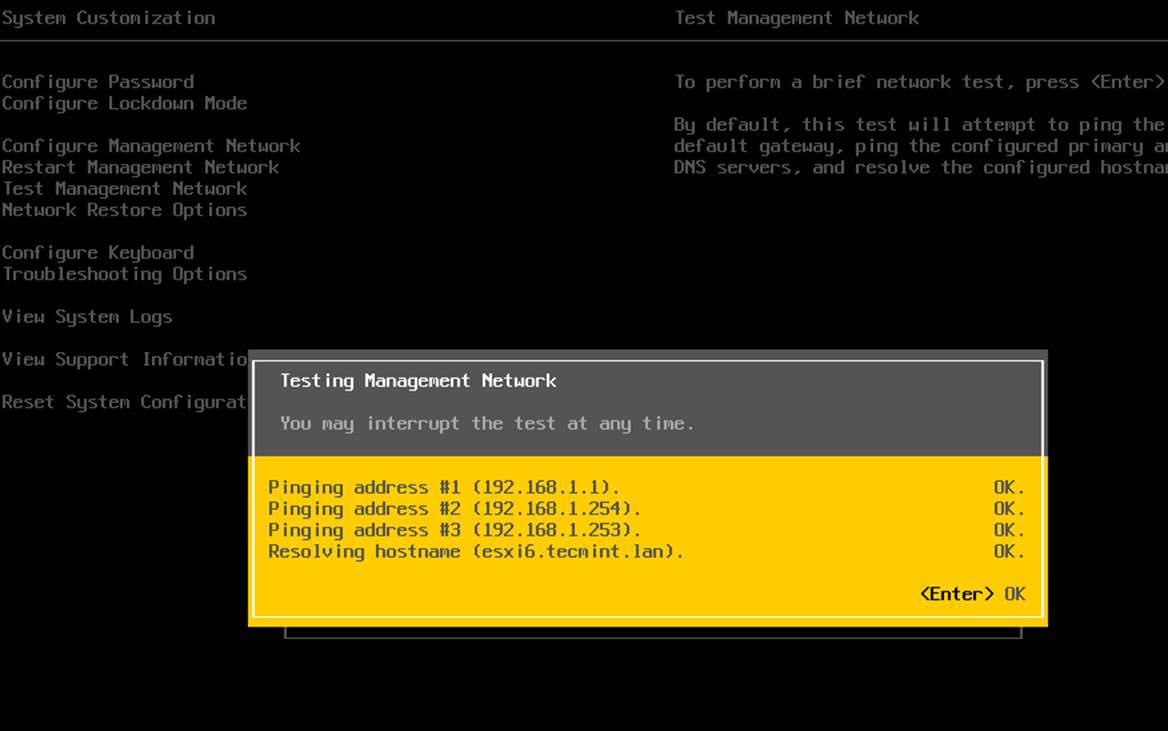
Confirm Samba DNS IP
Step 2: Join VMware ESXI to Samba4 AD DC
4. All the steps performed from now on will be made through the VMware vSphere Client. Open VMware vSphere Client and login to your hypervisor IP address with the default root account credentials or with other account with root privileges on the hypervisor if that’s the case.
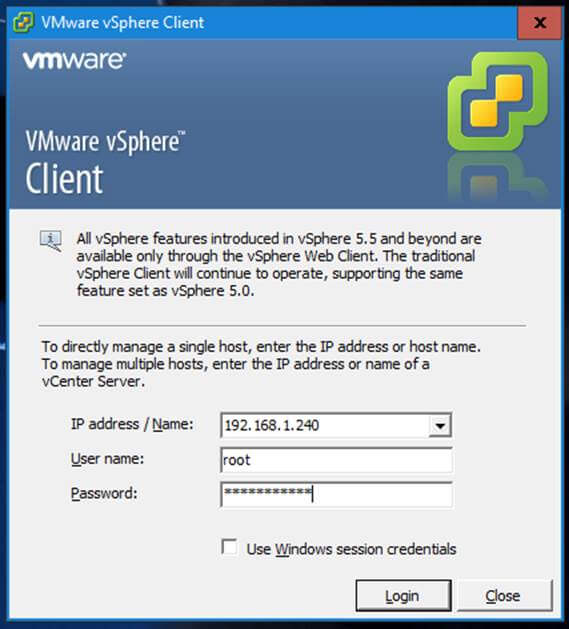
VMware vSphere Client
5. Once you’ve entered the vSphere console, before actually joining to the domain, make sure that the hypervisor’s time is in sync with Samba domain controllers.
To accomplish this, navigate to the upper menu and hit on Configuration tab. Then, go to left box Software -> Time Configuration and hit Properties button from upper right plane and the Time Configuration window should open as illustrated below.
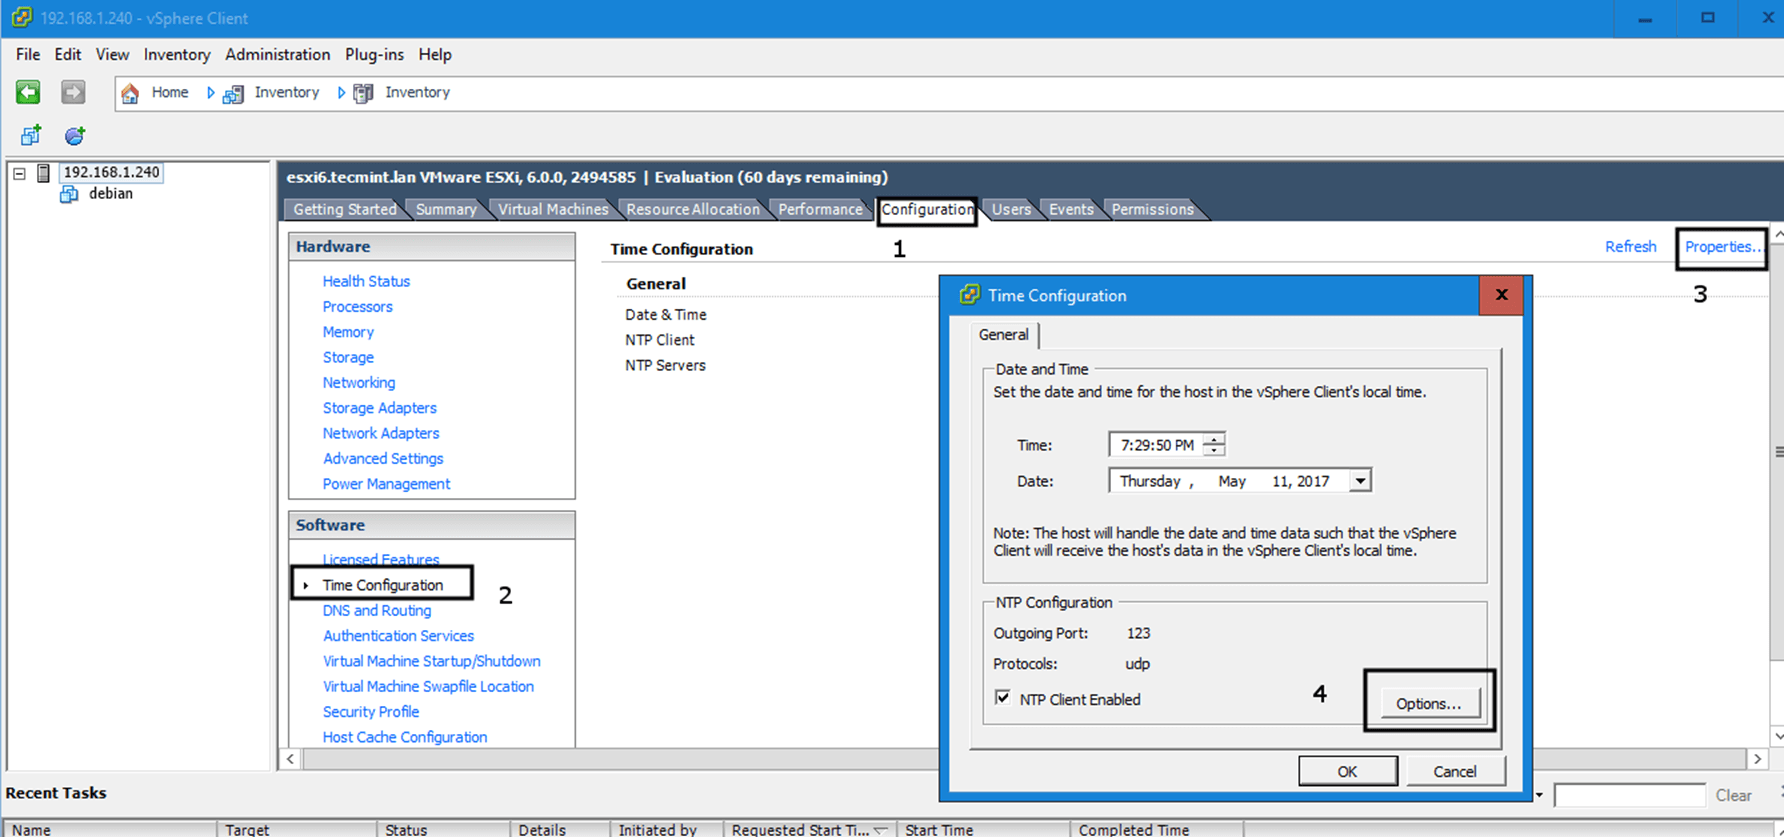
VMware vSphere Client Time Configuration
6. On Time Configuration window hit on Options button, navigate to NTP Settings and add the IP addresses of your domain time providers (usually the IP addresses of your Samba domain controllers).
Then go to General menu and start the NTP daemon and choose to start and stop the NTP service with the hypervisor as illustrated below. Press OK button to apply changes and close both windows.
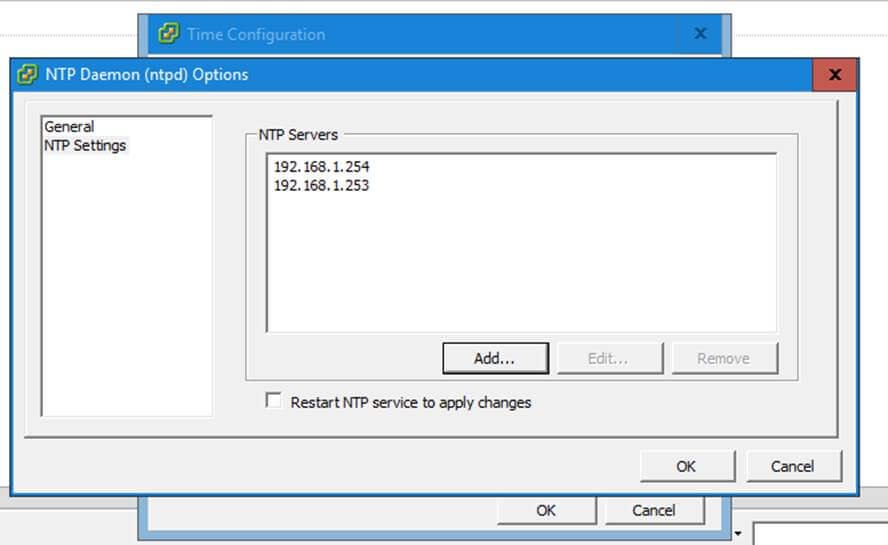
Add NTP Server IP
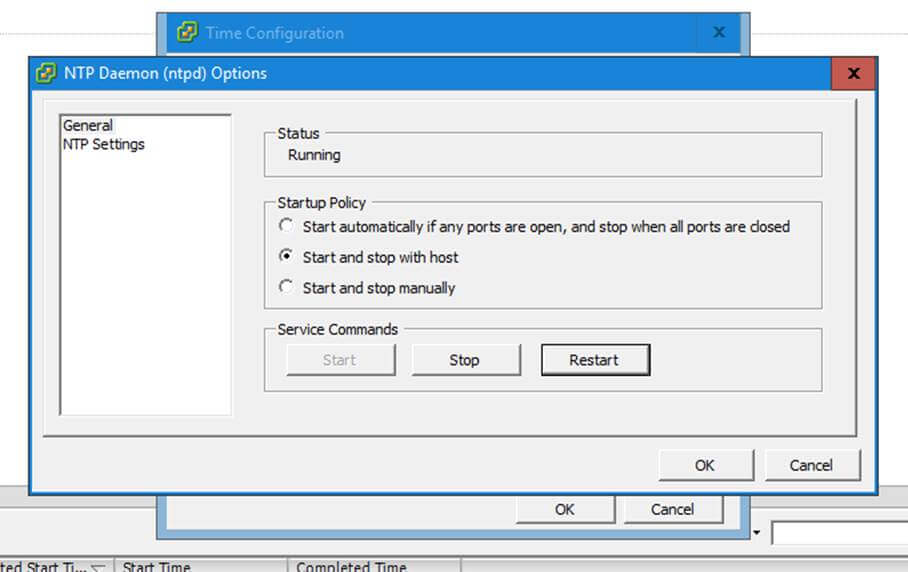
Manage NTP Service
7. Now you can join VMware ESXI hypervisor to Samba domain. Open Directory Services Configuration window by hitting on Configuration -> Authentication Services –> Properties.
From the window prompt select Active Directory as Directory Service Type, write the name of your domain with uppercase click on Join Domain button to perform the domain binding.
On the new prompt you will be asked to add the credentials of a domain account with elevated privileges to perform the joining. Add the username and password of a domain account with administrative privileges and hit Join Domain button to integrate into the realm and OK button to close the window.

Join VMware ESXI Hypervisor to Samba
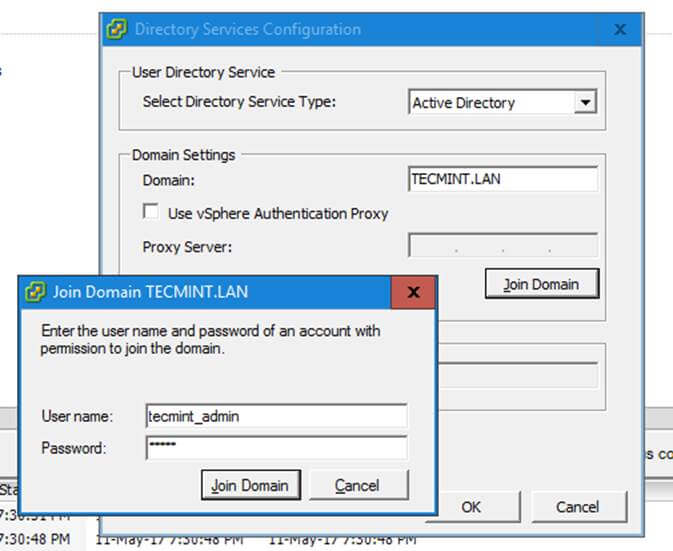
Directory Services Configuration
8. In order to verify if the ESXI hypervisor has been integrated to Samba4 AD DC, open AD Users and Computersfrom a Windows machine with RSAT tools installed and navigate to your domain Computers container.
The hostname of VMware ESXI machine should be listed on the right plane as illustrated below.
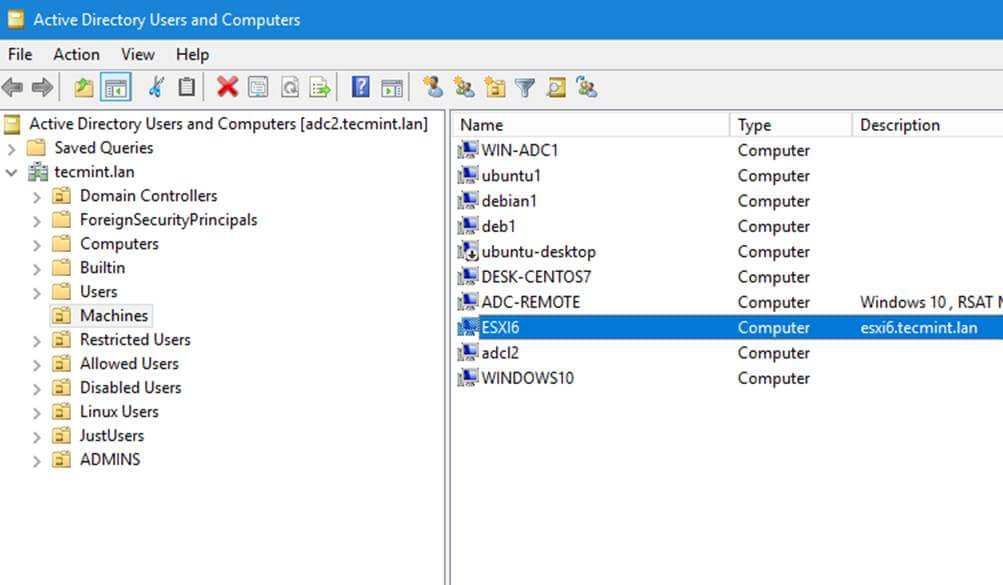
AD Users and Computers
Step 3: Assign Permissions for Domain Accounts to ESXI Hypervisor
9. In order to manipulate different aspects and services of the VMware hypervisor you might want to assign certain permissions and roles for domain accounts in VMware ESXI host.
To add permissions hit on upper Permissions tab, right-click anywhere in the permissions plane and choose Add Permission from the menu.
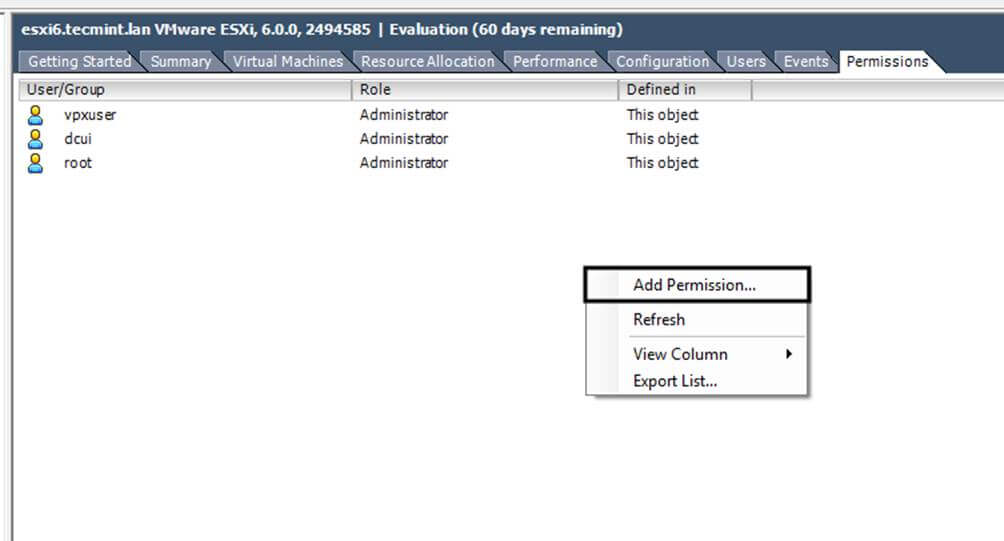
Assign Permissions for Domain Accounts
10. In the Assign Permissions window hit on the below left Add button, select your domain and type the name of a domain account in search filed.
Choose the proper username from the list and hit Add button to add the account. Repeat the step if you want to add other domain users or groups. When you finish adding the domain users hit OK button to close the window and return previous setting.
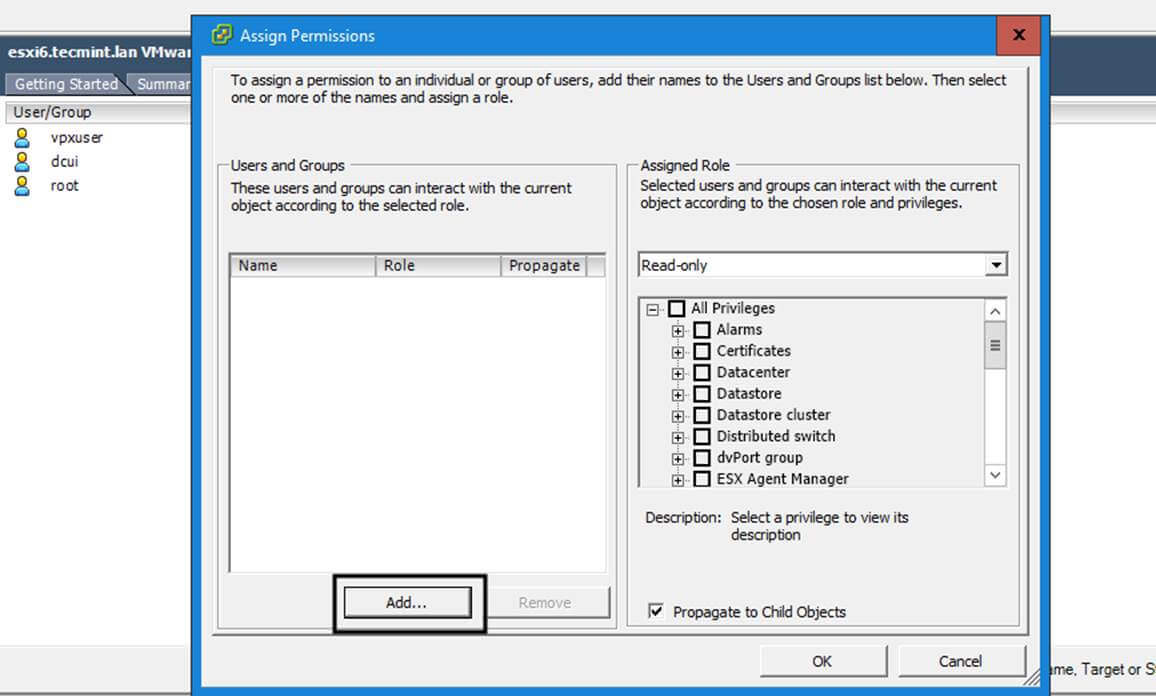
Assign Permissions
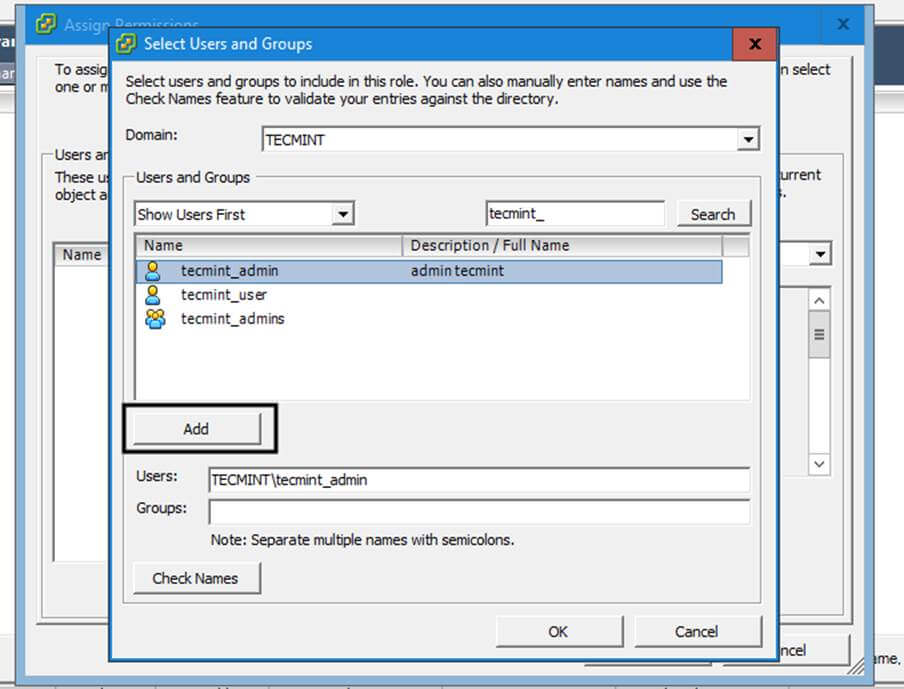
Select Users and Groups
11. To assign a role for a domain account, select the desired name from the left plane and choose a predefined role, such as Read-only or Administrator from the right plane.
Check the proper privileges you want to grant for this user and hit OK when you finish in order to reflect changes.

Assign Admin User for Domain
12. That’s all! The authentication process in VMware ESXI hypervisor from VSphere Client with a Samba domain account is pretty straightforward now.
Just add the username and the password of a domain account in the login screen as shown in the below picture. Depending on level of permissions grated for the domain account you should be able to manage the hypervisor completely or just some parts of it.
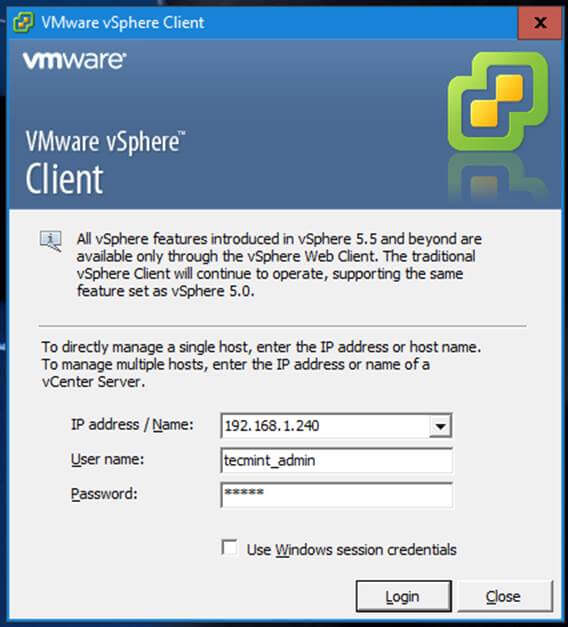
VMware vSphere Client Login
Although this tutorial mainly included only the steps required to join a VMware ESXI hypervisor into a Samba4 AD DC, the same procedure as described in this tutorial applies for integrating a VMware ESXI host into a Microsoft Windows Server 2012/2016 realm.