
phpMyBackupPro is an open source very easy to use web based MySQL backup application, written in PHPlanguage released under the GNU GPL. It allows you to create schedule backups, restore and manage them, download, email, or upload backups to any FTP server and lot more. It also takes File directories backup and upload them on a FTP Server.
It supports three compression levels of backups (No compression, zip or gzip compression). It also supports two alternative security login methods, HTTP or HTML authentication.
Features
Following are some major key features of “phpMyBackupPro“.
- Single or Multiple database backup support with or without data, table structure.
- Three level of compression supported are no compression, gzip or zip compression.
- Create scheduled backups without cron jobs using small PHP script.
- Upload backups directly onto FTP server and posting of backups by email.
- Only Apache and PHP needed to run on platforms like Linux, Mac or Windows.
- Shell interface to take backups manually or by using cron script.
- Whole File directory backup and move them to any FTP server.
- Take databases backup from different accounts on several MySQL servers.
- Two security authentication methods supported HTTP or HTML login authentication.
- Friendly interface and very easy to install and setup.
- Multiple language supported.
Taking MySQL backups and restoring them from command line is always a good practice, but if what when you don’t have physical access to server. In that, situation phpMyBackupPro tool comes in handy.
How to Install phpMyBackupPro in RHEL/CentOS/Fedora and Debian/Ubuntu
For installing phpMyBackupPro application, you must have running Apache web server and PHP installed on the server. Let’s install these required packages on the server.
Install Apache and PHP
Install on Red Hat based systems using yum command.
# yum install httpd
# yum install php php-mysql
# service httpd start
Install on Debian based systems using apt-get command.
# apt-get install apache2
# apt-get install php5 libapache2-mod-auth-mysql php5-mysql
# service apache2 start
The newest phpMyBackupPro version can be downloaded from phpMyBackupPro website or you may use following “wget” command to download.
# cd /usr/share
# wget http://kaz.dl.sourceforge.net/project/phpmybackup/phpMyBackupPro/phpmyBackupPro%202.4/phpMyBackupPro-2.4.zip
Unzip the phpMyBackupPro zip file under /usr/share/ directory.
# unzip phpMyBackupPro-2.4.zip
For security reasons, it’s better to place the content of the folder under /usr/share/phpmybackup directory.
# cd phpMyBackupPro-2.4
# mv phpMyBackupPro/ /usr/share/phpmybackup
# mv documentation/ /usr/share/phpmybackup/
Next go to Apache “conf.d” directory and create a file named “phpmybackup.conf” under it. For Red Hat based systems path should be (/etc/httpd/conf.d/) and for Debain (/etc/apache2/conf.d).
# vi phpmybackup.conf
Append the following lines to it. Save and close. The below rules by default enable access to all, if you want to restrict the access to specific IP. Replace “all” with your IP address”. For example, the line should be “allow from 172.16.25.125“.
Alias /phpmybackup /usr/share/phpmybackup
<Directory /usr/share/phpmybackup>
   Options None
   Order allow,deny
   allow from all
</Directory>
Restart Apache service.
# /etc/init.d/httpd restart (On Red Hat systems)

# /etc/init.d/apache2 restart (On Debian systems)
On some systems, certain files must have write permissions for the file “global_conf.php” and for the “export” directory.
# cd /usr/share/

# chown -R root:apache phpmybackup (On Red Hat systems)

# chown -R root:www-data phpmybackup (On Debian systems)

# cd /usr/share/phpmybackup/
# chmod 0777 global_conf.php
# chmod 0777 export
Now you are almost ready to start phpMyBackupPro. Navigate to the browser and load the config.php file like this.
http://localhost/phpmybackup/config.php
OR
http://ip-address/phpmybackup/config.php
In the configuration tab insert your MySQL details, like hostname, username, password and database name. If you would like to setup FTP to save backups, enter FTP login details as shown below.
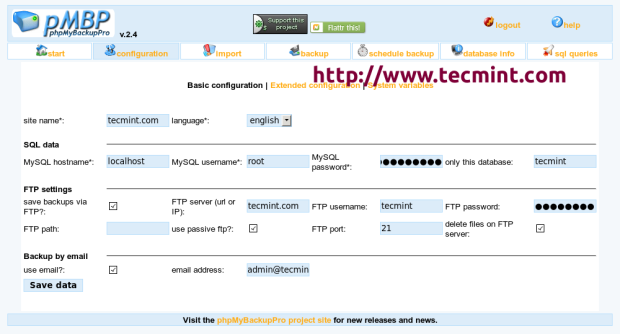
Configuration Panel
Next, click on “backup” tab to see list of your MySQL database and select the database name that you wish to take backup.
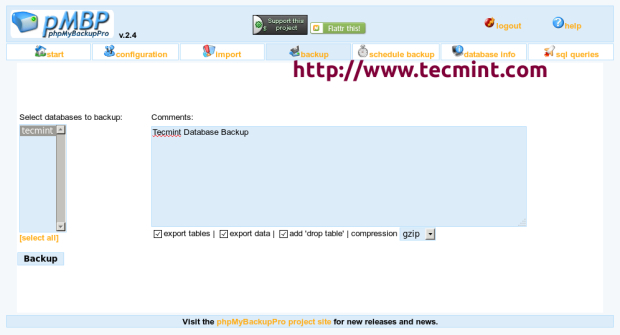
Backup Panel
Schedule backup has two popular ways to schedule backups:
- By including the schedule script into existing application.
- By using a hidden frame in a HTML frameset.
To schedule a backup, you must first create a schedule script. Go to “schedule backup” tab.
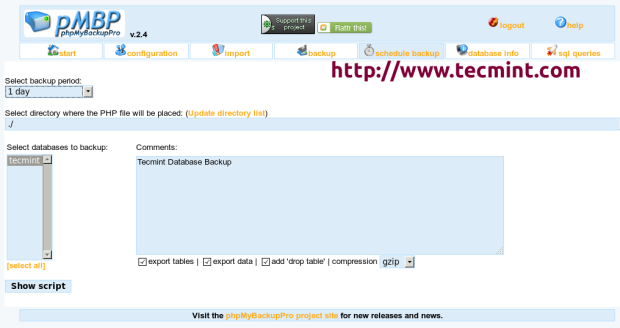
Schedule Backup
Select how often you want a backup to be generated. Then you have to choose the directory of that PHP script which will include the schedule script later. After that select the name of the database to backup, enter a comment, select compression type and finally click on “Show script” button. On the next page you will see the newly created schedule script.
Instead of copying generated code to new file, you can save the code by giving a filename like “schedule_backup.php” in the text box and click on “Save data” to save. For more information read “SCHEDULED_BACKUPS.txt” file under documentation directory.
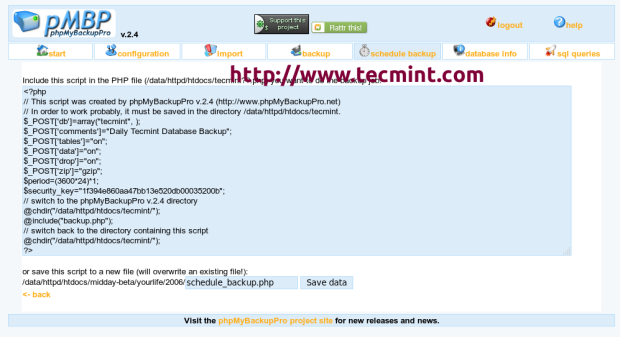
Backup Script
The “sql queries” tab build to run simple sql queries to the databases or import databases from the local computer.

SQL Query Shell
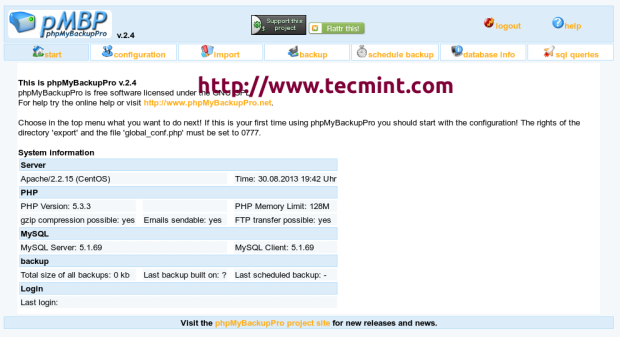
The “start” tab display your current Apache, PHP and MySQL version information.
Version Information
phpMyBackupPro is by far the easiest backup solution for MySQL. If you are handling MySQL server, then pMBP is a must needed application that can help you to save your precious data with minimum effort.