
Learn Useful ‘Vi/Vim’ Editor Tips and Tricks to Enhance Your Skills – Part 1
The need to learn how to use text editors in Linux is indisputable. Every system administrator and engineer deal with configuration (plain text) files on a daily basis, and most times this is done purely using one or more tools from a command-line interface (such as nano, vim, or emacs).

Learn Linux Vi and Vim Tricks and Tips – Part 1
While nano is perhaps more suitable for new users, vim or emacs are the tool of choice for more experienced users due to its advanced capabilities.
But there is yet another reason why learning how to use one of this text editors should be a top priority for you: you may either bump into a CLI-only server or run into an issue with the desktop manager in your GUI-based Linux server or desktop and the only resource to examine it and edit configuration files is the command line.
Between this article and the next of this 2-article series, we will review 15 tips and tricks for enhancing your vimskills. It is assumed that you are already familiar with this text editor. If not, do yourself a favor and become acquainted with vim before proceeding further: you may want to refer to How to Use vi/vim as a Full Text Editorfor a very detailed guide on starting with vim.
Part 2: 8 Interesting ‘Vi/Vim’ Editor Tips and Tricks
TIP #1: Using the online help
After you launch vim, press F1 or use :h in ex mode to enter the online help. You can jump to a specific section or topic by placing the cursor upon it and then pressing Ctrl+] (Ctrl, then the closing square bracket).
After you’re done, press Ctrl+t to return to the previous screen. Alternatively, you can look up a specific subject or command with :h <topic or command>.
For example,
:h x
will display the help for the x (delete) command:
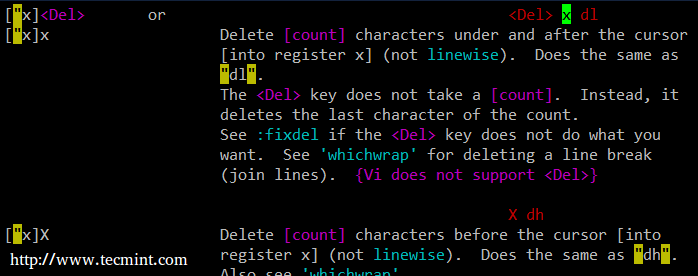
Vi Editor Online Help
and
:h substitute
will bring up the help about the substitute command (our final tip in this article).
TIP #2: Jump back and forth using marks
If you find yourself editing a file that is larger than one screen, you will appreciate the functionality provided by marks. You can think of a mark in vim as a bookmark – once you place it somewhere, you can go back to it quickly and easily. Suppose you are editing a 300-word configuration file and for some reason need to repeatedly switch between lines 30 and 150 for example.
First, go to line #30 by entering :30 in ex mode, then return to command mode and hit ma (m, then a) to create a mark named “a” in line 30.
Then go to line 250 (with :250 in ex mode) and hit `a (backtick, then a) to return to mark a in line 30. You can use lowercase and uppercase letters to identify marks in vim (now repeat the process to create a mark named Ain line #250).
You can view your marks with
:marks aA
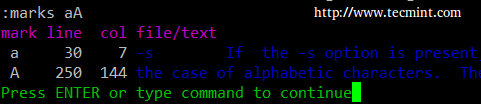
Marks Usage in Vim Editor
As you can see, each mark is referenced by a specific line / column position on the file, not just by line.
TIP #3: Repeat the last command
Suppose you’re editing a shell script and realize the previous developer was rather lousy when it comes to indentation. Let’s see how you can fix it with a couple of vim commands.
First, select a visual block by placing the cursor at the start of the block, then pressing Ctrl+v (Ctrl, then v).
- To indentate to the left: press
<j - To indentate to the right: press
<j
Then press the . (dot) command to repeat either indentation. The selected block will either move to the right or to the left with only one keystroke.
Another classic example of using the dot command is when you need to delete a series of words: place the cursor on the first word you want to delete, then press dw. To continue deleting the next words, just press .(shorter and easier than repeating dw several times).
TIP #4: Inserting special Unicode characters
If your keyboard layout does not allow to easily insert special Unicode characters in a file, or if you find yourself in front of a server with different language settings than the one you are used to, this trick will come in handy.
To do this, press Ctrl+v in insert mode followed by the letter u and the hexadecimal numeric code for the character you want to insert. You can check the Unicode charts for a list of special characters and their corresponding numeric codes.
For example,
| Ctrl+v followed by | returns |
| u0040 | @ |
| u00B5 | μ |
| u20AC | € |
TIP #5: Invoke external binaries from within vim
There will be times when you will need to insert the output of external commands directly into a file being edited with vim. For example, I often create a variable named DIR in my scripts to store the absolute path to the directory where the script resides in order to use it later in the script. To do that, I use:
:r! pwd
in ex mode. Thus, the current working directory is inserted.
Another example: if you’re required to use the default gateway somewhere in a script, you can easily insert it in the current file without exiting vim as follows:
:!r ip route show | grep default | cut -f 3 -d " "
TIP #6: Insert existing file
If you need to append the contents of a separate file into the one you are currently editing, the syntax is similar to the previous tip. Just omit the exclamation sign and you’re good to go.
For example, to copy the contents of /etc/passwd:
:r /etc/passwd
You may found this tip useful when you need to modify configuration files but want to keep the original ones to roll back to “factory settings” so to speak.
TIP #7: Search and substitute (replace)
True story. Once during an exam, I was asked to open a large text file containing random data. The assigned task consisted of replacing each occurrence of the word Globe with Earth (yes, I still remember the exact words). For those familiar with sed, this will ring a bell – in ex mode, type:
:%s/old/new/g
where old is the pattern to search for and new is the string that will replace it.
In the case described above, I used:
:%s/Globe/Earth/g
to get the job done.
So what about you want to be prompted before making substitutions? Easy. Just add a c at the end of the above command, as follows:
:%s/old/new/gc
The occurrences of the pattern will be highlighted and you will be asked whether you want to replace it with the new string:
:%s/gacanepa/me/gc
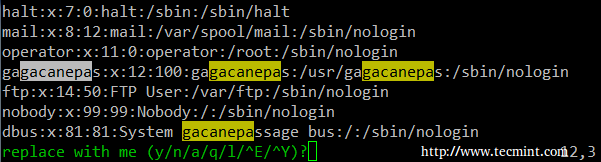
Search and Replace String in Vim
where
- y: yes
- n: no
- a: substitute all
- q: quit
- l: substitute this occurrence and quit
- ^E (Ctrl+E): Scroll up one screen
- ^Y (Ctrl+Y): Scroll down one screen
Summary
In this article we have started reviewing some vim tips and tricks to add to your text editing skills. You will probably think of several others, so please share them using the form below and I will consider covering them in the next and final article of this vim series. I look forward to hearing from you.
Addings: LFCS: How to Install and Use vi/vim as a Full Text Editor – Part 2
A couple of months ago, the Linux Foundation launched the LFCS (Linux Foundation Certified Sysadmin) certification in order to help individuals from all over the world to verify they are capable of doing basic to intermediate system administration tasks on Linux systems: system support, first-hand troubleshooting and maintenance, plus intelligent decision-making to know when it’s time to raise issues to upper support teams.

Learning VI Editor in Linux
Please take a look at the below video that explains The Linux Foundation Certification Program.
This post is Part 2 of a 10-tutorial series, here in this part, we will cover the basic file editing operations and understanding modes in vi/m editor, that are required for the LFCS certification exam.
Perform Basic File Editing Operations Using vi/m
Vi was the first full-screen text editor written for Unix. Although it was intended to be small and simple, it can be a bit challenging for people used exclusively to GUI text editors, such as NotePad++, or gedit, to name a few examples.
To use Vi, we must first understand the 3 modes in which this powerful program operates, in order to begin learning later about the its powerful text-editing procedures.
Please note that most modern Linux distributions ship with a variant of vi known as vim (“Vi improved”), which supports more features than the original vi does. For that reason, throughout this tutorial we will use vi and vim interchangeably.
If your distribution does not have vim installed, you can install it as follows.
- Ubuntu and derivatives: aptitude update && aptitude install vim
- Red Hat-based distributions: yum update && yum install vim
- openSUSE: zypper update && zypper install vim
Why should I want to learn vi?
There are at least 2 good reasons to learn vi.
1. vi is always available (no matter what distribution you’re using) since it is required by POSIX.
2. vi does not consume a considerable amount of system resources and allows us to perform any imaginable tasks without lifting our fingers from the keyboard.
In addition, vi has a very extensive built-in manual, which can be launched using the :help command right after the program is started. This built-in manual contains more information than vi/m’s man page.

vi Man Pages
Launching vi
To launch vi, type vi in your command prompt.

Start vi Editor
Then press i to enter Insert mode, and you can start typing. Another way to launch vi/m is.
# vi filename
Which will open a new buffer (more on buffers later) named filename, which you can later save to disk.
Understanding Vi modes
1. In command mode, vi allows the user to navigate around the file and enter vi commands, which are brief, case-sensitive combinations of one or more letters. Almost all of them can be prefixed with a number to repeat the command that number of times.
For example, yy (or Y) copies the entire current line, whereas 3yy (or 3Y) copies the entire current line along with the two next lines (3 lines in total). We can always enter command mode (regardless of the mode we’re working on) by pressing the Esc key. The fact that in command mode the keyboard keys are interpreted as commands instead of text tends to be confusing to beginners.
2. In ex mode, we can manipulate files (including saving a current file and running outside programs). To enter this mode, we must type a colon (:) from command mode, directly followed by the name of the ex-mode command that needs to be used. After that, vi returns automatically to command mode.
3. In insert mode (the letter i is commonly used to enter this mode), we simply enter text. Most keystrokes result in text appearing on the screen (one important exception is the Esc key, which exits insert mode and returns to command mode).
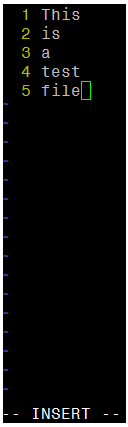
vi Insert Mode
Vi Commands
The following table shows a list of commonly used vi commands. File edition commands can be enforced by appending the exclamation sign to the command (for example, <b.:q! enforces quitting without saving).
| Key command | Description |
| h or left arrow | Go one character to the left |
| j or down arrow | Go down one line |
| k or up arrow | Go up one line |
| l (lowercase L) or right arrow | Go one character to the right |
| H | Go to the top of the screen |
| L | Go to the bottom of the screen |
| G | Go to the end of the file |
| w | Move one word to the right |
| b | Move one word to the left |
| 0 (zero) | Go to the beginning of the current line |
| ^ | Go to the first nonblank character on the current line |
| $ | Go to the end of the current line |
| Ctrl-B | Go back one screen |
| Ctrl-F | Go forward one screen |
| i | Insert at the current cursor position |
| I (uppercase i) | Insert at the beginning of the current line |
| J (uppercase j) | Join current line with the next one (move next line up) |
| a | Append after the current cursor position |
| o (lowercase O) | Creates a blank line after the current line |
| O (uppercase o) | Creates a blank line before the current line |
| r | Replace the character at the current cursor position |
| R | Overwrite at the current cursor position |
| x | Delete the character at the current cursor position |
| X | Delete the character immediately before (to the left) of the current cursor position |
| dd | Cut (for later pasting) the entire current line |
| D | Cut from the current cursor position to the end of the line (this command is equivalent to d$) |
| yX | Give a movement command X, copy (yank) the appropriate number of characters, words, or lines from the current cursor position |
| yy or Y | Yank (copy) the entire current line |
| p | Paste after (next line) the current cursor position |
| P | Paste before (previous line) the current cursor position |
| . (period) | Repeat the last command |
| u | Undo the last command |
| U | Undo the last command in the last line. This will work as long as the cursor is still on the line. |
| n | Find the next match in a search |
| N | Find the previous match in a search |
| :n | Next file; when multiple files are specified for editing, this commands loads the next file. |
| :e file | Load file in place of the current file. |
| :r file | Insert the contents of file after (next line) the current cursor position |
| :q | Quit without saving changes. |
| :w file | Write the current buffer to file. To append to an existing file, use :w >> file. |
| :wq | Write the contents of the current file and quit. Equivalent to x! and ZZ |
| :r! command | Execute command and insert output after (next line) the current cursor position. |
Vi Options
The following options can come in handy while running vim (we need to add them in our ~/.vimrc file).
# echo set number >> ~/.vimrc
# echo syntax on >> ~/.vimrc
# echo set tabstop=4 >> ~/.vimrc
# echo set autoindent >> ~/.vimrc
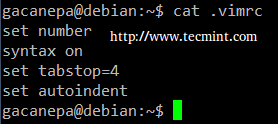
vi Editor Options
- set number shows line numbers when vi opens an existing or a new file.
- syntax on turns on syntax highlighting (for multiple file extensions) in order to make code and config files more readable.
- set tabstop=4 sets the tab size to 4 spaces (default value is 8).
- set autoindent carries over previous indent to the next line.
Search and replace
vi has the ability to move the cursor to a certain location (on a single line or over an entire file) based on searches. It can also perform text replacements with or without confirmation from the user.
a). Searching within a line: the f command searches a line and moves the cursor to the next occurrence of a specified character in the current line.
For example, the command fh would move the cursor to the next instance of the letter h within the current line. Note that neither the letter f nor the character you’re searching for will appear anywhere on your screen, but the character will be highlighted after you press Enter.
For example, this is what I get after pressing f4 in command mode.

Search String in Vi
b). Searching an entire file: use the / command, followed by the word or phrase to be searched for. A search may be repeated using the previous search string with the n command, or the next one (using the N command). This is the result of typing /Jane in command mode.
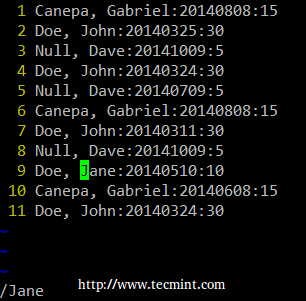
Vi Search String in File
c). vi uses a command (similar to sed’s) to perform substitution operations over a range of lines or an entire file. To change the word “old” to “young” for the entire file, we must enter the following command.
:%s/old/young/g
Notice: The colon at the beginning of the command.
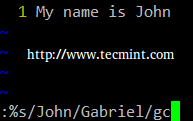
Vi Search and Replace
The colon (:) starts the ex command, s in this case (for substitution), % is a shortcut meaning from the first line to the last line (the range can also be specified as n,m which means “from line n to line m”), old is the search pattern, while young is the replacement text, and g indicates that the substitution should be performed on every occurrence of the search string in the file.
Alternatively, a c can be added to the end of the command to ask for confirmation before performing any substitution.
:%s/old/young/gc
Before replacing the original text with the new one, vi/m will present us with the following message.
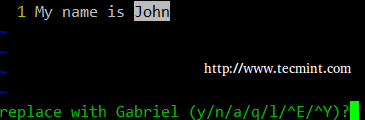
Replace String in Vi
- y: perform the substitution (yes)
- n: skip this occurrence and go to the next one (no)
- a: perform the substitution in this and all subsequent instances of the pattern.
- q or Esc: quit substituting.
- l (lowercase L): perform this substitution and quit (last).
- Ctrl-e, Ctrl-y: Scroll down and up, respectively, to view the context of the proposed substitution.
Editing Multiple Files at a Time
Let’s type vim file1 file2 file3 in our command prompt.
# vim file1 file2 file3
First, vim will open file1. To switch to the next file (file2), we need to use the :n command. When we want to return to the previous file, :N will do the job.
In order to switch from file1 to file3.
a). The :buffers command will show a list of the file currently being edited.
:buffers
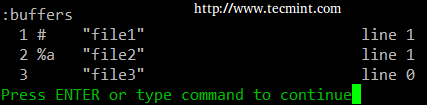
Edit Multiple Files
b). The command :buffer 3 (without the s at the end) will open file3 for editing.
In the image above, a pound sign (#) indicates that the file is currently open but in the background, while %amarks the file that is currently being edited. On the other hand, a blank space after the file number (3 in the above example) indicates that the file has not yet been opened.
Temporary vi buffers
To copy a couple of consecutive lines (let’s say 4, for example) into a temporary buffer named a (not associated with a file) and place those lines in another part of the file later in the current vi section, we need to…
1. Press the ESC key to be sure we are in vi Command mode.
2. Place the cursor on the first line of the text we wish to copy.
3. Type “a4yy” to copy the current line, along with the 3 subsequent lines, into a buffer named a. We can continue editing our file – we do not need to insert the copied lines immediately.
4. When we reach the location for the copied lines, use “a before the p or P commands to insert the lines copied into the buffer named a:
- Type “ap to insert the lines copied into buffer a after the current line on which the cursor is resting.
- Type “aP to insert the lines copied into buffer a before the current line.
If we wish, we can repeat the above steps to insert the contents of buffer a in multiple places in our file. A temporary buffer, as the one in this section, is disposed when the current window is closed.
Summary
As we have seen, vi/m is a powerful and versatile text editor for the CLI. Feel free to share your own tricks and comments below.
Reference Links
Update: If you want to extend your VI editor skills, then I would suggest you read following two guides that will guide you to some useful VI editor tricks and tips.
Part 1: Learn Useful ‘Vi/Vim’ Editor Tips and Tricks to Enhance Your Skills
Part 2: 8 Interesting ‘Vi/Vim’ Editor Tips and Tricks
8 Interesting ‘Vi/Vim’ Editor Tips and Tricks for Every Linux Administrator – Part 2
In the previous article of this series we reviewed 7 tips and tricks to add to your vi/m skills set. Besides the reasons given previously, learning how to use effectively a text editor in Linux in an essential ability for a system administrator or engineer and is a required competency to pass any major Linux certification program (such as LFCS, LFCE, RHCSA, and RHCE).

8 Interesting ‘Vi/Vim’ Editor Tips and Tricks – Part 2
That said, let’s get started.
TIP #8: Create horizontal or vertical windows
This tip was shared by Yoander, one of our readers, in Part 1. You can launch vi/m with multiple horizontal or vertical divisions to edit separate files inside the same main window:
Launch vi/m with two horizontal windows, with test1 at the top and test2 at the bottom
# vim -o test1 test2
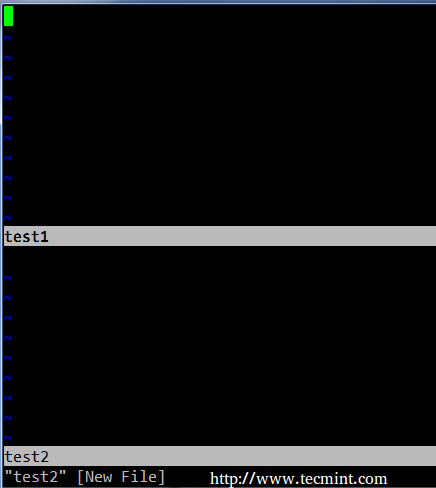
Launch Vim Editor in Horizontal Windows
Launch vi/m with two vertical windows, with test3 on the left and test4 on the right:
# vim -O test3 test4
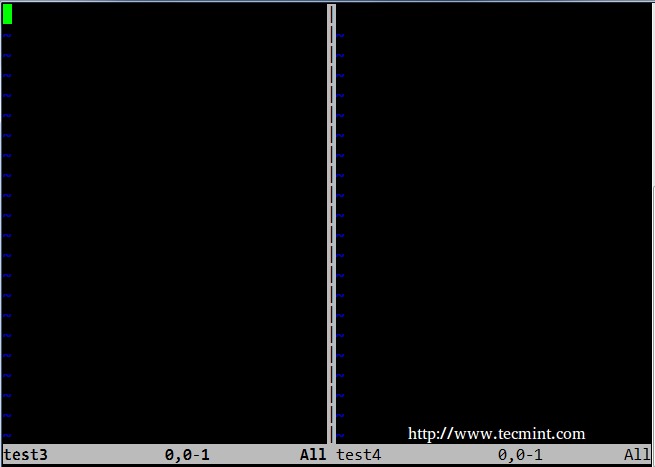
Launch Vim Editor in Vertical Windows
You can switch the cursor from one window to another with the usual vi/m movement routine (h: right, l: left, j:bottom, k: top):
- Ctrl+w k – top
- Ctrl+w j – bottom
- Ctrl+w l – left
- Ctrl+w h – right
TIP #9: Change letters, words, or entire lines to UPPERCASE or lowercase
Please note that this tip only works in vim. In the next examples, X is an integer number.
- To change a series of letters to uppercase, position the cursor on the first letter, then type gUX in ex mode, and finally press the right arrow on the keyboard.
- To change X number of words, place the cursor at the beginning of the word, and type gUXw in ex mode.
- To change an entire line to uppercase, place the cursor anywhere on the line and type gUU in ex mode.
For example, to convert an entire lowercase line to uppercase, you should place the cursor anywhere on the line and type gUU:

Change String to Uppercase in Vim Editor
For example, to convert 2 uppercase words to lowercase, you should place the cursor at the beginning of the first word and type gu2w:
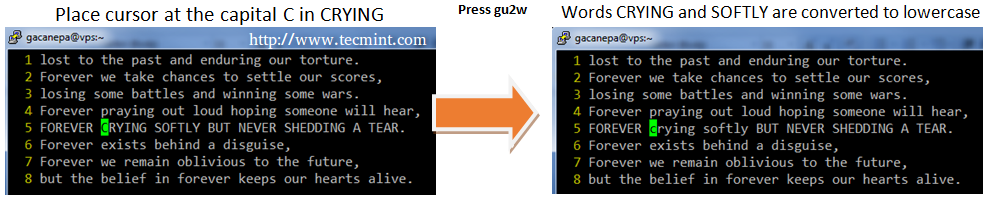
Convert String to Lowercase in Vim Editor
TIP #10: Delete characters, words, or to the beginning of a line in INSERT mode
While you can delete characters or several words at once in ex mode (i.e. dw to delete a word), you can also do so in Insert mode as follows:
- Ctrl + h: delete the previous character to the place where the cursor is currently located.
- Ctrl + w: delete the previous word to the place where the cursor is currently located. For this to work correctly, the cursor must be placed in an empty space after the word that you need to delete.
- Ctrl + u: delete the current line beginning at the character immediately to the left of the place where the cursor is.
TIP #11: Move or copy existing lines to another line of the document
While it is true that you can use the well-known dd, yy, and p commands in ex mode to delete, yank (copy) and paste lines, respectively, that only works when the cursor is placed where you want to perform those operations. The good news is that with the copy and move commands you can do the same regardless of where the cursor is currently placed.
For the next example we will use a short poem titled “Forever” by Terri Nicole Tharrington. To begin, we will have vim display the line numbers (:set nu in Command mode – consider this an extra tip). We will use :3copy5 (also in Command mode) to copy line 3 below line 5:
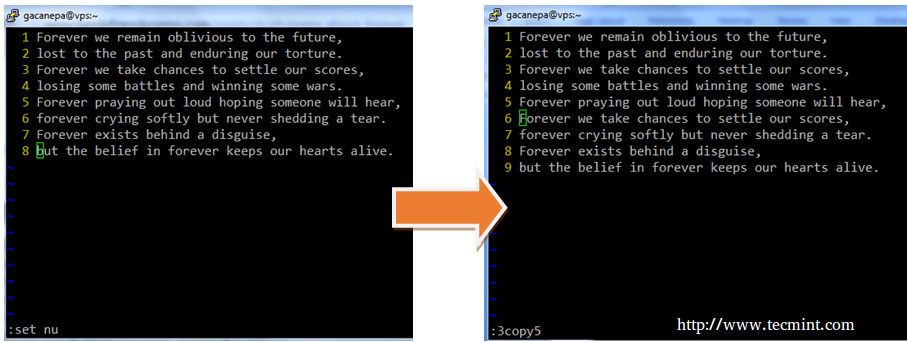
Move Copy Existing Lines in Vim
Now, undo last change (Esc + u – another bonus tip!) and type :1move7 to replace line 7 with line 1. Please note how lines 2 through 7 are shifted up and former line 1 now occupies line 7:
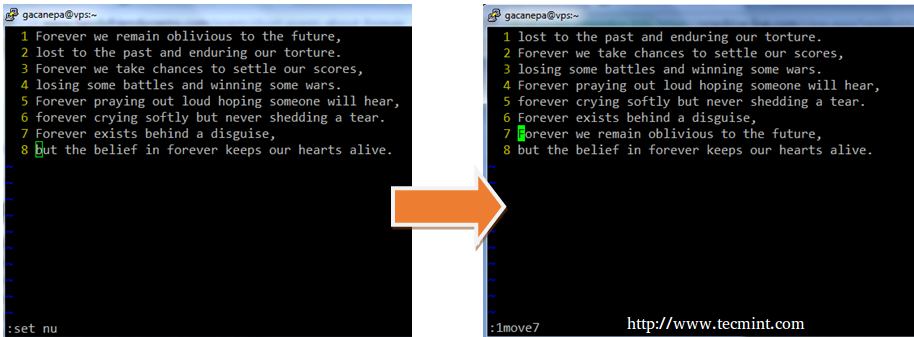
Move Lines in Vim Editor
TIP #12: Count matches resulting from a search by pattern and move from one occurrence to another
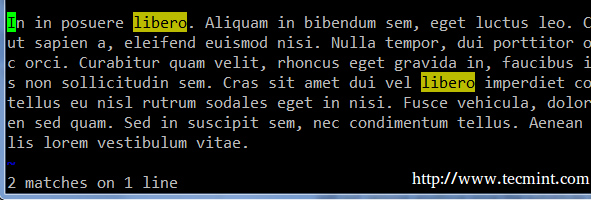
This tip is based on the substitute command (tip #7 in Part 1 of this series), with the exception that it will not remove anything since the substitute behavior is overridden by the n option, resulting in the count of occurrences of the specified pattern:
Make sure that you don’t omit any of the forward slashes!
:%s/pattern//gn
For example,
:%s/libero//gn
Count Matches by Search Pattern in Vim
To move from one occurrence of the pattern to the next in ex mode, press n (lowercase N). To move to the previous instance, press N.
TIP #13: Directly open vi/m in a specified line
By default, when you launch vi/m, the cursor is initially placed in the last line that was edited. If you want to open the program and have the cursor be directly placed on a specified line, you can use the following trick:
# vim filename +line_number
For example, open forever.txt and place the cursor in line 6:
# vim forever.txt +6
Let’s tweak this example a little bit. Suppose we want to open the file on the line where the 3rd occurrence of the pattern appears:
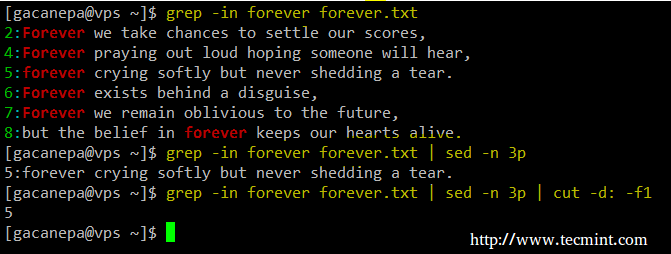
# vim filename +$(grep -in pattern filename | sed -n 3p | cut -d: -f1)
Let’s take a closer look at what the above command does:
- grep -in pattern filename – displays all lines from filename where pattern occurs, with the line number at the beginning of each output line.
- sed -n 3p – displays the 3rd line from the preceding pipeline’s output.
Finally,
- cut -d: -f1 returns the first field of the previous pipeline with the colon (:) is the field separator.
# grep -in forever forever.txt
# grep -in forever forever.txt | sed -n 3p
# grep -in forever forever.txt | sed -n 3p | cut -d: -f1
Open Vim Editor in Specified Line
The result of the previous command is then passed to vi/m to open the program at the specified line.
TIP #14: Customizing your vi/m environment
If you use vi/m to edit configuration files or to write code, you will want to be able to display the line numbers when you first open the program and to set automatic indentation so that when you press the Enter key, the cursor will be automatically placed at the proper position. In addition, you may want to customize the number of white spaces a tab occupies.
While you can do that each time you launch vi/m, it’s easier to set these options in ~/.vimrc so that they will be automatically applied:
set number
set autoindent
set shiftwidth=4
set softtabstop=4
set expandtab
For further options to customize your vi/m environment, you can refer to the online vim documentation.
TIP #15: Get General Vim Help/Options with vimtutor
If at any time you need to brush up your general vi/m skills, you can launch vimtutor from the command line which will display a full vi/m help that you can refer to as often as you wish without the need to fire up a web browser to search how to accomplish a certain task in vi/m.
# vimtutor
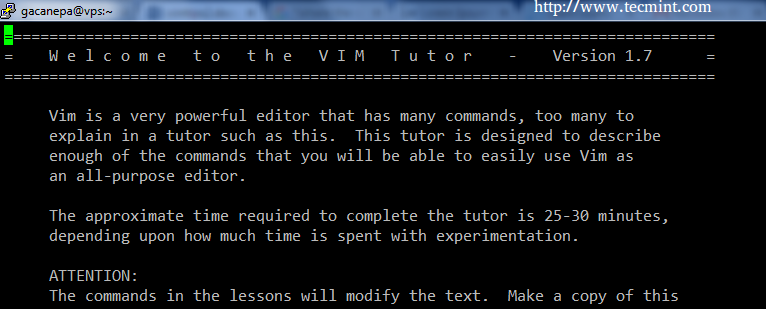
Vim Editor Help and Options
Note that you can navigate or search the contents of vimtutor as if you were navigating a regular file in vi/m.
Summary
In this 2-article series I’ve shared several vi/m tips and tricks that should help you to be more effective when it comes to editing text using command line tools. I’m sure you must have other ones – so feel free to share them with the rest of the community by using the form below. As always, questions and comments are also welcome.