
Installing Netbeans and Java JDK in Ubuntu and Setting Up a Basic HTML5 Project
In this 4-article mobile web development series, we will walk you through setting up Netbeans as an IDE (also known as Integrated Development Environment) in Ubuntu 14.04.2 LTS Trusty Tahr to start developing mobile-friendly and responsive HTML5 web applications.
HTML5 Mobile Web Development – Part 1
Following are the 4-article series about HTML5 Mobile Web Development:
A well-polished work environment (as we will later see), autocompletion for supported languages, and its seamless integration with web browsers are, in our opinion, some of Netbeans, most distinguishing features.
Let us also remember that the HTML 5 specification brought many advantages for developers – to name a few examples: cleaner code thanks to many new elements), built-in video and audio playback capabilities (which replaces the need for Flash), cross-compatibility with major browsers, and optimization for mobile devices.
Although we will initially test our applications on our local development machine, we will eventually move our web site to a LAMP server and turn it into a dynamic tool.
Along the way we will make use of jQuery (a well-known cross-platform Javascript library that greatly simplifies client-side scripting), and of Bootstrap (the popular HTML, CSS, and JavaScript framework for developing responsive websites). You will see in coming articles how easy it is to set up a mobile-friendly application using these HTML 5 tools.
After you go through this brief series, you will be able to:
- use the tools described herein to create basic HTML5 dynamic applications, and
- go on to learn more advanced web development skills.
However, please note that even though we will be using Ubuntu for this series, the instructions and procedures are perfectly valid for other desktop distributions as well (Linux Mint, Debian, CentOS, Fedora, you name it).
To that end, we have chosen to install the necessary software (Netbeans and the Java JDK, as you will see in a minute) using a generic tarball (.tar.gz) as installation method.
That being said – let’s get started with Part 1.
Installing Java JDK and NetBeans
This tutorial assumes that you already have an Ubuntu 14.04.2 LTS Trusty Tahr desktop installation in place. If you don’t, please refer to Ubuntu 14.04 Desktop Installation article, written by our colleague Matei Cezar before proceeding further.
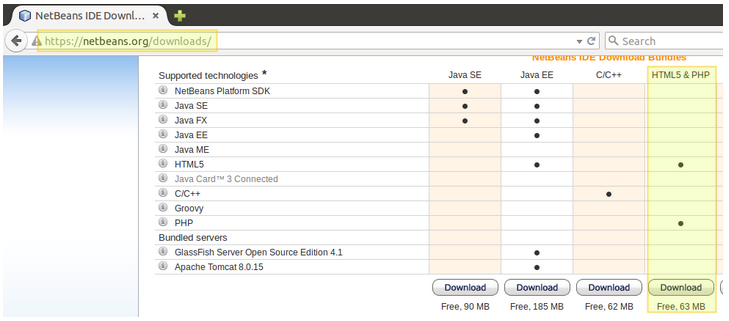
Since the Netbeans version that is available for download from the Ubuntu official repositories (7.0.1) is a little outdated, we will download the package from the Oracle website to get a newer version (8.0.2).
To do this, you have two choices:
- Choice 1: download the bundle that includes Netbeans + JDK, or
- Choice 2: install both utilities separately.
In this article we will choose #2 because that not only means a download that is a bit smaller (as we will only install Netbeans with support for HTML5 and PHP), but also will allow us to have a standalone JDK installer should we need it for another setting that does not require Netbeans nor involve web development (mostly related to other Oracle products).
To download JDK 8u45, go to the Oracle Technology Network site and navigate to the Java → Java SE → Downloads section.
When you click on the image highlighted below, you will be asked to accept the license agreement and then you will be able to download the necessary JDK version (which in our case is the tarball for 64-bit machines). When prompted by your web browser, choose to save the file instead of opening it.
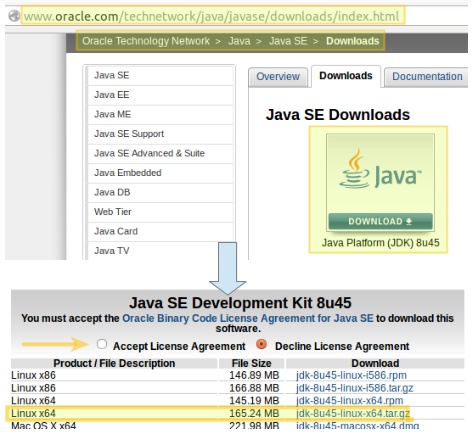
Download Java JDK
When the download is complete, go to ~/Downloads and extract the tarball to /usr/local/bin:
$ sudo tar xf jdk-8u45-linux-x64.tar.gz -C /usr/local/bin
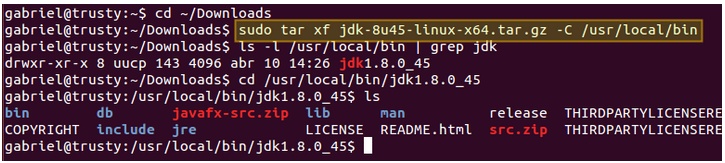
Extract Java
To install Netbeans with support for HTML5 and PHP, go to https://netbeans.org/downloads/ and click Download as indicated in the following image:
Download NetBeans
This will cause your browser to either open the installation shell script or save it to your computer. Choose Save File, then OK:
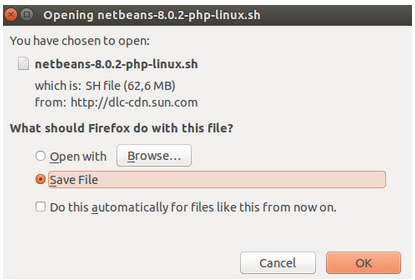
Save NetBeans Shell Script
Once done, turn the .sh into an executable file and then run the shell script with administrative privileges:
$ cd ~/Downloads
$ chmod 755 netbeans-8.0.2-php-linux.sh
$ sudo ./netbeans-8.0.2-php-linux.sh --javahome /usr/local/bin/jdk1.8.0_45
From then on, follow the on-screen instructions to complete the installation leaving the default values:
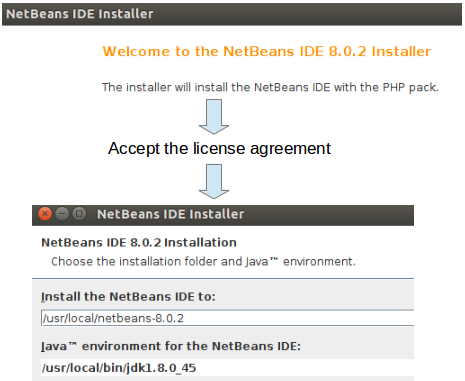
NetBeans IDE Installation
and wait for the installation to complete.
Launching NetBeans and Creating a Basic HTML5 Project
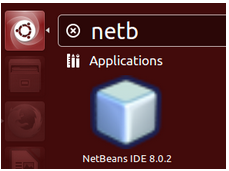
To open Netbeans, select it from the Dash menu:
Start NetBeans
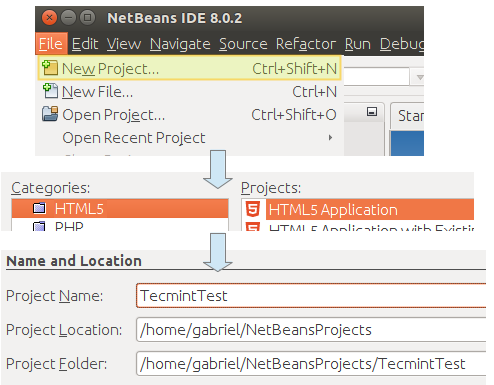
To create a new HTML5 project using the basic template provided by Netbeans, go to File → New project → HTML5 → HTML5 Application. Choose a descriptive name for your project and finally click Finish (do not include an external site template or javascript libraries at this time):
Create New Project in Netbeans
We will then be taken to the Netbeans UI, where we can add folders and files to our Site Root as needed. In our case, this will mean adding folders for fonts, images, Javascript files (scripts) and cascading style sheets (styles) to help us better organize our content in coming articles.
To add a folder or a file, right-click on Site Root and then choose New → Folder or HTML file.

Create HTML5 Project
Now let’s introduce some new HTML5 elements and modify the page body:
- <header> and <footer> define a header or a footer, respectively, for a document or a section.
- <main> represents the main content of a document, where the central topic or functionality is shown.
- <figure> is used for self-contained material, such as images or code, to name a few examples..
- <figcaption> shows a caption for a <figure> element, and thus it must be placed within the <figure> tags.
- <aside> is reserved for contents related somehow to the page content, usually related to it. It can be placed as a sidebar with help from CSS (more on this in coming articles).
.
Now copy the following code snippet to your index.html file in Netbeans.
TIP: Don’t just copy and paste from this window to your development environment, but take the time to type in each tag in order to visualize the auto-completion features of Netbeans, which will come in handy later on.
!DOCTYPE html>
<html>
	<head>
    	<title>TODO supply a title</title>
    	<meta charset="UTF-8">
    	<meta name="viewport" content="width=device-width, initial-scale=1.0">
	</head>
	<body>
    	<header style="background-color: #6699CC">THIS IS A HEADER</header>
    	<main>
        	<article>
            	<p>This is some sample text.</p>
            	<p>Another line of sample text for this HTML 5 article</p>
                	<aside>
                    	<figure>
                        	<img src="https://www.w3.org/html/logo/downloads/HTML5_Logo_256.png" alt="HTML 5 logo" />
                        	<figcaption>Figure 1: The HTML 5 logo</figcaption>
                    	</figure>
                        	<h2>Web development basics series at Tecmint.com</h2>
                        	<h3><a href="http://dev.w3.org/html5/html-author/">This is HTML 5!</a></h3>
                        	<p>Some text here</p>
                	</aside>
        	</article>
    	</main>
    	<footer style="background-color: #CC6699">THIS IS A FOOTER</footer>
	</body>
</html>
You can view the page by selecting a web browser (preferably Firefox, as in the below image) and clicking the Play icon:
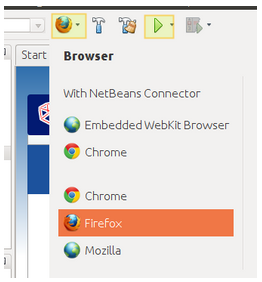
Open HTML5 Page in Firefox
You can now view the progress of your development so far:
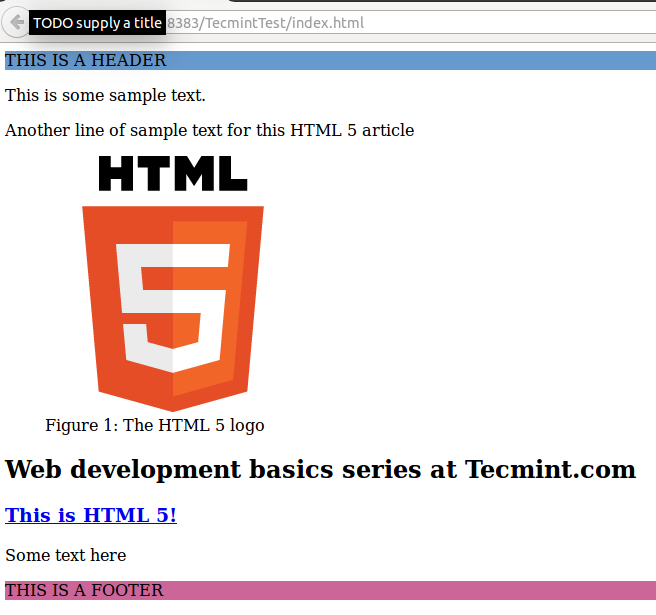
HTML5 Development Page
Summary
In this article we have reviewed some of the advantages of writing your web applications using HTML 5 and set up a development environment with Netbeans in Ubuntu 14.04.2.
We learned that this specification of the language introduced new elements and thus provided us with the possibility of writing cleaner code and replace resource-hungry components such as Flash movies with built-in controls.
In coming articles we will introduce jQuery and Bootstrap so that you can not only use these controls and watch your pages load faster, but also make them mobile-friendly.
In the meanwhile, feel free to experiment with other controls in Netbeans, and let us know if you have any questions or comments using the form below.
Adding jQuery and Bootstrap to Write a Mobile-Friendly and Responsive Web Application
In Part 1 of this series, we set up a basic HTML 5 project using Netbeans as our IDE, and we also presented a few elements that have been added in this new specification of the language.
Create Mobile-Friendly Responsive Websites – Part 2
In few words, you can think of jQuery as a cross-browser and cross-platform Javascript library that can greatly simplify client-side scripting in HTML pages. On the other hand, Bootstrap can be described as a complete framework that integrates HTML, CSS, and Javascript tools to create mobile-friendly and responsive web pages.
In this article we will introduce you to jQuery and Bootstrap, two priceless utilities to write HTML 5 code more easily. Both jQuery and Bootstrap are licensed under the MIT and Apache 2.0 licenses, which are compatible with the GPL and are thus free software.
Please note that basic HTML, CSS, and Javascript concepts are not covered in any article of this series. If you feel you need to get up to speed with this topics first before proceeding, I highly recommend the HTML 5 tutorialin W3Schools.
Incorporating jQuery and Bootstrap into Our Project
To download jQuery, go to the project’s web site at http://jquery.com and click on the button that displays the notice for the latest stable version.
At the time of this writing it’s v1.11.3 for full-browser compatibility (including Internet Explorer versions 6, 7, and 8) or v2.1.4 if you’re sure that your visitors will not be using those versions of IE.
We will go with this second option in this guide. DO NOT click on the download link yet (the following illustration is only meant to indicate which is the right option).
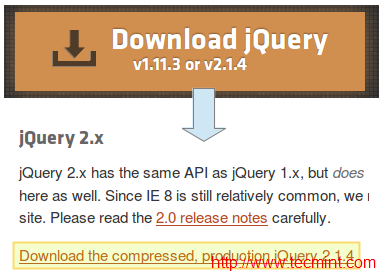
Download JQuery
You will notice that you can download either a compressed .min.js or an uncompressed .js version of jQuery. The first is meant specially for websites and helps reduce the load time of pages (and thus Google will rank your site better), while the second is targeted mostly at coders for development purposes.
For the sake of brevity and easiness of use, we will download the compressed (also known as minified) version to the scripts folder inside our site structure.
Right click on the link for the compressed, production version and choose Save Link As…, and then navigate to the indicated directory (you may want to refer to the path indicated where we chose to save our project in Part 1).
Finally, click Save on the bottom of the current dialog:
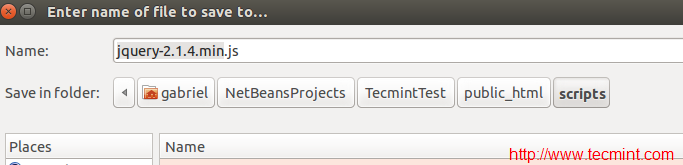
Save jQuery
Now it’s time to add Bootstrap to our project. Go to http://getbootstrap.com and click on Download Bootstrap. On the next page, click on the highlighted option as indicated below to download the minified components, ready to use, in a zip file:
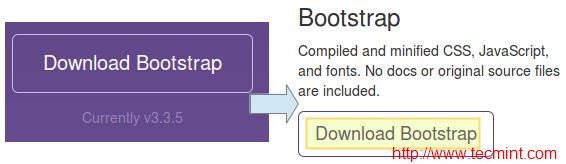
Download Bootstrap
When the download completes, go to your Downloads folder, unzip the file, and copy the highlighted files to the indicated directories inside your project:
# cd ~/Downloads
# unzip -a bootstrap-3.3.5-dist.zip
# cd bootstrap-3.3.5-dist

Install Bootstrap
# cp css/bootstrap.min.css /home/gabriel/NetBeansProjects/TecmintTest/public_html/styles
# cp fonts/* /home/gabriel/NetBeansProjects/TecmintTest/public_html/fonts
# cp js/bootstrap.min.js /home/gabriel/NetBeansProjects/TecmintTest/public_html/scripts
If you now expand the structure of your site in Netbeans, it should look as follows:
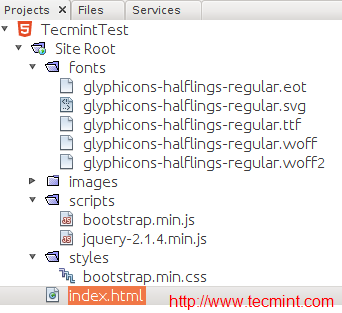
Site Structure in Netbeans
Adding References
That sure looks good, but we still haven’t told our index.html file to use any of those files. For the sake of simplicity, we will replace the contents of that file with a barebones html file first:
<!DOCTYPE html>
<html>
<head>
	<meta charset="utf-8">
	<title>jQuery and Bootstrap</title>
</head>
<body>

   <!-- // Your code will appear here. -->

</body>
</html>
Then, just drag and drop each file from the project navigator section to the code, inside the </head> tags, as you can see in the following screencast. Make sure that the reference to jQuery appears before the reference to Bootstrap because the latter depends on the former:
That’s it – you have added the references to both jQuery and Bootstrap, and can now start writing code.
Writing Your First Responsive Code
Let’s now add a navigation bar and place it at the top of our page. Feel free to include 4-5 links with dummy text and don’t link it to any document for the time being – just insert the following code snippet inside the body of the document.
Don’t forget to spend some time become acquainted with the auto-completion feature in Netbeans, which will show you the classes made available by Bootstrap as you start typing.
At the heart of the code snippet below is the Bootstrap container class, which is used to place content inside of a horizontal container which will automatically resize depending on the size of the screen where it is being viewed. Not less important is the container-fluid class, which will ensure that the content within will occupy the entire width of the screen.
<div class="container">
  	<nav class="navbar navbar-default">
    	<div class="container-fluid">
      	<div class="navbar-header">
        	<button type="button" class="navbar-toggle collapsed" data-toggle="collapse" data-target="#navbar" aria-expanded="false" aria-controls="navbar">
          	<span class="sr-only">Toggle navigation</span>
          	<span class="icon-bar"></span>
          	<span class="icon-bar"></span>
          	<span class="icon-bar"></span>
        	</button>
        	<a class="navbar-brand" href="#">Project name</a>
      	</div>
      	<div id="navbar" class="navbar-collapse collapse">
        	<ul class="nav navbar-nav">
          	<li class="active"><a href="#">Home</a></li>
          	<li><a href="#">About</a></li>
          	<li><a href="#">Contact</a></li>
          	<li class="dropdown">
            	<a href="#" class="dropdown-toggle" data-toggle="dropdown" role="button" aria-haspopup="true" aria-expanded="false">Dropdown <span class="caret"></span></a>
            	<ul class="dropdown-menu">
              	<li><a href="#">Action</a></li>
              	<li><a href="#">Another action</a></li>
              	<li><a href="#">Something else here</a></li>
              	<li role="separator" class="divider"></li>
              	<li class="dropdown-header">Nav header</li>
              	<li><a href="#">Separated link</a></li>
              	<li><a href="#">One more separated link</a></li>
            	</ul>
          	</li>
        	</ul>
      	</div><!--/.nav-collapse -->
    	</div><!--/.container-fluid -->
  	</nav>
</div>
Another distinguishing feature of Bootstrap is that it eliminates the need for tables in HTML code. Instead, it uses a grid system to layout content and make it look properly both on large and small devices (from phones all the way to big desktop or laptop screens).
In Bootstrap’s grid system, the screen layout is divided in 12 columns:
![]()
Bootstrap Grid Layout
A typical setup consists of using the 12-column layout divided into 3 groups of 4 columns each, as follows:
![]()
Bootstrap Column Layout
To indicate this fact in code, and in order to have it displayed that way starting in medium-size devices (such as laptops) and above, add the following code below the closing </nav> tag:
...
    </nav>
   	 <div class="row">
   	 	<div class="col-md-4">This is the text in GROUP 1</div>
   	 	<div class="col-md-4">This is the text in GROUP 2</div>
   	 	<div class="col-md-4">This is the text in GROUP 3</div>
   	 </div>
</div> <!--Closing tag of the container class -->
You must have probably noticed that the column classes in the Bootstrap grid indicate the starting layout for a specific device size and above, as md in this example stands for medium (which also covers lg, or large devices).
For smaller devices (sm and xs), the content divs gets stacked and appears one above the next.
In the following screencast you can see how your page should look by now. Note that you can resize your browser’s window to simulate different screen sizes after launching the project using the Run project button as we learned in Part 1.
Summary
Congratulations! You must have written a simple, yet functional, responsive page by now. Don’t forget to check the Bootstrap website in order to become more familiar with the almost-limitless functionality of this framework.
As always, in case you have a question or comment, feel free to contact us using the form below.
Creating a Dynamic HTML5 Web Application and Deploying on Remote Web Server Using Filezilla
In the previous two articles of this series, we explained how to set up Netbeans in a Linux desktop distribution as an IDE to develop web applications. We then proceeded to add two core components, jQuery and Bootstrap, in order to make your pages mobile-friendly and responsive.
Create HTML5 Applications and Deploy to Web Server – Part 3
- Install Netbeans and Java to Create a Basic HTML5 Application – Part 1
- Creating Mobile-Friendly and Responsive Web Application Using jQuery and Bootstrap – Part 2
As you will seldom deal with static content as a developer, we will now add dynamic functionality to the basic page that we set up in Part 2. To begin, let us list the prerequisites and address them before moving forward.
Prerequisites
In order to test a dynamic application in our development machine before deploying it to a LAMP server, we will need to install some packages. Since we are using a Ubuntu 14.04 desktop to write this series, we assume that your user account has already been added to the sudoers file and granted the necessary permissions.
Installing Packages and Configuring Access to the DB Server
Please note that during the installation you may be prompted to enter a password for the MySQL root user. Make sure you choose a strong password and then continue.
Ubuntu and derivatives (also for other Debian-based distributions):
$ sudo aptitude update && sudo aptitude install apache2 php5 php5-common php5-myqsql mysql mysql-server filezilla
Fedora / CentOS / RHEL:
$ sudo yum update && sudo yum install httpd php php-common php-mysql mysql mysql-server filezilla
When the installation is complete, it is strongly recommended that you run mysql_secure_installation to, not surprisingly, secure your database server. You will be prompted for the following information:
- Change the root password? [Y/n]. If you already set a password for the MySQL root user, you can skip this step.
- Remove anonymous users? [Y/n] y.
- Disallow root login remotely? [Y/n] y (Since this is your local development environment, you will not need to connect to your DB server remotely).
- Remove test database and access to it? [Y/n] y
- Reload privilege tables now? [Y/n] y.
Creating a sample Database and Loading test Data
To create a sample database and load some test data, log on to your DB server:
$ sudo mysql -u root -p
You will be be prompted to enter the password for the MySQL root user.
At the MySQL prompt, type
CREATE DATABASE tecmint_db;
and press Enter:
![]()
Create MySQL Database
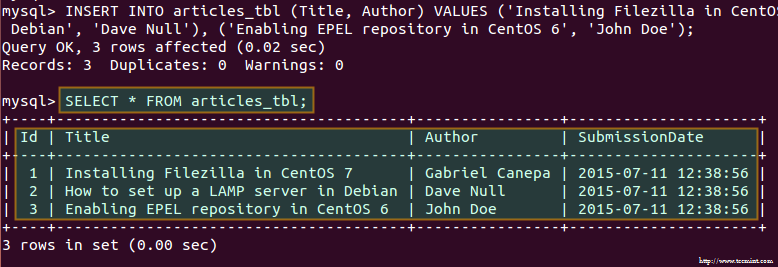
Now let’s create a table:
USE tecmint_db;
CREATE TABLE articles_tbl(
   Id INT NOT NULL AUTO_INCREMENT,
   Title VARCHAR(100) NOT NULL,
   Author VARCHAR(40) NOT NULL,
   SubmissionDate TIMESTAMP DEFAULT CURRENT_TIMESTAMP,
   PRIMARY KEY ( Id )
);

Create Database Table
and populate it with sample data:
INSERT INTO articles_tbl (Title, Author) VALUES ('Installing Filezilla in CentOS 7', 'Gabriel Canepa'), ('How to set up a LAMP server in Debian', 'Dave Null'), ('Enabling EPEL repository in CentOS 6', 'John Doe');
Populate Database Table
Adding symbolic links in the Web Server directory
Since Netbeans, by default, stores projects in the current user’s home directory, you will need to add symbolic links that point to that location. For example,
$ sudo ln -s /home/gabriel/NetBeansProjects/TecmintTest/public_html /var/www/html/TecmintTest
will add a soft link called TecmintTest that points to /home/gabriel/NetBeansProjects/TecmintTest/public_html.
For that reason, when you point your browser to http://localhost/TecmintTest/, you will actually see the application that we set up in Part 2:

HTML5 Application
Setting up a remote FTP and Web server
Since you can easily set up a FTP and Web server with the instructions provided in Part 9 – Install and Configure Secure FTP and Web Server of the RHCSA series in Tecmint, we will not repeat them here. Please refer to that guide before proceeding further.
Turning our application into a Dynamic One
You will probably think that we can’t do much with the sample data that we added to our database earlier, and you are right, but it will be enough to learn the basics of embedding PHP code and the results of queries to a MySQL DB in your HTML5 pages.
First off, we will need to change the extension of the main document of our application to .php instead of html:
# mv /var/www/html/TecmintTest/index.html /var/www/html/TecmintTest/index.php
Then let’s open the project in Netbeans and start doing some modifications.
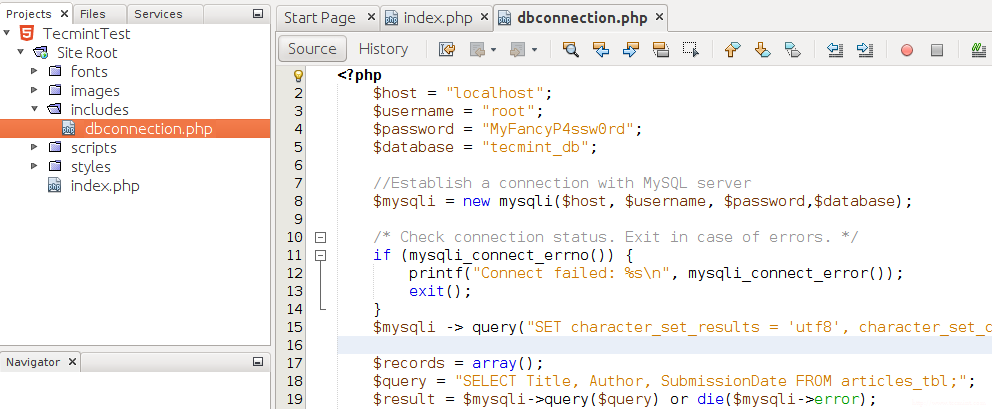
1. Add a folder to the project named includes where we will store backend php applications.
2. Create a file named dbconnection.php inside includes and insert with the following code:
<?php
    $host = "localhost";
    $username = "root";
    $password = "MyFancyP4ssw0rd";
    $database = "tecmint_db";

    //Establish a connection with MySQL server
    $mysqli = new mysqli($host, $username, $password,$database);

    /* Check connection status. Exit in case of errors. */
    if (mysqli_connect_errno()) {
        printf("Connect failed: %s\n", mysqli_connect_error());
        exit();
    }
    $mysqli -> query("SET character_set_results = 'utf8', character_set_client = 'utf8', character_set_connection = 'utf8', character_set_database = 'utf8', character_set_server = 'utf8'");

    $records = array();
    $query = "SELECT Title, Author, SubmissionDate FROM articles_tbl;";
    $result = $mysqli->query($query) or die($mysqli->error);
    $data = array();

    while ( $row = $result->fetch_assoc() ){
        $data[] = json_encode($row);
    }
    echo json_encode( $data );
?>
as indicated in the following image:
Create Database Configuration File
This file will be used to connect to the database server, to query it, and to return the results of that query in a JSON-like string to be consumed by the frontend application with a slight modification.
Note that typically you would use separate files to perform each of these operations, but we chose to include all of that functionality in one file for sake of simplicity.
3. In index.php, add the following snippet just beneath the opening body tag. That is the jQuery way of calling an external PHP app when the web document is ready, or in other words, each time it loads:
<script>
    $(document).ready(function(){
        $.ajax({
            url: 'includes/dbconnection.php',
            datatype: 'json',
            type: 'POST',
            success: function(data){
                var output = $.parseJSON(data);
                for(var i =0;i < output.length;i++)
                {
                  var item = output[i];
                  $("#title").append("<br>"+item.Title);
                  $("#author").append("<br>"+item.Author);
                  $("#submissiondate").append("<br>"+item.SubmissionDate);
                }
            }}
        );
    });
</script>

Add jQuery Script
4. Now, add an unique id (same as inside the for loop above) to each line in the div with class row at the bottom of index.php:
<div class="row">
    <div class="col-md-4" id="title" style="text-align: center"><strong>Titles</strong></div>
    <div class="col-md-4" id="author" style="text-align: center"><strong>Authors</strong></div>
    <div class="col-md-4" id="submissiondate" style="text-align: center"><strong>Published on:</strong></div>
</div>
If you now click Run Project, you should see this:
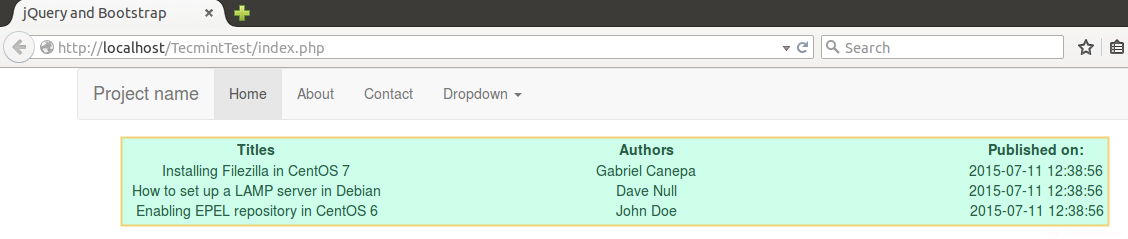
Working Web Application Preview
Which is essentially the same as the information returned when we ran the query from our MySQL client prompt earlier.
Deploying to a LAMP server using Filezilla
Launch Filezilla from the Dash menu and enter the IP of the remote FTP server and your credentials. Then click Quickconnect to connect to the FTP server:
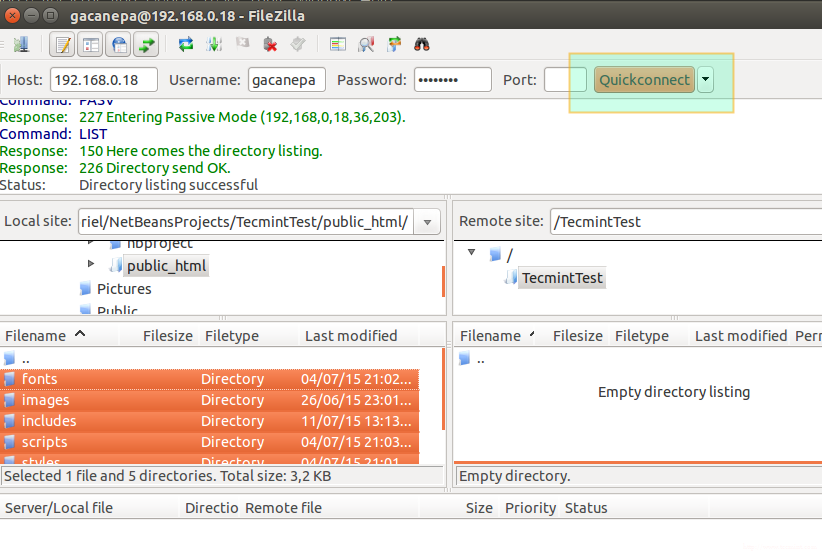
Deploying Application on Web Server
Navigate to /home/gabriel/NetBeansProjects/TecmintTest/public_html/, select its contents, right click on them and select Upload.
This, of course, assumes that the remote user indicated in Username has write permissions on the remote directory. When the upload is complete, point your browser to the desired location and you should see the same page as before (please note that we have not set up the local MySQL database to the remote host, but you can easily do so following the steps from the beginning of this tutorial).

Web Application Preview
Summary
In this article we have added dynamic functionality to our web application using jQuery and a little JavaScript. You can refer to the official jQuery docs for more information, which will be very helpful if you decide to write more complex applications. Wrapping up, we have also deployed our application to a remote LAMP server using a FTP client.
We are excited to hear your opinion about this article – feel free to contact us using the form below.
Tuning Dynamic HTML5 Web Apps Using Open Source Online Tools
As I begin the last article in this series, it is my hope that you have been able to grasp the importance of HTML 5 and mobile-friendly / responsive web development. Regardless of your desktop distribution of choice, Netbeansis a powerful IDE and when used together with basic Linux command-line skills and the tools discussed in Part 3, can help you to create outstanding applications without much hassle.
Tuning Dynamic HTML5 Web Apps – Part 4
However, please note that we have only covered the basics of HTML 5 and web development in this series and assumed that you are somewhat familiar with HTML, but the WWW is full of great resources – some of them are FOSS – to expand on what we’ve shared here.
In this last guide we will talk about some of those tools and show you how to use them to add to the existing page we have been working on Beautifying our UI (user interface).
You will recall from Part 2 of this series (“Adding jQuery and Bootstrap to Write a HTML5 Web Application“) that the Bootstrap zip file comes with a directory named fonts. We saved its contents into a folder with the same name inside our project’s SiteRoot:
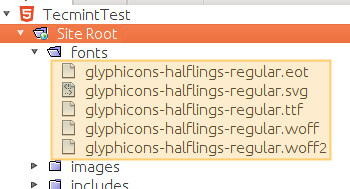
Bootstrap Fonts
As you probably can tell from the above image, Bootstrap includes a set of elements called glyphicons, which are no more and no less the built-in components that provide nice-looking icons for buttons and menus in your applications. The complete list of glyphicons included in Bootstrap is available at http://getbootstrap.com/components/.
To illustrate the use of glyphicons, let’s add some to the navigation bar in our main page. Modify the navigation bar menus as follows. Please note the space between each closing span tag and the menu text:
<li class="active"><a href="#"><span class="glyphicon glyphicon-home" aria-hidden="true"></span> Home</a></li>
<li><a href="#"><span class="glyphicon glyphicon-info-sign" aria-hidden="true"></span> About</a></li>
<li><a href="#"><span class="glyphicon glyphicon-envelope" aria-hidden="true"></span> Contact</a></li>
(by the way, the span tags are used here to prevent the icons from getting mixed with other components).
And here’s the result:
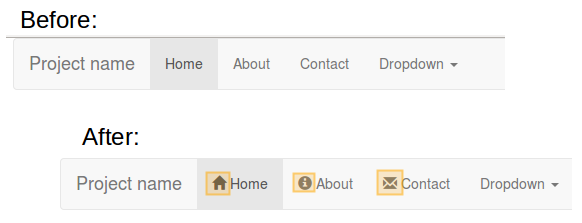
Add Navigation Menu
Glyphicons, though useful, are also limited. And here’s where Font Awesome enters the scene. Font Awesome is an icon / font / css complete toolkit that has the potential to seamlessly integrate with Bootstrap.
Not only you can add a whole lot of other icons to your pages, but can also resize them, cast shadows, change color, and a many other options using CSS. However, since dealing with CSS is out of the scope of this series, we will only deal with the default-sized icons but encourage you at the same time to “dig a little deeper” to discover how far this tool can take you.
To download Font Awesome and incorporate it into your project, execute the following commands (or feel free to go directly to the project’s web site and download the zip file through your browser and decompress it using GUI tools):
# wget http://fortawesome.github.io/Font-Awesome/assets/font-awesome-4.3.0.zip
(yes, the domain name is actually FortAwesome, with an R, so that is not a typo).
# unzip font-awesome-4.3.0.zip
# cp font-awesome-4.3.0/css/font-awesome.min.css /home/gabriel/NetBeansProjects/TecmintTest/public_html/styles
# cp font-awesome-4.3.0/fonts/* /home/gabriel/NetBeansProjects/TecmintTest/public_html/fonts
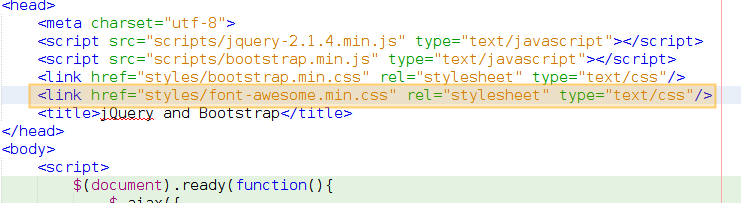
And add the .css file to the references list at the top of our page, just like we did with jQuery and Bootstrapearlier (remember that you don’t have to type everything – just drag the file from the Projects tab into the code window):
Add Font Awesome
Let’s take the dropdown list in our navigation bar, for example:
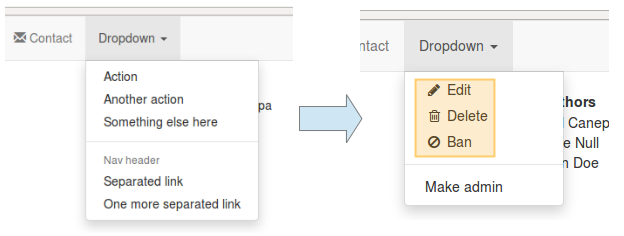
Dropdown List
Nice, right? All it takes is replacing the contents of the existing ul class named dropdown-menu at the bottom of index.php with:
<li><a href="#"><i class="fa fa-pencil fa-fw"></i> Edit</a></li>
<li><a href="#"><i class="fa fa-trash-o fa-fw"></i> Delete</a></li>
<li><a href="#"><i class="fa fa-ban fa-fw"></i> Ban</a></li>
<li class="divider"></li>
<li><a href="#"><i class="i"></i> Make admin</a></li>
Believe me – investing your time in learning how to use these tools will be a very rewarding experience.
Where to Ask for Help
As an IT person, you must be well acquainted with the many resources for help the Internet has made available. Since doing web development is not an exception, here are a few resources that we’re sure you will find useful while tuning your applications.
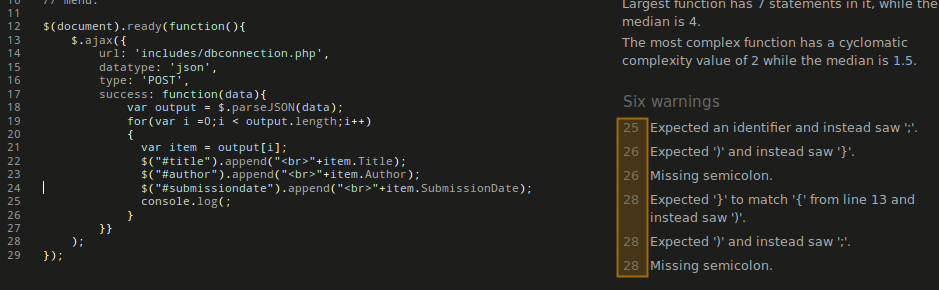
When dealing with Javascript code (for example, when working with jQuery as we did in Part 2), you will want to use JSHint, an online Javascript quality code checker that aims at helping developers to detect errors and potential problems. When those pitfalls are found, JSHint indicates the line number where they are located and gives you hints to fix them:
JSHint Tool to Detect Errors
That surely looks great, but even with this great automated tool, there will be times when you will need someone else to take a look at your code and tell you how to fix it or otherwise improve it, which implies sharing it somehow.
JSFiddle (an online Javascript / CSS / HTML code tester) and Bootply (same as JSFiddle but specialized in Bootstrap code) let you save code snippets (also known as fiddles) and provide you a link to share them very easily over the Internet (either via email with your friends, using your social network profiles, or in forums).
Summary
In this article we have provided you with a few tips to tune your web applications and shared some resources that will come in handy if you get stuck or want another pair of eyes (and not just one, but many) to take a look at your code to see how it can be improved. Chances are that you may know of other resources as well. We hope that this series have given you a glimpse of the vast possibilities of mobile-friendly and responsive web development.