
RHCE Series: How to Setup and Test Static Network Routing – Part 1
RHCE (Red Hat Certified Engineer) is a certification from Red Hat company, which gives an open source operating system and software to the enterprise community, It also gives training, support and consulting services for the companies.

RHCE Exam Preparation Guide
This RHCE (Red Hat Certified Engineer) is a performance-based exam (codename EX300), who possesses the additional skills, knowledge, and abilities required of a senior system administrator responsible for Red Hat Enterprise Linux (RHEL) systems.
Important: Red Hat Certified System Administrator (RHCSA) certification is required to earn RHCE certification.
Following are the exam objectives based on the Red Hat Enterprise Linux 7 version of the exam, which will going to cover in this RHCE series:
To view fees and register for an exam in your country, check the RHCE Certification page.
In this Part 1 of the RHCE series and the next, we will present basic, yet typical, cases where the principles of static routing, packet filtering, and network address translation come into play.

RHCE: Setup and Test Network Static Routing – Part 1
Please note that we will not cover them in depth, but rather organize these contents in such a way that will be helpful to take the first steps and build from there.
Static Routing in Red Hat Enterprise Linux 7
One of the wonders of modern networking is the vast availability of devices that can connect groups of computers, whether in relatively small numbers and confined to a single room or several machines in the same building, city, country, or across continents.
However, in order to effectively accomplish this in any situation, network packets need to be routed, or in other words, the path they follow from source to destination must be ruled somehow.
Static routing is the process of specifying a route for network packets other than the default, which is provided by a network device known as the default gateway. Unless specified otherwise through static routing, network packets are directed to the default gateway; with static routing, other paths are defined based on predefined criteria, such as the packet destination.
Let us define the following scenario for this tutorial. We have a Red Hat Enterprise Linux 7 box connecting to router #1 [192.168.0.1] to access the Internet and machines in 192.168.0.0/24.
A second router (router #2) has two network interface cards: enp0s3 is also connected to router #1 to access the Internet and to communicate with the RHEL 7 box and other machines in the same network, whereas the other (enp0s8) is used to grant access to the 10.0.0.0/24 network where internal services reside, such as a web and / or database server.
This scenario is illustrated in the diagram below:

Static Routing Network Diagram
In this article we will focus exclusively on setting up the routing table on our RHEL 7 box to make sure that it can both access the Internet through router #1 and the internal network via router #2.
In RHEL 7, you will use the ip command to configure and show devices and routing using the command line. These changes can take effect immediately on a running system but since they are not persistent across reboots, we will use ifcfg-enp0sX and route-enp0sX files inside /etc/sysconfig/network-scripts to save our configuration permanently.
To begin, let’s print our current routing table:
# ip route show

Check Current Routing Table
From the output above, we can see the following facts:
- The default gateway’s IP address is 192.168.0.1 and can be accessed via the enp0s3 NIC.
- When the system booted up, it enabled the zeroconf route to 169.254.0.0/16 (just in case). In few words, if a machine is set to obtain an IP address through DHCP but fails to do so for some reason, it is automatically assigned an address in this network. Bottom line is, this route will allow us to communicate, also via enp0s3, with other machines who have failed to obtain an IP address from a DHCP server.
- Last, but not least, we can communicate with other boxes inside the 192.168.0.0/24 network through enp0s3, whose IP address is 192.168.0.18.
These are the typical tasks that you would have to perform in such a setting. Unless specified otherwise, the following tasks should be performed in router #2:
Make sure all NICs have been properly installed:
# ip link show
If one of them is down, bring it up:
# ip link set dev enp0s8 up
and assign an IP address in the 10.0.0.0/24 network to it:
# ip addr add 10.0.0.17 dev enp0s8
Oops! We made a mistake in the IP address. We will have to remove the one we assigned earlier and then add the right one (10.0.0.18):
# ip addr del 10.0.0.17 dev enp0s8
# ip addr add 10.0.0.18 dev enp0s8
Now, please note that you can only add a route to a destination network through a gateway that is itself already reachable. For that reason, we need to assign an IP address within the 192.168.0.0/24 range to enp0s3 so that our RHEL 7 box can communicate with it:
# ip addr add 192.168.0.19 dev enp0s3
Finally, we will need to enable packet forwarding:
# echo "1" > /proc/sys/net/ipv4/ip_forward
and stop / disable (just for the time being – until we cover packet filtering in the next article) the firewall:
# systemctl stop firewalld
# systemctl disable firewalld
Back in our RHEL 7 box (192.168.0.18), let’s configure a route to 10.0.0.0/24 through 192.168.0.19 (enp0s3 in router #2):
# ip route add 10.0.0.0/24 via 192.168.0.19
After that, the routing table looks as follows:
# ip route show

Confirm Network Routing Table
Likewise, add the corresponding route in the machine(s) you’re trying to reach in 10.0.0.0/24:
# ip route add 192.168.0.0/24 via 10.0.0.18
You can test for basic connectivity using ping:
In the RHEL 7 box, run
# ping -c 4 10.0.0.20
where 10.0.0.20 is the IP address of a web server in the 10.0.0.0/24 network.
In the web server (10.0.0.20), run
# ping -c 192.168.0.18
where 192.168.0.18 is, as you will recall, the IP address of our RHEL 7 machine.
Alternatively, we can use tcpdump (you may need to install it with yum install tcpdump) to check the 2-way communication over TCP between our RHEL 7 box and the web server at 10.0.0.20.
To do so, let’s start the logging in the first machine with:
# tcpdump -qnnvvv -i enp0s3 host 10.0.0.20
and from another terminal in the same system let’s telnet to port 80 in the web server (assuming Apache is listening on that port; otherwise, indicate the right port in the following command):
# telnet 10.0.0.20 80
The tcpdump log should look as follows:

Check Network Communication between Servers
Where the connection has been properly initialized, as we can tell by looking at the 2-way communication between our RHEL 7 box (192.168.0.18) and the web server (10.0.0.20).
Please remember that these changes will go away when you restart the system. If you want to make them persistent, you will need to edit (or create, if they don’t already exist) the following files, in the same systems where we performed the above commands.
Though not strictly necessary for our test case, you should know that /etc/sysconfig/network contains system-wide network parameters. A typical /etc/sysconfig/network looks as follows:
# Enable networking on this system?
NETWORKING=yes
# Hostname. Should match the value in /etc/hostname
HOSTNAME=yourhostnamehere
# Default gateway
GATEWAY=XXX.XXX.XXX.XXX
# Device used to connect to default gateway. Replace X with the appropriate number.
GATEWAYDEV=enp0sX
When it comes to setting specific variables and values for each NIC (as we did for router #2), you will have to edit /etc/sysconfig/network-scripts/ifcfg-enp0s3 and /etc/sysconfig/network-scripts/ifcfg-enp0s8.
Following our case,
TYPE=Ethernet
BOOTPROTO=static
IPADDR=192.168.0.19
NETMASK=255.255.255.0
GATEWAY=192.168.0.1
NAME=enp0s3
ONBOOT=yes
and
TYPE=Ethernet
BOOTPROTO=static
IPADDR=10.0.0.18
NETMASK=255.255.255.0
GATEWAY=10.0.0.1
NAME=enp0s8
ONBOOT=yes
for enp0s3 and enp0s8, respectively.
As for routing in our client machine (192.168.0.18), we will need to edit /etc/sysconfig/network-scripts/route-enp0s3:
10.0.0.0/24 via 192.168.0.19 dev enp0s3
Now reboot your system and you should see that route in your table.
Summary
In this article we have covered the essentials of static routing in Red Hat Enterprise Linux 7. Although scenarios may vary, the case presented here illustrates the required principles and the procedures to perform this task. Before wrapping up, I would like to suggest you to take a look at Chapter 4 of the Securing and Optimizing Linuxsection in The Linux Documentation Project site for further details on the topics covered here.
Free ebook on Securing & Optimizing Linux: The Hacking Solution (v.3.0) – This 800+ eBook contains comprehensive collection of Linux security tips and how to use them safely and easily to configure Linux-based applications and services.

Linux Security and Optimization Book
In the next article we will talk about packet filtering and network address translation to sum up the networking basic skills needed for the RHCE certification.
As always, we look forward to hearing from you, so feel free to leave your questions, comments, and suggestions using the form below.
How to Perform Packet Filtering, Network Address Translation and Set Kernel Runtime Parameters – Part 2
As promised in Part 1 (“Setup Static Network Routing”), in this article (Part 2 of RHCE series) we will begin by introducing the principles of packet filtering and network address translation (NAT) in Red Hat Enterprise Linux 7, before diving into setting runtime kernel parameters to modify the behavior of a running kernel if certain conditions change or needs arise.

RHCE: Network Packet Filtering – Part 2
Network Packet Filtering in RHEL 7
When we talk about packet filtering, we refer to a process performed by a firewall in which it reads the header of each data packet that attempts to pass through it. Then, it filters the packet by taking the required action based on rules that have been previously defined by the system administrator.
As you probably know, beginning with RHEL 7, the default service that manages firewall rules is firewalld. Like iptables, it talks to the netfilter module in the Linux kernel in order to examine and manipulate network packets. Unlike iptables, updates can take effect immediately without interrupting active connections – you don’t even have to restart the service.
Another advantage of firewalld is that it allows us to define rules based on pre-configured service names (more on that in a minute).
In Part 1, we used the following scenario:
Static Routing Network Diagram
However, you will recall that we disabled the firewall on router #2 to simplify the example since we had not covered packet filtering yet. Let’s see now how we can enable incoming packets destined for a specific service or port in the destination.
First, let’s add a permanent rule to allow inbound traffic in enp0s3 (192.168.0.19) to enp0s8 (10.0.0.18):
# firewall-cmd --permanent --direct --add-rule ipv4 filter FORWARD 0 -i enp0s3 -o enp0s8 -j ACCEPT
The above command will save the rule to /etc/firewalld/direct.xml:
# cat /etc/firewalld/direct.xml

Check Firewalld Saved Rules
Then enable the rule for it to take effect immediately:
# firewall-cmd --direct --add-rule ipv4 filter FORWARD 0 -i enp0s3 -o enp0s8 -j ACCEPT
Now you can telnet to the web server from the RHEL 7 box and run tcpdump again to monitor the TCP traffic between the two machines, this time with the firewall in router #2 enabled.
# telnet 10.0.0.20 80
# tcpdump -qnnvvv -i enp0s3 host 10.0.0.20
What if you want to only allow incoming connections to the web server (port 80) from 192.168.0.18 and block connections from other sources in the 192.168.0.0/24 network?
In the web server’s firewall, add the following rules:
# firewall-cmd --add-rich-rule 'rule family="ipv4" source address="192.168.0.18/24" service name="http" accept'
# firewall-cmd --add-rich-rule 'rule family="ipv4" source address="192.168.0.18/24" service name="http" accept' --permanent
# firewall-cmd --add-rich-rule 'rule family="ipv4" source address="192.168.0.0/24" service name="http" drop'
# firewall-cmd --add-rich-rule 'rule family="ipv4" source address="192.168.0.0/24" service name="http" drop' --permanent
Now you can make HTTP requests to the web server, from 192.168.0.18 and from some other machine in 192.168.0.0/24. In the first case the connection should complete successfully, whereas in the second it will eventually timeout.
To do so, any of the following commands will do the trick:
# telnet 10.0.0.20 80
# wget 10.0.0.20
I strongly advise you to check out the Firewalld Rich Language documentation in the Fedora Project Wiki for further details on rich rules.
Network Address Translation in RHEL 7
Network Address Translation (NAT) is the process where a group of computers (it can also be just one of them) in a private network are assigned an unique public IP address. As result, they are still uniquely identified by their own private IP address inside the network but to the outside they all “seem” the same.
In addition, NAT makes it possible that computers inside a network sends requests to outside resources (like the Internet) and have the corresponding responses be sent back to the source system only.
Let’s now consider the following scenario:

Network Address Translation
In router #2, we will move the enp0s3 interface to the external zone, and enp0s8 to the internal zone, where masquerading, or NAT, is enabled by default:
# firewall-cmd --list-all --zone=external
# firewall-cmd --change-interface=enp0s3 --zone=external
# firewall-cmd --change-interface=enp0s3 --zone=external --permanent
# firewall-cmd --change-interface=enp0s8 --zone=internal
# firewall-cmd --change-interface=enp0s8 --zone=internal --permanent
For our current setup, the internal zone – along with everything that is enabled in it will be the default zone:
# firewall-cmd --set-default-zone=internal
Next, let’s reload firewall rules and keep state information:
# firewall-cmd --reload
Finally, let’s add router #2 as default gateway in the web server:
# ip route add default via 10.0.0.18
You can now verify that you can ping router #1 and an external site (tecmint.com, for example) from the web server:
# ping -c 2 192.168.0.1
# ping -c 2 tecmint.com

Verify Network Routing
Setting Kernel Runtime Parameters in RHEL 7
In Linux, you are allowed to change, enable, and disable the kernel runtime parameters, and RHEL is no exception. The /proc/sys interface (sysctl) lets you set runtime parameters on-the-fly to modify the system’s behavior without much hassle when operating conditions change.
To do so, the echo shell built-in is used to write to files inside /proc/sys/<category>, where <category> is most likely one of the following directories:
- dev: parameters for specific devices connected to the machine.
- fs: filesystem configuration (quotas and inodes, for example).
- kernel: kernel-specific configuration.
- net: network configuration.
- vm: use of the kernel’s virtual memory.
To display the list of all the currently available values, run
# sysctl -a | less
In Part 1, we changed the value of the net.ipv4.ip_forward parameter by doing
# echo 1 > /proc/sys/net/ipv4/ip_forward
in order to allow a Linux machine to act as router.
Another runtime parameter that you may want to set is kernel.sysrq, which enables the Sysrq key in your keyboard to instruct the system to perform gracefully some low-level functions, such as rebooting the system if it has frozen for some reason:
# echo 1 > /proc/sys/kernel/sysrq
To display the value of a specific parameter, use sysctl as follows:
# sysctl <parameter.name>
For example,
# sysctl net.ipv4.ip_forward
# sysctl kernel.sysrq
Some parameters, such as the ones mentioned above, require only one value, whereas others (for example, fs.inode-state) require multiple values:

Check Kernel Parameters
In either case, you need to read the kernel’s documentation before making any changes.
Please note that these settings will go away when the system is rebooted. To make these changes permanent, we will need to add .conf files inside the /etc/sysctl.d as follows:
# echo "net.ipv4.ip_forward = 1" > /etc/sysctl.d/10-forward.conf
(where the number 10 indicates the order of processing relative to other files in the same directory).
and enable the changes with
# sysctl -p /etc/sysctl.d/10-forward.conf
Summary
In this tutorial we have explained the basics of packet filtering, network address translation, and setting kernel runtime parameters on a running system and persistently across reboots. I hope you have found this information useful, and as always, we look forward to hearing from you!
Don’t hesitate to share with us your questions, comments, or suggestions using the form below.
How to Produce and Deliver System Activity Reports Using Linux Toolsets – Part 3
As a system engineer, you will often need to produce reports that show the utilization of your system’s resources in order to make sure that: 1) they are being utilized optimally, 2) prevent bottlenecks, and 3) ensure scalability, among other reasons.

RHCE: Monitor Linux Performance Activity Reports – Part 3
Besides the well-known native Linux tools that are used to check disk, memory, and CPU usage – to name a few examples, Red Hat Enterprise Linux 7 provides two additional toolsets to enhance the data you can collect for your reports: sysstat and dstat.
In this article we will describe both, but let’s first start by reviewing the usage of the classic tools.
Native Linux Tools
With df, you will be able to report disk space and inode usage of by filesystem. You need to monitor both because a lack of space will prevent you from being able to save further files (and may even cause the system to crash), just like running out of inodes will mean you can’t link further files with their corresponding data structures, thus producing the same effect: you won’t be able to save those files to disk.
# df -h 		[Display output in human-readable form]
# df -h --total         [Produce a grand total]
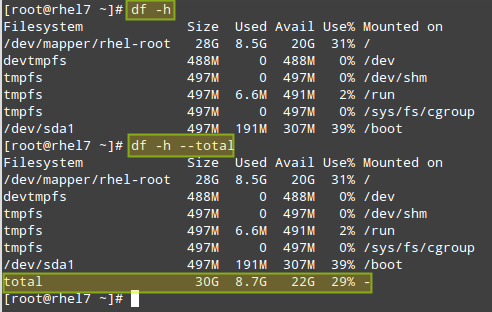
Check Linux Total Disk Usage
# df -i 		[Show inode count by filesystem]
# df -i --total 	[Produce a grand total]

Check Linux Total inode Numbers
With du, you can estimate file space usage by either file, directory, or filesystem.
For example, let’s see how much space is used by the /home directory, which includes all of the user’s personal files. The first command will return the overall space currently used by the entire /home directory, whereas the second will also display a disaggregated list by sub-directory as well:
# du -sch /home
# du -sch /home/*

Check Linux Directory Disk Size
Don’t Miss:
- 12 ‘df’ Command Examples to Check Linux Disk Space Usage
- 10 ‘du’ Command Examples to Find Disk Usage of Files/Directories
Another utility that can’t be missing from your toolset is vmstat. It will allow you to see at a quick glance information about processes, CPU and memory usage, disk activity, and more.
If run without arguments, vmstat will return averages since the last reboot. While you may use this form of the command once in a while, it will be more helpful to take a certain amount of system utilization samples, one after another, with a defined time separation between samples.
For example,
# vmstat 5 10
will return 10 samples taken every 5 seconds:

Check Linux System Performance
As you can see in the above picture, the output of vmstat is divided by columns: procs (processes), memory, swap, io, system, and cpu. The meaning of each field can be found in the FIELD DESCRIPTION sections in the man page of vmstat.
Where can vmstat come in handy? Let’s examine the behavior of the system before and during a yum update:
# vmstat -a 1 5

Vmstat Linux Performance Monitoring
Please note that as files are being modified on disk, the amount of active memory increases and so does the number of blocks written to disk (bo) and the CPU time that is dedicated to user processes (us).
Or during the saving process of a large file directly to disk (caused by dsync):
# vmstat -a 1 5
# dd if=/dev/zero of=dummy.out bs=1M count=1000 oflag=dsync

VmStat Linux Disk Performance Monitoring
In this case, we can see a yet larger number of blocks being written to disk (bo), which was to be expected, but also an increase of the amount of CPU time that it has to wait for I/O operations to complete before processing tasks (wa).
Don’t Miss: Vmstat – Linux Performance Monitoring
Other Linux Tools
As mentioned in the introduction of this chapter, there are other tools that you can use to check the system status and utilization (they are not only provided by Red Hat but also by other major distributions from their officially supported repositories).
The sysstat package contains the following utilities:
- sar (collect, report, or save system activity information).
- sadf (display data collected by sar in multiple formats).
- mpstat (report processors related statistics).
- iostat (report CPU statistics and I/O statistics for devices and partitions).
- pidstat (report statistics for Linux tasks).
- nfsiostat (report input/output statistics for NFS).
- cifsiostat (report CIFS statistics) and
- sa1 (collect and store binary data in the system activity daily data file.
- sa2 (write a daily report in the /var/log/sa directory) tools.
whereas dstat adds some extra features to the functionality provided by those tools, along with more counters and flexibility. You can find an overall description of each tool by running yum info sysstat or yum info dstat, respectively, or checking the individual man pages after installation.
To install both packages:
# yum update && yum install sysstat dstat
The main configuration file for sysstat is /etc/sysconfig/sysstat. You will find the following parameters in that file:
# How long to keep log files (in days).
# If value is greater than 28, then log files are kept in
# multiple directories, one for each month.
HISTORY=28
# Compress (using gzip or bzip2) sa and sar files older than (in days):
COMPRESSAFTER=31
# Parameters for the system activity data collector (see sadc manual page)
# which are used for the generation of log files.
SADC_OPTIONS="-S DISK"
# Compression program to use.
ZIP="bzip2"
When sysstat is installed, two cron jobs are added and enabled in /etc/cron.d/sysstat. The first job runs the system activity accounting tool every 10 minutes and stores the reports in /var/log/sa/saXX where XX is the day of the month.
Thus, /var/log/sa/sa05 will contain all the system activity reports from the 5th of the month. This assumes that we are using the default value in the HISTORY variable in the configuration file above:
*/10 * * * * root /usr/lib64/sa/sa1 1 1
The second job generates a daily summary of process accounting at 11:53 pm every day and stores it in /var/log/sa/sarXX files, where XX has the same meaning as in the previous example:
53 23 * * * root /usr/lib64/sa/sa2 -A
For example, you may want to output system statistics from 9:30 am through 5:30 pm of the sixth of the month to a .csv file that can easily be viewed using LibreOffice Calc or Microsoft Excel (this approach will also allow you to create charts or graphs):
# sadf -s 09:30:00 -e 17:30:00 -dh /var/log/sa/sa06 -- | sed 's/;/,/g' > system_stats20150806.csv
You could alternatively use the -j flag instead of -d in the sadf command above to output the system stats in JSON format, which could be useful if you need to consume the data in a web application, for example.

Linux System Statistics
Finally, let’s see what dstat has to offer. Please note that if run without arguments, dstat assumes -cdngy by default (short for CPU, disk, network, memory pages, and system stats, respectively), and adds one line every second (execution can be interrupted anytime with Ctrl + C):
# dstat

Linux Disk Statistics Monitoring
To output the stats to a .csv file, use the –output flag followed by a file name. Let’s see how this looks on LibreOffice Calc:

Monitor Linux Statistics Output
I strongly advise you to check out the man page of dstat along with the man page of sysstat in PDF format for your reading convenience. You will find several other options that will help you create custom and detailed system activity reports.
Don’t Miss: Sysstat – Linux Usage Activity Monitoring Tool
Summary
In this guide we have explained how to use both native Linux tools and specific utilities provided with RHEL 7 in order to produce reports on system utilization. At one point or another, you will come to rely on these reports as best friends.
You will probably have used other tools that we have not covered in this tutorial. If so, feel free to share them with the rest of the community along with any other suggestions / questions / comments that you may have- using the form below.
We look forward to hearing from you.
Using Shell Scripting to Automate Linux System Maintenance Tasks – Part 4
Some time ago I read that one of the distinguishing characteristics of an effective system administrator / engineer is laziness. It seemed a little contradictory at first but the author then proceeded to explain why:

RHCE Series: Automate Linux System Maintenance Tasks – Part 4
if a sysadmin spends most of his time solving issues and doing repetitive tasks, you can suspect he or she is not doing things quite right. In other words, an effective system administrator / engineer should develop a plan to perform repetitive tasks with as less action on his / her part as possible, and should foresee problems by using,
for example, the tools reviewed in Part 3 – Monitor System Activity Reports Using Linux Toolsets of this series. Thus, although he or she may not seem to be doing much, it’s because most of his / her responsibilities have been taken care of with the help of shell scripting, which is what we’re going to talk about in this tutorial.
What is a shell script?
In few words, a shell script is nothing more and nothing less than a program that is executed step by step by a shell, which is another program that provides an interface layer between the Linux kernel and the end user.
By default, the shell used for user accounts in RHEL 7 is bash (/bin/bash). If you want a detailed description and some historical background, you can refer to this Wikipedia article.
To find out more about the enormous set of features provided by this shell, you may want to check out its man page, which is downloaded in in PDF format at (Bash Commands). Other than that, it is assumed that you are familiar with Linux commands (if not, I strongly advise you to go through A Guide from Newbies to SysAdminarticle in Tecmint.com before proceeding). Now let’s get started.
Writing a script to display system information
For our convenience, let’s create a directory to store our shell scripts:
# mkdir scripts
# cd scripts
And open a new text file named system_info.sh with your preferred text editor. We will begin by inserting a few comments at the top and some commands afterwards:
#!/bin/bash

# Sample script written for Part 4 of the RHCE series
# This script will return the following set of system information:
# -Hostname information:
echo -e "\e[31;43m***** HOSTNAME INFORMATION *****\e[0m"
hostnamectl
echo ""
# -File system disk space usage:
echo -e "\e[31;43m***** FILE SYSTEM DISK SPACE USAGE *****\e[0m"
df -h
echo ""
# -Free and used memory in the system:
echo -e "\e[31;43m ***** FREE AND USED MEMORY *****\e[0m"
free
echo ""
# -System uptime and load:
echo -e "\e[31;43m***** SYSTEM UPTIME AND LOAD *****\e[0m"
uptime
echo ""
# -Logged-in users:
echo -e "\e[31;43m***** CURRENTLY LOGGED-IN USERS *****\e[0m"
who
echo ""
# -Top 5 processes as far as memory usage is concerned
echo -e "\e[31;43m***** TOP 5 MEMORY-CONSUMING PROCESSES *****\e[0m"
ps -eo %mem,%cpu,comm --sort=-%mem | head -n 6
echo ""
echo -e "\e[1;32mDone.\e[0m"
Next, give the script execute permissions:
# chmod +x system_info.sh
and run it:
./system_info.sh
Note that the headers of each section are shown in color for better visualization:
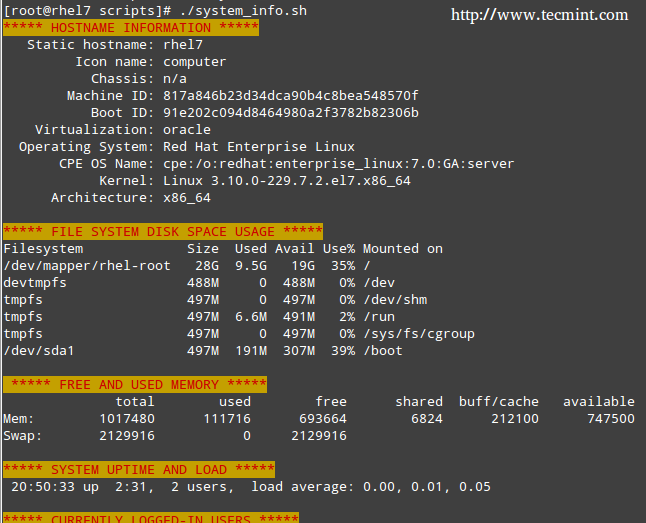
Server Monitoring Shell Script
That functionality is provided by this command:
echo -e "\e[COLOR1;COLOR2m<YOUR TEXT HERE>\e[0m"
Where COLOR1 and COLOR2 are the foreground and background colors, respectively (more info and options are explained in this entry from the Arch Linux Wiki) and <YOUR TEXT HERE> is the string that you want to show in color.
Automating Tasks
The tasks that you may need to automate may vary from case to case. Thus, we cannot possibly cover all of the possible scenarios in a single article, but we will present three classic tasks that can be automated using shell scripting:
1) update the local file database, 2) find (and alternatively delete) files with 777 permissions, and 3) alert when filesystem usage surpasses a defined limit.
Let’s create a file named auto_tasks.sh in our scripts directory with the following content:
#!/bin/bash

# Sample script to automate tasks:
# -Update local file database:
echo -e "\e[4;32mUPDATING LOCAL FILE DATABASE\e[0m"
updatedb
if [ $? == 0 ]; then
        echo "The local file database was updated correctly."
else
        echo "The local file database was not updated correctly."
fi
echo ""

# -Find and / or delete files with 777 permissions.
echo -e "\e[4;32mLOOKING FOR FILES WITH 777 PERMISSIONS\e[0m"
# Enable either option (comment out the other line), but not both.
# Option 1: Delete files without prompting for confirmation. Assumes GNU version of find.
#find -type f -perm 0777 -delete
# Option 2: Ask for confirmation before deleting files. More portable across systems.
find -type f -perm 0777 -exec rm -i {} +;
echo ""
# -Alert when file system usage surpasses a defined limit
echo -e "\e[4;32mCHECKING FILE SYSTEM USAGE\e[0m"
THRESHOLD=30
while read line; do
        # This variable stores the file system path as a string
        FILESYSTEM=$(echo $line | awk '{print $1}')
        # This variable stores the use percentage (XX%)
        PERCENTAGE=$(echo $line | awk '{print $5}')
        # Use percentage without the % sign.
        USAGE=${PERCENTAGE%?}
        if [ $USAGE -gt $THRESHOLD ]; then
                echo "The remaining available space in $FILESYSTEM is critically low. Used: $PERCENTAGE"
        fi
done < <(df -h --total | grep -vi filesystem)
Please note that there is a space between the two < signs in the last line of the script.

Shell Script to Find 777 Permissions
Using Cron
To take efficiency one step further, you will not want to sit in front of your computer and run those scripts manually. Rather, you will use cron to schedule those tasks to run on a periodic basis and sends the results to a predefined list of recipients via email or save them to a file that can be viewed using a web browser.
The following script (filesystem_usage.sh) will run the well-known df -h command, format the output into a HTML table and save it in the report.html file:
#!/bin/bash
# Sample script to demonstrate the creation of an HTML report using shell scripting
# Web directory
WEB_DIR=/var/www/html
# A little CSS and table layout to make the report look a little nicer
echo "<HTML>
<HEAD>
<style>
.titulo{font-size: 1em; color: white; background:#0863CE; padding: 0.1em 0.2em;}
table
{
border-collapse:collapse;
}
table, td, th
{
border:1px solid black;
}
</style>
<meta http-equiv='Content-Type' content='text/html; charset=UTF-8' />
</HEAD>
<BODY>" > $WEB_DIR/report.html
# View hostname and insert it at the top of the html body
HOST=$(hostname)
echo "Filesystem usage for host <strong>$HOST</strong><br>
Last updated: <strong>$(date)</strong><br><br>
<table border='1'>
<tr><th class='titulo'>Filesystem</td>
<th class='titulo'>Size</td>
<th class='titulo'>Use %</td>
</tr>" >> $WEB_DIR/report.html
# Read the output of df -h line by line
while read line; do
echo "<tr><td align='center'>" >> $WEB_DIR/report.html
echo $line | awk '{print $1}' >> $WEB_DIR/report.html
echo "</td><td align='center'>" >> $WEB_DIR/report.html
echo $line | awk '{print $2}' >> $WEB_DIR/report.html
echo "</td><td align='center'>" >> $WEB_DIR/report.html
echo $line | awk '{print $5}' >> $WEB_DIR/report.html
echo "</td></tr>" >> $WEB_DIR/report.html
done < <(df -h | grep -vi filesystem)
echo "</table></BODY></HTML>" >> $WEB_DIR/report.html
In our RHEL 7 server (192.168.0.18), this looks as follows:
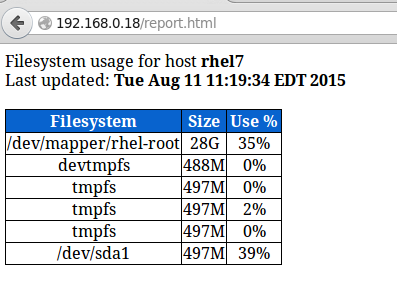
Server Monitoring Report
You can add to that report as much information as you want. To run the script every day at 1:30 pm, add the following crontab entry:
30 13 * * * /root/scripts/filesystem_usage.sh
Summary
You will most likely think of several other tasks that you want or need to automate; as you can see, using shell scripting will greatly simplify this effort. Feel free to let us know if you find this article helpful and don’t hesitate to add your own ideas or comments via the form below.
How to Manage System Logs (Configure, Rotate and Import Into Database) in RHEL 7 – Part 5
In order to keep your RHEL 7 systems secure, you need to know how to monitor all of the activities that take place on such systems by examining log files. Thus, you will be able to detect any unusual or potentially malicious activity and perform system troubleshooting or take another appropriate action.

RHCE Exam: Manage System LogsUsing Rsyslogd and Logrotate – Part 5
In RHEL 7, the rsyslogd daemon is responsible for system logging and reads its configuration from /etc/rsyslog.conf (this file specifies the default location for all system logs) and from files inside /etc/rsyslog.d, if any.
Rsyslogd Configuration
A quick inspection of the rsyslog.conf will be helpful to start. This file is divided into 3 main sections: Modules(since rsyslog follows a modular design), Global directives (used to set global properties of the rsyslogd daemon), and Rules. As you will probably guess, this last section indicates what gets logged or shown (also known as the selector) and where, and will be our focus throughout this article.
A typical line in rsyslog.conf is as follows:

Rsyslogd Configuration
In the image above, we can see that a selector consists of one or more pairs Facility:Priority separated by semicolons, where Facility describes the type of message (refer to section 4.1.1 in RFC 3164 to see the complete list of facilities available for rsyslog) and Priority indicates its severity, which can be one of the following self-explanatory words:
- debug
- info
- notice
- warning
- err
- crit
- alert
- emerg
Though not a priority itself, the keyword none means no priority at all of the given facility.
Note: That a given priority indicates that all messages of such priority and above should be logged. Thus, the line in the example above instructs the rsyslogd daemon to log all messages of priority info or higher (regardless of the facility) except those belonging to mail, authpriv, and cron services (no messages coming from this facilities will be taken into account) to /var/log/messages.
You can also group multiple facilities using the colon sign to apply the same priority to all of them. Thus, the line:
*.info;mail.none;authpriv.none;cron.none /var/log/messages
Could be rewritten as
*.info;mail,authpriv,cron.none /var/log/messages
In other words, the facilities mail, authpriv, and cron are grouped and the keyword none is applied to the three of them.
Creating a custom log file
To log all daemon messages to /var/log/tecmint.log, we need to add the following line either in rsyslog.conf or in a separate file (easier to manage) inside /etc/rsyslog.d:
daemon.* /var/log/tecmint.log
Let’s restart the daemon (note that the service name does not end with a d):
# systemctl restart rsyslog
And check the contents of our custom log before and after restarting two random daemons:

Create Custom Log File
As a self-study exercise, I would recommend you play around with the facilities and priorities and either log additional messages to existing log files or create new ones as in the previous example.
Rotating Logs using Logrotate
To prevent log files from growing endlessly, the logrotate utility is used to rotate, compress, remove, and alternatively mail logs, thus easing the administration of systems that generate large numbers of log files.
Suggested Read: How to Setup and Manage Log Rotation Using Logrotate in Linux
Logrotate runs daily as a cron job (/etc/cron.daily/logrotate) and reads its configuration from /etc/logrotate.conf and from files located in /etc/logrotate.d, if any.
As with the case of rsyslog, even when you can include settings for specific services in the main file, creating separate configuration files for each one will help organize your settings better.
Let’s take a look at a typical logrotate.conf:

Logrotate Configuration
In the example above, logrotate will perform the following actions for /var/loh/wtmp: attempt to rotate only once a month, but only if the file is at least 1 MB in size, then create a brand new log file with permissions set to 0664 and ownership given to user root and group utmp. Next, only keep one archived log, as specified by the rotate directive:
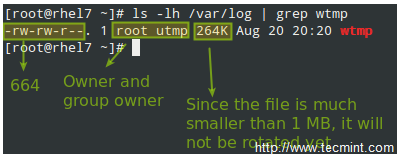
Logrotate Logs Monthly
Let’s now consider another example as found in /etc/logrotate.d/httpd:

Rotate Apache Log Files
You can read more about the settings for logrotate in its man pages (man logrotate and man logrotate.conf). Both files are provided along with this article in PDF format for your reading convenience.
As a system engineer, it will be pretty much up to you to decide for how long logs will be stored and in what format, depending on whether you have /var in a separate partition / logical volume. Otherwise, you really want to consider removing old logs to save storage space. On the other hand, you may be forced to keep several logs for future security auditing according to your company’s or client’s internal policies.
Saving Logs to a Database
Of course examining logs (even with the help of tools such as grep and regular expressions) can become a rather tedious task. For that reason, rsyslog allows us to export them into a database (OTB supported RDBMS include MySQL, MariaDB, PostgreSQL, and Oracle.
This section of the tutorial assumes that you have already installed the MariaDB server and client in the same RHEL 7 box where the logs are being managed:
# yum update && yum install mariadb mariadb-server mariadb-client rsyslog-mysql
# systemctl enable mariadb && systemctl start mariadb
Then use the mysql_secure_installation utility to set the password for the root user and other security considerations:

Secure MySQL Database
Note: If you don’t want to use the MariaDB root user to insert log messages to the database, you can configure another user account to do so. Explaining how to do that is out of the scope of this tutorial but is explained in detail in MariaDB knowledge base. In this tutorial we will use the root account for simplicity.
Next, download the createDB.sql script from GitHub and import it into your database server:
# mysql -u root -p < createDB.sql

Save Server Logs to Database
Finally, add the following lines to /etc/rsyslog.conf:
$ModLoad ommysql
$ActionOmmysqlServerPort 3306
*.* :ommysql:localhost,Syslog,root,YourPasswordHere
Restart rsyslog and the database server:
# systemctl restart rsyslog
# systemctl restart mariadb
Querying the Logs using SQL syntax
Now perform some tasks that will modify the logs (like stopping and starting services, for example), then log to your DB server and use standard SQL commands to display and search in the logs:
USE Syslog;
SELECT ReceivedAt, Message FROM SystemEvents;

Query Logs in Database
Summary
In this article we have explained how to set up system logging, how to rotate logs, and how to redirect the messages to a database for easier search. We hope that these skills will be helpful as you prepare for the RHCE exam and in your daily responsibilities as well.
As always, your feedback is more than welcome. Feel free to use the form below to reach us.
Setting Up Samba and Configure FirewallD and SELinux to Allow File Sharing on Linux/Windows Clients – Part 6
Since computers seldom work as isolated systems, it is to be expected that as a system administrator or engineer, you know how to set up and maintain a network with multiple types of servers.
In this article and in the next of this series we will go through the essentials of setting up Samba and NFSservers with Windows/Linux and Linux clients, respectively.

RHCE: Setup Samba File Sharing – Part 6
This article will definitely come in handy if you’re called upon to set up file servers in corporate or enterprise environments where you are likely to find different operating systems and types of devices.
Since you can read about the background and the technical aspects of both Samba and NFS all over the Internet, in this article and the next we will cut right to the chase with the topic at hand.
Step 1: Installing Samba Server
Our current testing environment consists of two RHEL 7 boxes and one Windows 8 machine, in that order:
1. Samba / NFS server [box1 (RHEL 7): 192.168.0.18],
2. Samba client #1 [box2 (RHEL 7): 192.168.0.20]
3. Samba client #2 [Windows 8 machine: 192.168.0.106]
![]()
Testing Setup for Samba
On box1, install the following packages:
# yum update && yum install samba samba-client samba-common
On box2:
# yum update && yum install samba samba-client samba-common cifs-utils
Once the installation is complete, we’re ready to configure our share.
Step 2: Setting Up File Sharing Through Samba
One of the reason why Samba is so relevant is because it provides file and print services to SMB/CIFS clients, which causes those clients to see the server as if it was a Windows system (I must admit I tend to get a little emotional while writing about this topic as it was my first setup as a new Linux system administrator some years ago).
Adding system users and setting up permissions and ownership
To allow for group collaboration, we will create a group named finance with two users (user1 and user2) with useradd command and a directory /finance in box1.
We will also change the group owner of this directory to finance and set its permissions to 0770 (read, write, and execution permissions for the owner and the group owner):
# groupadd finance
# useradd user1
# useradd user2
# usermod -a -G finance user1
# usermod -a -G finance user2
# mkdir /finance
# chmod 0770 /finance
# chgrp finance /finance
Step 3: Configuring SELinux and Firewalld
In preparation to configure /finance as a Samba share, we will need to either disable SELinux or set the proper boolean and security context values as follows (otherwise, SELinux will prevent clients from accessing the share):
# setsebool -P samba_export_all_ro=1 samba_export_all_rw=1
# getsebool –a | grep samba_export
# semanage fcontext –at samba_share_t "/finance(/.*)?"
# restorecon /finance
In addition, we must ensure that Samba traffic is allowed by the firewalld.
# firewall-cmd --permanent --add-service=samba
# firewall-cmd --reload
Step 4: Configure Samba Share
Now it’s time to dive into the configuration file /etc/samba/smb.conf and add the section for our share: we want the members of the finance group to be able to browse the contents of /finance, and save / create files or subdirectories in it (which by default will have their permission bits set to 0770 and finance will be their group owner):
[finance]
comment=Directory for collaboration of the company's finance team
browsable=yes
path=/finance
public=no
valid users=@finance
write list=@finance
writeable=yes
create mask=0770
Force create mode=0770
force group=finance
Save the file and then test it with the testparm utility. If there are any errors, the output of the following command will indicate what you need to fix. Otherwise, it will display a review of your Samba server configuration:
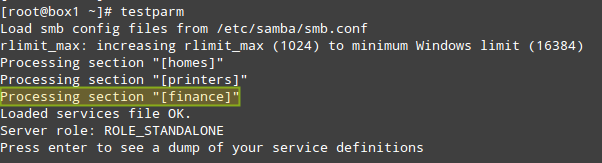
Test Samba Configuration
Should you want to add another share that is open to the public (meaning without any authentication whatsoever), create another section in /etc/samba/smb.conf and under the new share’s name copy the section above, only changing public=no to public=yes and not including the valid users and write list directives.
Step 5: Adding Samba Users
Next, you will need to add user1 and user2 as Samba users. To do so, you will use the smbpasswd command, which interacts with Samba’s internal database. You will be prompted to enter a password that you will later use to connect to the share:
# smbpasswd -a user1
# smbpasswd -a user2
Finally, restart Samba, enable the service to start on boot, and make sure the share is actually available to network clients:
# systemctl start smb
# systemctl enable smb
# smbclient -L localhost –U user1
# smbclient -L localhost –U user2

Verify Samba Share
At this point, the Samba file server has been properly installed and configured. Now it’s time to test this setup on our RHEL 7 and Windows 8 clients.
Step 6: Mounting the Samba Share in Linux
First, make sure the Samba share is accessible from this client:
# smbclient –L 192.168.0.18 -U user2

Mount Samba Share on Linux
(repeat the above command for user1)
As any other storage media, you can mount (and later unmount) this network share when needed:
# mount //192.168.0.18/finance /media/samba -o username=user1

Mount Samba Network Share
(where /media/samba is an existing directory)
or permanently, by adding the following entry in /etc/fstab file:
//192.168.0.18/finance /media/samba cifs credentials=/media/samba/.smbcredentials,defaults 0 0
Where the hidden file /media/samba/.smbcredentials (whose permissions and ownership have been set to 600and root:root, respectively) contains two lines that indicate the username and password of an account that is allowed to use the share:
username=user1
password=PasswordForUser1
Finally, let’s create a file inside /finance and check the permissions and ownership:
# touch /media/samba/FileCreatedInRHELClient.txt

Create File in Samba Share
As you can see, the file was created with 0770 permissions and ownership set to user1:finance.
Step 7: Mounting the Samba Share in Windows
To mount the Samba share in Windows, go to My PC and choose Computer, then Map network drive. Next, assign a letter for the drive to be mapped and check Connect using different credentials (the screenshots below are in Spanish, my native language):

Mount Samba Share in Windows
Finally, let’s create a file and check the permissions and ownership:

Create Files on Windows Samba Share
# ls -l /finance
This time the file belongs to user2 since that’s the account we used to connect from the Windows client.
Summary
In this article we have explained not only how to set up a Samba server and two clients using different operating systems, but also how to configure the firewalld and SELinux on the server to allow the desired group collaboration capabilities.
Last, but not least, let me recommend the reading of the online man page of smb.conf to explore other configuration directives that may be more suitable for your case than the scenario described in this article.
As always, feel free to drop a comment using the form below if you have any comments or suggestions.
Setting Up NFS Server with Kerberos-based Authentication for Linux Clients – Part 7
In the last article of this series, we reviewed how to set up a Samba share over a network that may consist of multiple types of operating systems. Now, if you need to set up file sharing for a group of Unix-like clients you will automatically think of the Network File System, or NFS for short.

RHCE Series: Setting Up NFS Server with Kerberos Authentication – Part 7
In this article we will walk you through the process of using Kerberos-based authentication for NFS shares. It is assumed that you already have set up a NFS server and a client. If not, please refer to install and configure NFS server – which will list the necessary packages that need to be installed and explain how to perform initial configurations on the server before proceeding further.
In addition, you will want to configure both SELinux and firewalld to allow for file sharing through NFS.
The following example assumes that your NFS share is located in /nfs in box2:
# semanage fcontext -a -t public_content_rw_t "/nfs(/.*)?"
# restorecon -R /nfs
# setsebool -P nfs_export_all_rw on
# setsebool -P nfs_export_all_ro on
(where the -P flag indicates persistence across reboots).
Finally, don’t forget to:
Create NFS Group and Configure NFS Share Directory
1. Create a group called nfs and add the nfsnobody user to it, then change the permissions of the /nfs directory to 0770 and its group owner to nfs. Thus, nfsnobody (which is mapped to the client requests) will have write permissions on the share) and you won’t need to use no_root_squash in the /etc/exports file.
# groupadd nfs
# usermod -a -G nfs nfsnobody
# chmod 0770 /nfs
# chgrp nfs /nfs
2. Modify the exports file (/etc/exports) as follows to only allow access from box1 using Kerberos security (sec=krb5).
Note: that the value of anongid has been set to the GID of the nfs group that we created previously:
/nfs box1(rw,sec=krb5,anongid=1004)
3. Re-export (-r) all (-a) the NFS shares. Adding verbosity to the output (-v) is a good idea since it will provide helpful information to troubleshoot the server if something goes wrong:
# exportfs -arv
4. Restart and enable the NFS server and related services. Note that you don’t have to enable nfs-lock and nfs-idmapd because they will be automatically started by the other services on boot:
# systemctl restart rpcbind nfs-server nfs-lock nfs-idmap
# systemctl enable rpcbind nfs-server
Testing Environment and Other Prerequisites
In this guide we will use the following test environment:
- Client machine [box1: 192.168.0.18]
- NFS / Kerberos server [box2: 192.168.0.20] (also known as Key Distribution Center, or KDC for short).
Note: that Kerberos service is crucial to the authentication scheme.
As you can see, the NFS server and the KDC are hosted in the same machine for simplicity, although you can set them up in separate machines if you have more available. Both machines are members of the mydomain.comdomain.
Last but not least, Kerberos requires at least a basic schema of name resolution and the Network Time Protocolservice to be present in both client and server since the security of Kerberos authentication is in part based upon the timestamps of tickets.
To set up name resolution, we will use the /etc/hosts file in both client and server:
192.168.0.18    box1.mydomain.com    box1
192.168.0.20    box2.mydomain.com    box2
In RHEL 7, chrony is the default software that is used for NTP synchronization:
# yum install chrony
# systemctl start chronyd
# systemctl enable chronyd
To make sure chrony is actually synchronizing your system’s time with time servers you may want to issue the following command two or three times and make sure the offset is getting nearer to zero:
# chronyc tracking

Synchronize Server Time with Chrony
Installing and Configuring Kerberos
To set up the KDC, install the following packages on both server and client (omit the server package in the client):
# yum update && yum install krb5-server krb5-workstation pam_krb5
Once it is installed, edit the configuration files (/etc/krb5.conf and /var/kerberos/krb5kdc/kadm5.acl) and replace all instances of example.com (lowercase and uppercase) with mydomain.com as follows.
Now create the Kerberos database (please note that this may take a while as it requires a some level of entropy in your system. To speed things up, I opened another terminal and ran ping -f localhost for 30-45 seconds):
# kdb5_util create -s

Create Kerberos Database
Next, enable Kerberos through the firewall and start / enable the related services.
Important: nfs-secure must be started and enabled on the client as well:
# firewall-cmd --permanent --add-service=kerberos
# systemctl start krb5kdc kadmin nfs-secure
# systemctl enable krb5kdc kadmin nfs-secure
Next, using the kadmin.local tool, create an admin principal for root:
# kadmin.local
# addprinc root/admin
And add the Kerberos server to the database:
# addprinc -randkey host/box2.mydomain.com
Same with the NFS service for both client (box1) and server (box2). Please note that in the screenshot below I forgot to do it for box1 before quitting:
# addprinc -randkey nfs/box2.mydomain.com
# addprinc -randkey nfs/box1.mydomain.com
And exit by typing quit and pressing Enter:

Add Kerberos to NFS Server
Then obtain and cache Kerberos ticket-granting ticket for root/admin:
# kinit root/admin
# klist

Cache Kerberos
The last step before actually using Kerberos is storing into a keytab file (in the server) the principals that are authorized to use Kerberos authentication:
# kadmin.local
# ktadd host/box2.mydomain.com
# ktadd nfs/box2.mydomain.com
# ktadd nfs/box1.mydomain.com
Finally, mount the share and perform a write test:
# mount -t nfs4 -o sec=krb5 box2:/nfs /mnt
# echo "Hello from Tecmint.com" > /mnt/greeting.txt

Mount NFS Share
Let’s now unmount the share, rename the keytab file in the client (to simulate it’s not present) and try to mount the share again:
# umount /mnt
# mv /etc/krb5.keytab /etc/krb5.keytab.orig

Mount Unmount Kerberos NFS Share
Now you can use the NFS share with Kerberos-based authentication.
Summary
In this article we have explained how to set up NFS with Kerberos authentication. Since there is much more to the topic than we can cover in a single guide, feel free to check the online Kerberos documentation and since Kerberos is a bit tricky to say the least, don’t hesitate to drop us a note using the form below if you run into any issue or need help with your testing or implementation.
RHCE Series: Implementing HTTPS through TLS using Network Security Service (NSS) for Apache – Part 8
If you are a system administrator who is in charge of maintaining and securing a web server, you can’t afford to not devote your very best efforts to ensure that data served by or going through your server is protected at all times.

RHCE Series: Implementing HTTPS through TLS using Network Security Service (NSS) for Apache – Part 8
In order to provide more secure communications between web clients and servers, the HTTPS protocol was born as a combination of HTTP and SSL (Secure Sockets Layer) or more recently, TLS (Transport Layer Security).
Due to some serious security breaches, SSL has been deprecated in favor of the more robust TLS. For that reason, in this article we will explain how to secure connections between your web server and clients using TLS.
This tutorial assumes that you have already installed and configured your Apache web server. If not, please refer to following article in this site before proceeding further.
Installation of OpenSSL and Utilities
First off, make sure that Apache is running and that both http and https are allowed through the firewall:
# systemctl start http
# systemctl enable http
# firewall-cmd --permanent –-add-service=http
# firewall-cmd --permanent –-add-service=https
Then install the necessary packages:
# yum update && yum install openssl mod_nss crypto-utils
Important: Please note that you can replace mod_nss with mod_ssl in the command above if you want to use OpenSSL libraries instead of NSS (Network Security Service) to implement TLS (which one to use is left entirely up to you, but we will use NSS in this article as it is more robust; for example, it supports recent cryptography standards such as PKCS #11).
Finally, uninstall mod_ssl if you chose to use mod_nss, or viceversa.
# yum remove mod_ssl
Configuring NSS (Network Security Service)
After mod_nss is installed, its default configuration file is created as /etc/httpd/conf.d/nss.conf. You should then make sure that all of the Listen and VirtualHost directives point to port 443 (default port for HTTPS):
Listen 443
VirtualHost _default_:443
Then restart Apache and check whether the mod_nss module has been loaded:
# apachectl restart
# httpd -M | grep nss

Check Mod_NSS Module Loaded in Apache
Next, the following edits should be made in /etc/httpd/conf.d/nss.conf configuration file:
1. Indicate NSS database directory. You can use the default directory or create a new one. In this tutorial we will use the default:
NSSCertificateDatabase /etc/httpd/alias
2. Avoid manual passphrase entry on each system start by saving the password to the database directory in /etc/httpd/nss-db-password.conf:
NSSPassPhraseDialog file:/etc/httpd/nss-db-password.conf
Where /etc/httpd/nss-db-password.conf contains ONLY the following line and mypassword is the password that you will set later for the NSS database:
internal:mypassword
In addition, its permissions and ownership should be set to 0640 and root:apache, respectively:
# chmod 640 /etc/httpd/nss-db-password.conf
# chgrp apache /etc/httpd/nss-db-password.conf
3. Red Hat recommends disabling SSL and all versions of TLS previous to TLSv1.0 due to the POODLE SSLv3vulnerability (more information here).
Make sure that every instance of the NSSProtocol directive reads as follows (you are likely to find only one if you are not hosting other virtual hosts):
NSSProtocol TLSv1.0,TLSv1.1
4. Apache will refuse to restart as this is a self-signed certificate and will not recognize the issuer as valid. For this reason, in this particular case you will have to add:
NSSEnforceValidCerts off
5. Though not strictly required, it is important to set a password for the NSS database:
# certutil -W -d /etc/httpd/alias

Set Password for NSS Database
Creating a Apache SSL Self-Signed Certificate
Next, we will create a self-signed certificate that will identify the server to our clients (please note that this method is not the best option for production environments; for such use you may want to consider buying a certificate verified by a 3rd trusted certificate authority, such as DigiCert).
To create a new NSS-compliant certificate for box1 which will be valid for 365 days, we will use the genkeycommand. When this process completes:
# genkey --nss --days 365 box1
Choose Next:

Create Apache SSL Key
You can leave the default choice for the key size (2048), then choose Next again:

Select Apache SSL Key Size
Wait while the system generates random bits:

Generating Random Key Bits
To speed up the process, you will be prompted to enter random text in your console, as shown in the following screencast. Please note how the progress bar stops when no input from the keyboard is received. Then, you will be asked to:
1. Whether to send the Certificate Sign Request (CSR) to a Certificate Authority (CA): Choose No, as this is a self-signed certificate.
2. to enter the information for the certificate.
Finally, you will be prompted to enter the password to the NSS certificate that you set earlier:
# genkey --nss --days 365 box1

Apache NSS Certificate Password
At anytime, you can list the existing certificates with:
# certutil –L –d /etc/httpd/alias

List Apache NSS Certificates
And delete them by name (only if strictly required, replacing box1 by your own certificate name) with:
# certutil -d /etc/httpd/alias -D -n "box1"
if you need to.c
Testing Apache SSL HTTPS Connections
Finally, it’s time to test the secure connection to our web server. When you point your browser to https://<web server IP or hostname>, you will get the well-known message “This connection is untrusted“:

Check Apache SSL Connection
In the above situation, you can click on Add Exception and then Confirm Security Exception – but don’t do it yet. Let’s first examine the certificate to see if its details match the information that we entered earlier (as shown in the screencast).
To do so, click on View… –> Details tab above and you should see this when you select Issuer from the list:

Confirm Apache SSL Certificate Details
Now you can go ahead, confirm the exception (either for this time or permanently) and you will be taken to your web server’s DocumentRoot directory via https, where you can inspect the connection details using your browser’s builtin developer tools:
In Firefox you can launch it by right clicking on the screen, and choosing Inspect Element from the context menu, specifically through the Network tab:

Inspect Apache HTTPS Connection
Please note that this is the same information as displayed before, which was entered during the certificate previously. There’s also a way to test the connection using command line tools:
On the left (testing SSLv3):
# openssl s_client -connect localhost:443 -ssl3
On the right (testing TLS):
# openssl s_client -connect localhost:443 -tls1

Testing Apache SSL and TLS Connections
Refer to the screenshot above for more details.
Summary
As I’m sure you already know, the presence of HTTPS inspires trust in visitors who may have to enter personal information in your site (from user names and passwords all the way to financial / bank account information).
In that case, you will want to get a certificate signed by a trusted Certificate Authority as we explained earlier (the steps to set it up are identical with the exception that you will need to send the CSR to a CA, and you will get the signed certificate back); otherwise, a self-signed certificate as the one used in this tutorial will do.
For more details on the use of NSS, please refer to the online help about mod-nss. And don’t hesitate to let us know if you have any questions or comments.
How to Setup Postfix Mail Server (SMTP) using null-client Configuration – Part 9
Regardless of the many online communication methods that are available today, email remains a practical way to deliver messages from one end of the world to another, or to a person sitting in the office next to ours.
The following image illustrates the process of email transport starting with the sender until the message reaches the recipient’s inbox:

How Mail Setup Works
To make this possible, several things happen behind the scenes. In order for an email message to be delivered from a client application (such as Thunderbird, Outlook, or webmail services such as Gmail or Yahoo! Mail) to a mail server, and from there to the destination server and finally to its intended recipient, a SMTP (Simple Mail Transfer Protocol) service must be in place in each server.
That is the reason why in this article we will explain how to set up a SMTP server in RHEL 7 where emails sent by local users (even to other local users) are forwarded to a central mail server for easier access.
In the exam’s requirements this is called a null-client setup.
Our test environment will consist of an originating mail server and a central mail server or relayhost.
Original Mail Server: (hostname: box1.mydomain.com / IP: 192.168.0.18)
Central Mail Server: (hostname: mail.mydomain.com / IP: 192.168.0.20)
For name resolution we will use the well-known /etc/hosts file on both boxes:
192.168.0.18    box1.mydomain.com       box1
192.168.0.20    mail.mydomain.com       mail
Installing Postfix and Firewall / SELinux Considerations
To begin, we will need to (in both servers):
1. Install Postfix:
# yum update && yum install postfix
2. Start the service and enable it to run on future reboots:
# systemctl start postfix
# systemctl enable postfix
3. Allow mail traffic through the firewall:
# firewall-cmd --permanent --add-service=smtp
# firewall-cmd --add-service=smtp
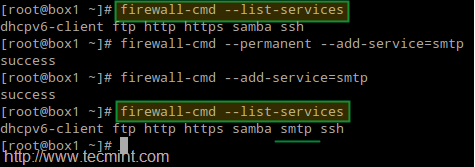
Open Mail Server SMTP Port in Firewall
4. Configure Postfix on box1.mydomain.com.
Postfix’s main configuration file is located in /etc/postfix/main.cf. This file itself is a great documentation source as the included comments explain the purpose of the program’s settings.
For brevity, let’s display only the lines that need to be edited (yes, you need to leave mydestination blank in the originating server; otherwise the emails will be stored locally as opposed to in a central mail server which is what we actually want):
myhostname = box1.mydomain.com
mydomain = mydomain.com
myorigin = $mydomain
inet_interfaces = loopback-only
mydestination =
relayhost = 192.168.0.20
5. Configure Postfix on mail.mydomain.com.
myhostname = mail.mydomain.com
mydomain = mydomain.com
myorigin = $mydomain
inet_interfaces = all
mydestination = $myhostname, localhost.$mydomain, localhost, $mydomain
mynetworks = 192.168.0.0/24, 127.0.0.0/8
And set the related SELinux boolean to true permanently if not already done:
# setsebool -P allow_postfix_local_write_mail_spool on

Set Postfix SELinux Permission
The above SELinux boolean will allow Postfix to write to the mail spool in the central server.
5. Restart the service on both servers for the changes to take effect:
# systemctl restart postfix
If Postfix does not start correctly, you can use following commands to troubleshoot.
# systemctl –l status postfix
# journalctl –xn
# postconf –n
Testing the Postfix Mail Servers
To test the mail servers, you can use any Mail User Agent (most commonly known as MUA for short) such as mail or mutt.
Since mutt is a personal favorite, I will use it in box1 to send an email to user tecmint using an existing file (mailbody.txt) as message body:
# mutt -s "Part 9-RHCE series" tecmint@mydomain.com < mailbody.txt

Test Postfix Mail Server
Now go to the central mail server (mail.mydomain.com), log on as user tecmint, and check whether the email was received:
# su – tecmint
# mail

Check Postfix Mail Server Delivery
If the email was not received, check root’s mail spool for a warning or error notification. You may also want to make sure that the SMTP service is running on both servers and that port 25 is open in the central mail server using nmap command:
# nmap -PN 192.168.0.20

Troubleshoot Postfix Mail Server
Summary
Setting up a mail server and a relay host as shown in this article is an essential skill that every system administrator must have, and represents the foundation to understand and install a more complex scenario such as a mail server hosting a live domain for several (even hundreds or thousands) of email accounts.
(Please note that this kind of setup requires a DNS server, which is out of the scope of this guide), but you can use following article to setup DNS Server:
Finally, I highly recommend you become familiar with Postfix’s configuration file (main.cf) and the program’s man page. If in doubt, don’t hesitate to drop us a line using the form below or using our forum, Linuxsay.com, where you will get almost immediate help from Linux experts from all around the world.
Install and Configure Caching-Only DNS Server in RHEL/CentOS 7 – Part 10
DNS servers comes in several types such as master, slave, forwarding and cache, to name a few examples, with cache-only DNS being the one that is easier to setup. Since DNS uses the UDP protocol, it improves the query time because it does not require an acknowledgement.
RHCE Series: Setup Cache-Only DNS in RHEL and CentOS 7 – Part 11
The cache-only DNS server is also known as resolver, which will query DNS records and fetch all the DNS details from other servers, and keep each query request in its cache for later use so that when we perform the same request in the future, it will serve from its cache, thus reducing the response time even more.
If you’re looking to setup DNS Caching-Only Server in CentOS/RHEL 6, follow this guide here:
Setting Up Caching-Only DNS Name Server in CentOS/RHEL 6
My Testing Environment
DNS server		:	dns.tecmintlocal.com (Red Hat Enterprise Linux 7.1)
Server IP Address	:	192.168.0.18
Client			:	node1.tecmintlocal.com (CentOS 7.1)
Client IP Address	:	192.168.0.29
Step 1: Installing Cache-Only DNS Server in RHEL/CentOS 7
1. The Cache-Only DNS server, can be installed via the bind package. If you don’t remember the package name, you can do a quick search for the package name using the command below.
# yum search bind

Search DNS Bind Package
2. In the above result, you will see several packages. From those, we need to choose and install only bind and bind-utils packages using following yum command.
# yum install bind bind-utils -y

Install DNS Bind in RHEL/CentOS 7
Step 2: Configure Cache-Only DNS in RHEL/CentOS 7
3. Once DNS packages are installed we can go ahead and configure DNS. Open and edit /etc/named.confusing your preferred text editor. Make the changes suggested below (or you can use your settings as per your requirements).
listen-on port 53 { 127.0.0.1; any; };
allow-query     { localhost; any; };
allow-query-cache       { localhost; any; };
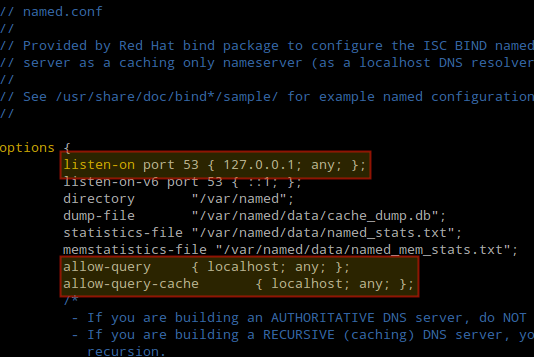
Configure Cache-Only DNS in CentOS and RHEL 7
These directives instruct the DNS server to listen on UDP port 53, and to allow queries and caches responses from localhost and any other machine that reaches the server.
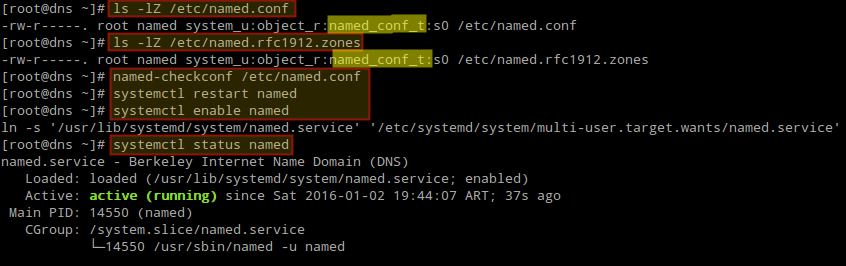
4. It is important to note that the ownership of this file must be set to root:named and also if SELinux is enabled, after editing the configuration file we need to make sure that its context is set to named_conf_t as shown in Fig. 4 (same thing for the auxiliary file /etc/named.rfc1912.zones):
# ls -lZ /etc/named.conf
# ls -lZ /etc/named.rfc1912.zones
Otherwise, configure the SELinux context before proceeding:
# semanage fcontext -a -t named_conf_t /etc/named.conf
# semanage fcontext -a -t named_conf_t /etc/named.rfc1912.zones
5. Additionally, we need to test the DNS configuration now for some syntax error before starting the bind service:
# named-checkconf /etc/named.conf
6. After the syntax verification results seems perfect, restart the named service to take new changes into effect and also make the service to auto start across system boots, and then check its status:
# systemctl restart named
# systemctl enable named
# systemctl status named
Configure and Start DNS Named Service
7. Next, open the port 53 on the firewall.
# firewall-cmd --add-port=53/udp
# firewall-cmd --add-port=53/udp --permanent

Open DNS Port 53 on Firewall
Step 3: Chroot Cache-Only DNS Server in RHEL and CentOS 7
8. If you wish to deploy the Cache-only DNS server within chroot environment, you need to have the package chroot installed on the system and no further configuration is needed as it by default hard-link to chroot.
# yum install bind-chroot -y
Once chroot package has been installed, you can restart named to take the new changes into effect:
# systemctl restart named
9. Next, create a symbolic link (also named /etc/named.conf) inside /var/named/chroot/etc/:
# ln -s /etc/named.conf /var/named/chroot/etc/named.conf
Step 4: Configure DNS on Client Machine
10. Add the DNS Cache servers IP 192.168.0.18 as resolver to the client machine. Edit /etc/sysconfig/network-scripts/ifcfg-enp0s3 as shown in the following figure:
DNS=192.168.0.18

Configure DNS on Client Machine
And /etc/resolv.conf as follows:
nameserver 192.168.0.18
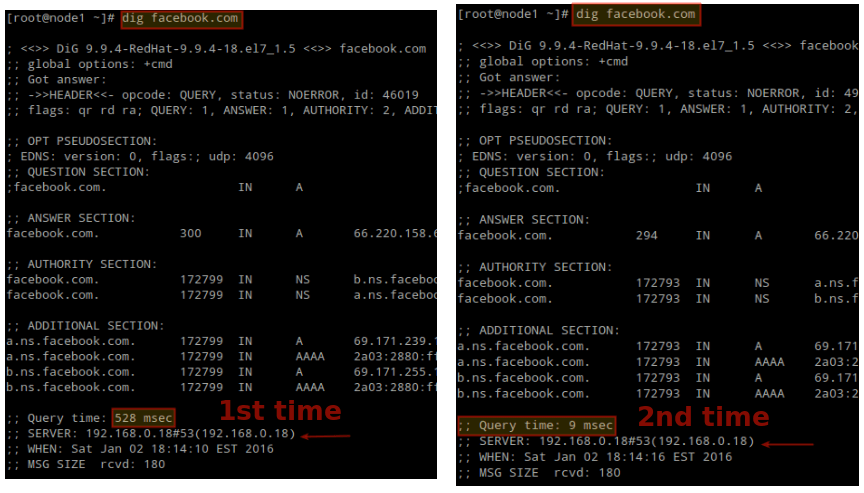
11. Finally it’s time to check our cache server. To do this, you can use dig utility or nslookup command.
Choose any website and query it twice (we will use facebook.com as an example). Note that with dig the second time the query is completed much faster because it is being served from the cache.
# dig facebook.com
Check Cache only DNS Queries
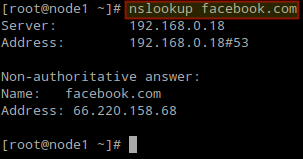
You can also use nslookup to verify that the DNS server is working as expected.
# nslookup facebook.com
Checking DNS Query with nslookup
Summary
In this article we have explained how to set up a DNS Cache-only server in Red Hat Enterprise Linux 7 and CentOS 7, and tested it in a client machine. Feel free to let us know if you have any questions or suggestions using the form below.
How to Setup and Configure Network Bonding or Teaming in RHEL/CentOS 7 – Part 11
When a system administrator wants to increase the bandwidth available and provide redundancy and load balancing for data transfers, a kernel feature known as network bonding allows to get the job done in a cost-effective way.
Read more about how to increase or bandwidth throttling in Linux

In simple words, bonding means aggregating two or more physical network interfaces (called slaves) into a single, logical one (called master). If a specific NIC (Network Interface Card) experiences a problem, communications are not affected significantly as long as the other(s) remain active.
Read more about network bonding in Linux systems here:
- Network Teaming or NiC Bondin in RHEL/CentOS 6/5
- Network NIC Bonding or Teaming on Debian based Systems
- How to Configure Network Bonding or Teaming in Ubuntu
Enabling and Configuring Network Bonding or Teaming
By default, the bonding kernel module is not enabled. Thus, we will need to load it and ensure it is persistent across boots. When used with the --first-time option, modprobe will alert us if loading the module fails:
# modprobe --first-time bonding
The above command will load the bonding module for the current session. In order to ensure persistency, create a .conf file inside /etc/modules-load.d with a descriptive name, such as /etc/modules-load.d/bonding.conf:
# echo "# Load the bonding kernel module at boot" > /etc/modules-load.d/bonding.conf
# echo "bonding" >> /etc/modules-load.d/bonding.conf
Now reboot your server and once it restarts, make sure the bonding module is loaded automatically, as seen in Fig. 1:
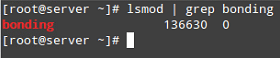
Check Network Bonding Module Loaded in Kernel
In this article we will use 3 interfaces (enp0s3, enp0s8, and enp0s9) to create a bond, named conveniently bond0.
To create bond0, we can either use nmtui, the text interface for controlling NetworkManager. When invoked without arguments from the command line, nmtui brings up a text interface that allows you to edit an existing connection, activate a connection, or set the system hostname.
Choose Edit connection –> Add –> Bond as illustrated in Fig. 2:
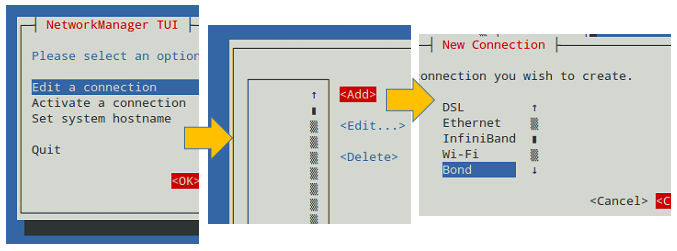
Create Network Bonding Channel
In the Edit Connection screen, add the slave interfaces (enp0s3, enp0s8, and enp0s9 in our case) and give them a descriptive (Profile) name (for example, NIC #1, NIC #2, and NIC #3, respectively).
In addition, you will need to set a name and device for the bond (TecmintBond and bond0 in Fig. 3, respectively) and an IP address for bond0, enter a gateway address, and the IPs of DNS servers.
Note that you do not need to enter the MAC address of each interface since nmtui will do that for you. You can leave all other settings as default. See Fig. 3 for more details.
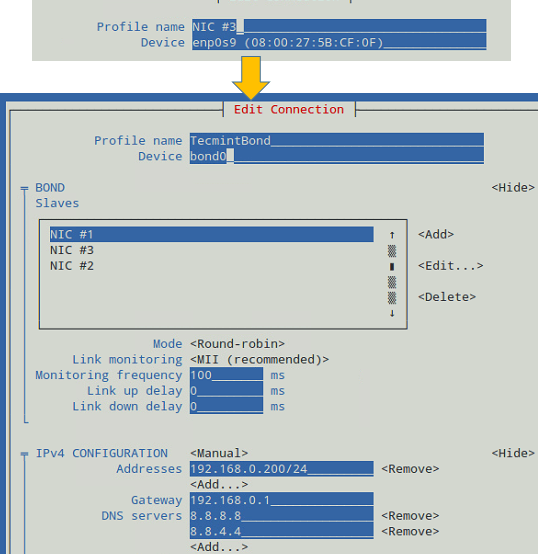
Network Bonding Teaming Configuration
When you’re done, go to the bottom of the screen and choose OK (see Fig. 4):
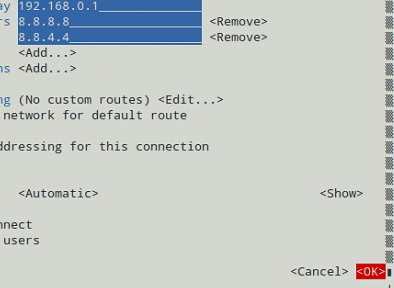
Configuration of bond0
And you’re done. Now you can exit the text interface and return to the command line, where you will enable the newly created interface using ip command:
# ip link set dev bond0 up
After that, you can see that bond0 is UP and is assigned 192.168.0.200, as seen in Fig. 5:
# ip addr show bond0
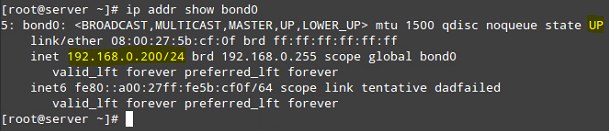
Check Network Bond Interface Status
Testing Network Bonding or Teaming in Linux
To verify that bond0 actually works, you can either ping its IP address from another machine, or what’s even better, watch the kernel interface table in real time (well, the refresh time in seconds is given by the -n option) to see how network traffic is distributed between the three network interfaces, as shown in Fig. 6.
The -d option is used to highlight changes when they occur:
# watch -d -n1 netstat -i
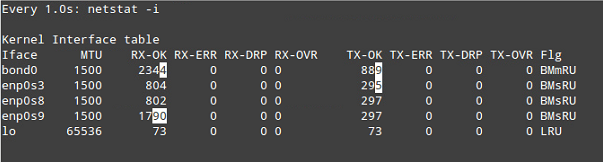
Check Kernel Interface Table
It is important to note that there are several bonding modes, each with its distinguishing characteristics. They are documented in section 4.5 of the Red Hat Enterprise Linux 7 Network Administration guide. Depending on your needs, you will choose one or the other.
In our current setup, we chose the Round-robin mode (see Fig. 3), which ensures packets are transmitted beginning with the first slave in sequential order, ending with the last slave, and starting with the first again.
The Round-robin alternative is also called mode 0, and provides load balancing and fault tolerance. To change the bonding mode, you can use nmtui as explained before (see also Fig. 7):
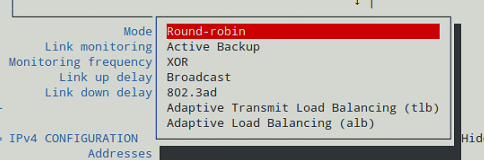
Changing Bonding Mode Using nmtui
If we change it to Active Backup, we will be prompted to choose a slave that will the only one active interface at a given time. If such card fails, one of the remaining slaves will take its place and becomes active.
Let’s choose enp0s3 to be the primary slave, bring bond0 down and up again, restart the network, and display the kernel interface table (see Fig. 8).
Note how data transfers (TX-OK and RX-OK) are now being made over enp0s3 only:
# ip link set dev bond0 down
# ip link set dev bond0 up
# systemctl restart network
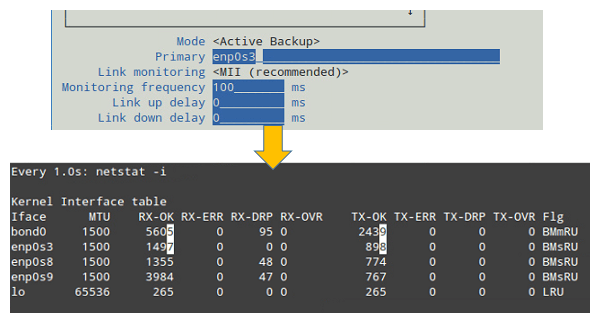
Bond Acting in Active Backup Mode
Alternatively, you can view the bond as the kernel sees it (see Fig. 9):
# cat /proc/net/bonding/bond0
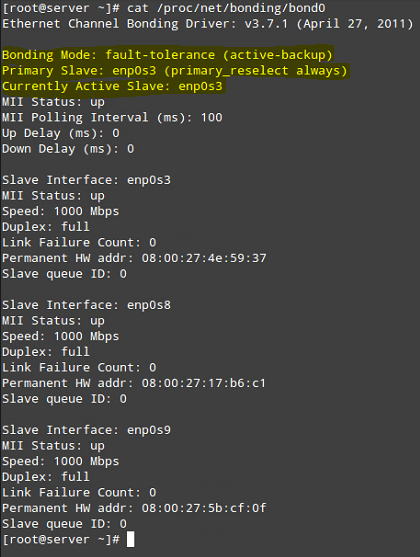
Check Network Bond as Kernel
Summary
In this chapter we have discussed how to set up and configure bonding in Red Hat Enterprise Linux 7 (also works on CentOS 7 and Fedora 22+) in order to increase bandwidth along with load balancing and redundancy for data transfers.
As you take the time to explore other bonding modes, you will come to master the concepts and practice related with this topic of the certification.
If you have questions about this article, or suggestions to share with the rest of the community, feel free to let us know using the comment form below.
Create Centralized Secure Storage using iSCSI Target / Initiator on RHEL/CentOS 7 – Part 12
iSCSI is a block level Protocol for managing storage devices over TCP/IP Networks, specially over long distances. iSCSI target is a remote hard disk presented from an remote iSCSI server (or) target. On the other hand, the iSCSI client is called the Initiator, and will access the storage that is shared in the Target machine.
The following machines have been used in this article:
Server (Target):
Operating System – Red Hat Enterprise Linux 7
iSCSI Target IP – 192.168.0.29
Ports Used : TCP 860, 3260
Client (Initiator):
Operating System – Red Hat Enterprise Linux 7
iSCSI Target IP – 192.168.0.30
Ports Used : TCP 3260
Step 1: Installing Packages on iSCSI Target
To install the packages needed for the target (we will deal with the client later), do:
# yum install targetcli -y
When the installation completes, we will start and enable the service as follows:
# systemctl start target
# systemctl enable target
Finally, we need to allow the service in firewalld:
# firewall-cmd --add-service=iscsi-target
# firewall-cmd --add-service=iscsi-target --permanent
And last but not least, we must not forget to allow the iSCSI target discovery:
# firewall-cmd --add-port=860/tcp
# firewall-cmd --add-port=860/tcp --permanent
# firewall-cmd --reload
Step 2: Defining LUNs in Target Server
Before proceeding to defining LUNs in the Target, we need to create two logical volumes as explained in Part 6 of RHCSA series (“Configuring system storage”).
This time we will name them vol_projects and vol_backups and place them inside a volume group called vg00, as shown in Fig. 1. Feel free to choose the space allocated to each LV:
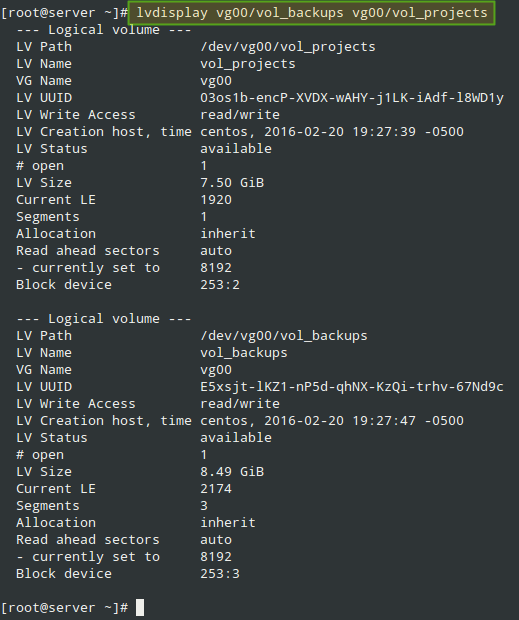
Fig 1: Two Logical Volumes Named vol_projects and vol_backups
After creating the LVs, we are ready to define the LUNs in the Target in order to make them available for the client machine.
As shown in Fig. 2, we will open a targetcli shell and issue the following commands, which will create two block backstores (local storage resources that represent the LUN the initiator will actually use) and an Iscsi Qualified Name (IQN), a method of addressing the target server.
Please refer to Page 32 of RFC 3720 for more details on the structure of the IQN. In particular, the text after the colon character (:tgt1) specifies the name of the target, while the text before (server:) indicates the hostname of the target inside the domain.
# targetcli
# cd backstores
# cd block
# create server.backups /dev/vg00/vol_backups
# create server.projects /dev/vg00/vol_projects
# cd /iscsi
# create iqn.2016-02.com.tecmint.server:tgt1
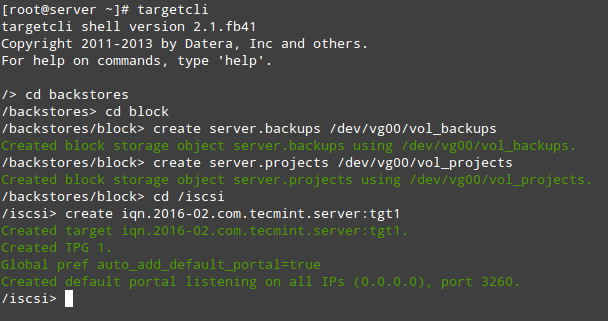
Fig 2: Define LUNs in Target Server
With the above step, a new TPG (Target Portal Group) was created along with the default portal (a pair consisting of an IP address and a port which is the way initiators can reach the target) listening on port 3260 of all IP addresses.
If you want to bind your portal to a specific IP (the Target’s main IP, for example), delete the default portal and create a new one as follows (otherwise, skip the following targetcli commands. Note that for simplicity we have skipped them as well):
# cd /iscsi/iqn.2016-02.com.tecmint.server:tgt1/tpg1/portals
# delete 0.0.0.0 3260
# create 192.168.0.29 3260
Now we are ready to proceed with the creation of LUNs. Note that we are using the backstores we previously created (server.backups and server.projects). This process is illustrated in Fig. 3:
# cd iqn.2016-02.com.tecmint.server:tgt1/tpg1/luns
# create /backstores/block/server.backups
# create /backstores/block/server.projects

Fig 3: Create LUNs in iSCSI Target Server
The last part in the Target configuration consists of creating an Access Control List to restrict access on a per-initiator basis. Since our client machine is named “client”, we will append that text to the IQN. Refer to Fig. 4 for details:
# cd ../acls
# create iqn.2016-02.com.tecmint.server:client

Fig 4: Create Access Control List for Initiator
At this point we can the targetcli shell to show all configured resources, as we can see in Fig. 5:
# targetcli
# cd /
# ls
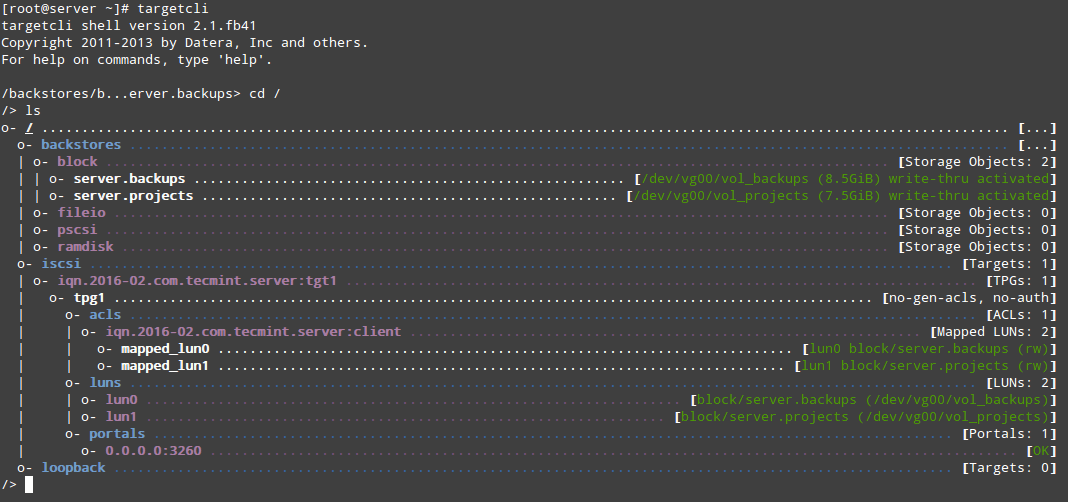
Fig 5: User targetcli to Check Configured Resources
To quit the targetcli shell, simply type exit and press Enter. The configuration will be saved automatically to /etc/target/saveconfig.json.
As you can see in Fig. 5 above, we have a portal listening on port 3260 of all IP addresses as expected. We can verify that using netstat command (see Fig. 6):
# netstat -npltu | grep 3260

Fig 6: Verify iSCSI Target Server Port Listening
This concludes the Target configuration. Feel free to restart the system and verify that all settings survive a reboot. If not, make sure to open the necessary ports in the firewall configuration and to start the target service on boot. We are now ready to set up the Initiator and to connect to the client.
Step 3: Setting up the Client Initiator
In the client we will need to install the iscsi-initiator-utils package, which provides the server daemon for the iSCSI protocol (iscsid) as well as iscsiadm, the administration utility:
# yum update && yum install iscsi-initiator-utils
Once the installation completes, open /etc/iscsi/initiatorname.iscsi and replace the default initiator name (commented in Fig. 7) with the name that was previously set in the ACL on the server (iqn.2016-02.com.tecmint.server:client).
Then save the file and run iscsiadm in discovery mode pointing to the target. If successful, this command will return the target information as shown in Fig. 7:
# iscsiadm -m discovery -t st -p 192.168.0.29
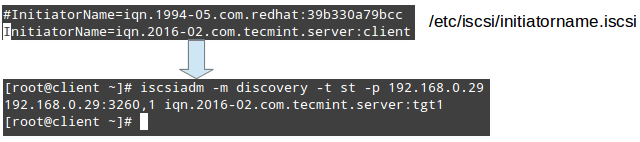
Fig 7: Setting Up Client Initiator
The next step consists in restarting and enabling the iscsid service:
# systemctl start iscsid
# systemctl enable iscsid
and contacting the target in node mode. This should result in kernel-level messages, which when captured through dmesg show the device identification that the remote LUNs have been given in the local system (sdeand sdf in Fig. 8):
# iscsiadm -m node -T iqn.2016-02.com.tecmint.server:tgt1 -p 192.168.0.29 -l
# dmesg | tail

Fig 8: Connecting to iSCSCI Target Server in Node Mode
From this point on, you can create partitions, or even LVs (and filesystems on top of them) as you would do with any other storage device. For simplicity, we will create a primary partition on each disk that will occupy its entire available space, and format it with ext4.
Finally, let’s mount /dev/sde1 and /dev/sdf1 on /projects and /backups, respectively (note that these directories must be created first):
# mount /dev/sde1 /projects
# mount /dev/sdf1 /backups
Additionally, you can add two entries in /etc/fstab in order for both filesystems to be mounted automatically at boot using each filesystem’s UUID as returned by blkid.
Note that the _netdev mount option must be used in order to defer the mounting of these filesystems until the network service has been started:

Fig 9: Find Filesystem UUID
You can now use these devices as you would with any other storage media.
Summary
In this article we have covered how to set up and configure an iSCSI Target and an Initiator in RHEL/CentOS 7disitributions. Although the first task is not part of the required competencies of the EX300 (RHCE) exam, it is needed in order to implement the second topic.
Don’t hesitate to let us know if you have any questions or comments about this article – feel free to drop us a line using the comment form below.
Looking to setup iSCSI Target and Client Initiator on RHEL/CentOS 6, follow this guide: Setting Up Centralized iSCSI Storage with Client Initiator.
Setting Up “NTP (Network Time Protocol) Server” in RHEL/CentOS 7
Network Time Protocol – NTP- is a protocol which runs over port 123 UDP at Transport Layer and allows computers to synchronize time over networks for an accurate time. While time is passing by, computers internal clocks tend to drift which can lead to inconsistent time issues, especially on servers and clients logs files or if you want to replicate servers resources or databases.

NTP Server Installation in CentOS and RHEL 7
Requirements:
Additional Requirements:
- Register and Enbale RHEL 7 Subscription for Updates
- Configure Static IP Address on CentOS/Rhel 7
- Disable and Remove Unwanted Services in CentOS/RHEL 7
This tutorial will demonstrate how you can install and configure NTP server on CentOS/RHEL 7 and automatically synchronize time with the closest geographically peers available for your server location by using NTP Public Pool Time Servers list.
Step 1: Install and configure NTP daemon
1. NTP server package is provided by default from official CentOS /RHEL 7 repositories and can be installed by issuing the following command.
# yum install ntp
Install NTP Server
2. After the server is installed, first go to official NTP Public Pool Time Servers, choose your Continent area where the server physically is located, then search for your Country location and a list of NTP servers should appear.

NTP Pool Server
3. Then open NTP daemon main configuration file for editing, comment the default list of Public Servers from pool.ntp.org project and replace it with the list provided for your country like in the screenshot below.

Configure NTP Server
4. Further, you need to allow clients from your networks to synchronize time with this server. To accomplish this, add the following line to NTP configuration file, where restrict statement controls, what network is allowed to query and sync time – replace network IPs accordingly.
restrict 192.168.1.0 netmask 255.255.255.0 nomodify notrap
The nomodify notrap statements suggest that your clients are not allowed to configure the server or be used as peers for time sync.
5. If you need additional information for troubleshooting in case there are problems with your NTP daemon add a log file statement which will record all NTP server issues into one dedicated log file.
logfile /var/log/ntp.log

Enable NTP Logs
6. After you have edited the file with all configuration explained above save and close ntp.conf file. Your final configuration should look like in the screenshot below.

NTP Server Configuration
Step 2: Add Firewall Rules and Start NTP Daemon
7. NTP service uses UDP port 123 on OSI transport layer (layer 4). It is designed particularly to resist the effects of variable latency (jitter). To open this port on RHEL/CentOS 7 run the following commands against Firewalld service.
# firewall-cmd --add-service=ntp --permanent
# firewall-cmd --reload

Open NTP Port in Firewall
8. After you have opened Firewall port 123, start NTP server and make sure you enable it system-wide. Use the following commands to manage the service.
# systemctl start ntpd
# systemctl enable ntpd
# systemctl status ntpd

Start NTP Service
Step 3: Verify Server Time Sync
9. After NTP daemon has been started, wait a few minutes for the server to synchronize time with its pool list servers, then run the following commands to verify NTP peers synchronization status and your system time.
# ntpq -p
# date -R

Verify NTP Time Sync
10. If you want to query and synchronize against a pool of your choice use ntpdate command, followed by the server or servers addresses, as suggested in the following command line example.
# ntpdate -q 0.ro.pool.ntp.org 1.ro.pool.ntp.org

Synchronize NTP Time
Step 4: Setup Windows NTP Client
11. If your windows machine is not a part of a Domain Controller you can configure Windows to synchronize time with your NTP server by going to Time from the right side of Taskbar -> Change Date and Time Settings -> Internet Time tab -> Change Settings -> Check Synchronize with an Internet time server -> put your server’s IP or FQDN on Server filed -> Update now -> OK.

Synchronize Windows Time with NTP
That’s all! Setting up a local NTP Server on your network ensures that all your servers and clients have the same time set in case of an Internet connectivity failure and they all are synchronized with each other.