How to Permanently Disable Swap in Linux

Swapping or swap space represents a physical memory page that lives on top of disk partition or a special disk file used for extending the RAM memory of a system when the physical memory fills up.

Using this method of extending RAM resources, inactive memory pages are frequently dumped into the swap area when no RAM is available. However, do to the spinning speed of classical hard disks, swap space is way lower in transfer speeds and access time compared to RAM.

On newer machines with fast SSD hard disks, reserving a small partition for swapping can greatly improve access time and speed transfer compared to classical HDD, but the speed is still more magnitudes lower than RAM memory. Some suggest that the swap space should be set as twice the amount of machine RAM. However, on systems with more than 4 GB or RAM, swap space should be set between 2 or 4 GB.

In case your server has sufficient RAM memory or does not require the use of swap space or the swapping greatly decreases your system performance, you should consider disabling the swap area.

Before actually disabling swap space, first you need to visualize your memory load degree and then identify the partition that holds the swap area, by issuing the below commands.

# free -h 

Look for Swap space used size. If the used size is 0B or close to 0 bytes, it can be assumed that swap space is not used intensively and can be safety disabled.

Check Swap Space

Check Swap Space

Next, issue following blkid command, look for TYPE=”swap” line in order to identify the swap partition, as shown in the below screenshot.

# blkid 

Check Swap Partition Type

Check Swap Partition Type

Again, issue the following lsblk command to search and identify the [SWAP] partition as shown in the below screenshot.

# lsblk

Search Confirm Swap Partition

Search Confirm Swap Partition

After you’ve identified the swap partition or file, execute the below command to deactivate the swap area.

# swapoff /dev/mapper/centos-swap  

Or disable all swaps from /proc/swaps

# swapoff -a 

Run free command in order to check if the swap area has been disabled.

# free -h

Disable Swap Partition

Disable Swap Partition

In order to permanently disable swap space in Linux, open /etc/fstab file, search for the swap line and comment the entire line by adding a # (hashtag) sign in front of the line, as shown in the below screenshot.

# vi /etc/fstab

Disable Swap Partition Permanently

Disable Swap Partition Permanently

Afterwards, reboot the system in order to apply the new swap setting or issuing mount -a command in some cases might do the trick.

# mount -a

After system reboot, issuing the commands presented in the beginning of this tutorial should reflect that the swap area has been completely and permanently disabled in your system.

# free -h
# blkid 
# lsblk

Source

8 Practical Examples of Linux “Touch” Command

In Linux every single file is associated with timestamps, and every file stores the information of last access time, last modification time and last change time. So, whenever we create new file, access or modify an existing file, the timestamps of that file automatically updated.

Linux Touch Command

Linux Touch Command Examples

In this article we will cover some useful practical examples of Linux touch command. The touch command is a standard program for Unix/Linux operating systems, that is used to create, change and modify timestamps of a file. Before heading up for touch command examples, please check out the following options.

Touch Command Options

  1. -a, change the access time only
  2. -c, if the file does not exist, do not create it
  3. -d, update the access and modification times
  4. -m, change the modification time only
  5. -r, use the access and modification times of file
  6. -t, creates a file using a specified time

1. How to Create an Empty File

The following touch command creates an empty (zero byte) new file called sheena.

# touch sheena

2. How to Create Multiple Files

By using touch command, you can also create more than one single file. For example the following command will create 3 files named, sheenameena and leena.

# touch sheena meena leena

3. How to Change File Access and Modification Time

To change or update the last access and modification times of a file called leena, use the -a option as follows. The following command sets the current time and date on a file. If the leena file does not exist, it will create the new empty file with the name.

# touch -a leena

The most popular Linux commands such as find command and ls command uses timestamps for listing and finding files.

4. How to Avoid Creating New File

Using -c option with touch command avoids creating new files. For example the following command will not create a file called leena if it does not exists.

# touch -c leena

5. How to Change File Modification Time

If you like to change the only modification time of a file called leena, then use the -m option with touch command. Please note it will only updates the last modification times (not the access times) of the file.

# touch -m leena

6. Explicitly Set the Access and Modification times

You can explicitly set the time using -c and -t option with touch command. The format would be as follows.

# touch -c -t YYDDHHMM leena

For example the following command sets the access and modification date and time to a file leena as 17:30(17:30 p.m.) December 10 of the current year (2012).

# touch -c -t 12101730 leena

Next verify the access and modification time of file leena, with ls -l command.

# ls -l

total 2
-rw-r--r--.  1 root    root   0 Dec 10 17:30 leena

7. How to Use the time stamp of another File

The following touch command with -r option, will update the time-stamp of file meena with the time-stamp of leena file. So, both the file holds the same time stamp.

# touch -r leena meena

8. Create a File using a specified time

If you would like to create a file with specified time other than the current time, then the format should be.

# touch -t YYMMDDHHMM.SS tecmint

For example the below command touch command with -t option will gives the tecmint file a time stamp of 18:30:55 p.m. on December 102012.

# touch -t 201212101830.55 tecmint

We’ve almost covered all the options available in the touch command for more options use “man touch“. If we’ve still missed any options and you would like to include in this list, please update us via comment box.

Source

Find Top Running Processes by Highest Memory and CPU Usage in Linux

I remember once reading that efficient system administrators are lazy people. The reason is not that they’re not doing their job or wasting their time – it is mostly because they have automated a good deal of their routine tasks. Thus, they don’t have to babysit their servers and can use their time to learn new technologies and always stay at the top of their game.

Part of automating your tasks, is learning how to get a script do what you would have to do yourself otherwise. Continually adding commands to your own knowledge base is just as important.

For that reason, in this article we will share a trick to find out, which processes are consuming lots of Memory and CPU utilization in Linux.

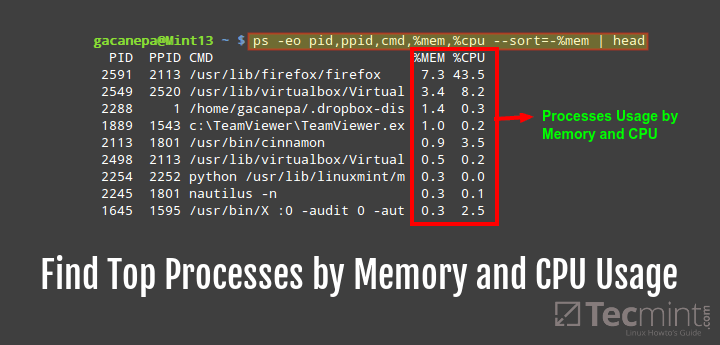
Find Linux Processes By RAM and CPU Usage

Find Linux Processes By RAM and CPU Usage

That said, let’s dive in and get started.

Check Top Processes sorted by RAM or CPU Usage in Linux

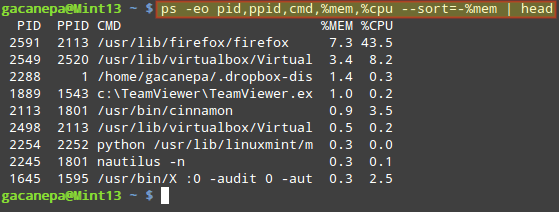
The following command will show the list of top processes ordered by RAM and CPU use in descendant form (remove the pipeline and head if you want to see the full list):

# ps -eo pid,ppid,cmd,%mem,%cpu --sort=-%mem | head
Sample Output
PID  	PPID 	CMD                      	%MEM 	%CPU
2591	2113 	/usr/lib/firefox/firefox    7.3 	43.5
2549   2520 	/usr/lib/virtualbox/Virtual 3.4  	8.2
2288       1 	/home/gacanepa/.dropbox-dis	1.4	0.3
1889   1543	c:\TeamViewer\TeamViewer.ex	1.0	0.2
2113	1801	/usr/bin/cinnamon		0.9	3.5
2254	2252	python /usr/bin/linuxmint/m	0.3	0.0
2245	1801	nautilus -n			0.3	0.1
1645	1595	/usr/bin/X :0 -audit 0 -aut	0.3	2.5

Find Top Processes By RAM and CPU Usage

Find Top Processes By RAM and CPU Usage

Brief explanation of above options used in above command.

The -o (or –format) option of ps allows you to specify the output format. A favorite of mine is to show the processes’ PIDs (pid), PPIDs (pid), the name of the executable file associated with the process (cmd), and the RAM and CPU utilization (%mem and %cpu, respectively).

Additionally, I use --sort to sort by either %mem or %cpu. By default, the output will be sorted in ascendant form, but personally I prefer to reverse that order by adding a minus sign in front of the sort criteria.

To add other fields to the output, or change the sort criteria, refer to the OUTPUT FORMAT CONTROL section in the man page of ps command.

Don’t Miss: Find Top 15 Processes by Memory Usage with ‘top’ in Batch Mode

Don’t Miss: Find top 10 Directories Disk Size in Linux

Summary

Monitoring process is one of the numerous tasks of a Linux server system administrator, in this tip, we looked at how you list processes on your system and sort them according to RAM and CPU use in descendant form using the ps utility.

Source

10 Screen Command Examples to Manage Linux Terminals

Screen is a full-screen software program that can be used to multiplexes a physical console between several processes (typically interactive shells). It offers a user to open several separate terminal instances inside a one single terminal window manager.

The screen application is very useful, if you are dealing with multiple programs from a command line interface and for separating programs from the terminal shell. It also allows you to share your sessions with others users and detach/attach terminal sessions.

Linux Screen Commands

Screen Command Examples

On my Ubuntu 10.04 Server Edition, Screen has been installed by default. But, in Linux Mint does not have screen installed by default, I need to install it first using apt-get command before using it. Please follow your distribution installation procedure to install screen.

# apt-get install screen (On Debian based Systems)
# yum install screen (On RedHat based Systems)

Actually, Screen is a very good command in Linux which is hidden inside hundreds of Linux commands. Let’s start to see the function of Screen.

Start screen for the first time

Just type screen at the command prompt. Then the screen will show with interface exactly as the command prompt.

pungki@mint ~ $ screen

Show screen parameter

When you enter the screen, you can do all your work as you are in the normal CLI environment. But since the screen is an application, so it have command or parameters.

Type “Ctrl-A” and “?” without quotes. Then you will see all commands or parameters on screen.

                                                             Screen key bindings, page 1 of 1.

                                                             Command key:  ^A   Literal ^A:  a

  break       ^B b         flow        ^F f         lockscreen  ^X x         pow_break   B            screen      ^C c         width       W
  clear       C            focus       ^I           log         H            pow_detach  D            select      '            windows     ^W w
  colon       :            hardcopy    h            login       L            prev        ^H ^P p ^?   silence     _            wrap        ^R r
  copy        ^[ [         help        ?            meta        a            quit        \            split       S            writebuf    >
  detach      ^D d         history     { }          monitor     M            readbuf     <            suspend     ^Z z         xoff        ^S s
  digraph     ^V           info        i            next        ^@ ^N sp n   redisplay   ^L l         time        ^T t         xon         ^Q q
  displays    *            kill        K k          number      N            remove      X            title       A
  dumptermcap .            lastmsg     ^M m         only        Q            removebuf   =            vbell       ^G
  fit         F            license     ,            other       ^A           reset       Z            version     v

^]  paste .
"   windowlist -b
-   select -
0   select 0
1   select 1
2   select 2
3   select 3
4   select 4
5   select 5
6   select 6
7   select 7
8   select 8
9   select 9
I   login on
O   login off
]   paste .

To get out of the help screen, you can press “space-bar” button or “Enter“. (Please note that all shortcuts which use “Ctrl-A” is done without quotes).

Detach the screen

One of the advantages of screen that is you can detach it. Then, you can restore it without losing anything you have done on the screen. Here’s the sample scenario:

You are in the middle of SSH-on your server. Let’s say that you are downloading 400MB patch for your system using wget command.

The download process is estimated to take 2 hours long. If you disconnect the SSH session, or suddenly the connection lost by accident, then the download process will stop. You have to start from the beginning again. To avoid that, we can use screen and detach it.

Take a look at this command. First, you have to enter the screen.

pungki@mint ~ $ screen

Then you can do the download process. For examples on my Linux Mint, I am upgrading my dpkg package using apt-get command.

pungki@mint ~ $ sudo apt-get install dpkg
Sample Output
Reading package lists... Done
Building dependency tree      
Reading state information... Done
The following packages will be upgraded:
  dpkg
1 upgraded, 0 newly installed, 0 to remove and 1146 not upgraded.
Need to get 2,583 kB of archives.
After this operation, 127 kB of additional disk space will be used.
Get:1 http://debian.linuxmint.com/latest/ testing/main dpkg i386 1.16.10 [2,583 kB]
47% [1 dpkg 1,625 kB/2,583 kB 47%]                                        14,7 kB/s

While downloading in progress, you can press “Ctrl-A” and “d“. You will not see anything when you press those buttons. The output will be like this:

[detached from 5561.pts-0.mint]
pungki@mint ~ $

Re-attach the screen

After you detach the screen, let say you are disconnecting your SSH session and going home. In your home, you start to SSH again to your server and you want to see the progress of your download process. To do that, you need to restore the screen. You can run this command:

pungki@mint ~ $ screen -r

And you will see that the process you left is still running.

When you have more than 1 screen session, you need to type the screen session ID. Use screen -ls to see how many screen are available.

pungki@mint ~ $ screen -ls
Sample Output
pungki@mint ~ $ screen -ls
There are screens on:
        7849.pts-0.mint (10/06/2013 01:50:45 PM)        (Detached)
        5561.pts-0.mint (10/06/2013 11:12:05 AM)        (Detached)
2 Sockets in /var/run/screen/S-pungki

If you want to restore screen 7849.pts-0.mint, then type this command.

pungki@mint ~ $ screen -r 7849

Using Multiple Screen

When you need more than 1 screen to do your job, is it possible? Yes it is. You can run multiple screen window at the same time. There are 2 (two) ways to do it.

First, you can detach the first screen and the run another screen on the real terminal. Second, you do nested screen.

Switching between screens

When you do nested screen, you can switch between screen using command “Ctrl-A” and “n“. It will be move to the next screen. When you need to go to the previous screen, just press “Ctrl-A” and “p“.

To create a new screen window, just press “Ctrl-A” and “c“.

Logging whatever you do

Sometimes it is important to record what you have done while you are in the console. Let say you are a Linux Administrator who manage a lot of Linux servers.

With this screen logging, you don’t need to write down every single command that you have done. To activate screen logging function, just press “Ctrl-A” and “H“. (Please be careful, we use capital ‘H’ letter. Using non capital ‘h’, will only create a screenshot of screen in another file named hardcopy).

At the bottom left of the screen, there will be a notification that tells you like: Creating logfile “screenlog.0“. You will find screenlog.0 file in your home directory.

This feature will append everything you do while you are in the screen window. To close screen to log running activity, press “Ctrl-A” and “H” again.

Another way to activate logging feature, you can add the parameter “-L” when the first time running screen. The command will be like this.

pungki@mint ~ $ screen -L

Lock screen

Screen also have shortcut to lock the screen. You can press “Ctrl-A” and “x” shortcut to lock the screen. This is handy if you want to lock your screen quickly. Here’s a sample output of lock screen after you press the shortcut.

Screen used by Pungki Arianto  on mint.
Password:

You can use your Linux password to unlock it.

Add password to lock screen

For security reason, you may want to put the password to your screen session. A Password will be asked whenever you want to re-attach the screen. This password is different with Lock Screen mechanism above.

To make your screen password protected, you can edit “$HOME/.screenrc” file. If the file doesn’t exist, you can create it manually. The syntax will be like this.

password crypt_password

To create “crypt_password” above, you can use “mkpasswd” command on Linux. Here’s the command with password “pungki123“.

pungki@mint ~ $ mkpasswd pungki123
l2BIBzvIeQNOs

mkpasswd will generate a hash password as shown above. Once you get the hash password, you can copy it into your “.screenrc” file and save it. So the “.screenrc” file will be like this.

password l2BIBzvIeQNOs

Next time you run screen and detach it, password will be asked when you try to re-attach it, as shown below:

pungki@mint ~ $ screen -r 5741
Screen password:

Type your password, which is “pungki123” and the screen will re-attach again.

After you implement this screen password and you press “Ctrl-A” and “x” , then the output will be like this.

Screen used by Pungki Arianto  on mint.
Password:
Screen password:

A Password will be asked to you twice. First password is your Linux password, and the second password is the password that you put in your .screenrc file.

Leaving Screen

There are 2 (two) ways to leaving the screen. First, we are using “Ctrl-A” and “d” to detach the screen. Second, we can use the exit command to terminating screen. You also can use “Ctrl-A” and “K” to kill the screen.

That’s some of screen usage on daily basis. There are still a lot of features inside the screen command. You may see screen man page for more detail.

Source

Cron Vs Anacron: How to Schedule Jobs Using Anacron on Linux

In this article, we will explain cron and anacron and also shows you how to setup anacron on Linux. We will as well cover a comparison of these two utilities.

To schedule a task on given or later time, you can use the ‘at’ or ‘batch’ commands and to set up commands to run repeatedly, you can employ the cron and anacron facilities.

Cron – is a daemon used to run scheduled tasks such as system backups, updates and many more. It is suitable for running scheduled tasks on machines that will run continuously 24X7 such as servers.

The commands/tasks are scripted into cron jobs which are scheduled in crontab files. The default system crontab file is /etc/crontab, but each user can also create their own crontab file that can launch commands at times that the user defines.

To create a personal crontab file, simply type the following:

$ crontab -e

How to Setup Anacron in Linux

Anacron is used to run commands periodically with a frequency defined in days. It works a little different from cron; assumes that a machine will not be powered on all the time.

It is appropriate for running daily, weekly, and monthly scheduled jobs normally run by cron, on machines that will not run 24-7 such as laptops and desktops machines.

Assuming you have a scheduled task (such as a backup script) to be run using cron every midnight, possibly when your asleep, and your desktop/laptop is off by that time. Your backup script will not be executed.

However, if you use anacron, you can be assured that the next time you power on the desktop/laptop again, the backup script will be executed.

How Anacron Works in Linux

anacron jobs are listed in /etc/anacrontab and jobs can be scheduled using the format below (comments inside anacrontab file must start with #).

period   delay   job-identifier   command

From the above format:

  • period – this is the frequency of job execution specified in days or as @daily, @weekly, or @monthly for once per day, week, or month. You can as well use numbers: 1 – daily, 7 – weekly, 30 – monthly and N – number of days.
  • delay – it’s the number of minutes to wait before executing a job.
  • job-id – it’s the distinctive name for the job written in log files.

To view example files, type:

$ ls -l /var/spool/anacron/

total 12
-rw------- 1 root root 9 Jun  1 10:25 cron.daily
-rw------- 1 root root 9 May 27 11:01 cron.monthly
-rw------- 1 root root 9 May 30 10:28 cron.weekly
  • command – it’s the command or shell script to be executed.
This is what practically happens:
  • Anacron will check if a job has been executed within the specified period in the period field. If not, it executes the command specified in the command field after waiting the number of minutes specified in the delay field.
  • Once the job has been executed, it records the date in a timestamp file in the /var/spool/anacron directory with the name specified in the job-id (timestamp file name) field.

Let’s now look at an example. This will run the /home/aaronkilik/bin/backup.sh script everyday:

@daily    10    example.daily   /bin/bash /home/aaronkilik/bin/backup.sh

If the machine is off when the backup.sh job is expected to run, anacron will run it 10 minutes after the machine is powered on without having to wait for another 7 days.

There are two important variables in the anacrontab file that you should understand:

  • START_HOURS_RANGE – this sets time range in which jobs will be started (i.e execute jobs during the following hours only).
  • RANDOM_DELAY – this defines the maximum random delay added to the user defined delay of a job (by default it’s 45).

This is how your anacrontab file would possibly look like.

Anacron – /etc/anacrontab File
# /etc/anacrontab: configuration file for anacron

# See anacron(8) and anacrontab(5) for details.

SHELL=/bin/sh
PATH=/usr/local/sbin:/usr/local/bin:/sbin:/bin:/usr/sbin:/usr/bin
HOME=/root
LOGNAME=root

# These replace cron's entries
1       5       cron.daily      run-parts --report /etc/cron.daily
7       10      cron.weekly     run-parts --report /etc/cron.weekly
@monthly        15      cron.monthly    run-parts --report /etc/cron.monthly

@daily    10    example.daily   /bin/bash /home/aaronkilik/bin/backup.sh                                                                      

The following is a comparison of cron and anacron to help you understand when to use either of them.

Cron Anacron
It’s a daemon It’s not a daemon
Appropriate for server machines Appropriate for desktop/laptop machines
Enables you to run scheduled jobs every minute Only enables you to run scheduled jobs on daily basis
Doesn’t executed a scheduled job when the machine if off If the machine if off when a scheduled job is due, it will execute a scheduled job when the machine is powered on the next time
Can be used by both normal users and root Can only be used by root unless otherwise (enabled for normal users with specific configs)

The major difference between cron and anacron is that cron works effectively on machines that will run continuously while anacron is intended for machines that will be powered off in a day or week.

If you know any other way, do share with us using the comment form below.

Source

8 Useful Commands to Monitor Swap Space Usage in Linux

Memory management is an essential aspect of every System Administrator to improve the performance of a Linux system. It is always a good practice to monitor swap space usage in Linux to ensure that your system operates relative to its memory demands.

Check Linux Swap Space Usage

8 Commands to Check Linux Swap Space Usage

Therefore in this article we are going to look at ways to monitor swap space usage in a Linux systems.

What is Swap space?

Swap space is a restricted amount of physical memory that is allocated for use by the operating system when available memory has been fully utilized. It is memory management that involves swapping sections of memory to and from physical storage.

On most distributions of Linux, it is recommended that you set swap space when installing the operating system. The amount of swap space you can set for your Linux system may depend on the architecture and kernel version.

How do I check Swap space usage in Linux?

We shall look at different commands and tools that can help you to monitor your swap space usage in your Linux systems as follows:

1. Using the swapon Command

This command helps you to specify the devices on which paging and swapping will be done and we shall look at few important options.

To view all devices marked as swap in the /etc/fstab file you can use the --all option. Though devices that are already working as swap space are skipped.

# swapon --all

If you want to view a summary of swap space usage by device, use the --summary option as follows.

# swapon --summary

Filename				Type		Size	Used	Priority
/dev/sda10                              partition	8282108	0	-1

Use --help option to view help information or open the manpage for more usage options.

2. Using /proc/swaps which is equivalent to swapon

The /proc filesystem is a very special virtual filesystem in Linux. It is also referred to as a process information pseudo-file system.

It actually does not contain ‘real’ files but runtime system information, for example system memory, devices mounted, hardware configuration and many more. Therefore you can also refer to it as a control and information base for the kernel.

To understand more about this filesystem read our article: Understanding /proc File System in Linux.

To check swap usage information, you can view the /proc/swaps file using the cat utility.

# cat /proc/swaps

Filename				Type		Size	Used	Priority
/dev/sda10                              partition	8282108	0	-1

3. Using ‘free’ Command

The free command is used to display the amount of free and used system memory. Using the free command with -h option, which displays output in a human readable format.

# free -h

             total       used       free     shared    buffers     cached
Mem:          7.7G       4.7G       3.0G       408M       182M       1.8G
-/+ buffers/cache:       2.7G       5.0G
Swap:         7.9G         0B       7.9G

From the output above, you can see that the last line provides information about the system swap space. For more usage and examples of free command can be found at: 10 free Command to Check Memory Usage in Linux.

4. Using top Command

The top command displays processor activity of your Linux system, tasks managed by kernel in real-time. To understand how the top command works, read this article: 12 top Commands to Check Linux Process Activity

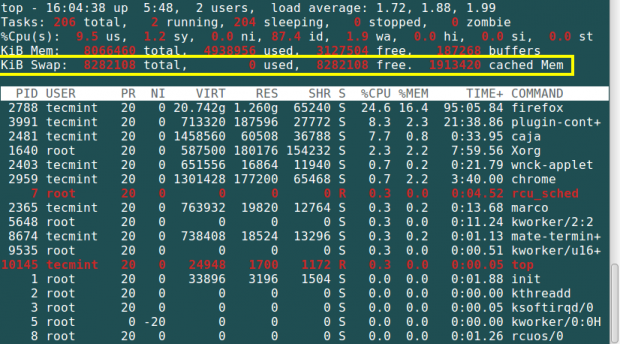
To check swap space usage with the help of ‘top’ command run the following command.

# top

Check Swap Space Using Top Command

Check Swap Space Using Top Command

5. Using atop Command

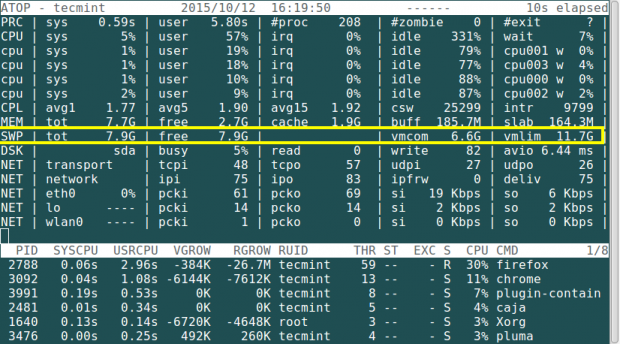
The atop command is a system monitor that reports about activities of various processes. But importantly it also shows information about free and used memory space.

# atop

Atop Check Swap Usage

Atop Check Swap Usage

To know more about how to install and use atop command in Linux, read this article: Monitor Logging Activity of Linux System Processes

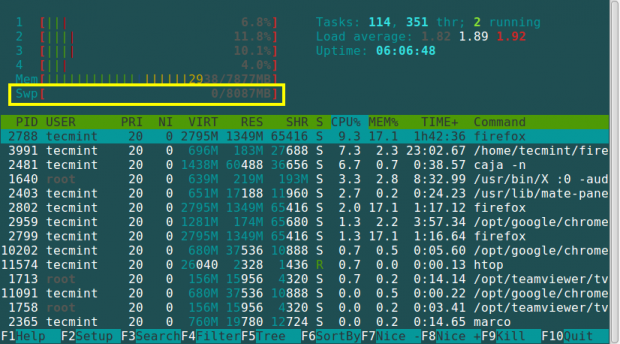
6. Using htop Command

The htop command is used to view processes in an interactive mode and also displays information about memory usage.

# htop

Htop Check Swap Usage

Htop Check Swap Usage

For more information regarding installation and usage about htop command, read this article: Htop – Interactive Linux Process Monitoring

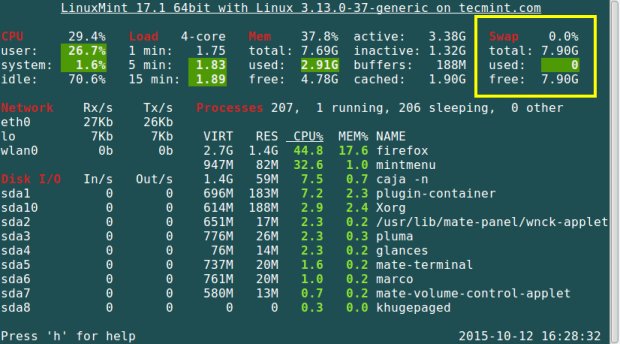
7. Using the Glances Command

This is a cross-platform system monitoring tool that displays information about running processes, cpu load, storage space usage, memory usage, swap space usage and many more.

# glances

Glances Check Swap Usage

Glances Check Swap Usage

For more information regarding installation and usage about glances command, read this article: Glances – An Advanced Real Time Linux System Monitoring Tool

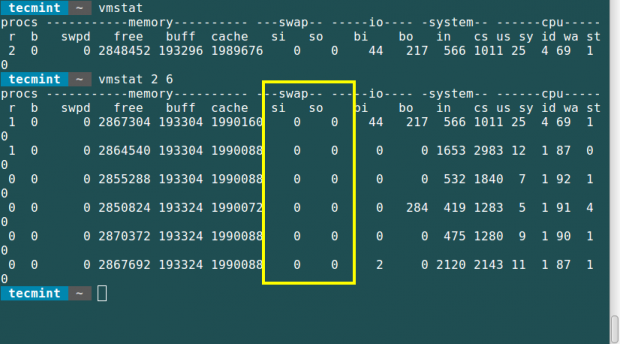
8. Using the vmstat Command

This command is used to display information about virtual memory statistics. To install vmstat on your Linux system, you can read the article below and see more usage examples:

Linux Performance Monitoring with Vmstat

# vmstat

VmStat Check Swap Usage

VmStat Check Swap Usage

You need to take note of the following in the swap field from the output of this command.

  1. si: Amount of memory swapped in from disk (s).
  2. so: Amount of memory swapped to disk (s).

Summary

These are easy methods one can use and follow to monitor swap space usage and hope this article was helpful. In case you need help or want to add any information relating to memory management in Linux systems, please post a comment.

Source

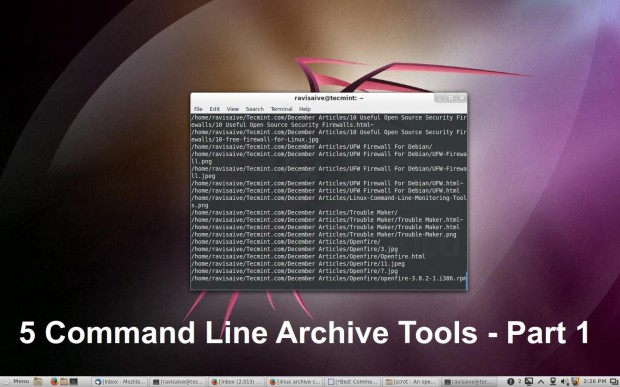
5 Best Command Line Archive Tools for Linux

In our day-to-day life we come across, archived files on the platforms of all kind be it WindowsMac or Linux. There are several Application program available for all of the platforms to create archive files as well as uncompress them. When it comes to work on Linux Platform, we need to deal with archived files very frequently.

Linux Command Line Archive Tools

Linux Command Line Archive Tools

Here in this article we will be discussing archive tools available on standard Linux Distribution, their features, Examples, etc. The article divided into two parts, each part contains five command line archive tools (i.e. total of 10 Best Command Line Archive Tools).

What is Archived file?

An archive file is a compressed file which is composed of one or more than one computer files along with metadata.

Features of Archiving

  1. Data Compression
  2. Encryption
  3. File Concatenation
  4. Automatic Extraction
  5. Automatic Installation
  6. Source Volume and Media Information
  7. File Spanning
  8. Checksum
  9. Directory Structure Information
  10. Other Metadata (Data About Data)
  11. Error discovery

Area of Application

  1. Store Computer Files System along with Metadata.
  2. Useful in transferring file locally.
  3. Useful in transferring file over web.
  4. Software Packaging Application.

The useful archiving application on standard Linux distribution follows:

1. tar Command

tar is the standard UNIX/Linux archiving application tool. In its early stage it used to be a Tape Archiving Program which gradually is developed into General Purpose archiving package which is capable of handling archive files of every kind. tar accepts a lot of archiving filter with options.

tar options

  1. -A : Append tar files to existing archives.
  2. -c : Create a new archive file.
  3. -d : Compare archive with Specified filesystem.
  4. -j : bzip the archive
  5. -r : append files to existing archives.
  6. -t : list contents of existing archives.
  7. -u : Update archive
  8. -x : Extract file from existing archive.
  9. -z : gzip the archive
  10. –delete : Delete files from existing archive.
tar Examples

Create a tar archive file.

# tar -zcvf name_of_tar.tar.gz /path/to/folder

Decompress an tar archive file.

# tar -zxvf Name_of_tar_file.tar.gz

For more detailed examples, read 18 Tar Command Examples in Linux.

shar Command

shar which stands for Shell archive is a shell script, the execution of which will create the files. shar is a self-extracting archive file which is a legacy utility and needs Unix Bourne Shell to extract the files. shar has an advantage of being plain text however it is potentially dangerous, since it outputs an executable.

shar options

  1. -o : Save output to archive files as specified, in the option.
  2. -l : Limit the output size, as specified, in the option but do not split it.
  3. -L : Limit the output size, as specified, in the option and split it.
  4. -n : Name of Archive to be included in the header of the shar files.
  5. -a : Allow automatic generation of headers.

Note: The ‘-o‘ option is required if the ‘-l‘ or ‘-L‘ option is used and the ‘-n‘ option is required if the ‘-a‘ option is used.

shar Examples

Create a shar archive file.

# shar file_name.extension > filename.shar

Extract an shar archive file.

# unshar file_name.shar

3. ar Command

ar is the creation and manipulation utility for archives, mainly used for binary object file libraries. ar stands for archiver which can be used to create archive of any kind for any purpose but has largely been replaced by ‘tar’ and now-a-days it is used only to create and update static library files.

ar options

  1. -d : Delete modules from the archive.
  2. -m : Move Members in the archive.
  3. -p : Print specified members of the archive.
  4. -q : Quick Append.
  5. -r : Insert file member to archive.
  6. -s : Add index to archive.
  7. -a : Add a new file to the existing members of archive.
ar Examples

Create an archive using ‘ar‘ tool with a static library say ‘libmath.a‘ with the objective files ‘substraction’ and ‘division’ as.

# ar cr libmath.a substraction.o division.o

To extract an ‘ar’ archive file.

# ar x libmath.a

4. cpio

cpio stands for Copy in and out. Cpio is a general purpose file archiver for Linux. It is actively used by RedHatPackage Manager (RPM) and in the initramfs of Linux Kernel as well as an important archiving tool in Apple Computer’s Installer (pax).

cpio options

  1. -0 : Read a list of filenames terminated by a null character instead of a newline.
  2. -a : Reset Access time.
  3. -A : Append.
  4. -b : swap.
  5. -d : Make Directories.
cpio Examples

Create an ‘cpio’ archive file.

# cd tecmint
# ls

file1.o file2.o file3.o

# ls | cpio  -ov > /path/to/output_folder/obj.cpio

To extract a cpio archive file.

# cpio -idv < /path/to folder/obj.cpio

5. Gzip

gzip is standard and widely used file compression and decompression utility. Gzip allows file concatenation. Compressing the file with gzip, outputs the tarball which is in the format of ‘*.tar.gz‘ or ‘*.tgz‘.

gzip options

  1. –stdout : Produce output on standard output.
  2. –to-stdout : Produce output on standard output.
  3. –decompress : Decompress File.
  4. –uncompress : Decompress File.
  5. -d : Decompress File.
  6. -f : Force Compression/Decompression.
gzip Examples

Create an ‘gzip’ archive file.

# tar -cvzf name_of_archive.tar.gz /path/to/folder

To extract a ‘gzip’ archive file.

# gunzip file_name.tar.gz

The above command must be passed followed with below command.

# tar -xvf file_name.tar

Note: The architecture and functionality of ‘gzip’ makes it difficult to recover corrupted ‘gzipped tar archive’ file. It is advised to make several backups of gzipped Important files, at different Locations.

That’s all for now.

Source

How to Control Systemd Services on Remote Linux Server

Systemd system and services manager can be controlled using the systemctl command line utility. It enables you to manage systemd locally or on a remote Linux machine over the SSH protocol.

In this short article, we will show you how to manage systemd system and service manager on a remote Linux machine over a SSH session.

Attention: We recommend using public/private key pairs for passwordless authentication for SSH, as opposed to passwords, and also employing additional methods to secure SSH service, as explained in these guides.

  1. SSH Passwordless Login Using SSH Keygen in 5 Easy Steps
  2. 5 Best Practices to Secure and Protect SSH Server
  3. How to Block SSH and FTP Access to Specific IP and Network Range

To connect to a remote server, run systemctl with the --host or -H flag as follows. In the command below, we are connecting to the remote server as the root user and status is a subcommand of systemctl utility used to view the status of the httpd service on centos.temint.lan (remote Linux server).

$ systemctl --host root@centos.temint.lan status httpd.service
OR
$ systemctl -H root@centos.temint.lan status httpd.service

Manage Systemd Service on Remote Linux

Manage Systemd Service on Remote Linux

Similarly, you can also start, stop or restart remote systemd service as shown.

$ systemctl --host root@centos.temint.lan start httpd.service   
$ systemctl --host root@centos.temint.lan stop httpd.service
$ systemctl --host root@centos.temint.lan restart httpd.service

To end the session, simply type [Ctrl+C]. For more information and usage options, see the systemctl man page:

$ man systemctl 

That’s all for now! What follows is an assortment of systemd articles which you’ll find useful:

  1. The Story Behind: Why ‘init’ Needed to be Replaced with ‘systemd’ in Linux
  2. Managing System Startup Process and Services (SysVinit, Systemd and Upstart)
  3. Manage Log Messages Under Systemd Using Journalctl [Comprehensive Guide]
  4. How to Create and Run New Service Units in Systemd Using Shell Script
  5. How to Change Runlevels (targets) in SystemD

In this article, we showed you how to manage systemd system and service manager on a remote Linux machine. Use the feedback section to ask questions or share your thoughts about this guide.

Source

Rename – A Command Line Tool For Renaming Multiple Files in Linux

We often use “mv” command to rename a single file in Linux. However, renaming multiple or group of files quickly makes it very difficult task in a terminal.

Linux comes with a very powerful built-in tool called rename. The rename command is used to rename multiple or group of files, rename files to lowercase, rename files to uppercase and overwrite files using perl expressions.

Rename Multiple Files In Linux

The “rename” command is a part of Perl script and it resides under “/usr/bin/” on many Linux distributions. You can run “which” command to find out the location of rename command.

$ which rename
/usr/bin/rename
The Basic Syntax of Rename Command
rename 's/old-name/new-name/' files

The rename command comes with few optional arguments along with mandatory perl expression that guides rename command to do actual work.

rename [ -v ] [ -n ] [ -f ] perlexpr [ files ]
  1. -v: Print names of files successfully renamed.
  2. -n: Show what files would have been renamed.
  3. -f: Force overwrite existing files.
  4. perlexpr: Perl Expression.

For better understanding of this utility, we’ve discussed few practical examples of this command in the article.

1. A Basic Rename Command Example

Suppose you’ve bunch of files with “.html” extension and you want to rename all “.html” files to “.php” at one go. For example, first do a “ls -l” to check the list of files with “.html” extension.

# ravisaive@tecmint:~$ ls -l
total 22532
-rw-rw-r-- 1 ravisaive ravisaive 6888896 Oct 10 12:10 cricket.html
-rw-rw-r-- 1 ravisaive ravisaive  588895 Oct 10 12:10 entertainment.html
-rw-rw-r-- 1 ravisaive ravisaive 6188895 Oct 10 12:10 health.html
-rw-rw-r-- 1 ravisaive ravisaive 6538895 Oct 10 12:10 lifestyle.html
-rw-rw-r-- 1 ravisaive ravisaive  938895 Oct 10 12:10 news.html
-rw-rw-r-- 1 ravisaive ravisaive  938937 Oct 10 12:11 photos.html
-rw-rw-r-- 1 ravisaive ravisaive  978137 Oct 10 12:11 sports.html

Now, you want to change the extension of all these files from “.html” to “.php“. You can use the following “rename” command with perl expression as shown below.

ravisaive@tecmint:~$ rename 's/\.html$/\.php/' *.html

Note: In the above command we’ve used two arguments.

  1. First argument is a perl expression that substitute .html with .php.
  2. Second argument tells the rename command to substitute all the files with *.php.

Let’s verify whether all files are renamed to “.php” extension, doing ls -l on the prompt.

ravisaive@tecmint:~$ ls -l
total 22532
-rw-rw-r-- 1 ravisaive ravisaive 6888896 Oct 10 12:10 cricket.php
-rw-rw-r-- 1 ravisaive ravisaive  588895 Oct 10 12:10 entertainment.php
-rw-rw-r-- 1 ravisaive ravisaive 6188895 Oct 10 12:10 health.php
-rw-rw-r-- 1 ravisaive ravisaive 6538895 Oct 10 12:10 lifestyle.php
-rw-rw-r-- 1 ravisaive ravisaive  938895 Oct 10 12:10 news.php
-rw-rw-r-- 1 ravisaive ravisaive  938937 Oct 10 12:11 photos.php
-rw-rw-r-- 1 ravisaive ravisaive  978137 Oct 10 12:11 sports.php

Now you can see above that all the html files are renamed to php.

2. Check Changes Before Running Rename Command

While doing critical or major renaming tasks, you can always check the changes by running rename command with “-n” argument. The “-n” parameter will tell you exactly what changes would take place, but the changes are not done for real. Here, is the example of the command below.

ravisaive@tecmint:~$ rename -n 's/\.php$/\.html/' *.php

cricket.php renamed as cricket.html
entertainment.php renamed as entertainment.html
health.php renamed as health.html
lifestyle.php renamed as lifestyle.html
news.php renamed as news.html
photos.php renamed as photos.html
sports.php renamed as sports.html

Note: The above command output only displays changes, but in real the changes are not done, unless you run the command without “-n” switch.

3. Print Rename Output

We saw that the rename command didn’t displayed any information of changes it does. So, if you want to get the details of rename command (like we did using “-n” option), here we use “-v” option to print the complete details of all the changes done by rename command successfully.

ravisaive@tecmint:~$ rename -v 's/\.php$/\.html/' *.php

cricket.php renamed as cricket.html
entertainment.php renamed as entertainment.html
health.php renamed as health.html
lifestyle.php renamed as lifestyle.html
news.php renamed as news.html
photos.php renamed as photos.html
sports.php renamed as sports.html

4. Convert all Lowercase to Uppercase and Vise-Versa

To batch rename all files with lower case names to upper case. For example, I want to covert all these following files from lower to upper case.

Lower to Upper Case
ravisaive@tecmint:~$ ls -l
total 22532
-rw-rw-r-- 1 ravisaive ravisaive 6888896 Oct 10 12:10 cricket.html
-rw-rw-r-- 1 ravisaive ravisaive  588895 Oct 10 12:10 entertainment.html
-rw-rw-r-- 1 ravisaive ravisaive 6188895 Oct 10 12:10 health.html
-rw-rw-r-- 1 ravisaive ravisaive 6538895 Oct 10 12:10 lifestyle.html
-rw-rw-r-- 1 ravisaive ravisaive  938895 Oct 10 12:10 news.html
-rw-rw-r-- 1 ravisaive ravisaive  938937 Oct 10 12:11 photos.html
-rw-rw-r-- 1 ravisaive ravisaive  978137 Oct 10 12:11 sports.html

Just, use the following command with perl expression.

ravisaive@tecmint:~$ rename 'y/a-z/A-Z/' *.html

Once you’ve executed the above command, you can check the changes by doing “ls -l“.

ravisaive@tecmint:~$ ls -l
total 22532
-rw-rw-r-- 1 ravisaive ravisaive 6888896 Oct 10 12:10 CRICKET.HTML
-rw-rw-r-- 1 ravisaive ravisaive  588895 Oct 10 12:10 ENTERTAINMENT.HTML
-rw-rw-r-- 1 ravisaive ravisaive 6188895 Oct 10 12:10 HEALTH.HTML
-rw-rw-r-- 1 ravisaive ravisaive 6538895 Oct 10 12:10 LIFESTYLE.HTML
-rw-rw-r-- 1 ravisaive ravisaive  938895 Oct 10 12:10 NEWS.HTML
-rw-rw-r-- 1 ravisaive ravisaive  938937 Oct 10 12:11 PHOTOS.HTML
-rw-rw-r-- 1 ravisaive ravisaive  978137 Oct 10 12:11 SPORTS.HTML

You can see that the above command actually renamed all the lower case file names (with .HTML extension) to upper case.

Upper to Lower Case

Similarly, you can also convert all upper case characters to lower case using the following command.

ravisaive@tecmint:~$ rename 'y/A-Z/a-z/' *.HTML
ravisaive@tecmint:~$ ls -l
total 22532
-rw-rw-r-- 1 ravisaive ravisaive 6888896 Oct 10 12:10 cricket.html
-rw-rw-r-- 1 ravisaive ravisaive  588895 Oct 10 12:10 entertainment.html
-rw-rw-r-- 1 ravisaive ravisaive 6188895 Oct 10 12:10 health.html
-rw-rw-r-- 1 ravisaive ravisaive 6538895 Oct 10 12:10 lifestyle.html
-rw-rw-r-- 1 ravisaive ravisaive  938895 Oct 10 12:10 news.html
-rw-rw-r-- 1 ravisaive ravisaive  938937 Oct 10 12:11 photos.html
-rw-rw-r-- 1 ravisaive ravisaive  978137 Oct 10 12:11 sports.html

5. Capitalize First Letter of Filename

To capitalize only first letter of each filename use the following command.

# rename 's/\b(\w)/\U$1/g' *.ext

Capitalize First Letter Filename

Capitalize First Letter Filename

6. Overwrite Existing Files

If you would like to forcefully overwrite existing files, use the “-f” option as shown below.

ravisaive@tecmint:~$ rename -f 's/a/b/' *.html

If you would like to know more about rename command, type the “man rename” in the terminal.

The rename command is very useful, if you are dealing with multiple or batch renaming of files from the command line. Do give a try and let me know, how far is useful in terms of renaming of files.

Source

3 Useful Hacks Every Linux User Must Know

The world of Linux is filled with so much fun and interesting stuffs, the more we go in, the more we find stuffs. In our efforts to bring those little hacks and tips for you that makes you different from others, here we have came up with three little tricks.

1. How to Schedule a Linux Job Without Cron

Scheduling a job/command in Linux is acronym to cron. Whenever we need to schedule a job, we call cron, but do you know we can schedule a job at a later time without corn? You can do it as suggested below..

Run a command (say date) every 5 sec and write the output to a file (say date.txt). To achieve this scenario, we need to run the below one liner script directly on the command prompt.

$ while true; do date >> date.txt ; sleep 5 ; done &

Anatomy of the above one liner script:

  1. while true – Ask script to run while the condition is true, it acts as a loop which makes the command to run again-and-again or say in a loop.
  2. do – do perform what follows, ie., execute command or set of commands that lies ahead of do statement.
  3. date >> date.txt – here the output of date command is being written to a file date.txt. Also note that we have used >> and not >.
  4. >> ensures that the file (date.txt) is not overwritten every time the script execute. It just append the changes. Whereas > overwrite the file again and again.
  5. sleep 5 – It ask the shell to keep a time difference of 5 seconds before it executed again. Note the time here is always measured in seconds. Say if you want to execute the command every 6 minutes, you should use (6*60) 360, in succession of sleep.
  6. done – marks the end of while loop.
  7. & – Put the whole process in loop to background.

Similarly, we can execute any script in the same manner. Here is the command to call a script after certain interval (say 100 sec) and the name of script is script_name.sh.

Also worth mentioning that the script above should be run in the directory where the script to be called lies, else you need to provide full path (/home/$USER/…/script_name.sh). The syntax for calling script at above described interval is:

$ while true; do /bin/sh script_name.sh ; sleep 100 ; done &

Conclusion: The above one liner is not a replacement of Cron, because Cron utility supports a whole lots of options, as compared and is very flexible as well as customizable. However if we want to run certain test cases or I/O benchmark, then the above singe command will serve the purpose.

Read Also: 11 Linux Cron Job Scheduling Examples

2. How to Clear Terminal without Using ‘clear’ Command

What we do to clear the screen? Well you may think how silly it is to ask such question. Well, we all know it’s ‘clear‘ command. However if we make a habit of using key combination ‘ctrl+l‘ to clear terminal, we will save a lot of time of ours.

Key combination ‘Ctrl+l‘ has the same effect as ‘clear‘ command. So from next time use ctrl+l to clear your Linux Command Line Interface.

Conclusion: Since ctrl+l is a key combination, so we can not use it inside a script. If we need to clear screen inside a shell script, call command ‘clear’, for all other cases I could think of now, ctrl+l is more than sufficient.

3. Run a command and come back to the current working directory automatically.

Well this is an amazing hack not many people know. You may run a command no matter what it return back to the current directory. All you need to do is to run the command in parentheses i.e., in between ( and ).

Let see the example,

avi@deb:~$ (cd /home/avi/Downloads/)
Sample Output
avi@deb:~

First it cd to directory Downloads and then again return back to home directory in one go. May be you believe that the command didn’t executed and for some reason one or another it is not throwing error, since there is no change in prompt. Lets do a little more tweak..

avi@deb:~$ (cd /home/avi/Downloads/ && ls -l)
Sample Output
-rw-r-----  1 avi  avi     54272 May  3 18:37 text1.txt
-rw-r-----  1 avi  avi     54272 May  3 18:37 text2.txt
-rw-r-----  1 avi  avi     54272 May  3 18:37 text3.txt
avi@deb:~$

So in the above command it first changed the current directory to Downloads and then list the content of that directory before returning back to current directory. Also, it proves that command executed successfully. You may run any sort of command in the parentheses and return back to your current working directory without a hitch.

That’s all for now, if you know any such Linux hacks or tricks you may share with us via our comment section and don’t forget to share this article with your friends….

Source

WP2Social Auto Publish Powered By : XYZScripts.com