Ntfy – Get Desktop or Phone Alerts When Long Running Command Finishes

Ntfy is a simple yet serviceable cross-platform Python utility that enables you to automatically get desktop notifications on demand or when long running commands complete. It can as well send push notifications to your phone once a particular command completes.

It supports shell integration with popular Linux shells such as bash and zsh; by default, ntfy will only send notifications for commands lasting longer than 10 seconds and if the terminal is focused. It also offers features for process, emjoi, XMPP, Telegram, Instapush and Slack notification support.

Check out the following video that demonstrates some of ntfy functionality:

In this article, we’ll show you how to install, configure and use ntfy in the mainstream Linux distributions to get desktop or phone notifications when long running commands finishes.

Step 1: How to Install Ntfy in Linux

Ntfy package can be installed using Python Pip as follows.

$ sudo pip install ntfy

Once ntfy installed, it can be configured using a YAML file located in ~/.ntfy.yml or in standard platform specific locations, ~/config/ntfy/ntfy.yml on Linux.

It operates via dbus, and works on most if not all popular Linux desktop environments such as Gnome, KDE, XFCE and with libnotify. Make sure you have required dependencies installed before using it as shown.

$ sudo apt-get install libdbus-glib-1-dev libdbus-1-dev [On Debian/Ubuntu]
$ sudo yum install dbus-1-glib-devel libdbus-1-devel    [On Fedora/CentOS]
$ pip install --user dbus-python

Step 2: Integrate Ntfy with Linux Shells

ntfy offers support for spontaneously sending notifications once long running commands complete in bash and zsh. In bash, it reproduces the function of zsh’s preexec and precmd functionality using rcaloras/bash-preexec.

You can enable it in your .bashrc or .zshrc file as below:

eval  "$(ntfy shell-integration)"

After integrating it with the shell, nfty will send notifications on your desktop for any commands lasting longer than 10 seconds provided the terminal is focused, this is the default setting.

Note that terminal focus works on X11 and with Terminal.app. You can configure it via the --longer-than and --foreground-too flags.

Ignore Unnecessary Notifications

Imaginably, you can do away with unnecessary notifications when running interactive programs, this can be configured using the AUTO_NTFY_DONE_IGNORE env variable.

For instance, using the export command below, you will prevent the command “vim screen meld” from generating notifications:

$ export AUTO_NTFY_DONE_IGNORE="vim screen meld"

Step 3: How to Use Nfty in Linux

Once you have installed and configured ntfy, you can test it with a these examples:

$ ntfy send "This is TecMint, we’re testing ntfy"

Ntfy Send Notification

Ntfy Send Notification

The example below shows how to run a command and send a notification when it is done:

$ ntfy done sleep 5

Ntfy Auto Send Notification

Ntfy Auto Send Notification

To use a custom notification title, set the -t flag as follows.

$ ntfy -t 'TecMint' send "Using custom notification title"

Ntfy Custom Notification Title

Ntfy Custom Notification Title

The example below will show an emoji for the particular code used.

$ ntfy send ":wink: Using emoji extra! :joy:" 

Ntfy Use Emoji in Notification

Ntfy Use Emoji in Notification

To send a notification to the desktop once a process with the specified ID completes, use the example below:

$ ntfy done --pid 2099

You can view all notifications using notification indicator, run the commands below to install recent notifications indicator.

$ sudo add-apt-repository ppa:jconti/recent-notifications
$ sudo apt update && sudo apt install indicator-notifications

When the installation completes, launch the indicator from the Unity Dash, run a few ntfy commands and click on the icon from the panel to view all notifications.

Ntfy Notifications

Ntfy Notifications

To view a help message, run:

$ ntfy -h

Step 4: Install Additional Ntfy Features

You can install additional features but this calls for extra dependencies:

ntfy done -p $PID – requires installing as ntfy[pid].

$ pip install ntfy[pid]

emjoi support – requires installing as ntfy[emoji].

$ pip install ntfy[emoji]

XMPP support – requires installing as ntfy[xmpp].

$ pip install ntfy[xmpp]

Telegram support – requires installing as ntfy[telegram].

$ pip install ntfy[telegram]

Instapush support – requires installing as ntfy[instapush].

$ pip install ntfy[instapush]

Slack support – requires installing as ntfy[slack].

$ pip install ntfy[slack]

And to install multiple extra features using a single command, separate them with commas like so:

$ pip install ntfy[pid,emjoi,xmpp, telegram]

For an exhaustive usage guide, check out: http://ntfy.readthedocs.io/en/latest/

That’s all! In this article, we showed you how to setup and use ntfy in the mainstream Linux distributions. Use the feedback form below to share your thoughts concerning this article or else share with us info about any similar Linux utilities.

Source

25 Hardening Security Tips for Linux Servers

Everybody says that Linux is secure by default and agreed to some extend (It’s debatable topics). However, Linux has in-built security model in place by default. Need to tune it up and customize as per your need which may help to make more secure system. Linux is harder to manage but offers more flexibility and configuration options.

Linux Security and Hardening Tips

25 Linux Security and Hardening Tips

Securing a system in a production from the hands of hackers and crackers is a challenging task for a System Administrator. This is our first article related to “How to Secure Linux box” or “Hardening a Linux Box“. In this post We’ll explain 25 useful tips & tricks to secure your Linux system. Hope, below tips & tricks will help you some extend to secure your system.

1. Physical System Security

Configure the BIOS to disable booting from CD/DVDExternal DevicesFloppy Drive in BIOS. Next, enable BIOSpassword & also protect GRUB with password to restrict physical access of your system.

  1. Set GRUB Password to Protect Linux Servers
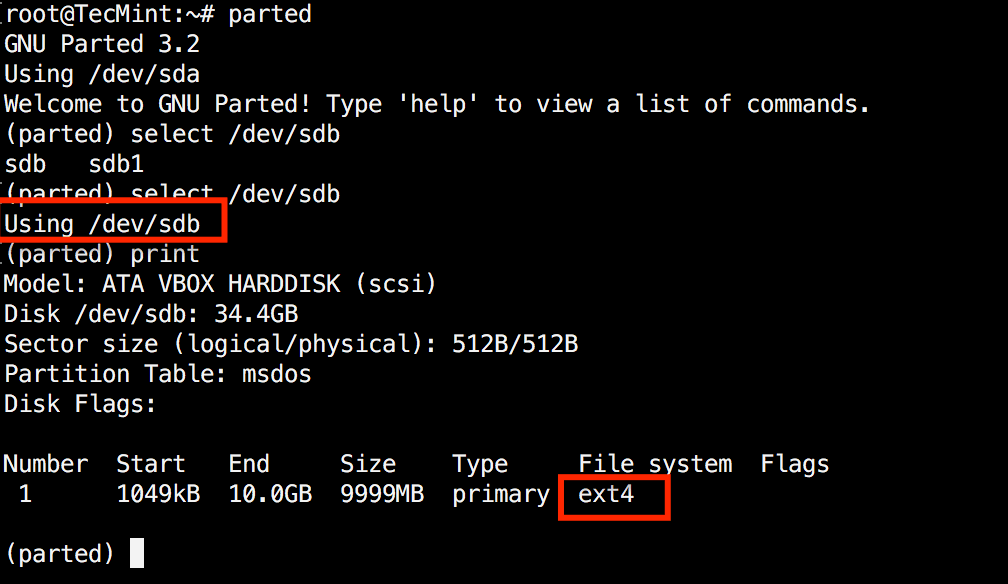
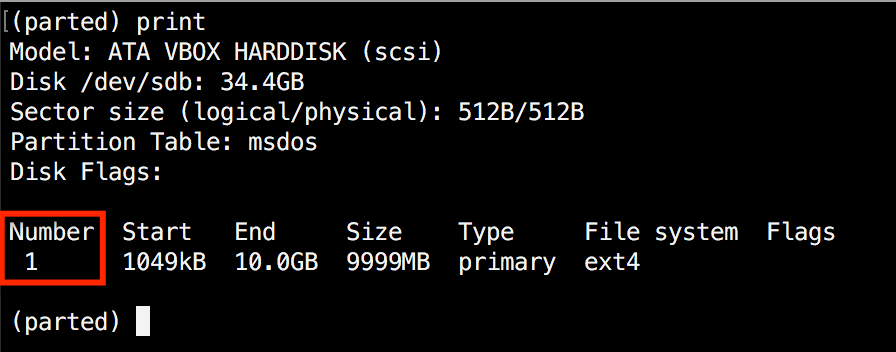
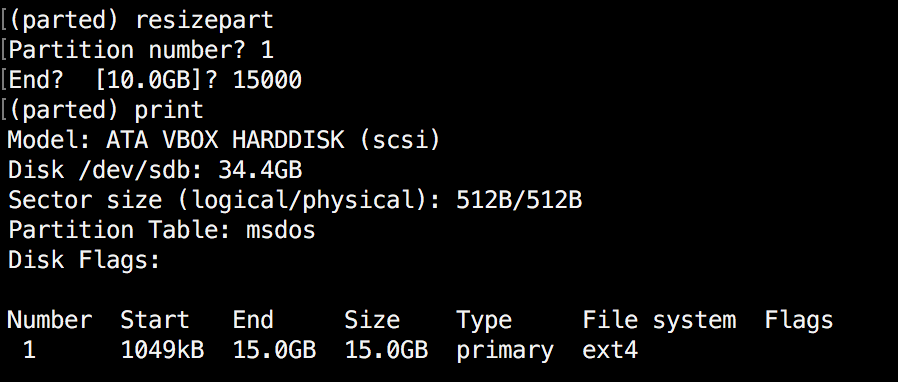
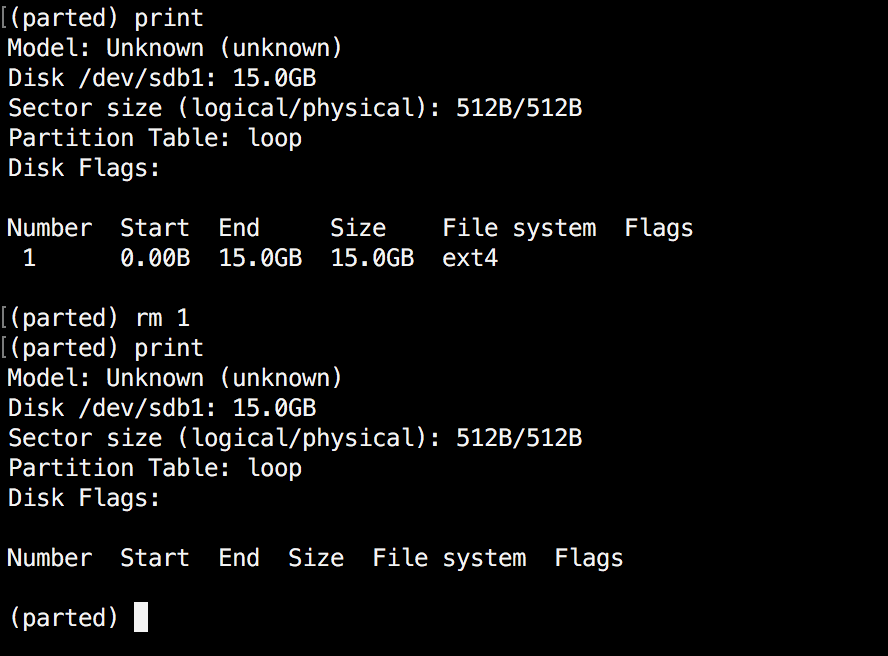
2. Disk Partitions

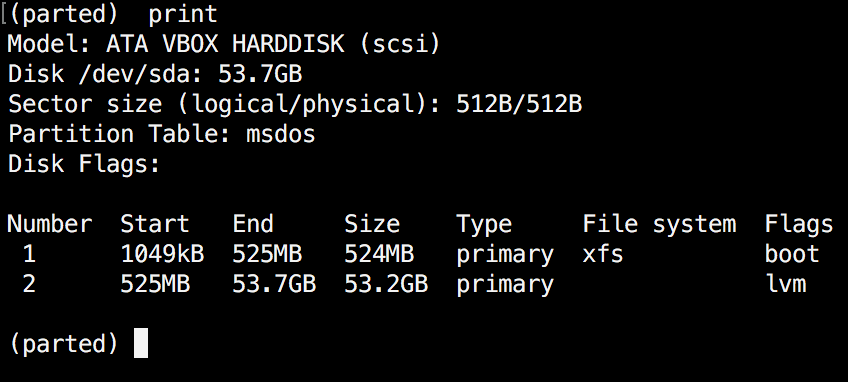
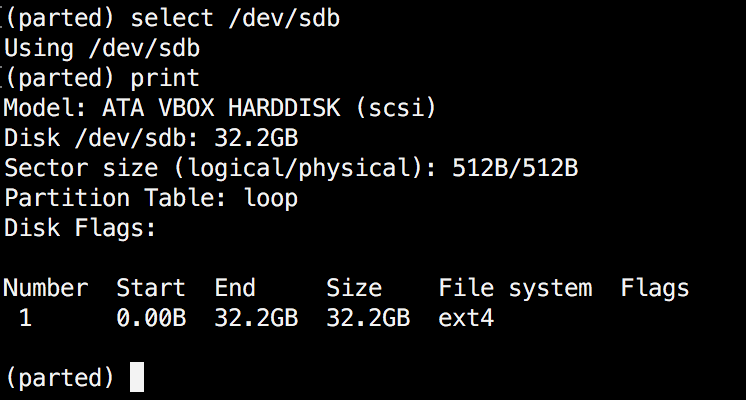
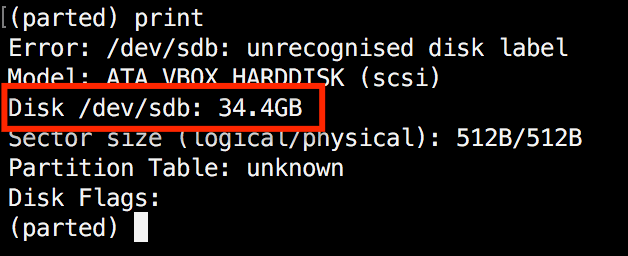
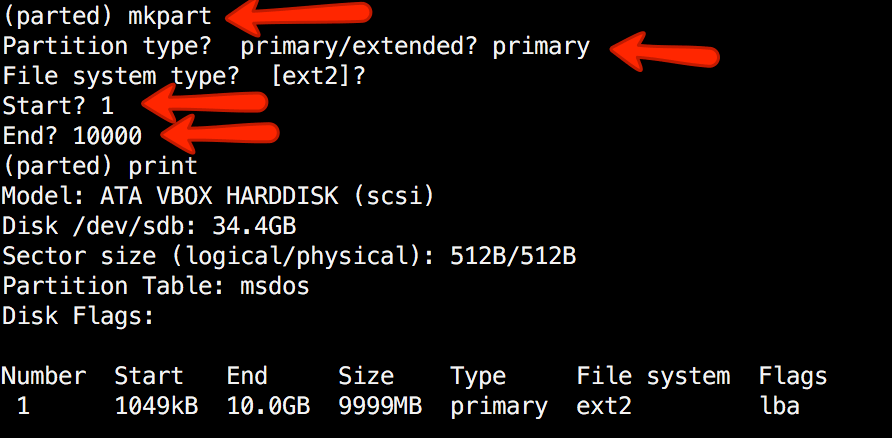
It’s important to have different partitions to obtain higher data security in case if any disaster happens. By creating different partitions, data can be separated and grouped. When an unexpected accident occurs, only data of that partition will be damaged, while the data on other partitions survived. Make sure you must have following separate partitions and sure that third party applications should be installed on separate file systems under /opt.

/
/boot
/usr
/var
/home
/tmp
/opt

3. Minimize Packages to Minimize Vulnerability

Do you really want all sort of services installed?. It’s recommended to avoid installing useless packages to avoid vulnerabilities in packages. This may minimize risk that compromise of one service may lead to compromise of other services. Find and remove or disable unwanted services from the server to minimize vulnerability. Use the ‘chkconfig‘ command to find out services which are running on runlevel 3.

# /sbin/chkconfig --list |grep '3:on'

Once you’ve find out any unwanted service are running, disable them using the following command.

# chkconfig serviceName off

Use the RPM package manager such as “yum” or “apt-get” tools to list all installed packages on a system and remove them using the following command.

# yum -y remove package-name
# sudo apt-get remove package-name
  1. 5 chkconfig Command Examples
  2. 20 Practical Examples of RPM Commands
  3. 20 Linux YUM Commands for Linux Package Management
  4. 25 APT-GET and APT-CACHE Commands to Manage Package Management

4. Check Listening Network Ports

With the help of ‘netstat‘ networking command you can view all open ports and associated programs. As I said above use ‘chkconfig‘ command to disable all unwanted network services from the system.

# netstat -tulpn
  1. 20 Netstat Commands for Network Management in Linux

5. Use Secure Shell(SSH)

Telnet and rlogin protocols uses plain text, not encrypted format which is the security breaches. SSH is a secure protocol that use encryption technology during communication with server.

Never login directly as root unless necessary. Use “sudo” to execute commands. sudo are specified in /etc/sudoers file also can be edited with the “visudo” utility which opens in VI editor.

It’s also recommended to change default SSH 22 port number with some other higher level port number. Open the main SSH configuration file and make some following parameters to restrict users to access.

# vi /etc/ssh/sshd_config
Disable root Login
PermitRootLogin no
Only allow Specific Users
AllowUsers username
Use SSH Protocol 2 Version
Protocol 2
  1. 5 Best Practices to Secure and Protect SSH Server

6. Keep System updated

Always keep system updated with latest releases patches, security fixes and kernel when it’s available.

# yum updates
# yum check-update

7. Lockdown Cronjobs

Cron has it’s own built in feature, where it allows to specify who may, and who may not want to run jobs. This is controlled by the use of files called /etc/cron.allow and /etc/cron.deny. To lock a user using cron, simply add user names in cron.deny and to allow a user to run cron add in cron.allow file. If you would like to disable all users from using cron, add the ‘ALL‘ line to cron.deny file.

# echo ALL >>/etc/cron.deny
  1. 11 Cron Scheduling Examples in Linux

8. Disable USB stick to Detect

Many times it happens that we want to restrict users from using USB stick in systems to protect and secure data from stealing. Create a file ‘/etc/modprobe.d/no-usb‘ and adding below line will not detect USB storage.

install usb-storage /bin/true

9. Turn on SELinux

Security-Enhanced Linux (SELinux) is a compulsory access control security mechanism provided in the kernel. Disabling SELinux means removing security mechanism from the system. Think twice carefully before removing, if your system is attached to internet and accessed by the public, then think some more on it.

SELinux provides three basic modes of operation and they are.

  1. Enforcing: This is default mode which enable and enforce the SELinux security policy on the machine.
  2. Permissive: In this mode, SELinux will not enforce the security policy on the system, only warn and log actions. This mode is very useful in term of troubleshooting SELinux related issues.
  3. DisabledSELinux is turned off.

You can view current status of SELinux mode from the command line using ‘system-config-selinux‘, ‘getenforce‘ or ‘sestatus‘ commands.

# sestatus

If it is disabled, enable SELinux using the following command.

# setenforce enforcing

It also can be managed from ‘/etc/selinux/config‘ file, where you can enable or disable it.

10. Remove KDE/GNOME Desktops

There is no need to run X Window desktops like KDE or GNOME on your dedicated LAMP server. You can remove or disable them to increase security of server and performance. To disable simple open the file ‘/etc/inittab‘ and set run level to 3. If you wish to remove it completely from the system use the below command.

# yum groupremove "X Window System"

11. Turn Off IPv6

If you’re not using a IPv6 protocol, then you should disable it because most of the applications or policies not required IPv6 protocol and currently it doesn’t required on the server. Go to network configuration file and add followings lines to disable it.

# vi /etc/sysconfig/network
NETWORKING_IPV6=no
IPV6INIT=no

12. Restrict Users to Use Old Passwords

This is very useful if you want to disallow users to use same old passwords. The old password file is located at /etc/security/opasswd. This can be achieved by using PAM module.

Open ‘/etc/pam.d/system-auth‘ file under RHEL / CentOS / Fedora.

# vi /etc/pam.d/system-auth

Open ‘/etc/pam.d/common-password‘ file under Ubuntu/Debian/Linux Mint.

# vi /etc/pam.d/common-password

Add the following line to ‘auth‘ section.

auth        sufficient    pam_unix.so likeauth nullok

Add the following line to ‘password‘ section to disallow a user from re-using last 5 password of his or her.

password   sufficient    pam_unix.so nullok use_authtok md5 shadow remember=5

Only last 5 passwords are remember by server. If you tried to use any of last 5 old passwords, you will get an error like.

Password has been already used. Choose another.

13. How to Check Password Expiration of User

In Linux, user’s passwords are stored in ‘/etc/shadow‘ file in encrypted format. To check password expiration of user’s, you need to use ‘chage‘ command. It displays information of password expiration details along with last password change date. These details are used by system to decide when a user must change his/her password.

To view any existing user’s aging information such as expiry date and time, use the following command.

#chage -l username

To change password aging of any user, use the following command.

#chage -M 60 username
#chage -M 60 -m 7 -W 7 userName
Parameters
  1. -M Set maximum number of days
  2. -m Set minimum number of days
  3. -W Set the number of days of warning

14. Lock and Unlock Account Manually

The lock and unlock features are very useful, instead of removing an account from the system, you can lock it for an week or a month. To lock a specific user, you can use the follow command.

# passwd -l accountName

Note : The locked user is still available for root user only. The locking is performed by replacing encrypted password with an (!) string. If someone trying to access the system using this account, he will get an error similar to below.

# su - accountName
This account is currently not available.

To unlock or enable access to an locked account, use the command as. This will remove (!) string with encrypted password.

# passwd -u accountName

15. Enforcing Stronger Passwords

A number of users use soft or weak passwords and their password might be hacked with a dictionary based or brute-force attacks. The ‘pam_cracklib‘ module is available in PAM (Pluggable Authentication Modules) module stack which will force user to set strong passwords. Open the following file with an editor.

Read Also:

# vi /etc/pam.d/system-auth

And add line using credit parameters as (lcreditucreditdcredit and/or ocredit respectively lower-case, upper-case, digit and other)

/lib/security/$ISA/pam_cracklib.so retry=3 minlen=8 lcredit=-1 ucredit=-2 dcredit=-2 ocredit=-1

16. Enable Iptables (Firewall)

It’s highly recommended to enable Linux firewall to secure unauthorised access of your servers. Apply rules in iptables to filters incomingoutgoing and forwarding packets. We can specify the source and destination address to allow and deny in specific udp/tcp port number.

  1. Basic IPTables Guide and Tips

17. Disable Ctrl+Alt+Delete in Inittab

In most Linux distributions, pressing ‘CTRL-ALT-DELETE’ will takes your system to reboot process. So, it’s not a good idea to have this option enabled at least on production servers, if someone by mistakenly does this.

This is defined in ‘/etc/inittab‘ file, if you look closely in that file you will see a line similar to below. By default line is not commented out. We have to comment it out. This particular key sequence signalling will shut-down a system.

# Trap CTRL-ALT-DELETE
#ca::ctrlaltdel:/sbin/shutdown -t3 -r now

18. Checking Accounts for Empty Passwords

Any account having an empty password means its opened for unauthorized access to anyone on the web and it’s a part of security within a Linux server. So, you must make sure all accounts have strong passwords and no one has any authorized access. Empty password accounts are security risks and that can be easily hackable. To check if there were any accounts with empty password, use the following command.

# cat /etc/shadow | awk -F: '($2==""){print $1}'

19. Display SSH Banner Before Login

It’s always a better idea to have an legal banner or security banners with some security warnings before SSH authentication. To set such banners read the following article.

  1. Display SSH Warning Message to Users

20. Monitor User Activities

If you are dealing with lots of users, then its important to collect the information of each user activities and processes consumed by them and analyse them at a later time or in case if any kind of performance, security issues. But how we can monitor and collect user activities information.

There are two useful tools called ‘psacct‘ and ‘acct‘ are used for monitoring user activities and processes on a system. These tools runs in a system background and continuously tracks each user activity on a system and resources consumed by services such as ApacheMySQLSSHFTP, etc. For more information about installation, configuration and usage, visit the below url.

  1. Monitor User Activity with psacct or acct Commands

21. Review Logs Regularly

Move logs in dedicated log server, this may prevents intruders to easily modify local logs. Below are the Common Linux default log files name and their usage:

  1. /var/log/message – Where whole system logs or current activity logs are available.
  2. /var/log/auth.log – Authentication logs.
  3. /var/log/kern.log – Kernel logs.
  4. /var/log/cron.log – Crond logs (cron job).
  5. /var/log/maillog – Mail server logs.
  6. /var/log/boot.log – System boot log.
  7. /var/log/mysqld.log – MySQL database server log file.
  8. /var/log/secure – Authentication log.
  9. /var/log/utmp or /var/log/wtmp : Login records file.
  10. /var/log/yum.log: Yum log files.

22. Important file Backup

In a production system, it is necessary to take important files backup and keep them in safety vault, remote site or offsite for Disasters recovery.

23. NIC Bonding

There are two types of mode in NIC bonding, need to mention in bonding interface.

  1. mode=0 – Round Robin
  2. mode=1 – Active and Backup

NIC Bonding helps us to avoid single point of failure. In NIC bonding, we bond two or more Network Ethernet Cards together and make one single virtual Interface where we can assign IP address to talk with other servers. Our network will be available in case of one NIC Card is down or unavailable due to any reason.

Read Also : Create NIC Channel Bonding in Linux

24. Keep /boot as read-only

Linux kernel and its related files are in /boot directory which is by default as read-write. Changing it to read-onlyreduces the risk of unauthorized modification of critical boot files. To do this, open “/etc/fstab” file.

# vi /etc/fstab

Add the following line at the bottom, save and close it.

LABEL=/boot     /boot     ext2     defaults,ro     1 2

Please note that you need to reset the change to read-write if you need to upgrade the kernel in future.

25. Ignore ICMP or Broadcast Request

Add following line in “/etc/sysctl.conf” file to ignore ping or broadcast request.

Ignore ICMP request:
net.ipv4.icmp_echo_ignore_all = 1

Ignore Broadcast request:
net.ipv4.icmp_echo_ignore_broadcasts = 1

Load new settings or changes, by running following command

#sysctl -p

If you’ve missed any important security or hardening tip in the above list, or you’ve any other tip that needs to be included in the list. Please drop your comments in our comment box.

Source

10 Useful Sudoers Configurations for Setting ‘sudo’ in Linux

In Linux and other Unix-like operating systems, only the root user can run all commands and perform certain critical operations on the system such as install and update, remove packages, create users and groups, modify important system configuration files and so on.

However, a system administrator who assumes the role of the root user can permit other normal system users with the help of sudo command and a few configurations to run some commands as well as carry out a number of vital system operations including the ones mentioned above.

Alternatively, the system administrator can share the root user password (which is not a recommended method) so that normal system users have access to the root user account via su command.

sudo allows a permitted user to execute a command as root (or another user), as specified by the security policy:

  1. It reads and parses /etc/sudoers, looks up the invoking user and its permissions,
  2. then prompts the invoking user for a password (normally the user’s password, but it can as well be the target user’s password. Or it can be skipped with NOPASSWD tag),
  3. after that, sudo creates a child process in which it calls setuid() to switch to the target user
  4. next, it executes a shell or the command given as arguments in the child process above.

Below are ten /etc/sudoers file configurations to modify the behavior of sudo command using Defaults entries.

$ sudo cat /etc/sudoers
/etc/sudoers File
#
# This file MUST be edited with the 'visudo' command as root.
#
# Please consider adding local content in /etc/sudoers.d/ instead of
# directly modifying this file.
#
# See the man page for details on how to write a sudoers file.
#
Defaults	env_reset
Defaults	mail_badpass
Defaults	secure_path="/usr/local/sbin:/usr/local/bin:/usr/sbin:/usr/bin:/sbin:/bin"
Defaults	logfile="/var/log/sudo.log"
Defaults	lecture="always"
Defaults	badpass_message="Password is wrong, please try again"
Defaults	passwd_tries=5
Defaults	insults
Defaults	log_input,log_output

Types of Defaults Entries

Defaults                parameter,   parameter_list     #affect all users on any host
Defaults@Host_List      parameter,   parameter_list     #affects all users on a specific host
Defaults:User_List      parameter,   parameter_list     #affects a specific user
Defaults!Cmnd_List      parameter,   parameter_list     #affects  a specific command 
Defaults>Runas_List     parameter,   parameter_list     #affects commands being run as a specific user

For the scope of this guide, we will zero down to the first type of Defaults in the forms below. Parameters may be flags, integer values, strings, or lists.

You should note that flags are implicitly boolean and can be turned off using the '!' operator, and lists have two additional assignment operators, += (add to list) and -= (remove from list).

Defaults     parameter
OR
Defaults     parameter=value
OR
Defaults     parameter -=value   
Defaults     parameter +=value  
OR
Defaults     !parameter       

1. Set a Secure PATH

This is the path used for every command run with sudo, it has two importances:

  1. Used when a system administrator does not trust sudo users to have a secure PATH environment variable
  2. To separate “root path” and “user path”, only users defined by exempt_group are not affected by this setting.

To set it, add the line:

Defaults secure_path="/usr/local/sbin:/usr/local/bin:/usr/sbin:/usr/bin:/sbin:/bin:/snap/bin"

2. Enable sudo on TTY User Login Session

To enable sudo to be invoked from a real tty but not through methods such as cron or cgi-bin scripts, add the line:

Defaults  requiretty   

3. Run Sudo Command Using a pty

A few times, attackers can run a malicious program (such as a virus or malware) using sudo, which would again fork a background process that remains on the user’s terminal device even when the main program has finished executing.

To avoid such a scenario, you can configure sudo to run other commands only from a psuedo-pty using the use_pty parameter, whether I/O logging is turned on or not as follows:

Defaults  use_pty

4. Create a Sudo Log File

By default, sudo logs through syslog(3). However, to specify a custom log file, use the logfile parameter like so:

Defaults  logfile="/var/log/sudo.log"

To log hostname and the four-digit year in the custom log file, use log_host and log_year parameters respectively as follows:

Defaults  log_host, log_year, logfile="/var/log/sudo.log"

Below is an example of a custom sudo log file:

Create Custom Sudo Log File

Create Custom Sudo Log File

5. Log Sudo Command Input/Output

The log_input and log_output parameters enable sudo to run a command in pseudo-tty and log all user input and all output sent to the screen receptively.

The default I/O log directory is /var/log/sudo-io, and if there is a session sequence number, it is stored in this directory. You can specify a custom directory through the iolog_dir parameter.

Defaults   log_input, log_output

There are some escape sequences are supported such as %{seq} which expands to a monotonically increasing base-36 sequence number, such as 000001, where every two digits are used to form a new directory, e.g. 00/00/01 as in the example below:

$ cd /var/log/sudo-io/
$ ls
$ cd  00/00/01
$ ls
$ cat log

Log sudo Input Output

Log sudo Input Output

You can view the rest of the files in that directory using the cat command.

6. Lecture Sudo Users

To lecture sudo users about password usage on the system, use the lecture parameter as below.

It has 3 possible values:

  1. always – always lecture a user.
  2. once – only lecture a user the first time they execute sudo command (this is used when no value is specified)
  3. never – never lecture the user.
 
Defaults  lecture="always"

Additionally, you can set a custom lecture file with the lecture_file parameter, type the appropriate message in the file:

Defaults  lecture_file="/path/to/file"

Lecture Sudo Users

Lecture Sudo Users

7. Show Custom Message When You Enter Wrong sudo Password

When a user enters a wrong password, a certain message is displayed on the command line. The default message is “sorry, try again”, you can modify the message using the badpass_message parameter as follows:

Defaults  badpass_message="Password is wrong, please try again"

8. Increase sudo Password Tries Limit

The parameter passwd_tries is used to specify the number of times a user can try to enter a password.

The default value is 3:

Defaults   passwd_tries=5 

Increase Sudo Password Attempts

Increase Sudo Password Attempts

To set a password timeout (default is 5 minutes) using passwd_timeout parameter, add the line below:

Defaults   passwd_timeout=2

9. Let Sudo Insult You When You Enter Wrong Password

In case a user types a wrong password, sudo will display insults on the terminal with the insults parameter. This will automatically turn off the badpass_message parameter.

Defaults  insults 

Let's Sudo Insult You When Enter Wrong Password

Let’s Sudo Insult You When Enter Wrong Password

Read MoreLet Sudo Insult You When You Enter Incorrect Password

10. Learn More Sudo Configurations

Additionally, you can learn more sudo command configurations by reading: Difference Between su and sudo and How to Configure sudo in Linux.

That’s it! You can share other useful sudo command configurations or tricks and tips with Linux users out there via the comment section below.

Source

Newsboat – An RSS/Atom Feed Reader for Linux Terminals

Newsboat is a free, open source RSS/Atom feed reader for Linux terminals. It is originally created from Newsbeuter, a text based RSS/Atom feed reader, however, Newsbeuter is not actively maintained.

RSS/Atom are a number of widely-used XML formats to communicate, publish and syndicate articles, for instance news or blog articles. Newsboat is created to be used on text terminals such as GNU/Linux, FreeBSD or macOS.

Read AlsoNewsroom – A Modern CLI to Get Your Favorite News in Linux

In this article, we will show how to install and use Newsboat – a command-line feed reader to read your favorite news or articles from the Linux terminal.

Requirements:

  • GCC 4.9 or later, or Clang 3.6 or later
  • STFL (version 0.21 or later)
  • pkg-config
  • GNU gettext (only for systems that do not offer gettext in the libc)
  • libcurl (version 7.18.0 or later)
  • libxml2, xmllint, and xsltproc
  • json-c (version 0.11 or later)
  • SQLite3 (version 3.5 or later)
  • DocBook XML
  • DocBook SML
  • asciidoc

How to Install Newsboat in Linux Systems

Newsboat is available to install from the snap package management system, but first you have to install snapdon your system to install Newsboat as shown.

------------- On Debian/Ubuntu/Linux Mint ------------- 
$ sudo apt install snapd	
$ sudo snap install newsboat 

------------- On Fedora 22+ -------------
$ sudo dnf install snapd
$ sudo snap install newsboat

Alternatively, you can install Newsboat from source code to use some of the latest features, but before that you need to fully install dependencies with the command that follows.

------------- On Debian/Ubuntu/Linux Mint ------------- 
$ sudo apt update
$ sudo apt install libncursesw5-dev ncurses-term debhelper libjson0 libjson0-dev libxml2-dev libstfl-dev libsqlite3-dev perl pkg-config libcurl4-gnutls-dev librtmp-dev libjson-c-dev asciidoc libxml2-utils xsltproc docbook-xml docbook-xsl bc
$ wget http://www.clifford.at/stfl/stfl-0.24.tar.gz
$ tar -xvf  stfl-0.24.tar.gz
$ cd  stfl-0.24
$ make
$ sudo make install
------------- On RHEL and CentOS -------------
# yum install libncursesw5-devel ncurses-term libjson0-devel libxml2-devel libstfl-devel libsqlite3-devel perl pkgconfig libcurl4-gnutls-devel librtmp-devel libjson-c-devel asciidoc libxml2-devel libxslt-devel debhelper docbook-style-xsl docbook-style-xml bc
# wget http://www.clifford.at/stfl/stfl-0.24.tar.gz
# tar -xvf  stfl-0.24.tar.gz
# cd  stfl-0.24
# make
# make install 

Then clone the Newsboat repository from Github to your system, and install it as shown.

$ git clone git://github.com/newsboat/newsboat.git
$ cd newsboat  
$ make
$ sudo make install

How to Use Newsboat Feed Reader in Linux Terminal

In this section, we will explain how to use Newsboat to read RSS feed from a site, for example tecmint.comFirst of all, we will need to get the rss-feed link for tecmint.com from a browser and copy it (you can use any website feed url).

https://www.tecmint.com/feed/

Afterwards, save it in a file for later usage.

$ echo "https://www.tecmint.com/feed/" >rss_links.txt

Now you can read RSS feed from Tecmint.com using following command with the switches -u (specifies file containing RSS feed URLs) and -r (refresh feeds on start) as follows.

$ newsboat -ru rss_links.txt

Read RSS Feed in Linux Terminal

Read RSS Feed in Linux Terminal

To select a topic, use the Up and Down arrows to navigate, then press Enter on the topic you want. This examples shows that we have selected topic number 5 from the list.

Select Feed Topic in Linux Terminal

Select Feed Topic in Linux Terminal

To open a topic in the browser, you can press o, and to quit the program, hit q.

You can see all the options and usages by running the following command.

$ newsboat -h

For more information, visit Newsboat Github Repository: https://github.com/newsboat/newsboat.

Read Also: Cricket-CLI – Watch Live Cricket Scores in Linux Terminal

Newsboat is a simple and intuitive RSS/Atom feed reader for Linux terminals. Try it out and give us your feedback via the comment form below.

Source

20 Funny Commands of Linux or Linux is Fun in Terminal

Linux is fun! Huhhh. OK so you don’t believe me. Mind me at the end of this article you will have to believe that Linux is actually a fun box.

Linux Funny Commands

20 Linux Funny Commands

1. Command: sl (Steam Locomotive)

You might be aware of command ‘ls‘ the list command and use it frequently to view the contents of a folder but because of miss-typing sometimes you would result in ‘sl‘, how about getting a little fun in terminal and not “command not found“.

Install sl

root@tecmint:~# apt-get install sl 		(In Debian like OS)
root@tecmint:~# yum -y install sl 		(In Red Hat like OS)
Output
root@tecmint:~# sl

sl funny command

sl command

This command works even when you type ‘LS‘ and not ‘ls‘.

2. Command: telnet

NoNo!! it is not as much complex as it seems. You would be familiar with telnet. Telnet is a text-oriented bidirectional network protocol over network. Here is nothing to be installed. What you should have is a Linux box and a working Internet.

root@tecmint:~# telnet towel.blinkenlights.nl

telnet command

telnet command

3. Command: fortune

what about getting your random fortune, sometimes funny in terminal.

Install fortune

root@tecmint:~# apt-get install fortune 	(for aptitude based system)
root@tecmint:~# yum install fortune 		(for yum based system)
root@tecmint:~# fortune

You're not my type.  For that matter, you're not even my species!!!
Future looks spotty.  You will spill soup in late evening.
You worry too much about your job.  Stop it.  You are not paid enough to worry.
Your love life will be... interesting.

4. Command: rev (Reverse)

It reverse every string given to it, is not it funny.

root@tecmint:~# rev

123abc 
cba321 

xuniL eb ot nrob
born to be Linux

5. Command: factor

Time for some Mathematics, this command output all the possible factors of a given number.

root@tecmint:~# factor 5

5 
5: 5 

12 
12: 2 2 3 

1001 
1001: 7 11 13 

5442134 
5442134: 2 2721067

6. Command: script

OK fine this is not a command and a script but it is nice.

root@tecmint:~# for i in {1..12}; do for j in $(seq 1 $i); do echo -ne $i×$j=$((i*j))\t;done; echo;done 

1×1=1	
2×1=2	2×2=4	
3×1=3	3×2=6	3×3=9	
4×1=4	4×2=8	4×3=12	4×4=16	
5×1=5	5×2=10	5×3=15	5×4=20	5×5=25	
6×1=6	6×2=12	6×3=18	6×4=24	6×5=30	6×6=36	
7×1=7	7×2=14	7×3=21	7×4=28	7×5=35	7×6=42	7×7=49	
8×1=8	8×2=16	8×3=24	8×4=32	8×5=40	8×6=48	8×7=56	8×8=64	
9×1=9	9×2=18	9×3=27	9×4=36	9×5=45	9×6=54	9×7=63	9×8=72	9×9=81	
10×1=10	10×2=20	10×3=30	10×4=40	10×5=50	10×6=60	10×7=70	10×8=80	10×9=90	10×10=100	
11×1=11	11×2=22	11×3=33	11×4=44	11×5=55	11×6=66	11×7=77	11×8=88	11×9=99	11×10=110	11×11=121	
12×1=12	12×2=24	12×3=36	12×4=48	12×5=60	12×6=72	12×7=84	12×8=96	12×9=108	12×10=120	12×11=132	12×12=144

7. Command: Cowsay

An ASCII cow in terminal that will say what ever you want.

Install Cowsay

root@tecmint:~# apt-get install cowsay 		(for Debian based OS)
root@tecmint:~# yum install cowsay		(for Red Hat based OS)
Output
root@tecmint:~# cowsay I Love nix 

 ____________
< I Love nix >
 ------------
        \   ^__^
         \  (oo)\_______
            (__)\       )\/\
                ||----w |
                ||     ||

How about pipelineing ‘fortune command‘, described above with cowsay?

root@tecmint:~# fortune | cowsay 

 _________________________________________
/ Q: How many Oregonians does it take to  \
| screw in a light bulb? A: Three. One to |
| screw in the light bulb and two to fend |
| off all those                           |
|                                         |
| Californians trying to share the        |
\ experience.                             /
 -----------------------------------------
        \   ^__^
         \  (oo)\_______
            (__)\       )\/\
                ||----w |
                ||     ||

Note: ‘|‘ is called pipeline instruction and it is used where the output of one command needs to be the input of another command. In the above example the output of ‘fortune‘ command acts as an input of ‘cowsay‘ command. This pipeline instruction is frequently used in scripting and programming.

xcowsay is a graphical program which response similar to cowsay but in a graphical manner, hence it is X of cowsay.

apt-get install xcowsay
yum install xcowsay
Output
root@tecmint:~# xcowsay I Love nix

install xcowsay

xcowsay command

cowthink is another command just run “cowthink Linux is sooo funny” and see the difference in output of cowsay and cowthink.

apt-get install cowthink
yum install cowthink
Output
root@tecmint:~# cowthink ....Linux is sooo funny
 _________________________
( ....Linux is sooo funny )
 -------------------------
        o   ^__^
         o  (oo)\_______
            (__)\       )\/\
                ||----w |
                ||     ||

8. Command: yes

It is funny but useful as well, specially in scripts and for System Administrators where an automated predefined response can be passed to terminal or generated.

root@tecmint:~# yes I Love Linux

I Love Linux
I Love Linux
I Love Linux
I Love Linux
I Love Linux
I Love Linux
I Love Linux
I Love Linux
I Love Linux
I Love Linux
I Love Linux
I Love Linux

Note: (Till you interrupt i.e ctrl+c).

9. Command: toilet

what? Are u kidding, huhh no! Definitely not, but for sure this command name itself is too funny, and I don’t know from where this command gets it’s name.

Install toilet

root@tecmint:~# apt-get install toilet 
root@tecmint:~# yum install toilet
Output
root@tecmint:~# toilet tecmint 

mmmmmmm                        "             m                               
   #     mmm    mmm   mmmmm  mmm    m mm   mm#mm          mmm    mmm   mmmmm 
   #    #"  #  #"  "  # # #    #    #"  #    #           #"  "  #" "#  # # # 
   #    #""""  #      # # #    #    #   #    #           #      #   #  # # # 
   #    "#mm"  "#mm"  # # #  mm#mm  #   #    "mm    #    "#mm"  "#m#"  # # #

It even offers some kind of color and fonts style.

root@tecmint:~# toilet -f mono12 -F metal Tecmint.com

install toilet command

toilet command

NoteFiglet is another command that more or less provide such kind of effect in terminal.

10. Command: cmatrix

You might have seen Hollywood movie ‘matrix‘ and would be fascinated with power, Neo was provided with, to see anything and everything in matrix or you might think of an animation that looks alike Hacker‘s desktop.

Install cmatrix

root@tecmint:~# apt-get install cmatrix
root@tecmint:~# yum install cmatrix
Output
root@tecmint:~# cmatrix

cmatrix command

cmatrix command

11. Command: oneko

OK so you believe that mouse pointer of Linux is the same silly black/white pointer where no animation lies then I fear you could be wrong. “oneko“ is a package that will attach a “Jerry“ with you mouse pointer and moves along with you pointer.

Install oneko

root@tecmint:~# apt-get install oneko
root@tecmint:~# yum install oneko
Output
root@tecmint:~# oneko

install oneko

oneko command

Note: Once you close the terminal from which oneko was run, jerry will disappear, nor will start at start-up. You can add the application to start up and continue enjoying.

12. Fork Bomb

This is a very nasty piece of code. Run this at your own risk. This actually is a fork bomb which exponentially multiplies itself till all the system resource is utilized and the system hangs. (To check the power of above code you should try it once, but all at your own risk, close and save all other programs and file before running fork bomb).

root@tecmint:~# :(){ :|:& }:

13. Command: while

The below “while” command is a script which provides you with colored date and file till you interrupt (ctrl + c). Just copy and paste the below code in terminal.

root@tecmint:~# while true; do echo "$(date '+%D %T' | toilet -f term -F border --gay)"; sleep 1; done

Linux while command

Linux while command

Note: The above script when modified with following command, will gives similar output but with a little difference, check it in your terminal.

root@tecmint:~# while true; do clear; echo "$(date '+%D %T' | toilet -f term -F border --gay)"; sleep 1; done

14. Command: espeak

Just Turn the Knob of your multimedia speaker to full before pasting this command in your terminal and let us know how you felt listening the god’s voice.

Install espeak

root@tecmint:~# apt-get install espeak
root@tecmint:~# yum install espeak
Output
root@tecmint:~# espeak "Tecmint is a very good website dedicated to Foss Community"

15. Command: aafire

How about fire in your terminal. Just type “aafire” in the terminal, without quotes and see the magic. Press any key to interrupt the program.

Install aafire

root@tecmint:~# apt-get install libaa-bin
Output
root@tecmint:~# aafire

install aafire

aafire command

16. Command: bb

First install “apt-get insatll bb” and then, type “bb” in terminal and see what happens.

root@tecmint:~# bb

bb command

bb command

17. Command: url

Won’t it be an awesome feeling for you if you can update you twitter status from command line in front of your friend and they seems impressed. OK just replace usernamepassword and your status message with your’s usernamepassword and “your status message“.

root@tecmint:~# url -u YourUsername:YourPassword -d status="Your status message" http://twitter.com/statuses/update.xml

18. ASCIIquarium

How it will be to get an aquarium in terminal.

root@tecmint:~# apt-get install libcurses-perl
root@tecmint:~# cd /tmp 
root@tecmint:~# wget http://search.cpan.org/CPAN/authors/id/K/KB/KBAUCOM/Term-Animation-2.4.tar.gz
root@tecmint:~# tar -zxvf Term-Animation-2.4.tar.gz
root@tecmint:~# cd Term-Animation-2.4/
root@tecmint:~# perl Makefile.PL &&  make &&   make test
root@tecmint:~# make install
Install ASCIIquarium

Now Download and Install ASCIIquarium.

root@tecmint:~# cd /tmp
root@tecmint:~# wget http://www.robobunny.com/projects/asciiquarium/asciiquarium.tar.gz
root@tecmint:~# tar -zxvf asciiquarium.tar.gz
root@tecmint:~# cd asciiquarium_1.1/
root@tecmint:~# cp asciiquarium /usr/local/bin
root@tecmint:~# chmod 0755 /usr/local/bin/asciiquarium

And finally run “asciiquarium” or “/usr/local/bin/asciiquarium“ in terminal without quotes and be a part of magic that will be taking place in front of your eyes.

root@tecmint:~# asciiquarium

install aquarium

aquarium command

19. Command: funny manpages

First install “apt-get install funny-manpages” and then run man pages for the commands below. Some of them may be 18+, run at your own risk, they all are too funny.

baby
celibacy
condom
date
echo
flame
flog
gong
grope, egrope, fgrope 
party 
rescrog 
rm
rtfm
tm
uubp
woman (undocumented)
xkill 
xlart 
sex 
strfry
root@tecmint:~# man baby

20. Linux Tweaks

It is time for you to have some one liner tweaks.

root@tecmint:~# world

bash: world: not found
root@tecmint:~# touch girls\ boo** 

touch: cannot touch `girls boo**': Permission denied
root@tecmint:~# nice man woman

No manual entry for woman
root@tecmint:~# ^How did the sex change operation go?^ 

bash: :s^How did the sex change operation go?^ : substitution failed
root@tecmint:~# %blow 

bash: fg: %blow: no such job
root@tecmint:~# make love 

make: *** No rule to make target `love'.  Stop.
$ [ whereis my brain?                    
sh: 2: [: missing ]
% man: why did you get a divorce? 
man:: Too many arguments.
% !:say, what is saccharine? 
Bad substitute.
server@localhost:/srv$ \(- 
bash: (-: command not found

Linux is sexy: who | grep -i blonde | date; cd ~; unzip; touch; strip; finger; mount; gasp; yes; uptime; umount; sleep (If you know what i mean)

There are certain other but these don’t work on all the system and hence not included in this article. Some of them are man dog , filterbanner, etc.

Have fun, you can say me thanks later 🙂 yup your comment is highly appreciated which encourages us write more. Tell us which command you liked the most. Stay tuned i will be back soon with another article worth reading.

Source

Set Date and Time for Each Command You Execute in Bash History

By default, all commands executed by Bash on the command line are stored in history buffer or recorded in a file called ~/.bash_history. This means that a system administrator can view a list of commands executed by users on the system or a user can view his/her command history using the history command like so.

$ history

Linux History Command

Linux History Command

From the output of the history command above, the date and time when a command was executed is not shown. This is the default setting on most if not all Linux distributions.

In this article, we will explain how you can configure time stamp information when each command in the Bash history was executed to be displayed.

The date and time associated with each history entry can be written to the history file, marked with the history comment character by setting the HISTTIMEFORMAT variable.

There are two possible ways of doing this: one does it temporarily while the other makes it permanent.

To set HISTTIMEFORMAT variable temporarily, export it as below on the command line:

$ export HISTTIMEFORMAT='%F %T'

In the export command above, the time stamp format:

  1. %F – expands to full date same, as %Y-%m-%d (year-month-date).
  2. %T – expands to time; same as %H:%M:%S (hour:minute:seconds).

Read through the date command man page for additional usage information:

$ man date

Then check your command history as follows:

$ history 

Display Linux Command History with Date and Time

Display Linux Command History with Date and Time

However, if you want to configure this variable permanently, open the file ~/.bashrc with your favorite editor:

$ vi ~/.bashrc

And add the line below in it (you mark it with a comment as your own configuration):

#my config
export HISTTIMEFORMAT='%F %T'

Save the file and exit, afterwards, run the command below to effect the changes made to the file:

$ source ~/.bashrc

That’s all! Do share with us any interesting history command tips and tricks or your thoughts about this guide via the comment section below.

Source

zstd – A Fast Data Compression Algorithm Used By Facebook

Zstandard (also known as zstd) is a free open source, fast real-time data compression program with better compression ratios, developed by Facebook. It is a lossless compression algorithm written in C (there is a re-implementation in Java) – its thus a native Linux program.

Read Also10 7zip (Data Comperssion) Command Examples in Linux

When required, it can trade compression speed for stronger compression ratios (compression speed vs compression ratio trade-off can be configured by small increments), vice versa. It has a special mode for small data compression, known as dictionary compression, and can build dictionaries from any sample set provided. It comes with a command line utility for creating and decoding .zst.gz.xz and .lz4 files.

Importantly, Zstandard has a rich collection of APIs, supports almost all popular programming languages including Python, Java, JavaScript, Nodejs, Perl, Ruby, C#, Go, Rust, PHP, Switft, and lots more.

It is actively used to compress large volumes of data in multiple formats and use cases in Facebook; services such as Amazon Redshift data warehousing; databases such as Hadoop and Redis; the Tor network and many other applications including games.

The following results are obtained by doing several fast compression algorithms tests on a server running Linux Debian using lzbench, an open-source in-memory benchmark tool.

Zstandard Compression Testing

Zstandard Compression Testing

How to Install Zstandard Compression Tool in Linux

To install Zstandard on a Linux distribution, you need to compile it from sources, but before that first you need to install the necessary development tools on your system using your distribution package manager as shown.

$ sudo apt update && sudo apt install build-essential		#Ubuntu/Debian
# yum group install "Development Tools" 			#CentOS/REHL
# dnf groupinstall "C Development Tools and Libraries"		#Fedora 22+

Once all the needed development tools installed, now you can download the source package, move into the local repo directory, build the binary and install it as shown.

$ cd ~/Downloads
$ git clone https://github.com/facebook/zstd.git
$ cd zstd
$ make
$ sudo make install 

Once Zstandard installed, now we can move further to learn some basic usage of Zstd command examples in the following section.

Learn 10 Zstd Command Usage Examples in Linux

Zstd’s command line syntax is generally similar to that of gzip and xz tools, with a few differences.

1. To create a .zst compression file, simply provide a filename to compress it or use the -z flag also means compress, which is the default action.

$ zstd etcher-1.3.1-x86_64.AppImage 
OR
$ zstd -z etcher-1.3.1-x86_64.AppImage 

2. To decompress a .zst compression file, use the -d flag or the unzstd utility as shown.

$ zstd -d etcher-1.3.1-x86_64.AppImage.zst 
OR
$ unzstd etcher-1.3.1-x86_64.AppImage.zst 

3. To remove source file after an operation, by default, the source file is not deleted after successful compression or decompression, to delete it, use the --rm option.

$ ls etcher-1.3.1-x86_64.AppImage
$ zstd --rm  etcher-1.3.1-x86_64.AppImage
$ ls etcher-1.3.1-x86_64.AppImage

4. To set a compression level, zstd has a number of operation modifiers, for instance you can specify a compression level as -6(a number 1-19, default is 3) as shown.

$ zstd -6 --rm etcher-1.3.1-x86_64.AppImage

5. To set a compression speed, zstd has a compression speed ratio 1-10, the default compression speed is 1. You can trade compression ratio for compression speed with the --fast option, the higher the number the faster the compression speed.

$ zstd --fast=10 etcher-1.3.1-x86_64.AppImage

6. To display information about a compressed file, use the -l flag, which is used to display information about a compressed file, for example.

$ zstd -l etcher-1.3.1-x86_64.AppImage.zst

7. To test the integrity of a compressed files, use the -t flag as shown.

$ zstd -t etcher-1.3.1-x86_64.AppImage.zst

8. To enable verbose mode, use the -v option.

$ zstd -v -5 etcher-1.3.1-x86_64.AppImage

9. To use other file compression or decompression formats such as gzip, xz, lzma, and lz4, using the --format=FORMAT as shown.

$ zstd -v --format=gzip etcher-1.3.1-x86_64.AppImage
$ zstd -v --format=xz  etcher-1.3.1-x86_64.AppImage

10. To set a zstd process priority to real-time, you can use the option –priority=rt as shown.

$zstd --priority=rt etcher-1.3.1-x86_64.AppImage

The -r flag instructs zstd to operate recursively on dictionaries. You can find lots of useful and advanced options, how to read or create dictionaries by consulting the zstd man page.

$ man zstd

Zstandard Github Repositoryhttps://github.com/facebook/zstd

Zstandard is a fast real-time, lossless data compression algorithm and compression tool which offers high compression ratios. Try it out and share your thoughts about it or ask questions via the feedback form below.

Source

8 Linux ‘Parted’ Commands to Create, Resize and Rescue Disk Partitions

Parted is a famous command line tool that allows you to easily manage hard disk partitions. It can help you add, delete, shrink and extend disk partitions along with the file systems located on them. Parted has gone a long way from when it first came out. Some of it’s functions have been removed, others have been added.

Parted Command to Manage Linux Disk Partitions

Parted Command to Manage Linux Disk Partitions

In this tutorial you will learn the basics of parted and we will show you some practical examples. If you don’t have any previous experience with parted, please be aware that parted writes the changes immediately to your disk, so be careful if you try to modify your disk partitions.

If you plan on testing parted, the better option would be to simply use a virtual machine or old computer/laptop without any valuable information on it. To make modifications on a disk partition it must not be in use. If you need to work on primary partition, you may boot into rescue mode.

Note: You will need to have root access to the machine you will be working on in order to use parted.

How to Install Parted on Linux

On many Linux distributions, parted comes pre-installed. If it is not included in your distro, you can install it with:

$ sudo apt-get install parted           [On Debian/Ubuntu systems]
# yum install parted                    [On RHEL/CentOS and Fedora]
# dnf install parted                    [On Fedora 22+ versions]

Once you have make sure that parted is installed, you can proceed further to check out some real world examples of parted command in the rest of this article.

1. Check Parted Version

Run the following command, you see message similar to the one shown on the image below. Don’t worry if your parted version is different. Unless specified otherwise, parted will use your primary drive, which in most cases will be /dev/sda.

$ parted

Check Parted Command Version

Check Parted Command Version

If you want to exit parted, simply type:

$ quit

2. List Linux Disk Partitions

Now that parted is started, let’s list the partitions of the selected hard disk. As mentioned earlier, parted chooses your first drive by default. To see the disk partitions run print.

(parted) print

Check Linux Partitions

Check Linux Partitions

When running print, it will also display the hard disk information and model. Here is example from a real hard disk (not virtual as shown on the image above) :

(parted) print

Model: ATA TOSHIBA MQ01ACF0 (scsi)
Disk /dev/sda: 320GB
Sector size (logical/physical): 512B/4096B
Partition Table: msdos

Number  Start   End    Size   Type      File system  Flags

 1      1049kB  256MB  255MB  primary   ext2         boot
 2      257MB   320GB  320GB  extended
 5      257MB   320GB  320GB  logical                lvm

In the example above, you can see the disk model, capacity sector size and partition table.

3. List or Switch to Different Disk

If you have more than one hard disk, you can easily switch between disks, by using the “select” command. In the example below, I will switch from /dev/sda to /dev/sdb which is a secondary drive on my system.

To easily switch between disks you can use:

(parted) select /dev/sdX

Select Different Disk

Select Different Disk

Change "X" with the letter of the disk to which you wish to switch.

4. Create Primary or Logical Partition in Linux

Parted can be used to create primary and logical disk partitions. In this example, I will show you how to create primary partition, but the steps are the same for logical partitions.

To create new partition, parted uses “mkpart“. You can give it additional parameters like "primary" or "logical" depending on the partition type that you wish to create.

Before you start creating partitions, it’s important to make sure that you are using (you have selected) the right disk.

Start by using print:

(parted) print

Show Current Linux Disk

Show Current Linux Disk

As shown on the above image, we are using a virtual drive of 34 GB. First we will give the new disk a label and then create a partition and set a file system on it.

Now the first step is to give the new disk a label name with:

(parted) mklabel msdos

Now create the new partition with  mkpart. The listed units are in megabytes (MB). We will create a 10 GBpartition starting from 1 to 10000:

(parted) mkpart
 
Partition type?  primary/extended? primary
File system type?  [ext2]?
Start? 1
End? 10000
(parted) print
Model: ATA VBOX HARDDISK (scsi)
Disk /dev/sdb: 34.4GB
Sector size (logical/physical): 512B/512B
Partition Table: msdos
Disk Flags: 
Number  Start   End     Size    Type     File system  Flags
 1      1049kB  10.0GB  9999MB  primary  ext2         lba

Create Primary or Logical Linux Partitions

Create Primary or Logical Linux Partitions

Next,  exit parted with "quit" command. We will format our new partition in ext4 file system using mkfs. To make this happen run the following command:

# mkfs.ext4 /dev/sdb1

Note: It’s important to select the right disk and partition when executing the above command!

Now let’s verify our results, by printing the partition table on our secondary disk. Under file system column, you should see ext4 or the file system type that you have decided to use for your partition:

Verify Disk Partition Filesystem

Verify Disk Partition Filesystem

5. Resize Linux Disk Partition

Parted includes multiple useful functions and one of them is "resizepart". As you have probably figured this out by now, "resizepart" helps you resize a partition.

In the example below, you will see how to resize an existing partition. For the purpose of this example, we will be using the earlier created partition.

First you will need to know the number of the partition that you will be resizing. This can be easily found by using "print":

(parted) print

Find Linux Partition Number

Find Linux Partition Number

In our example, the partition number is "1". Now run the resizepart command:

(parted) resizepart

You will be asked for the number of the partition that you will resize. Enter it’s number. After that, you will be asked to set the new ending point for this partition. Remember that by default the units are in MB. In our example, we have set the new partition size to 15 GB:

(parted) resizepart 
Partition number? 1
End?  [10.0GB]? 15000

Now verify the results with "print":

(parted) print

Verify Linux Resize Partition

Verify Linux Resize Partition

6. Delete Linux Partition

The next thing you will learn is how to delete a partition from your hard drive. To do this, you will need to use the "rm" command within parted. To delete a disk partition you will need to know it’s number.

As mentioned earlier, you can easily obtain this number by using "print". In our example, we will delete the partition with number 1 from our secondary drive /dev/sdb1:

(parted) rm 1

Verify the results by printing the partitions table:

Delete a Linux Partition

Delete a Linux Partition

7. Rescue Linux Disk Partition

Parted supports a “rescue" utility that helps you recover a lost partition between a starting and ending point. If a partition is found within that range, it will attempt to restore it.

Here is an example:

(parted) rescue
Start? 1
End? 15000
(parted) print
Model: Unknown (unknown)
Disk /dev/sdb1: 15.0GB
Sector size (logical/physical): 512B/512B
Partition Table: loop
Disk Flags:

Number Start End Size File system Flags
1 0.00B 15.0GB 15.0GB ext4

8 Change Linux Partition Flag

Using parted, you can change the state of a flag for disk partitions. The supported flags are:

  1. boot
  2. root
  3. swap
  4. hidden
  5. raid
  6. lvm
  7. lba
  8. legacy_boot
  9. irst
  10. esp
  11. palo

The states can be either "on" or "off". To change a flag simply run "set" command within parted:

(parted) set 2 lba on

The above command sets lba flag to on for second partition. Verify the results with print:

Change Partition Flag

Change Partition Flag

Conclusion

Parted is a useful and powerful utility that can help you manage your disk partitions in Linux systems. As always, when working with disk partitions you need to be extra careful. It is strongly recommend to go through parted man pages to learn how you can customize it’s output and find more information about its capabilities.

If you have any questions or comments, please do not hesitate to use the comment section below.

Source

Cheat – An Ultimate Command Line ‘Cheat-Sheet’ for Linux Beginners and Administrators

What you do when you are not sure of the command you are running especially in case of complex commands which uses a lot of options. We use man pages to get some help in such situation. Some of the other options may include commands like ‘help‘, ‘whereis‘ and ‘whatis‘. But all has their Pros and Cons.

While going through man pages for options and help, the description in man pages are too lengthy to understand specially in short span of time.

Linux Man Pages

Linux Man Pages

Similarly, ‘help‘ command may not give you desired output.

Linux help command

Help Command

A ‘whereis‘ command hardly tells anything other than the location of Installed Binaries (May be Important at time).

Linux Whereis Command

Whereis Command

A ‘whatis‘ command gives strict and one liner answer which is not much helpful other than acknowledging the purpose of the command, Moreover it never says a single word about the available options.

Linux Whatis Command

Whatis Command

We have used all these options till date to solve our issue in the dilemma but here comes an interactive cheat-sheet application ‘cheat‘ which is going to lead all the rest.

What is cheat?

Cheat is an interactive cheat-sheet application released under GNU General Public License for Linux Command line users which serves the purpose of showing, use cases of a Linux command with all the options and their short yet understandable function.

Install Cheat in Linux

Cheat: Provides Easy Command Options

Installing ‘Cheat’ in Linux Systems

Cheat‘ has two major dependency – ‘python‘ and ‘pip‘. Make sure you have installed python and pip before installing ‘cheat‘ on the system.

Install Python
# apt-get install Python	(On Debian based Systems)
# yum install python		(On RedHat based Systems)
Install Pip
# apt-get install python-pip 	(On Debian based Systems)
# yum install python-pip 	(On RedHat based Systems)

NOTE: pip is an easy install replacement and is intended to be an improved Python package installer.

Download and Install Cheat

We will be downloading ‘cheat’ from Git. Make sure you have package ‘git’ installed, if not better install this first.

# apt-get install git	(On Debian based Systems)
# yum install git	(On RedHat based Systems)

Next, install the required python dependencies by running following command.

# pip install docopt pygments

Now, clone the Git repository of cheat.

# git clone https://github.com/chrisallenlane/cheat.git

Move to the cheat directory and run ‘setup.py‘ (a python script).

# cd cheat
# python setup.py install

If installation goes smoothly, you should be able to see a cheat version installed on the system.

# cheat -v 

cheat 2.0.9

Required Configuration for Cheat

You must have an ‘EDITOR‘ environment variable set in ‘~/.bashrc’ file. Open the user ‘.bashrc‘ file and add the following line to it.

export EDITOR=/usr/bin/nano

You can use your favourite editor here in place of ‘nano‘. Save the file and logout. Again Login to make the changes taken into effect.

Next, add the cheat autocompletion feature to enable command-line autocompletion for different shells. To enable autocompletion, simply clone the ‘cheat.bash‘ script and copy the script to the appropriate path in your system.

# wget https://github.com/chrisallenlane/cheat/raw/master/cheat/autocompletion/cheat.bash 
# mv cheat.bash /etc/bash_completion.d/

NOTE: The team has uploaded other shell’s auto completion scrip to Git, which may be cloned and used in case of respective Shell. Use the following link for other shell’s auto completion script.

  1. Auto Completion Script for Various Shells

Optionally, you can also enable syntax highlighting, if desired. To active syntax highlighting feature, add a CHEATCOLORS environment variable in your ‘.bashrc‘ file.

export CHEATCOLORS=true

The Cheat application default program only serves the basic and most used commands. The content of cheat-sheet resides at location ~/.cheat/. Manual Cheatsheets can be added to this location to make the application rich.

# cheat -e xyz

This will open xyz cheat-sheet if available. If not it will create one. The cheat-sheet will be opened in the default EDITOR, we set in .bashrc in the configuration stage, above.

Usage of Cheat with Some Commands

A tarball may be *.gz or *.bz2 or *.zip or *.xz. So, what option to be used where?

Linux Tar Command

tar command options

I never run dd command, no matter how much sure I am about the command before consulting and cross checking it at more than one location. The things seems to be easy now.

Linux dd Command

dd command options

A ‘uname‘ command help.

Linux uname Command

uname command options

A short ifconfig command line tutorial, in action.

Linux ifconfig Command

ifconfig command options

A ‘top‘ command, one of the most important command for Admin and Normal User.

Linux top Command

top command options

How about Cheating the cheat command (though the other sense)? Get a list of available commands, the cheat-sheet of which is installed in the System.

List All Linux Commands

List All Linux Commands

Search Cheat-sheet with specific keyword.

Search Cheat Sheet

Search Cheat Sheet

See the location of built-in cheat-sheets for all the commands.

$ cheat -d 

/home/avi/.cheat 
/usr/local/lib/python2.7/dist-packages/cheat/cheatsheets

Copy the in-built cheat-sheet to your native directory.

# cp /usr/local/lib/python2.7/dist-packages/cheat/cheatsheets/* /home/avi/.cheat/

Conclusion

This wonderful project is a life Saviour in many-a-situation. It just gives you information that is required, nothing extra, nothing vague and to the point. This is a must tool for everyone. Easy to build, easy to install, easy to run and easy to understand, this project seems promising.

This Git project has added a wonderful gag which I am not going to explain but leave on you to interpret.

Linux Gag

Linux Gag

That’s all for now. I’ll be here again with another interesting article you people will love to read. Till then stay tuned and connected to Tecmint. Don’t forget to provide us with your valuable feedback in the comment section below.

Don’t MissUnderstanding Shell Commands Easily Using “Explain Shell” Script

Source

Boxes – Draws ASCII Art Boxes and Shapes in Linux Terminal

Boxes is a simple, configurable command line program which can draw any kind of box around its input text. It filters text and draws shapes around it – it’s practically a text filter. In fact it is designed to be integrated with your editor as a text filter (supports Vim default). It can draw shapes ranging from simple boxes to complex ASCII art.

In this article, we will learn how to use the boxes utility to draw shapes in the Linux terminal.

How to Install Boxes Utility in Linux

To install the boxes utility in Linux, use the appropriate command for your distribution.

$ sudo apt install boxes  [On Debian/Ubuntu]
$ sudo yum install boxes  [On CentOS/RHEL]
$ sudo dnf install boxes  [On Fedora]

Now that you have boxes installed, note that it uses the $HOME/.boxes user specific configuration file or the /etc/boxes/boxes-config system-wide configuration file.

Let’s have some Linux terminal fun.

To see the default boxes design, simply provide some input text to it as shown.

$ echo "Hey, this is Tecmint.com! Thanks for following us." | boxes

/******************************************************/
/* Hey, this is Tecmint.com! Thanks for following us. */
/******************************************************/

To specify another design, use the -d flag as shown.

$ echo "Hey, this is Tecmint.com! Thanks for following us." | boxes -d boy

                        .-"""-.
                       / .===. \
                       \/ 6 6 \/
                       ( \___/ )
  _________________ooo__\_____/_____________________
 /                                                  \
| Hey, this is Tecmint.com! Thanks for following us. |
 \______________________________ooo_________________/
                       |  |  |
                       |_ | _|
                       |  |  |
                       |__|__|
                       /-'Y'-\
                      (__/ \__)

To align or position text inside the box, use the -a flag. Let’s demonstrate how this works with the following example (where the c means center).

$ echo "Hey, this is Tecmint.com! Thanks for following us." | boxes -d diamonds

       /\          /\          /\          /\          /\
    /\//\/\    /\//\/\    /\//\/\    /\//\/\    /\//\/\
 /\//\\///\/\//\\///\/\//\\///\/\//\\///\/\//\\///\/\
//\\//\/\///\\//\/\///\\//\/\///\\//\/\///\\//\/\///\
\//\/Hey, this is Tecmint.com! Thanks for following us.  \/\//
 \/                                                          \/
 /\                                                          /\
//\                                                        //\
\//                                                        \//
 \/                                                          \/
 /\                                                          /\
//\/\                                                    /\//\
\///\/\//\\///\/\//\\///\/\//\\///\/\//\\///\/\//\\//
 \/\///\\//\/\///\\//\/\///\\//\/\///\\//\/\///\\//\/
    \/\//\/    \/\//\/    \/\//\/    \/\//\/    \/\//\/
       \/          \/          \/          \/          \/
$ echo "Hey, this is Tecmint.com! Thanks for following us." | boxes -d diamonds -a c

       /\          /\          /\          /\          /\
    /\//\/\    /\//\/\    /\//\/\    /\//\/\    /\//\/\
 /\//\\///\/\//\\///\/\//\\///\/\//\\///\/\//\\///\/\
//\\//\/\///\\//\/\///\\//\/\///\\//\/\///\\//\/\///\
\//\/                                                    \/\//
 \/                                                          \/
 /\                                                          /\
//\   Hey, this is Tecmint.com! Thanks for following us.   //\
\//                                                        \//
 \/                                                          \/
 /\                                                          /\
//\/\                                                    /\//\
\///\/\//\\///\/\//\\///\/\//\\///\/\//\\///\/\//\\//
 \/\///\\//\/\///\\//\/\///\\//\/\///\\//\/\///\\//\/
    \/\//\/    \/\//\/    \/\//\/    \/\//\/    \/\//\/
       \/          \/          \/          \/          \/

In the Christmas season, you can use the santa design to send your family and friends happy holiday messages, for example.

$ echo "Tecmint.com wishes you a Merry Christmas and a Happy New Year 2019" | boxes -d santa

                                 .-"``"-.
                                /______; \
                               {_______}\|
                               (/ a a \)(_)
                               (.-.).-.)
  _______________________ooo__(    ^    )___________________________
 /                             '-.___.-'                            \
| Tecmint.com wishes you a Merry Christmas and a Happy New Year 2019 |
 \________________________________________ooo_______________________/
                               |_  |  _|  jgs
                               \___|___/
                               {___|___}
                                |_ | _|
                                /-'Y'-\
                               (__/ \__)

To list all available designs/styles, run the following command.

$ boxes -l

59 Available Styles in "/etc/boxes/boxes-config":
-------------------------------------------------

ada-box
(public domain), coded by Neil Bird <neil.bird@rdel.co.uk>:

    ---------------
    --           --
    --           --
    ---------------


ada-cmt
(public domain), coded by Neil Bird <neil.bird@rdel.co.uk>:

    --
    -- regular Ada
    -- comments
...

It supports line justification, box size specification, text padding, indentation, use of regular expressions and much more.

Valentine’s day coming closer, and you wanted to impress your girlfriend or wife in a Linux way, then use boxes as shown.

$ echo -e "\n\tMe: Will you be my Valentine?\n\tGirl: No way\n\tMe: sudo will you be my Valentine?\n\tGirl: Yes..yes..yes! Let's go!" | boxes -d boy

                        .-"""-.
                       / .===. \
                       \/ 6 6 \/
                       ( \___/ )
          _________ooo__\_____/_____________
         /                                  \
        |                                    |
        | Me: Will you be my Valentine?      |
        | Girl: No way                       |
        | Me: sudo will you be my Valentine? |
        | Girl: Yes..yes..yes! Let's go!     |
         \______________________ooo_________/
                       |  |  |
                       |_ | _|
                       |  |  |
                       |__|__|
                       /-'Y'-\
                      (__/ \__)

For more information and examples, go to http://boxes.thomasjensen.com/examples.html.

Boxes is a command line utility that draws a box around its input text. In this article, we will learn how to install and use boxes utility to draw shapes in the Linux terminal. Use the feedback form below to share your thoughts about it.

Source

WP2Social Auto Publish Powered By : XYZScripts.com